The Player Script
Now we have everything ready to start coding the player’s movement. In the Project tab under Assets Right Click -> Create -> Folder name it Scripts. In the Scripts folder create a new folder and name it Player Scripts.
Inside the Player Scripts folder Right Click -> Create -> C# Script, name it Player and attach it on the Player 1 game object:
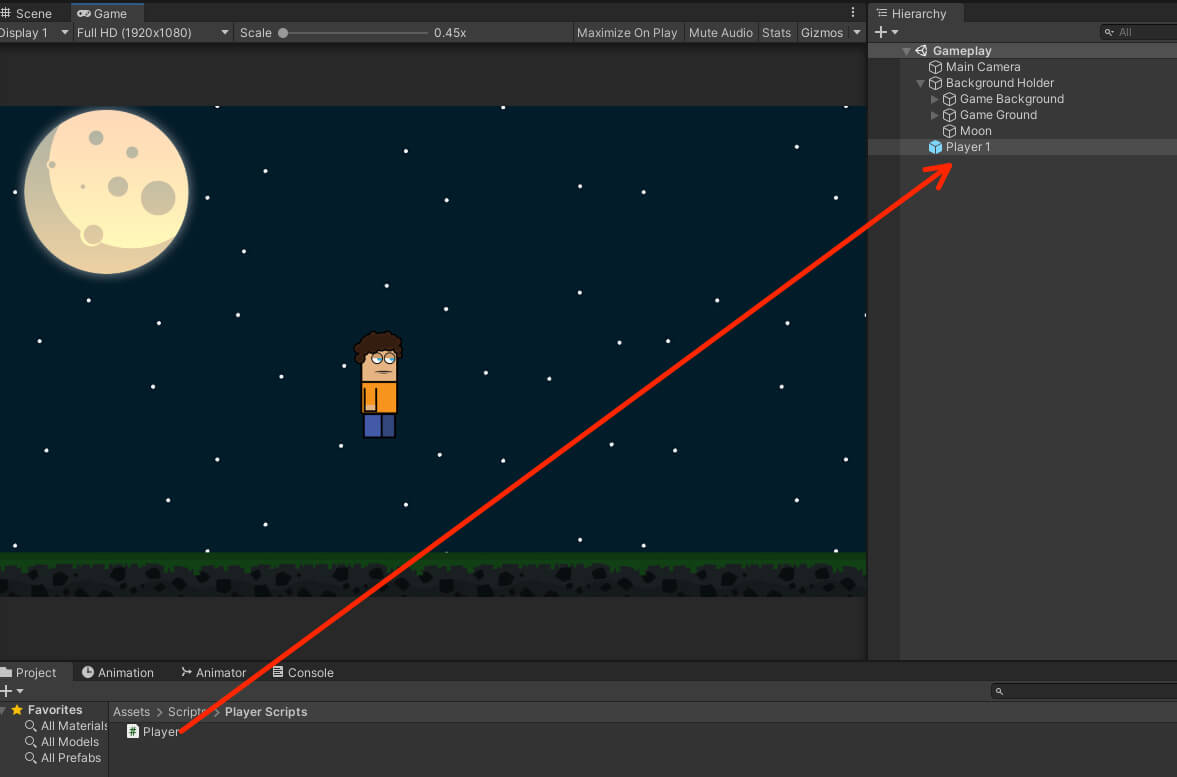
The first thing that we are going to do is move the player character. For that open the Player script and add the following variables above the Start function declaration:
					[SerializeField]
    private float moveSpeed = 10f;

    private float movementX;
The moveSpeed variable is going to control how fast we are moving, I added SerializeField above it so that we can change that value directly in the Inspector tab if there is a need for that.
The movementX will get the movement input from the user when he presses a button on his keyboard to move the player left or right.
To do this, we are going to create a function that will handle the player’s movement:
					void HandlePlayerMovement()
    {

        movementX = Input.GetAxisRaw("Horizontal");

        transform.position += new Vector3(movementX, 0f, 0f) * moveSpeed * Time.deltaTime;

    }
					void Update()
    {
        HandlePlayerMovement();
    }
Setting Up Best Coding Practices
In the HandlePlayerMovement function we are passing a string in the GetAxisRaw function to get the horizontal movement of the player.
					public static class TagManager
{


}
					public static class TagManager
{

    public static string HORIZONTAL_AXIS = "Horizontal";

}
					void HandlePlayerMovement()
    {

        movementX = Input.GetAxisRaw(TagManager.HORIZONTAL_AXIS);

        transform.position += new Vector3(movementX, 0f, 0f) * moveSpeed * Time.deltaTime;

    }
Facing The Moving Direction
Now while the player character is moving he is not facing the movement direction.
private Vector3 tempScale;
					void HandleFacingDirection()
    {
        tempScale = transform.localScale;

        if (movementX > 0)
            tempScale.x = Mathf.Abs(tempScale.x);
        else if (movementX < 0)
            tempScale.x = -Mathf.Abs(tempScale.x);

        transform.localScale = tempScale;
    }

					void Update()
    {
        HandlePlayerMovement();
        HandleFacingDirection();
    }
Now let’s play the game to test it out:
Animating The Player Through Code
Now that the player character is moving and facing the direction of his movement we need to animate the player.
In the Player script declare a new Animator variable:
private Animator anim;
					 private void Awake()
    {
        anim = GetComponent<Animator>();
    }
public static string WALK_ANIMATION_PARAMETER = "Walk";
					void HandlePlayerAnimation()
    {
        if (movementX != 0)
            anim.SetBool(TagManager.WALK_ANIMATION_PARAMETER, true);
        else
            anim.SetBool(TagManager.WALK_ANIMATION_PARAMETER, false);
    }
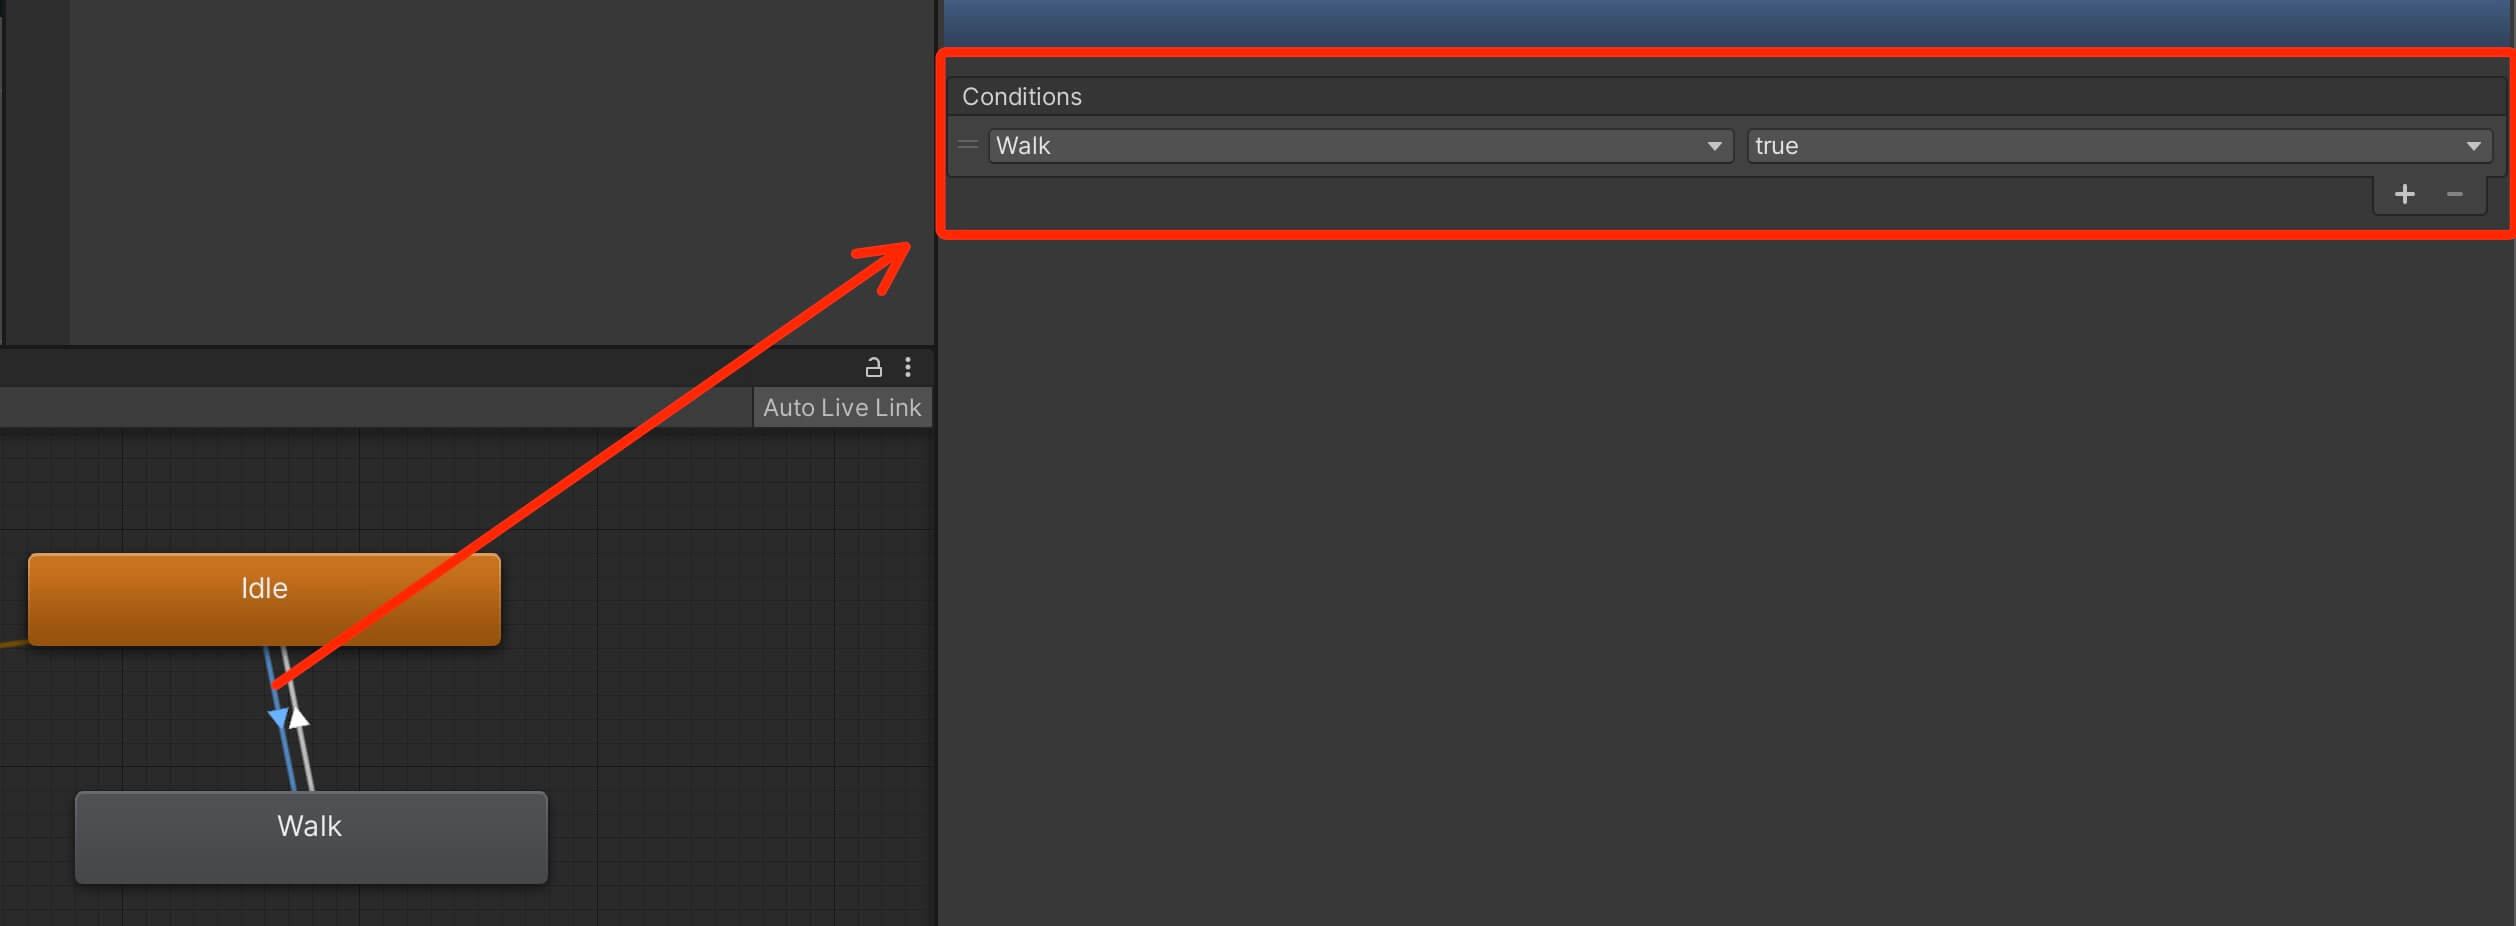
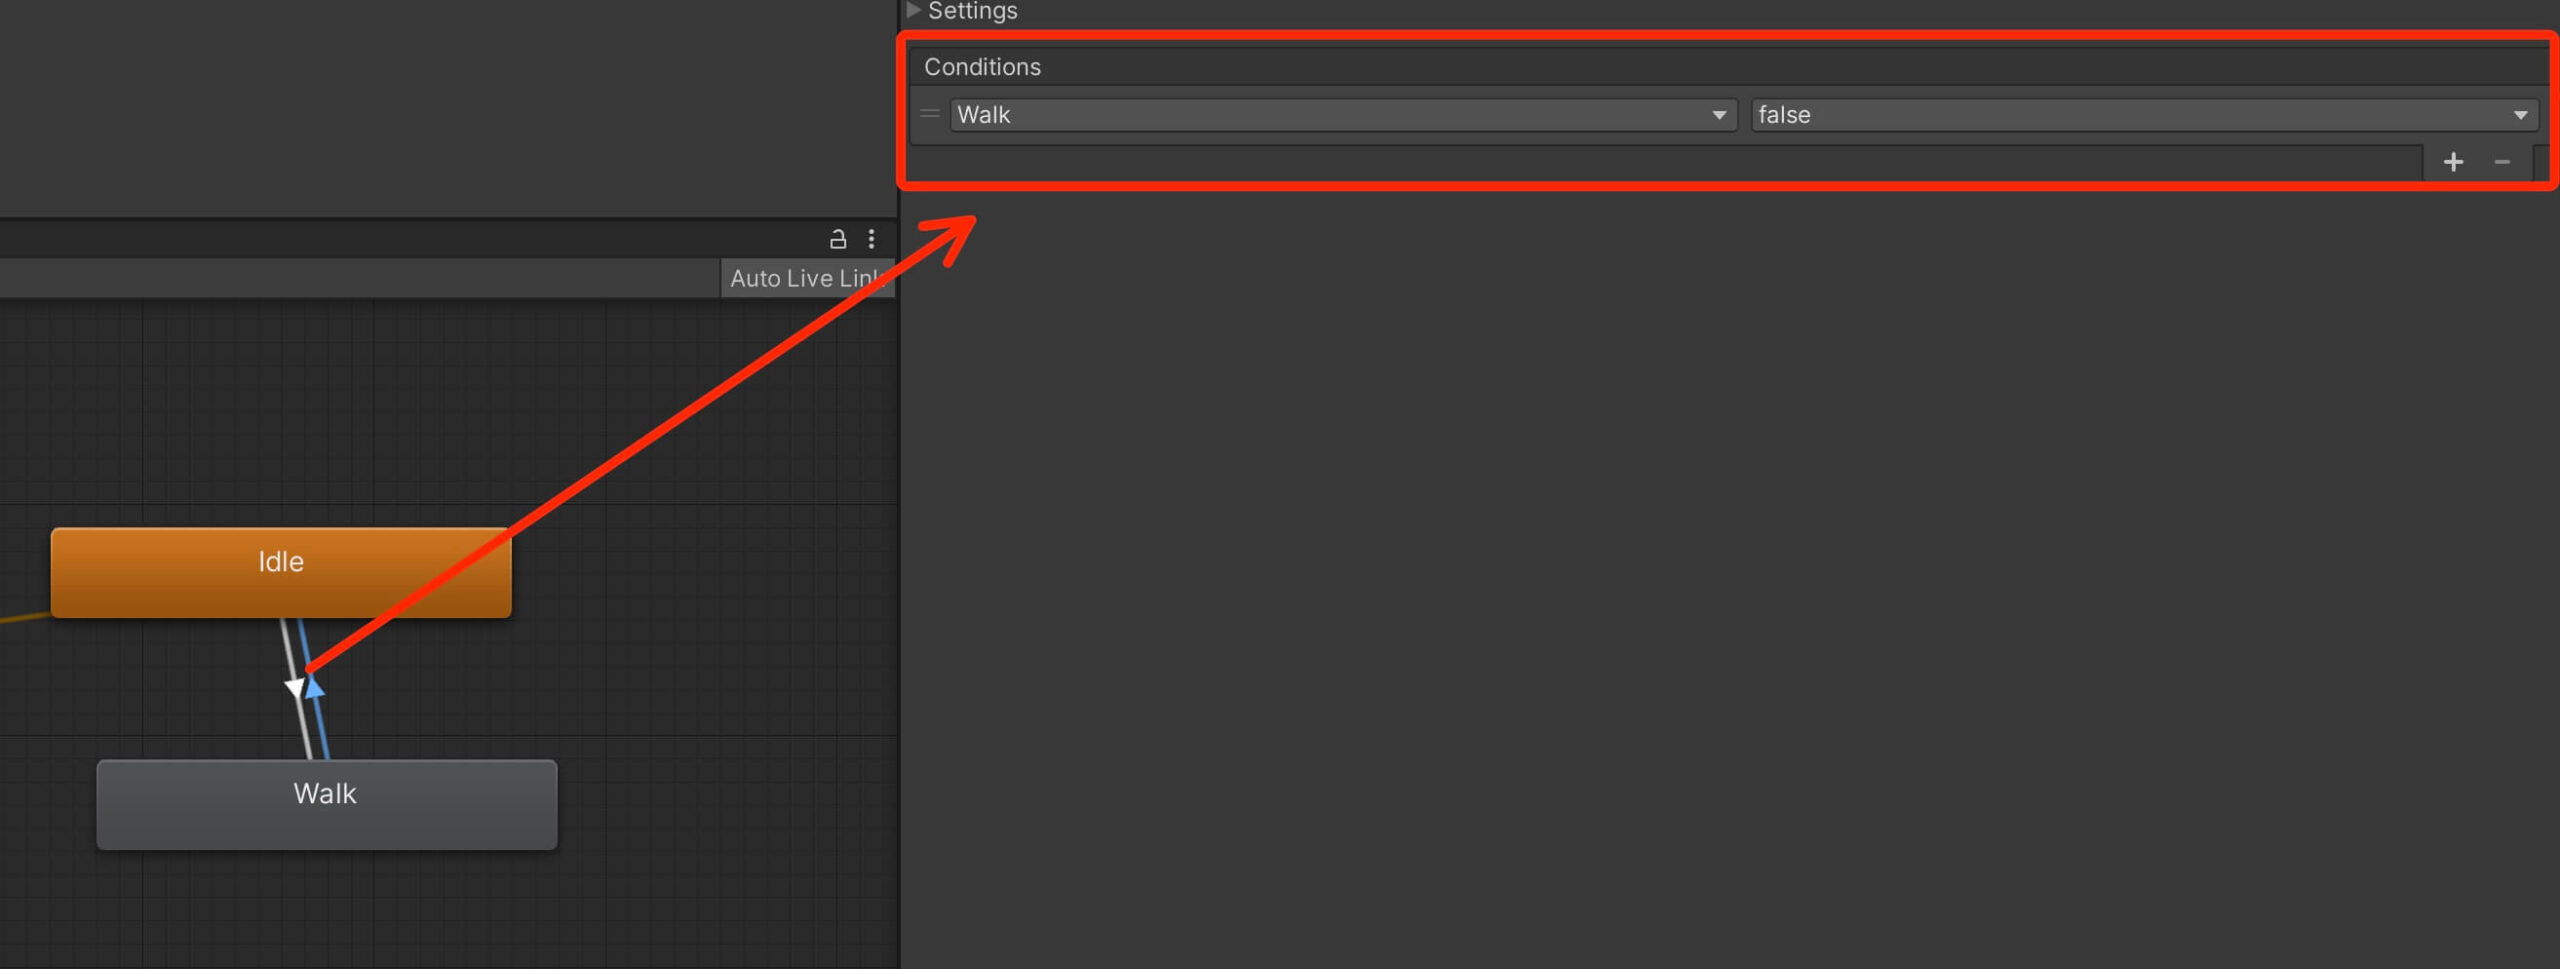
Call the HandlePlayerAnimation inside the Update function:
					void Update()
    {
        HandlePlayerMovement();
        HandleFacingDirection();
        HandlePlayerAnimation();
    }
Let’s run the game and test the animation out:
We see that the player’s animation is working but it looks weird as the player is flapping his hands like a crazy person.
How can we fix this?
Changing The Speed Of Animations
The player character is not flapping with his hands like a crazy person and the animation looks good now, but another issue that we have is that the transitions between animations are late.
Because of that you see how the player is sliding on the ground instead of playing the walk animation.
What is the issue here?
Fixing The Speed Of The Animation Transition
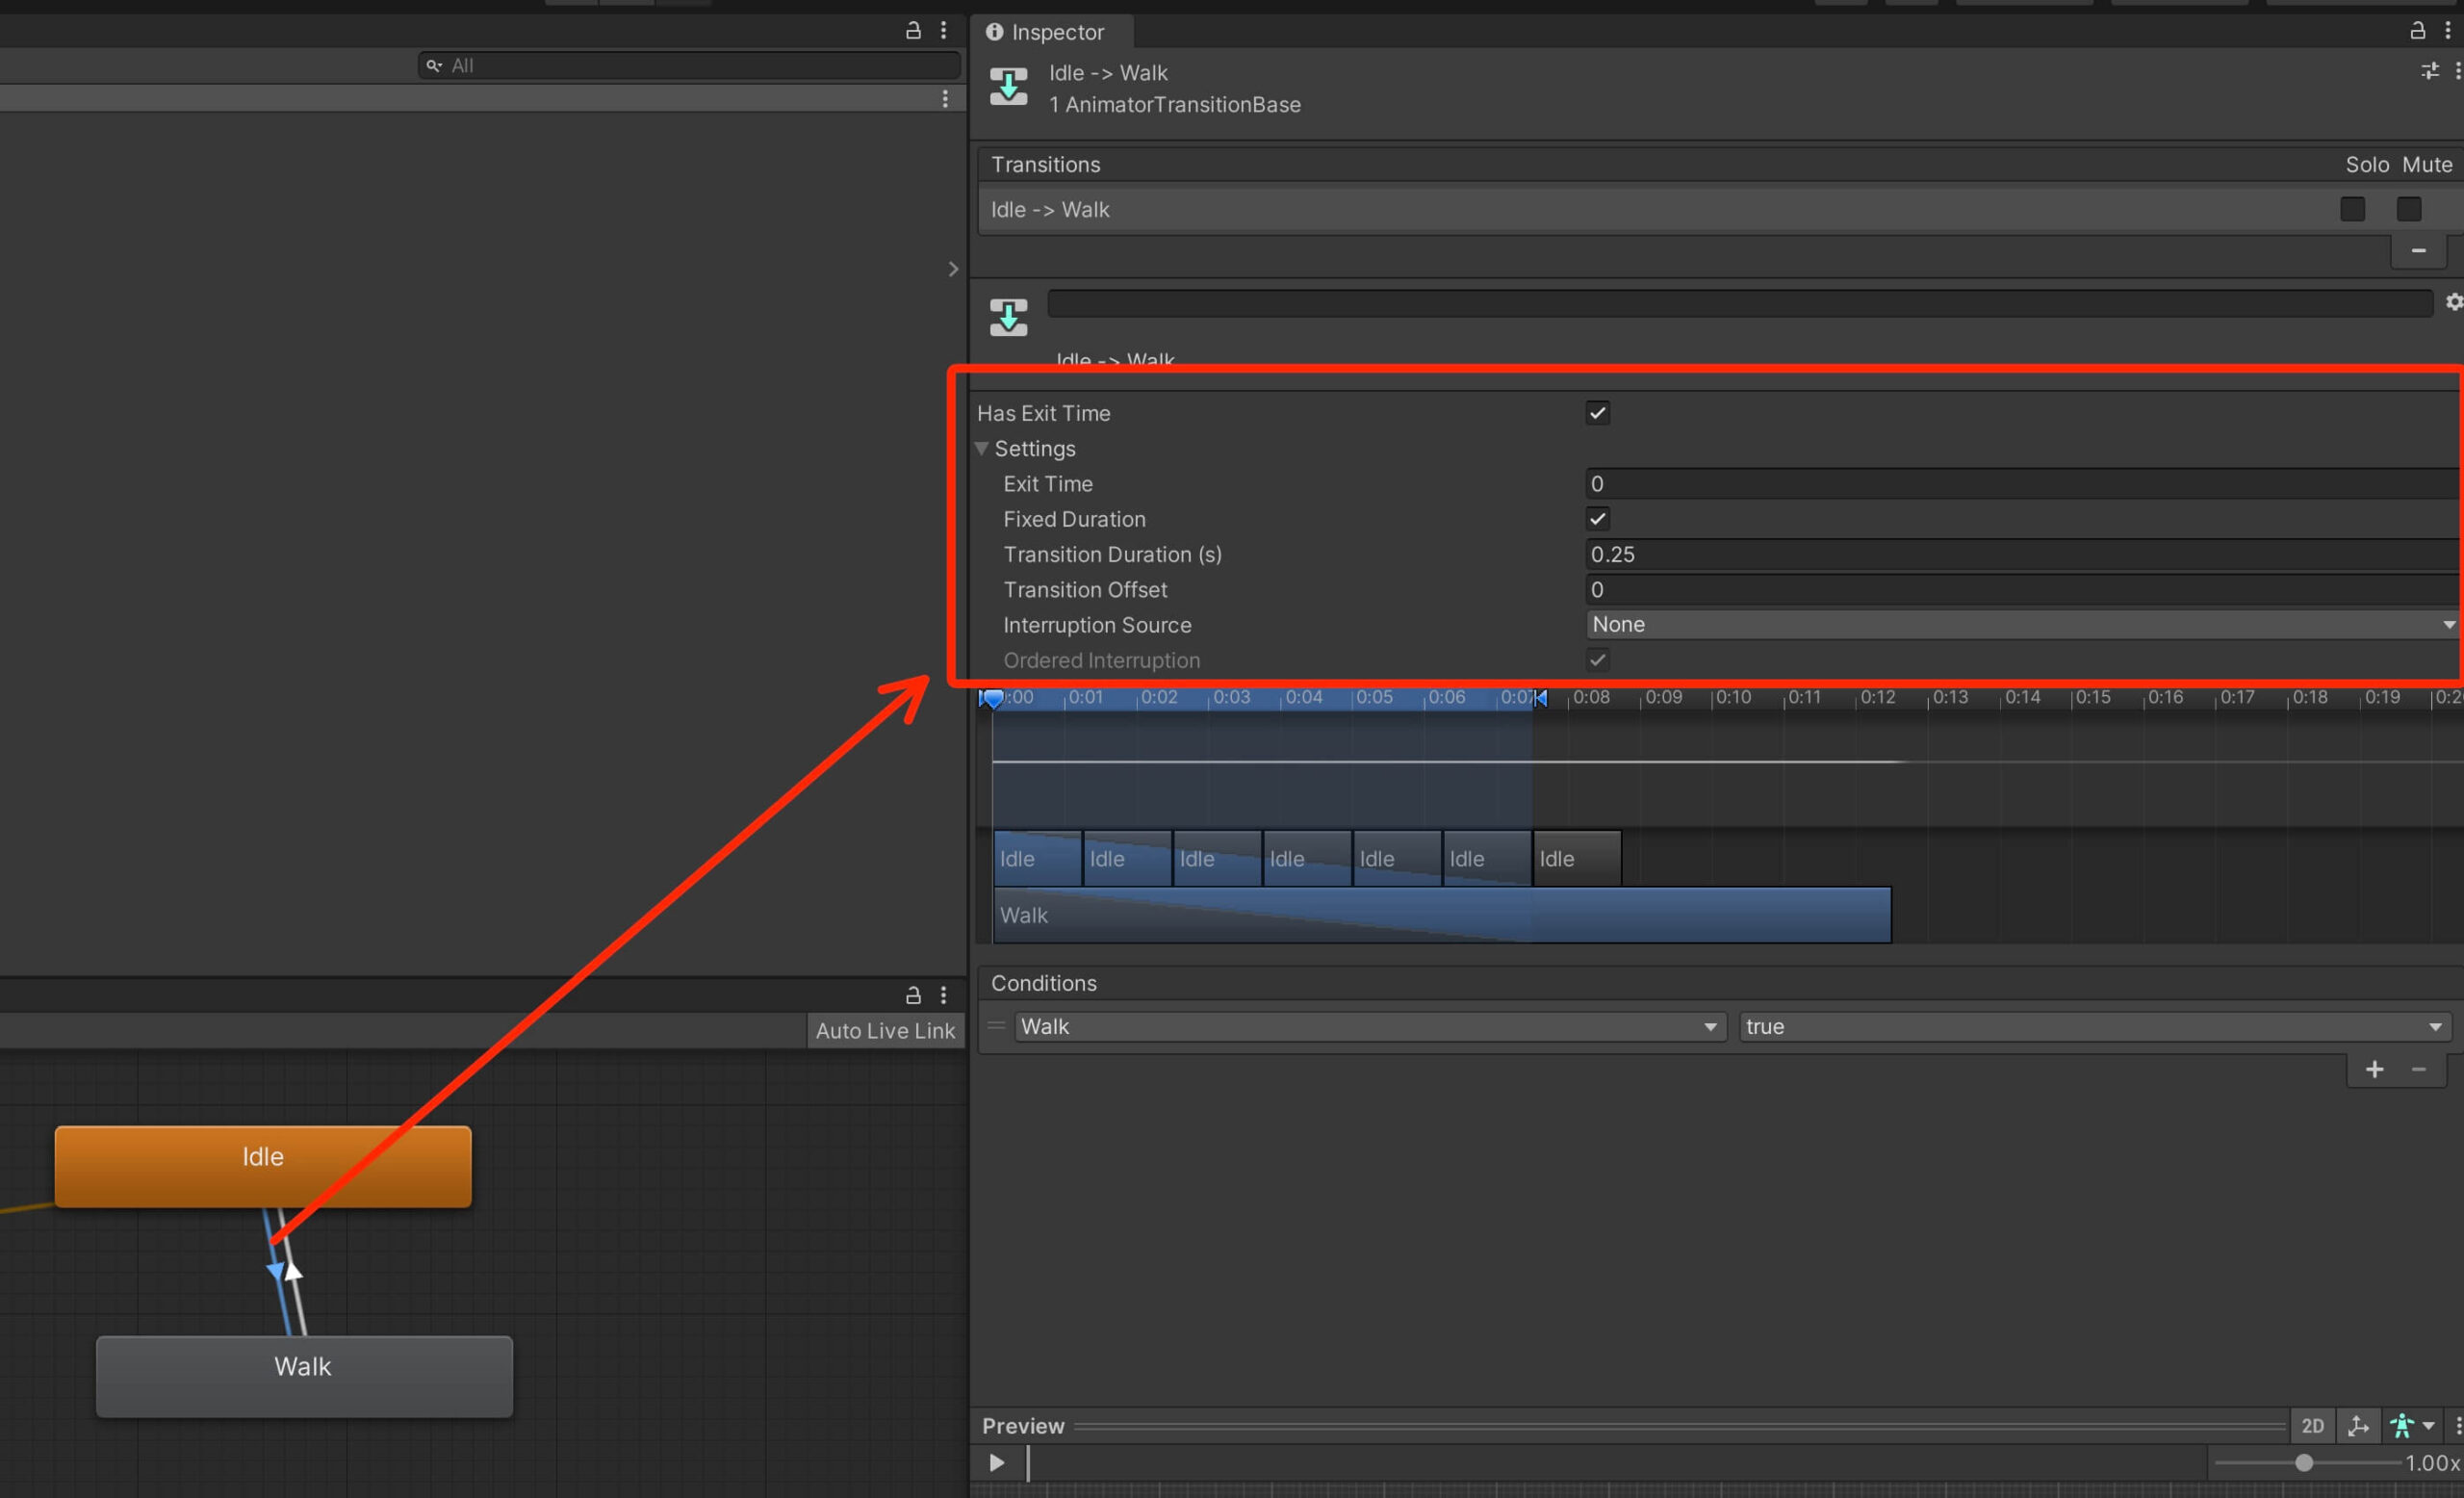
Change the values in the Settings for the transition to following:

Now when we move the Walk animation plays without any delays and the same thing goes when we stop moving, the Walk animation stops and the Idle animations starts playing without any delays.
Player Jump Functionality
The next step is to make the player character jump so that he can avoid the wave of enemies that comes towards him.
As always, we need a few variables for that. Inside the Player script add the following variables:
					private Rigidbody2D myBody;

    [SerializeField]
    private float jumpForce = 8f;

    private bool isGrounded;
					private void Awake()
    {
        anim = GetComponent<Animator>();
        myBody = GetComponent<Rigidbody2D>();
    }
Before we create the jump function, inside the TagManager class, add the following variable:
public static string JUMP_BUTTON_ID = "Jump";
					void HandleJumping()
    {
        if (Input.GetButtonDown(TagManager.JUMP_BUTTON_ID) && isGrounded)
        {
            isGrounded = false;
            myBody.AddForce(new Vector2(0f, jumpForce), ForceMode2D.Impulse);
        }
    }
					void Update()
    {
        HandlePlayerMovement();
        HandleFacingDirection();
        HandlePlayerAnimation();
        HandleJumping();
    }
public static string GROUND_TAG = "Ground";

If you don’t know how to create a new tag and tag a game object, you can learn that here.
Now we can test for collision inside the Player class using the OnCollisionEnter2D function:
					private void OnCollisionEnter2D(Collision2D collision)
    {

        if (collision.gameObject.CompareTag(TagManager.GROUND_TAG))
            isGrounded = true;

    }
The OnCollisionEnter2D function will give us information about the game object we have collided in the form of the Collision2D parameter.
That’s why, we can use that parameter and call its gameObject property and perform the tag test using the CompareTag function which will tell us if the game object we have collided with has the tag that we provided as the parameter in the CompareTag function in our case the Ground tag.
Keep in mind that the tag name in the code and the tag name in the editor need to match with capitalization or otherwise the test will not work.
So if we declared a tag Ground in the editor, in the code we need to test with another Ground, if we use ground with lower case g, it will not work.
If the comparison above is true, then the isGrounded variable will be set to true and we will be able to jump.
Let’s run the game to test it out:
Editing The Settings For Rigidbody2D
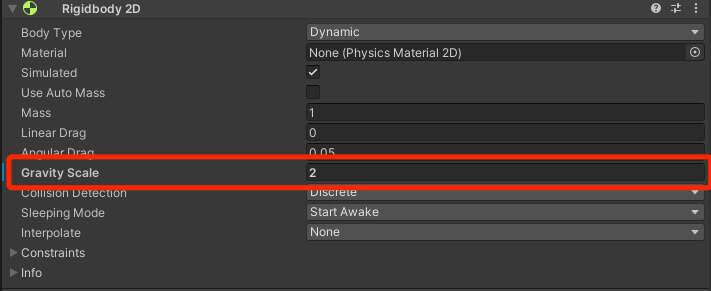
We are using the Rigidbody2D component to make the player jump. The Rigidbody2D component applies gravity to the game object and it allows forces to affect the game object.
For the current situation where the player character is jumping weirdly, we can double the gravity effect on the player game object by changing the value of the Gravity Scale from 1 to 2 inside the Rididbody2D component:
While we are at it, we can also freeze the Z rotation in the Constraints option for the Rigidbody2D:
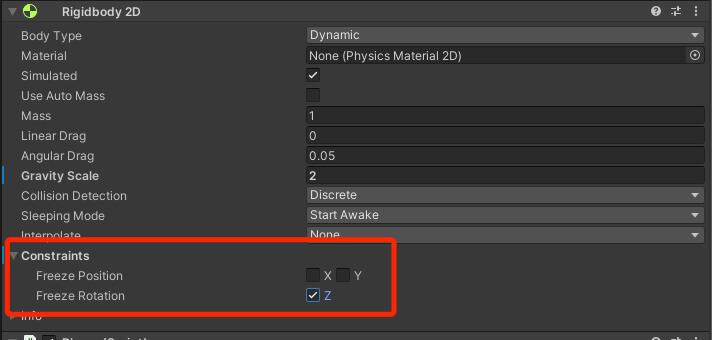
Freezing the Z rotation in the Constraints option will prevent the player game object from rolling over. For more information about this issue, you can click here.
Let’s test the game now and see the outcome:

					using System.Collections;
using System.Collections.Generic;
using UnityEngine;

public class Player : MonoBehaviour
{

    [SerializeField]
    private float moveSpeed = 10f;

    private float movementX;

    private Vector3 tempScale;

    private Animator anim;

    private Rigidbody2D myBody;

    [SerializeField]
    private float jumpForce = 8f;
    private bool isGrounded;

    private void Awake()
    {
        anim = GetComponent<Animator>();
        myBody = GetComponent<Rigidbody2D>();
    }

    // Update is called once per frame
    void Update()
    {
        HandlePlayerMovement();
        HandleFacingDirection();
        HandlePlayerAnimation();
        HandleJumping();
    }

    void HandlePlayerMovement()
    {

        movementX = Input.GetAxisRaw(TagManager.HORIZONTAL_AXIS);

        transform.position += new Vector3(movementX, 0f, 0f) * moveSpeed * Time.deltaTime;

    }

    void HandleFacingDirection()
    {
        tempScale = transform.localScale;

        if (movementX > 0)
            tempScale.x = Mathf.Abs(tempScale.x);
        else if (movementX < 0)
            tempScale.x = -Mathf.Abs(tempScale.x);

        transform.localScale = tempScale;
    }

    void HandlePlayerAnimation()
    {
        if (movementX != 0)
            anim.SetBool(TagManager.WALK_ANIMATION_PARAMETER, true);
        else
            anim.SetBool(TagManager.WALK_ANIMATION_PARAMETER, false);
    }

    void HandleJumping()
    {
        if (Input.GetButtonDown(TagManager.JUMP_BUTTON_ID) && isGrounded)
        {
            isGrounded = false;
            myBody.AddForce(new Vector2(0f, jumpForce), ForceMode2D.Impulse);
        }
    }

    private void OnCollisionEnter2D(Collision2D collision)
    {

        if (collision.gameObject.CompareTag(TagManager.GROUND_TAG))
            isGrounded = true;

    }

} // class
CameraFollow Script
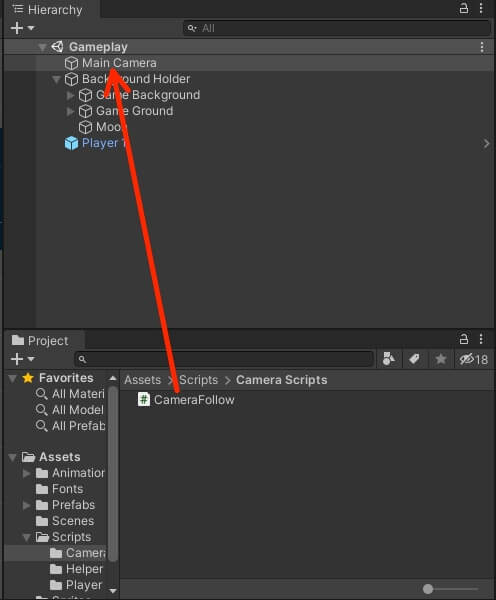
					private Transform playerTarget;

    private Vector3 tempPos;

    [SerializeField]
    private float minX, maxX;
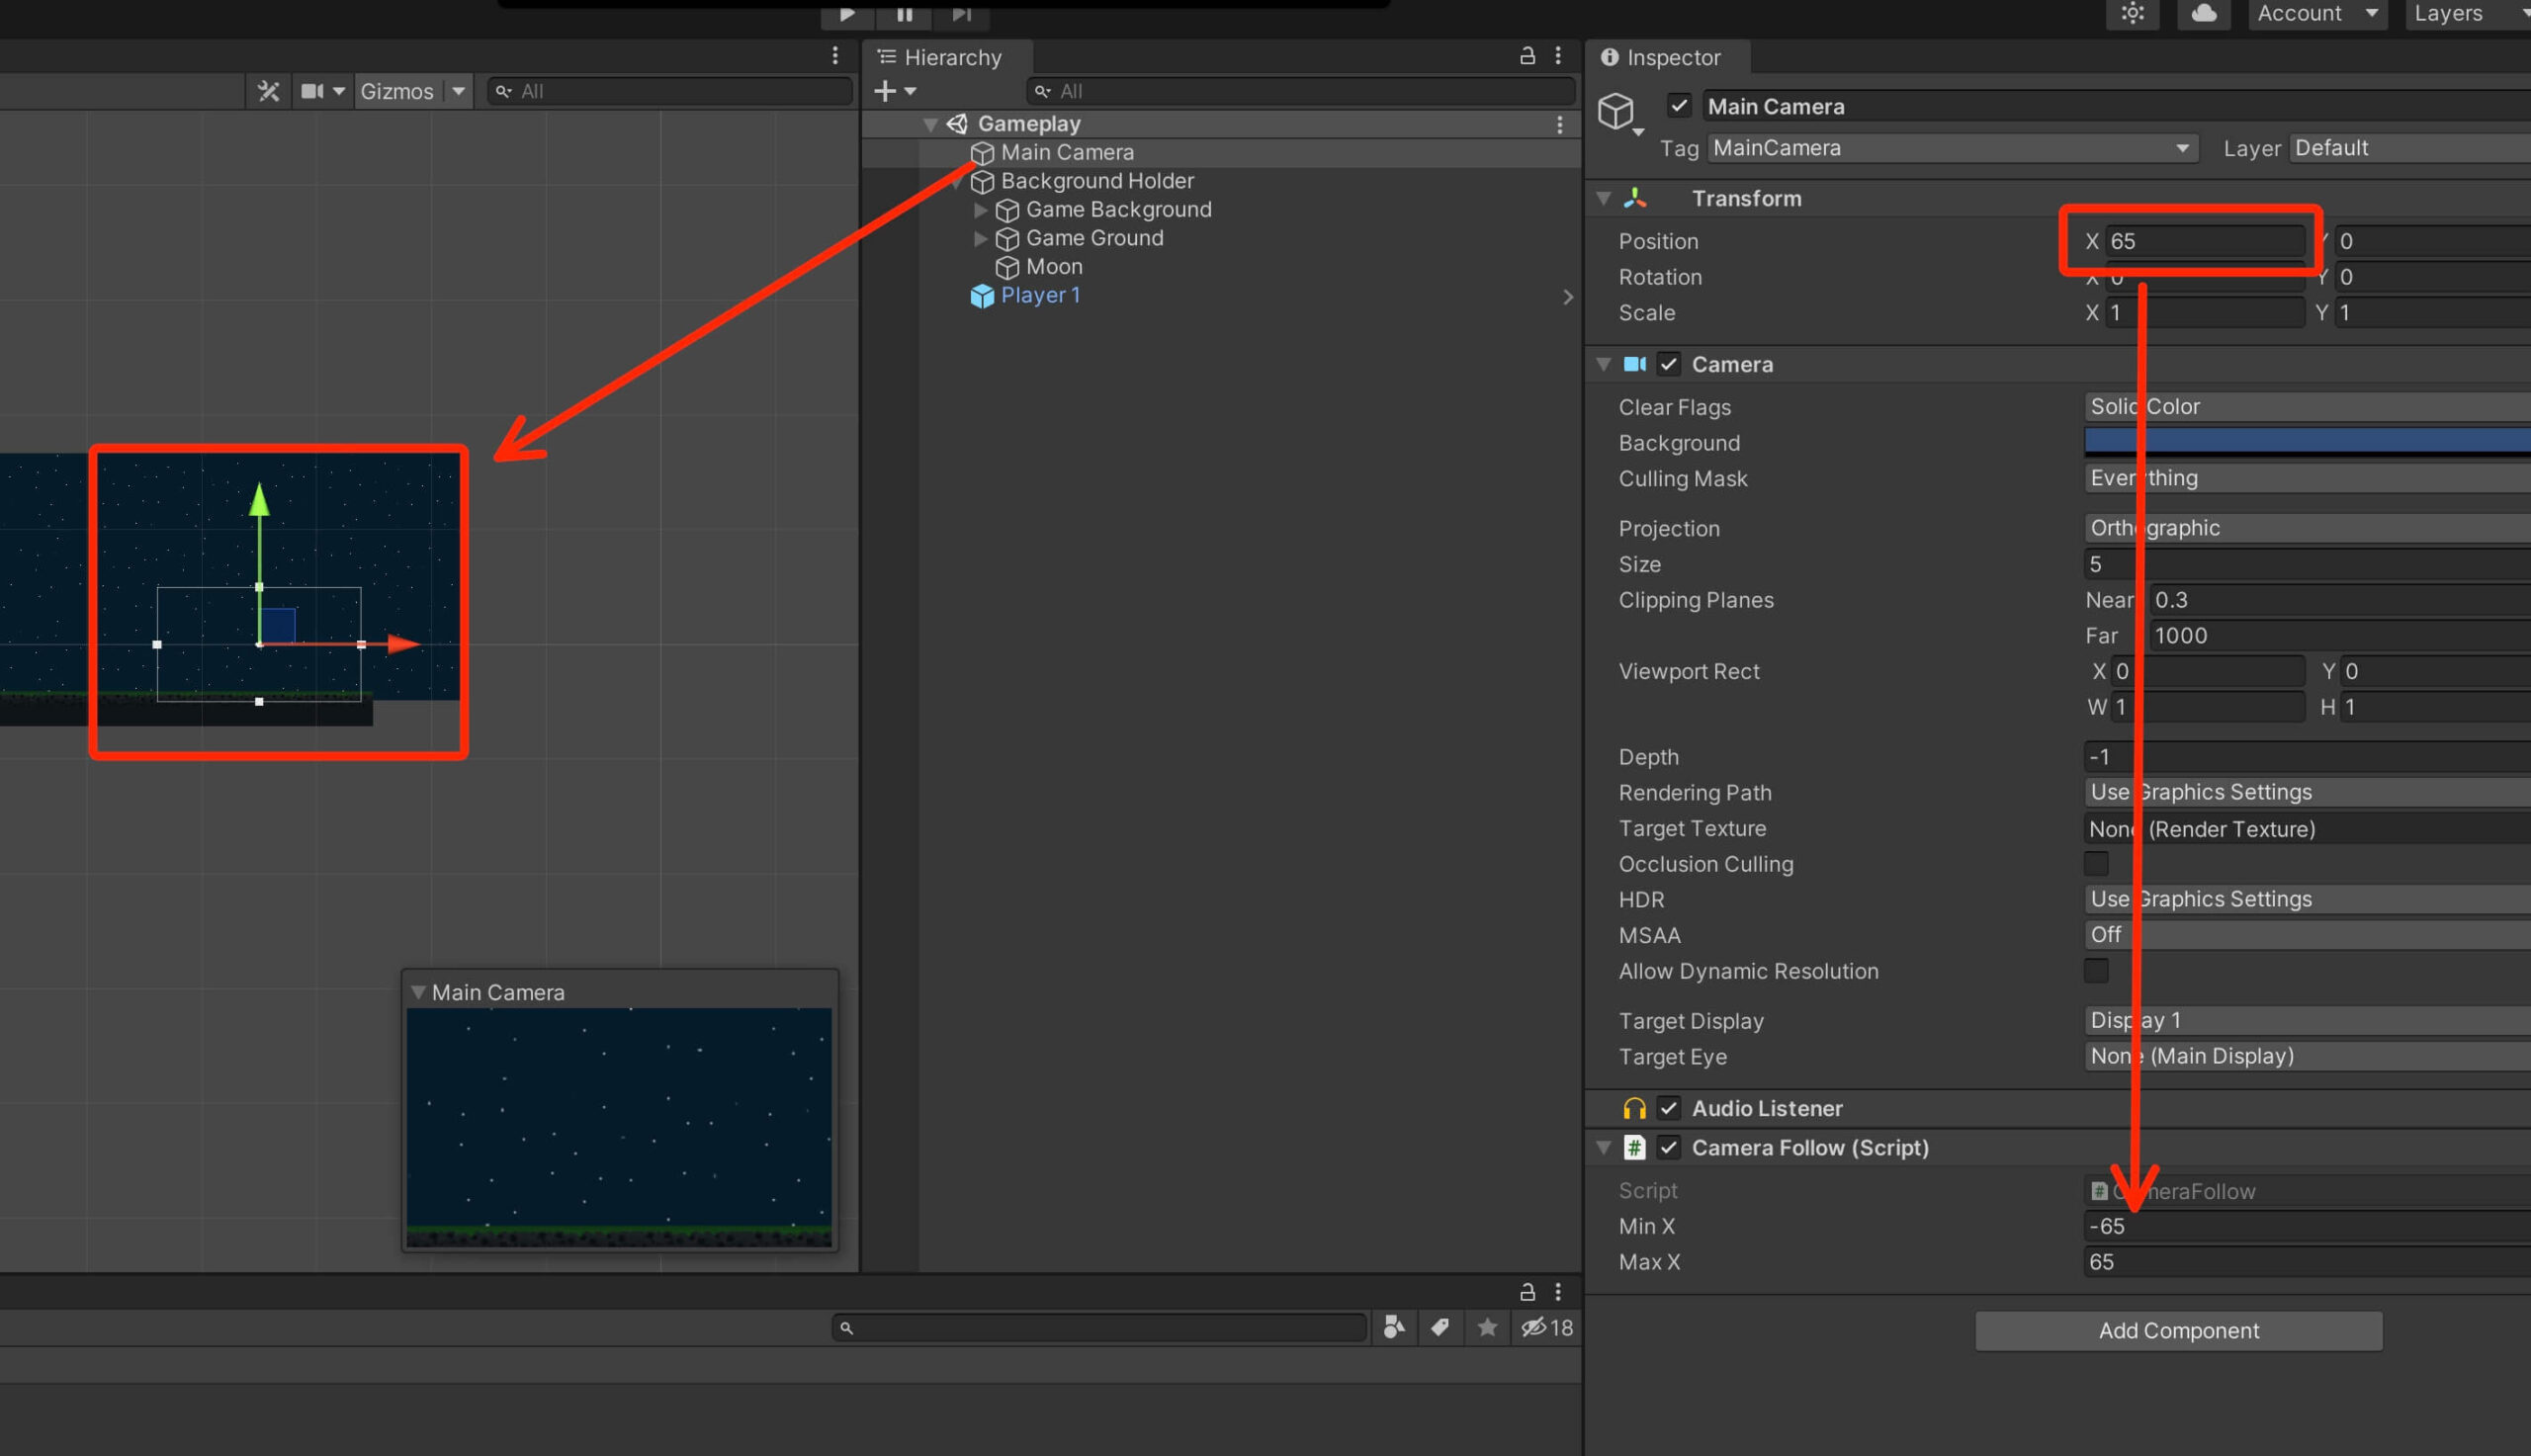

Next we need to get a reference to the player’s transform component. We are going to search for the player character via its tag, so we need to tag the player.
We already have the Player tag by default, so make sure that you select the Player 1 game object in the Hierarchy and tag him with the Player tag:

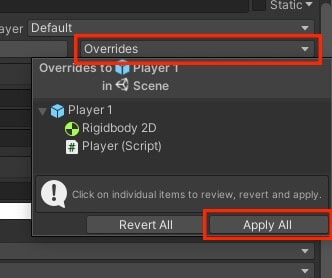
Don’t forget to override the changes for the Player 1 prefab and all the changes we make to Player 1, do the same changes to Player 2 game object as the steps are the same.
Inside the TagManager script add the following line of code:
public static string PLAYER_TAG = "Player";
Now we can get a reference to the transform component. Inside the Start function in the CameraFollow script, add the following line of code:
					 void Start()
    {
        playerTarget = GameObject.FindWithTag(TagManager.PLAYER_TAG).transform;
    }
					void LateUpdate()
    {

        if (!playerTarget)
            return;

        tempPos = transform.position;
        tempPos.x = playerTarget.position.x;

        if (tempPos.x < minX)
            tempPos.x = minX;

        if (tempPos.x > maxX)
            tempPos.x = maxX;

        transform.position = tempPos;

    }
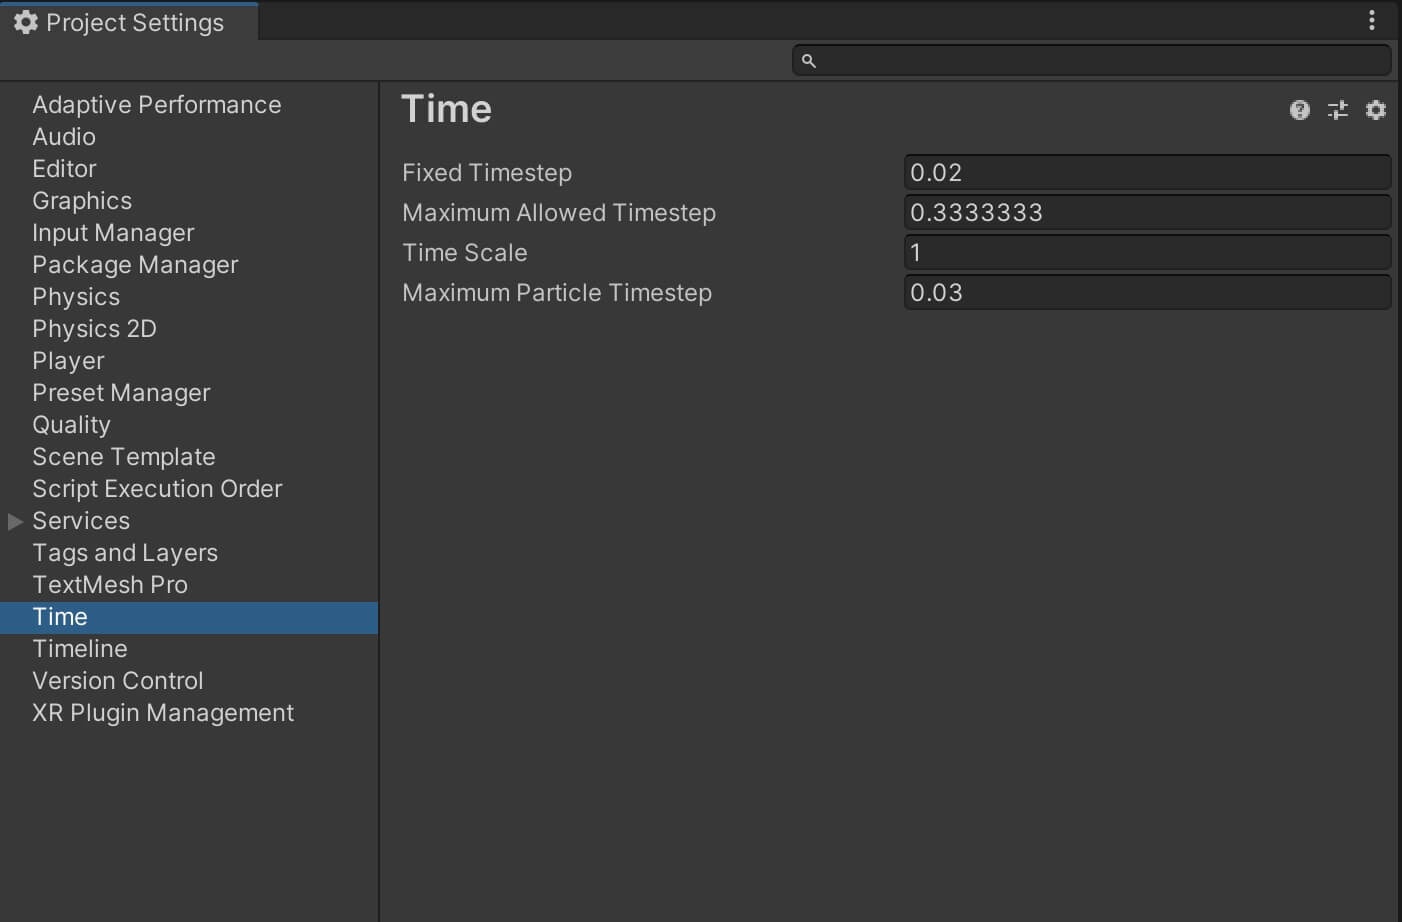
Update, FixedUpdate And LateUpdate
Going Back To CameraFollow Script
And with that we have finished the CameraFollow script. I will leave the complete CameraFollow script below if you need to copy any line of code in your project:
					using System.Collections;
using System.Collections.Generic;
using UnityEngine;

public class CameraFollow : MonoBehaviour
{

    private Transform playerTarget;

    private Vector3 tempPos;

    [SerializeField]
    private float minX, maxX;

    // Start is called before the first frame update
    void Start()
    {
        playerTarget = GameObject.FindWithTag(TagManager.PLAYER_TAG).transform;
    }

    // Update is called once per frame
    void LateUpdate()
    {

        if (!playerTarget)
            return;

        tempPos = transform.position;
        tempPos.x = playerTarget.position.x;

        if (tempPos.x < minX)
            tempPos.x = minX;

        if (tempPos.x > maxX)
            tempPos.x = maxX;

        transform.position = tempPos;

    }

} // class


Comments are closed.