In part 4 of this tutorial series we created the Knife obstacle, made it a Prefab and we started spawning the Knifes in the game.
In this part of the tutorial, we are going to animate the Player through code and show some neat code tricks.
Freezing The Rotation Of The Rigidbody
Currently the Knifes are falling from the sky and pilling up in our game. This of course will be fixed soon because it’s not how our game is going to be played.
But we can’t help but notice one thing that happens with the Player while he is trying to move in the pile of Knifes:
While the Player is trying to move through the Knifes he falls down.
I am going to illustrate this issue even better by using a ground game object and making the Player fall on it:
As you can see the Player fell off the edge of the ground object.
This is something that you won’t expect in a video game except if this is a part of your gameplay, but normally these things don’t happen.
Now, even though we could have skipped this part because when we make the Knifes disappear when they fall on the ground we will not have this issue, but still I want to explain it as we will use it later in our development.
The reason why the Player falls down is because we didn’t freeze the rotation of his Rigidbody 2D component.
In order to do that, click on the Player game object, and under his Rigidbody 2D component find the Constraints option:


Getting A Reference To The Player's Animator Component
Inside the PlayerMovement script above the Awake function declare the following:
private Animator anim;
					private void Awake()
    {
        sr = GetComponent<SpriteRenderer>();
        anim = GetComponent<Animator>();
    }
					[SerializeField]
    private Animator anim;
We can also drag the Player game object in the anim field for the script, and because the Player game object has an Animator component attached on it, the script will know to look for it and even though we technically dragged the Player game object, the Animator component will be the one that will be added in the anim field:
Either way you chose the outcome will be the same.
Just remember, if you choose to get a reference to the Animator component by using the GetComponent line of code, remove the SerializeField from the Animator variable declaration:
private Animator anim;
I am going to use the GetComponent approach so I will remove the SerializeField from the Animator variable declaration and in the Awake I will get a reference to the Animator:
					private void Awake()
    {
        sr = GetComponent<SpriteRenderer>();
        anim = GetComponent<Animator>();
    }
Animating The Player In Our Code
Now that we have a reference to the Animator component, we can create a function to animate the Player’s movement.
But the question is how can we know if the Player is moving or not?
For that, we can use the moveX variable.
If you remember, we are storing the Input.GetAxisRaw we get from the user in the moveX variable, and we said that when the user presses the Left Arrow or the A key the value returned will be -1 and when the user presses the Right Arrow or the D key the value returned will be 1.
We can use that information to know if the Player is moving or not.
I am going to create a new function that will Animate the Player and put the code for the animation inside:
					// function for handling the animation
    void HandleAnimation()
    {
        if (moveX != 0)
            anim.SetBool("Walk", true);
        else
            anim.SetBool("Walk", false);
    }
Inside the HandleAnimation function we are testing if moveX is not equal to 0, that means the value of moveX is either -1 or 1 which means that the Player is moving.
To animate the movement, we use the SetBool function, passing the name of the parameter and the value of the parameter.
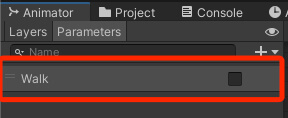
If you remember, when we set up the animation for the Player in part 1 of this tutorial series, we created a parameter that will handle the transitions between the Idle and the Walk animation, that parameter is a bool and the name of that parameter is Walk:

And if the value of moveX is equal to 0(zero), then we call the same function e.g. SetBool, pass the name of the Walk parameter but this time we set the value to false which you can see on lines 6 and 7 of the code above.
We set the value to false, because that is the condition for the transition that will go from Walk back to the Idle animation:

Before we test out our code we need to do two things.
First, call the HandleAnimation function inside the Update function:
					private void Update()
    {
        HandleMovement();
        HandleFacingDirection();
        HandleAnimation();
    }
Second, because the Knifes are going to fall from the sky we are going to turn off the Knife Spawner game object by unchecking the check box in the Inspector tab:

Animation Transition Settings
The problem with the animations running late lies in the Settings set up of the transitions of the animations.
To fix this, select any of the transitions, and in the Inspector tab locate the Settings option:

As you can see the Transition Duration option is set to 0.25 which is why the transition takes time to finish and that’s why the animations are running late.
To fix this issue we are going to set the value of Transition Duration to 0 and we are also going to uncheck the Has Exit Time option because we don’t want the transitions to have an exit time which also delays the transition between the animations.
This is how you should set up the options in the Settings for BOTH transitions:

Again, make sure the settings for BOTH transitions are like the ones you see in the image above, and now we can test the Player’s animations again:
Now the animations are running smoothly and they don’t have a delay when they transition between them.
The TagManager Script
					// function for handling the animation
    void HandleAnimation()
    {
        if (moveX != 0)
            anim.SetBool("Walk", true);
        else
            anim.SetBool("Walk", false);
    }
					public static class TagManager
{

    public static string WALK_ANIMATION_PARAMETER = "Walk";

}
					// function for handling the animation
    void HandleAnimation()
    {
        if (moveX != 0)
            anim.SetBool(TagManager.WALK_ANIMATION_PARAMETER, true);
        else
            anim.SetBool(TagManager.WALK_ANIMATION_PARAMETER, false);
    }
					public static class TagManager
{

    public static string WALK_ANIMATION_PARAMETER = "Walk";

    public static string HORIZONTAL_AXIS = "Horizontal";

}
Inside the HandleMovement function modify the line of code where we get the Input from the user:
moveX = Input.GetAxisRaw(TagManager.HORIZONTAL_AXIS);
Again, if we test this out, we will not see any change. Everything will run the same as before, but our code is much cleaner.
Where To Go From Here
In this lecture we learned how to use the Animator component to animate the game objects from code.
We also learned more about the options we have for animation transitions and options we have in the Rigidbody 2D component.

Comments are closed.