Creating Your First Unity Game – Rainy Knifes Part 4: Knifes, Prefabs And Spawning Obstacles In The Game

Table of Contents

Creating Your First Unity Game – Rainy Knifes Part 4: Knifes, Prefabs And Spawning Obstacles In The Game

Reading Time: 13 minutes
Level: Beginner
Version: 2020.3.1 LTS

Help Others Learn Game Development

In part 3 of this tutorial series we created the PlayerMovement script and made the Player move in the level.

In this part of the tutorial we are going to create the Knifes and make them fall from the sky so that the Player can start avoiding them.

Preparing The Knife Game Object

Drag the Knife sprite in the Scene from the Assets -> Sprites -> Obstacles folder.
 
The Knife is currently not visible because his Sorting Layer is set to Default.
 
Change his Sorting Layer to Player layer. If you are not sure how to do this, then go back to part 2 of this tutorial series and follow the guide.
 
We can also create a new Sorting Layer for the Knife, but there is no need to do that as the only important thing is that the Knife is rendered on top of the Background and ground game objects.
 
Next, attach a Box Collider 2D and Rigidbody 2D on the Knife game object. If you are not sure how to do this, you can look it up in part 2 of this tutorial series under sub lectures Colliders and Rigidbody.
 
After setting up the Knife game object, if you run the game this is what you will see:
 

The Knife is falling down which is the expect behavior because we attached a Rigidbody 2D on him. But the Knife is too big, and it is not rotated correctly so it falls on the side. I am going to change the size of the Knife and rotate him so that the sharp edge of the Knife is facing down.

These are the settings for the Rotation and Scale property of the Knife game object:

Img 1 - 85%

You can ignore the Position property as that will change anyways when the Knife starts moving down.

I am also going to change the size of the Knife’s Box Collider 2D as the collider is covering too much of the Knife at the moment. I only want the collider to cover the sharp edge of the knife.

These are the values for the new size of the Box Collider 2D of the Knife:

Img 2

So now when we run the game we have this:

The Knife Prefab

One of the most important concepts in Unity game development is something called a Prefab.

And a Prefab is a way for us to save game objects along with all the modifications we did to them.

If we delete the Knife game object from the Hierarchy tab, we will have to create a new one and go through all the set up we already did e.g. attach a collider, attach a rigid body, adjust their values and so on.

But if we create a Prefab out of the Knife then we can just drag that Prefab and we have the saved Knife game object with all of its components.

But how do we create a Prefab?

First inside the Project tab and Assets root folder, Right Click -> Create -> Folder. Give the new folder name Prefabs.

If this was a more complex game where we have Prefabs of all kinds such as different Players, Enemies, Obstacles, Pick Up Items and so on, we would create sub-folders to group all Prefabs that go together.

For example, we would put all the enemies in the Enemy Prefabs folder, all Players in the Player Prefabs folder and so on.
 

Now open the Prefabs folder and drag the Knife game object from the Hierarchy tab in the Prefabs folder:

Img 3

This will create a Prefab out of the Knife game object and you will see the Knife Prefab inside the Prefab folder:

Img 4

We can now delete the Knife game object from the Hierarchy tab and drag the Knife Prefab in the same tab and it will have all the components and properties that we already set up:

This is the power of Prefabs. And this is not the only purpose for what we can use them.

Prefabs are an essential part of our game logic, because in order to make the Knifes fall from the sky, we are going to use the Knife Prefab and create copies out of it.

Editing And Saving Changes To The Prefab

One important thing to know is that when we make any change on a Prefab that is inside the Hierarchy tab, we need to apply those changes so that they reflect on the original Prefab stored in the Prefabs folder.
 
For example, if we attach a new component on the Knife Prefab inside the Hierarchy tab, that change will not be reflected on the original Knife Prefab in the Prefabs folder:
 
As you can see from the preview above, if we attach an Animator component on the Knife Prefab in the Hierarchy tab, the new component was not found on the original Knife Prefab in the Prefabs folder.
 

To apply the new change to the original Prefab, we had to select the Knife Prefab in the Hierarchy tab, and click on the Overrides button at the top right corner in the Inspector tab:

Img 5 - 85%

And then click on the Apply All from the new drop down list so that the new change will be applied to the original Knife Prefab stored in the Prefabs folder:

IMG 6

This what we need to every time we add a new change to a Prefab in the Hierarchy tab and you want that change to be saved on the original Prefab.

This also includes any changes you make to components such as resizing the collider that is already attached on the Prefab, that change will not be applied to the original Prefab until you override it by clicking on the buttons mentioned above.

I encourage you that you take 5 minutes now and experiment with this concept so that you will memorize it because it is really important as we will be using it a lot in our development.

Removing Components From Game Objects

We used the Animator component only for demonstration purposes and we don’t need it attached on the Knife game object.
 
So you can remove the Animator component by clicking on the three dots on the side of the component:
 
IMG 7

And from there click on the Remove Component from the drop down list.

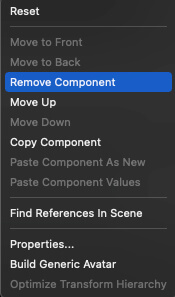
Of course, for this change to apply to the original Knife Prefab stored in the Prefabs folder, we need to override the changes by clicking on the Overrides -> Apply All.

The Knife Spawner Script

In order to make the Knifes fall from the sky we need to create a script that is going to do that for us.

Inside the Assets -> Scripts folder, Right Click -> Create -> Folder and give it a name Knife Scripts.

Inside Knife Scripts folder Right Click -> Create -> C# Script and give it a name KnifeSpawner.

Inside the Hierarchy tab, Right Click -> Create Empty and give it a name Knife Spawner, after that attach the KnifeSpawner script on the Knife Spawner game object in the Hierarchy.

Since the KnifeSpawner script is going to spawn the Knifes every X amount of seconds, the first we need is a reference to the Knife prefab, because we are going to create copies of that Prefab.

In the KnifeSpawner script above the Start function declare the following:

				
					[SerializeField]
    private GameObject knifePrefab;
				
			
We already talked about the SerializeField keyword and we saw that this keyword will expose a private variable in the Inspector tab.
 
If you wish to refresh your memory about this concept you can do that by going back to part 3 of this tutorial series.
 
In that example we used a float but here we have a GameObject, but the outcome will be the same, the knifePrefab variable will be exposed in the Inspector tab.
 

If you select the KnifeSpawner in the Hierarchy tab and take a look in the Inspector tab you will see this:

IMG 9 - 80 %

You see that we have an empty field for the knifePrefab variable and inside that field we see None which denotes that we didn’t attach any game object.

Why is this important?

Well in order for us to create copies of the Knife Prefab, we need to get a reference to that Prefab in our code, and we are going to do it by dragging the Knife Prefab from the Prefabs folder in the knifePrefab exposed variable in the Inspector tab:
 

Now that we dragged the Knife Prefab in the knifePrefab empty field in the Inspector tab, we have a reference to the Knife Prefab and we can create as many copies of the knife prefab as we want.

To create a copy from a Prefab, we use the Instantiate function. In the KnifeSpawner script add the following line of code:

				
					void Start()
    {
        Instantiate(knifePrefab);   
    }


Remove any copy of the Knife game object from the Hierarchy by selecting the Knife game object and pressing the Delete key on Windows, on Mac CMD + delete key. Or you can Right Click -> Delete on the Knife game object.

Now run the game:

As you can see from the video, as soon as we started the game a Knife was spawned in the scene and it fell down.

This is because of the Instantiate function we used in the KnifeSpawner.

Adding Icons To Empty Game Objects

The Knife was spawned at its stored position e.g. the x, y, and z position the Knife game object had at the time we created a Prefab out of it or when we applied changes that were made to a copy of the Knife Prefab in the Hierarchy tab.
 

This is not what we want for our game because if we use Instantiate like this, the Knife will always be spawned at the same place in our game.

Because of that we need a X and Y position where we are going to spawn the Knife game object.

For the Y position we can use the Knife Spawner Y position, we just need to move it above the view port of the Camera.

Because the Knife Spawner is an empty game object and thus it’s invisible in the Scene, I am going to show you a way how we can add an icon to an empty game object so that we can see where it is in the Scene.

Select the Knife Spawner in the Hierarchy and press the cube icon in the Inspector:

Img 10

When you click on the cube, from the list select any icon which is either a label or a dot, and select any color of the label or the dot:

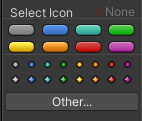
I am going to select the red label for the Knife Spawner and this is how it looks like in the Scene tab:

Img 12
You can see the Knife Spawner above the Player has a red icon label. This icon label is only visible in the Scene view and it is not visible when we run the game or when the game is shipped for production.
 
Now we can position the Knife Spawner above the viewport of the Camera, so set the position property of the transform component for the Knife Spawner at the following values:
 
  • X: 0
  • Y: 6
  • Z:0
When you take a look in the Scene tab the Knife Spawner is positioned above the white rectangle denoting Cameras viewport:
 
Img 13
For the X position of the Knife, we are going to do the same thing we did for the Player’s bounds. Because we have a minimum X and the maximum X where the Knife game object can be spawned.
 
To be more precise the Knife can be spawned between the two ends of the level:
 
IMG 14
To get the values for the minimum and maximum X do the same thing we did for the Player’s bounds, except this time use the Knife.
 
If you don’t remember how we got the bounds for the Player, go back to part 3 of this tutorial series and take a look at the guide on how to do it.
 
Inside the Knife Spawner create two float variables for the minimum and maximum X position:
 
				
					[SerializeField]
    private float min_X = -2.6f, max_X = 2.6f;
				
			
I marked the variables with SerializeField in case we want to experiment with the minimum and maximum position so that we can change them in the Inspector tab.
 
The Y position of the spawned Knife game object is always going to be the same e.g. the Y position of the Knife Spawner, but we are going to randomize the X position every time we spawn a new Knife using Random.Range.
 
Since we are going to set a new position for the Knife every time we spawn a new one, we are going to create a Vector2 global variable to store that position, and we are going to create a function and put the code for spawning the Knife inside:
 
				
					public class KnifeSpawner : MonoBehaviour
{
    [SerializeField]
    private GameObject knifePrefab;

    [SerializeField]
    private float min_X = -2.6f, max_X = 2.6f;

    private Vector2 knifePos;

    void Start()
    {
        SpawnKnife();
    }

    void SpawnKnife()
    {
        knifePos.y = transform.position.y;
        knifePos.x = Random.Range(min_X, max_X);

        Instantiate(knifePrefab, knifePos, Quaternion.Euler(0, 0, 90));
    }

} // class
				
			
All the magic is happening in the SpawnKnife function.
 
First, we set the Y position of the temporary knifePos Y variable to the current Y position of the Knife Spawner.
 
Because this script is attached to the Knife Spawner game object, when we call transform.position.y this is referring to the Y position of the game object holding the script, in our case Knife Spawner.
 
Then we randomize the X position of the knifePos variable by using Random.Range(min_X, max_X).
 
The Random.Range function is going to return a random number between the two provided numbers, in our case min_X and max_X. This will randomize the spawning of every new Knife game object and it will make our game challenging for the user to play.
 
After that in the Instantiate function we pass the prefab we want to spawn e.g. Knife, the position where we want to spawn it e.g. knifePos and lastly we need to provide rotation as well.
 
For the rotation we used Quaternion.Euler(0, 0, 90). In Unity Quaternions are used to represent a rotation of a game object and they have x, y and z rotation values.
 
Quaternion.Euler(x, y, z) will provide the values of the rotation for every axis, in our case we set:
 
  • X = 0;
  • Y = 0;
  • Z = 90;
If you remember we changed the Z rotation of the Knife because the default rotation made the Knife game object fall horizontally, but we want it to fall vertically e.g. with the blade facing down.
 
That is why we need to use 90 for the value of the Z rotation.

Now we can test the game:
 
As you can see from the preview, every time we run the game the Knife was spawned at a different position. Well, the Y position was the same but the X position was randomized thanks to Random.Range.
 
We do have one problem and that is, the Knife only spawns once when the game starts. We need to stop the game, then run it again to spawn a new Knife.
 
This is not how we want our users to play our game so we need to provide a way to infinitely spawn the Knifes.
 

Spawning Infinite Knifes

To spawn the Knifes all the time while the game is running we are going to use the Invoke function.
 
This a function built in Unity that we can use to execute a custom function that we created.
 
And not only that, but we can also provide the time in seconds when we want to execute that function.
 
So the first thing that we will do is create two new global variables above the Start function that we will use to randomize the spawning time:
 
				
					[SerializeField]
    private float minSpawnTime = 1f, maxSpawnTime = 3f;
				
			
Now we are going to use the two variables with the Invoke function to call the SpawnKnife function with a random timer:
 
				
					void Start()
    {
        Invoke("SpawnKnife", Random.Range(minSpawnTime, maxSpawnTime));
    }
				
			
The Invoke function takes two arguments, one is the string which represents the name of the function that the Invoke function will call, and the other is a float which represents seconds e.g. after how many seconds the Invoke function will call the function whose name we passed.
 
In our case, the Invoke function will call the SpawnKnife function after Random.Range(minSpawnTime, maxSpawnTime) which will randomize the Invoke time because again, Random.Range will return a random value between the two provided parameters.
 
This is the outcome of our new code:
 

The Invoke function spawned a new Knife after a random time interval, but it only spawned one Knife, what is the issue here?

Well the issue is that we are calling the Invoke function only once hence it has spawned only one Knife.

There are two solutions for this.

The first solution is to call the Invoke function again within the SpawnKnife function:

				
					void SpawnKnife()
    {
        knifePos.y = transform.position.y;
        knifePos.x = Random.Range(min_X, max_X);

        Instantiate(knifePrefab, knifePos, Quaternion.Euler(0, 0, 90));

        Invoke("SpawnKnife", Random.Range(minSpawnTime, maxSpawnTime));
    }
				
			
After Invoke calls SpawnKnife to spawn a new Knife, the code on line 8 will be executed and it will call the Invoke function again hence creating a system where the Invoke function will be called over and over to spawn new Knifes in the game.
 
Here is the outcome of that method:
 

As you can see, calling Invoke over and over again will create infinite number of Knifes that are being spawned.

The second solution is to use InvokeRepeating function which takes three parameters.

  • The first parameter is the name of the function it will call
  • The second parameter is a float which represents the time InvokeRepeating will be called for the first time
  • And the third parameter is a float which represents the time InvokeRepeating will be called after that
For example:
				
					InvokeRepeating("SpawnKnife", 1f, 2f);
				
			
In the example above, InvokeRepeating will call SpawnKnife function after one second the first time, then it will call the same function every time after two seconds.
 
For our purpose we are going to randomize the InvokeRepeating function both times:
 
				
					InvokeRepeating("SpawnKnife", Random.Range(minSpawnTime, maxSpawnTime), Random.Range(minSpawnTime, maxSpawnTime));
				
			
The code above will randomize the first call of InvokeRepeating and it will randomize every other calling of InvokeRepeating using Random.Range(minSpawnTime, maxSpawnTime).
 
Before we test this out, make sure that you remove the Invoke function we added in the SpawnKnife in the previous example as that will mess up the new set up we have.
 
The SpawnKnife function should look like this:
 
				
					void SpawnKnife()
    {
        knifePos.y = transform.position.y;
        knifePos.x = Random.Range(min_X, max_X);

        Instantiate(knifePrefab, knifePos, Quaternion.Euler(0, 0, 90));
    }


And inside the start function call InvokeRepeating:

				
					void Start()
    {
        InvokeRepeating("SpawnKnife", Random.Range(minSpawnTime, maxSpawnTime), Random.Range(minSpawnTime, maxSpawnTime));
    }


Now we can test the game:

As you can see the outcome is the same as with the first example, on here we are using another line of code.
 
And this is the beauty of programming.
 
There are always multiple solutions for the given problem, and there is no general solution that will always help you solve the problem at hand.
 
Instead, you will try different ways until you come up with a solution for the problem that you have and this is what programming is all about – problem solving, and not coming up with complicated algorithms like the majority of people think.

Where To Go From Here

In this lecture we learned about Prefabs, how we can create copies of  Prefabs from our code and how we can repeatedly execute one function with the help of the Invoke function.

Of course, our game is still not done as we have some modifications to do and we are going to start with the Player game object.
 
In the next lecture titled Animating The Player With Code we are going to animate the Player, and fix some physics issues we have before we proceed to finish our game.

1 thought on “Creating Your First Unity Game – Rainy Knifes Part 4: Knifes, Prefabs And Spawning Obstacles In The Game”

Leave a Comment