In part 1 of this tutorial series we imported the assets and we created animations for the main game character.
In this part of the tutorial, we are going to create the game backgrounds and make the Player a solid game object with applied physics.
Adding The Game Backgrounds
Inside the Sprites -> Background folder you will find two images, one is the game Background and the other is the ground.
Drag the Background sprite inside the Scene tab, or you can drag it in the Hierarchy tab as well.
Just make sure to set the x,y, and z axis to 0(zero) for the position property of the transform component for the Background game object.
This will position the Background in the center of the screen.
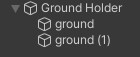
Next, inside the Hierarchy tab, Right Click -> Create Empty, this will create an empty game object.
Set the x, y, and z axis to 0(zero) for the position of the empty game object and rename it to Ground Holder.
Another way to set all axis to 0 is to Right Click on transform component on the game object and press “Reset”.
Just make sure that you click exactly where it says “Transform” like you see in the image below:

Next, drag the ground sprite from the Sprites -> Background folder on the Ground Holder game object which will make it a child of that object.
And you can do this from the Hierarchy as well. Just drag the object on another object and it will make it a child object and the other object is the parent.
When a game object has child objects, you will see an arrow on the left side of the object indicating that it has child objects and if you want to see them click on the arrow which acts as a drop down list:
Snapping Sprites Together
If you go in the Game tab, you will see that the ground sprite is small and doesn’t cover the whole screen:

You can also create copies by using CTRL + C and then CTRL + V, or on mac CMD + C then CMD + V, but this way is faster as you don’t have to type two commands.
Rename the two ground objects to ground 1 and ground 2 either by clicking on them two times or Right Click -> Rename, we covered this already.
Next, move the ground 2 object to the right side of ground 1 because we are going to snap the ground 2 object to the right side of ground 1.
To snap a game object first click on it, then HOLD the ” V ” key on your keyboard:
While you are holding the ” V ” key you will see how the pivot arrows(green up arrow and red right arrow) move to the corners of the selected game object like in the video above.
The goal of snapping is to snap one game object to another so that they look like a single game object, and that way form one bigger game object that actually consists out of two game objects.
I encourage you to play a little more with the snapping tool same as you how you saw in this video, just so you get a grasp how the snapping works, because not always will the game object snap where you want it to snap and you will have to move it and try again.
But these are all small things that are not a game changer in your development, but as a beginner it is good to practice.
Now duplicate the ground 1 game object again, rename the duplicate to ground 3 and this time snap the duplicated ground to the left side of ground 1 so that you get this result:
Now, instead of moving the ground objects around as individual parts, or even selecting all three grounds and then moving them around, we can simply take the Ground Holder game object and move it around.
Since the three grounds are children of the Ground Holder object, they will move along with their parent object.
So now, we can select the Ground Holder object, and set the y axis for the position of the Ground Holder to -5:

When you go to the Game tab now, your level should look like this:

Transform Rendering Order
One important thing to set up in our game is the rendering order of our game elements.
For example, we need to make sure that our main character is always rendered in front of the background.
There are two ways how we can achieve this.
The first way is to use the z position of the game object. This is highly dependent on the Camera’s z position.
By default, the z position of the Camera should be -10, if by any chance that is not true for your project, set the Camera’s z position to -10:

The default z position for our other game objects we added in the Scene is 0. And this is how your current game should look like:
Let’s see what happens if we change the Backgrounds z position to -1:

If you go in the Scene tab or in the Game tab, your game should now look like this:

The Background is covering the whole game and we don’t see the Player or the grounds at all.
They are still in the game, if you take a look in the Hierarchy tab you will see the Player and ground objects inside, but we don’t see them in our game.
This is called the rendering order which determines which objects will be rendered first.
If we were to use this way to set up the rendering order, then must set the z positions like this:
- Player Z position = -3
- Background Z position = -1
- Ground Holder Z position = -2
Because the Camera’s z position is set at -10, the numbers closer to the Camera’s z position will be rendered first.
In our case, the Player is rendered first because his z position is at -3, then the Ground Holder whose z position is at -2, and lastly the Background which z position is at -1.
Sprite Rendering Order
Another way how can we ensure a correct rendering order is using the Sprite Renderer component.
In the Sprite Renderer component under “Additional Settings” you will see the following:

The Sorting Layer option allows us to select a Sorting Layer that the Sprite Renderer component will use to render the sprite.
This option is important because this determines which Sorting Layer is rendered first.
And the Order in Layer option determines the rendering order within the specific Sorting Layer.
Let’s take a look at how that works. First we are going to create new Sorting Layers.
In the Sprite Renderer component under Additional Settings -> Sorting Layer, click on the drop down list where it says Default and from there click on Add Sorting Layer:

When you follow the previous steps, this is what you will see in the Inspector tab:

Under the Sorting Layers drop down list, we can add new layers by clicking the ” + ” button:

Add three new layers by clicking the ” + ” button three times. Name the layers Background, Ground, And Player.
This is the result that you will get:

Now we can assign the newly created layers to game objects in our scene.
Click on the Background game object in the Hierarchy and on his Sprite Renderer component under the Additional Settings click on the drop down list for the Sorting Layer and select the Background Sorting Layer:

If you look in the Game tab you will notice that we don’t see the player and the ground game objects anymore because the background game object is rendered in front of them.
Now select all three ground game objects that are children of the Ground Holder, and in their Sprite Renderer component under Additional Settings click on the drop down list for the Sorting Layer and select the Ground layer.
Repeat the same step for the Player game object but select the Player layer.
If you take a look how your game looks like in the Game tab, this is what you will see:


This is really important to know as we will be using this method to display or render our game elements on the screen. And how you set up the Sorting Layers will determine that.
You can play around by selecting different Sorting Layers for the game objects in the Scene and see the outcome.
You can even drag around the game objects after you change their Sorting Layers and see how they will be rendered on screen.
I highly encourage you to do this because this way you will memorize how Sorting Layers work and you will know how to use them.
Sprite Order In Layer

Assuming that the Background’s Order in Layer is 0, which is the default, then the Background will be rendered on top of the Player:

Colliders
Before we can move our game character we need to attach some essential components. These components are colliders and rigid bodies.
Colliders enable collision between game objects. This is how we make a game object solid, meaning nothing can pass through it.
And rigid bodies are responsible for applying physics to your game object e.g. the gravity will start affecting him and forces can be applied to that game object.
Starting with colliders, we already know how to attach a component as we already did that, so repeat the same process and in the search bar filter for Box Collider 2D.
If you don’t remember how to add a component you can look that up in part 1 of this tutorial series.
When you are finished you will have a Box Collider 2D attached on your Player game object:

If you zoom in on the Player game object in the Scene view you will see a green box around him:

This green box is only visible in the editor while we are creating the game. When the game is exported for your desired platform the users who play your game will not be able to see this collider.
I don’t know how Unitys algorithm for assigning the size of the collider works, but it takes the size of the image into consideration and it puts your selected collider around that size.
Note that this also takes gaps into calculation as well, so if you have an image that has 200×200 size and your game character has only 50×50 size, the collider will still be around the 200×200 size.
Of course, the collider can be resized any time you want. Simply click on the “Edit Collider” button and then change the size however you want:


In this example we saw a Box Collider 2D, there are of course, other types of colliders like a Circle Collider, Polygon Collider and so on.
There are also 2D and 3D colliders and there is a difference between them.
For this game, using a Box Collider 2D is enough, when we create other more complex games we will explore other types of colliders that are available to us.
Of course, you don’t have to wait for that to happen, you can just click on the “Add Component” button and filter for colliders and see the different types that are available and experiment with them.
Rigidbody
As I already mentioned, a Rigidbody is a component that applies physics to your game objects.
If you run the game now, you will see that nothing is happening. The Player is standing still in one place. But that will change when we attach a Rigidbody component on him.
Click on the Add Component button and filter for Rigidbody 2D in the search bar. I am emphasizing Rigidbody 2D because there is also a 3D Rigidbody component so you need to attach the right one.
Since this is a 2D game, you need to attach a Rigidbody 2D, otherwise the game will not run correctly.
When we add the Rigidbody 2D to the Player, you will see it in his list of attached components:

If you run the game now, you will see something different:
As soon as you run the game, the Player fell down. Don’t worry, this is the expected behaviour because if you remember, we said that the Rigidbody 2D component applies physics to the game object.
The Player falling down is the effect of the gravity that is now affecting the Player since he has a Rigidbody 2D component attached on him.
The only issue here is that the Player fell out of the screen and we don’t see him in the game anymore.
This is because the ground game objects don’t have a collider attached on them.
We can attach a Box Collider 2D on all three ground child objects, or we can simply attach one collider on the Ground Holder parent game object and resize the collider so that it will cover all three ground child objects:


Now that we have the ground collider in place, we can run the game and see what will happen with the Player when he falls down:
Since the Player has a collider and the ground has a collider as well, the player is now able to fall on the ground and stand on it as opposed to falling through the ground when there was no collider attached to it.
Where To Go From Here
In this lecture we learned a lot of things like setting up the rendering order and using physics components.
Next, we will move on to the third part of this tutorial titled Player Movement Script where we will use the set up we prepared in this lecture, and code the Player’s movement.
Comments are closed.