After going through our introduction to C# and Unity beginner series, in this tutorial series you will create your very first Unity game.
This is a beginner tutorial and no prior Unity or C# experience is required, however, it is required that you go through the C# beginner series that you can access by clicking on the link above.
I always make these first games as simple as they can be while implementing all the basic stuff we learned about Unity and C# programming.
The goal of the game is to avoid the Knifes that are falling from the sky as long as we can. When one of the Knifes hits the Player, the Player will die and the game will be restarted for us to play again.
Here is a preview of the game that we will create:
Download Assets And Complete Project For This Tutorial
In the first part of this tutorial series we will import the project files that you can download by clicking the Download assets button above, and we will animate our main character.
Let’s get started.
Importing Assets
If you want to have the same tab arrangement as I do, you can take a look at the “Rearranging Tabs In The Editor” title in the same lecture.
Slicing Sprites With Sprite Editor
Of course, where your Inspector tab is located depends on how you arranged your tabs in the editor, which is something we talked about in Downloading Unity And Taking A Look At Its Interface lecture.
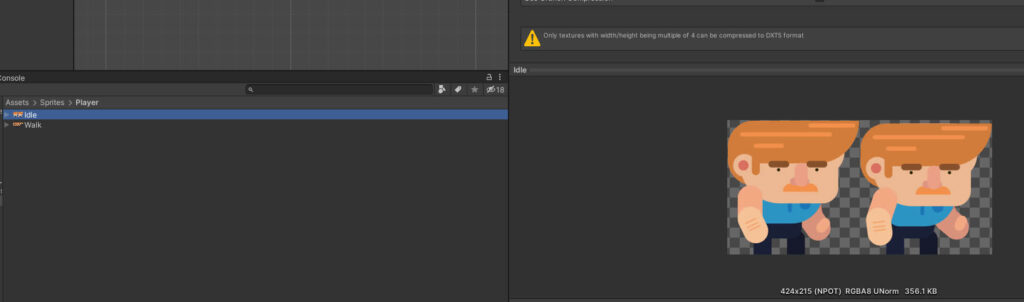
The first thing that you will notice with both sprites is that they are not a single image, but multiple images put into one. This is called a sprite sheet.
A sprite sheet is used to save storage memory as well as graphics memory when the graphics processor renders the images.
Simply put, using a sprite sheet image is more performance efficient for your game than having all those images as separate files.
Of course, there will be situations where you will use separate images instead of a sprite sheet, and we will see those examples as well.
Now, the question is, how can we separate every image from the sprite sheet to be able to use it as individual images?
That is very easy to do by using the Sprite Editor.
First we need to select the desired sprite, and in the Inspector tab for the “Sprite Mode” we need to change it from “Single” to “Multiple”:

When you do that, make sure that you press the “Apply” button at the bottom right of the Inspector tab:

And from now on, any time we make a change to the sprite settings, be that for the Sprite Mode, or some other settings, we need to press the Apply button for those changes to happen.
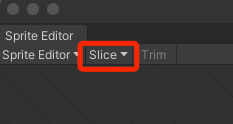
Now that we changed the sprite mode, we can press the “Sprite Editor” button to open the sprite sheet in the Sprite Editor:

In the Sprite Editor window you can click on the “Slice” button at the top left corner:
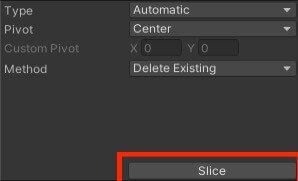
From there, in the new pop up window you can leave the “Type” to Automatic, and press the “Slice” button so that Unity will slice e.g. separate the images inside the sprite sheet:
After Unity slices the individual images in the sprite sheet, you can click on every image, see its width and height in the “Sprite” property window in the bottom right corner.
You can also change the name of every image in the sprite sheet which is something that we will be doing in more complex games:
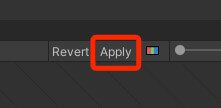
Finally, to save the changes you made you need to click on the “Apply” button at the top right corner of the Sprite Editor:
You will need to do this every time you slice a sprite sheet, or if you make any changes within the sliced sprite sheet like changing one of the images names and so on.
Now repeat the same process for the other sprite sheet image called “Walk”.
And from now on, whenever we need to slice a sprite sheet, this is the process that we must go through.
When you finish, click on the small arrow on the right side of the sprite sheet indicating a drop down list, and when you do you will see this:
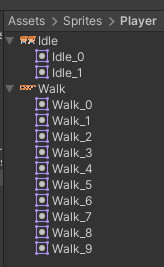
All individual images have been separated inside the sprite sheets, and now we can use every image as a single entity.
The Player Game Object And Sprite Renderer
Drag the first image from the “Idle” sprite sheet inside the Scene tab:

When you do that, automatically a new game object is created in the Hierarchy tab with the same name as the individual sprite that you dragged in the Scene.
If you select that game object from the Hierarchy, you can inspect its properties in the Inspector tab:

You will see that the game object has a Transform, and a Sprite Renderer component.
The transform component is the default component that comes with every game object you create.
It has properties like position, rotation and scale for moving, rotating and resizing the game object.
The Sprite Renderer component is a component that renders or draws sprites on the screen and this is how we present images in our game.
Renaming The Player Character
First things first, let us rename the Player character. In the Hierarchy tab, on the “Idle_0” Right Click -> Rename:

You can also left click 2 times on “Idle_0” but not fast as when you are opening the folder, but have a small delay between the two clicks and you will be able to rename the game object.
Since this is our main character give this game object a name Player.
Changing The Reference Resolution In The Game Tab
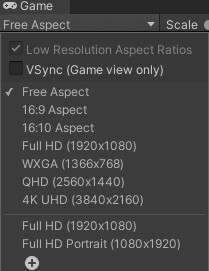
The current available resolutions is depended on the platform for which you are creating the game. When you start a new project the default platform is always desktop.
You can verify that by click on the File -> Build Settings:

From there the “Build Settings” window will appear and you will see that the current platform for which we are developing the game is PC, Mac & Linux Standalone:

When we start creating games for mobile phones we will change the target platform for Android or iOS, but I just wanted to show from where the default resolutions in the Game tab come from.
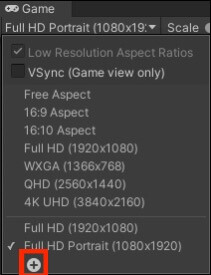
You can also create custom resolutions by clicking on the ” + ” button at the bottom, that’s why you saw the “Full HD” resolutions in my window:
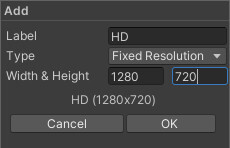
In the new window, under “Label”, give your custom resolution a name, e.g. Full HD, 4K and so on.
Leave the “Type” to “Fixed Resolution” and under width and height enter values for your custom resolution and press “Ok” to create it:
Now you will see your custom resolutions in the list as well. I am going to use full hd portrait resolution(1080×1920) from this point on.
Resizing The Player Character
If you take a look at the Player character in the Game tab you will see that he is enormous.
There are two ways how we can change the size of the Player character.
The first one is going back to the sprite sheet itself. Click on the “Idle” sprite sheet and in the Inspector tab under “Sprite Mode” you will see a property called “Pixels Per Unit”:

What this property represents is how many pixels of the image will be drawn in one Unity unit.
Currently this number is set to 100. If you change the number to a higher value the Player will get smaller, and if you change the number to a lower value the Player will get bigger:
Don’t forget to hit the “Apply” button every time you make a change to the sprite settings.
You can play around with the numbers for “Pixels Per Unit” and see the outcome in the Game tab.
If you don’t see the Player character in the Game tab after setting the resolution to full hd portrait mode, just set the Player game object position in the transform property to 0, 0, 0 for x, y, and z:

I am going to put “Pixels Per Unit” back to 100, and show you another way how we can change the size of the game object.
We already mentioned that the scale property inside transform component of the Player game object can be used to resize the Player.
You can simply play with the x and y scale value, and observe how the Player will change its size in the Game tab:
I am going to leave the scale for x and y at 0.4, and this is how we are going to resize the Player game object.
Attaching Components To Game Objects
In the lecture about math operations with variables we talked how you can attach components to game objects.
I am going to repeat that process here and from now on we will use this as a reference to know how components are attached on game objects.
Because we need to animate the Player character, the first thing we need to do is attach the “Animator” component on the Player object.
So click on the Player in the Hierarchy tab, and in the Inspector tab click on the “Add Component” button:

In the search bar of the pop up window type “Animator”:

Click on the animator and this will attach it to the Player game object:

This is how we will attach every component on game objects from now on and you can use this guide as a reference to attach colliders, rigid bodies, scripts and anything in between whenever there is a need for that.
Creating The Animator Controller
The animator component is just the first step towards animating the Player character.
In order for the animator component to work, we need to create an animator controller who controls the animations we create for the Player.
The animator controller is also used in code to manipulate the animations and play the right animation at the right time.
Going back to the root asset folder in the Project tab:

Right Click -> Create -> Folder:

Give the folder a name “Animations”. Inside the Animations folder, Right Click -> Create -> Animator Controller:

Rename the animator controller to Player Controller.
Click on the Player game object in the Hierarchy tab, and drag the Player Controller inside the “Controller” field property of the animator component:
This will attach the Player Controller to the animator component and now we are ready to animate the Player.
Animating The Player Character
To animate the Player, we need the “Animation” tab. The Animation tab is located under Window -> Animation -> Animation:

If the tab is floating, you can dock it wherever you want inside the editor, but I usually make the Animation tab above the Project tab, because we will need to drag the sprites from the project tab in the Animation tab to create the animations.
To animate a game object, it needs to have the animator component attached along with the animator controller, which we already did.
After that, select the game object you want to animate in the Hierarchy tab, in our case Player, and when you do, in the Animator tab you will see a “Create” button:

When you click the create button a new window will pop up, prompting you to give your animation a name and a location where to save the animation:

Make sure that you save the animation in the animations folder that we created. This is just for organizational purposes which is always a good idea.
When we start working on more complex games we will have a separate folder for every game character that we will animate and we will store the animations for the specific character in their own folder.
In the “Save As” field give the animation a name “Idle” and click the “Save” button at the bottom right corner to save the animation clip.
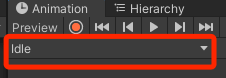
Now when you click on the Player object in the Hierarchy, you will see how the Animation tab now has a timeline where you can drag images which act as frames for the animation:

You will also notice that it displays the name of the current animation in the top left corner of the Animation tab:
Note that this is only displayed for the game object who has the animator component and has animations, like the Player character does.
If you select another game object that doesn’t have the mentioned things you will see an empty animation tab.
You can try this out with selecting the Main Camera game object in the Hierarchy tab and see the outcome.
Now we can drag the two frames for the Idle animation inside the timeline. First select the Player object in the Hierarchy tab, and from the Sprites -> Player folder, click on the drop down list for the Idle sprite sheet and drag the two frames in the timeline:
By doing this we created the Idle animation for the Player game character.
Now to create the Walk animation, we need to create a new animation clip, but since we already have one animation created, we don’t see the “Create” button in the Animation tab.
So how can we create a new animation clip?
For that, we need to click on the button that displays the current animation name located at the top left corner of the Animation tab, and from there click on the “Create New Clip…” button:
Give the animation name “Walk” and save it in the same folder where we saved the Idle animation.
Now that you have two animations, you can switch between them by clicking on the same button and selecting your desired animation.
Repeat the same process we did for the Idle, but this time drag the frames of the Walk animation in the timeline.
Make sure that you have selected the correct animation before dragging the frames in the timeline:
Previewing The Animations And Changing The Speed Of The Animation
Now that we created the animations for the player character, we can preview them by using the play commands buttons in the Animation tab:
As you can see both Idle and Walk animations are previewing.
The Idle animation does look unnatural because there are only two frames for the animation, while the Walk animations looks a lot smoother.
There is a fix for this.
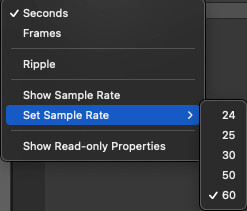
In the Animation tab, you can click on the three dots at the top right corner:

From there, you can go to “Set Sample Rate” and play with the numbers until you are satisfied with how the animation looks like:
Changing The Animation Speed In The Animator Tab

Same as with the Animation tab, in order for the Animator tab to display information, you first need to select the game object that has an Animator component attached to it and has animations.
So when you select the Player game object in the Hierarchy tab, this is what you will see in the Animator tab:

You will notice that the animations inside the Animator tab are displayed as nodes. Every node has the name of the animation it represents.
In the case of our Player character we have the Idle and Walk animation.
You will also see that the Idle animation has an orangy – yellowish color, denoting that this is the starting animation e.g. the animation that will be first played for the Player character when the game starts.
This is also denoted by the yellow arrow pointing from the “Entry” node towards the Idle node:

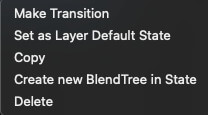
You can always change the starting animation by Right Click -> Set As Layer Default State on any animation node you wish to be the starting animation:
To change the speed of the animation, you can click on the animation node you wish the change the speed for, and in the Inspector tab you will see a speed property:

Number 1 indicates that the animation will play at its normal speed. If you set that number to 2, then the animation will play three times faster that the normal speed.
If you set it to 3, then the animation will play three times faster and so on. If you set it to 0.5 then the animation will play at half of the normal speed.
I am going to set the default animation to be Walk, and preview the normal speed of the animation, and the change the speed to see the outcome:
I am going to put the Idle animation back to be the starting animation, and set the speed for the Idle animation at 0.14, and the speed for the Walk animation at 0.6.
You can of course, experiment on your own and set these values as you wish, as long as you think the animation looks great at that speed, it will not affect the outcome of this tutorial.
Animation Transitions
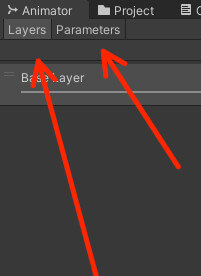
Click on the Parameters tab, and at the top right corner of the Parameters tab click on the ” + ” button:

You will see a drop down list giving you a choice between float, int, bool, and a trigger as the parameter. We are going to select bool as the parameter:
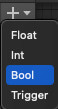
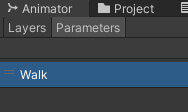
Double click on the bool parameter now located below the Parameters tab, and give it a name Walk:
To create transitions between animations, we need to Right Click -> Make Transition on the animation that will transition from, and click on the animation where we want to transition to:
Creating Transition Parameters
What we did in the previous step will only create transitions for the animations, it will not specify how the transitions will happen. For that we will use the bool Walk parameter that we created.
To create conditions for the transitions, you click on the desired transition, for example the transition from Idle to Walk animation, and in the Inspector tab under “Conditions” click on the “+” button:
In the example above, we create a condition for the transition from Idle to Walk animation, and the condition is the Walk parameter.
To be more specific when the value of the Walk parameter is set to true, then we will transition from Idle to Walk animation.
Of course, if we have multiple parameters, we can choose which parameter is going to be used for transition condition, and we will see examples of this for more complex games.
Repeat the same process for the transition from Walk to Idle, but this time set the value of the Walk parameter to false from the drop down list:

Even though we still didn’t code the movement for the Player, we can test if these transitions work by checking and unchecking the check box for the Walk parameter inside the Animator tab:
Of course, when we start coding, we will change the parameter value from our code to animate the Player walking or idle state.
Where To Go From Here
This was the first part of this tutorial where you learned how to animate sprites using Unitys so called Mechanim animation system.
Next, we will move on to the second part of this tutorial titled Sprites, Colliders, And Rigidbodies where we will learn how to set up the rendering order of our game objects and how to apply physics to game objects.
Comments are closed.