In part 2 of this tutorial series we talked about sprites, rendering order, colliders and rigid bodies.
We also prepared our Player by setting up all the necessary components to make the Player a solider physics game object.
In this part of the tutorial, we are going to create the Player movement script and make the Player move in the level.
Player Movement Script
Inside your project root folder(Assets) Right Click -> Create -> Folder, give it a name Scripts and inside of that folder create a new folder and name it Player Scripts.
Inside the Player Scripts folder, Right Click -> Create -> C# Script and give it a name PlayerMovement.
Attach the script on the Player game object in the Hierarchy tab. You can do this in two ways.
One is clicking on the Add Component button and searching for the script name in the search bar, another way is to drag the script from its folder on the Player game object in the Hierarchy:

Choose whatever way works for you, but from now on, when I say attach a script to a specific game object, you are going to do it in one of the two mentioned ways.
Now double click the PlayerMovement script, this will open it in Visual Studio.
Private, Public And SerializeField
In the lecture titled C# Programming With Unity: Extending The Functionality Of A Class we introduced a concept called data encapsulation.
public float moveSpeed = 5f;
You can declare this variable below the class declaration, or above the Start() function because this is going to be a global class variable.
Since we declared this variable to be public, this variable will be visible in the Inspector tab.
You can verify this by selecting the Player game object in the Hierarchy and taking a look at his script component in the Inspector tab:

Let us first explain what is the purpose of having the variable exposed in the Inspector tab.
Having the variable visible in the Inspector tab allows us to change the value of that variable without the need to go back in the script.
For example, if we set the value of moveSpeed inside the script to be equal to 5, and then in the Inspector tab we change that value to 10, the value that Unity will use for that variable when the game starts is going to be 10.
So basically when you change the value of the variable in the Inspector tab, the value you declared in the script will be ignored and the new value in the Inspector tab will be used.
Memorize this concept because we will use this a lot in our development.
Now if you change the declaration of the moveSpeed variable from public to private like this:
private float moveSpeed = 5f;
The variable will not be visible in the Inspector tab anymore which you can verify by selecting the Player game object again:

Going back to the lecture about data encapsulation and that it is better to set your variables to private, if you want to make your variable private but still be able to access it in the Inspector tab and change its value, you can add the SerializeField keyword in the variable declaration:
					[SerializeField]
    private float moveSpeed = 5f;
Moving The Player
We are going to use the Transform component and its Position property to move the player.
Inside the Update() function, add the following lines of code:
					private void Update()
    {
        float moveX = Input.GetAxisRaw("Horizontal");

        Vector2 tempPos = transform.position;

        tempPos.x += moveX * moveSpeed * Time.deltaTime;

        transform.position = tempPos;
    }
Let’s break down what is happening in the code:
The line of code: Input.GetAxisRaw(“Horizontal”) will get the input when the user presses one of the following keys: Left Arrow, Right Arrow, A, or D and the function will return a float value.
The value will be -1 if the user presses the Left Arrow or the A key on the keyboard.
The value will be 1 if the user presses the Right Arrow or the D key on the keyboard.
And the value will be 0 if the user is not pressing any keys on the keyboard.
That is the reason why we are using a variable float moveX to store the value that will be returned by the GetAxisRaw static function.
You can test all of this out by using the following line of code:
Debug.Log("The value of horizontal input is: " + Input.GetAxisRaw("Horizontal"));
You can add the above line of code in the Update function and test the output while you are pressing the specified keys I mentioned above.
The line of code: Vector2 tempPos = transform.position; is used to edit the position property of the transform.
Vector2 represents a vector in space with x and y coordinates.
We saw that the transform.position property has x, y and z coordinates, but this is a 2D game and we don’t need to access the z axis that’s why we created a Vector2 variable.
But even if we used Vector3 instead of Vector2, it will not affect our game at all because we will only edit x and y coordinates for that variable.
Now the reason why we first need to create a Vector2 tempPos variable is because in C#, we can’t edit the position property by typing something like:
transform.position.x += moveX * moveSpeed * Time.deltaTime;
If you try to do this, you will get an error like this:

So to modify the position property we first need to store the current value of the position in a temporary variable, hence the Vector2 tempPos = transform.position; and now we can edit the values of the temporary variable.
Since we are moving horizontally e.g. along the X axis, we are editing the X value of the tempPos.
The line of code: tempPos.x += moveX * moveSpeed * Time.deltaTime; is adding to the current value of the X axis of the position the following calculation:
- moveX will have the value of -1, 0, or 1 depending the input we get from the user
- moveSpeed is set to be 5 by default, but we can always change that value to make the Player move faster or slower
- Time.deltaTime is the interval in seconds from the last frame to the current one e.g. the time between two frames, which is a very small number
tempPos.x = tempPos.x + moveX * moveSpeed * Time.deltaTime;
We can write:
tempPos.x += moveX * moveSpeed * Time.deltaTime;
And these two lines of code have the exact same outcome. To make this even more clear, I will use another example:
					int a = 1;

// Calculation 1
a += 1;

// Calculation 2
a = a + 1;
The two calculations above have the exact same outcome, just the Calculation 1 is a shortcut so that we don’t have to write a longer line of code.
Finally, the line of code transform.position = tempPos; will assign back the new position value to the transform.position property e.g. it will assign back the edited position back to the original property.
Again, this is because we can’t edit transform.position directly, instead we need to store it in a temporary value.
Now we can test the game out and see the outcome:
Try pressing A, D, Left Arrow and Right Arrow keys and you will see how the Player is moving like in the example above.
You can always change the moveSpeed value from the Inspector tab and make the Player move slower and faster, and I encourage you to do that right now just to get a grasp of how Unity game development works.
One thing to note is, you can also change the moveSpeed in the Inspector tab during gameplay testing, and any other variable that is exposed in the Inspector.
However, when you stop the game, the value will return back to the original value you had before you pressed the Play button:
This is something to keep in mind in case you want to change the value of the variable in the Inspector tab and you messed with it during gameplay, just remember the value you are satisfied with, and when you stop testing your game, set the value for that variable.
Rigidbody VS Transform
Player's Facing Direction - Facing The Movement Direction
While the Player is moving he is not facing the movement direction.
The Player is by default turned to face the right side because that’s how the sprite was drawn, but when we move to the left side in the game, the Player should face the left side.
There are two ways how to fix this.
The first way is using the scale of the Player. If you remember, the Transform component has three properties: position, rotation and scale.
We can use the scale to change the facing direction of the game object. Just change the value to the negative number of the axis for which you want to change the direction:
As you can see, when we set the scale X to a negative value the Player changes the direction he is facing. This also works on any axis, but for our purpose we only need the X axis.
The second way how we can fix this issue is by using the Sprite Renderers Flip property:
Depending on the situation you might use one way over the other. In our current game, we can use any of the two and they will serve the purpose to change the facing direction.
I am going to use the Sprite Renderer component, and later in other games we will use the Scale property as well.
In the PlayerMovement script add the following lines of code:
					private SpriteRenderer sr;

    private void Awake()
    {
        sr = GetComponent<SpriteRenderer>();
    }

    private void Start()
    {

    }
When you plan to use a component of a game object often it is a good idea to declare it as a global variable inside the class hence the private SpriteRenderer sr declaration.
The Awake function is one of the initialization functions, and inside of it we get a reference to the SpriteRenderer by using GetComponent function.
If you don’t know what is GetComponent, then you should check out the lecture Object References And GetComponent.
Now that we have the reference to the SpriteRenderer component, we can modify the movement code to make the Player face the direction he is moving:
					private void Update()
    {
        float moveX = Input.GetAxisRaw("Horizontal");

        Vector2 tempPos = transform.position;

        tempPos.x += moveX * moveSpeed * Time.deltaTime;

        transform.position = tempPos;

        // change the facing direction
        if (moveX > 0)
            sr.flipX = false;
        else if (moveX < 0)
            sr.flipX = true;
    }
When we test the game now, the Player will face the direction he is moving to:
Unitys Coordinate System

So every time we have a negative value for the calculation of the position, the Player will move to the left side if the movement is horizontal and down if the movement is vertical.
And if we have a positive value for the calculation of the position, the Player will move to the right side for the horizontal movement and up for the vertical movement.
You will also notice that the if statement doesn’t have curly brackets {}. The reason for that is if you have only one line of code after the if statement, you can omit the curly brackets:
					// BOTH CODE VERSIONS HAVE THE SAME OUTCOME

// with curly brackets
if (moveX > 0)
{
    sr.flipX = false;
}
else if (moveX < 0)
{
    sr.flipX = true;
}

// without curly brackets
// possible only if you have ONE
// line of code after the if or else statement
if (moveX > 0)
    sr.flipX = false;
else if (moveX < 0)
    sr.flipX = true;
Initialization Functions In Unity
A new function that we introduced in this tutorial is the Awake function. We used it to get a reference to the Sprite Renderer component.
So far we saw the Start function and we were using it to initialize everything for our game. But there are two other initialization functions that we can use: one is Awake and the other is OnEnable.
Now if all three functions are used for initialization, what is the difference between them?
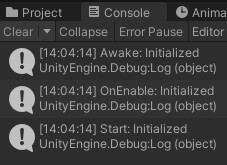
First the execution order. One function is called before the other and we can easily test that by using Debug.Log:
					private void Awake()
    {
        Debug.Log("Awake: Initialized");
    }

    private void OnEnable()
    {
        Debug.Log("OnEnable: Initialized");
    }

    private void Start()
    {
        Debug.Log("Start: Initialized");
    }
If you run the game you will see this in the Console:
Player's Bounds
While everything is ok with the player’s movement, we didn’t set up any bounds where the Player can move.
With this I mean that the Player can get out of screen if you walk to far away on the left or the right side.
Because of that, we need a way to strict his movement only within the bounds of the level:

There are multiple ways how we can fix this issue, but one of the most simplest ways is to take the Player game object, move him up to the bound where you want to strict him and take a look at the current X position(because we are setting horizontal bounds), that will be the bound up to where the Player can go:
As you can see from the example above, you simply move the Player up to the edge of the bound, and then take that X position as the bound value and for the bound on the left side, just use the negative value.
Now we need to create two variables that will represent those bounds in the code. So right below the SpriteRenderer sr declaration add the following:
					[SerializeField]
    private float min_X = -2.28f;

    [SerializeField]
    private float max_X = -2.28f;
					[SerializeField]
    private float min_X = -2.28f, max_X = 2.28f;
					private void Update()
    {
        float moveX = Input.GetAxisRaw("Horizontal");

        Vector2 tempPos = transform.position;

        tempPos.x += moveX * moveSpeed * Time.deltaTime;

        // code for restricting player's movement
        if (tempPos.x > max_X)
            tempPos.x = max_X;
        else if (tempPos.x < min_X)
            tempPos.x = min_X;

        transform.position = tempPos;

        // change the facing direction
        if (moveX > 0)
            sr.flipX = false;
        else if (moveX < 0)
            sr.flipX = true;
    }
Writing Better Code
The last thing that we will do in this lecture is format and optimize our code.
First there is one thing that I need to explain in regards to the Update function.
The Update function is called every frame, which means if we have sixty frames in one second, the Update function is called 60 times in one second.
That is a lot of code that needs to be processed in a small amount of time. That’s why it’s important that you optimize the code you put in the Update otherwise your game can slow down.
In regards to what we did so far, here is what we can change. The two variables that we are creating:
					private void Update()
    {
        float moveX = Input.GetAxisRaw("Horizontal");

        Vector2 tempPos = transform.position;
    }
					// These variables are declared above
// the Awake function
private float moveX;

private Vector2 tempPos;
Don’t forget to change the code in the Update as well:
					private void Update()
    {
        moveX = Input.GetAxisRaw("Horizontal");

        tempPos = transform.position;
    }
Now the code above is not creating new floats and Vector2 variables every frame, instead it is using the ones we already declared and this is much more efficient for our game.
Of course, even if we leave the first version of the code it will not affect our game performance, but this is a small game with not that many lines of code, if you are creating a bigger game and you are not paying attention to these things, then your game can slow down.
I also want to group the lines of code in a function, because that will make it more readable and it will be easier to maintain.
This is what we talked about in the lecture about functions, we group our code into functions and then use the function name to call the code.
					using System.Collections;
using System.Collections.Generic;
using UnityEngine;

public class PlayerMovement : MonoBehaviour
{
    [SerializeField]
    private float moveSpeed = 5f;

    private float moveX;

    private Vector2 tempPos;

    private SpriteRenderer sr;

    [SerializeField]
    private float min_X = -2.28f, max_X = 2.28f;

    private void Awake()
    {
        sr = GetComponent<SpriteRenderer>();
    }

    private void Update()
    {
        HandleMovement();
        HandleFacingDirection();
    }

    // function responsible for moving the player
    void HandleMovement()
    {
        moveX = Input.GetAxisRaw("Horizontal");

        tempPos = transform.position;

        tempPos.x += moveX * moveSpeed * Time.deltaTime;

        // call the handle bounds function before
        // you re-assign the position back to
        // transform.position
        HandleBoundsRestriction();

        transform.position = tempPos;
    }

    // function for handling the bounds restriction
    void HandleBoundsRestriction()
    {
        if (tempPos.x > max_X)
            tempPos.x = max_X;
        else if (tempPos.x < min_X)
            tempPos.x = min_X;
    }

    // function for handling the facing direction
    void HandleFacingDirection()
    {
        if (moveX > 0)
            sr.flipX = false;
        else if (moveX < 0)
            sr.flipX = true;
    }

} // class
Where To Go From Here
In this lecture we covered the code side of making the Player move along with making him face the direction of his movement and setting up the bounds where the Player can move.
Next, we will move on to the fourth part of this tutorial titled Knifes, Prefabs, And Spawning Obstacles In The Game where we will learn how to save game objects and how to spawn them in the game from our code.

Comments are closed.