In this tutorial we are going to create a 2.5D infinite runner game using Unreal Engine and C++. The game is simple, yet it contains a lot of cool features that will help you learn how to create games using Unreal Engine and C++.
Here is a short preview of the game that we will create:
Download Assets And Complete Project For This Tutorial
To follow along with this tutorial, please download the assets by clicking on the green Download assets button above.
In the downloaded folder you will find the assets for the tutorial and the complete project that you can use as a reference to inspect the code.
Important Information Before We Start
I’ve labeled this tutorial as beginner, however, this is not a tutorial for complete beginner.
I expect you to know your way around Unreal Engine and its interface. I also expect that you know the basics and a little above basics of working with blueprints. Basic knowledge of C++ is also required. Things like variables, functions, classes, objects, and so on.
To put it simple, this tutorial is suited for beginners who started learning Unreal Engine and a little bit of C++, and they created a few basic games in Unreal Engine using blueprints, and now they look to learn how to create games using C++ and Unreal Engine.
If this is not you, then please go through my C++ tutorial series starting with variables, and my Unreal Engine Parasite Platformer tutorial.
Now that we have that out of the way, we can start with our game.
Creating The Project
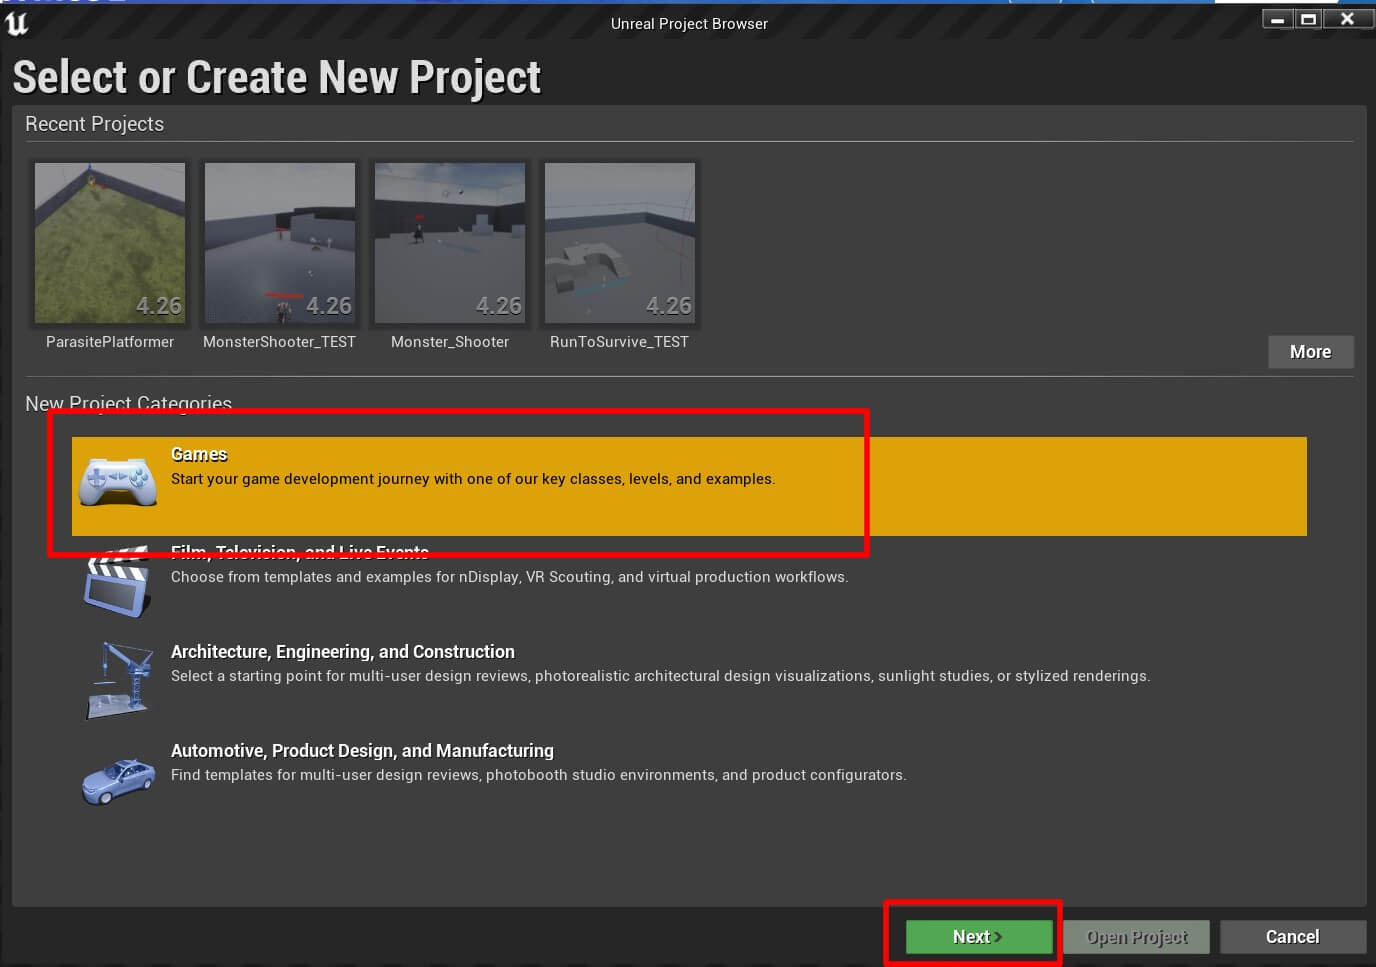
As always, from the Unreal Project Browser select Games and click the Next button:
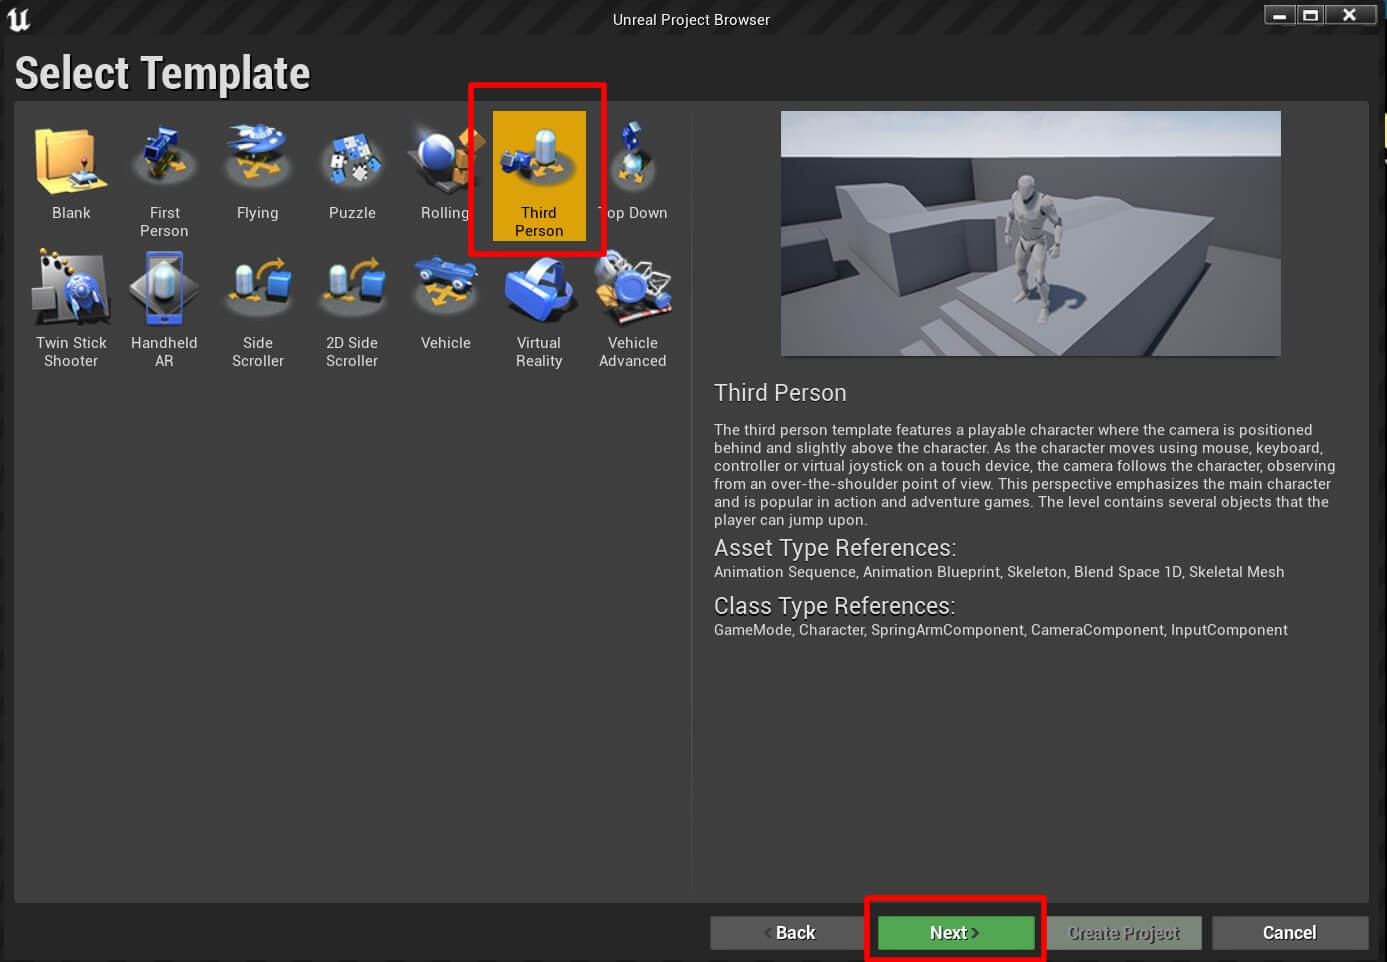
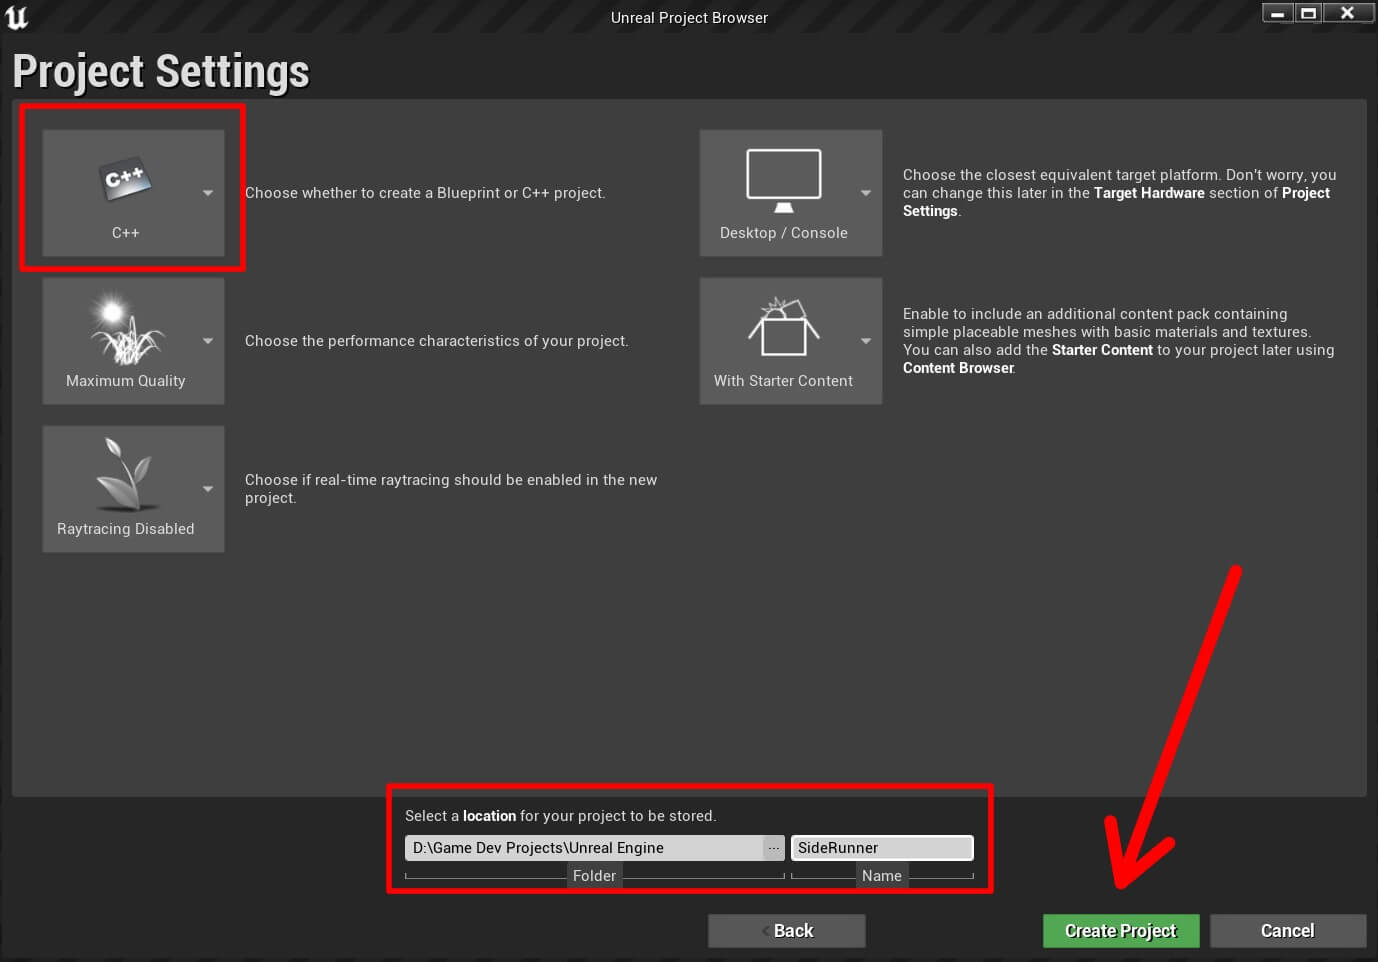
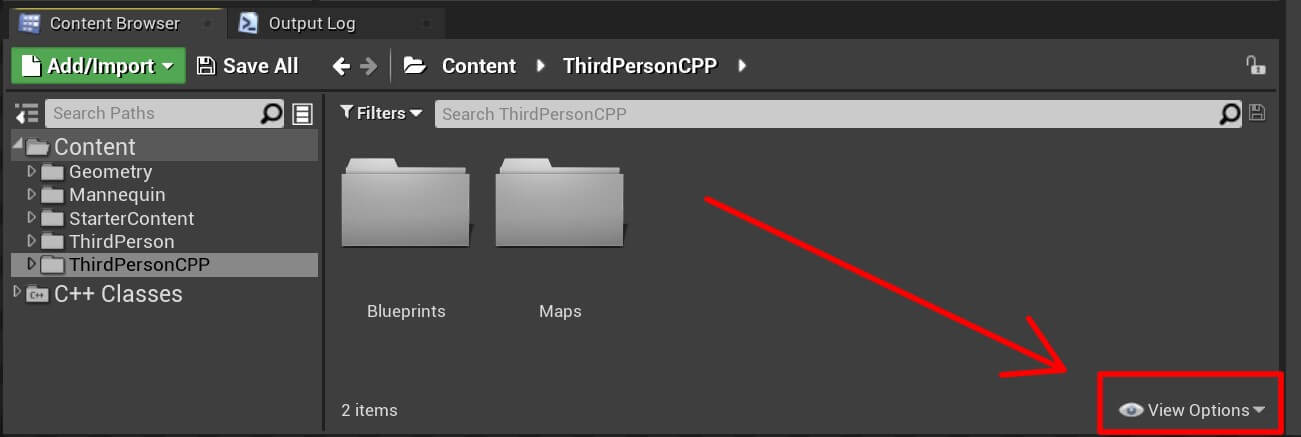
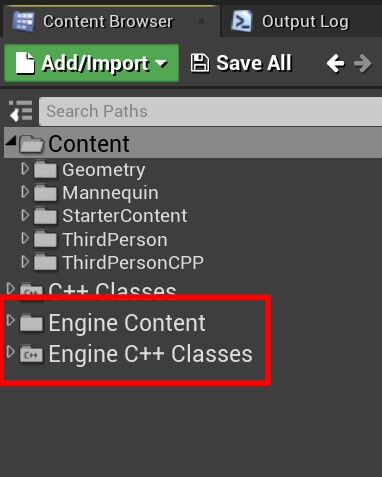
Enabling Engine Content

Resizing The Unreal Engine Editor Font
Before we proceed, I want to show you a nice trick that can help you with your development process.
If you are working on large monitors, it can happen that the font size in the editor is small and you need to give effort to read the labels in the editor.
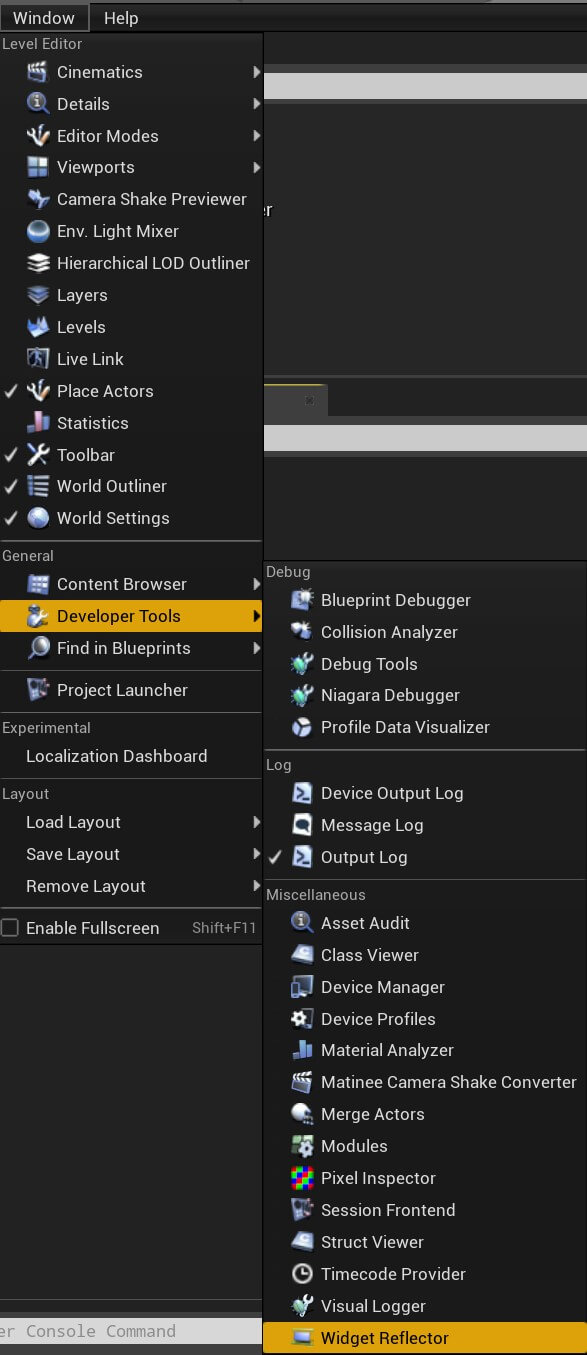
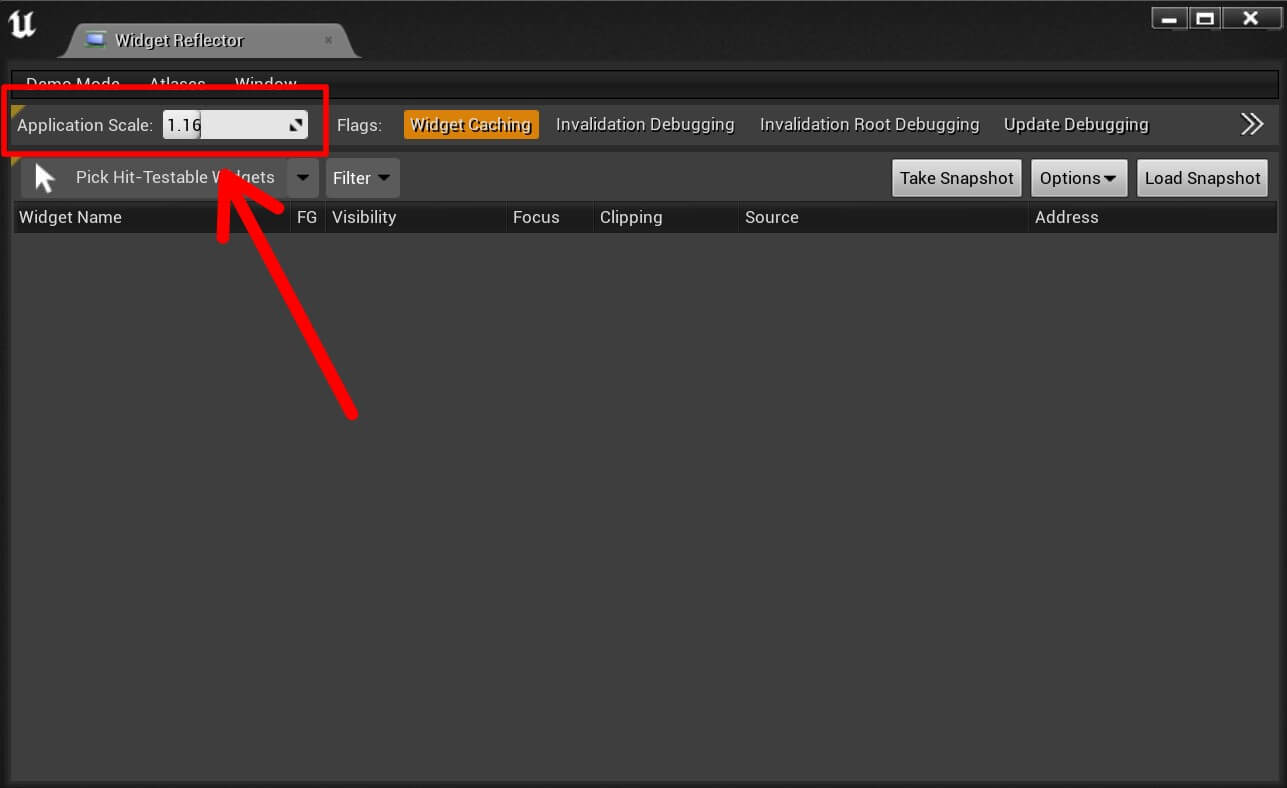
You can resize the font by going to Window -> Developer Tools -> Widget Reflector:
Creating The Gameplay Level And Setting Up The Input
Now that we resized the font in the editor, in the Content folder, Right Click -> Folder to create a new folder and name it Maps.
Btw, you can name the folder Maps, Levels, Scene, however you want, because they all refer to the same thing.
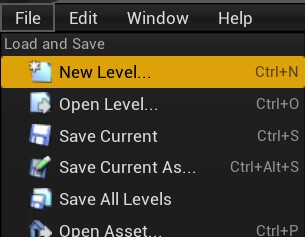
Next, click on File -> New Level:
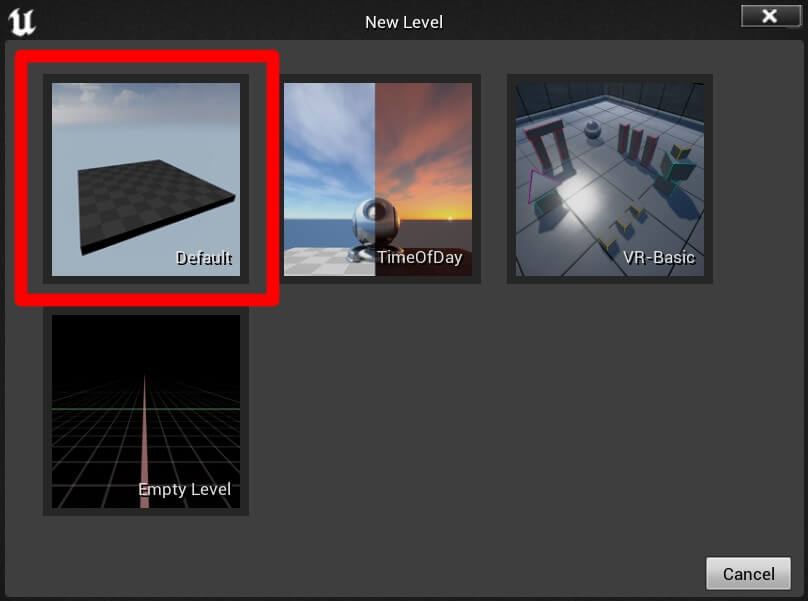
From the New Level window, select the Default level:
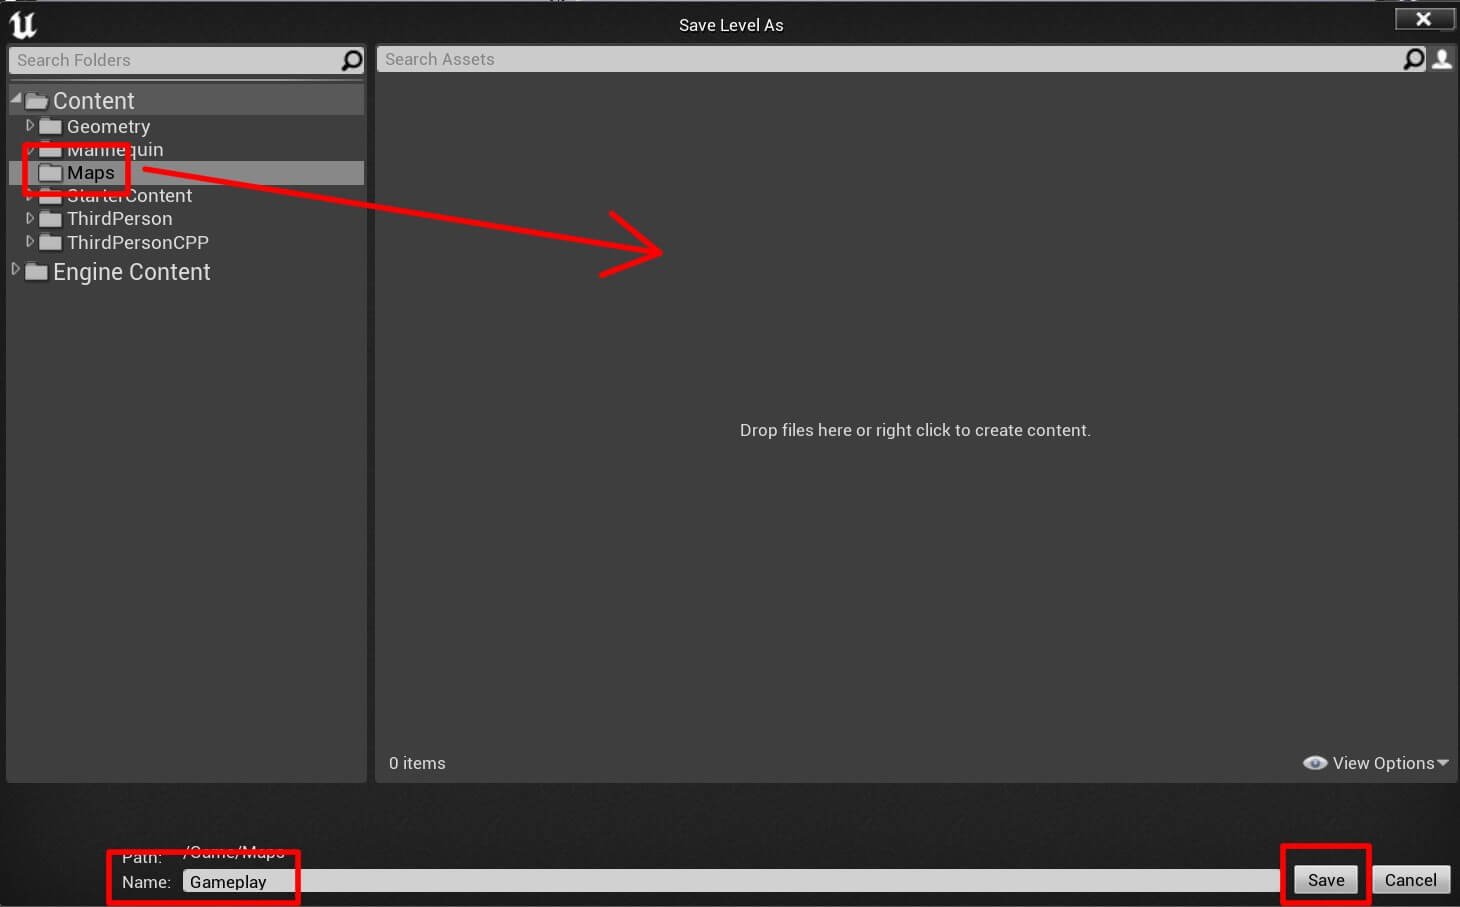
Save the level by going to File -> Save Current, or hold CTRL + S, on MacOS CMD + S, name the level Gameplay and save the it in the Maps folder:
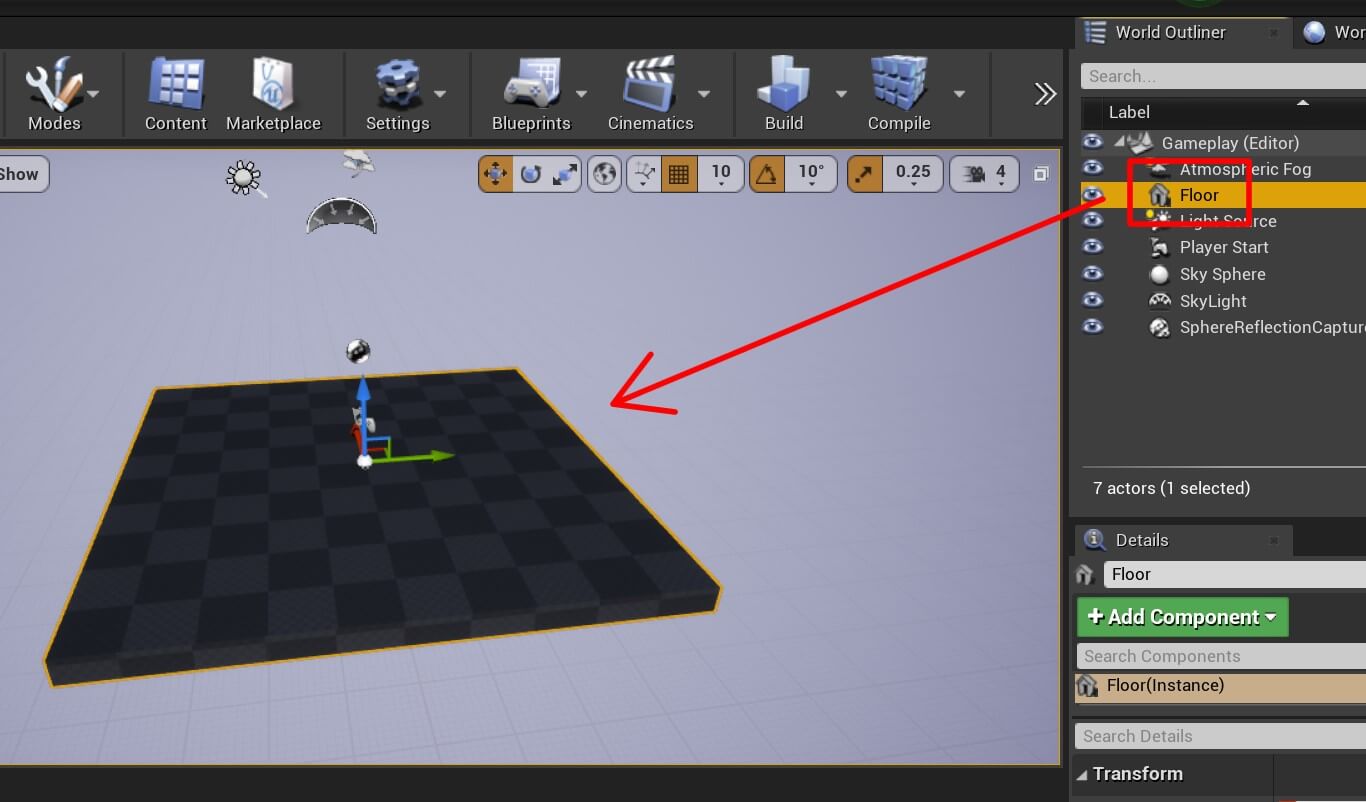
In the World Outliner tab, select the Floor actor and delete it by pressing the Delete button on your keyboard:
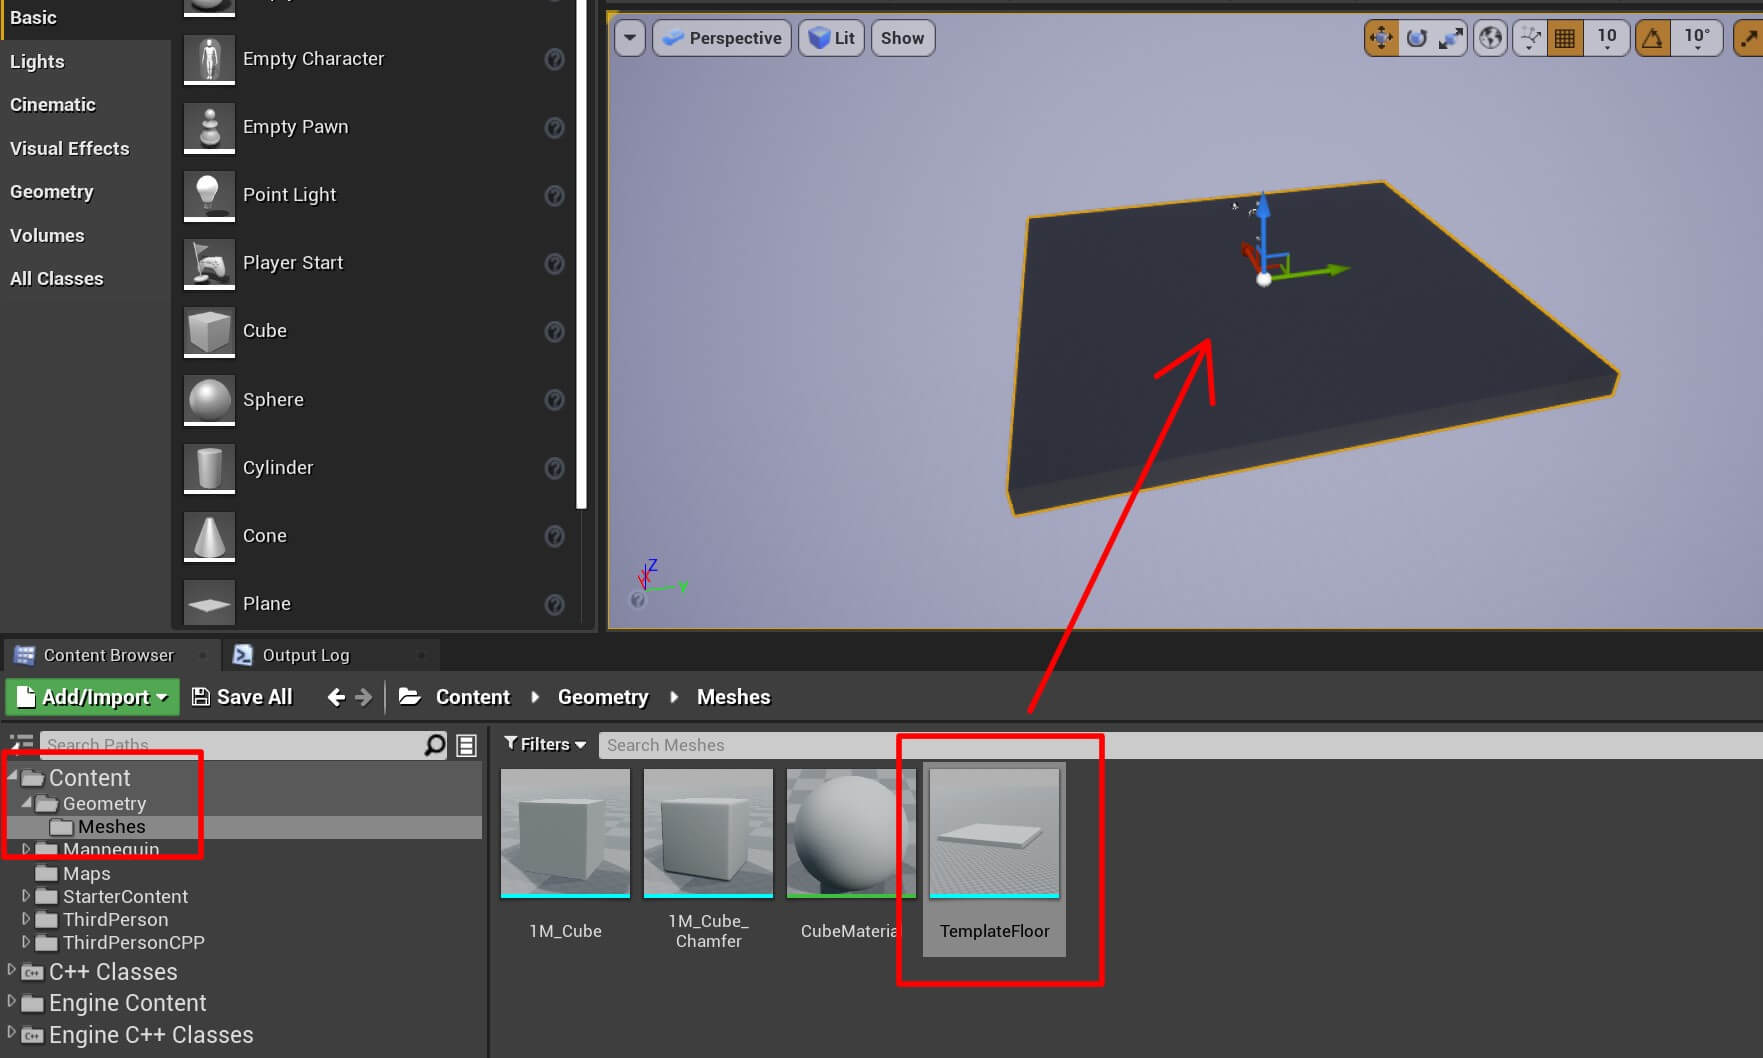
From the Content -> Geometry -> Meshes, drag the TemplateFloor mesh in the level:
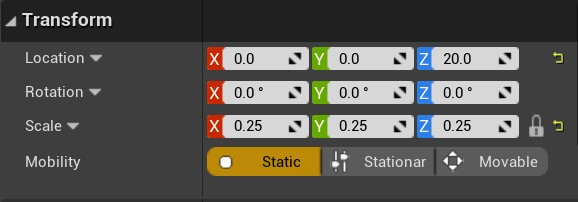
In the World Outliner rename the TemplateFloor to Floor, and change the values for the Location and Scale in the Transform component:
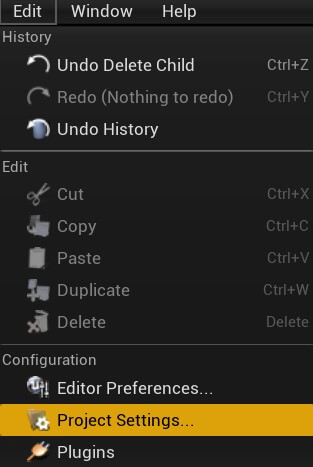
Next, go to Edit -> Project Settings:
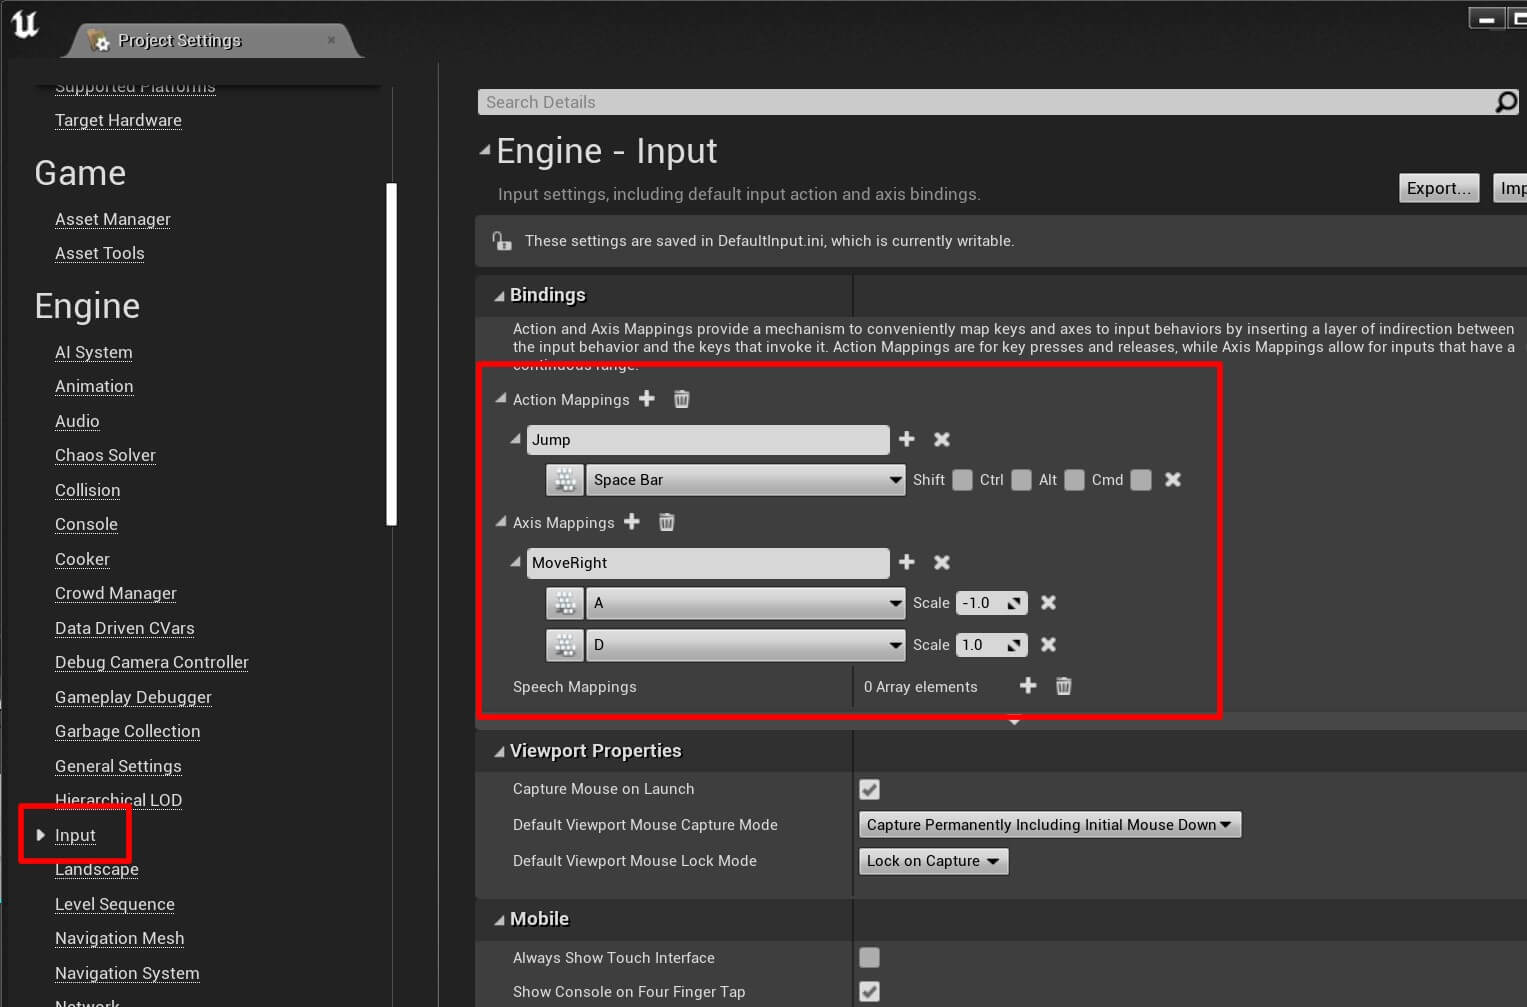
If you need help with setting up the input, you can follow this guide by clicking here.
Since this is a side scroller game, we move the player character forward and backwards by using the A and D key, you can also add the Left Arrow and the Right Arrow keys if you wish, and we use Space to make him jump, and this all we need.
Runner Character C++ Class
Now that we set up everything we need, in the Content -> C++ Classes -> SideRunner, Right Click -> New C++ Class:
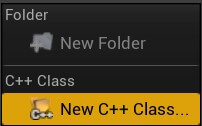
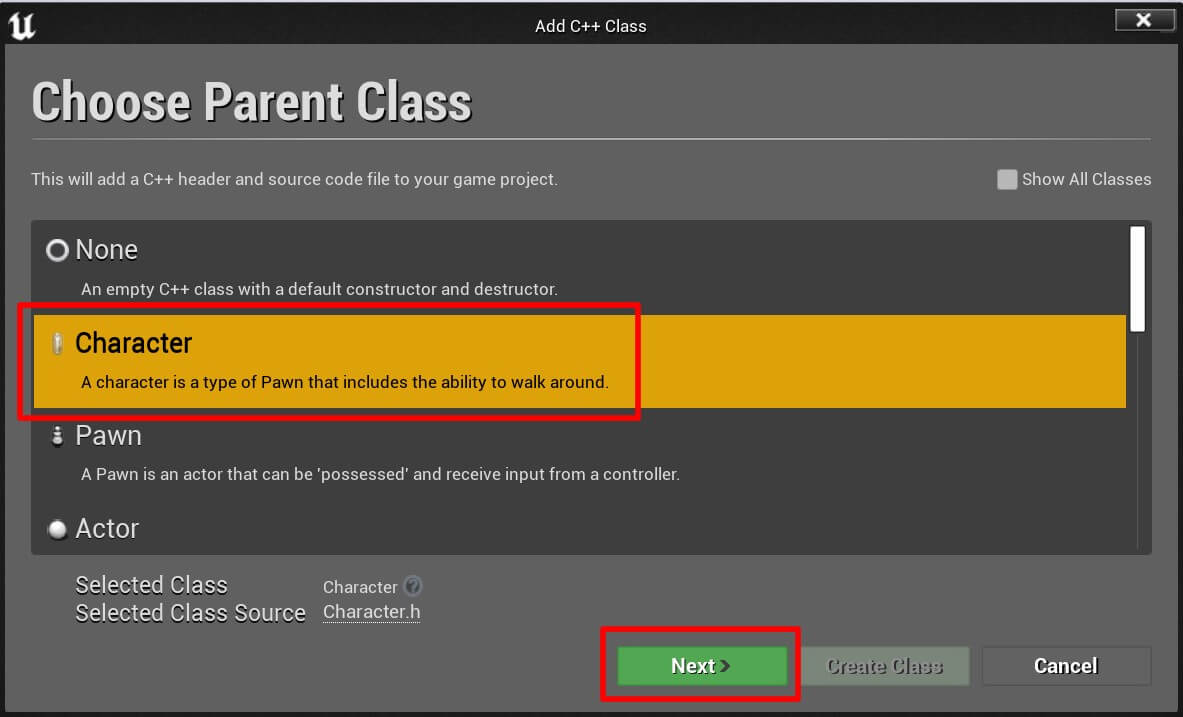
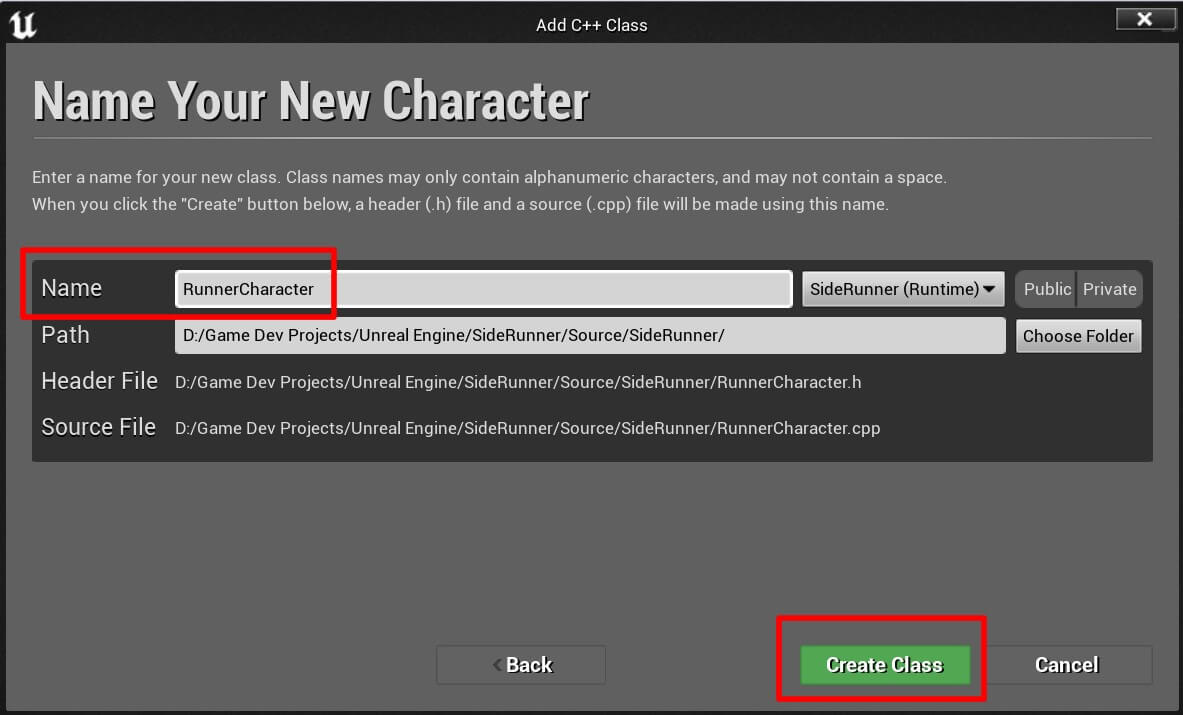
When the class is created, it will automatically open in Visual Studio. You will notice that we have two files for the class, RunnerCharacter.h and RunnerCharacter.cpp:
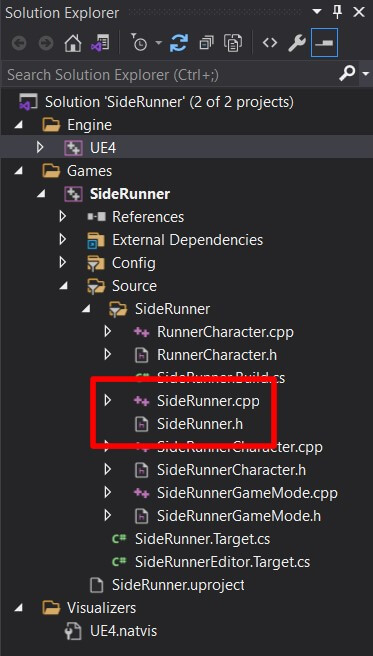
We already talked about this in the lecture about classes and objects, and we explained that the .h and the .cpp file represent one class.
In the .h file we model the behavior of a class e.g. we declare the variable and functions that the class will have.
And in the .cpp file we implement those functionalities e.g. code the functions to do specific operations, use the declared variables for their purpose and so on.
Forward Declaration And Avoiding #include
Open the RunnerCharacter.h file, and at the bottom of the class declare the following variable:
					UPROPERTY(VisibleAnywhere)
		class UCameraComponent* SideViewCamera;
Let’s break down the lines we wrote one by one.
The UPROPERTY is a C++ macro that basically helps with things like exposing those variables you define to blueprints, and then we can access those variables in the Details tab.
The VisibleAnywhere parameter that we passed in the UPROPERTY Indicates that this property(variable) is visible in all property windows, but cannot be edited.
The UCameraComponent is a class that represents the camera object that we can place in the level, the * after the UCameraComponent denotes that this variable is a pointer, and the name of that variable is SideViewCamera.
The class keyword in front of the UCameraComponent is used to forward declare the UCameraComponent variable. The reason for that is, because we are declaring a variable of type UCameraComponent in the RunnerCharacter class.
The RunnerCharacter class doesn’t know of the existence of UCameraComponent class. The way that we inform the RunnerCharacter class of the existance of UCameraComponent class is in two ways.
The first way is to use the #include keyword and include the UCameraComponent at the top of the class file where you see the other includes:
					#include "CoreMinimal.h"
#include "GameFramework/Character.h"
#include "RunnerCharacter.generated.h"

// INCLUDING THE CAMERA COMPONENT SO THAT
// THE RunnerCharacter CLASS IS AWARE
// OF ITS EXISTANCE
#include "Camera/CameraComponent.h"
					UPROPERTY(VisibleAnywhere)
		class UCameraComponent* SideViewCamera;
					UPROPERTY(VisibleAnywhere)
		class UCameraComponent* SideViewCamera;
Declaring And Implementing Functions And Compiling Our Code
Moving forward, we can declare the rest of the variables that we will use in our RunnerCharacter class. Below the declaration of the SideViewCamera variable, add the following lines of code:
					protected:

	void MoveRight(float Value);

public:

	void RestartLevel();

	UFUNCTION()
		void OnOverlapBegin(UPrimitiveComponent* OverlappedComp,
			AActor* OtherActor, UPrimitiveComponent* OtherComp,
			int32 OtherBodyIndex, bool bFromSweep, const FHitResult& SweepResult);

private:

	float zPosition;
	FVector TempPos = FVector();

	bool CanMove;
The MoveRight function will be used to move the player actor left and right, or forward and backwards since this is a side scroller game.
The RestartLevel function is self explanatory.
The OnOverlapBegin is the function that will inform us when we collide with other actors. This is how we are going to test if the player actor collides with the spike or the wall that is chasing him to end the game.
The zPosition variable will be used to determine the offset between the camera and the player actor.
The TempPos variable is used to store a temporary reference to the player actor’s position.
And the CanMove variable is going to control if we can move the player actor in the game or not.
Don’t forget to create definitions inside the RunnerCharacter.cpp file for the functions that we declared in the RunnerCharacter.h file:
					void ARunnerCharacter::MoveRight(float Value)
{
}

void ARunnerCharacter::RestartLevel()
{
}

void ARunnerCharacter::OnOverlapBegin(UPrimitiveComponent* OverlappedComp, AActor* OtherActor,
	UPrimitiveComponent* OtherComp, int32 OtherBodyIndex, bool bFromSweep, const FHitResult& SweepResult)
{
}
You can either copy the code above and paste it in your RunnerCharacter.cpp file, or you can follow this guide by clicking here that will show a shortcut for creating function definitions in the .cpp file.
Now we can compile our code. To do that, you can hold CTRL + SHIFT + B, or you can go to Build -> Build Solution:
Every time we write new code or we make any changes to the existing code, we need to compile it the same way you saw in the preview above so that those changes will reflect in the Unreal Engine editor.
This is really important, because if we don’t compile the code, we will not be able to use it in Unreal Engine editor.
For example, if we create the player actor’s jump functionality but we don’t compile the code in Visual Studio, the player actor will not be able to jump when we test the game in the editor.
We can also compile the code in Unreal Engine editor by pressing the Compile button located in the Toolbar:
Before we move to the next section in this tutorial, I will leave the full code that we wrote so far for the .h and .cpp file of the RunnerCharacter class.
You can use this as a reference to compare your code with mine, just to make sure that everything is in order and you didn’t make any mistake.
RunnerCharacter.h:
					#pragma once

#include "CoreMinimal.h"
#include "GameFramework/Character.h"
#include "RunnerCharacter.generated.h"

UCLASS()
class SIDERUNNER_API ARunnerCharacter : public ACharacter
{
	GENERATED_BODY()

public:
	// Sets default values for this character's properties
	ARunnerCharacter();

protected:
	// Called when the game starts or when spawned
	virtual void BeginPlay() override;

public:
	// Called every frame
	virtual void Tick(float DeltaTime) override;

	// Called to bind functionality to input
	virtual void SetupPlayerInputComponent(class UInputComponent* PlayerInputComponent) override;

	UPROPERTY(VisibleAnywhere)
		class UCameraComponent* SideViewCamera;

protected:

	void MoveRight(float Value);

public:

	void RestartLevel();

	UFUNCTION()
		void OnOverlapBegin(UPrimitiveComponent* OverlappedComp,
			AActor* OtherActor, UPrimitiveComponent* OtherComp,
			int32 OtherBodyIndex, bool bFromSweep, const FHitResult& SweepResult);

private:

	float zPosition;
	FVector TempPos = FVector();

	bool CanMove;

};
					#include "RunnerCharacter.h"

// Sets default values
ARunnerCharacter::ARunnerCharacter()
{
 	// Set this character to call Tick() every frame.  You can turn this off to improve performance if you don't need it.
	PrimaryActorTick.bCanEverTick = true;

}

// Called when the game starts or when spawned
void ARunnerCharacter::BeginPlay()
{
	Super::BeginPlay();

}

// Called every frame
void ARunnerCharacter::Tick(float DeltaTime)
{
	Super::Tick(DeltaTime);

}

// Called to bind functionality to input
void ARunnerCharacter::SetupPlayerInputComponent(UInputComponent* PlayerInputComponent)
{
	Super::SetupPlayerInputComponent(PlayerInputComponent);

}

void ARunnerCharacter::MoveRight(float Value)
{
}

void ARunnerCharacter::RestartLevel()
{
}

void ARunnerCharacter::OnOverlapBegin(UPrimitiveComponent* OverlappedComp, AActor* OtherActor,
	UPrimitiveComponent* OtherComp, int32 OtherBodyIndex, bool bFromSweep, const FHitResult& SweepResult)
{
}
Adding #include In The .CPP File Of The Class
					#include "Camera/CameraComponent.h"
#include "Components/CapsuleComponent.h"
#include "GameFramework/CharacterMovementComponent.h"
How To Know What To Include?

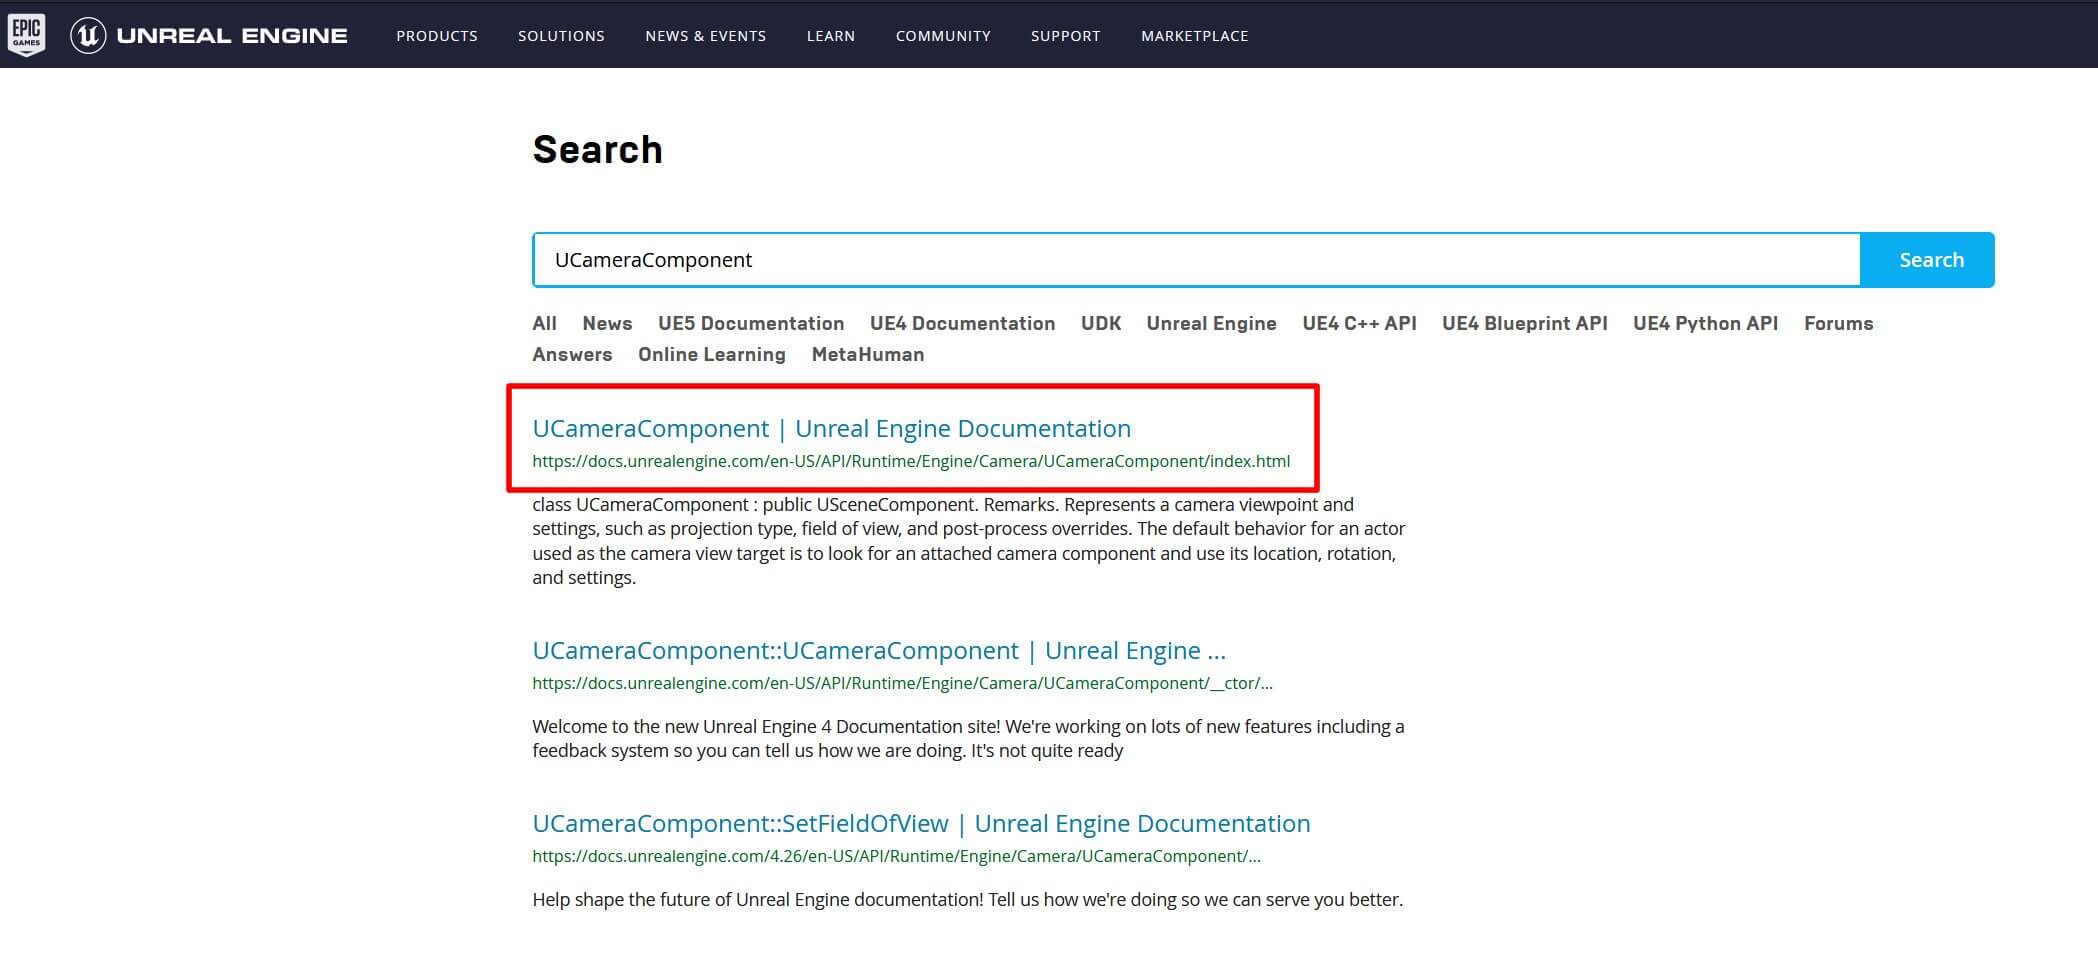
When you do that, on the next page scroll down until you find the #include of the specific class that you are looking for:
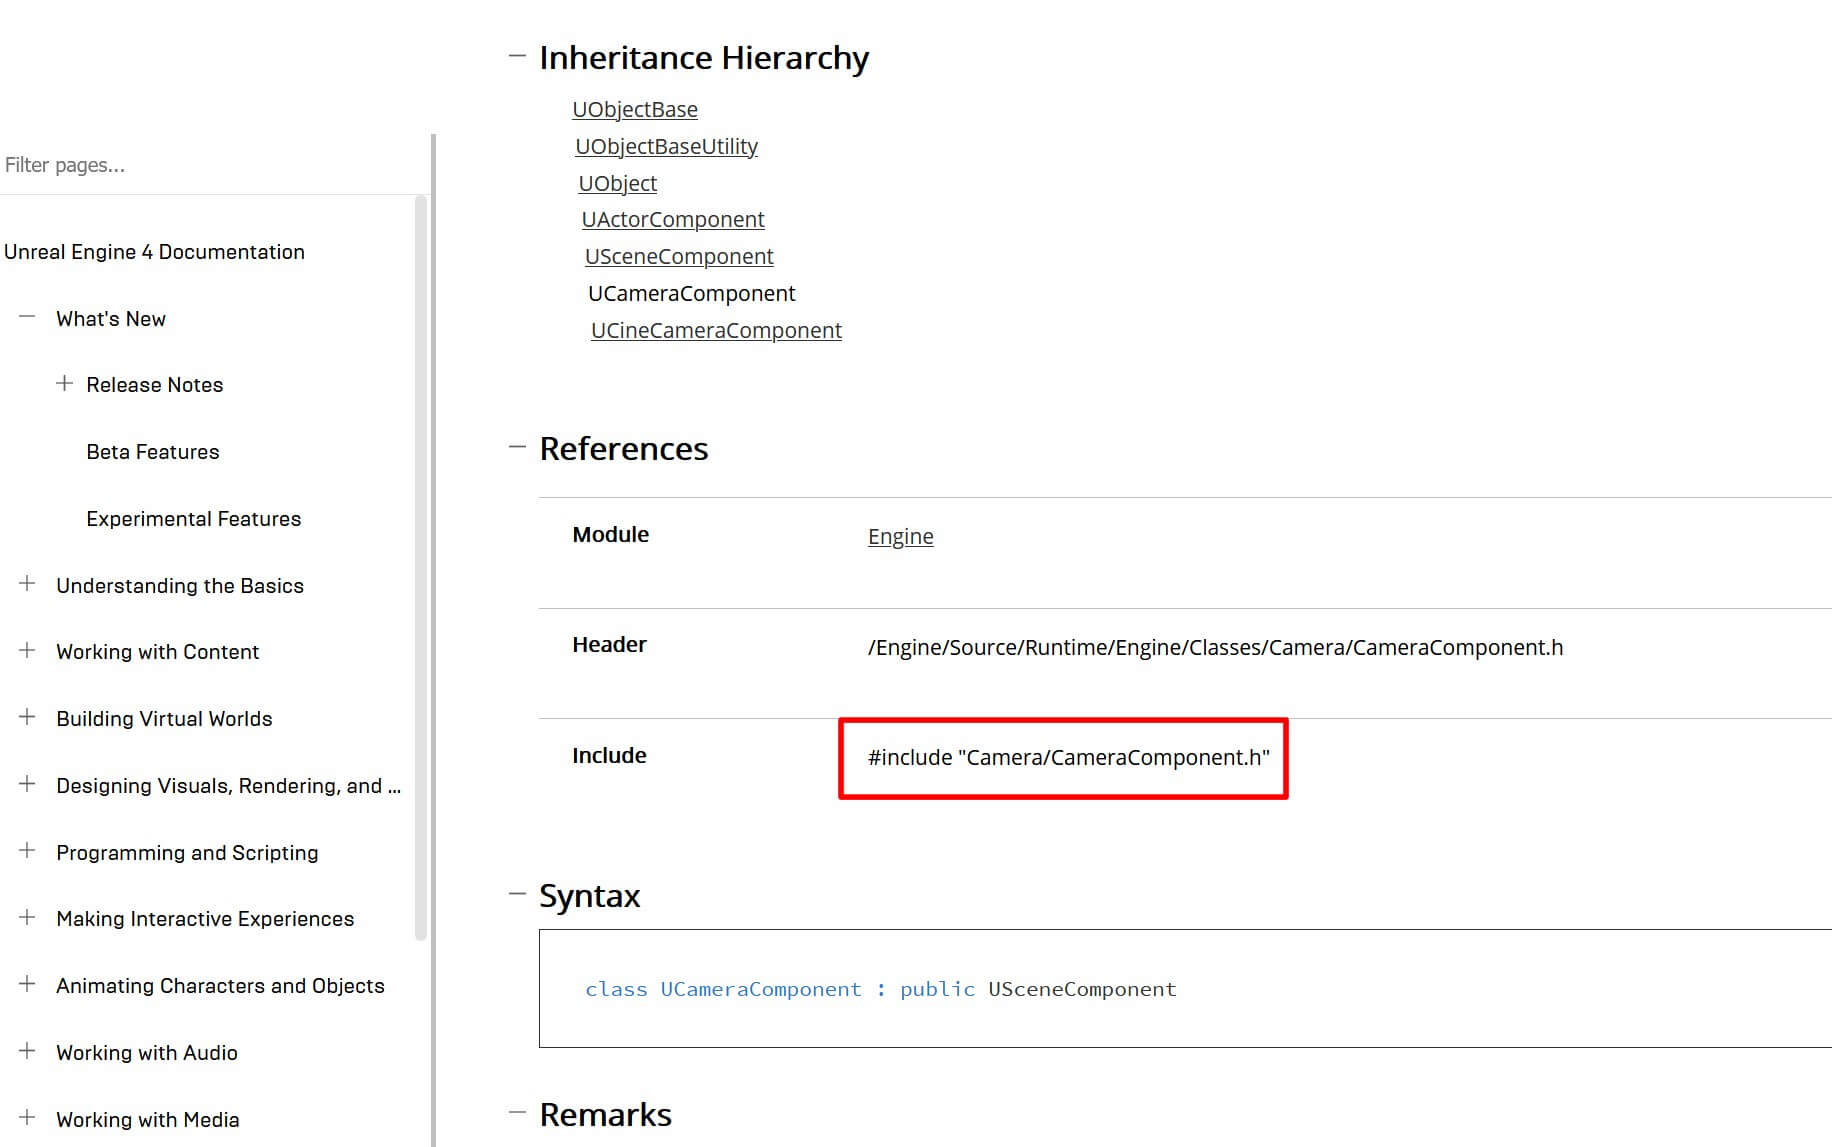
The code you see in the red rectangle is what you need to copy and paste in the .cpp file to include the specific class.
This way, you can easily find the include for any class that you will use in your projects.
Coding The RunnerCharacter.cpp Class
Going back to our RunnerCharacter.cpp class. Let’s explain the includes that we wrote:
					#include "Camera/CameraComponent.h"
#include "Components/CapsuleComponent.h"
#include "GameFramework/CharacterMovementComponent.h"
					ARunnerCharacter::ARunnerCharacter()
{
 	// Set this character to call Tick() every frame.  You can turn this off to improve performance if you don't need it.
	PrimaryActorTick.bCanEverTick = true;

	GetCapsuleComponent()->InitCapsuleSize(42.f, 96.f);

	SideViewCamera = CreateDefaultSubobject<UCameraComponent>(TEXT("Side View Camera"));
	SideViewCamera->bUsePawnControlRotation = false;

	GetCharacterMovement()->bOrientRotationToMovement = true;
	GetCharacterMovement()->RotationRate = FRotator(0.0f, 720.0f, 0.0f);

	GetCharacterMovement()->GravityScale = 2.0f;
	GetCharacterMovement()->AirControl = 0.8f;
	GetCharacterMovement()->JumpZVelocity = 1000.0f;
	GetCharacterMovement()->GroundFriction = 3.0f;
	GetCharacterMovement()->MaxWalkSpeed = 600.0f;
	GetCharacterMovement()->MaxFlySpeed = 600.0f;

	TempPos = GetActorLocation();
	zPosition = tempPos.Z + 300.0f;

}
					void ARunnerCharacter::MoveRight(float Value)
{
	if (CanMove)
		AddMovementInput(FVector(0.0f, 1.0f, 0.0f), Value);
}
We use the CanMove bool variable to control if the player actor can move. When CanMove is true, then we can move, when CanMove is false which will happen when the player actor collides with an obstacle, then we will not be able to move.
Inside the BeginPlay function we need to set the CanMove to be true because when the game starts the player actor will be able to move:
					void ARunnerCharacter::BeginPlay()
{
	Super::BeginPlay();

	CanMove = true;

}
To make this work, we need to bind the MoveRight function to the input that we set up. In the SetupLayerInputComponent function add the following lines of code:
					void ARunnerCharacter::SetupPlayerInputComponent(UInputComponent* PlayerInputComponent)
{
	Super::SetupPlayerInputComponent(PlayerInputComponent);

	PlayerInputComponent->BindAction("Jump", IE_Pressed, this, &ACharacter::Jump);
	PlayerInputComponent->BindAction("Jump", IE_Released, this, &ACharacter::StopJumping);

	PlayerInputComponent->BindAxis("MoveRight", this, &ARunnerCharacter::MoveRight);

}
We use BindAction function from the InputComponent class to bind functions from our class to the actions we defined in Project Settings -> Input. And we use BindAxis to bind functions to the axis we defined in Input settings:
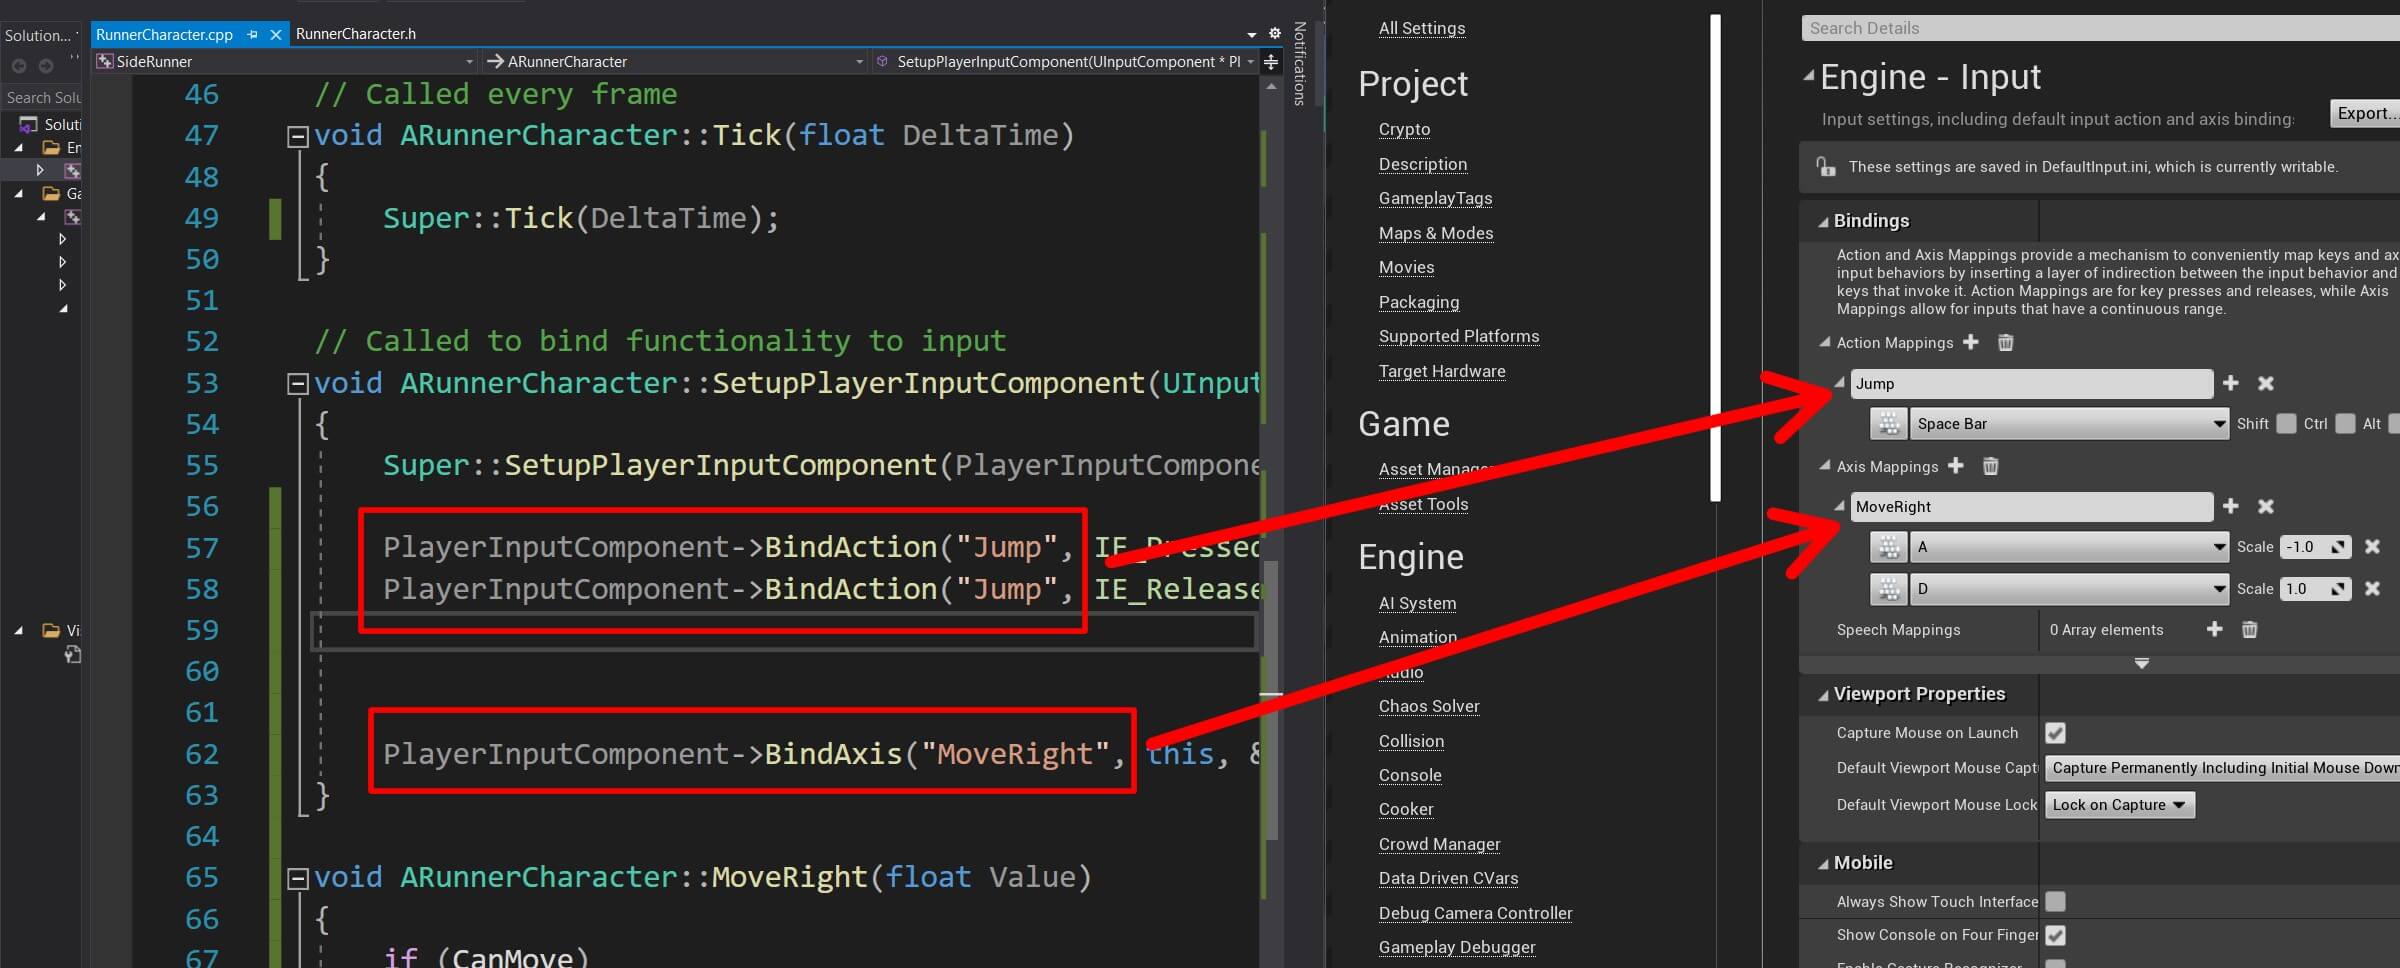
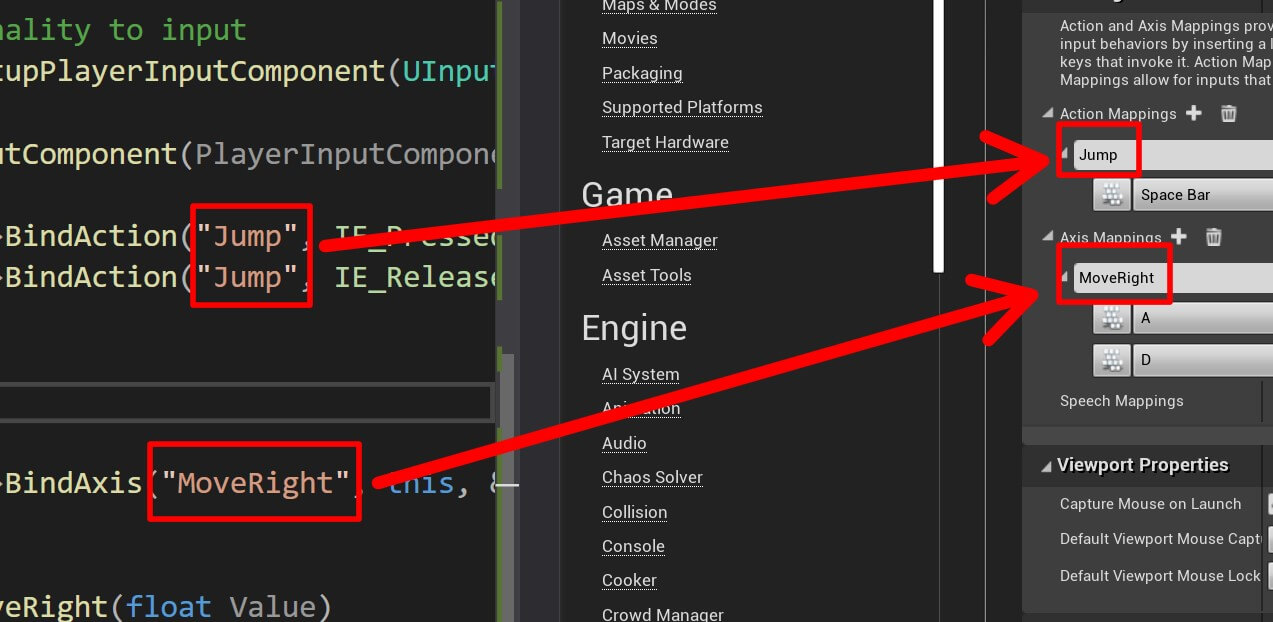
If we type moveRight, it will not work because we typed m with lower case but we defined it with capital M, this is really important to keep in mind.
The last step is to make the camera follow the player actor which is going to happen in the Tick function:
					void ARunnerCharacter::Tick(float DeltaTime)
{
	Super::Tick(DeltaTime);

	TempPos = GetActorLocation();
	TempPos.X -= 850.0f;
	TempPos.Z = zPosition;
	SideViewCamera->SetWorldLocation(TempPos);
}
The Tick function is called every frame and you can use it to update any part of your game that needs to be updated while the game is running, such as the camera that is following the player in this case.
Before we proceed make sure that you compile the code using CTRL + B or Build ->Build Solution.
As we already mentioned, we need to do this every time we make a change to the class.
Creating The Runner Character Blueprint
While the RunnerCharacter class is ready, we can’t test the game until we create a blueprint from that class.
The blueprint will represent the RunnerCharacter actor in the game because we can’t add a class in the game, we need to create a blueprint from the class, and use that blueprint in the game. That blueprint will have all the functionality we created in the class.
Before we do this, first we are going to create a new folder in the Content top hierarchy. Right Click -> New Folder and name it Blueprints.
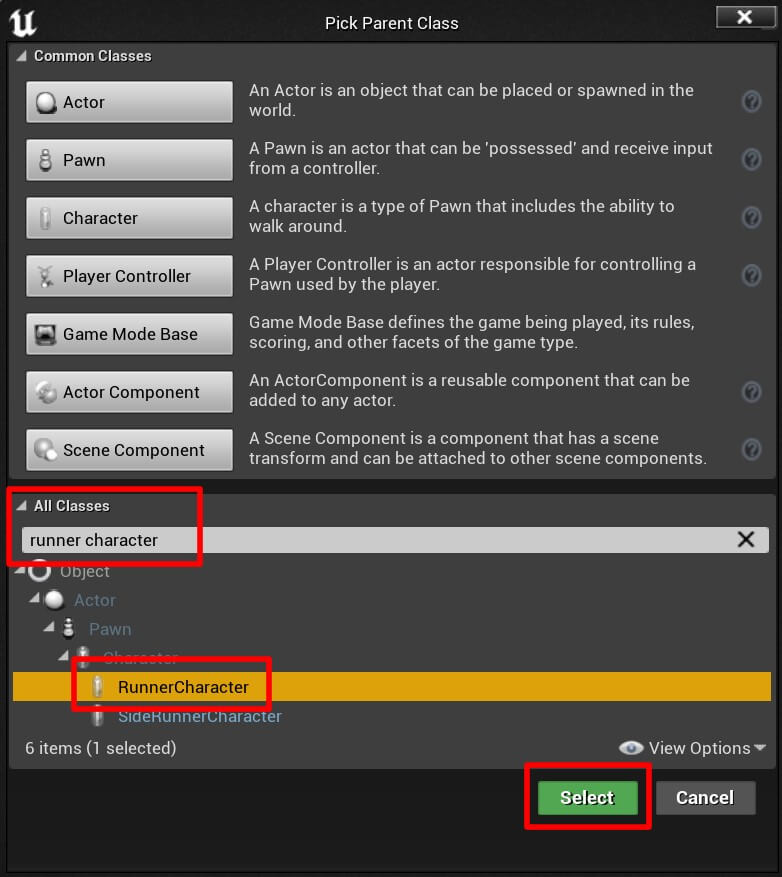
In the Blueprint folder, Right Click -> Blueprint Class and from the Pick Parent Class window, click on the drop down list for all classes and search for the RunnerCharacter class and select the RunnerCharacter class that we created and click on the Select button:
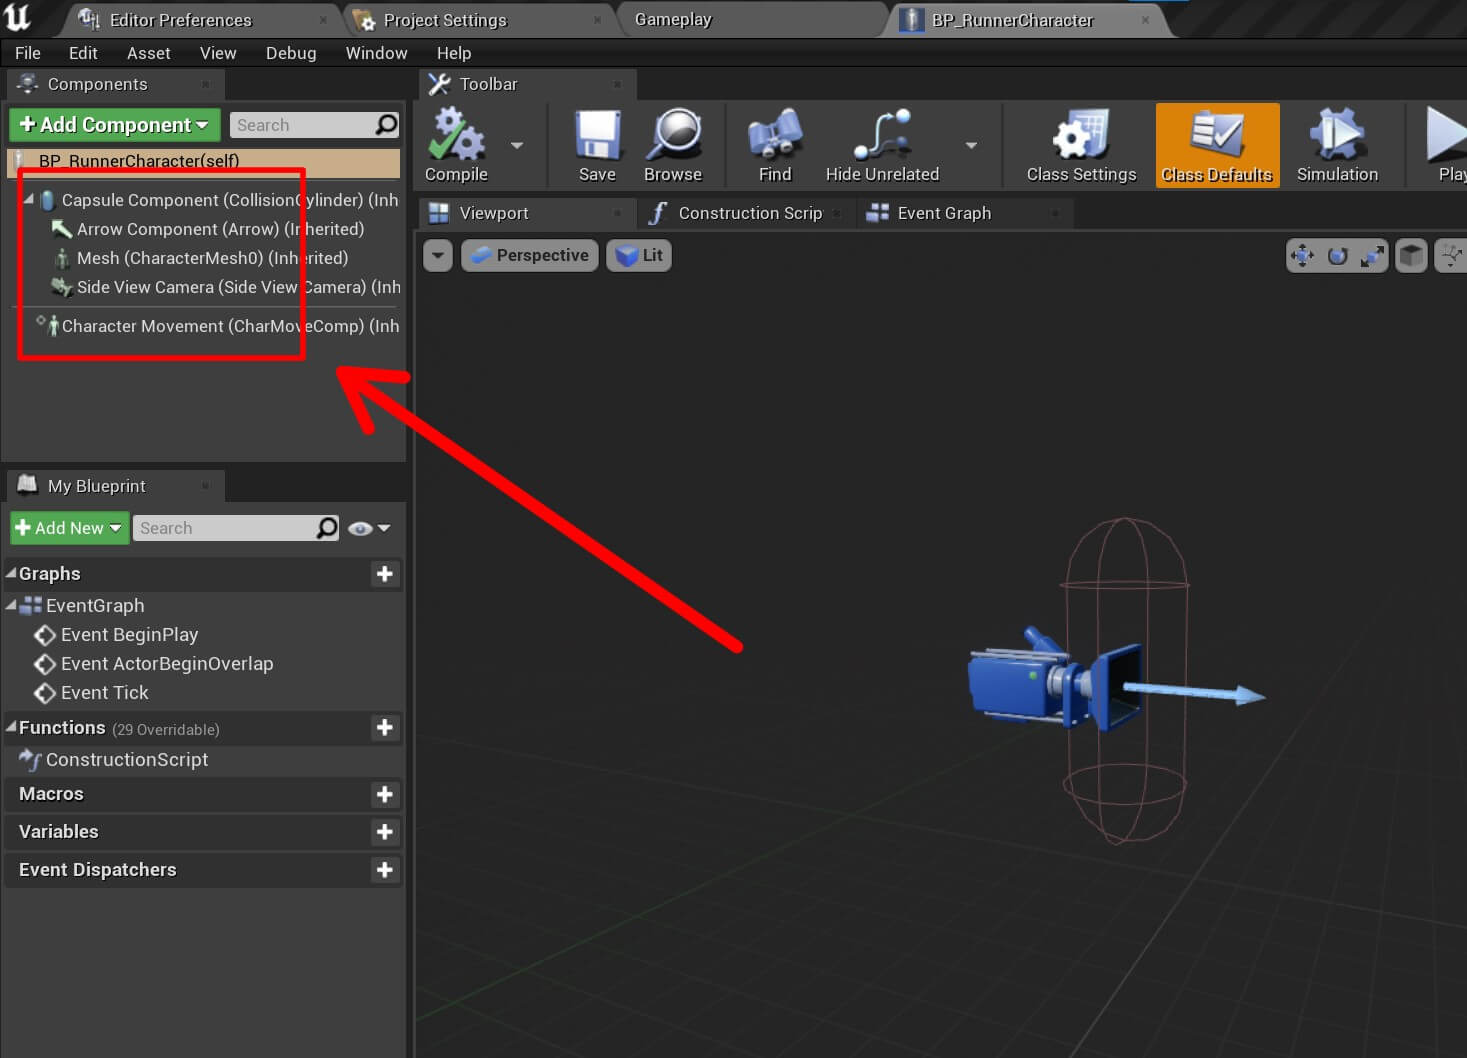
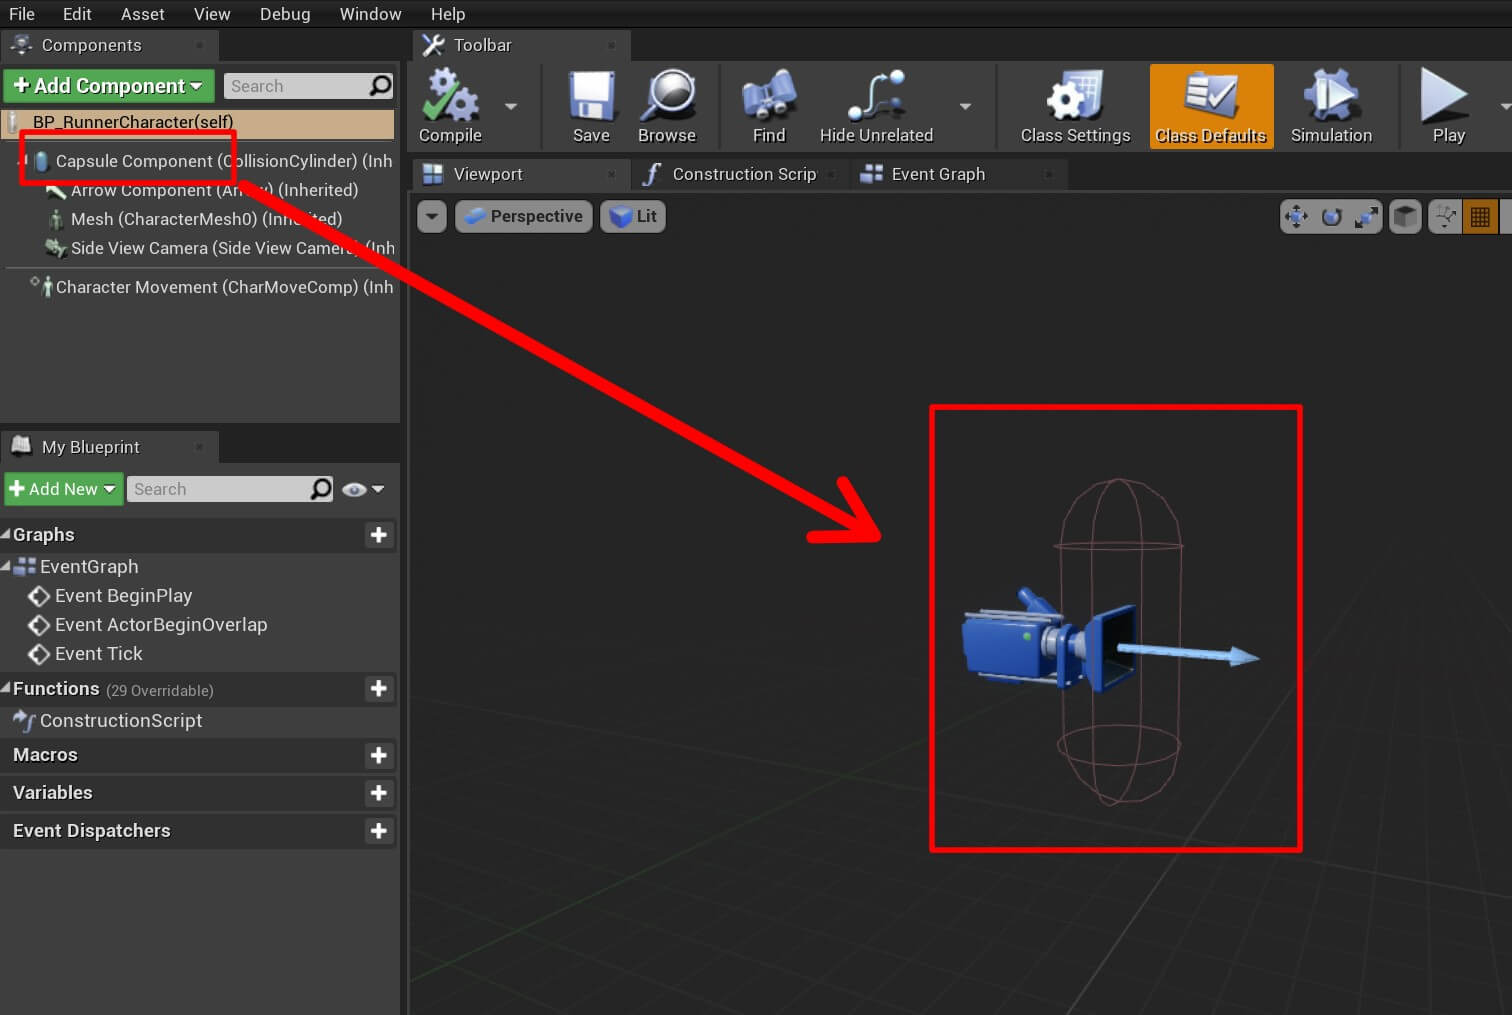
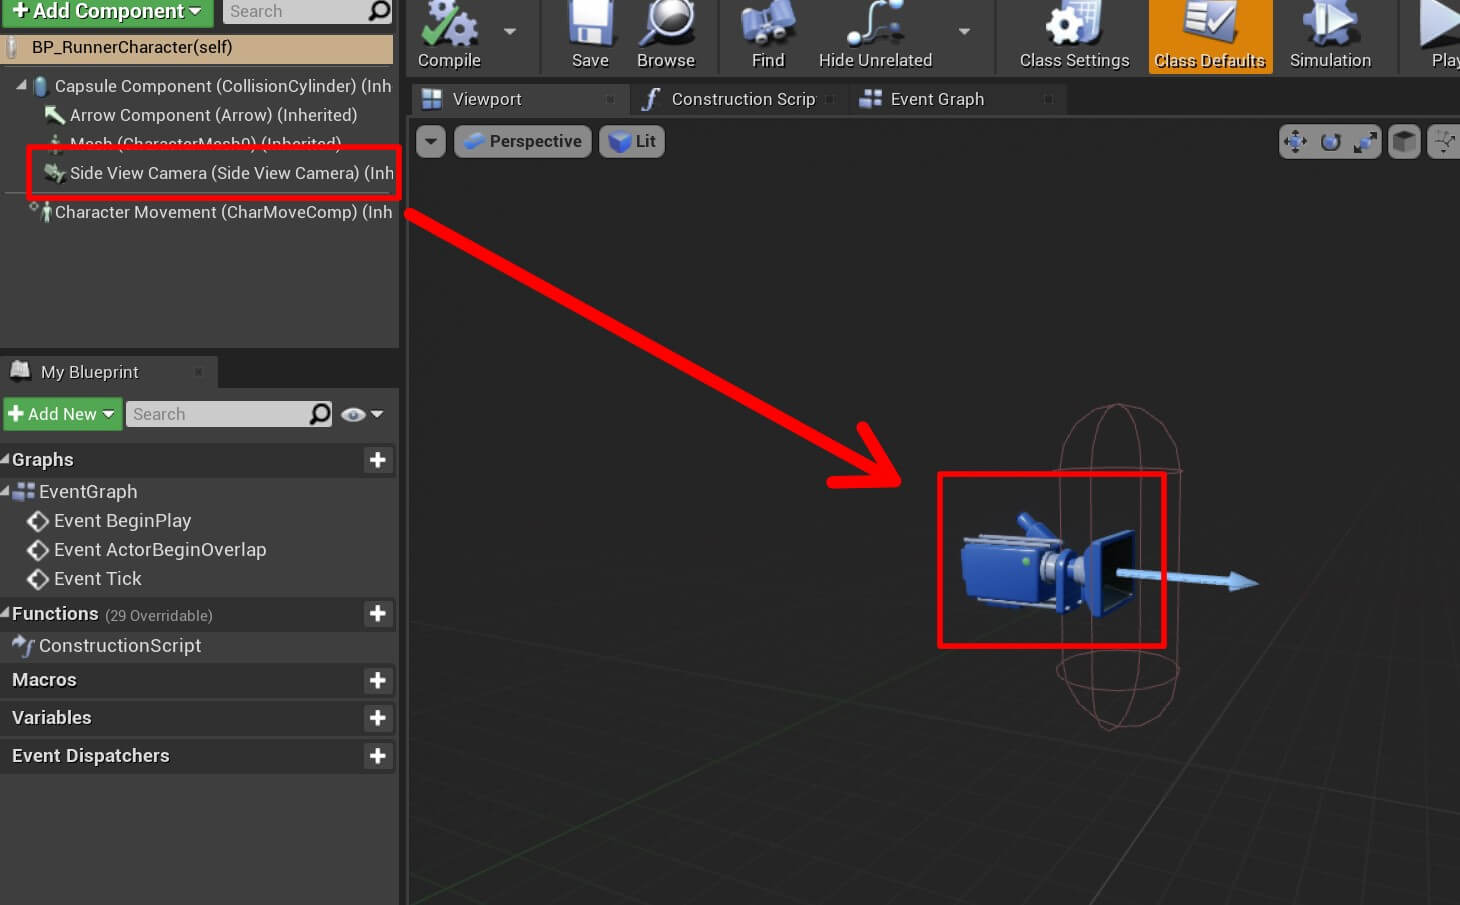
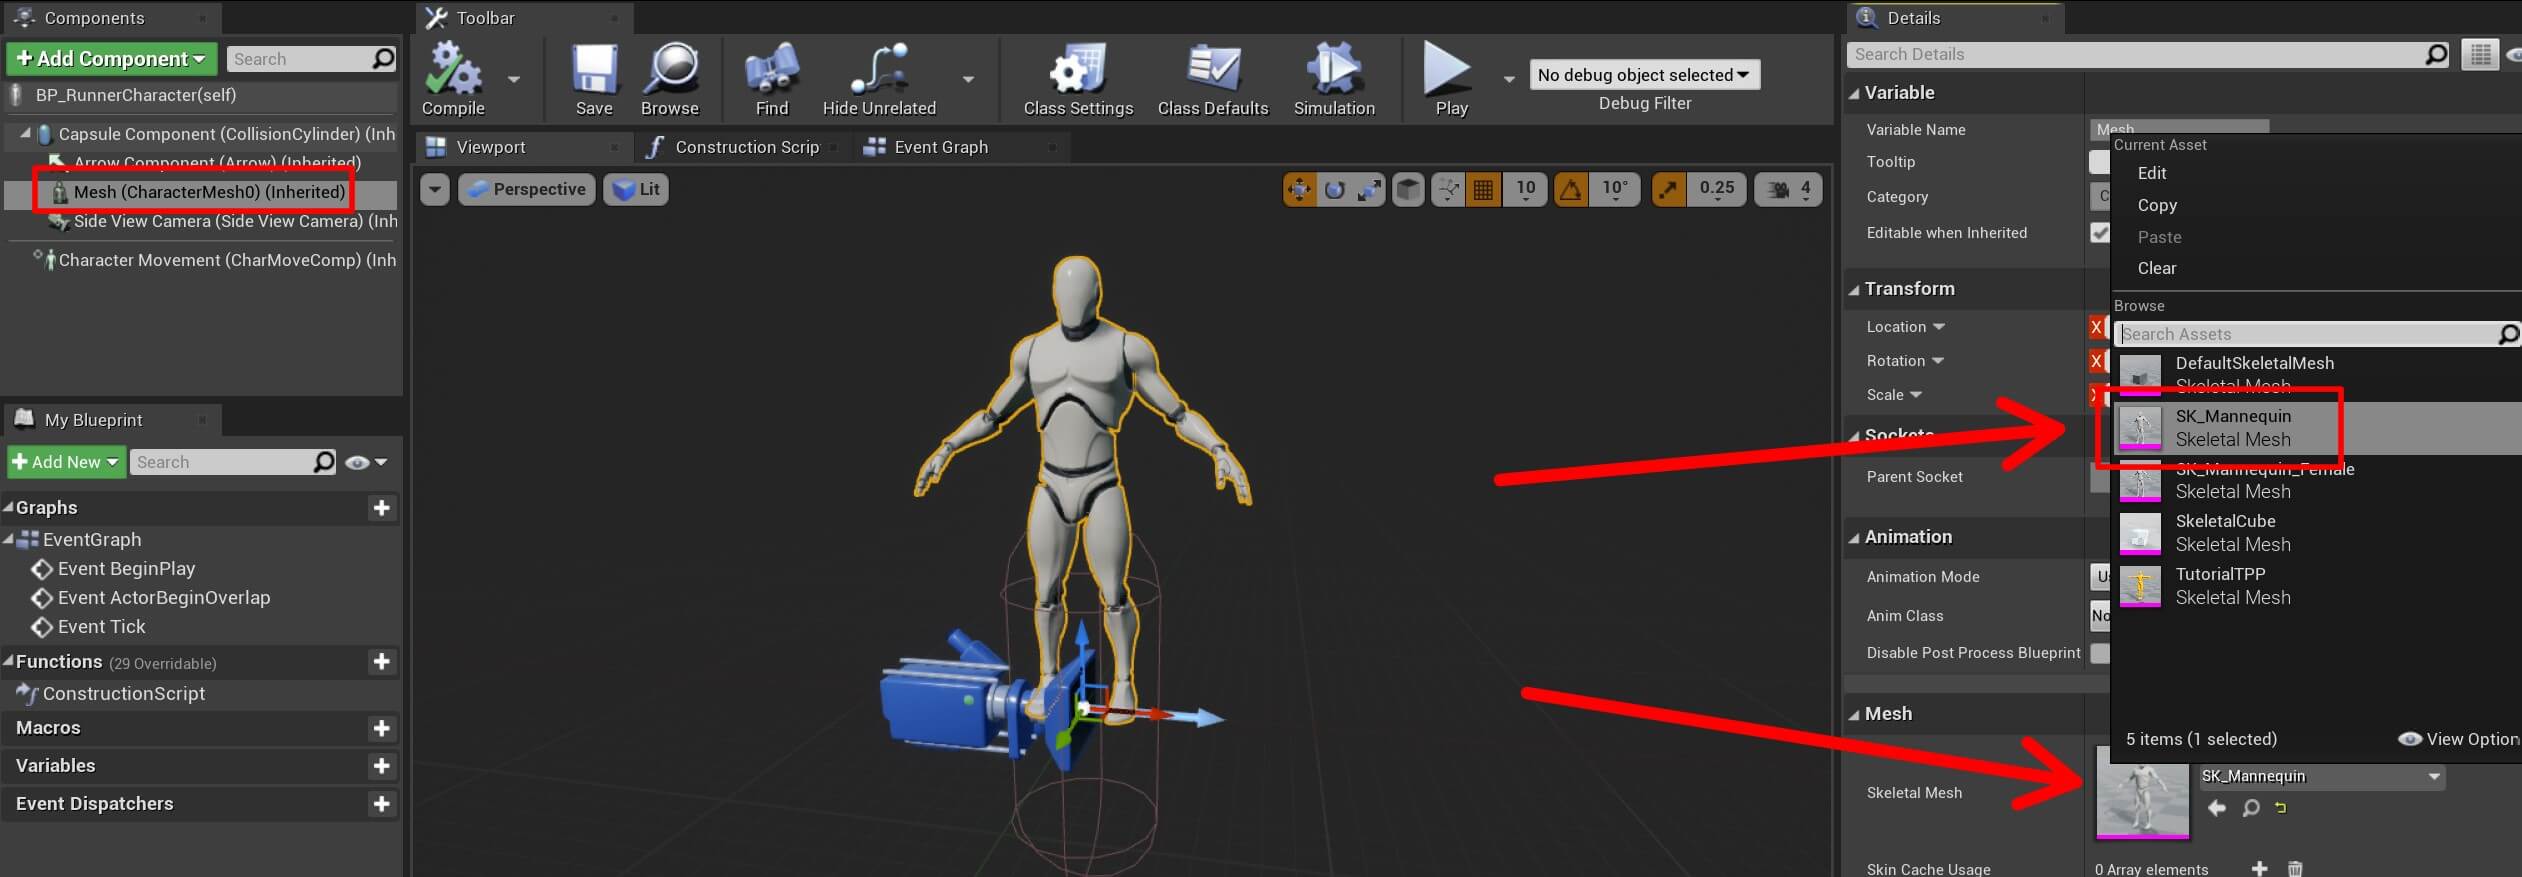
Moving forward, select the Mesh component in the Components tab and under the Mesh settings in the Details tab, for the Skeletal Mesh select the SK_Mannequin model that is available from the third person project files:

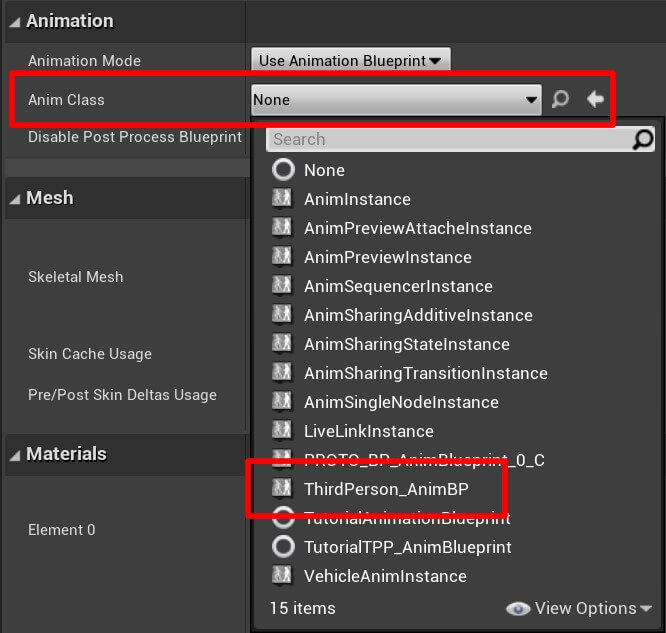
In the Animation settings in the Details tab, click on the Anim Class drop down list and select the ThirdPerson_AnimBP as the animator blueprint for the Mesh component:
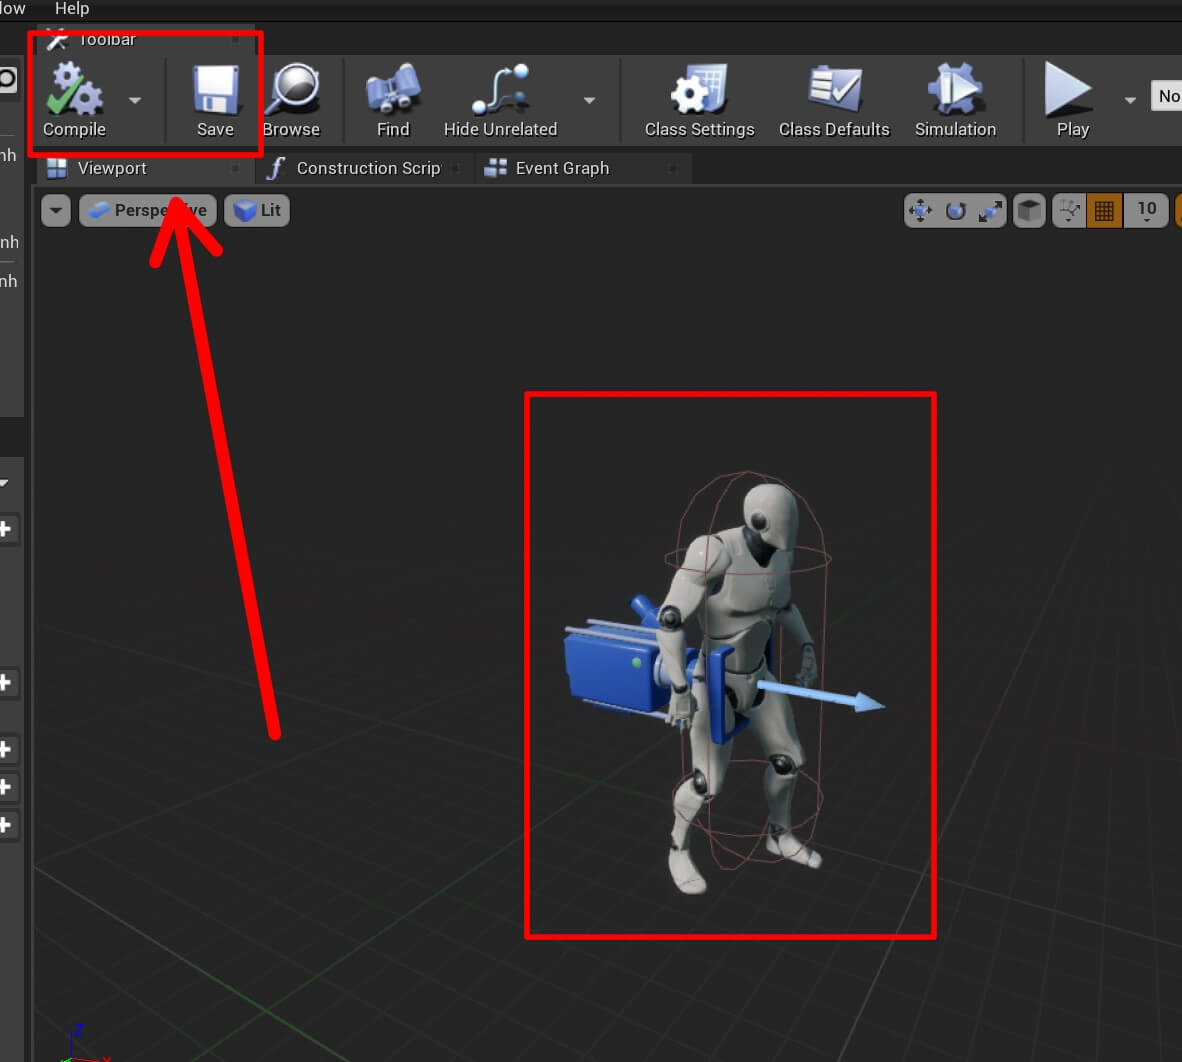
Make sure that you Compile and Save all the changes we make, and when you do that you will see how the character is being animated in the Viewport window:
Side Runner Game Mode Blueprint
If we run the game now we will see the default player actor that comes with the Third Person project in the level. In order to place our own actor that we just created, e.g. BP_RunnerCharacter, we need to create a custom game mode.
If you don’t know what is a game mode and what is the purpose of game modes, then please, before you proceed with the tutorial, learn about that concept by clicking here.
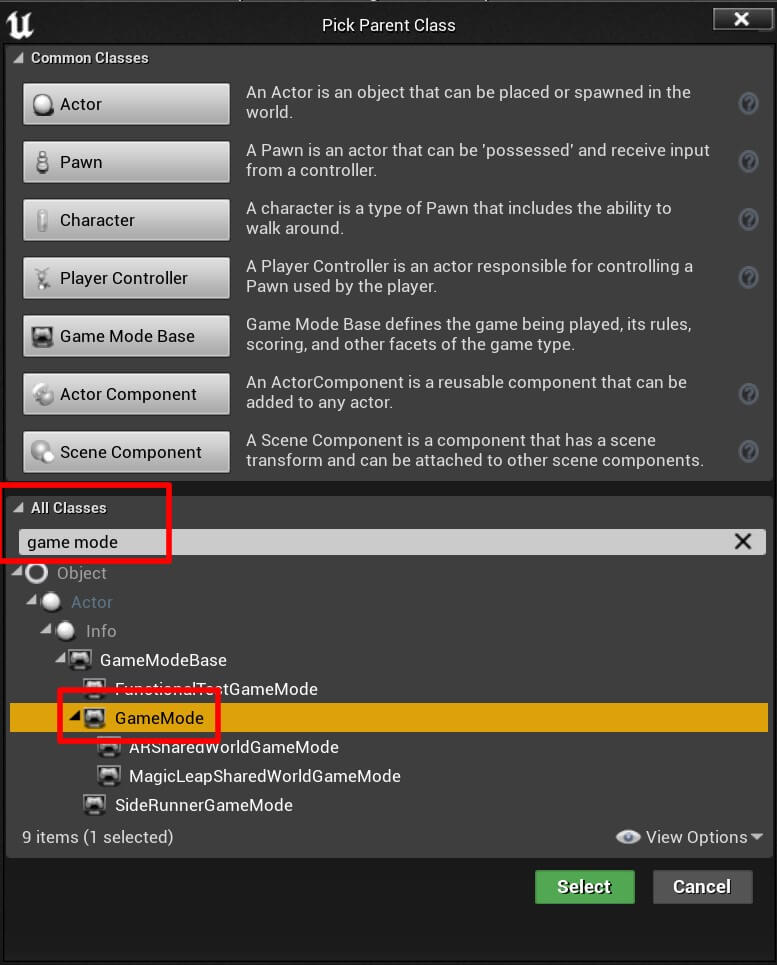
Inside the Content -> Blueprints folder, Right Click -> Blueprint Class. Inside the pop up window in the search bar filter for game mode and select the GameMode class from the list:
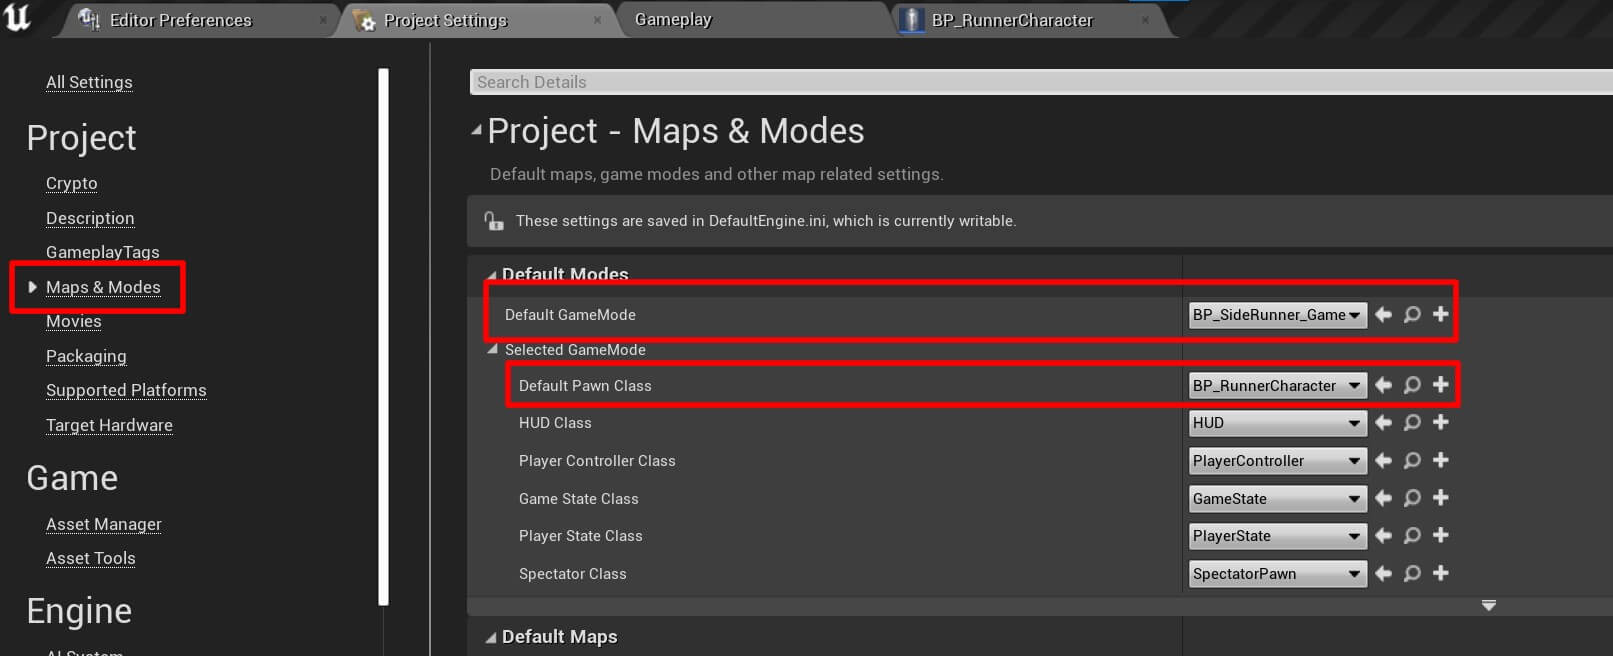
Name the new blueprint BP_SideRunner_GameMode. Next, go to Edit -> Project Settings -> Maps & Modes, and under the Default Modes select the BP_SideRunner_GameMode and for the Default Pawn Class select the BP_RunnerCharacter:
Now we run the game and test it out:
So we have our BP_RunnerCharacter player actor in the level, he can move, jump, and the camera is following him.
The camera is using the offset we defined in the RunnerCharacter.cpp class using the ZPosition variable. You can play with the offset value and test the game to see the different outcomes that you will get.
You can also change the value of the CanMove variable to false and try to move the player actor and see that he will not be able to move.
I am mentioning these small changes to get you used to experimenting with projects and changing things around to see the outcome. This is the best way to learn and the fastest way to understand how things work in Unreal Engine and C++.
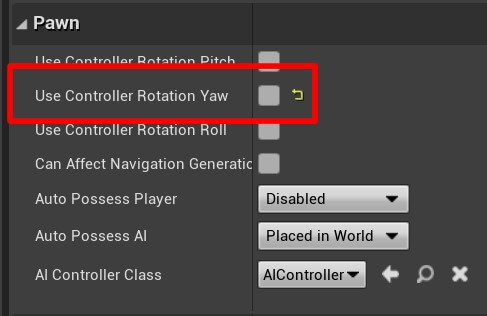
We do have one problem when it comes to the player actor, and that is, he is not facing the direction where is going, instead he looks in one direction, and because of that his back is always turned towards the camera.
Rotating The Player Actor In The Moving Direction
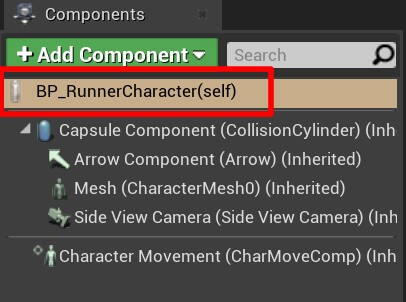
To fix the rotation issue we need to open the BP_RunnerCharacter in the editor.
In the Components window select the BP_RunnerCharacter(self):
In the Details tab under Pawn settings, uncheck the checkbox for Use Controller Rotation Yaw:
Where To Go From Here
In this tutorial we created the RunnerCharacter class and modeled the behaviour of the player actor. We also created a blueprint out of that class and tested the player’s movement in the level.
In the next part titled Creating Obstacles And Level Parts For Our Game we will create C++ classes for the obstacles and level parts for our game, and we will create blueprints out of those classes.

Comments are closed.