Classes are the basis of everything that we will create in our game development journey. Every player, enemy, level part, pick up item and so on, that we create, will be derived from a class.
So What Are Classes?
If you ever tried to learn how to code you probably stumbled upon the term “classes are blueprints for creating objects”, but what does that mean?
It means that we model the behaviour inside the classes, and then we can create objects from that class who will have the modeled behaviour.
For example, a player can have health as its property and attack as its behavior, we model these in the class. Then we create a player object who has the health property and the attack behaviour.
And not only that, but we can create multiple player objects from that single class.
Another good example for this is a blueprint for a car. The blueprint has all the car properties and functionalities, and from that blueprint we can create as many cars as we want.
How Can We Create A Class?
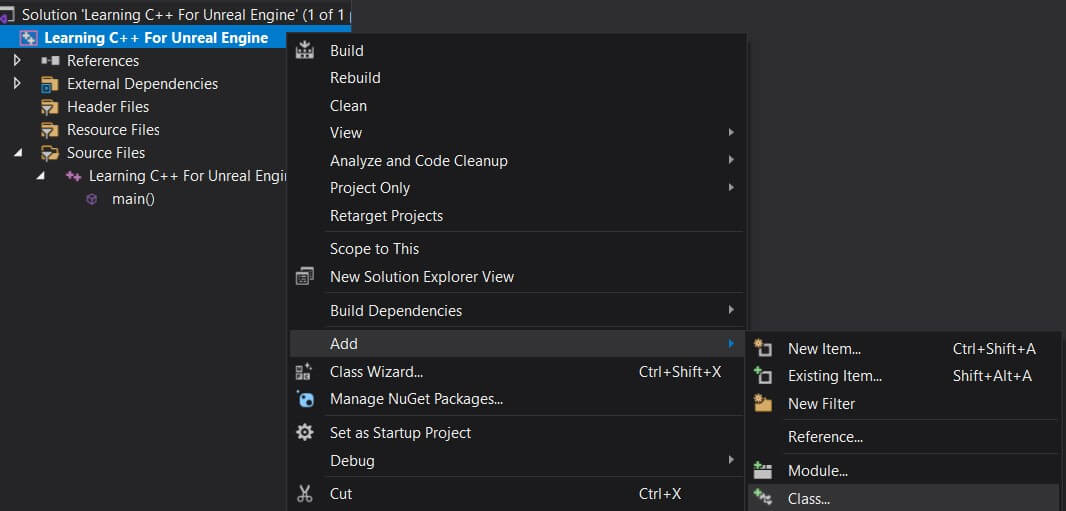
To create a class, on the project name, Right Click -> Add -> Class:
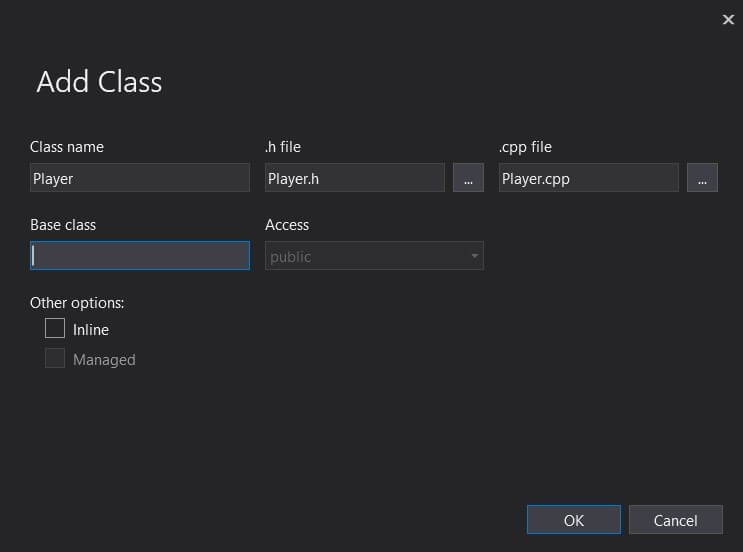
When you do that, a new pop up window will appear asking you to give a name to your class. Give your class a name Player, and when you do that you will see that the ” .h file ” and the ” .cpp file ” fields have automatically been filled.
Click the Ok button to create the class:
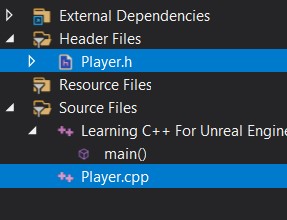
If you open the .h file of the class you will see this:
					#pragma once
class Player
{

};
And if you open the .cpp file you will see this:
#include "Player.h"
These two files represent a single class e.g. Player.
In the .h file we model the behavior of the class e.g. declare variables and functions that the class will have.
And in the .cpp file we implement those functionalities e.g. code the functions to do specific operations, use the declared variables for their purpose and so on.
For example, inside the .h file we can declare the following variables:
					#pragma once
class Player
{
	int Health;
	int Power;
	int Magic;
};
The Player class will now have the properties that we declared above.
But how can we use this class inside the main function?
As we already said, a class is a blueprint for creating objects, and in order to create an object from a class we use its constructor which looks like this:
					int main()
{
    Player Wizard = Player();
}
Here we created a new player object called Wizard, we used the constructor Player() to create that object.
But you will notice one thing and which is the red lines under the Player declaration:

If you hover over the red line you will see a message telling you “identifier Player is unidentified”.
The issue here is that if you want to use a class and its functionalities inside another class you need to import that class using the include keyword:
					// this line imports the Player
// class and its functionalities
#include "Player.h"

int main()
{
    Player Wizard = Player();
}
Now that we included the #include “Player.h” above the main function, we can use the Player class and its functionalities, and you will notice that the red line has disappeared.
In order to use the properties of a class, you simply call them by using the variable name you gave to the object, in this case Wizard, and with the dot( . ) you call the property that you wish:
					int main()
{
    Player Wizard = Player();
    Wizard.Health = 1;
}
This is how we call the Health property and set its value to 1. But you will notice one problem:

There is a red line under the Health property and it says that the Health variable is inaccessible. The reason for this is because the Health variable is a private variable.
Let’s talk more about that.
Accessibility Modifiers
This is something that I usually cover in a separate lecture, but because of the nature of C++ I need to include it as a section in this lecture.
Accessibility modifiers define if the properties and functionalities of a class are accessible in other classes.
We use the keywords private and public to denote if a variable is available inside other classes or if the variable is only available inside the class where it is declared.
If we change the declaration of the variables inside the Player.h to this:
					#pragma once
class Player
{

public:
	int Health;
	int Power;
	int Magic;

};
Adding the public keyword on line 5 will make all the variables declared below it public which means that our previous code inside the main() function will not show a red underline below the Health property of the Wizard:
					int main()
{
    Player Wizard = Player();
    Wizard.Health = 1;
}
But if we change the public keyword with private then again we will see the red underline for the Wizard’s Health property:
					#pragma once
class Player
{

private:
	int Health;
	int Power;
	int Magic;

};
Now you are wondering why did we see the red underline(denoting an error in code) before when we didn’t add public or private keyword:
					#pragma once
class Player
{

// First initial declaration
// without the private keyword

	int Health;
	int Power;
	int Magic;

};
The reason for that is if you don’t specify an accessibility modifier like in the example above, the default accessibility modifier is private, so the declaration above, is exactly the same as the following below:
					#pragma once
class Player
{

// declaration using the private keyword
private:
	int Health;
	int Power;
	int Magic;

};
This is something to keep in mind when declaring variables and functionalities in your classes.
Why Are Accessibility Modifiers Important?
In every programming language a general rule is to keep your variables private and provide public getters and setters as means for manipulating those variables.
For example:
					#pragma once
class Player
{

private:
	int Health;

public:
    void SetHealth(int health);
    int GetHealth();

};
And inside the Player.cpp file we would implement these two functions:
					#include "Player.h"

void Player::SetHealth(int NewHealth)
{
	Health = NewHealth;
}

int Player::GetHealth()
{
	return Health;
}
From this example you can see that the main variable Health is a private variable which means we can’t access it outside the Player class.
The SetHealth function which takes an integer NewHealth as a parameter will set the new value for the Health and the GetHealth function will return the Health value when we need it.
And this is how we can manipulate the Health property of the Player class if we set it to be a private variable, which again, is a general rule in every programming language.
But every software development is different and sometimes you will create public variables because it’s easier to access and manipulate them, so it’s not strict that if you don’t follow general programming rules that you are writing “bad code” as a lot of people would say.
Plus, every company out there has their own coding standards or ways they require you to write code, and the more you progress in the programming world you will develop your own style of coding especially if you are working on your projects a lot.
You Mentioned A Constructor Before, What Is That?
When we created a new object from the Player class we used a constructor to do that for us:
					// this line imports the Player
// class and its functionalities
#include "Player.h"

int main()
{
    Player Wizard = Player();
}
A constructor is the = Player() part in the code and by calling him like that a new object will be created out of the Player class.
So what is a constructor?
First, if we take a look at the declaration in the .h file we will not see anywhere that we declared a constructor using Player():
					#pragma once
class Player
{

private:
	int Health;
	int Power;
	int Magic;

public:
    void SetHealth(int health);
    int GetHealth();

};
So how are we able to use Player() if we did not define it?
The Player() is the default constructor that is automatically available even if we don’t declare it ourselves. Because without it, we can’t create new objects from the specified class.
In order to declare a constructor ourselves we can write:
					#pragma once
class Player
{

private:
	int Health;
	int Power;
	int Magic;

public:
    void SetHealth(int health);
    int GetHealth();

    Player();

};
The Player(); on line 14 denotes that we declared a constructor for this class. Now we need to create a definition for this constructor inside the .cpp file for the Player class:
					Player::Player()
{

}
Every time we create a function or a constructor we need to create a definition e.g. the implementation for that constructor or function inside the .cpp file, and you use the Class Name:: Function Name or Constructor Name to declare the function or constructor.
In the example above you can see its:
					Player::Player()
{

}
A Shortcut For Declaring Functions In .cpp Files
If you have a lot of functions and constructors it can be a tedious process to write all that code on your own, so I am going to show you a shortcut for creating the implementation code for your functions and constructors.
If we write this line of code inside the .h file:
					public:
    void Attack();
Inside the .h file, you can Right Click on the Attack function and from there click on Quick Actions And Refactorings:

Then when the new pop up window opens, click on the Create Declaration / Definition:
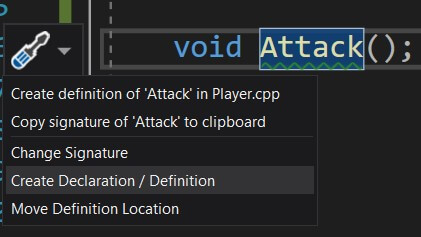
This will automatically create a definition for the Attack function inside the appropriate .cpp file for the specific class:
					void Player::Attack()
{
}
And you don’t have to write this part of code the for every single function and constructor that you create.
Going Back To The Constructors...
Now going back to our constructor.
We already have a definition for the constructor inside the .cpp file and we can use it to initialize our variables:
					Player::Player()
{
	Health = 100;
	Power = 50;
	Magic = 10;
}
This will give all these variables the specified values as soon as we call the constructor to create an object out of this class. So if we do something like this:
					int main()
{
    Player Wizard = Player();
    std::cout << "The value of health is: " << Wizard.GetHealth() << "\n";
}
When you run this app you will see this in the console:

Even though we didn’t manipulate the health variable at all, we see its value is 100, which is defined in the constructor of the class.
So besides from being used to create an object out of the class, a constructor can be used to initialize class variables.
Now the problem with this example is that every time we create a new object the values of our variables are fixed at 100, 50 and 10, maybe we want to provide the values for these variables at the time when we create a new object for the specific class.
There is a solution for that as well. We can create a constructor that takes parameters and use those parameters to initialize the variables:
					#pragma once
class Player
{

private:
	int Health;
	int Power;
	int Magic;

public:
    void SetHealth(int health);
    int GetHealth();

    Player();

    Player(int InitialHealth, int InitialPower, int InitialMagic);

};
When we define the constructor we can initialize the class variables with the ones passed as parameters:
					Player::Player(int InitialHealth, int InitialPower, int InitialMagic)
{
	Health = InitialHealth;
	Power = InitialPower;
	Magic = InitialMagic;
}
So now when we create an object for the Player class we can give different values for every object created:
					int main()
{
    Player Wizard = Player(55, 60, 1);
    Player Archer = Player(88, 54, 67);
    Player Knight = Player(22, 51, 23);

    std::cout << "The value of Wizard's health is: " << Wizard.GetHealth() << "\n";
    std::cout << "The value of Archer's health is: " << Archer.GetHealth() << "\n";
    std::cout << "The value of Knight's health is: " << Knight.GetHealth() << "\n";
}
When you run this app you will see this in the console:

As you can see we created 3 different objects out of the same class and they have different values for the same properties defined inside the Player class.
This is the power of classes and this is the meaning of the phrase “classes are blueprints for creating objects”
We define the behavior inside the class and then every object created from the class has that behavior and it can act on its own.
And this is not limited to variables only, it works the same way for functions as well. So if we define the following functions:
					#pragma once
class Player
{


public:
    void Attack();
    void Heal();
    void SwitchWeapon();

};
And inside the .cpp file in the Player class we can import iostream which allows us to use the code to print to the console:
					#include "Player.h"
#include <iostream> // <-- add this include
                    // to use the print code
The same way how we included the Player.h file to be able to use the Player class inside main(), we can import other predefined libraries like iostream and use their functionalities.
We will see a lot of these examples when we start creating games in Unreal Engine because a lot of the functionality is already created for us so that we don’t need to build everything from scratch every time we start a new project.
Now we can implement the functions like this:
					void Player::Attack()
{
	// implementation for this function
	std::cout << "Player is attacking";
}

void Player::Heal()
{
	// implementation for this function
	std::cout << "Player is healing";
}

void Player::SwitchWeapon()
{
	// implementation for this function
	std::cout << "Player is switching weapons";
}
We can use these functions for every object we create from this class:
					int main()
{
    Player Wizard = Player();
    Player Archer = Player();
    Player Knight = Player();

    Wizard.Heal();

    // line separator to separate the prints
    std::cout << "\n";

    Archer.SwitchWeapon();
    // line separator to separate the prints
    std::cout << "\n";

    Knight.Attack();

}
When you run this app you will see this in the console:

This is printed from different objects created out of the same class.
Of course, in a real game we would model the functionality of these classes to attack, heal and switch weapons, this is just used as an example to demonstrate how everything works.
This is how you can model a common behavior for the characters in your game and then create different game characters, the same thing you can do for the enemies and other parts of your games.
The concept you learned in this lecture is the fundamental basis of everything that we will create in our game development journey.

1 thought on “Learn To Code In C++ For Unreal Engine – Classes And Objects”
thanks so clean and understandble about objects in c++ unreal. thank you!