In part 7 of this tutorial series we learned how to work with UI widgets, how to create user interfaces and how to spawn them in the game.
In this part of the tutorial we are going to create the code logic that will be triggered when the PlayerCharacter reaches the goal of the level and when the PlayerCharacter collides with the Fire Obstacle.
Creating Functions In Blueprints
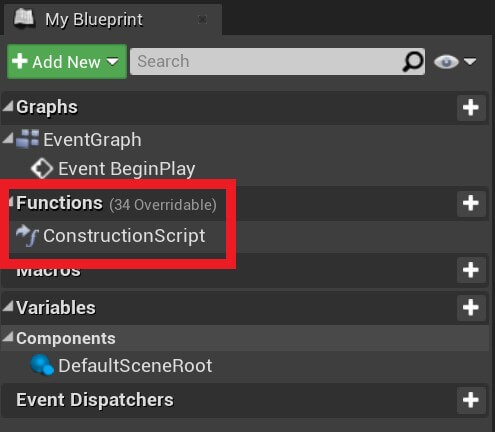
Same as how we create variables we can create functions by clicking on the + button under the Functions list:

And same as how you can give a name to a variable you can also give a name to a function. So name the newly created function to Create Game Over UI.
I will also add that all the rules and ways about renaming variables also apply to functions as well.
One important thing to know when you are editing a function is that it opens in a new tab inside the editor:
Create Game Over UI Function

You can copy the nodes from here:
Detecting Collision Between Actors
If we try to pass through the Doorway that we created with our PlayerCharacter Actor, nothing will happen:
As you can see we pass through the Doorway and we can even fall down on the other side of it and nothing changes in the game in terms of informing the user that we reached the level goal.
To fix this, we need to open the BP_Door in the Blueprint editor.
In the Event Graph, you can delete all the nodes that we have by default because we will not use them.
Since we need to detect collision using the Door Collision component, we are going to call On Component Begin Overlap event of that component.
To do that, select the Door Collision component in the Components tab, then inside the Details tab scroll all the way to the bottom until you reach the Events settings and from there, select the On Component Begin Overlap event:
When we locate the event we want to use, click on the green + button to the right of that event to create it as a node in the editor, same as what you saw in the video above.
The On Component Begin Overlap event will inform us every time an Actor colliders with the Door Collision component.
From the On Component Begin Overlap event we have parameters that we can use to test who is the Actor that has collided with the Door Collision.
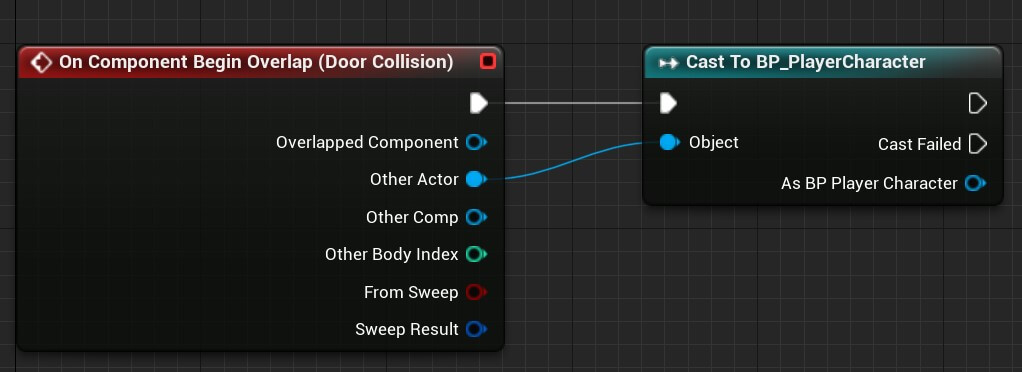
To test if the PlayerCharacter has collided with the Door Collision we are going to cast the Other Actor parameter to BP_PlayerCharacter:
We already talked about casting and what it means. If you need to refresh you knowledge you can click here.
Since the Cast To node takes a parameter an Object that will be casted, we are passing the Other Actor from the On Component Begin Overlap.
The Other Actor represents the other actor who was collided with the specific component, in our case the Door Collision component.
So if the PlayerCharacter Actor collides with the Door Collision, we are going to call the Create Game Over UI function that we created inside the BP_ParasitePlatformer_GameMode:

You can copy the nodes from here:
As you can see from the nodes above, if the cast to PlayerCharacter succeeds, then we are going to get the BP_ParasitePlatformer_GameMode by casting the returning value of the Get Game Mode function.
If that cast succeeds, simply call the Create Game Over UI which is the function that we previously created inside the BP_ParasitePlatformer_GameMode.
Now we can test the game:
Now when we collide with the Door Collision, we will create the UI to display to the user that the game is over.
Set The Input Control To UI Widget
While we are displaying game over UI when we reach the Doorway, we have two problems.
First, if we press the Play Again button nothing will happen, and second, even though game over UI is displaying on the screen we can still move in the game.
To be able to press the button in the game over UI, we need to call a function called Set Input Mode UI Only.
Inside the Create Game Over UI function in the BP_ParasitePlatformer_GameMode, after we add the game over UI to the viewport call the Set Input Mode UI Only node:

Organizing The Nodes In The Blueprint Editor
The node code above will give the input control to the game over UI when it is created, so that issue is fixed.
However, I want to mention one thing that is concerning the organization of the nodes that we call.
The game we are creating is a small game where we don’t have too many nodes in our Blueprints.
But when we start working on more complex games the nodes start to clutter up and we can easily mix up the lines connecting the nodes and it quickly gets to a messy node spaghetti code.
How can we fix this?
Well we can bend the lines connecting the nodes by adding additional connecting dots on the line itself.
This can be done by double clicking on the line, and we can also delete these lines by selecting them and pressing the delete button on the keyboard:
When we add these extra dots from where we can drag the lines to connect the nodes we can easily organize them and not make them obscure one another.
This will be really useful when we start working on more complex games where we will need to organize the nodes like this to avoid confusion and the already mentioned node spaghetti code.
Pausing The Game
Now that we are giving the input control to the UI widget, we also need to make sure that our mouse cursor is visible and that the game is paused:

You can copy the nodes from here:
The Show Mouse cursor node takes a parameter of Player Controller, so we passed the return value of the Get Player Controller function.
Also make sure that you check the checkbox for the Show Mouse Cursor bool to denote that we should show the mouse cursor.
For the Set Game Paused function we need to do the same and check the Paused checkbox denoting that it is true e.g. we should pause the game.
Compile and Save the changes and run the game:
Now when we reach the level goal, the game is paused, the PlayerCharacter can’t move, and we can press the Play Again button.
Restarting The Game When We Press The Button
While we can press the Play Again button now, nothing happens because we didn’t set any code to execute when the button is pressed.
To change this, go inside the BP_GameOver_UI Blueprint. Select the Play Again Button from the Hierarchy tab and in the Details tab scroll to the bottom where the Events settings is and select the On Clicked event:
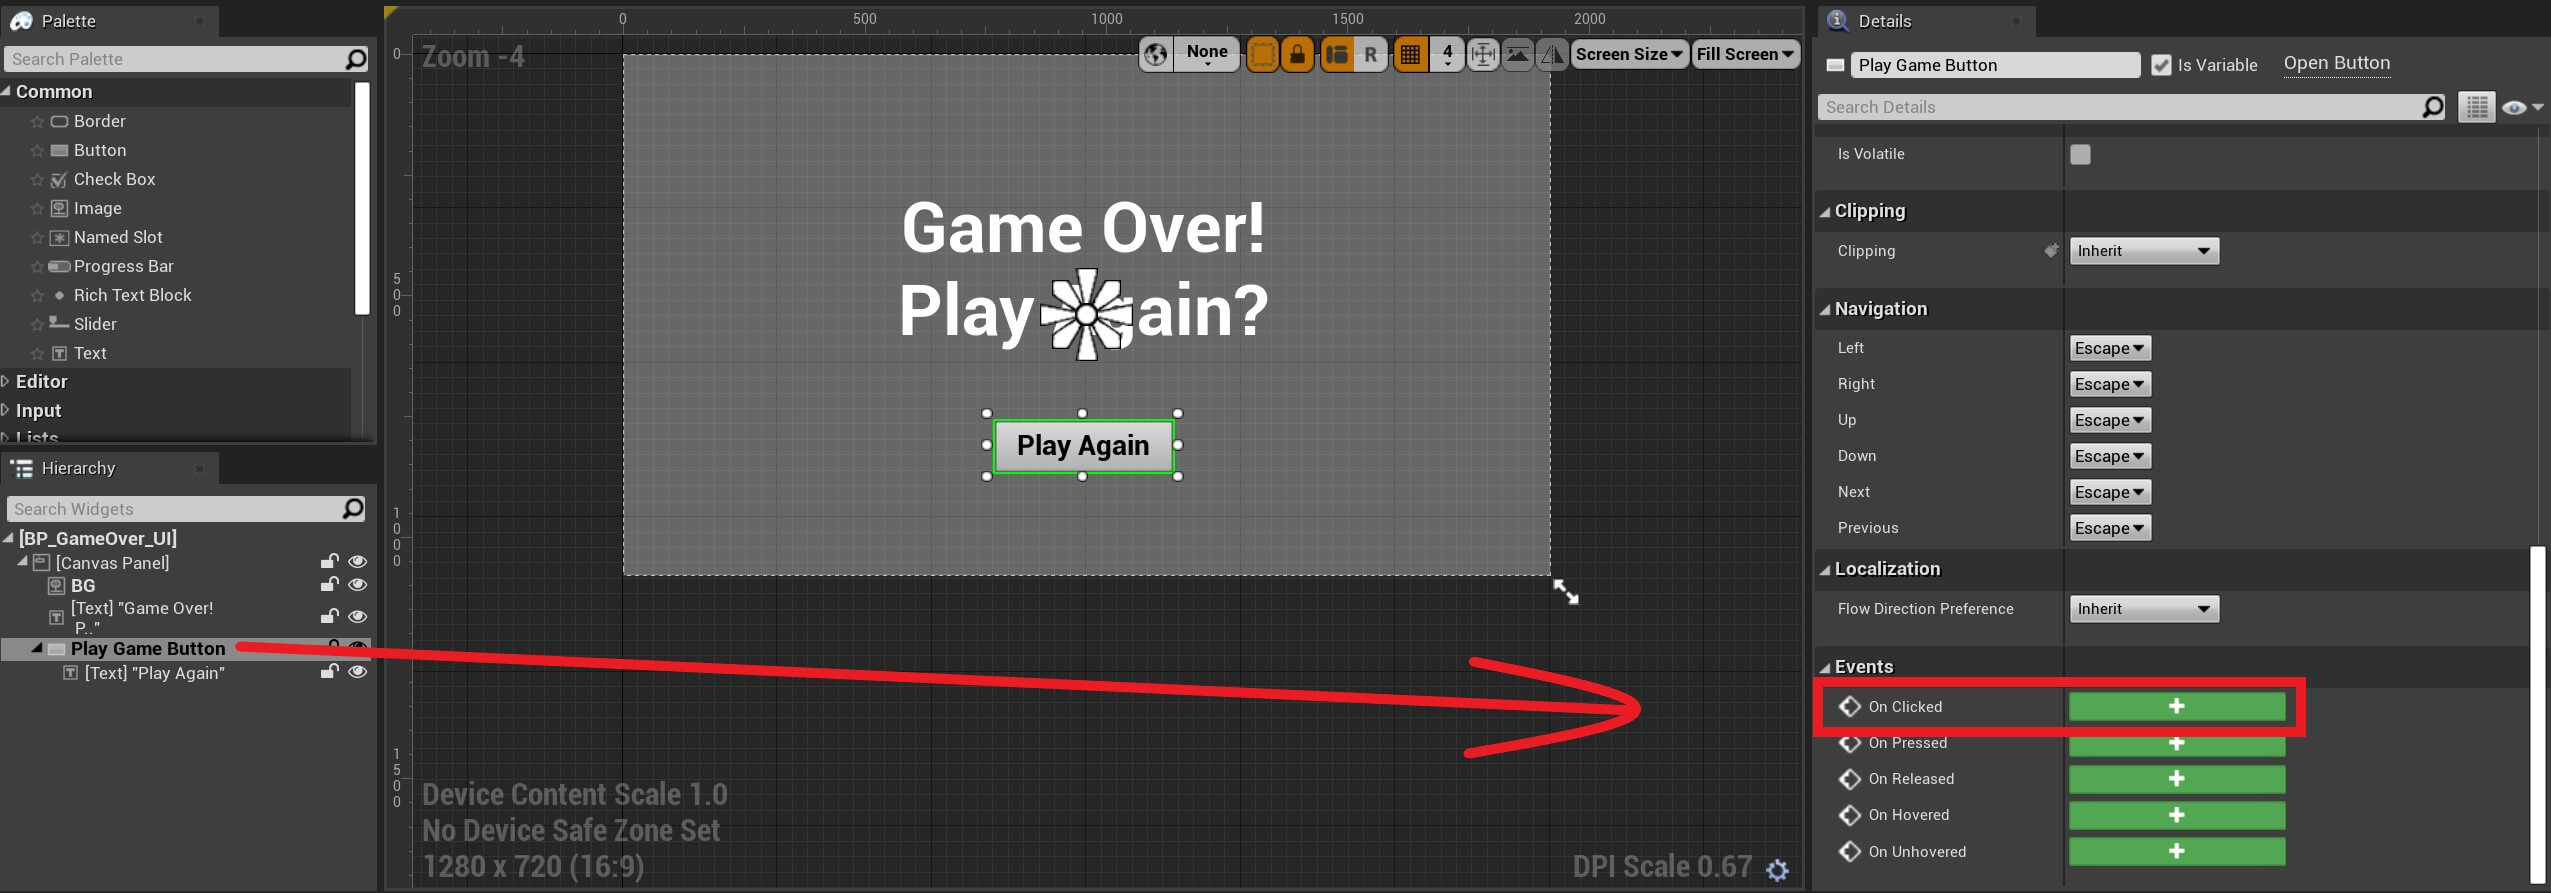
When you click on the On Clicked event it will take you to the Graph editor inside the BP_GameOver_UI Blueprint.
Remember that you can always switch back and forth from the Graph editor where we place nodes, and the Designer editor where we place the UI widgets by click on the tabs located at the top right corner:

So when we press the Play Game Button we will restart the level:

You can copy the nodes from here:
The Get Current Level name function will return the name of the current level we are in, and the Open Level (by Name) function will open the level with the given name.
We only need to pass the returning value of the Get Current Level Name function to the Level Name parameter of the Open Level (by Name) function.
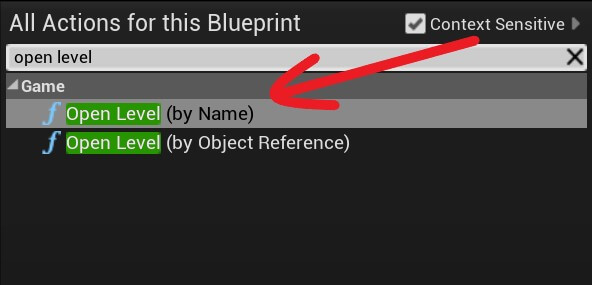
Just be careful when you are calling the Open Level function because there are two versions of it. One will open the level by name and the other will open the level by object reference.
So make sure you select the Open Level (by Name):
Compile and Save and run the game:
Now when we press the Play Again Button we restart the game and the PlayerCharacter is spawned where the Player Start Actor is placed.
However, we have one problem, when the game is restarted we can’t move the PlayerCharacter which I am sure you noticed when you pressed the buttons on your keyboard or when you tried to use the mouse to rotate him.
Unpausing The Game And Giving Back Input Control To The Game

Now when we restart the game, we can move the PlayerCharacter.
Dealing Damage To The Player
Now that we have the level goal part out of the way, let us make the Fire Obstacle deal damage to the PlayerCharacter.

Now when we collide with the Fire Obstacle we should see the game over UI. Let’s the test the game:
As we can see from the preview above, when we collide with the Fire Obstacle nothing happens.
What is the issue?
The issue is that the Collision Preset for the Mesh component inside the BP_MovingObstacle_Fire Blueprint is set to BlockAllDynamic.
You can locate this by going inside the Blueprint editor, select the Mesh component and inside the Details tab scroll to the Collision settings:
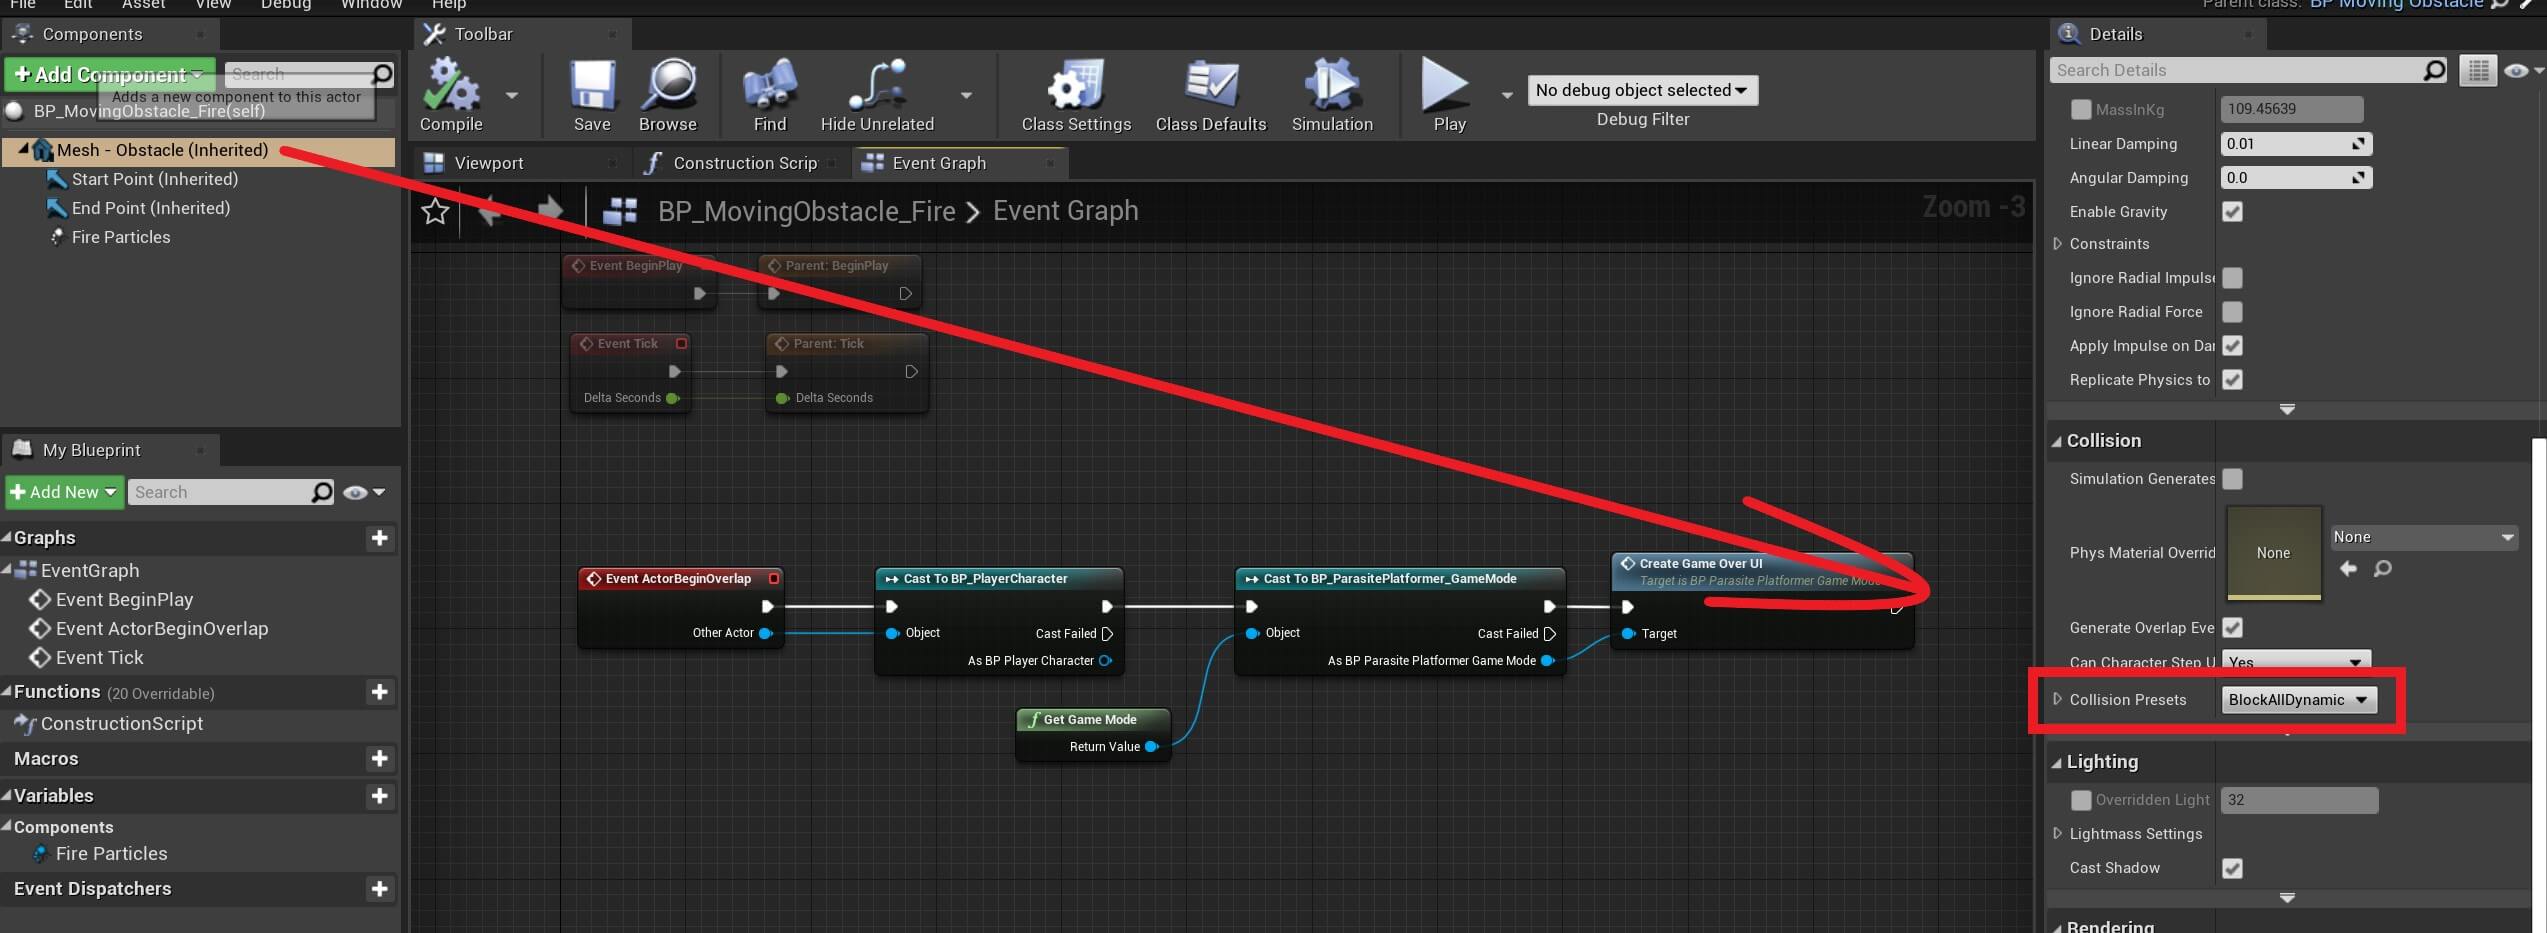
This setting will block all collisions with the Fire Obstacle. To fix this, click on the drop down list and select the OverlapAllDynamic collision preset:
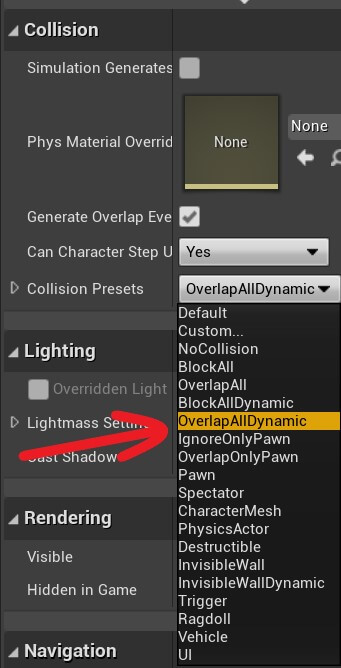
The OverlapAllDynamic preset will enable collision between all Actors e.g. any Actor that collides with the Fire Obstacle that collision will be detected.
Let’s test the game now:
Now when we collide with the Fire Obstacle the collision works and we see the game over UI on the screen.

Comments are closed.