In part 2 of this tutorial series we learned about Game Modes, created our PlayerCharacter Actor and we set up the Input.
In this part of the tutorial we are going to learn how to use nodes to create visual code in the Blueprint editor and we are going to make the PlayerCharacter move in the level.
In Programming There Are Different Ways To Solve A Problem
Before we program the movement of the PlayerCharacter I need to stress one very important thing when it comes to programming, and that is there are always multiple ways how to solve a certain problem.
I am saying this because every time I explain something like making the player move, people comment you could have done it likes, or why didn’t do this or that and so on.
The answer to all these questions is very simple – you can always do it in multiple ways and there is no general way that anyone can say this is the best way to do it.
No matter how you do something, make sure the code is optimized so that it runs smoothly, other than that, however you do something, it is the right way.
Of course, the more you practice the better you will be with problem solving in programming, so that is something that comes with time.
And one more thing, I used the term programming to explain my point, but this also refers to Blueprint visual scripting because Blueprints are technically visual code that’s why they are called visual scripting.
And when we start working with C++ we will see that all the function names and functionalities are the same in Blueprints and C++ written code.
Player Controller

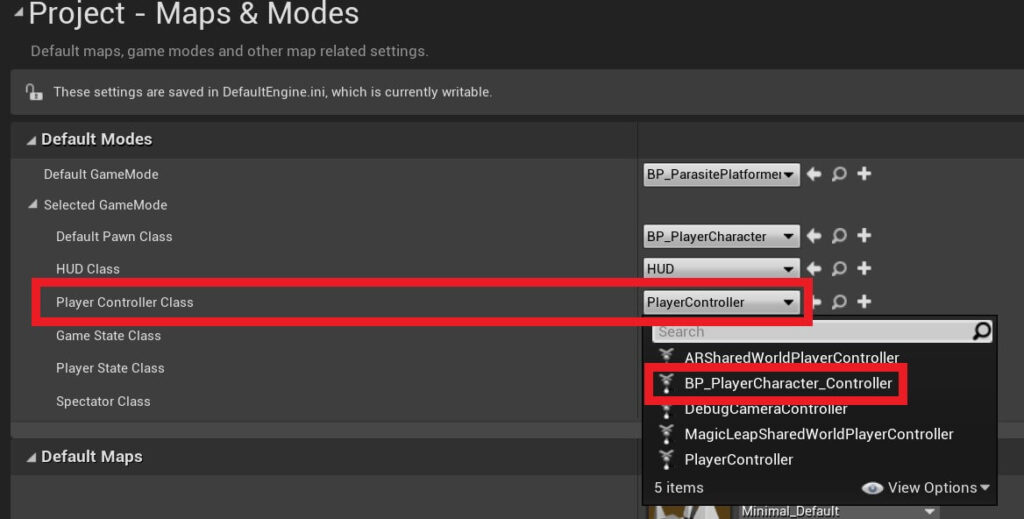
After you select the parent class give the new Blueprint a name BP_PlayerCharacter_Controller.
Navigating Inside The Event Graph
Open the BP_PlayerCharacter_Controller in the Blueprint editor by double clicking on him and inside the Event Graph is where the magic is going to happen.
First, you can remove the Event Tick node by clicking on it, and pressing the Delete button on your keyboard or Right Click -> Delete:

The code inside the Event Graph is represented with nodes and there are two ways how we can create nodes in the Event Graph.
The first one is to Right Click inside the Event Graph and a new window will pop up. From there we can filter for the nodes that we want or search for them in the search bar:
Another way is to Left Click and drag the execution line from the Exec of one node and then release the Left Click inside the Event Graph and the same pop up window will appear:
How Are The Nodes Executed
Let’s do a little test to see how the node code works.
Inside the Event Graph Right Click and inside the All Actions For This Blueprint window search for Print String:

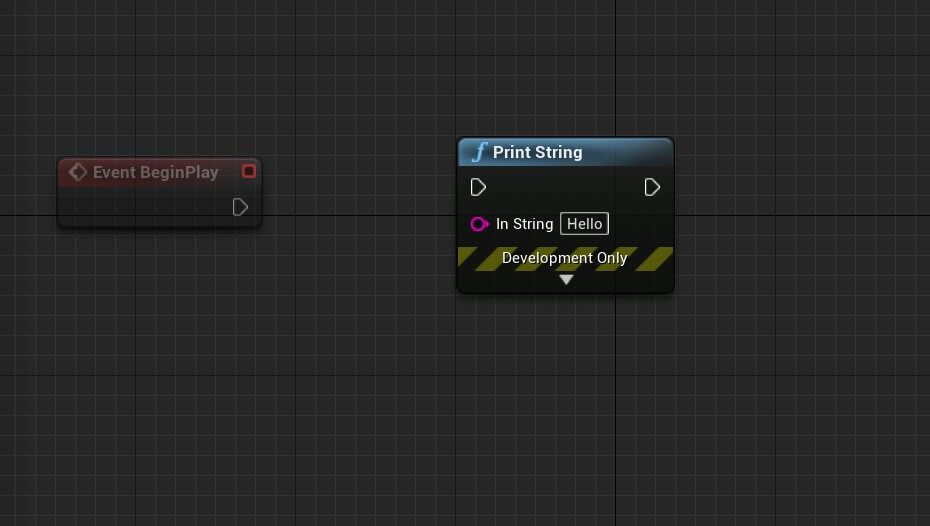
The Print String node is actually a function that will print to the screen the string that we pass as a parameter inside the In String field where currently we see the word Hello:

The Nodes Execution Order
So we learned how to execute the nodes inside the Blueprint editor. but what happens when we have a lot of nodes, how do we know the execution order?
The execution order of nodes is determined by the node pin. When one node executes, the execution will move towards the node to which the previous node is connected, and so on.
To demonstrate this, we will create a couple of Print String nodes, and btw, you can copy / paste nodes same as text by selecting the node and then CTRL + C to copy and CTRL + V to paste for Windows, and for MacOS it’s CMD + C and CMD + V:
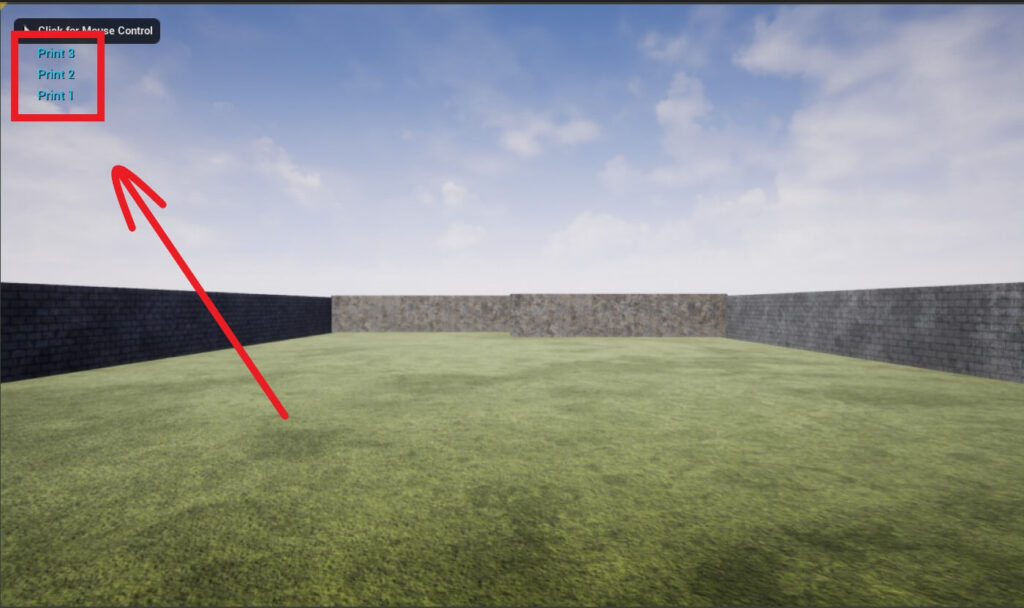
So I’ve created two more Print String nodes and in total we have three now.
I’ve also changed the parameter in the In String field to Print 1, Print 2, and Print 3 for the appropriate nodes which you saw in the preview.
Make sure that you press Compile and Save after you make all those changes.
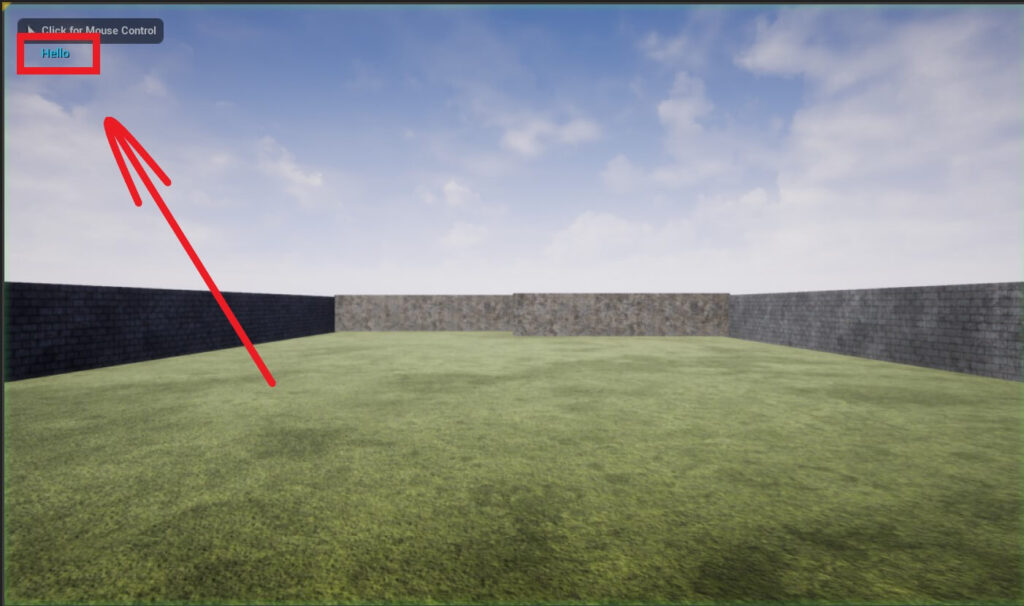
When we run the game now this is what you will see in the Viewport:
blueprintUE An Amazing Tool
As you can see blueprintUE is an amazing tool for the purpose of our tutorials.
And I have debated myself whether to only use bleuprintUE because it is much easier for me and for you, but the issue is that blueprintUE is only run by one person and who knows what will happen with the website in case something happens to the owner of the website.
That is why I will use the combination of screenshots and blueprintUE. If blueprintUE stops working some day, which I hope will never happen, you will still have the screenshots to follow along with the tutorials.
For the code that I will embed in these tutorial pages you can zoom in and out to better see the nodes. You can also enter the full screen mode to have a better view of all the nodes for the current feature that we are coding.
And copy and pasting nodes from the tutorial page to Unreal Engine Blueprint editor works the same way as you saw in the video above:
Blueprinting Is Actually Coding
Inside the Event Graph of BP_PlayerCharacter_Controller Blueprint, Right Click and in the search filter for Cast To BP_PlayerCharacter, then Right Click again and search for Get Player Character:
If you try to press Compile and Save now, you will see an error in the Compiler Results tab at the bottom with the message “The type of Object is undetermined. Connect something to Cast To BP_PlayerCharacter to imply a specific type”:

The reason for this error is that the Cast To node takes a parameter. We want to cast to BP_PlayerCharacter but we didn’t specify who are we casting.
Now that we provided a parameter for the Cast To function it is not showing any errors when we Compile and Save the Blueprint.
The point I want to show here is that Blueprints is actually coding, it’s visual coding, but it is actual code.
The names of the functions that we can access from Blueprints are the same names of the functions that we can access from C++ code along with their functionalities as well.
So even though we are creating nodes and connecting them with each other, we are still writing or Blueprinting code.
Understanding The Concept Of Casting

The reason for that is because we want to cast an object to the BP_PlayerCharacter because we want to get a reference to him.
And the object that we are trying to cast is the one returned from the Get Player Character function.
If we hover over the Get Player Character node in the editor we will see a pop text explaining the use of Get Player Character node:

From the explanation you can see that this function returns the Player Character, NULL if the Player Pawn doesn’t exist or is not a character.
What does this mean?
Inside the Project Settings -> Maps & Modes we set the Default Pawn Class is the BP_PlayerCharacter, this is the field or the object that the Get Player Character function will return.
Because the Get Player Character function will return the Player Pawn and the Player Pawn is determined by the Default Pawn.
But why do we need the cast then? If the Default Pawn is BP_PlayerCharacter can’t we just use it?
Well the issue here is that Unreal Engine doesn’t know that the Default Pawn is BP_PlayerCharacter, because this is a default Blueprint that we created.
This is all related to the casting that we mentioned in the Math Operations With Variables lecture where we performed a cast on an integer to convert it to a float.
The same thing we are doing here, we are performing a cast on the Default Pawn so that we can convert it to BP_PlayerCharacter.
And this is possible because of the inheritance hierarchy. In the lecture about Inheritance In C++ we talked about that we can inherit a class.
This automatically means that the child class e.g. the class that has inherited, can also be identified by the parent class.
For example, if we have a parent class Player, and a child class Warrior, this means that every Warrior is a Player, but the Player is not a Warrior.
The reason for that is because the Warrior class inherits the Player class, but the Player class doesn’t inherit the Warrior class, which means that the inheritance goes backwards not forward.
This is one of the major features of inheritance and that is why we are able to cast the object that is returned by Get Player Character function into the BP_PlayerCharacter.
Now why do we need to cast to the BP_PlayerCharacter in the first place?
Because we want to get a reference to that Blueprint so that we can control its movement from the BP_PlayerCharacter_Controller.
From the Cast To node you will notice two Exec output fields, on one nothing is written and on the other we see Cast Failed.
The first Exec continues the execution flow if the cast has succeeded, and the second Exec continues the execution flow if the cast has failed.
We can test this by adding two Print String nodes:
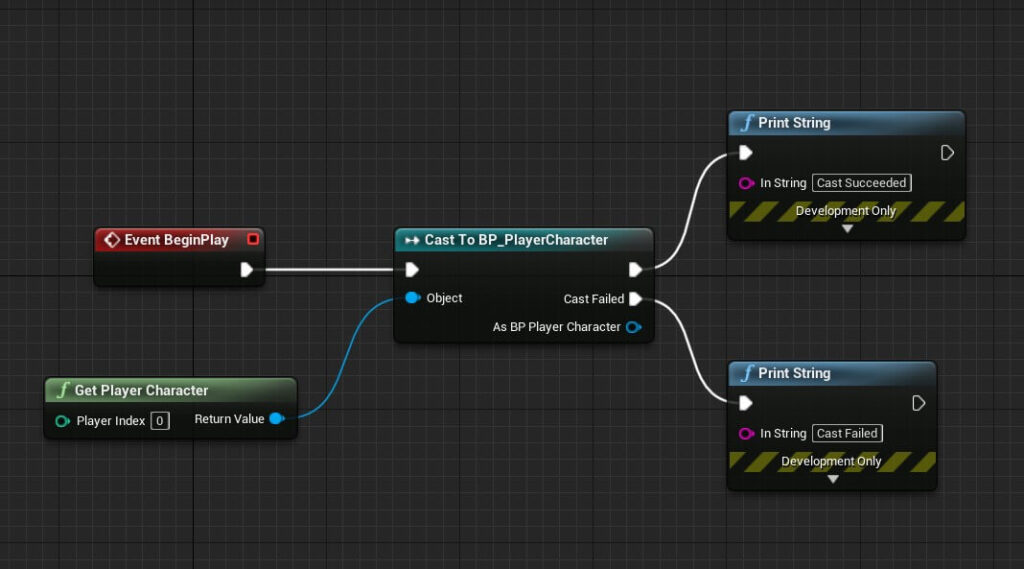
You can copy the nodes from here:
If we run the game now, this is what we will see printed in the Level Editor:

And with this we see that we are able to cast the object returned from the Get Player Character function to BP_PlayerCharacter.
Saving Casted Objects As Variables
Now that we understand what is casting and we know how to cast, let us create a variable from the casted object so that we can have a reference to it.
To create a variable from the casted object we can use the returned value that is returned from the Cast To function because if the cast succeeds, then we can access the casted object.
We can drag a line from the As BP Player Character pin in the Cast To function to create a new node, and from the list, select Promote To Variable, this will create a variable from that object and you will see it under the Variables settings in the My Blueprint tab:
You can change the name of the new As BP Player Character variable by selecting it in the Variables settings by using Right Click -> Rename or clicking on the variable:
Moving The PlayerCharacter


But where did we declare this MoveForward event?
If you hover over the Add Movement Input function node you will see the explanation for it that says that this function adds movement along the given world direction.
And we see that we need to provide parameters for World Direction and the Scale Value.
We can provide the Scale Value by using the Axis Value which is the return value from the MoveForward event.
If you remember inside the Project Settings -> Input -> Axis Mappings we have the Scale value right next to the button that we are using for that Mapping.
That value can be 1 or -1 depending if we are moving in the positive or negative side of the axis that we are moving on, and we explained that using the coordinate system which you can look up in part 2 of this tutorial series.
So for the Scale Value parameter for the Add Movement Input we can pass the Axis Value from MoveForward event.
Now when it comes to the World Direction, since we are moving forward in this case, we can get the current rotation from the Player Character by calling Get Control Rotation function.
From the return value of the Get Control Rotation function we can get the forward vector e.g. the forward direction by calling Get Forward Vector function and pass that as the World Direction parameter:
You can copy the nodes from here:
As you can see the PlayerCharacter is moving forward and backwards when we press the appropriate keys.
To make the PlayerCharacter move left and right we can repeat the same process but this time we will use MoveRight event, and from the Get Control Rotation function we will get the right direction by calling Get Right Vector:

Rotating The PlayerCharacter With The Mouse And Context Sensitive Search
So the PlayerCharacter can move, but we can’t rotate him which means we can’t properly control the direction where the PlayerCharacter is going.
To fix this we are going to use the Rotation Y and Rotation X events that we create along with MoveForward and MoveRight.
So in the Event Graph of the BP_PlayerCharacter_Controller, below the MoveRight event Right Click and search for the two events, don’t forget that they are located under the Input -> Axis Events:

For the Rotation Y we are going to connect it to the Add Controller Pitch Input node, and the Rotation X will be connected to the Add Controller Yaw Input.
One thing that I want to show you is that sometimes it can happen that you can’t find the node function you are looking for when you are searching for it.
This is because you need to turn off Context Sensitive in the All Actions For This Blueprint window:
You might be wondering why are we using Mouse X for the Z or the Yaw rotation, because that is how we are going to rotate the Actor left and right.
And the answer is if you use X or the Roll rotation, it is basically going to make your PlayerCharacter roll over like when a dog or a cat is rolling over.
Why it works like that I don’t know, I’ve searched for an explanation online but I could not find it, the only thing that is important to us is to understand that to rotate an Actor left or right, we use the Yaw axis.
We are still not done because the Add Controller Yaw and Pitch Input also need a target parameter e.g. who are we going to rotate, in our case that is the PlayerCharacter:
You can copy the nodes from here:
Now we can run the game and test it:


Inversing The Rotation
Before we proceed to make the PlayerCharacter jump I want to show a nice little trick when it comes to the rotations.
When we rotate the PlayerCharacter up or down you will notice that we move the mouse up to rotate up and we move the mouse down to rotate down:

When we run the game now, we will see that the rotation will be inversed:
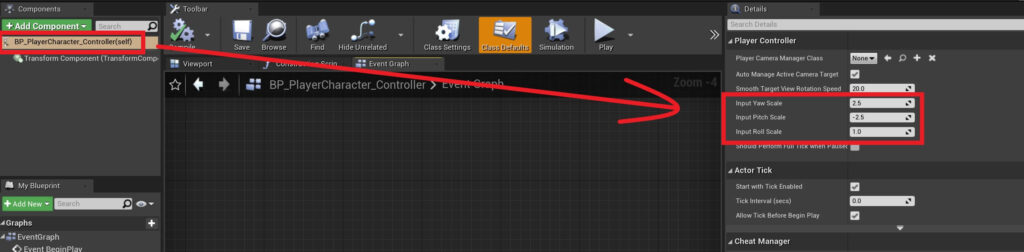
Since we set the Scale value back to -1 for Mouse Y inside the Axis Mappings, you can change the Input Pitch Scale value from -2.5 to 2.5 and you will achieve the same inverse rotation result.
You can also play with the values of other rotations to see the outcome just don’t forget to put the Scale values back to the their original values.
This option is present in FPS games where you have the choice to check the checkbox if you want the mouse to be inverse or not, plus you can use this trick for one of your games as well.
Making The PlayerCharacter Jump

This is the Action Mapping that we defined under Project Settings -> Input -> Action Mappings and we set Space to be the button that will trigger this action mapping, which means when we press the Space Bar key on our keyboard the PlayerCharacter will jump.
Next, drag the Player Character variable in the Event Graph and chose Get Player Character so that we have a reference to it:
From the Player Character node, drag a line to place a new node and from the search filter for Jump, and locate the Jump function under Character:
The Jump function takes a parameter Target e.g. the object who will jump or on who the jump functionality will be performed.
When the Jump node is created it automatically has connected the Player Character in the Target parameter since we dragged the node from the Player Character.
Now you will notice that we have two Exec options for the Jump input action, one is Pressed and the other is Released, and you can assume from their names what they are for.
Pressed is when the button that will be used for the Jump input action is pressed, and released is when that button is released, meaning you can perform actions when the button is pressed or released.
We want to make the PlayerCharacter jump when the button is pressed so connect the node from the Pressed Exec of the Jump input action and connect it to the Jump function:

You can copy the nodes from here:
Changing The Movement Speed And Jump Velocity
We can also change the movement speed to make the PlayerCharacter move faster or slower.
And we can also make him jump higher by changing the jump velocity or force that is applied when the PlayerCharacter jumps.
To do that, we need to go in the BP_PlayerCharacter Blueprint so open it in the editor.
In the Components tab click on the Character Movement component at the bottom:


Let’s test the game and check out the speed of the PlayerCharacter:
As you can see the PlayerCharacter was moving faster when the value of the Max Walk Speed was higher, and he walked slower when the value was slower.
To make the PlayerCharacter jump higher, inside the Jump / Falling settings change the value for the Jump Z Velocity.
Currently the value is set to 420, you can change it to a higher value to make the PlayerCharacter jump higher, or a lower value to make him jump lower:

Let’s test the game and check out the jump of the PlayerCharacter:
While the jumping feature is not important for our game, I just wanted to show you how you can use it because it’s very easy to set up.
Blueprint Comments
One really cool feature of Blueprints is the ability to use comments to document our nodes same as how we can use comments in code to document the code we write.
To create a comment inside the Blueprint editor, first you need to select a node or a group of nodes you want to comment, and then right click on any selected node and at the bottom click on Create Comment From Section:

When the comment box appears you can then write a comment about the block of nodes that you selected:
You can also select the comment box and move it around which will move all the nodes that under that comment box:
Where To Go From Here
In this tutorial we learned how to use a Player Controller to control the movement and rotation of game characters. And we also learned how Blueprint code works.
In the next part of this tutorial series titled Creating The First Obstacle And Moving It With Blueprint Code you will learn more about Blueprint coding and how to create Obstacles for our level.
Comments are closed.