Creating The Moving Cube Obstacle Blueprint
Inside the Blueprints folder in the Content Browser tab Right Click -> Blueprint Class and set the class to inherit from the Actor class:

Give the new Blueprint name BP_MovingObstacle and open it in the Blueprint editor.
Under the Components tab click on the green Add Component button and filter for Static Mesh and add that component to the Blueprint:

Rename the Static Mesh component by Right Click -> Rename or clicking on the name of the component once you have selected, or select it and press F2 and give it a name Mesh – Obstacle.
For the mesh object we are going to filter for Shape_Cube and for the material of the mesh use M_Brick_Clay_Old:
Again, don’t forget that every time you make a change in a Blueprint, press Compile and Save otherwise the change you made will not reflect, and take this as the most important rule when it comes to Blueprint visual coding.
Before we attach more components to the BP_MovingObstacle blueprint, I am going ti make the Mesh – Obstacle component the root component by dragging it on the DefaultSceneRoot in the Components tab:
The root component defines the Transform e.g. Location, Rotation, and Scale of the Actor in World space e.g. inside the level.
All other components will be attached to the root component and when we move them around their location e.g. position will be in respect to the root components location.
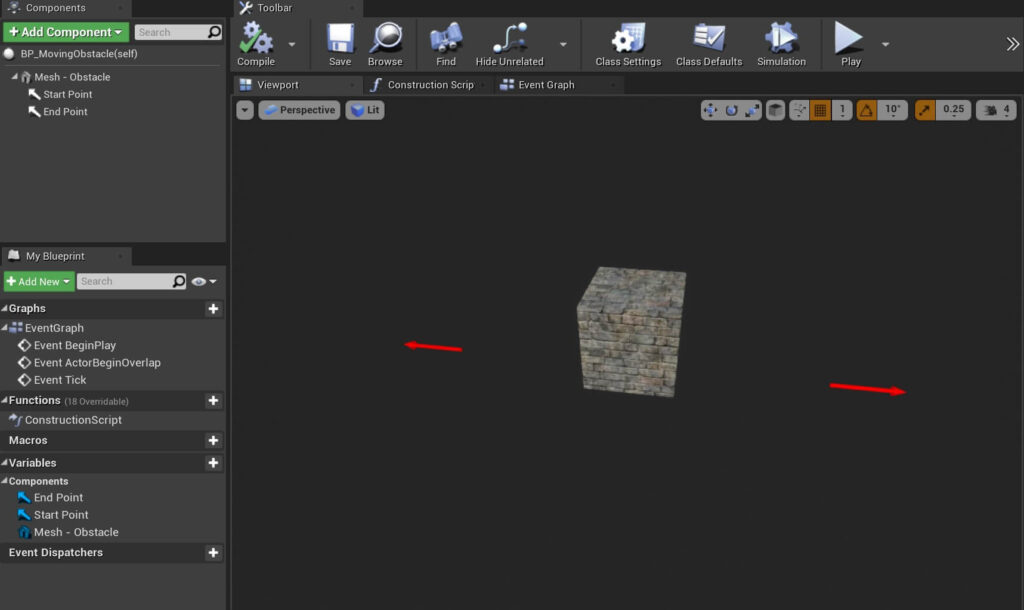
Now we are going to attach a new component to the MovingObstacle Blueprint so click on the Add Component button and filter for arrow:

- X = 222
- Y = 0
- Z = 0
- X = -222
- Y = 0
- Z = 0
- X = 0
- Y = 0
- Z = 180
Blueprint Variables
To make the Obstacle move between the Arrows, we need to create variables that will store the position of the Arrows when the game starts.
We saw examples of variables in the Introduction To Variables lecture, but these are C++ variables that we write in code.
Well, we have the same variable types inside the Blueprints that we can declare and use.
We can declare variables inside the Blueprint by clicking on the + button for the Variable list inside the My Blueprint tab:

When you click on the + button a new variable will be created and you will see it under the Variables list.
Usually when a new variable is created, its type is the same as the type of the previous variable that we created.
In our case, since this is the first variable we created for this Blueprint, the type is a bool.
We can see that because of the icon that is on the left of the variable name:

You can also hover over that icon and you will see that the current type is boolean:

We can also select the variable, and inside the Details tab we will see information about the variable such as its type, name and so on:


Or we can select the variable in the Variables list, and inside the Details tab click on the drop down list under the Variable Type and select the type of variable that we want:

Also, when the variable is declared it will have a default name like the one you see for our variable which is NewVar_0.
You can rename the variable the same way as we rename components and you can also rename it by selecting it from the Variables list, and inside the Details tab change the name of the variable inside the Variable Name field:

Declaring Variables For The MovingObstacle Blueprint
Now that we know how to declare variables let us declare all the variables that we will need for the MovingObstacle Blueprint:

As you can see we have in total 7 variables that we will use to move the Obstacle from Start Arrow to End Arrow.
We have the float type Frame Time variable which is going to represent the delta seconds time between each frame e.g. the time between each frame, and we will use this variable to smooth the movement of the Obstacle.
Next we have the float type Movement Speed which is the variable that will determine how fast the Obstacle can move between two Arrows.
Current Location is a vector type variable that we will use to store the current location of the Obstacle.
The Target Location is also a vector type variable that will represent the location where we need to go e.g. the location where the Obstacle is moving to.
Move To Start Point is a bool type variable that we will use to determine if we should move to the Start Point Arrow or to the End Point Arrow.
The Start Point Location is a vector type variable where we will store the location of the Start Point Arrow inside the level world.
And the End Point Location is a vector type variable which will store the location of the End Point Arrow inside the level world.
Declare all these variables with the same types and names as I have declared them.
Public And Private Blueprint Variables
Same as with C++ variables, we can also make the Blueprint variables public and private.
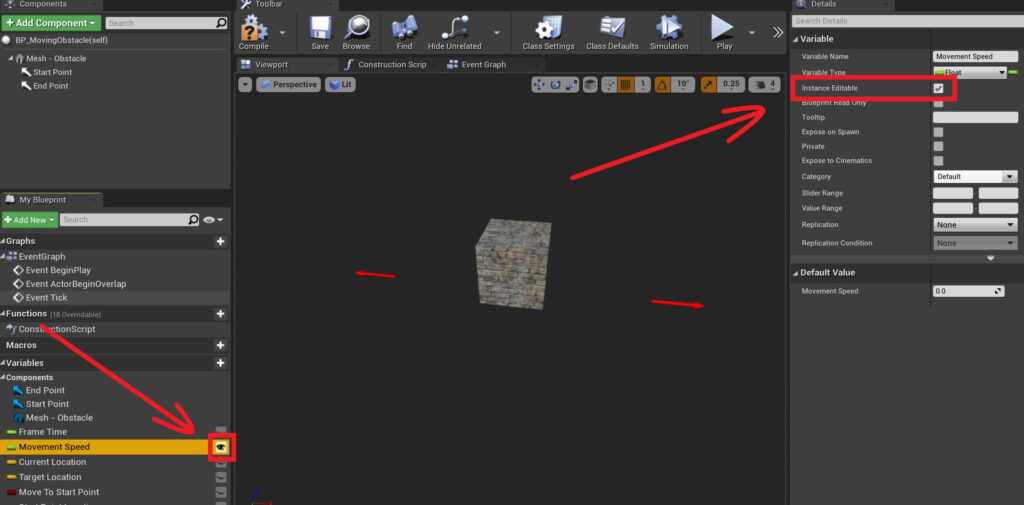
We can set the Blueprint variable to be public or private by selecting the variable in the Variables list, and inside the Details tab check or uncheck the Private checkbox:

Setting the variable to private like this will make it accessible or not accessible by other Blueprints, basically the same way how private and public works in C++.
There is another feature that will allow us to make the variable editable or not editable on the instances of the Blueprint.
What does this mean?
Let’s drag the BP_MovingObstacle from the Blueprints folder inside the level and then select it from the World Outliner.
Inside the Details tab we will see all the normal options we have for an Actor:
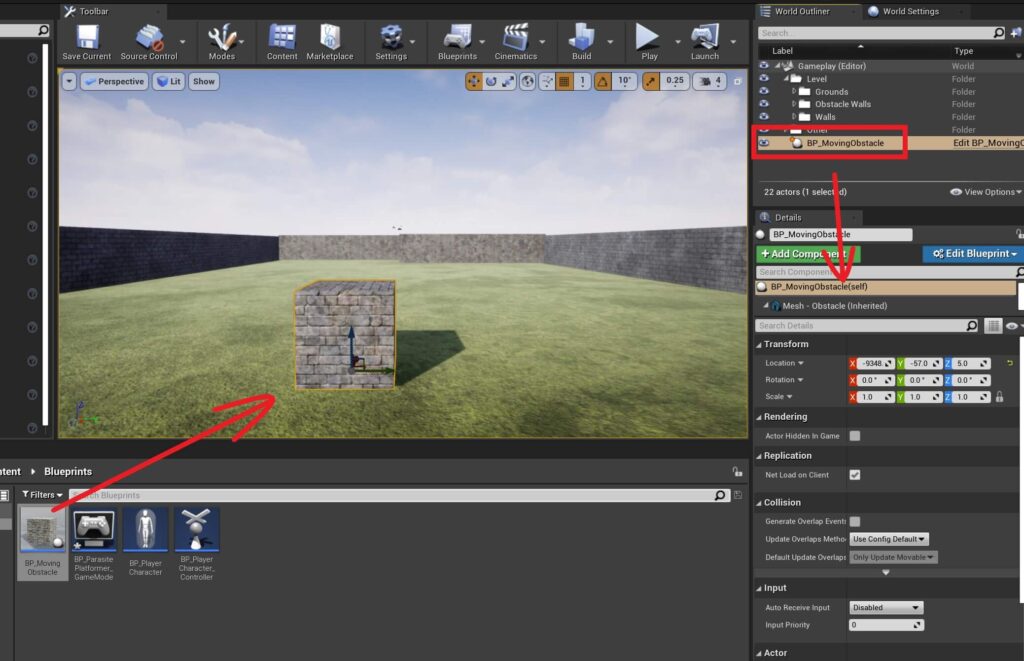

This way we can now edit the Movement Speed variable value directly on the instance of the BP_MovingObstacle which means for every instance e.g. object that we create from the BP_MovingObstacle inside the level, we can set a different value for the speed.
For the BP_MovingObstacle, Movement Speed and Move To Start Point variables are going to be Instance Editable so make sure that you enable that for both variables using one of the ways that we already explained above:

When you are done, press the Compile and Save buttons for those changes to take affect on the BP_MovingObstacle Blueprint.
Setting The Default Values For Blueprint Variables
While we can edit the variable values on the instances of the Blueprint, we can also set a default value for every variable that we create.
The default value will be applicable to every instance of the Blueprint and that is the value that will be used in case that we don’t change the that value by making the variable visible in the Details tab.
To set a value for the variable, inside the Blueprint editor for the BP_MovingObstacle Blueprint, select the variable you want and inside the Details tab you will see Default Value setting and below it you can set the value that you want:
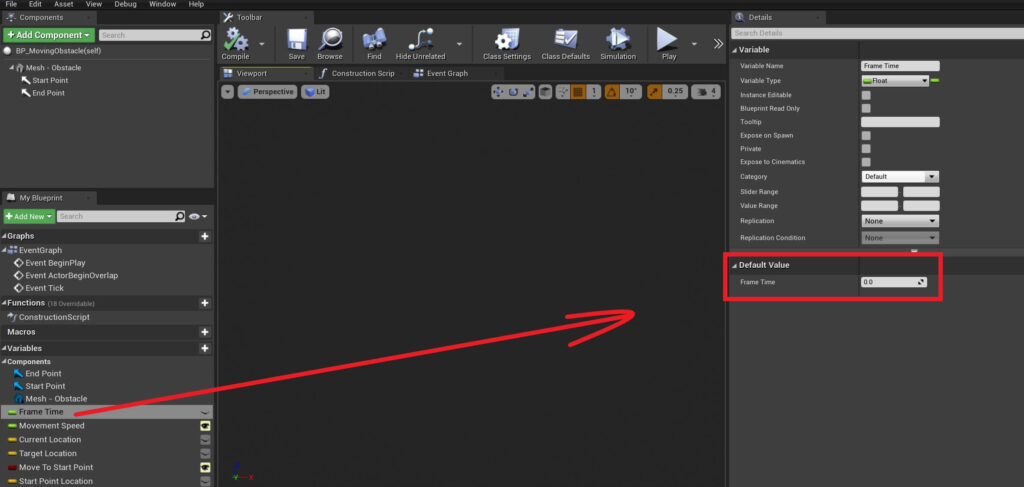
If you don’t set any value for the variable you will see its default value which for a float is 0.0
For the BP_MovingObstacle we are only going to set the default value for the Movement Speed variable, so make sure that you select it and set its value to 200:

Setting The Variable Values Inside The Blueprint Editor
We already saw this and we know that the Getter will get a reference to the variable and we can then call functions and variables of that reference or we can use its value.

You can copy the nodes from here:
Using Components As Variables
The components we attach to an Actor such as Static Mesh, Arrows, and so on, can also be used as variables inside the Blueprint.
If you take a better look under the Variables list, you will see another sub list Components and under that list you will see a list of components that we attached on the MovingObstacle Blueprint:

You will also notice that the names of the components are the same as the ones we gave them under the Components tab.
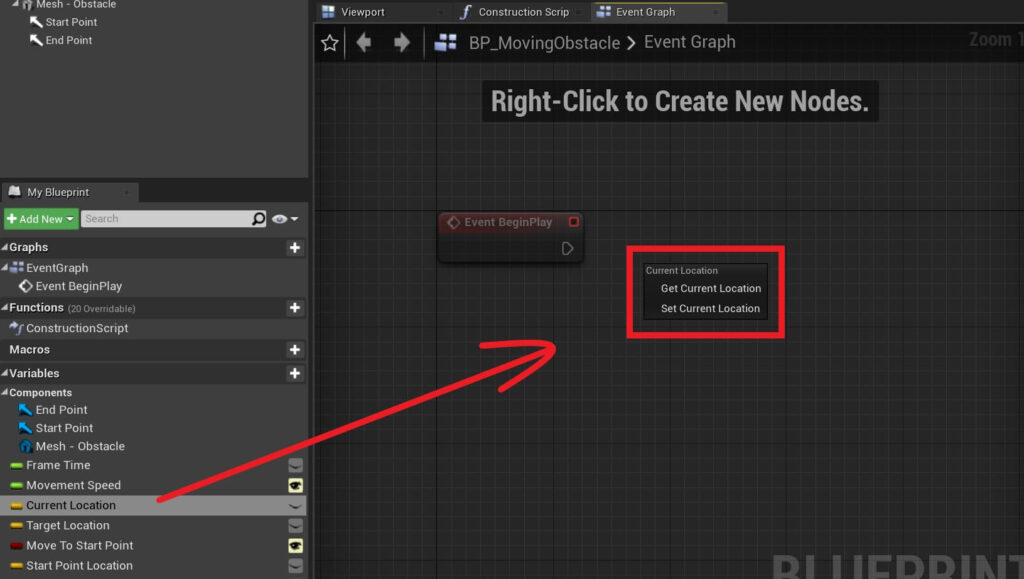
We can get a reference to these components inside the Event Graph by dragging them from the Variables list:
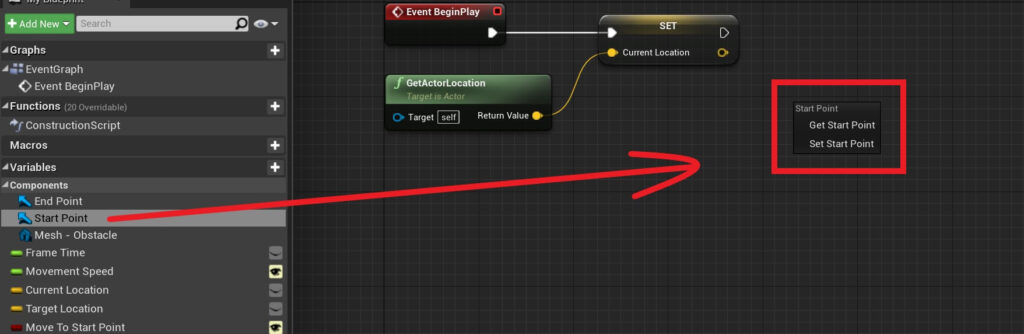
When we drag a component like this we can select if we want the Getter or the Setter for that component.
We can also drag the component directly from the Components tab, but in this case we can only create a Getter for that component and not a Setter:
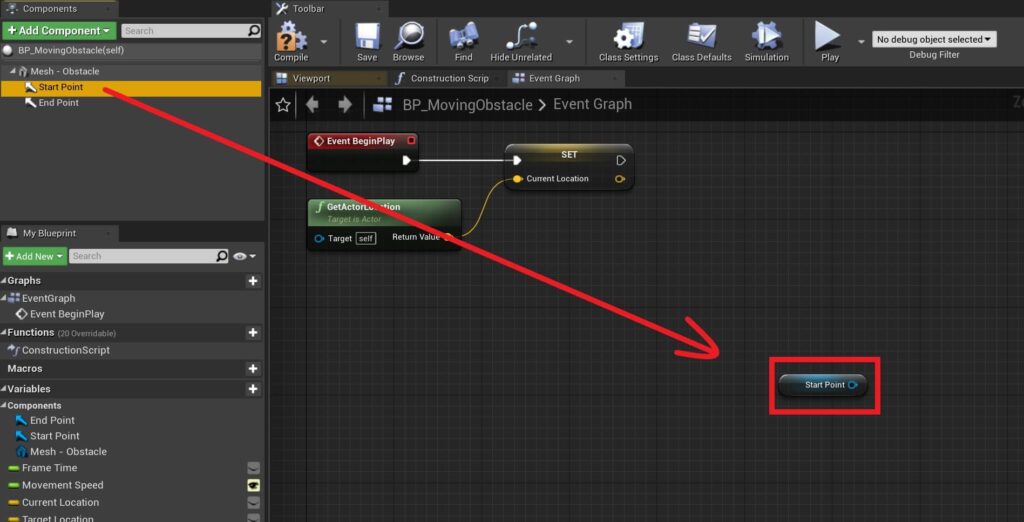
You can copy the nodes from here:
If Else Statements For Blueprint Code
The Move To Start Point variable is going to control whether we are moving the Obstacle towards the Start Point Location or the End Point Location.
We also made this variable Instance Editable which allows us to edit it on every copy of the BP_MovingObstacle Blueprint.
This way we can create multiple Obstacles and every Obstacle can start the movement in the opposite direction e.g. one Obstacle will move towards the Start Point Location and the other will move to the End Point Location.
To control this, we need an if statement so that we can test if the Move To Start Point bool variable is true or false.
In Blueprint visual coding, the if statement is represented with a Branch, it’s basically the same thing as the if statement except the name is different.
So the next step after we set the value for the End Point Location is to create a branch, and this can be done by Right Click and in the search field type branch:


Take the Move To Start Point variable and plug it in the condition of the Branch.
If the condition is true we are going to set the Target Location to the Start Point Location, and if the condition is false we are going to set the Target Location to the End Point Location:
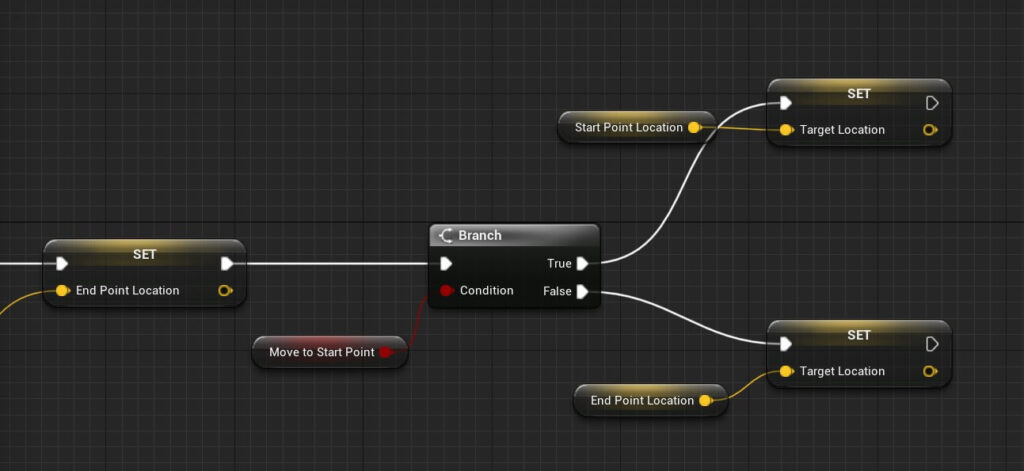
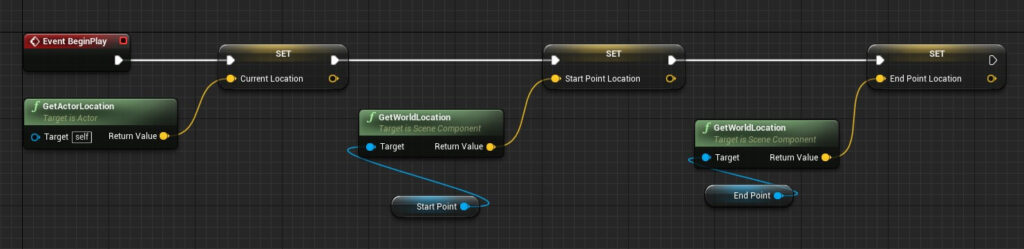
So first we set the values for the Start Point and End Point Locations by getting the Start Point and End Point Arrows and getting their world locations which will get us the locations of those Arrows inside the level.
Next we check if the Obstacle should move to the Start Point, if it’s true, we set the Target Location to the Start Point Location, if it’s false, we set the Target Location to the End Point Location.
We already mentioned this but you can also see from this set up that we will use the Target Location vector variable as the destination when we move the Obstacle Blueprint in the code.
Moving The Obstacle

You can copy the nodes from here:
As you can see, we can control the Arrows inside the Level editor by selecting them in the Details tab after we selected the BP_MovingObstacle in the World Outliner.
We can then move the Arrows anywhere in the level and when the game starts, we will store their world location in the Start Point and End Point Location variables in the Blueprint and we will use those values to move the Obstacle from one location to the other.
Before we run the game to test it, next to the Play button in the Editor there is a drop down list, click on it and under the setting where it says Spawn Player At click on the Current Camera Location:

As you can see the Obstacle is moving to the Start Point Location when the Move To Start Point bool variable is checked and it moves to the End Point Location when the Move To Start Point bool is not checked.
We also saw that the Obstacle was moving faster when we changed the Movement Speed to a higher value.
The same way it would move slower if set a lower value for the Movement Speed variable.
The cool part about this method is that you can move the the Start Point and the End Point Arrows anywhere in the level and when the game starts the Obstacle will move between them.
Moving The Obstacle Between Two Points


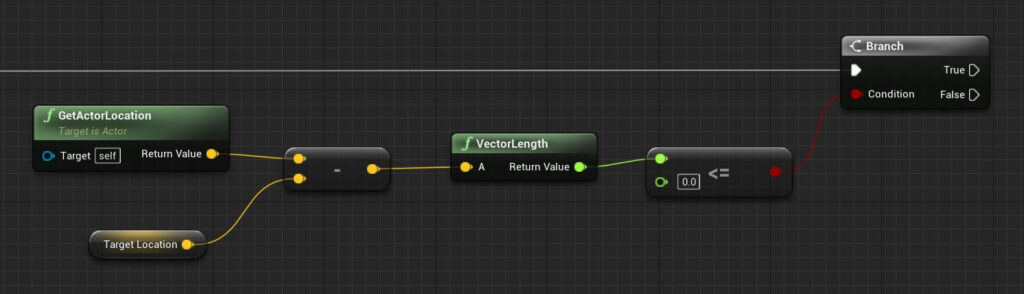
In the first parameter plug in the return value from the GetActorLocation function, and in the second plug in the Target Location because we are subtracting the Target Location from the Actors current location.
This calculation will return a new vector variable which is the subtraction of the two mentioned vectors above.
From the returning value of the vector – vector function, drag a node and search for vector length:

As you can see the VectorLength function returns a float value. That float represents the length of the vector.
We can think of the length of the vector as all 3 axis e.g. X, Y, and Z, combined into one straight line, and the length of that line is the length of the vector.
In our case, the closer the Actor location is to the Target Location, the length of the vector will be smaller.
We can use that to our advantage and compare the returned value of the VectorLength function with 0(zero) and that will be our condition for the Branch.
To compare variables to each other, Right Click and in the search bar type the comparison you want to make e.g. >, <, >=, <=, ==, and you will see functions for comparing different variables like floats and integers:

You can copy the nodes from here:
As I already mentioned, every functionality that we have in C++ we have in Blueprints as well which we see from the comparison node which allows us to compare two variables the same way we compare them using C++.
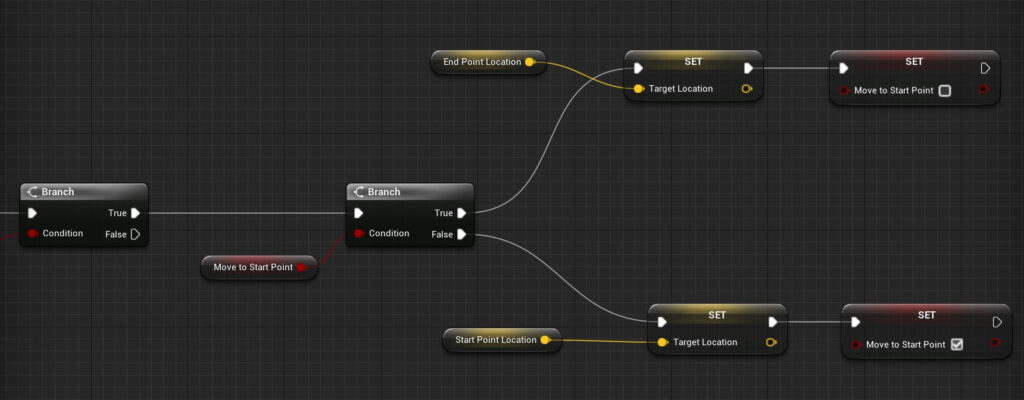
If the condition that we set up is true meaning the length of the returning vector when we subtract the Target Location from the Actors current location is less than or equal to 0(zero), we are going to go inside another Branch.
The condition for that Branch is going to be the Move To Start Point bool variable.
The reason for that is when we reach the Target Location we need to change the movement of the Obstacle e.g. if the Target Location was the Start Point Location and we reach it, now we need to make the Obstacle move to the End Point Location which means we need to set the Target Location to be the End Point Location:
You can copy the nodes from here:
If the Move To Start Point is true, we need to set the Target Location to the End Point Location so that now the Obstacle will start moving towards the End Point Location, as we already explained.
If the Move To Start Point is false we need to do the vice-versa e.g. we set the Target Location to the Start Point Location so that the Obstacle continues moving towards the new Target Location.
What is also important is to change the Move To Start Point value when we change the movement.
So when we set the Target Location to the End Point Location, we set the Move To Start Point to false denoting that we are not moving towards the Start Point Location but we are moving towards the End Point Location.
And when we set the Target Location to the Start Point Location we set the Move To Start Point to true.
If we don’t make these changes then again our Obstacle is only going to move towards the Target Location once and then stop moving.
We can now test the game and check out the movement of the Obstacle:
Creating Multiple Obstacles For Our Level
Where To Go From Here
In this tutorial you learned more about Blueprint coding by making the Obstacle move between two points. And we also created the first row of Obstacles for our level.
In the next part of this tutorial series titled Creating The Fire Obstacle Using Inheritance you will learn how to use inheritance to extend the Blueprints we created and create new Actors for our game.

Comments are closed.