Create A 2D Game With Unity Engine Part 7: On Click Listeners, Singleton Patterns And Loading Scenes

Table of Contents

Create A 2D Game With Unity Engine Part 7: On Click Listeners, Singleton Patterns And Loading Scenes

Reading Time: 15 minutes
Level: Beginner
Version: Unity 2020.3.1 LTS

Help Others Learn Game Development

In part 6 of this tutorial series we learned about Unity’s UI system and we created our main menu along with the character select buttons.

In this part we are going to learn how to interact with UI buttons, how to navigate between scenes and we will learn about the singleton pattern which is one of the most important concepts of Unity game development.

Button On Click Event Listener
So the idea of the two buttons is that they will allow us to click on one of them, and the player character that is on the image of the button will be the selected player with which we will play the game with.
 
Before we get to the point where create the character select system, we need to learn how execute code when a UI button is pressed.
 
First, inside the Assets -> Scripts folder, Right Click -> Create -> Folder, and name it Controller Scripts.
 
Inside the Controller Scripts, Right Click -> Create -> C# Script and name it MainMenuController.
 
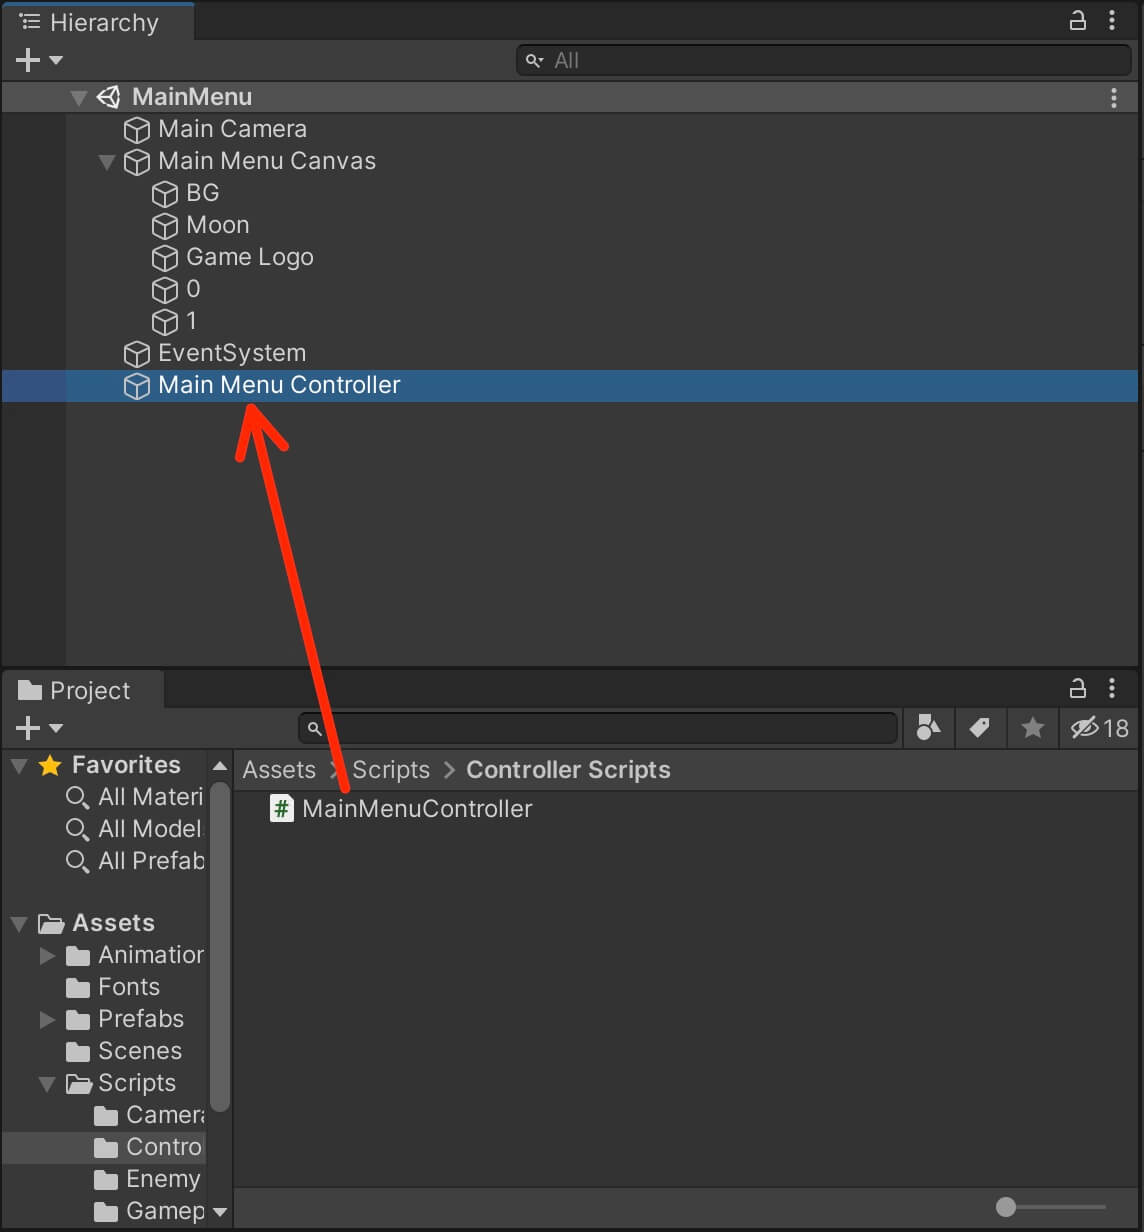
In the Hierarchy tab, Right Click -> Create Empty, name the new game object Main Menu Controller and attach the MainMenuController script on him:
 
Img 1

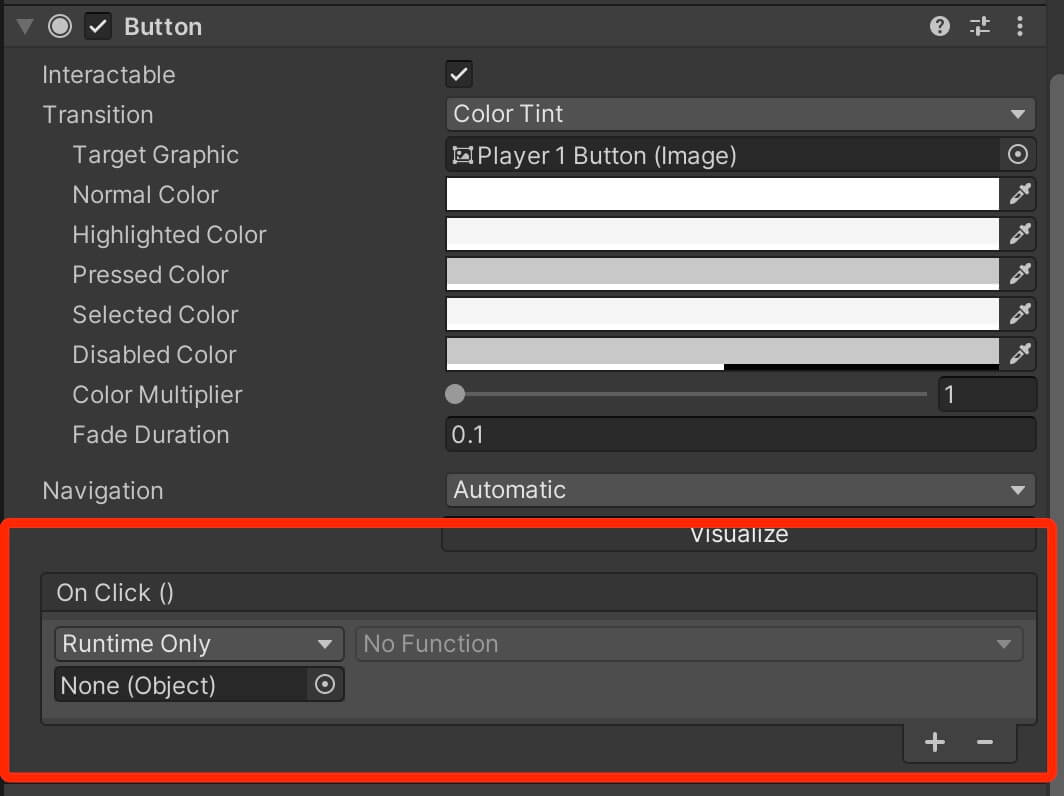
Now, to execute a function when we press a button we need to create a OnClick listener for that button. To create a OnClick listener, select the Player 1 Button in the Hierarchy, and in the Inspector tab scroll down until you see the Button component and the On Click empty list:
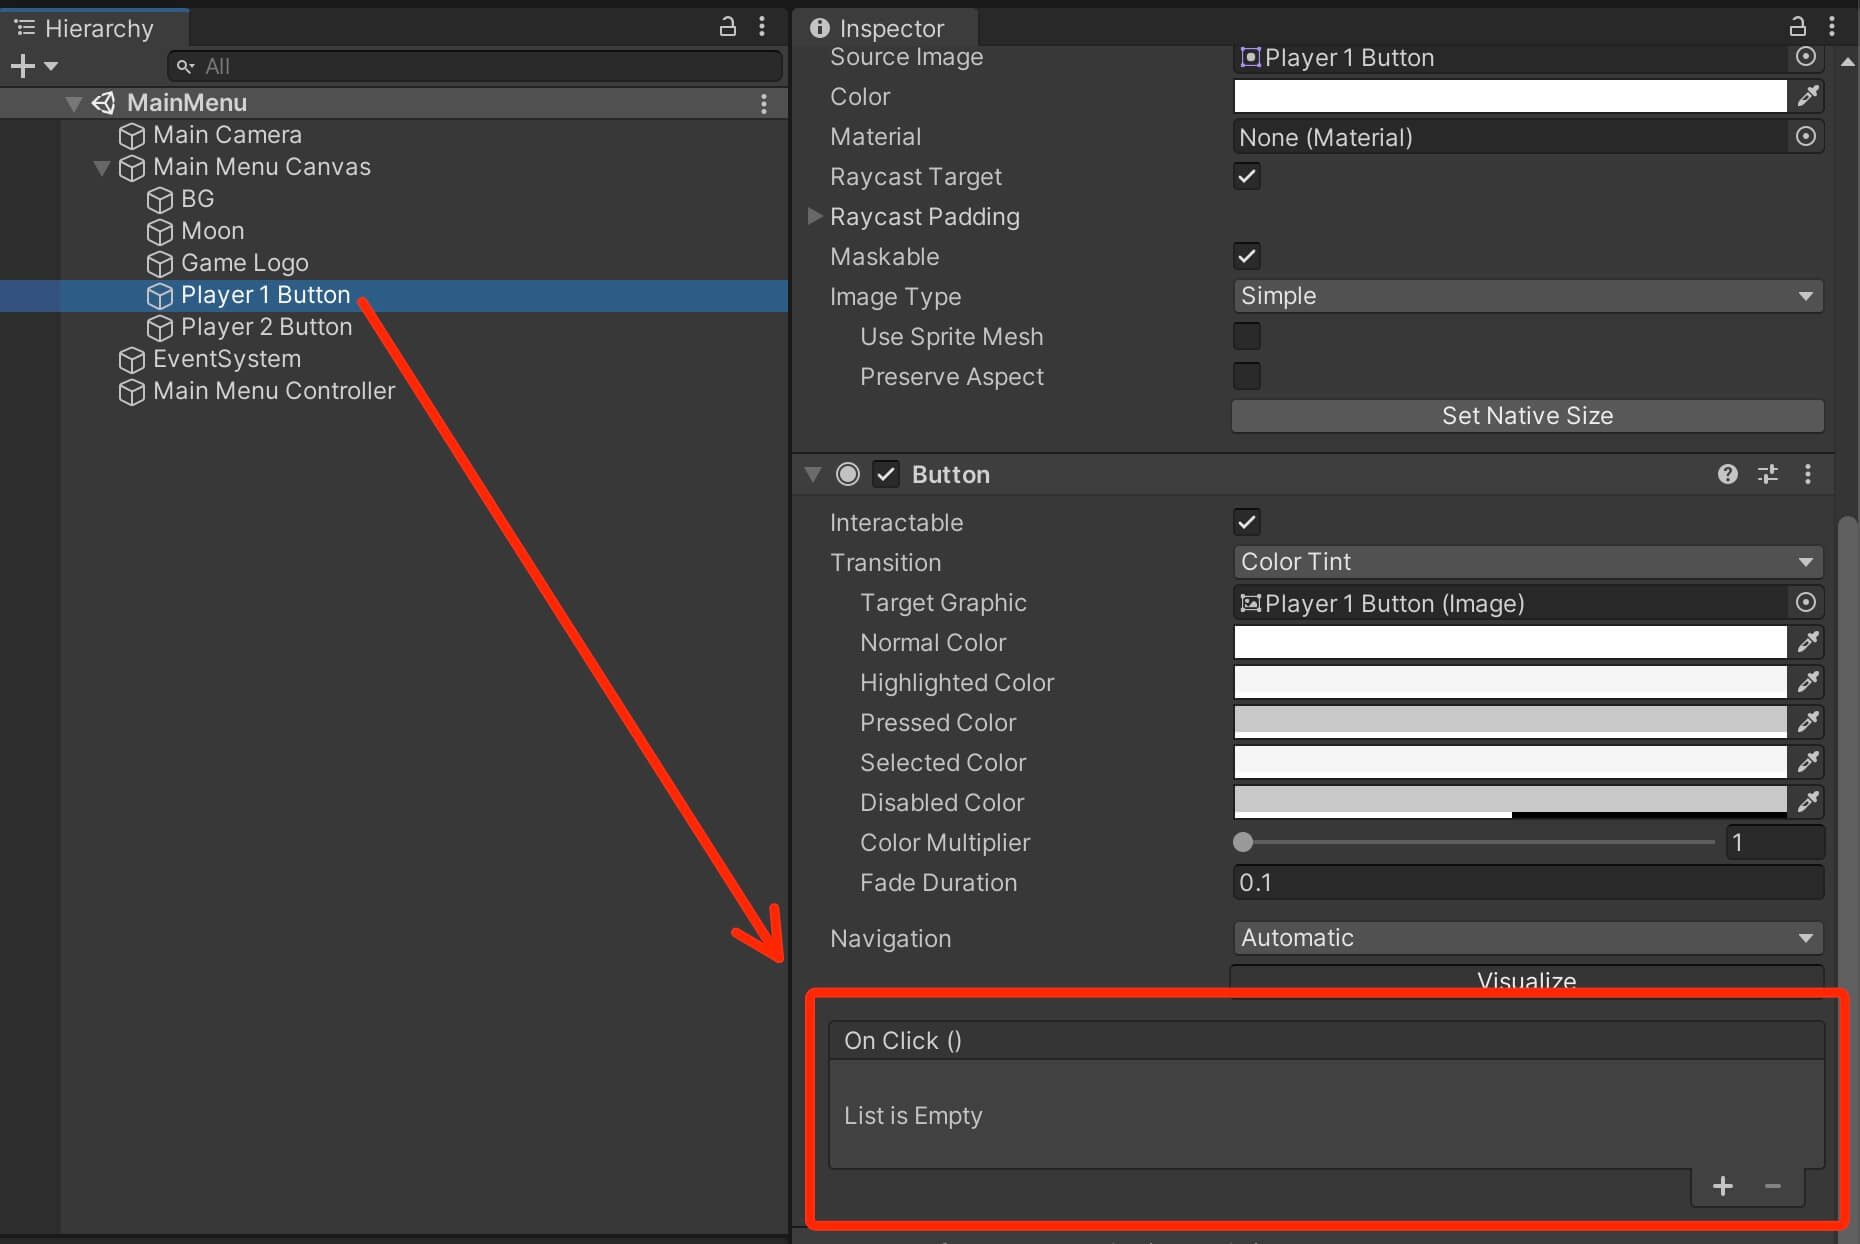
Img 2
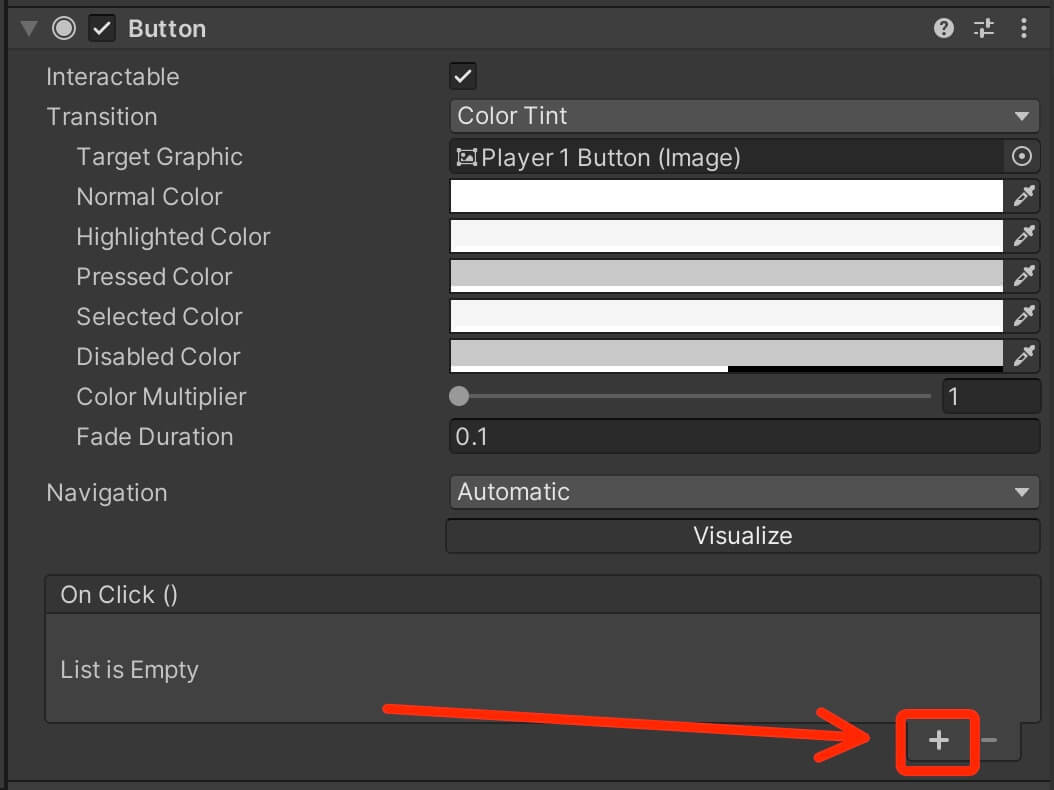
To add a new listener in the On Click list, click the + button at the bottom right:
 
Img 3
This will create an empty field in the On Click list:
 
Img 4
So what do we need to attach in this empty field to make this work?
 
In the empty field we need to attach a game object that carries a script that contains a function that we want to execute when the button is pressed.
 
We already created our MainMenuController, but we didn’t create any function in it. So open the MainMenuController script and add the following lines of code:
 
				
					public void PlayGame()
    {
        Debug.Log("The button is pressed");
    }


Now select the Player 1 Button in the Hierarchy and drag the Main Menu Controller game object in the empty field:
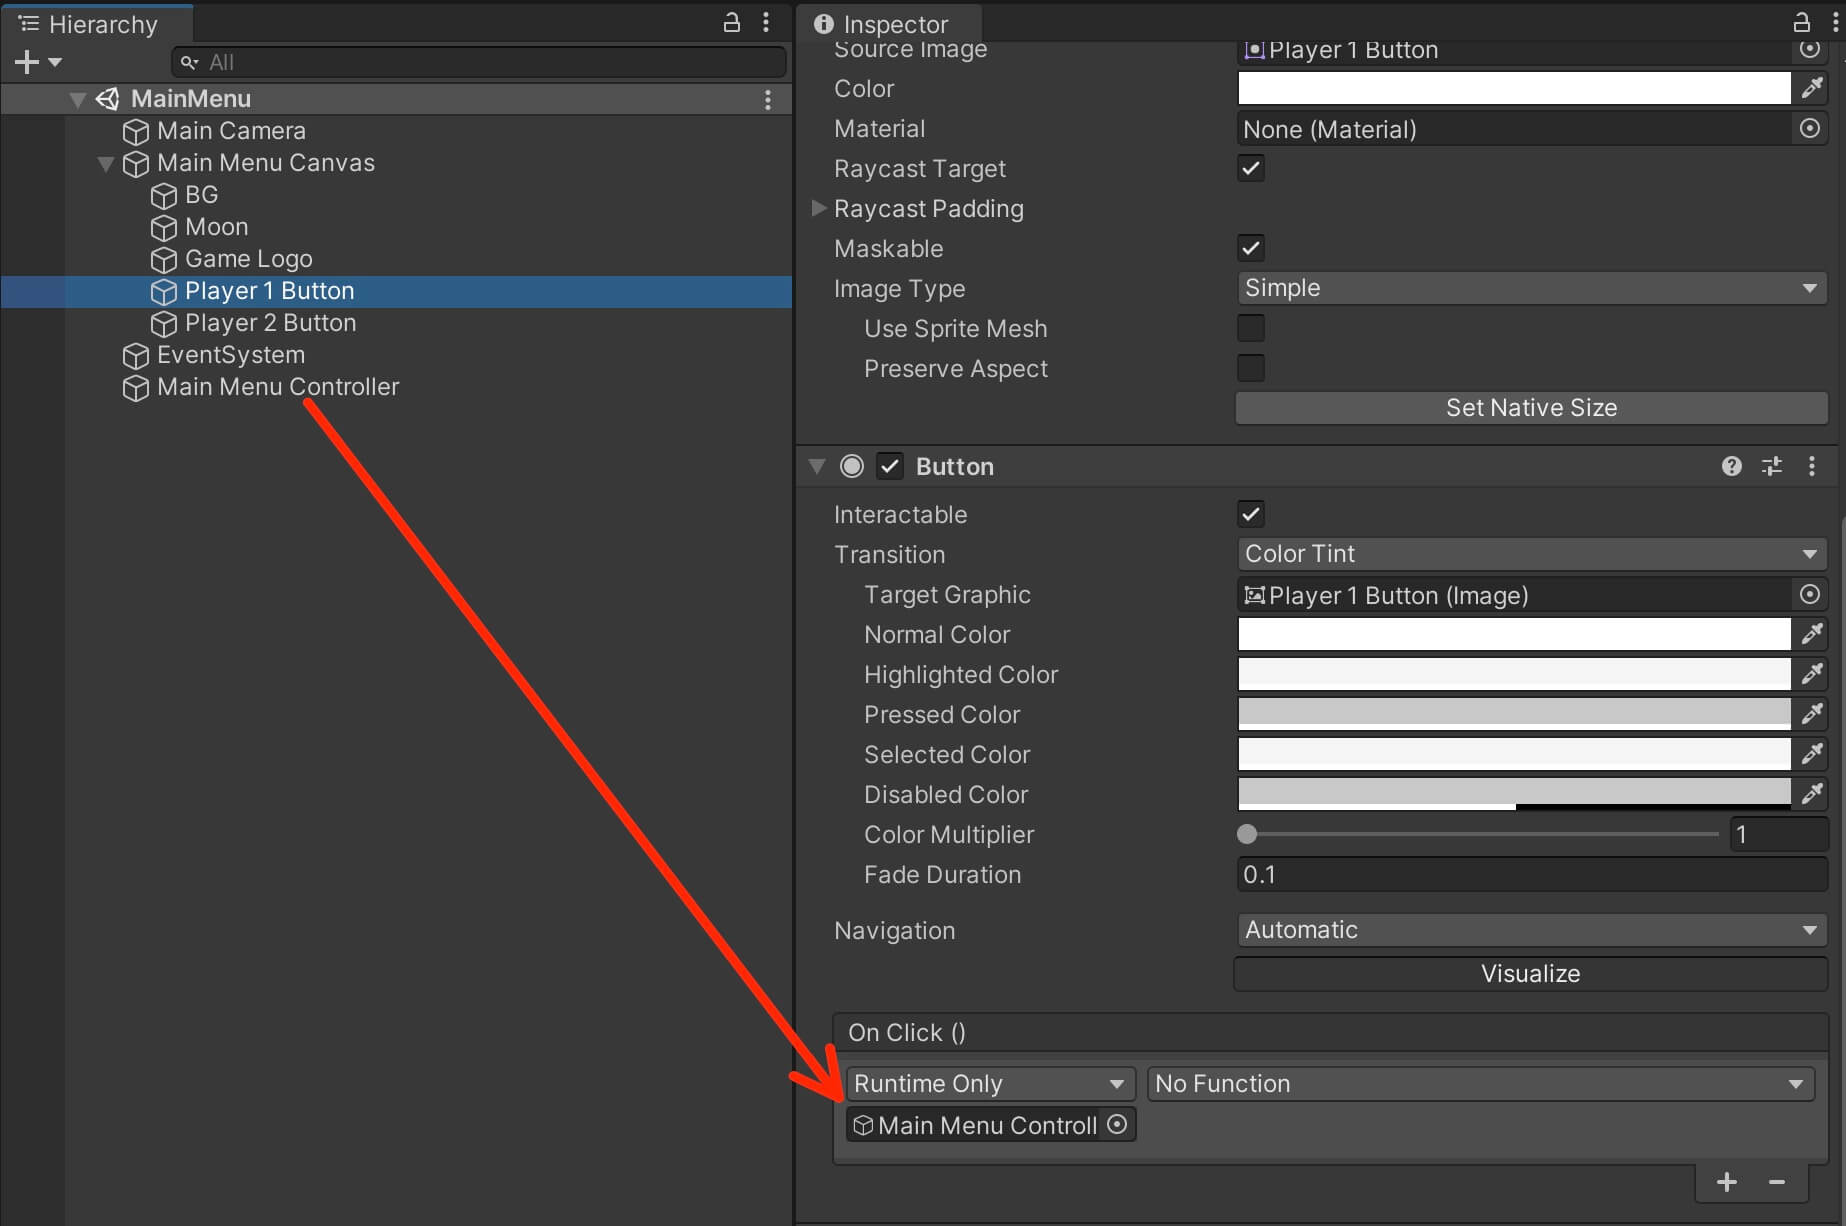
Img 5

Now from the drop down list on the right side where it says No Function, click on it, search for the MainMenuController script and then the PlayGame function of that script and select it:
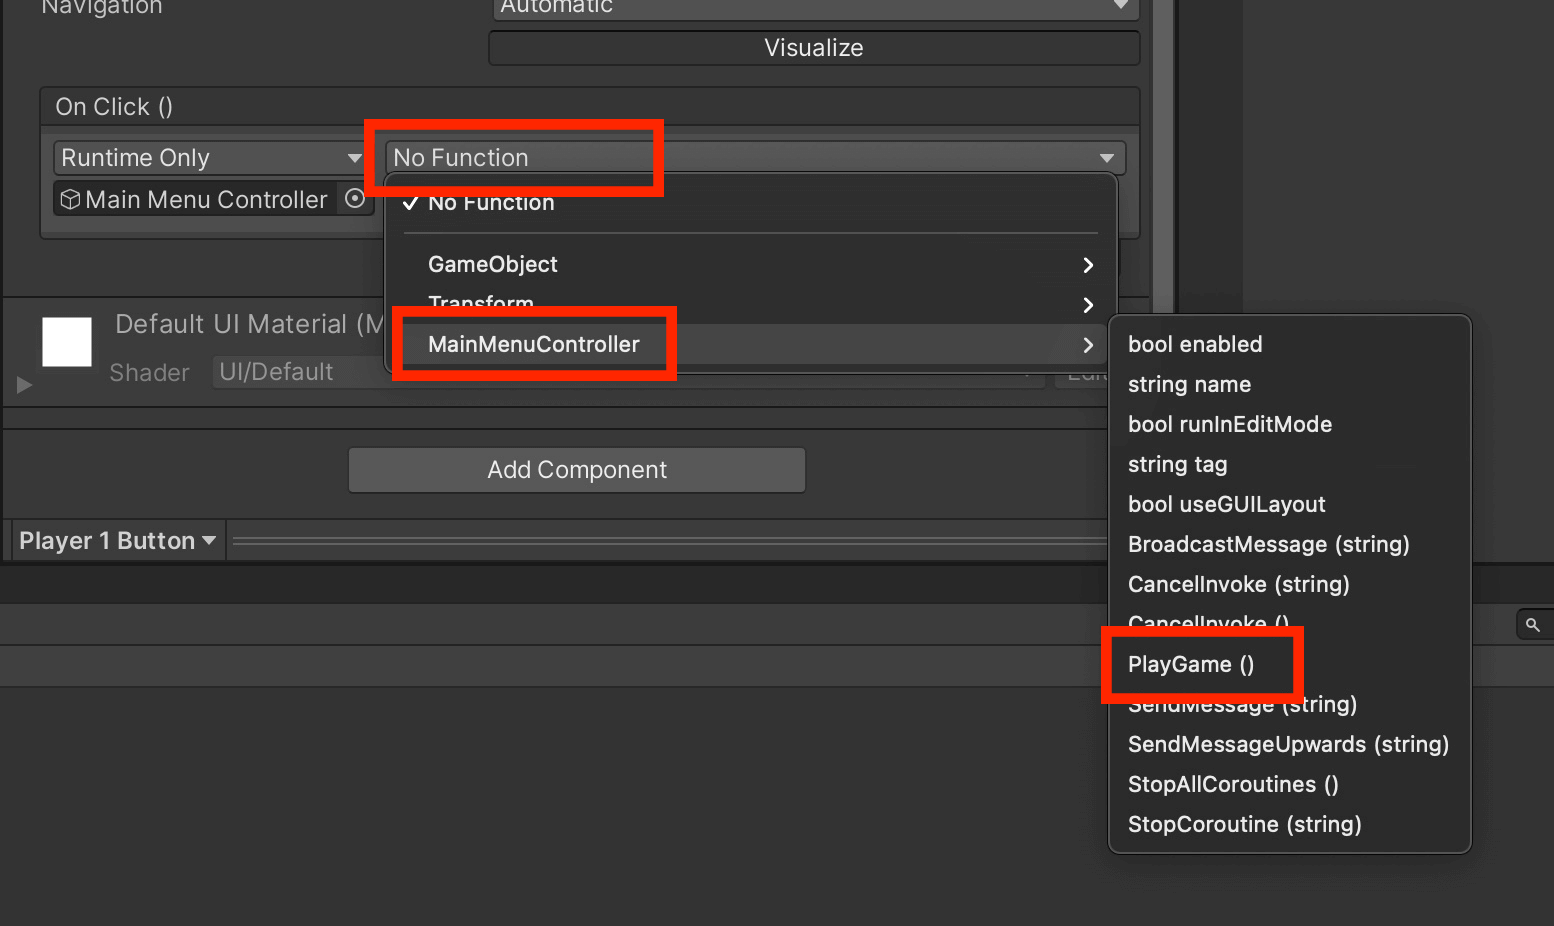
Img 6

Now in the On Click list you will see the MainMenuController script and the PlayGame function of that script:
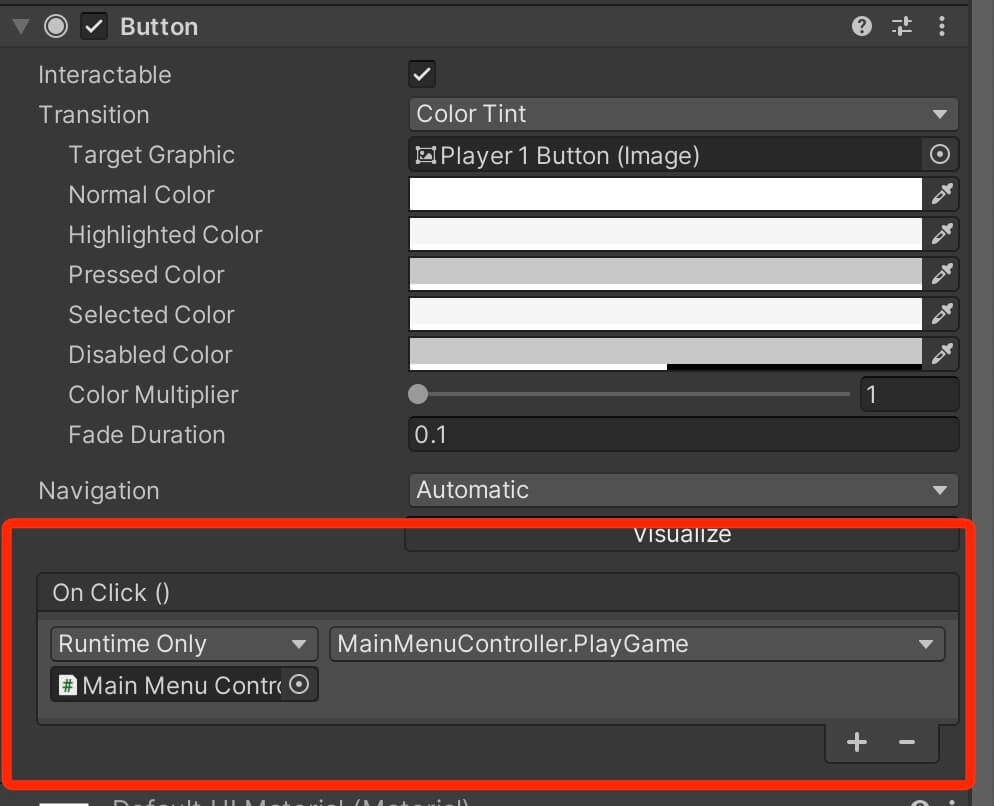
Img 7
This means, when we press the Player 1 Button, the PlayGame function of the MainMenuController script will be executed.
 
We can test that by running the game:
 
Every time we press the Player 1 Button the PlayGame function will be executed which we saw by the print statements in the Console tab that are printed from the PlayGame function using Debug.Log.
 
What’s important to know is the function you want to use as a OnClick listener for a button, the function must be public, void, it can be without parameters or it can take only one parameter.
 
The type of the parameter that the function can take can be a float, string, int, or an object.
 

Build Settings

Because this is a basic game, the purpose of the main menu is to allow us to select a  game character with which we will play the game, and then load the Gameplay scene.
 
To load scenes in Unity, we need to add them in the build. We talked about that concept in the Rainy Knifes tutorial.
 
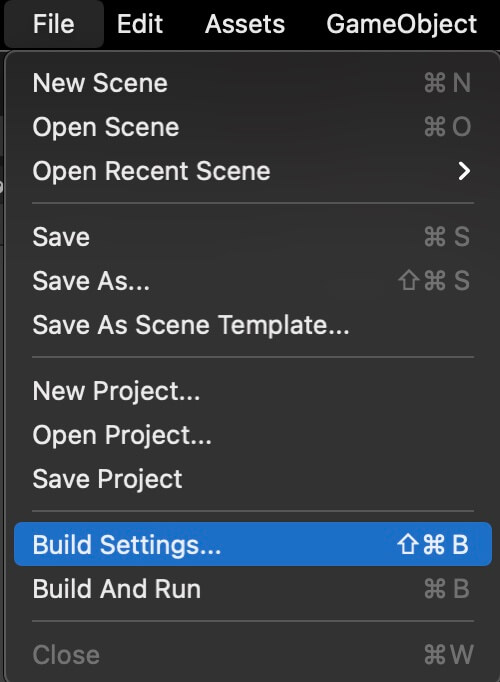
When you want to add a specific scene to the build, you need to first open that scene, then click on File -> Build Settings to open the Build Settings window:
 
Img 8

In the Build Settings, click on the Add Open Scenes button and it will add the current scene you have opened, to the build:
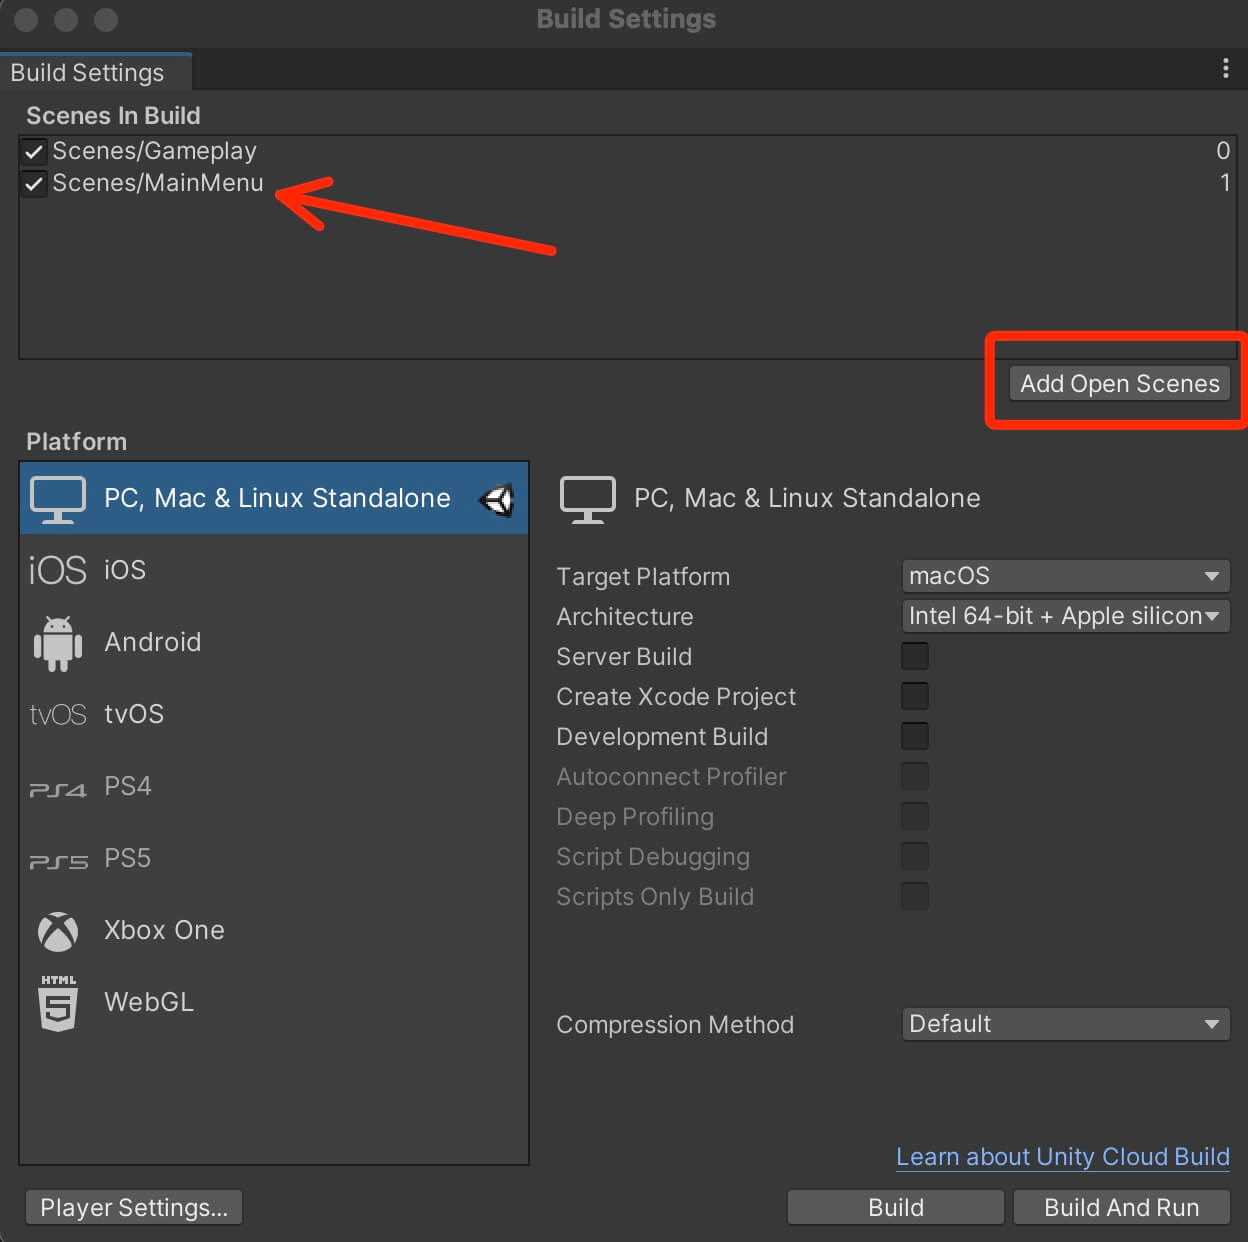
Img 9

One thing that is important when it comes to Build Settings is the order of the scenes in the list. Because the first scene in the list will be the first scene that is called when you export the game on any platform.

You can also see the index numbers on the right side of the scenes indicating the placement of the scene in the list. The scene that has index 0 is the first scene in the list and the first scene that will be called when the game runs on any device:

Img 10

In our case the Gameplay scene is the one that will be called first, which is not what we want. We can fix this by rearranging the scenes in the build list by dragging them:

We only have two scenes, but you can rearrange any number of scenes the same way you saw in the example above.

Navigating Between Scenes

Now that we added the scenes to the build, we can navigate between them via code.
 
We already showed an example of this in the Rainy Knifes tutorial where we used the SceneManager class to load a scene with this line of code:
 
				
					UnityEngine.SceneManagement.SceneManager.LoadScene("Gameplay");
				
			
One thing that you will notice is that we are first calling UnityEngine, then SceneManagement, then SceneManager.
 
We can skip all this long calling of classes by importing SceneManagement in our script.
 
In the MainMenuController above the class declaration where you see the using statements which define which libraries of classes we are importing in the project, add the following line:
 
				
					using UnityEngine.SceneManagement;


When we first introduced programming we said that there are a lot of predefined libraries at our disposal.

This means that a lot of the functionality like Debug.Log that prints to the screen, is already written and defined and we just use it without the need to write the code that will make the Debug.Log function print to the screen.

Same here. We don’t need to create our own code that will load scenes in Unity, the programmers at Unity have already created that for us, and in order for us to use it, we need to import those classes with the using keyboard like we did above.

Now there are two ways how we can load a scene in Unity. The first one is to load the scene by using the scene’s name.

Add the following line of code in the PlayGame function:

				
					public void PlayGame()
    {
        SceneManager.LoadScene("Gameplay");
    }
				
			
Don’t worry for hard coding the name of the scene, this is just for demonstration purposes. Run the game and press the Player 1 Button and let’s see what happens:
 
Another way how we can load a scene is by using the scene’s index. If you remember in the Build Settings there are numbers on the right side of the scene names indicating the index of the scene:
 
Img 11

We can use the index number of the scene to load a specific scene. In our case, if we want to load the Gameplay scene, we need to use index 1.

This is how it looks like in the code:

				
					public void PlayGame()
    {
        SceneManager.LoadScene(1);
    }
				
			
Basically instead of using the name of the scene as a string, you just pass the index number.
 
This is useful if you have a game where the player progresses from level to level, so when you want to progress to the next level you just increase the level index by 1 in the code and use that to load the next level.
 
For our purpose we can use any of the two methods, but if you go with the name of the scene, make sure that you add the following lines of code in the TagManager:
 
				
					public static string GAMEPLAY_SCENE_NAME = "Gameplay";
    public static string MAIN_MENU_SCENE_NAME = "MainMenu";
				
			
And when you load the scene by its name use the TagManager instead of hard coding the name of the scene:
 
				
					public void PlayGame()
    {
        SceneManager.LoadScene(TagManager.GAMEPLAY_SCENE_NAME);
    }


The Singleton Pattern

When the button for the appropriate player character is pressed, we are going to load the Gameplay scene and play the game with the selected character.

To do this, we first need to create a new script. Inside the Assets -> Scripts -> Controller Scripts, Right Click -> Create -> C# Script and name it CharacterSelectController.

In the Hierarchy tab, Right Click -> Create Empty and name the new game object Character Select Controller and attach the CharacterSelectController script on it:
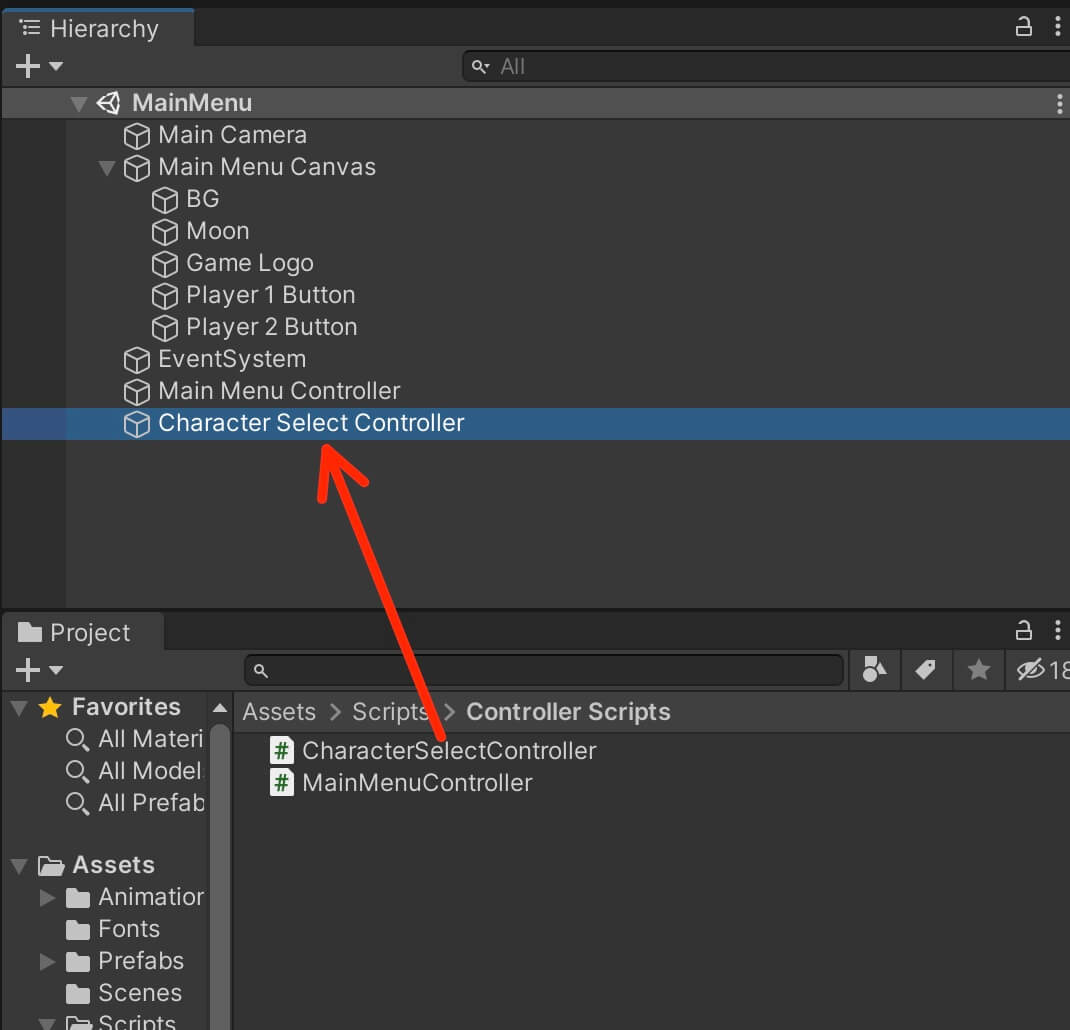
Img 12
Before we proceed to create the character select system, there is one important concept we need to talk about and that is singletons.
 
A singleton pattern is a way to ensure a class has only a single globally accessible instance available at all times.
 
To put it in simple words, there can only be one object from a specific class in the whole game.
 
But why is this important? Why do we need a singleton?
When we load a new scene and move from the old scene to that new scene, all game objects in the previous scene will be destroyed.
 
Let’s demonstrate that by loading the Gameplay scene again:
 
When the Gameplay scene is loaded we don’t see any of the game objects we have in the MainMenu scene.
 
Using a singleton pattern we can make a game object indestructible and as such, it will be able to move between scenes without being destroyed.
 
In the CharacterSelectController script, below the class declaration add the following line of code:
 
				
					public static CharacterSelectController instance;
				
			
You will notice that we have created an object instance out of the CharacterSelectController class inside of the class itself.
 
We also made the instance static, which will allow us to use instance variable to access all public functions and variables that we define in the CharacterSelectController.
 
If you don’t know what is a static variable, you can learn that by clicking here.
 
To make the instance a singleton, we need to add the following lines of code in the Awake function:
 
				
					private void Awake()
    {
        if (instance == null)
        {
            instance = this;
            DontDestroyOnLoad(gameObject);
        }
        else
        {
            Destroy(gameObject);
        }
    }
				
			
First we are testing if the instance variable is equal to null, meaning we didn’t set it to any value, if that is the case, then we set the instance = this.
 
The this keyword is referring to the class where it is called, in our case we calling the this keyword in the CharacterSelectController class so it is referring to that class.
 
The DontDestroyOnLoad function will make sure that the game object we pass as a parameter, in our case the game object holding the CharacterSelectController script, will not be destroyed when we load a new scene.
 
Else, if the instance is not equal to null, meaning we already have one copy of the CharacterSelectController script, then we will destroy the duplicate CharacterControllerScript object.
 
Let’s test the game now:
 

To explain how destroying the duplicate singleton object works, I am going to comment out the else statement in the CharacterSelectController script:

				
					 private void Awake()
    {
        if (instance == null)
        {
            instance = this;
            DontDestroyOnLoad(gameObject);
        }
        //else
        //{
        //    Destroy(gameObject);
        //}
    }
				
			
In the CameraFollow script I am going to create the following function and call it in the Start function as a temporary code:
 
				
					    void Start()
    {
        playerTarget = GameObject.FindWithTag(TagManager.PLAYER_TAG).transform;
        Invoke("LOAD", 2f);
    }

    void LOAD()
    {
        UnityEngine.SceneManagement.SceneManager.LoadScene("MainMenu");
    }
				
			
The LOAD function will returns us back to the MainMenu scene 2 seconds after we load the Gameplay scene. So let’s test it out:
 

When we don’t use the Destroy function then we have duplicate game objects that have the same script, and that script is not a singleton because there are two copies of game objects who carry that same script.

Now remove the comments from the else statement in the CharacterSelectController:

				
					 private void Awake()
    {
        if (instance == null)
        {
            instance = this;
            DontDestroyOnLoad(gameObject);
        }
        else
        {
            Destroy(gameObject);
        }
    }
				
			
Run the game again and let’s see what happens:
 

Now when we move from scene to scene, there is only one copy of the CharacterSelectController script in the whole game. And this is the point of the singleton pattern.

This allows us to create unique game objects in the game that can carry information throughout the whole game.

That is how we are going to select the player character in the MainMenu scene, and then load the selected player character in the Gameplay scene.

Before we proceed, remember to remove the LOAD function we created in the CameraFollow script:

				
					public class CameraFollow : MonoBehaviour
{

    private Transform playerTarget;

    private Vector3 tempPos;

    [SerializeField]
    private float minX, maxX;

    // Start is called before the first frame update
    void Start()
    {
        playerTarget = GameObject.FindWithTag(TagManager.PLAYER_TAG).transform;
    }

    // Update is called once per frame
    void LateUpdate()
    {

        if (!playerTarget)
            return;

        tempPos = transform.position;
        tempPos.x = playerTarget.position.x;

        if (tempPos.x < minX)
            tempPos.x = minX;

        if (tempPos.x > maxX)
            tempPos.x = maxX;

        transform.position = tempPos;

    }

} // class


Loading The Selected Player Character

Now that we understand what is a singleton, we can continue with the CharacterSelectController script.
 
Below the instance variable declaration in the CharacterSelectController script, add the following lines of code:
 
				
					[SerializeField]
    private GameObject[] characters;

    private int _charIndex;
    public int CharIndex
    {
        get { return _charIndex; }
        set { _charIndex = value; }
    }
				
			
The characters game object array variable will store the two characters that we can select. And the CharIndex variable is going to be the index of the selected character.
 
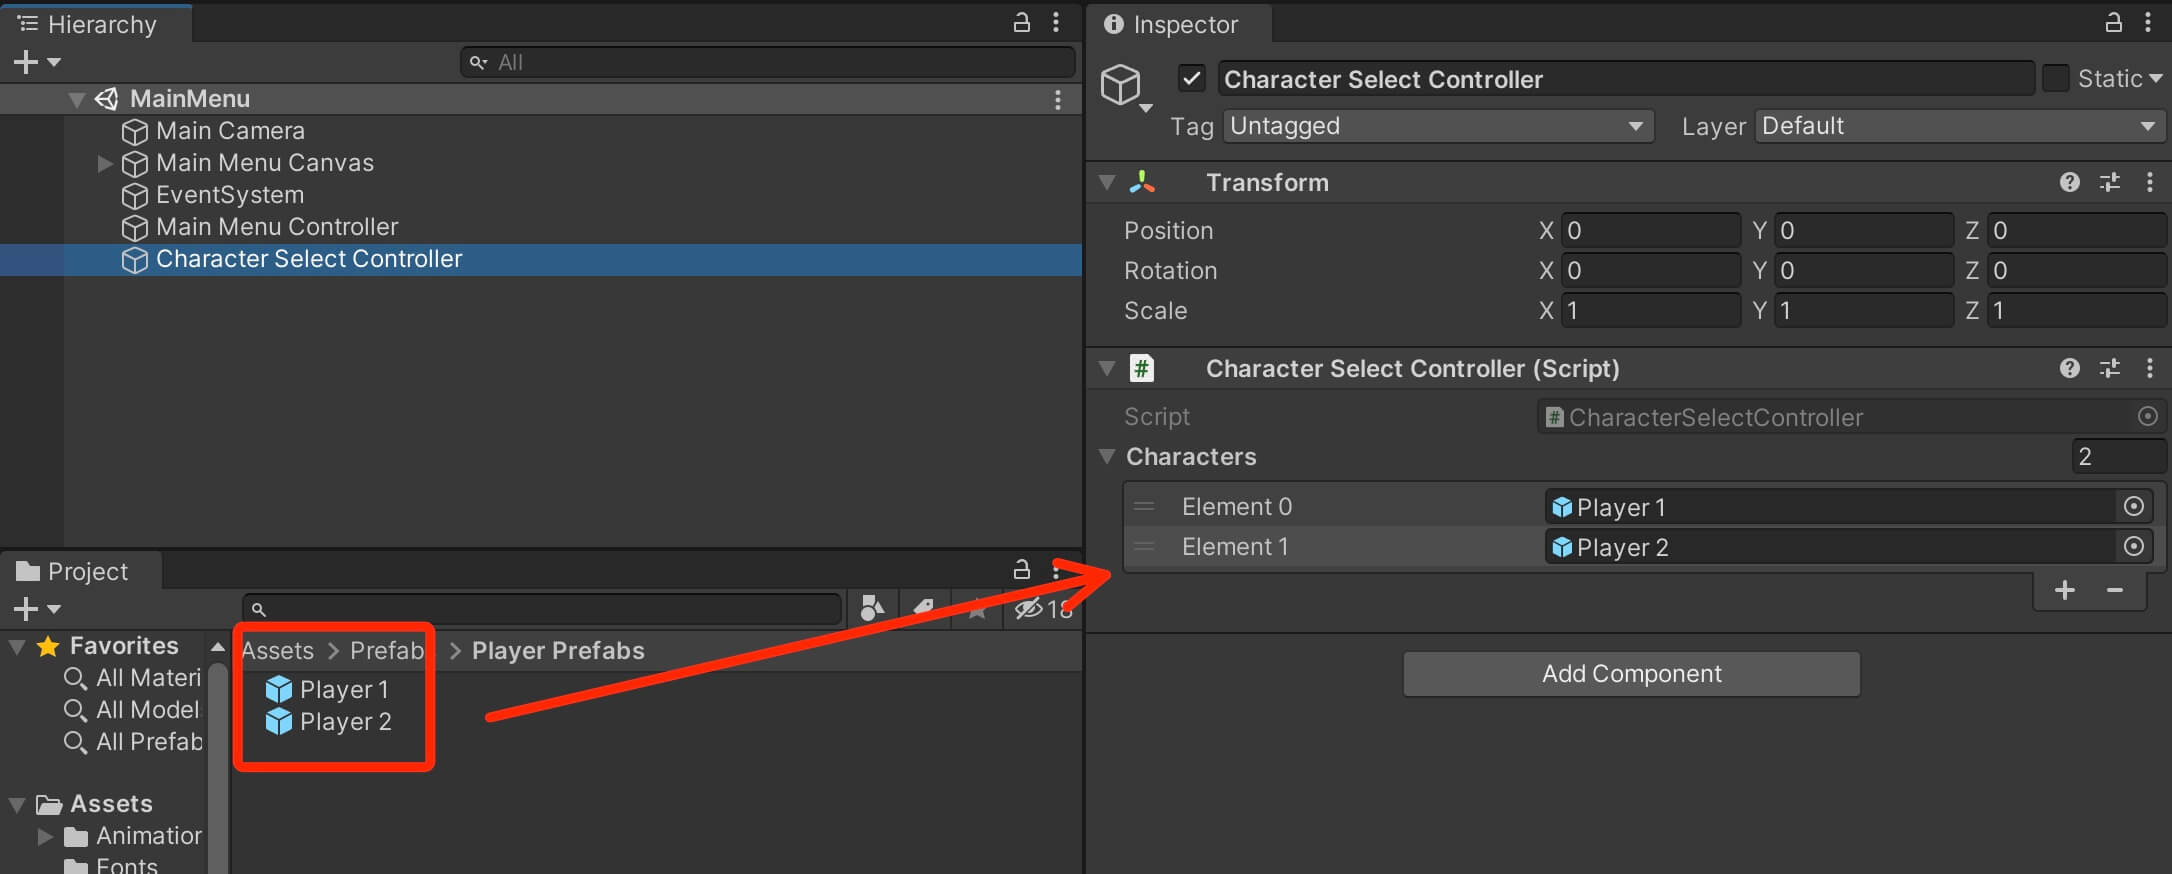
Before we proceed with the code, make sure that you attach the two player characters from the Assets -> Prefabs -> Player Prefabs folder in the Characters array for the CharacterSelectController in the Inspector tab:
 
Img 13

The order of player prefabs in the Characters array is very important here, because we are going to use indexes to select a player character, then we need to make sure that the indexes match.

When we press the Player 1 Button we want to select the player with the yellow shirt, so that player needs to be the first element in the Characters array e.g. he needs to be at element index.

So again, make sure that Player 1 prefab is at element 0, and Player 2 prefab is at element 1:

Img 14
Now there are multiple ways how we can select a player character. We can create two functions for the two buttons, and when the appropriate button is pressed, we will inform the CharacterSelectController about the index of the selected player character.
 
In the MainMenuController script add the following lines of code:
 
				
					public void SelectPlayer1()
    {
        // first character is selected
        CharacterSelectController.instance.CharIndex = 0;

        Debug.Log("The index of the selected character is: " + CharacterSelectController.instance.CharIndex);

        // load the gameplay level
    }

    public void SelectPlayer2()
    {
        // second character is selected
        CharacterSelectController.instance.CharIndex = 1;

        Debug.Log("The index of the selected character is: " + CharacterSelectController.instance.CharIndex);

        // load the gameplay level
    }
				
			
Each of these functions will be assigned to the appropriate button as the listeners for the OnClick event.
 
The code is self explanatory, when we press Player 1 Button we set the CharIndex to 0, when we press the Player 2 Button we set the CharIndex to 1.
 
One thing that you will notice is how the instance variable of the CharacterSelectController is allowing us to access public variables and functions of that class.
 
This is the beauty of singletons because it allows us to have only one copy of a specific class and that class exists across the whole game and we can share information between game elements using that single class.
 
I am using Debug.Log to print the selected player index, and I just put a comment where we would load the Gameplay scene because we are using this for demonstration purposes.
 
Make sure that the SelectPlayer1 and SelectPlayer2 functions are attached to the buttons as listeners and run the game to test it:
 

When we press the appropriate button, we see that the appropriate index is selected.

Another way how we can select the character is to create a function with a parameter. In the MainMenuController script add the following lines:

				
					public void SelectPlayer(int index)
    {
        CharacterSelectController.instance.CharIndex = index;

        Debug.Log("The selected character is: " + CharacterSelectController.instance.CharIndex);

        // load gameplay level
    }


We use the index parameter of the function and assign it as the CharIndex. To make this work, attach the SelectPlayer function to both buttons as the OnClick listener.

When you do that, you will notice a field bellow the list where we selected the SelectPlayer function:
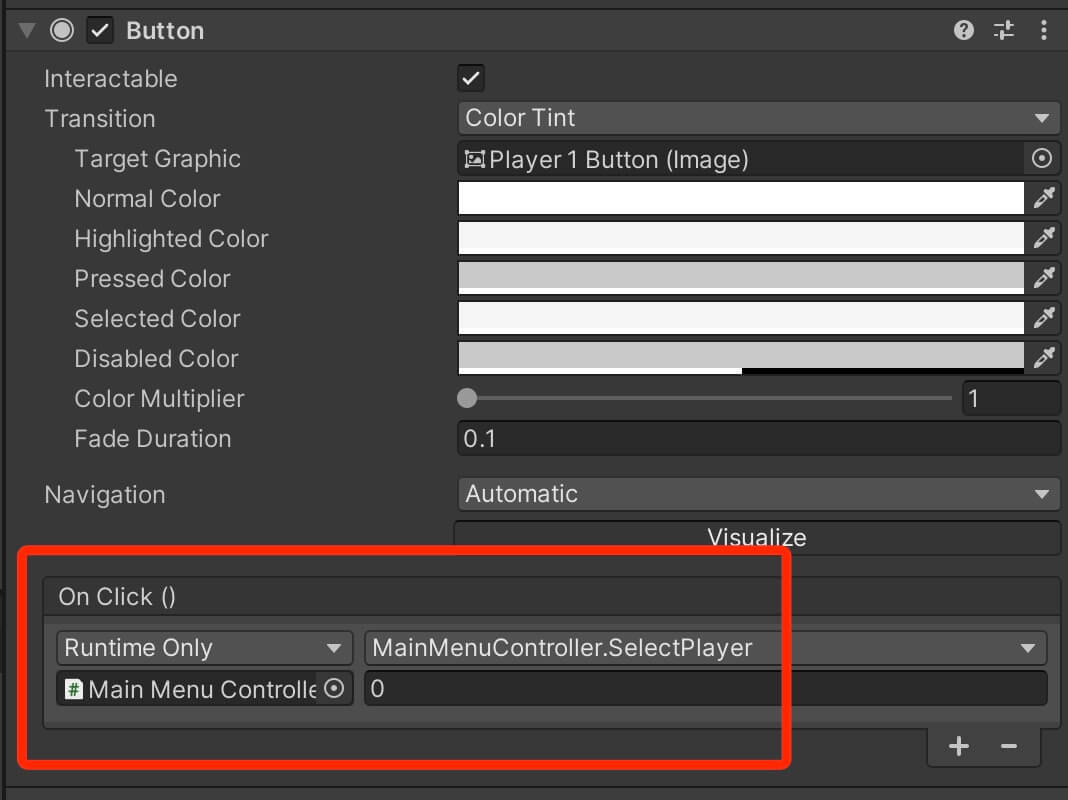
Img 15
This field represents the index parameter that we passed to the function and we can manually set the value of that parameter which will be passed to that function when we press the button.
 
So for Player 1 Button set the value 0, and for Player 2 Button set the value to 2.
 
Now let’s run the game and see the outcome:
 

As you can see we print the same text in the console, but the code is different. Now let’s take a look at our third way how we can achieve the same effect.

When we press a button, we can get information about the button that is pressed from Unity’s event system. With that information we can access things such as the name of the button.

Remove the current code from the SelectPlayer function and add the following lines:

				
					public void SelectPlayer()
    {
        string btnName = UnityEngine.EventSystems.EventSystem.current.currentSelectedGameObject.name;
        Debug.Log("The name of the button that is pressed is: " + btnName);
    }
				
			
Run the game and let’s test this:
 

When we press the appropriate button we see the name of that button printed in the console. But how is this going to help us with selecting the player character?

Well, we can change the names of the buttons, instead of Player 1 Button and Player 2 Button we can name them 0 and 1:
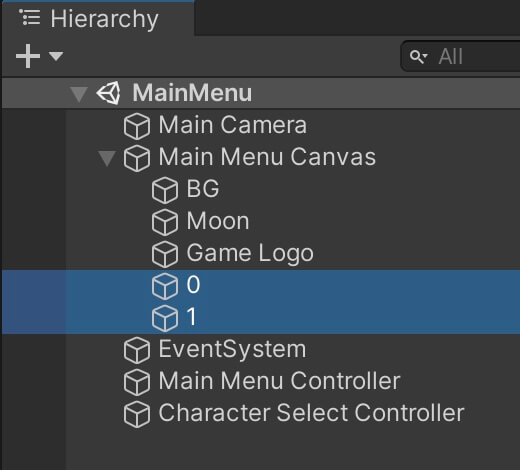
Img 16
You can already assume where this is going. We named the buttons using numbers, and when we get the name of the buttons we can convert them into integers because again, the names are numbers.
 
The reason why we need to convert them is because the name property of a game object is a string type variable, and when we know that the string variable has a number as its value, we can us parsing to convert that value into an integer or any other number type variable.
 
In the SelectPlayer function add the following lines of code:
 
				
					public void SelectPlayer()
    {
        string btnName = UnityEngine.EventSystems.EventSystem.current.currentSelectedGameObject.name;

        CharacterSelectController.instance.CharIndex = int.Parse(btnName);

        Debug.Log("The index of the selected player is " + CharacterSelectController.instance.CharIndex);
    }
				
			
First we get the name of the pressed button using Unity’s event system, the we use the Parse function which will parse e.g. convert a string into an integer and we set that value to CharIndex variable.
 
Be careful when you use parsing because if the string has characters in its value then the parsing will not work because parsing only converts numbers, which means if you have 10 numbers and only 1 character as the value of a string, the parsing will not work, so keep that in mind.
 
We can make this code shorter by passing the pressed object name directly in the Parse function as the parameter:
 
				
					public void SelectPlayer()
    {

        CharacterSelectController.instance.CharIndex = int.Parse(UnityEngine.EventSystems.EventSystem.current.currentSelectedGameObject.name);

        Debug.Log("The index of the selected player is " + CharacterSelectController.instance.CharIndex);
    }
				
			
This is how you should think of programming. First make something work, then make it work better.
 
In our case, the code in the first example works, but we can make it shorter by passing the name of the pressed button directly in the Parse function which saves us one line of code.
 
Run the game and let’s test this out:
 

What we demonstrated now is a really good example of the fact that in programming there are always multiple ways how to fix a certain problem.

You can use whichever solution you want out of the ones we presented, but aim to use the easiest solution and the most efficient.

For example, I would never use two functions approach because that is wasting lines of code if there we already have a solution where we can use one function.

This is how you should think of programming in general, always chose the easiest and the most efficient solution.

You are probably wondering how will you know what is the easiest and most efficient solution, right?

That comes with experience, the more code you write, the more projects you create and the more you learn, the better you will be at fixing problems and getting to that “thinking as a programmer” mentality.

I will leave all the solutions down below and you can chose which want you want to use, just don’t forget to load the Gameplay scene after you get the index of the selected character, also, if you are going to use parsing solution, make sure that the names of your buttons are 0 and 1:

				
					using System.Collections;
using System.Collections.Generic;
using UnityEngine;
using UnityEngine.SceneManagement;

public class MainMenuController : MonoBehaviour
{

    public void SelectPlayer1()
    {
        CharacterSelectController.instance.CharIndex = 0;

        SceneManager.LoadScene(TagManager.GAMEPLAY_SCENE_NAME);
    }

    public void SelectPlayer2()
    {
        CharacterSelectController.instance.CharIndex = 1;

        SceneManager.LoadScene(TagManager.GAMEPLAY_SCENE_NAME);
    }

    public void SelectPlayer(int index)
    {
        CharacterSelectController.instance.CharIndex = index;

        SceneManager.LoadScene(TagManager.GAMEPLAY_SCENE_NAME);
    }

    public void SelectPlayer()
    {

        CharacterSelectController.instance.CharIndex = int.Parse(UnityEngine.EventSystems.EventSystem.current.currentSelectedGameObject.name);

        SceneManager.LoadScene(TagManager.GAMEPLAY_SCENE_NAME);
    }

}


Instantiating The Selected Character When The Game Starts

Now that we are able to select the player character to play the game, we need to instantiate that player character when the Gameplay scene is loaded.

We are going to do by testing if the loaded scene’s name is Gameplay, and if it is, then we will instantiate the selected character.

This can be done with the help of delegates and events. If you don’t know what are delegates and events, make sure that you learn about that concept by clicking here before you proceed with this part of the tutorial.

Following the concept of events, we need to create a function that has the same signature as the function declared by Unity that will inform us that the scene has been loaded.

We can find the signature of that function in Unity’s documentation about SceneManager.sceneLoaded.

From the documentation we see that we need to create a function that takes a Scene and LoadSceneMode as a parameter.

Inside the CharacterSelectController declare the following function:

				
					void OnLevelFinishedLoading(Scene scene, LoadSceneMode mode)
    {

    }
				
			
Before we subscribe to the sceneLoaded event, we need to import the SceneManagement library from Unity. So above the CharacterSelectController class declaration add the following line of code:
 
				
					using UnityEngine.SceneManagement;
				
			
In the lecture about delegates and events I mentioned that the best place to subscribe to events is in the OnEnable function, and the best place to unsubscribe from events is in the OnDisable function.
 
So let’s do just that:
 
				
					private void OnEnable()
    {
        SceneManager.sceneLoaded += OnLevelFinishedLoading;
    }

    private void OnDisable()
    {
        SceneManager.sceneLoaded -= OnLevelFinishedLoading;
    }
				
			
Now how can we check which scene has been loaded so that we can instantiate the selected character when we load the Gameplay scene.
 
We can use the Scene parameter from the OnLevelFinishedLoading function and access the name property which will give us the name of the loaded scene.

In the OnLevelFinishedLoading function add the following lines:
 
				
					void OnLevelFinishedLoading(Scene scene, LoadSceneMode mode)
    {

        if (scene.name == TagManager.GAMEPLAY_SCENE_NAME)
        {
            Instantiate(characters[CharIndex]);
        }

    }
				
			
If the name property of the scene parameter is equal to Gameplay which is defined in the TagManager, then we use the Instantiate function and pass the character array with the CharIndex that we previously set in the MainMenu scene when we pressed the button, and this will instantiate the selected character in the game.
 
Before we test this out, make sure that you remove any player character you have in the Gameplay scene because in that case we will have duplicate players in the game.
 
Also, and I’ve said this already, any change you made to Player 1 game object, you need to do to Player 2. So make sure Player 2 game object is animated, has a collider, rigidbody, and the Player script attached and its tagged with the Player tag.
 
Now we can run the game and test it:


Where To Go From Here

In this part of the tutorial we learned how to interact with UI buttons and navigate between scenes.
 
We also learned about the singleton pattern which is one of the most common used in Unity game development. And we learned how to test which scene is loaded which is important especially if we want to initialize specific game mechanics based on which level we load in our game.
 
In the next part titled Restarting The Level When The Player Dies And Wrapping Up Our Game we will restart the game when the player dies and finish our project.
 

Leave a Comment