Create A 2D Game With Unity Engine Part 5: Enemies, Spawners, And Gameplay Mechanism

Table of Contents

Create A 2D Game With Unity Engine Part 5: Enemies, Spawners, And Gameplay Mechanism

Reading Time: 15 minutes
Level: Beginner
Version: Unity 2020.3.1 LTS

Help Others Learn Game Development

In part 4 of this tutorial series we animated and prepared the enemy game objects.

In this part we are going to make the enemies move, spawn them in the game and create the gameplay mechanism.

The Enemy Script

Now that we prepared the enemies let us create a script that will move them.
 
In the Assets -> Scripts folder, Right Click -> Create -> Folder and name it Enemy Scripts. Inside the Enemy Scripts folder, Right Click -> Create -> C# Script and name it Enemy.
 
As always, we need variables that will get us started with the script. Open the Enemy script and declare the following variables below the class declaration:
 
				
					public float moveSpeed = 5f;
private Rigidbody2D myBody;


The variables are self explanatory, the moveSpeed is going to determine how fast the enemy is moving and we are going to move the enemy with the help of Rigidbody2D component.

In the Awake function we are going to get the reference to myBody variable:

				
					void Awake()
    {
        myBody = GetComponent<Rigidbody2D>();
    }
				
			
Now that we have a reference to the Rigidbody2D component, we can move the enemy using the FixedUpdate function:
 
				
					void FixedUpdate()
    {
        myBody.velocity = new Vector2(moveSpeed, myBody.velocity.y);
    }
				
			
When we created the player’s jump functionality we used the AddForce function of the Rigidbody2D component, but here we are using the velocity property.
 
What is the difference between the two?
 
Well using Add Force will gradually add force to the game object and the more force is added the more the game object will move, think of it like pressing the gas pedal on your car, at first the car starts moving slowly then the more you hold the gas pedal the car goes faster and faster.
 
But when you are using the velocity property it’s like making your car go from 0 to 100 miles an hour instantly without increasing the speed gradually.
 
You will notice that we are using Vector2 to add force to the velocity. Because this is a 2D game, we can add force on the X and on the Y axis. In our case, we only need to move the enemy on the X axis e.g. left and right, we are not moving it up or down.
 
That is why on the Y axis we are just applying the current value of the velocity.y of the Rigidbody2D component.
 

Attach the enemy script on all 3 enemy monsters:
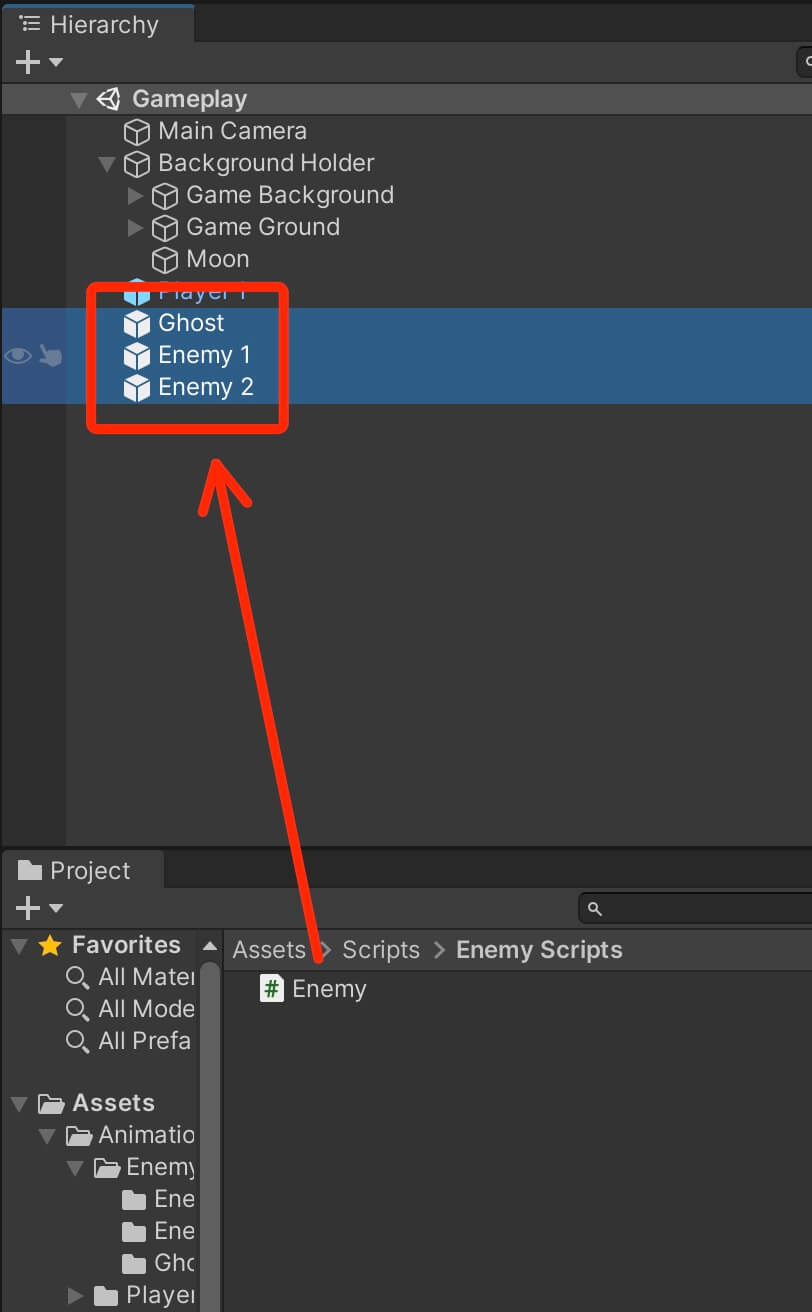
Img 1

When we test the game, you will see how all 3 enemy monsters are going to move to the right direction:

If you want to make the enemies move to the left side, just change the moveSpeed variable to a negative value.

Don’t forget to apply the new changes to every enemy so that the changes will be applied to their prefabs:
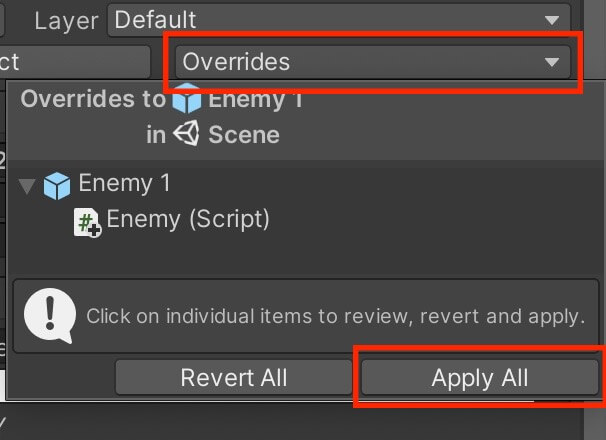
Img 2


EnemySpawner Script

The Enemy script is only responsible for moving the enemies in the game, that is why we need a new script to spawn enemies in the game over a time interval.
 
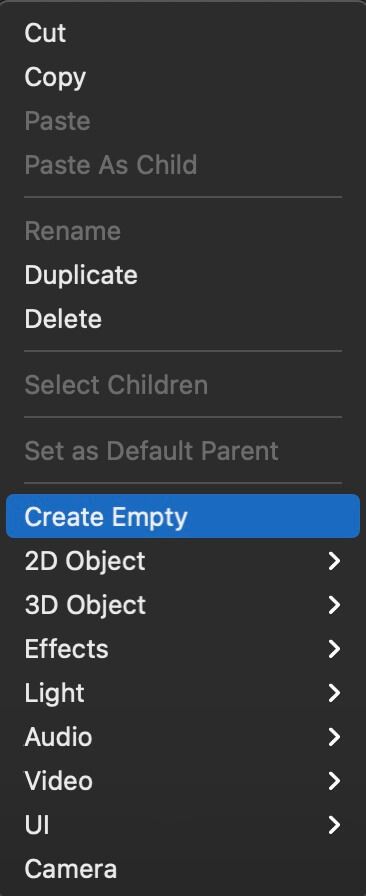
But before we create the new script, we are going to create an empty game object in the Hierarchy by Right Click -> Create Empty:
 
Img 3

Rename the new game object to Enemy Spawner and reset it’s position at 0 for X, Y and Z inside the transform component.

Next, create two new empty game objects as children of the Enemy Spawner object, add an icon to them so that you can see them better in the Scene view and move them to the edge of the level but make sure that they are above the ground so that when an enemy object is spawned it lands on the ground and doesn’t fall below it:
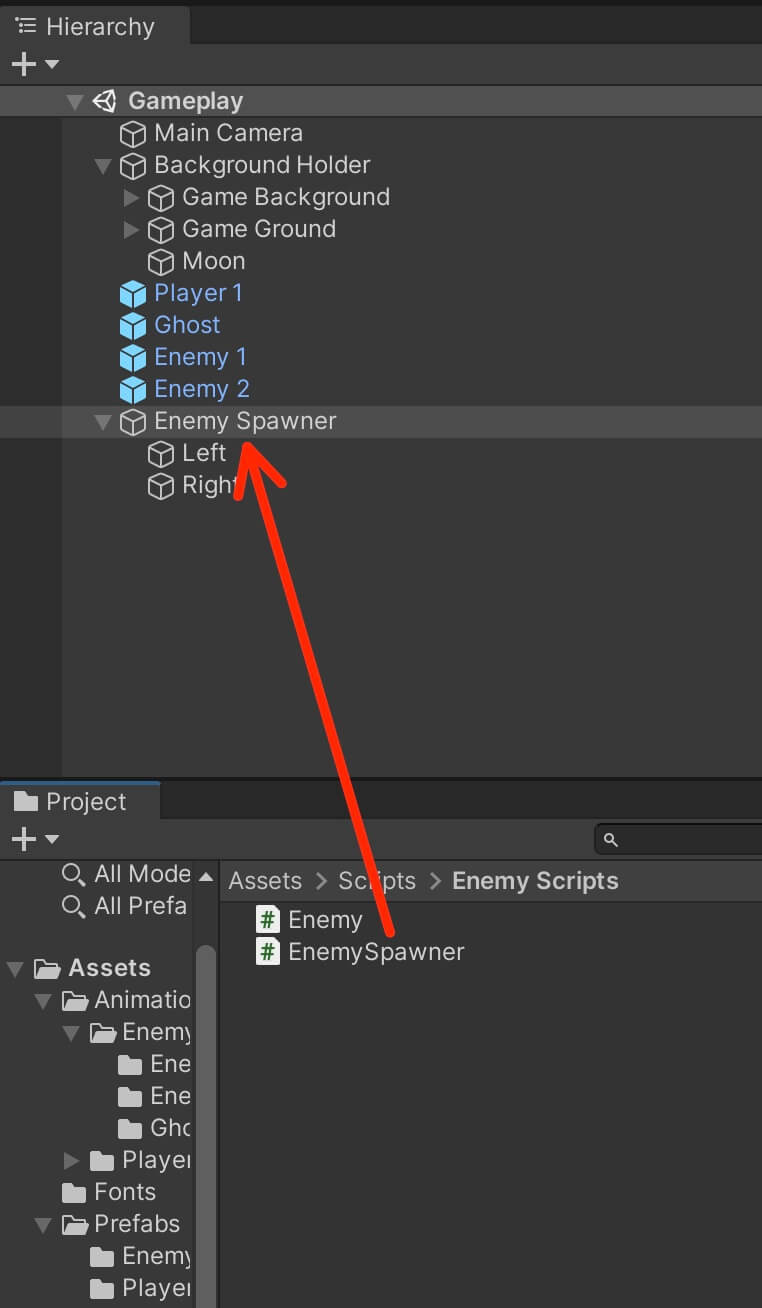
As you can assume, we are going to use the position of the two child game objects (Left and Right) that we created to spawn the enemies at the edge of the level and then the enemies are going to run towards the player.
 
Inside the Assets -> Enemies Scripts, Right Click -> Create -> C# Script and name it EnemySpawner.
 
Attach the EnemySpawner script on the Enemy Spawner game object:
 
Img 4

Next, open the EnemySpawner script and add the following lines of code below the class declaration:

				
					[SerializeField]
    private GameObject[] enemyReference;

    private GameObject spawnedEnemy;

    [SerializeField]
    private Transform leftSide, rightSide;

    private int randomIndex;
    private int randomSide;
				
			
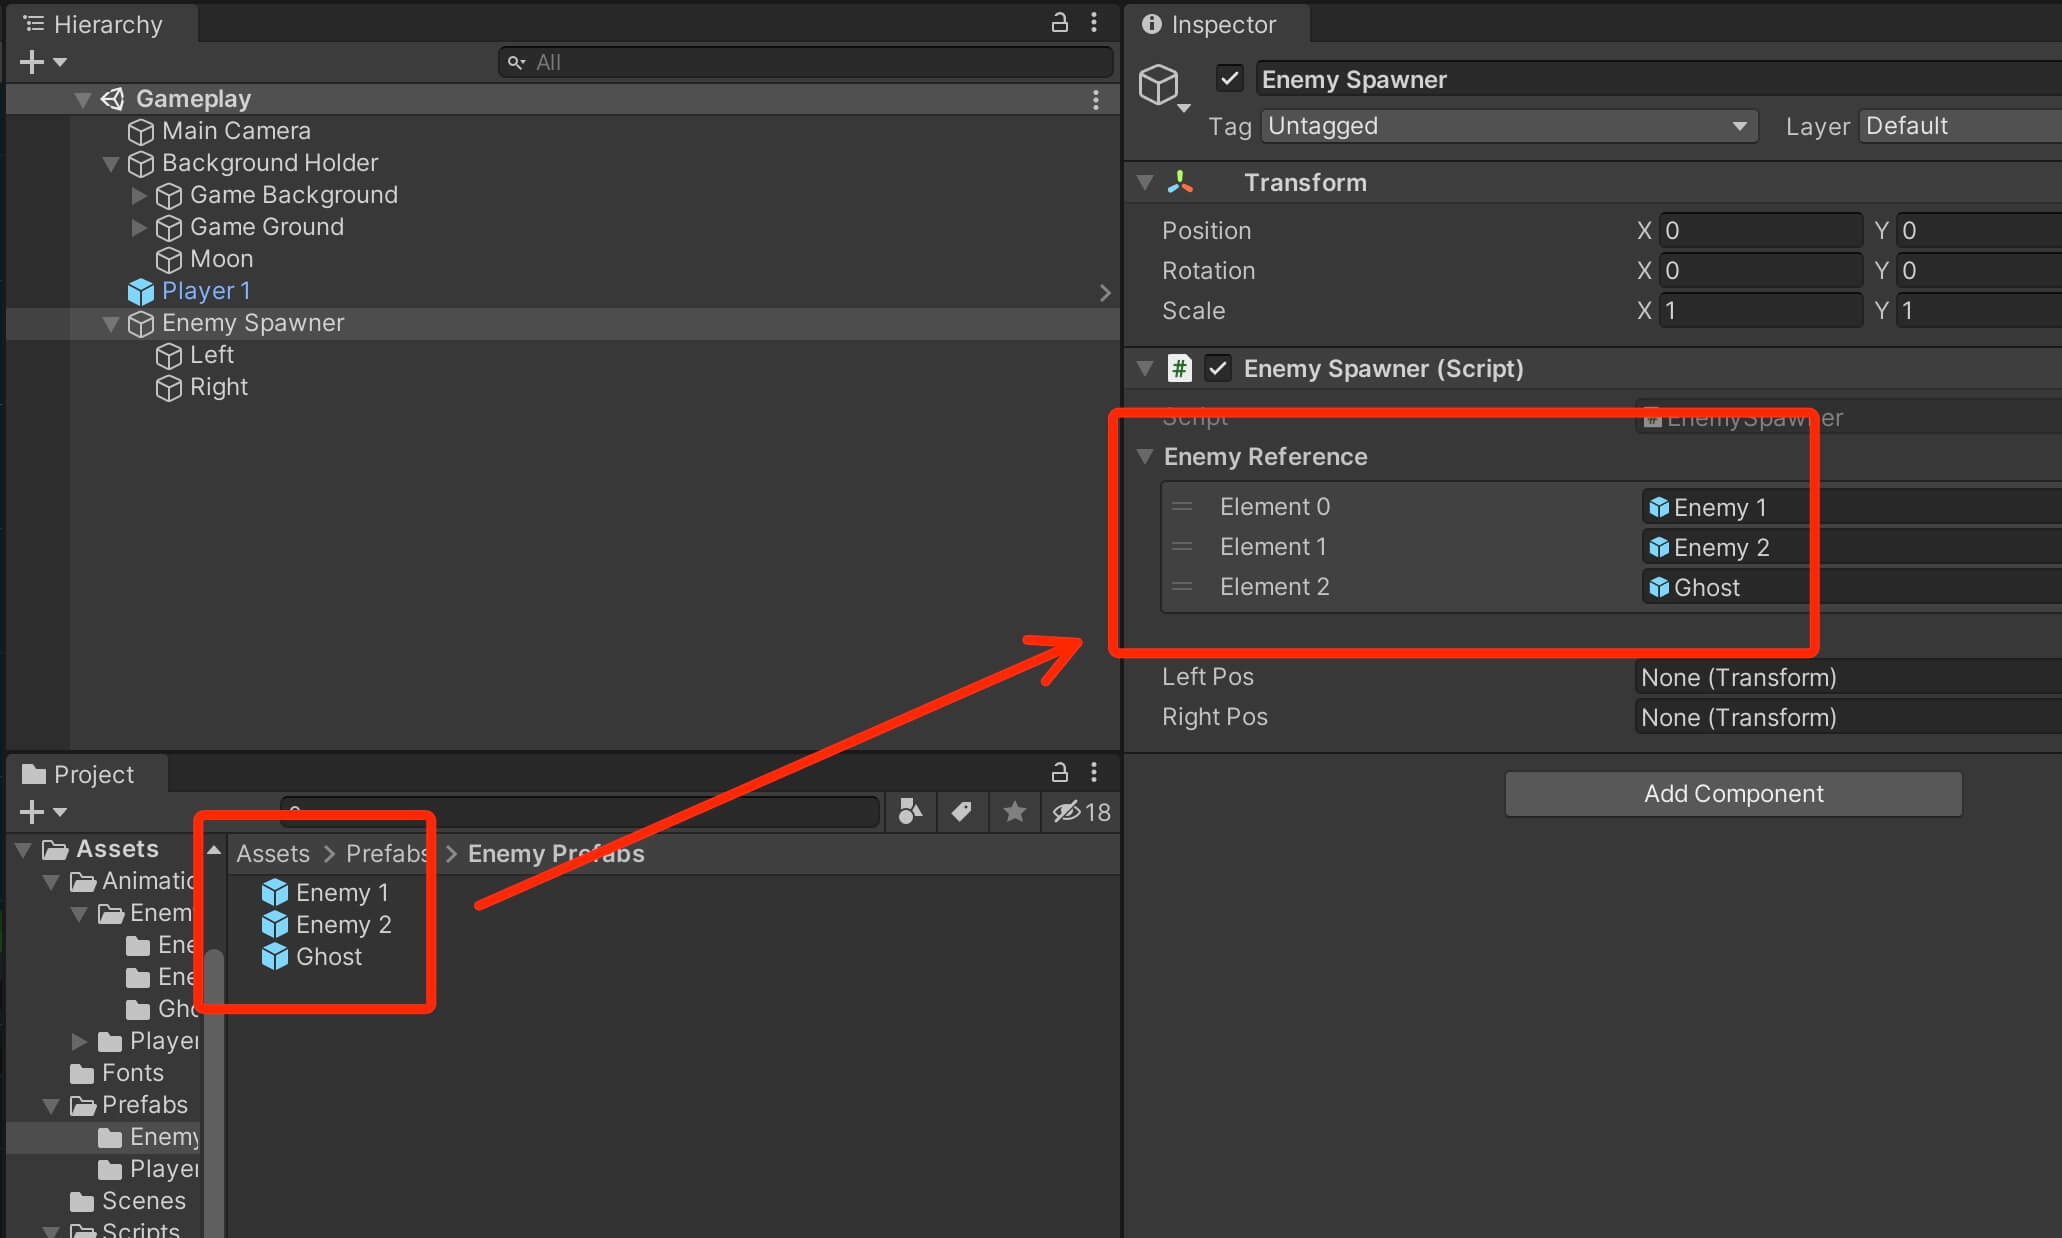
In the enemyReference array variable we are going to drag the 3 enemy prefabs and use them to create enemies that we will place in the game.
 
Because we need to make the enemy that we spawn in the game move left or right, depending where it is spawned, we are going to store the spawned enemy in the spawnedEnemy variable.
 
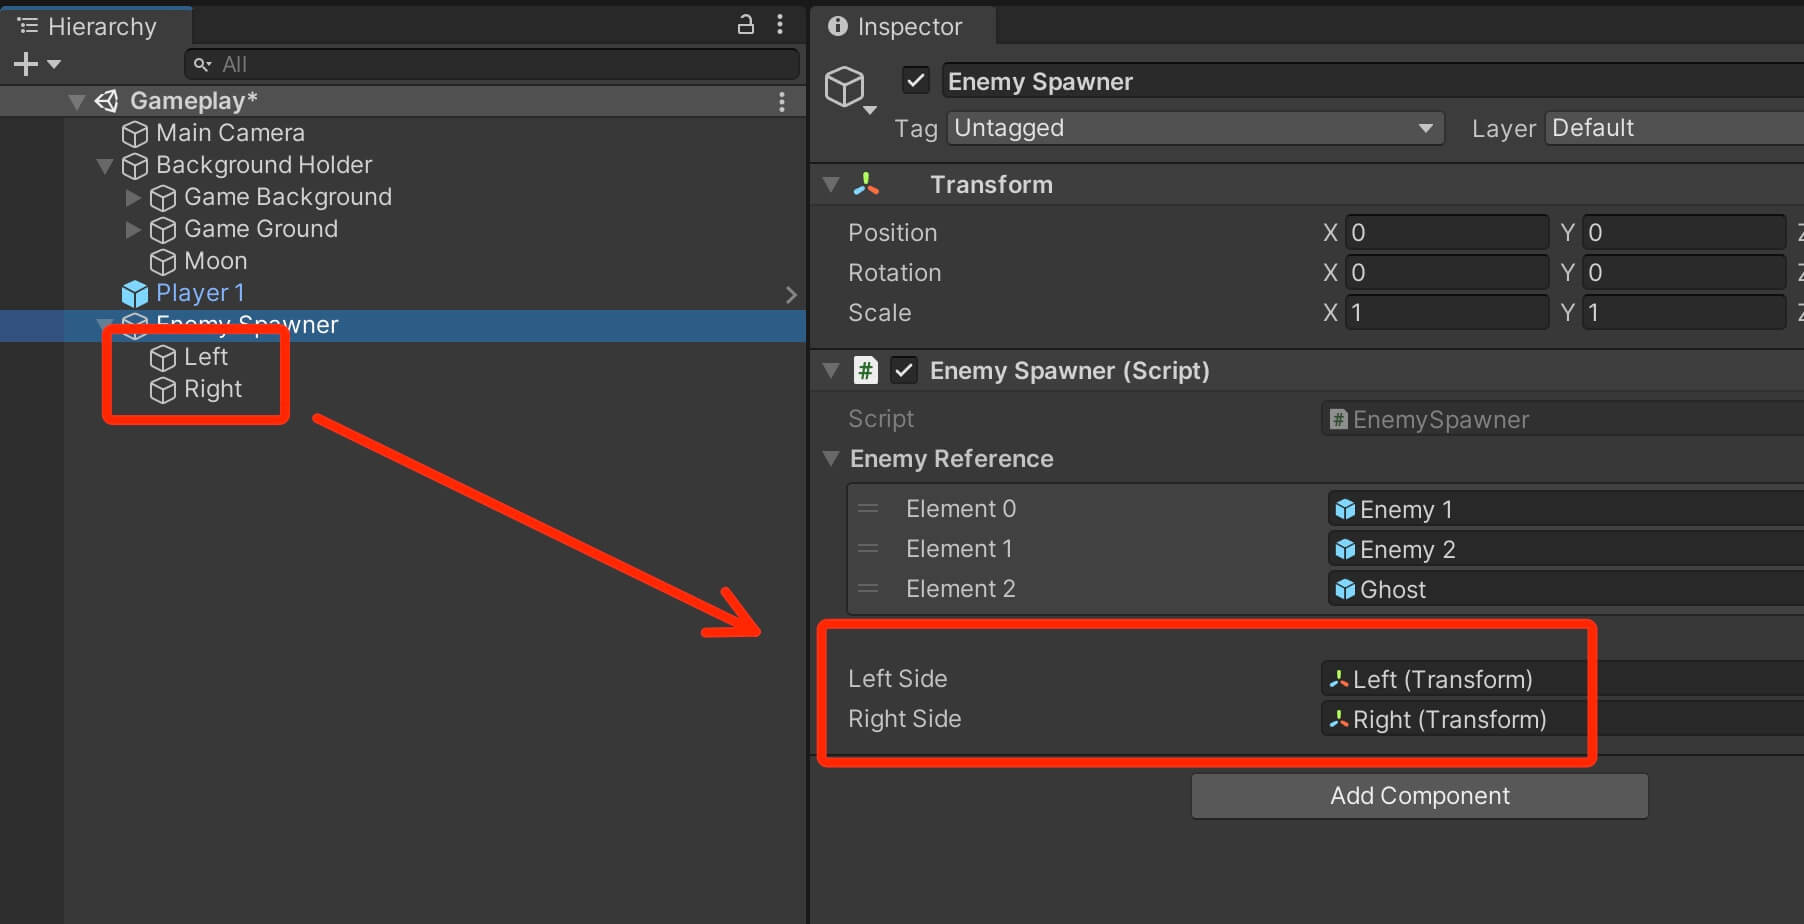
The leftSide and rightSide are the Left and Right game objects that we created as children of Monster Spawner game object.
 
The randomIndex variable is going to determine which monster we are going to spawn, and the randomSide will determine if the enemy will be spawned to the left or the right side.
 

Before we proceed further with the EnemySpawner script, attach the enemy prefabs in the enemyReference array variable in the Inspector tab:
Img 5
Also attach the Left and Right game object in the appropriate slot in the EnemySpawner script:
 
Img 6

Also, delete any enemy game object that is in the Hierarchy tab, because the EnemySpawner is going to spawn new enemies and we don’t need to add them manually in the game.

With this we finished the Enemy script and I will leave the full Enemy script as a reference below:

				
					using System.Collections;
using System.Collections.Generic;
using UnityEngine;

public class Enemy : MonoBehaviour
{

    public float moveSpeed = 5f;

    private Rigidbody2D myBody;

    // Start is called before the first frame update
    void Awake()
    {
        myBody = GetComponent<Rigidbody2D>();
    }

    // Update is called once per frame
    void FixedUpdate()
    {
        myBody.velocity = new Vector2(moveSpeed, myBody.velocity.y);
    }
}


Spawning Enemies In The Game With The Help Of Coroutine

To make the game interesting, we are going to spawn enemies over and over in the game. This means that we need to have some kind of time interval or a delay effect that we will use to spawn new enemies in the game.

In Unity, there are multiple ways how we can delay the execution of our code. One of the ways is using the Invoke function, which we saw in the Rainy Knifes tutorial.

This time, we are going to use a coroutine to create the delay effect. If you don’t know what is a coroutine, then, before you proceed with this tutorial, I highly suggest that you learn about them by clicking here.

Go back in the EnemySpawner script and create the following function:

				
					IEnumerator SpawnMonsters()
    {

        while (true)
        {

            yield return new WaitForSeconds(Random.Range(1, 5));

            randomIndex = Random.Range(0, enemyReference.Length);
            randomSide = Random.Range(0, 2);

            spawnedEnemy = Instantiate(enemyReference[randomIndex]);

            // left side
            if (randomSide == 0)
            {

                spawnedEnemy.transform.position = leftSide.position;
                spawnedEnemy.GetComponent<Enemy>().moveSpeed = Random.Range(4, 10);

            }
            else
            {
                // right side
                spawnedEnemy.transform.position = rightSide.position;
                spawnedEnemy.GetComponent<Enemy>().moveSpeed = -Random.Range(4, 10);
                spawnedEnemy.transform.localScale = new Vector3(-1f, 1f, 1f);

            }

        } // while loop

    }
				
			
Let’s break down what is happening inside of this coroutine function.
 
First we are using a while loop but we added true as the condition which makes this an infinite while loop, which means we will spawn enemies as long as this function is running, which is as long as the game lasts.
 
When we talked about while loops I said that you always need to have a way for the condition of the while loop to be false so that you avoid an infinite while loop and your computer crashes.
 
In this case however, we have a coroutine which is calling WaitForSeconds and while WaitForSeconds executes e.g. making us wait for a specific amount of seconds, the while loop is not executing the code after the yield return statement where we call WaitForSeconds.
 
In the code above, while we are waiting for WaitForSeconds on line 7, all the code that is below that line will not be executed so our infinite while loop will not cause any issues.
 
Next we are getting the randomIndex so that we spawn a random enemy from the enemyReference array. We are using Random.Range(min, max) which will return a random number between the min and max not including the max.
 
This means if we pass 0 as min and 3 as max in the Random.Range function, it will return a number between 0 and 3 not including 3, so it will return 0, 1, or 2.
 

Because array’s index is zero(0) based, that is why we can use enemyReference.Length which will return how many elements we have in the enemyReference array, in our case 3, and since Random.Range will not include the max parameter, the function will never return 3 and we will not get array index out of bounds exception.

If you don’t know how arrays work, make sure that you learn about them by clicking here so that you understand the explanation above.
 
For the randomSide we also use Random.Range and we pass 0 and 2, which will return either 0 or 1 and we will use those values to determine if the enemy should be spawned to the left or the right side. 0 will be for the left and 1 will be for the right side.
 
Next we spawn a random enemy using the Instantiate function and the randomly generated index and store the new spawned enemy in the spawnedEnemy variable.
 
Before we set the position of the enemy and the speed by which it will move, we need to determine if the enemy should be on the left or the right side.
 
If the randomSide value is equal to 0, we set the enemy’s position to the left side using the leftSide.position, and then we determine the enemy’s speed by using the Random.Range function again and passing 4 and 10, which means the enemy’s speed will be between 4 and 9.
 
This is a cool trick because it will randomize the speed of every spawned enemy. You can also create a minSpeed and maxSpeed variables and make them either public variables or private and use SerializeField to allow editing of those variables in the Inspector tab.
 
Then you can play with the values and set different min and max speed values for different enemies.
 
To set the speed of the enemy object, we are using GetComponent function which will get us the Enemy script component attached on the enemy object and we can access the moveSpeed variable because we declared it to be a public variable in the Enemy class.
 
Your assignment is to make the moveSpeed a private variable inside the Enemy script and provide a way to edit the value of the variable so that we can randomize the speed of the enemy when it is spawned


If the value of randomSide variable is not equal to 0 e.g. it is 1 because we are using else to test the second condition, then we set the position of the enemy to the right by using rightSide.position, we change the moveSpeed variable of the Enemy script to the negative value by adding – sign in front of the Random.Range and we change the Scale’s X value to -1.

The reason why we set the speed to a negative value is because the enemy will be placed on the right side. Which means, the enemy will run from the right to the left side.

We know that in Unity, the left side is the negative side, that is why we set the speed to a negative value, and you can easily test this out by setting a positive value for the moveSpeed variable.

We also need to change the Scale’s X to a negative value to make the enemy face the left side because it is running towards the left side. If we don’t change this, then it would look like the enemy is running with its back facing the left side.

You can also use the same technique we applied to the player object when we changed its Scale X value using Mathf.Abs function. Or you can use the sprite component and its flipX property to flip the enemy and make it face the left side.

Before we can test the EnemySpawner, we need to run our coroutine in the Start function:

				
					void Start()
    {
        StartCoroutine(SpawnMonsters());
    }
				
			
Now run the game and let’s test it out:


Collision Layers

While the EnemySpawner script is working we still have a few issues.
 
The first one is that the enemies are hugging each other when they collide, except for the Ghost enemy who passes through every other game object.
 
The reason for that is because the Ghost enemy’s collider is a trigger e.g. the Is Trigger checkbox is checked, which means the Ghost is not a solid body and other colliders can pass through him. You can read more about this concept by clicking here.
 
Enemy 1 and Enemy 2 are solid objects because we didn’t check the Is Trigger checkbox on their colliders and because of that they can’t pass through each other hence the hugging you saw in the preview video above.
 
Now if you think that we can fix this issue by checking the Is Trigger checkbox on Enemy 1 and Enemy 2 then you are wrong because if we do that they will fall through the ground.
 
This is where layers come into play.
 
Every game object we create has a Layer property that you can see in the Inspector tab when you select the game object:
 
Img 7

As you can see the Layer property is a drop down list and every game object is set on the Default layer when you create them except for the UI elements which are on the UI layer.

We can use the Layer property to determine which game objects can collide with each other and which game objects will ignore collisions between them.

First, we are going to create a new layer, so select any game object in the Hierarchy, and click on the Layer drop down list then click on Add Layer:
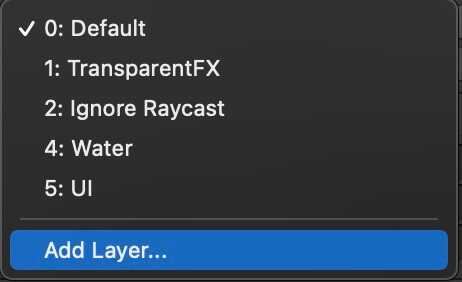
Img 8

This will open Tags & Layers in the Inspector. Create a new Enemy layer by typing Enemy in any empty layer field:
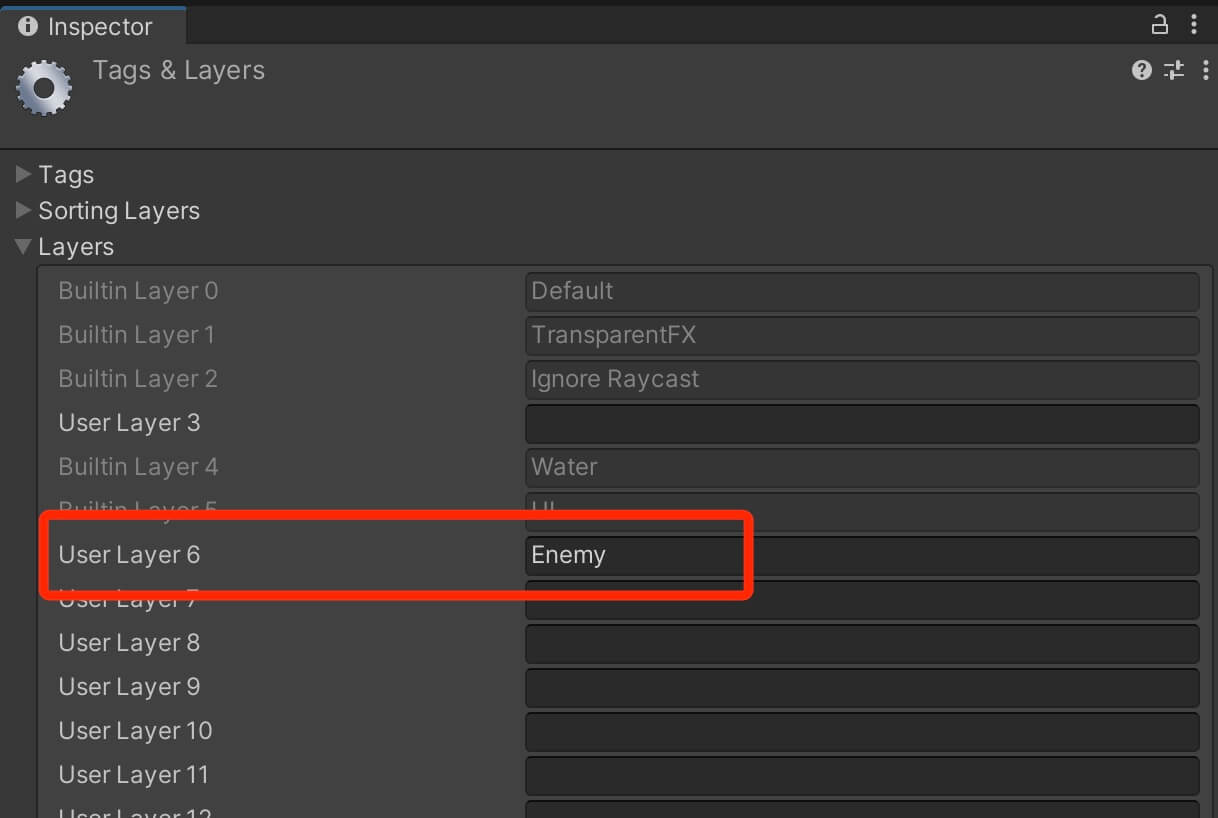
Img 9

You can name the layers however you want and you can create up to 31 layers(if Unity doesn’t change this in the future).

Now in the Assets -> Prefabs -> Enemy Prefabs folder, select all 3 enemies, and from the Layer drop down list select the Enemy layer for all 3 enemies:

Img 10

Now click on Edit -> Project Settings:

Img 11

If the Project Settings tab is floating dock it anywhere in the editor, and then select Physics 2D on the left side and scroll down until you see all the available layers that form a grid:
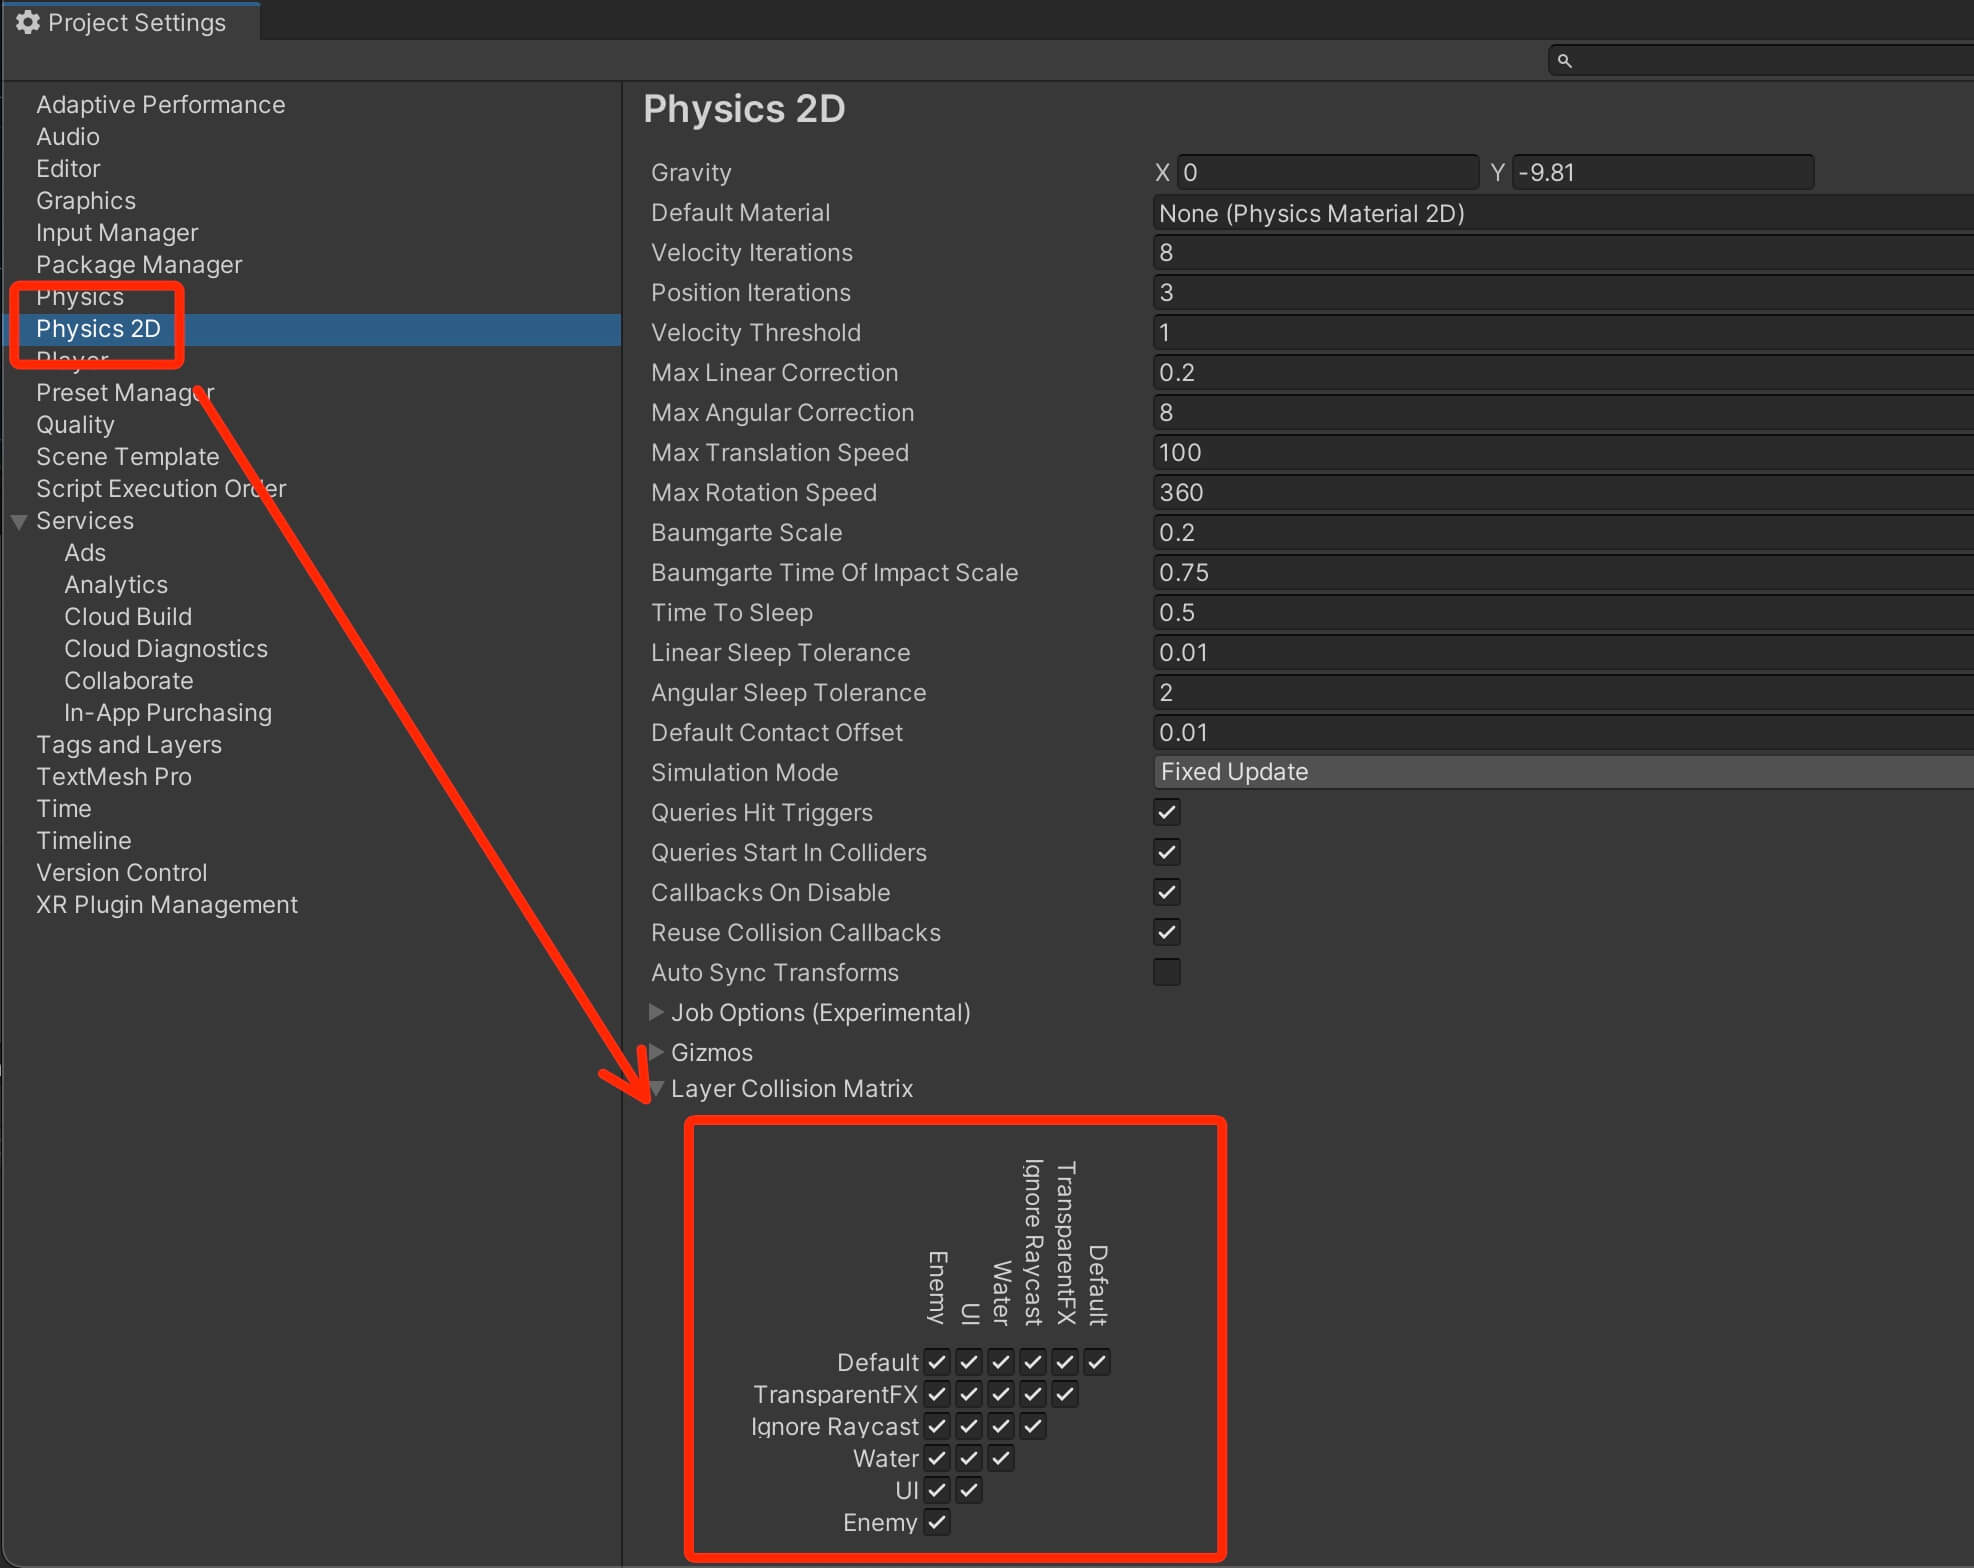
Screenshot 2021-09-11 at 10.52.33
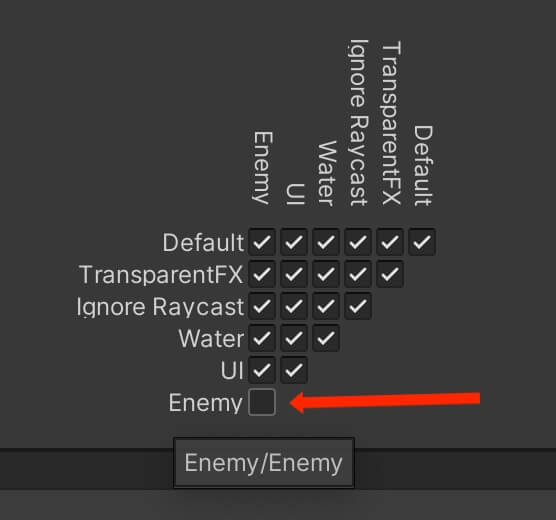
This grid that the layers form consists out of checkboxes that determine which layers can collide with which layers.
 
If we uncheck the Enemy/Enemy checkbox then the game objects that are on the Enemy layer will not collide with each other:
 
Img 12
We already set the Layer for all 3 enemies to the Enemy layer, so now that we turned off collision between Enemy layers, let’s test the game and see the outcome:
 

As you can see, the enemies are passing through each other without hugging as we saw the first time.

The Collector Script

While we fixed the hugging problem between the enemies we have another problem which is when the enemies get to the edge of the level they fall down from the ground and they continue falling down as long as the game is running.

While we don’t see the particular enemy game object, that game object is still in the game and it fills up the computer memory and the more enemies we create the slower and slower our game is going to be.

To fix this, we need to create a collector game object that will remove the unnecessary enemies from the game when we don’t need them anymore.

In the Assets -> Scripts folder, Right Click -> Create -> Folder and name it Gameplay Helper Scripts.

Inside the Gameplay Helper Scripts, Right Click -> Create -> C# Script and name it Collector.

In the Hierarchy tab, create an empty game object and name it Left Collector. Attach a Box Collider 2D component and attach the Collector script on him:
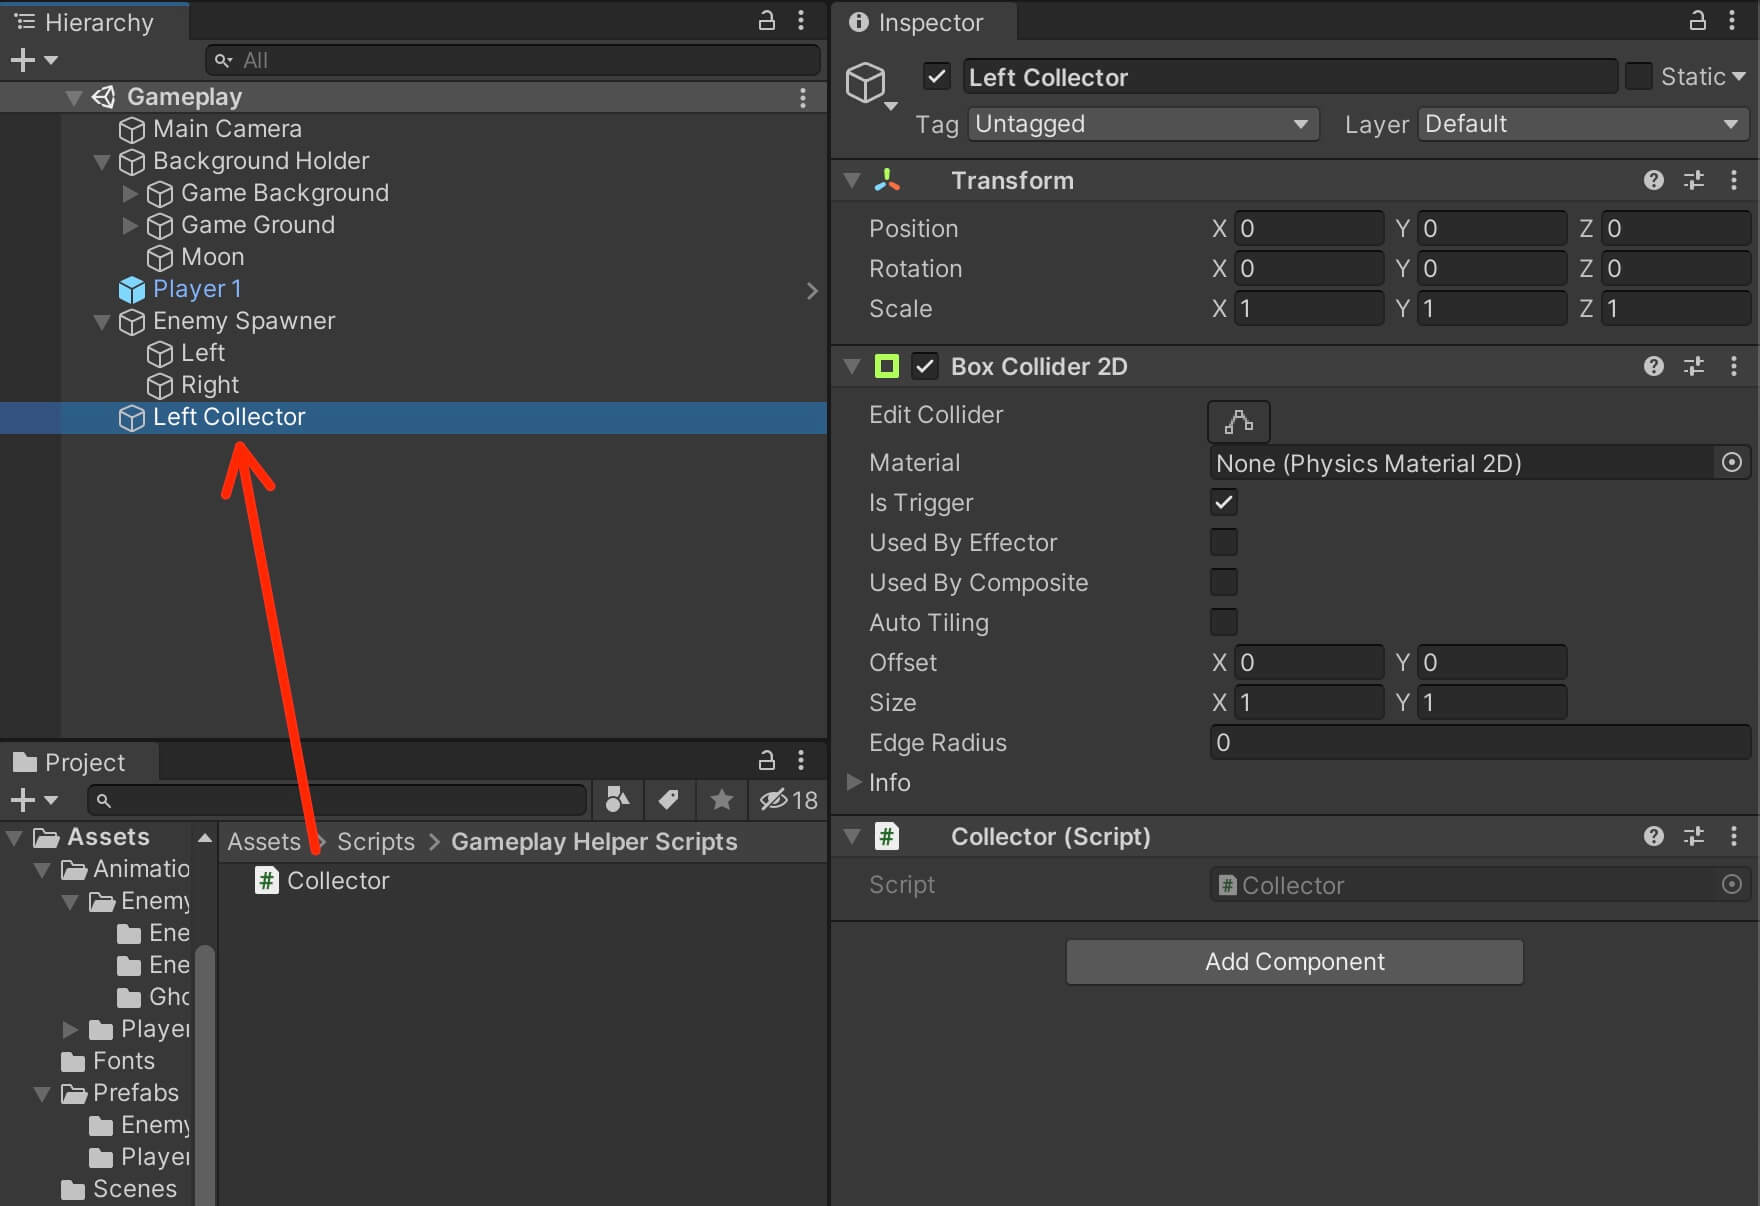
Img 13

Before we edit the Collector script, inside the TagManager add the following line of code:

				
					public static string ENEMY_TAG = "Enemy";
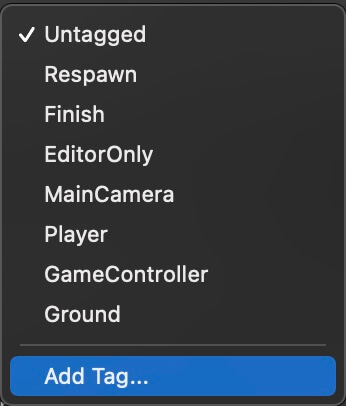
				
			
Since we are going to remove enemy game objects from the game, we need a way to identify that we collided with the enemy objects, and for that we are going to use a tag.
 
In the Hierarchy tab select any game object and from the Tag drop down list click on Add Tag:
 
Img 14
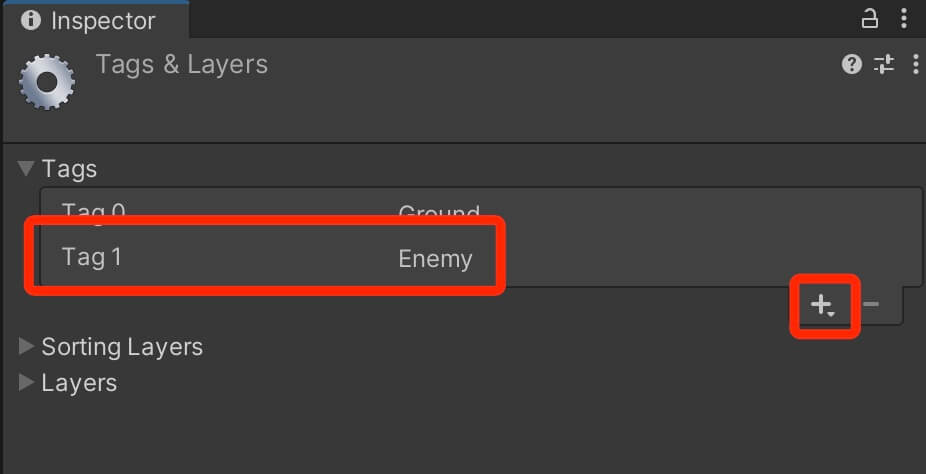
This will open the Tags & Layers in the Inspector tab. In the Tags drop down list, click on the + button at the bottom right to create a new tag field and create a new Enemy tag:
 
Img 15
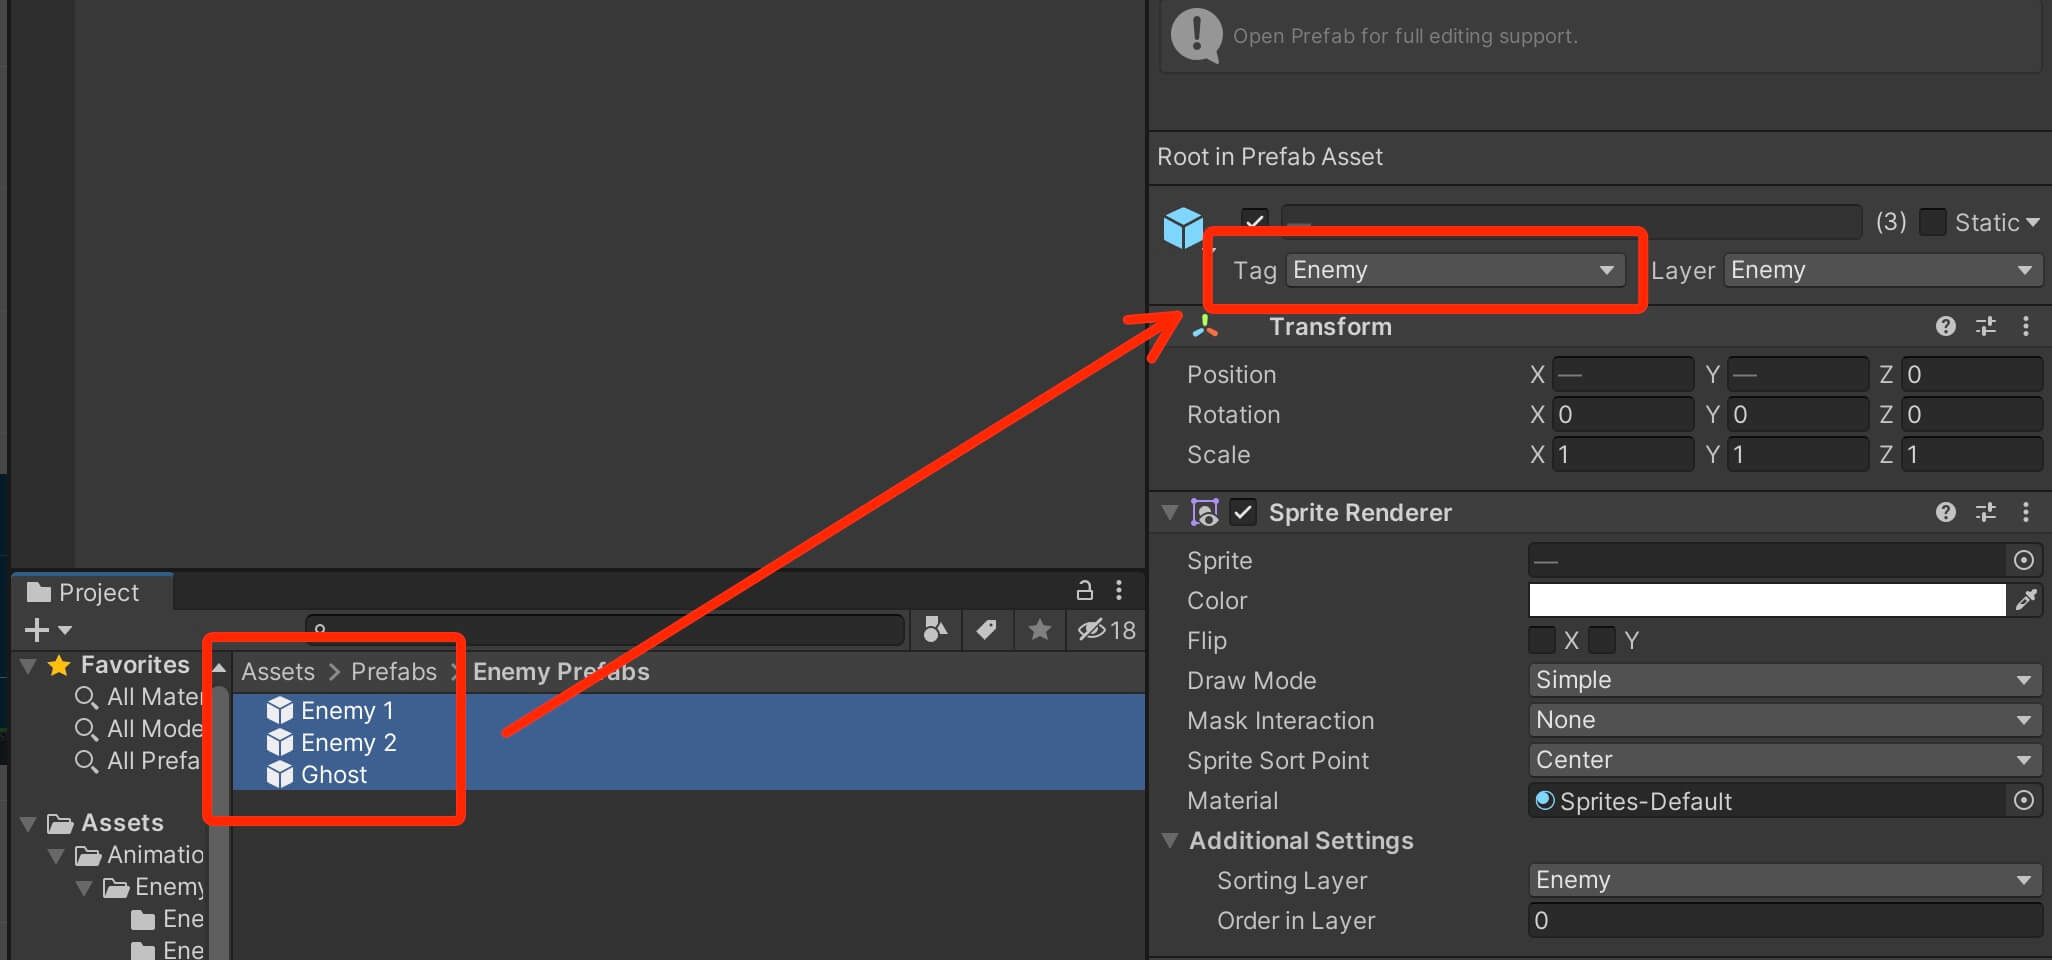
Now that we have the Enemy tag, in the Assets -> Prefabs -> Enemy Prefabs folder, select all 3 enemy objects and in the Inspector from the Tag drop down list select the Enemy tag for all 3 enemies:
 
Img 16

Inside the Collector script, add the following code block:

				
					private void OnTriggerEnter2D(Collider2D collision)
    {
        if (collision.CompareTag(TagManager.ENEMY_TAG) || collision.CompareTag(TagManager.PLAYER_TAG))
        {
            Destroy(collision.gameObject);
        }
    }


In the code above I am not only testing if the collector object collides with the enemy object, but I am also testing if the collector collides with the player object.

The reason for that is we didn’t define any bounds for the player’s movement, so the player can move freely in the level which means that he can potentially go outside the level bounds, if that happens he will collide with the collector and be destroyed which will end the game.

Another thing that I want to mention which is related to the CameraFollow script. If you remember, in the LateUpdate function in the CameraFollow script the first lines of code are:

				
					if (!playerTarget)
            return;


The reason for the lines of code above is because if the player object collides with the collector he will be destroyed and since the camera is using the reference of the player to follow him, when the player is destroyed the reference is destroyed along with him, and if we don’t perform a test like the one in the code above, we will get a null reference exception.

I already mentioned why we are performing that test in the lecture about the CameraFollow script, but I always like to revert back and explain the parts of code that are connected or have something to do with each other.

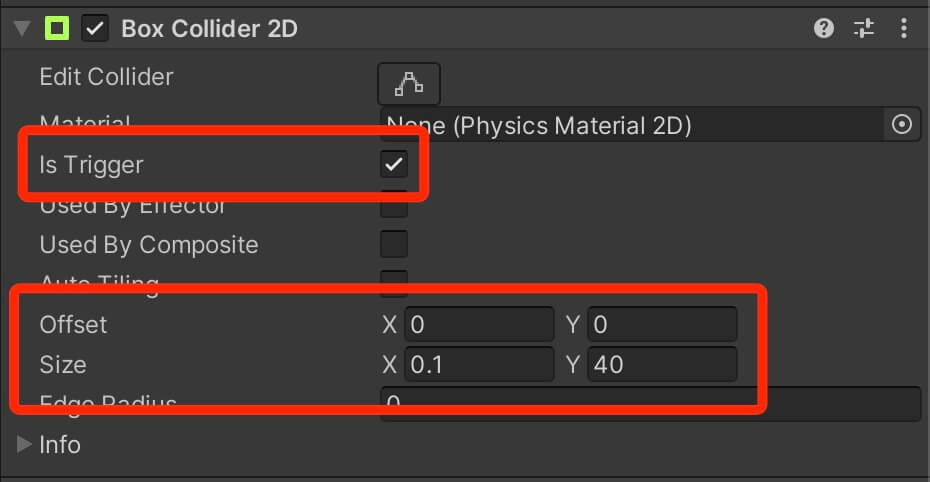
Since we are using the OnTriggerEnter2D function to detect collision between the collector game object and the enemy or the player, we need to check the Is Trigger checkbox for the Box Collider 2D component attached on the collector game object.

We also need to resize the collider so that when we position the collector object at the end of the level, the collider will be big enough so that the game object that falls off the level will collide with it:
Img 17 FIXED
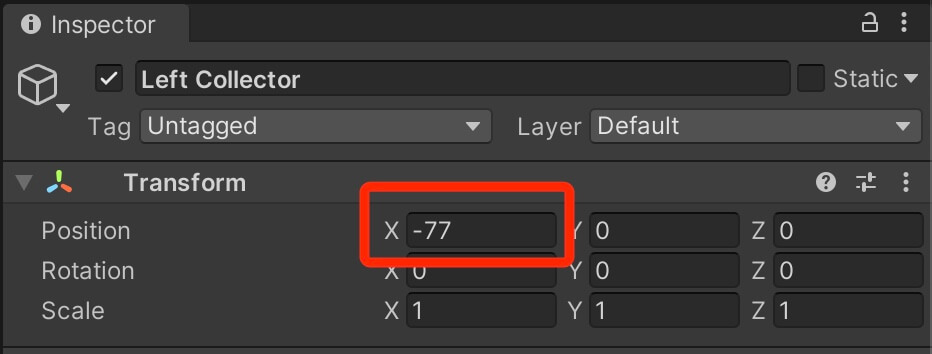
As I already mentioned, we need to position the collector object at the end of the level, so for our Left Collector game object set the following values for his position:
 
Img 18 FIXED
Next, duplicate the Left Collector object by selecting it and then hold CTRL + D or CMD + D on MacOS, or simply Right Click -> Duplicate.
 
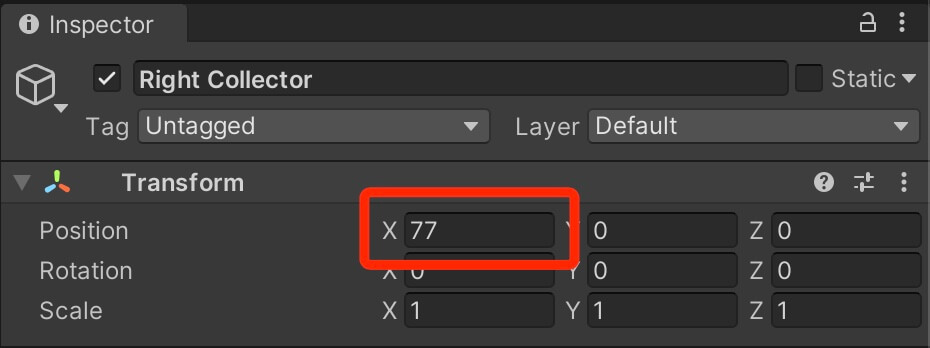
Rename the duplicated game object to Right Collector and set its position to the positive value of the position that we set for the Left Collector:
 
Img 19 FIXED
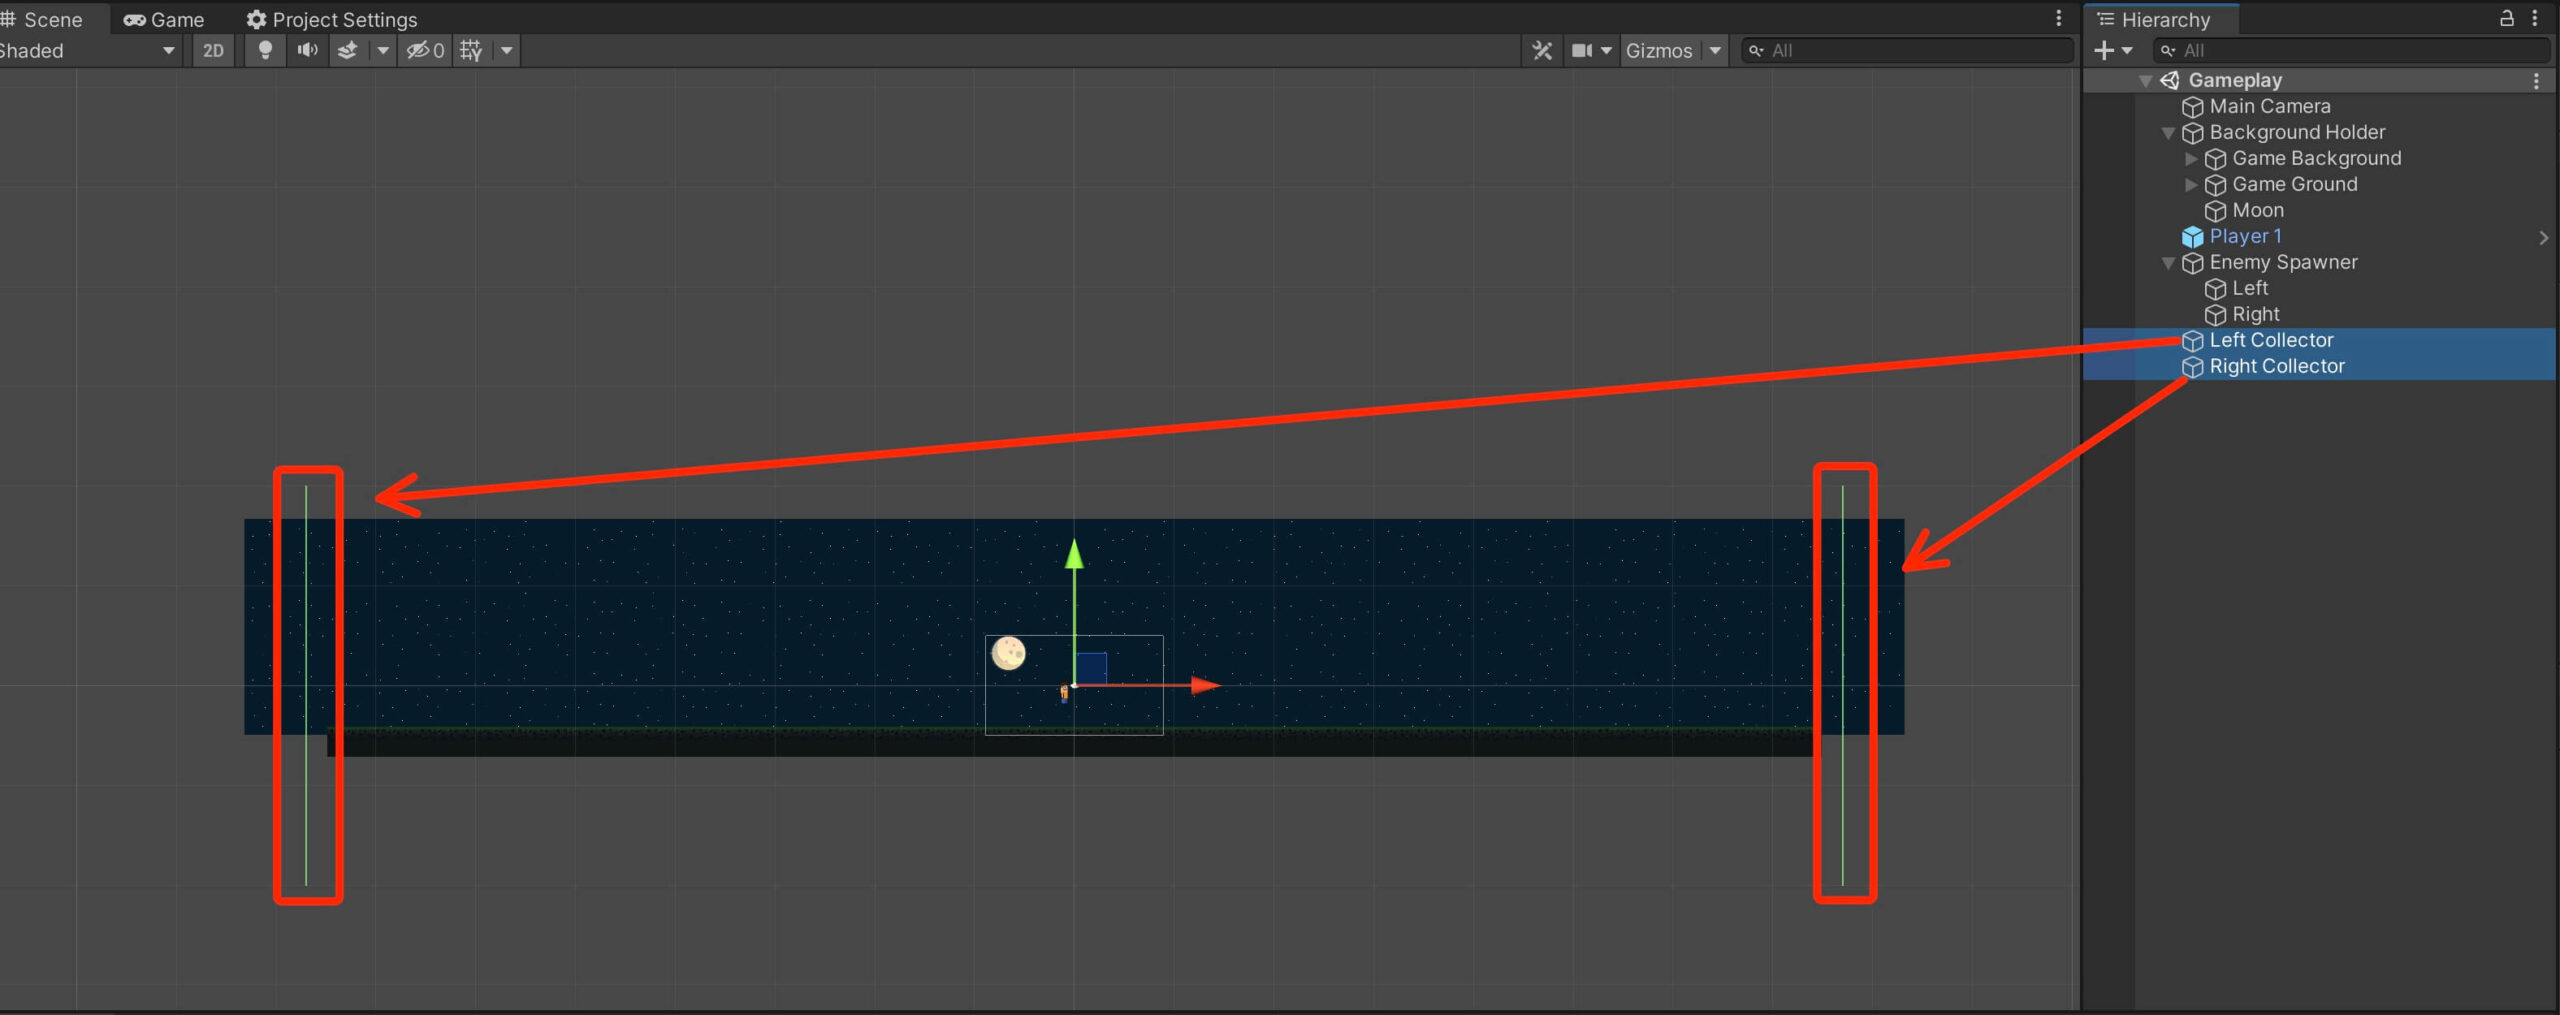
Now the collector game objects are positioned to the both ends of the level:
 
Img 20

Let’s test the game and see this in action:

Now when the player or any of the enemy game objects collides with the collector object it will be destroyed and removed from the game.

Now when it comes to Destroy function, if its overused it can lead to optimization problems and we already talked about that. So you can already assume that there is a better solution for that which is the SetActive function. You can read more about these two functions by clicking here.

Player And Enemy Collision

The point of the game is to avoid the enemies and stay alive in the game as long as possible. But that will not stop the enemies from trying to kill the player.
For that, we need to detect collision between the player object and the enemy objects.
 
Inside the Player script, in the OnCollisionEnter2D function add the following lines of code:
 
				
					private void OnCollisionEnter2D(Collision2D collision)
    {

        // detecting collision with the ground
        if (collision.gameObject.CompareTag(TagManager.GROUND_TAG))
            isGrounded = true;

        // detecting collision with the enemies
        if (collision.gameObject.CompareTag(TagManager.ENEMY_TAG))
            Destroy(gameObject);

    }
				
			
Let’s run the game and test this out:
 
So something weird is happening. The player object can collide with Enemy 1 and Enemy 2, but he can’t collide with the Ghost object as we saw from the preview video above.
 
The issue is that the collider of the Ghost object is set to be a trigger, which means we can’t detect collision between the player and Ghost object using OnCollisionEnter2D.
 
We need to use OnTriggerEnter2D to be able to detect collision between the player and the Ghost. And it doesn’t matter that the collider of the player object is not a trigger, because the Ghost object is a trigger, the OnTriggerEnter2D function will work even if we put it in the Player script.
 
Because when it comes to detecting collision in OnTriggerEnter2D function, at least one of the colliding objects needs to have its collider set to be a trigger, and this can be the game object which doesn’t have the script that will detect the collision attached on him.
 
So in the Player script, below the OnCollisionEnter2D function, create the OnTriggerEnter2D function:
 
				
					private void OnTriggerEnter2D(Collider2D collision)
    {
        if (collision.CompareTag(TagManager.ENEMY_TAG))
            Destroy(gameObject);
    }
				
			
If we test the game now, we will see that the player object is colliding with the Ghost as well as other enemy objects:
 
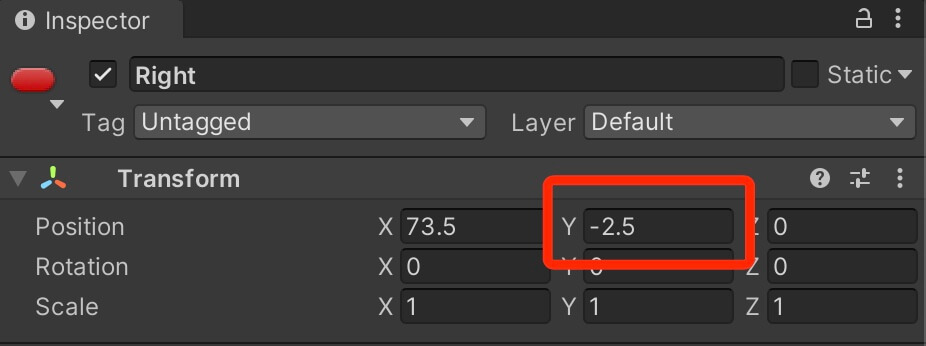
One thing to note is, if the Ghost object is set too high and you can’t jump over him, just set the position Y of the Left and Right objects that are children of the Enemy Spawner object to a lower position.
 
Because in the code, we are using the position of the Left and Right object as the position of the spawned enemy, if the position Y of either of the two is too high then the Ghost will be spawned at a position where the player can’t jump over him, so to fix this issue just position the Left and Right child objects to a lower Y position e.g. move them down:
 
Img 21


Where To Go From Here

In this part of the tutorial we created the main game mechanics. We created the Enemy script that will move the enemies, we created the EnemySpawner script that spawns the enemies in the game and we created a Collector script to remove unnecessary game objects from the game.
 
However, we are still not done, because when the player object gets destroyed by the enemies, the game ends but it doesn’t restart.
 
Before we can fix that issue, we first need to create the main menu and the character select system which will allow us to select the player we wish to play the game with.
 
So in the next part titled Introduction To Unity’s UI System And Creating The Main Menu For Our Game you will learn how to create user interfaces in Unity and how to position UI elements on the screen to support different screen resolutions.
 

1 thought on “Create A 2D Game With Unity Engine Part 5: Enemies, Spawners, And Gameplay Mechanism”

  1. Bro i have a issue
    The Enemies are seen in the scene view but when i click the play button they are not visible in the game view.
    But still they are moving in the scene view

    Reply

Leave a Comment