One of the things that you will do a lot in programming is repeat yourself… repeat yourself…. repeat yourself…. see what I did there? He he he I am very funny.
Anyways, the fact is that you will repeat a lot of the code that you wrote. Take the lines of code below for example:
					Debug.Log("Something to debug");
Debug.Log("Something to debug");
Debug.Log("Something to debug");
Debug.Log("Something to debug");
Debug.Log("Something to debug");
Instead of writing Debug.Log 5 times, or more depending on your needs, you can use a loop do that for you.
The Anatomy Of A Loop
The structure of a loop goes like this:
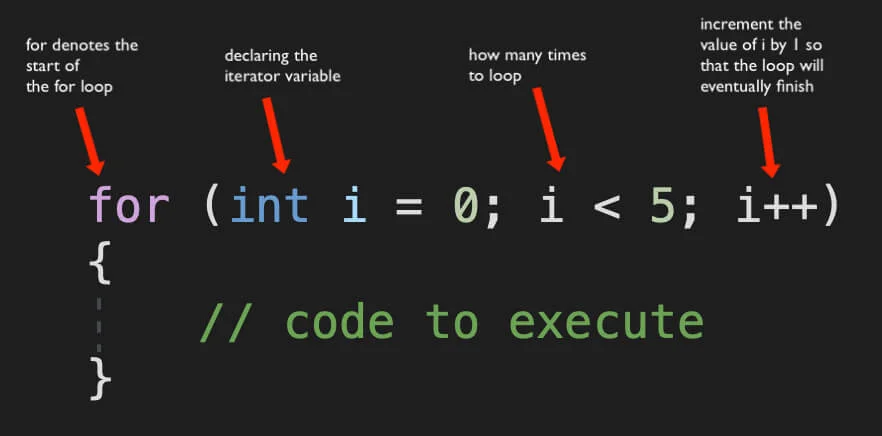
					for(int i = 0; i < 5; i++)
{
    // code that you want to execute
}
This is called a for loop, hence the opening for, the int i = 0 is called an iterator e.g. a variable that we will use to control how many times the for loop will loop, i < 5 means this loop will loop 5 times, and i++ means that we are incrementing the value of i after every loop:

To make it more simple, think of the code between the () as the condition for the loop.
So we have a variable i, and as long as i is less than the specified value, in this case 5, the loop will loop, and when it finishes it will increment the current value of i by 1 until the value of i gets to the point where the condition is no longer true and the loop will stop looping.
To demonstrate this, just add the following line of code inside the for loop:
Debug.Log("The value of i is: " + i);
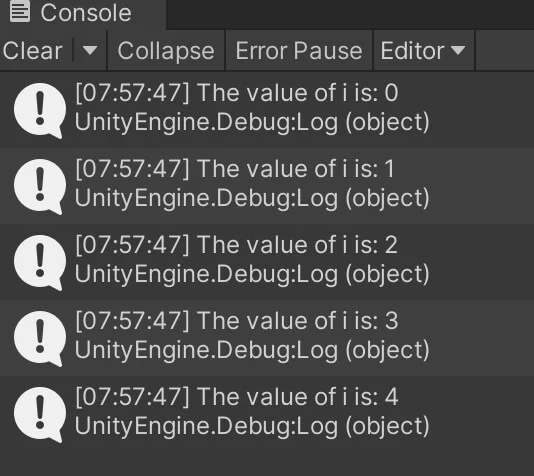
When you run the game this is what you will see in the Console:

As you can see the value of i goes from 0 up to 4 which means in the first iteration i has a value of 0, then when the loop finishes it will increase the value of i by 1 with the ++, after that the i has a value of 1, and then the process repeats.
When i gets to the point where the condition of i < 5 is no longer true, the loop will stop executing, that’s why the last value of i is 4 because when i gets to the value of 5 then the condition i < 5 is no longer true because 5 is not less than 5.
Of course, naming the variable i is not mandatory, you can name it g, t, u, Carl, Kenny, or whatever name you want, but i is a shortcut for iteration, that’s why you will see i is the most common name for the iterating variable.
While Loop
A for loop is not the only loop that we have at our disposal, there is also a while loop that goes like this:
					while(condition)
{
    // code to execute
}
The structure of a while loop is a little bit different but the purpose is the same. while denotes the opening of the loop, the condition between the parenthesis needs to be true so that the loop will execute the code.
If we were to rewrite the example with the for loop by using an integer it would go like this:
					int i = 0;

while(i < 5)
{
    Debug.Log("The value of i is: " + i);
    i++;
}
Where To Use For And Where To Use While Loop?
This is a question that a lot of people ask me while they are following a lecture about loops.
The short answer is we use loops for arrays and when we want to repeat a certain part of code that we have.
The long answer is with more examples that we will see in the upcoming lectures we will see a practical use of loops with a real world example and that’s when things will be even more clear.
One thing we need to understand is that programming is like that, the more you practice and the more lines of code you write and think about ways to solve problems the better you get and the more you understand how programming works.
So for now, we need to be satisfied with these basic examples of loops, but later down the road when we learn more things, then we will see practical examples in real projects.
Where To Go From Here
In this lecture you learned how to use loops to repeat your code multiple times with little effort.
To continue your learning journey you can check out our Introduction To Arrays Lecture which is the next lecture in this tutorial series.

