There are different types of enemy AI that you can create in Unity, from the very basic enemies that move between two points all the way to machine learning where your enemies are learning from the events in the game and behaving accordingly.
In this post we are going to learn about AI in Unity by creating basic and intermediate enemy AI behaviour.
Download Assets And Complete Project For This Tutorial
Important Information Before We Start
One of the labels for this tutorial is beginner, however this is not a tutorial for complete beginners.
I expect you to know how to create basic games in Unity, but you are a beginner when it comes to AI programming in Unity. So it is mandatory that you know how to code in C# and how to use Unity and its interface.
If you don’t know any of these things, you can learn how to code in C# in my C# tutorial series starting with variables, and then you can move on to create your first game in Unity with my Rainy Knifes tutorial.
Starting With Basic Enemy AI - Shooting
					[SerializeField]
    private GameObject spiderBullet;

    [SerializeField]
    private Transform bulletSpawnPos;

    [SerializeField]
    private float minShootWaitTime = 1f, maxShootWaitTime = 3f;

    private float waitTime;
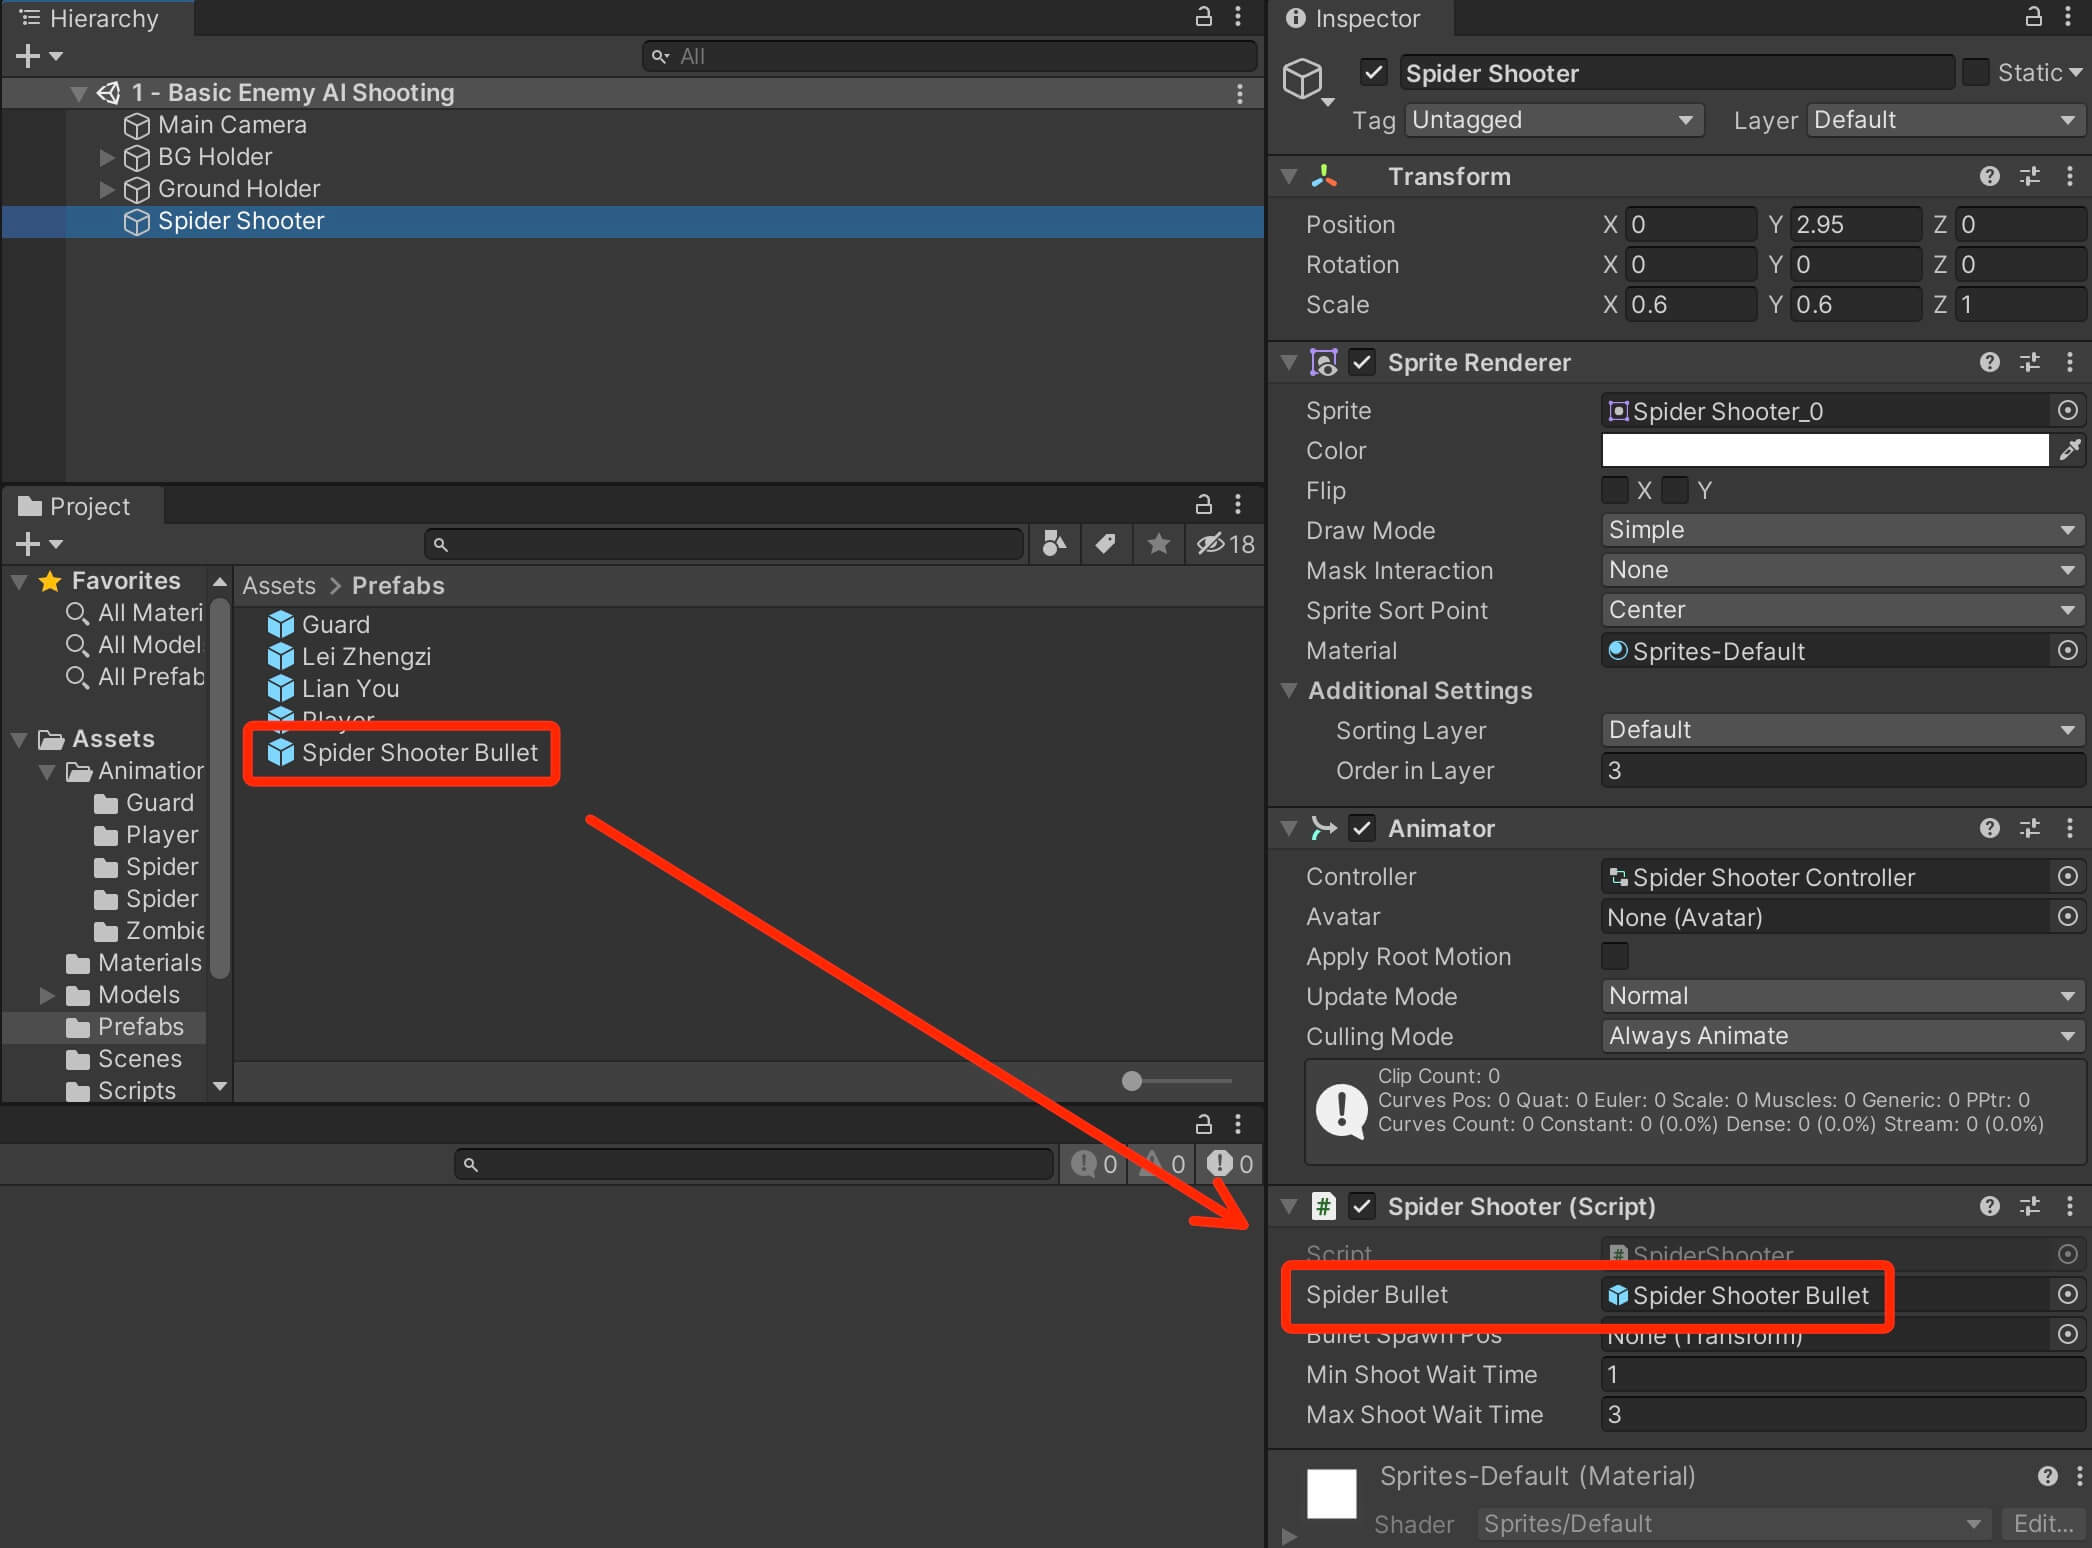

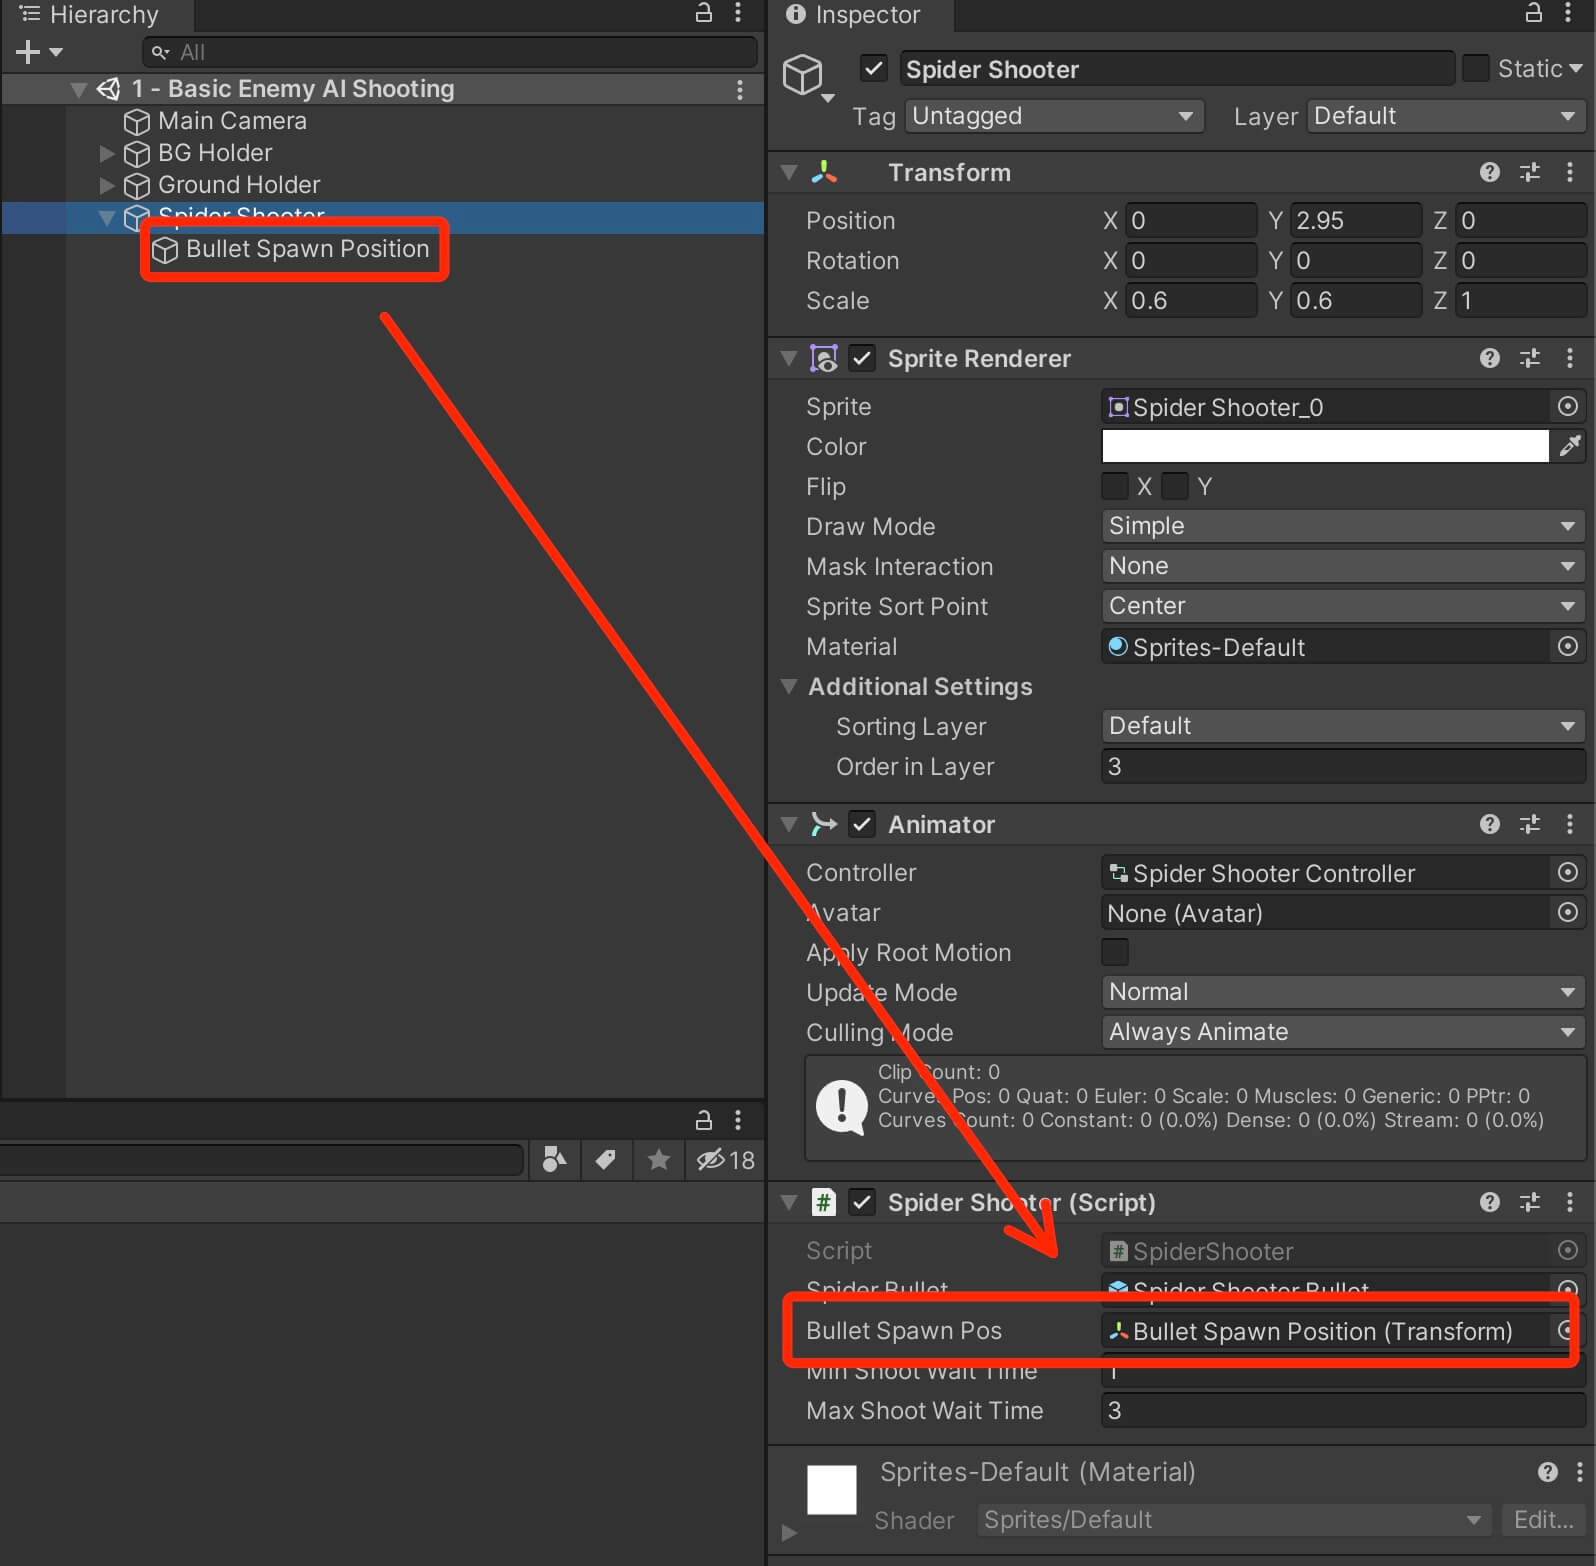
Going back in the SpiderShooter script, we are going to create the shooting functionality by adding the following lines of code:
					void Shoot()
    {
        Instantiate(spiderBullet, bulletSpawnPos.position, Quaternion.identity);
    }
The Shoot function simply uses the Instantiate function to create a new copy out of the spiderBullet game object. It will spawn it at the bulletSpawnPos variable position, and it will set the rotation values to 0 for X, Y, and Z using Quaternion.identity.
Inside the Update we will create a timer that will shoot the bullet every X seconds:
					private void Update()
    {
        if (Time.time > waitTime)
        {
            waitTime = Time.time + Random.Range(minShootWaitTime, maxShootWaitTime);
            Shoot();
        }
    }
					private void Start()
    {
        waitTime = Time.time + Random.Range(minShootWaitTime, maxShootWaitTime);
    }
As you can see, after every X amount of seconds the spider is shooting the bullet.
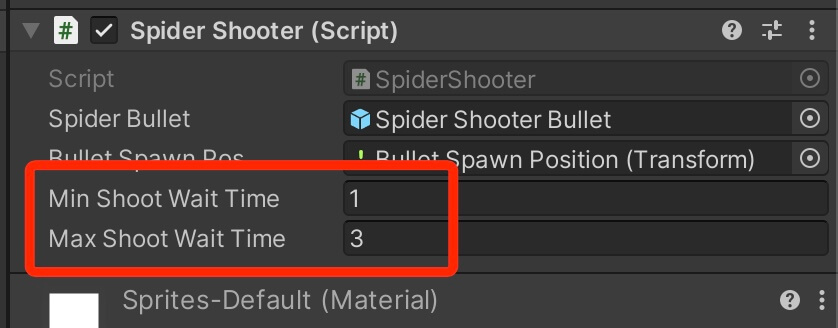
If you don’t like the wait time between each shoot, you can change the values for min and max shoot wait time because we added SerializeField in their declaration which means we can change their values in the Inspector tab:
					using System.Collections;
using System.Collections.Generic;
using UnityEngine;

public class SpiderShooter : MonoBehaviour
{

    [SerializeField]
    private GameObject spiderBullet;

    [SerializeField]
    private Transform bulletSpawnPos;

    [SerializeField]
    private float minShootWaitTime = 1f, maxShootWaitTime = 3f;

    private float waitTime;

    private void Start()
    {
        waitTime = Time.time + Random.Range(minShootWaitTime, maxShootWaitTime);
    }

    private void Update()
    {

        if (Time.time > waitTime)
        {
            waitTime = Time.time + Random.Range(minShootWaitTime, maxShootWaitTime);
            Shoot();
        }

    }

    void Shoot()
    {
        Instantiate(spiderBullet, bulletSpawnPos.position, Quaternion.identity);
    }

}
Optimizing Enemy AI Shooting - Object Pooling Technique
While the shooting functionality works, it can lead to our game being slow if we have too much shooting enemies in the game.
The reason for that is because we are using the Instantiate function which creates new objects every time, plus we are not disposing the bullets that we already created and this can lead to many game objects being in the game, not doing anything or having any functionality yet taking our game resources and this can make our game slower.
To fix this problem, we use a programming technique called pooling. The idea of pooling is to create a pool of objects, in our case a pool of bullets, and when we need a new bullet, we will reuse one of the bullets stored in the pool.
If by any chance all the bullets in the bullet are not available for use e.g. they are currently being used, then we will create a new bullet and store it in the pool and repeat the process.
To create this system, first we need to add new variables in the SpiderShooter script. Above the Start function add the following lines:
					[SerializeField]
    private List<GameObject> bullets;

    private bool canShoot;
    private int bulletIndex;

    [SerializeField]
    private int initialBulletCount = 2;
First we create a new list that will store game objects. A list is like an array, with the difference that a list is flexible, meaning we can add new and remove old elements from that list.
Between the <> we type the type of object we want to store in the list, in our case a GameObject. This can be modified in case we have a Bullet script for example, and we only want to store game objects that have the Bullet script attached on them, then, instead of typing:
					[SerializeField]
    private List<GameObject> bullets;
					[SerializeField]
    private List<Bullet> bullets;
					private void Start()
    {
        GameObject newBullet;

        for (int i = 0; i < initialBulletCount; i++)
        {
            newBullet = Instantiate(spiderBullet);
            bullets.Add(newBullet);
            newBullet.SetActive(false);
        }

        waitTime = Time.time + Random.Range(minShootWaitTime, maxShootWaitTime);
    }
First we create the newBullet variable and we don’t set a value for it, which means it is equal to null. We need the newBullet variable so that we can add the newly created bullet in the list.
Of course, since this is programming, there are always multiple ways how you can achieve a certain result. We can rewrite this code so that we don’t have to create the newBullet variable at all:
					private void Start()
    {
        for (int i = 0; i < initialBulletCount; i++)
        {
            bullets.Add(Instantiate(spiderBullet));
            bullets[i].SetActive(false);
        }

        waitTime = Time.time + Random.Range(minShootWaitTime, maxShootWaitTime);
    }
We can use Instantiate function as a parameter in the Add function from the list, because the Instantiate function returns the game object it has created, and the Add function of the list stores the object in the list.
To deactivate the newly created bullet, we can use i variable declared in the for loop and access the bullet we just created to deactivate it.
The reason why we deactivate the bullets as soon as we create them is because if don’t do that, they will be spawned in the level from the very start which is not something that we want.
You can test that by removing
bullets[i].SetActive(false);
from the code and see the outcome. Rewrite the Shoot function so that it uses the bullets from the bullets list instead of instantiating new ones:
					void Shoot()
    {
        canShoot = true;
        bulletIndex = 0;

        while (canShoot)
        {
            if (!bullets[bulletIndex].activeInHierarchy)
            {
                bullets[bulletIndex].SetActive(true);
                bullets[bulletIndex].transform.position = bulletSpawnPos.position;

                canShoot = false;
                break;
            }
            else
            {
                bulletIndex++;
            }

            if (bulletIndex == bullets.Count)
            {

                bullets.Add(Instantiate(spiderBullet, bulletSpawnPos.position, Quaternion.identity));

                canShoot = false;
                break;
            }
        }
    }
We are going to use a while loop to loop through the list and search for a bullet that is not active in the scene e.g. it used SetActive function and passed false as the parameter.
Because of that, every time we call the Shoot function first we need to set the value of canShoot to true. We also set the value of bulletIndex to zero(0) because we will start searching from the first element in the list.
The activeInHierarchy property of the game object returns true if the game object is active in the scene e.g. game, and it returns false if the game object is not active in the scene.
You will notice that we used an exclamation mark in front of the activeInHierarchy property, and the exclamation mark will make what’s after it, the opposite, meaning if activeInHierarchy returns true, then the exclamation mark will make it the opposite which is false, and if activeInHierarchy returns false, the exclamation mark will make it the opposite which is true.
So essentially we are searching for a game object, in our case a bullet, that is NOT active in the hierarchy so that we can activate it and use it. And this is the whole point of pooling technique because we are reusing game objects instead of creating new ones which saves performance.
We are using the bulletIndex to access the specific index in the list, and since we set the starting value of bulletIndex to 0 on line 4, we will first test if the element at index 0 is not active in the hierarchy.
To activate a game object, we simply call SetActive and pass true as the parameter and it will make the game object active in the game again.
Since we are simulating the effect of a bullet, we need to reposition the bullet we just activated so that it falls from the bulletSpawnPos, and this will make it look like the spider is shooting new bullets.
When we finish with that, we need to set canShoot to false, so that we don’t spawn more than one bullet, and we use break to exit outside the while loop.
When the code reaches the break statement, it will simply stop executing the loop, and all the code that is below the break statement will not get executed.
In our case, since we are using the canShoot variable to control the while loop, we can remove the break statements, but I put them in the code for this example just to explain what they are doing and that you can use them for that purpose.
In case we don’t find any bullets that are not active in the hierarchy, then we will create a new bullet and store it in the bullets list. This way, we will only create new bullets if all current bullets are active and being used, and this is very hard to happen when we get to a certain amount of bullets in the game.
Before we test out the game, one thing to note is that I added SerializeField above the bullets list declaration, I did this so that we can see directly in the Inspector tab when the bullets are created and added to the list, so when we test the game make sure that you pay attention to that.
Now run the game and let’s test it out:
When started the game we had only two spider bullets in the bullets list, and the more the spider enemy shoot, the more bullets were created in the list.
The reason for this is, we need to deactivate the bullet objects. Inside the Assets -> Scripts folder, create a new C# script and name it SpiderBullet. Open the SpiderBullet script in Visual Studio and add the following lines of code:
					private void OnTriggerEnter2D(Collider2D collision)
    {
        if (collision.CompareTag("Ground") || collision.CompareTag("Player"))
        {
            gameObject.SetActive(false);
        }
    }
In OnTriggerEnter2D we are testing if the bullet collides with the ground, or if the bullet collides with the player object, and if that happens we will deactivate the bullet.
Of course, in a real game, you would not use hard code string values instead you would have a more efficient way to compare strings to each other but I am not going to go into that in this tutorial.
Make sure that you attach the BulletScript to the Spider Shooter Bullet prefab inside the Assets -> Prefabs folder.
As for the Ground Holder game object, I’ve set his tag to Ground:

The result we have now is the same we had in the beginning when we used Instantiate, but the difference now is that the spider enemy is shooting the same way, but instead of creating new bullets every time, we are reusing the ones we already have.
Before we move forward, I will leave the new version of the SpiderShooter script as a reference:
					using System.Collections;
using System.Collections.Generic;
using UnityEngine;

public class SpiderShooter : MonoBehaviour
{
    [SerializeField]
    private GameObject spiderBullet;

    [SerializeField]
    private Transform bulletSpawnPos;

    [SerializeField]
    private float minShootWaitTime = 1f, maxShootWaitTime = 3f;

    private float waitTime;

    [SerializeField]
    private List<GameObject> bullets;

    private bool canShoot;
    private int bulletIndex;

    [SerializeField]
    private int initialBulletCount = 2;

    private void Start()
    {
        for (int i = 0; i < initialBulletCount; i++)
        {
            bullets.Add(Instantiate(spiderBullet));
            bullets[i].SetActive(false);
        }

        waitTime = Time.time + Random.Range(minShootWaitTime, maxShootWaitTime);
    }

    private void Update()
    {
        if (Time.time > waitTime)
        {
            waitTime = Time.time + Random.Range(minShootWaitTime, maxShootWaitTime);
            Shoot();
        }
    }

    void Shoot()
    {
        canShoot = true;
        bulletIndex = 0;

        while (canShoot)
        {
            if (!bullets[bulletIndex].activeInHierarchy)
            {
                bullets[bulletIndex].SetActive(true);
                bullets[bulletIndex].transform.position = bulletSpawnPos.position;

                canShoot = false;
            }
            else
            {
                bulletIndex++;
            }

            if (bulletIndex == bullets.Count)
            {

                bullets.Add(Instantiate(spiderBullet, bulletSpawnPos.position, Quaternion.identity));

                canShoot = false;
            }
        }
    }

} // class
Triggering AI Actions With Colliders
For the first example the spider enemy is shooting with the help of a timer. But what if we don’t want a functionality like that in our game. Let’s say we want to trigger the enemy to attack if the player is passing by.
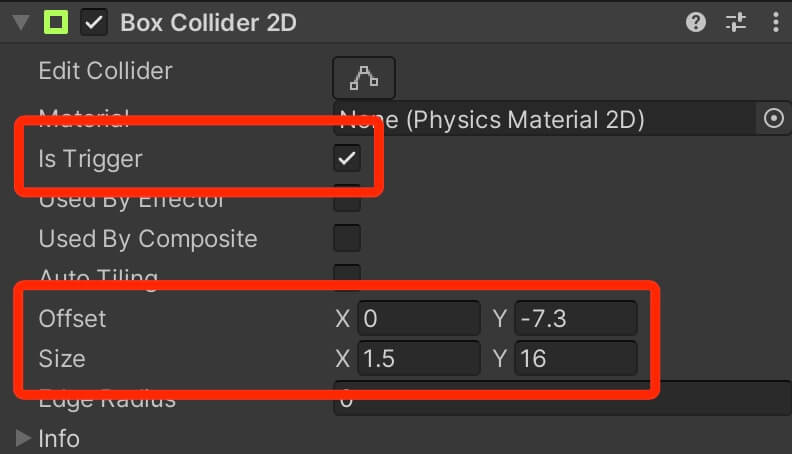
We can do that in couple of ways, one of them is using a collider. Attach a Box Collider 2D on the Spider Shooter game object in the Hierarchy tab, check the Is Trigger checkbox and set the following values for the size and position of the collider:
Since we are not going to use the timer functionality, we can remove the Update function and all the code that is inside. In the Start function we will only leave the code that will create the initial bullets when the game starts:
					 private void Start()
    {
        for (int i = 0; i < initialBulletCount; i++)
        {
            bullets.Add(Instantiate(spiderBullet));
            bullets[i].SetActive(false);
        }
    }
The Shoot function is going to stay the same. To trigger the shooting in the code, we are going to use OnTriggerEnter2D function:
					 private void OnTriggerEnter2D(Collider2D collision)
    {
        if (collision.CompareTag("Player"))
        {
            Shoot();
        }
    }
Since we checked the Is Trigger checkbox for the Box Collider 2D that is attached on the Spider Shooter, we can use OnTriggerEnter2D to detect collision between the player and the spider enemy, when they collide, the spider enemy will shoot.
I have already prepared the player game object and I’ve created a prefab out of it. In the Assets -> Prefabs folder, drag the Player object in the Hierarchy and run the game to test it:
As soon as the player entered the collider of the spider the spider started to shoot. One thing to keep in mind here is that we are using OnTriggerEnter2D to detect collision and shoot, depending on what you want to do this might not be the solution you are looking for.
Because if the player enters the collider and stays inside, then the spider will shoot only once:
					private void OnTriggerStay2D(Collider2D collision)
    {
        if (collision.CompareTag("Player"))
        {
            Shoot();
        }
    }
First, when the player entered the collider the spider shooter started shooting a lot of bullets, this is something we need to fix. Second, only when the player is moving while he is within the bounds of the collider does the spider start shooting.
“But teacher you said that OnTriggerStay2D registers collision for as long as the player stays inside the bounds.”
Yes I did handsome stranger. The issue here is, we need to attach a Rigidbody2D component on the spider, and we need to set the Sleeping Mode option to Never Sleep:
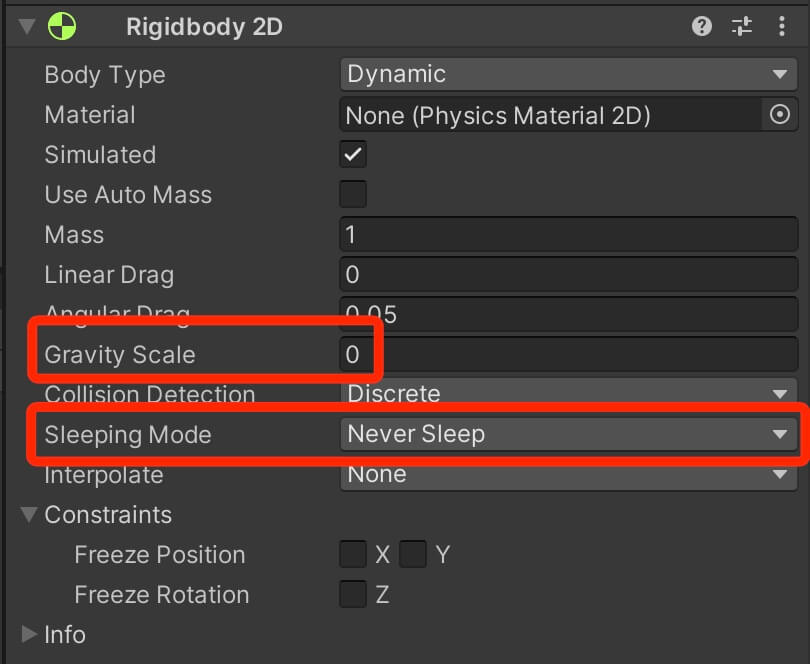
The collision now works as intended, but we still have the issue where the spider is shooting like crazy, which not something that we want.
We can fix this by implementing the same timer technique we used in the first example.
Inside the OnTriggerStay2D add the following lines of code:
					private void OnTriggerStay2D(Collider2D collision)
    {
        if (collision.CompareTag("Player"))
        {
            if (Time.time > waitTime)
            {
                waitTime = Time.time + Random.Range(minShootWaitTime, maxShootWaitTime);
                Shoot();
            }
        }
    }
Now we have a working logic that will trigger after X amount of seconds for as long as the player, or any other target game object, stays within the bounds of the collider.
The last trigger option, which we mentioned, that we can check is OnTriggerExit2D:
					private void OnTriggerExit2D(Collider2D collision)
    {
        if (collision.CompareTag("Player"))
        {
            Shoot();
        }
    }
Of course, you would use all three trigger detection functions in different ways depending on your needs, I am only showing you the options that you have at your disposal.
As a reference I will leave the new version of the SpiderShooter script below:
					using System.Collections;
using System.Collections.Generic;
using UnityEngine;

public class SpiderShooter : MonoBehaviour
{
    [SerializeField]
    private GameObject spiderBullet;

    [SerializeField]
    private Transform bulletSpawnPos;

    [SerializeField]
    private float minShootWaitTime = 1f, maxShootWaitTime = 3f;

    private float waitTime;

    [SerializeField]
    private List<GameObject> bullets;

    private bool canShoot;
    private int bulletIndex;

    [SerializeField]
    private int initialBulletCount = 2;

    private void Start()
    {
        for (int i = 0; i < initialBulletCount; i++)
        {
            bullets.Add(Instantiate(spiderBullet));
            bullets[i].SetActive(false);
        }
    }

    void Shoot()
    {
        canShoot = true;
        bulletIndex = 0;

        while (canShoot)
        {
            if (!bullets[bulletIndex].activeInHierarchy)
            {
                bullets[bulletIndex].SetActive(true);
                bullets[bulletIndex].transform.position = bulletSpawnPos.position;

                canShoot = false;
            }
            else
            {
                bulletIndex++;
            }

            if (bulletIndex == bullets.Count)
            {

                bullets.Add(Instantiate(spiderBullet, bulletSpawnPos.position, Quaternion.identity));

                canShoot = false;
            }
        }
    }

    private void OnTriggerEnter2D(Collider2D collision)
    {
        if (collision.CompareTag("Player"))
        {
            Shoot();
        }
    }

    private void OnTriggerStay2D(Collider2D collision)
    {
        if (collision.CompareTag("Player"))
        {
            if (Time.time > waitTime)
            {
                waitTime = Time.time + Random.Range(minShootWaitTime, maxShootWaitTime);
                Shoot();
            }
        }
    }

    private void OnTriggerExit2D(Collider2D collision)
    {
        if (collision.CompareTag("Player"))
        {
            Shoot();
        }
    }

} // class
Triggering AI Actions With Raycasts
Another way how we can create AI behavior is using raycasts. The idea of a raycast is to create an invisible ray in the shape of a line, circle, or a box, and when the target game object touches that ray, collision will be detected and you can perform actions based on that collision.
We are going to reuse the same script with the same shooting functionality, but we are going to change the way how we detect shooting, so you can remove the functions that detect collision between the enemy and other objects.
Now, to create a ray we use the Physics2D class, and it goes like this:
					private void Update()
    {
        if (Physics2D.Raycast(transform.position, Vector2.down, 10f))
        {

        }
    }
Debug.DrawRay(transform.position, Vector3.down * 10f, Color.red);
The DrawRay function doesn’t have the length parameter to determine the length of the ray that we will draw, because of that we can multiply the direction with the length of the ray, which we did for the second parameter: Vector3.down * 10f, and this will draw a ray in the down direction with the length of 10. The color parameter is the color of the ray that will be drawn on the screen.
Let’s run the game and see this in action:
					if (Physics2D.Raycast(transform.position, Vector2.down, 10f))
{
    Shoot();
}
					[SerializeField]
    private LayerMask collisionLayer;
					if (Physics2D.Raycast(transform.position, Vector2.down, 10f, collisionLayer))
{
    Shoot();
}
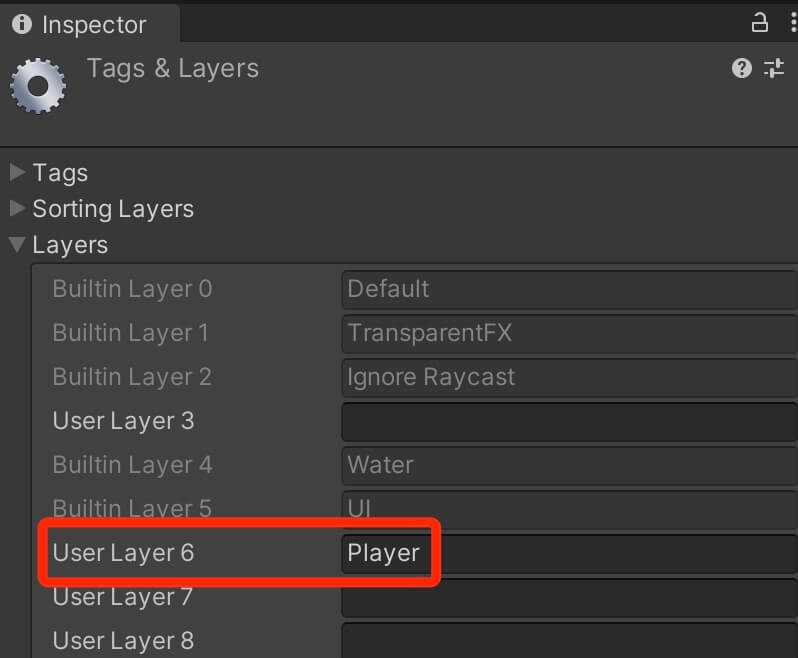
Now change the layer for the player object to Player layer:

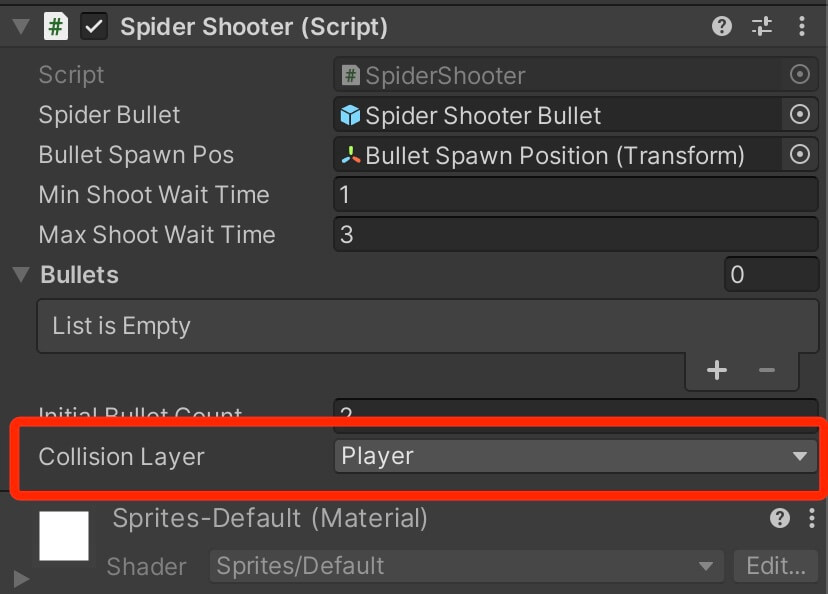
Now the raycast will only detect collisions with game objects that are on the Player layer. Let’s run the game to test it:
					using System.Collections;
using System.Collections.Generic;
using UnityEngine;

public class SpiderShooter : MonoBehaviour
{
    [SerializeField]
    private GameObject spiderBullet;

    [SerializeField]
    private Transform bulletSpawnPos;

    [SerializeField]
    private float minShootWaitTime = 1f, maxShootWaitTime = 3f;

    private float waitTime;

    [SerializeField]
    private List<GameObject> bullets;

    private bool canShoot;
    private int bulletIndex;

    [SerializeField]
    private int initialBulletCount = 2;

    [SerializeField]
    private LayerMask collisionLayer;

    private void Start()
    {
        for (int i = 0; i < initialBulletCount; i++)
        {
            bullets.Add(Instantiate(spiderBullet));
            bullets[i].SetActive(false);
        }
    }

    private void Update()
    {
        if (Physics2D.Raycast(transform.position, Vector2.down, 10f, collisionLayer))
        {
            if (Time.time > waitTime)
            {
                waitTime = Time.time + Random.Range(minShootWaitTime, maxShootWaitTime);
                Shoot();
            }
        }

        Debug.DrawRay(transform.position, Vector3.down * 10f, Color.red);

    }

    void Shoot()
    {
        canShoot = true;
        bulletIndex = 0;

        while (canShoot)
        {
            if (!bullets[bulletIndex].activeInHierarchy)
            {
                bullets[bulletIndex].SetActive(true);
                bullets[bulletIndex].transform.position = bulletSpawnPos.position;

                canShoot = false;
            }
            else
            {
                bulletIndex++;
            }

            if (bulletIndex == bullets.Count)
            {

                bullets.Add(Instantiate(spiderBullet, bulletSpawnPos.position, Quaternion.identity));

                canShoot = false;
            }
        }
    }

} // class
Shooting In Player's Direction
So far, all the AI examples we saw make the enemy shoot in one direction. But what if we want the enemy to shoot in the player’s direction, for example you have an enemy with a gun and you want it to shoot the player no matter where the player is in the level.
For that, we need to make the enemy rotate towards the player’s direction first, and then fire a bullet in that direction.
We are going to use the same shooting functionality, but you can remove the current code from the Update function and the LayerMask variable declaration since we don’t need raycasting for this example.
What we do need is a reference to the player’s Transform component because want the enemy to rotate towards the player.
Above the Start function declare the following variable:
private Transform playerTransform;
					private void Awake()
    {
        playerTransform = GameObject.FindWithTag("Player").transform;
    }
					private Vector3 direction;
    private float angle;
					void FacePlayersDirection()
    {
        direction = playerTransform.position - transform.position;
        angle = Mathf.Atan2(direction.y, direction.x) * Mathf.Rad2Deg;
        transform.rotation = Quaternion.AngleAxis(angle + 90f, Vector3.forward);
    }
					private void Update()
    {
        FacePlayersDirection();
    }
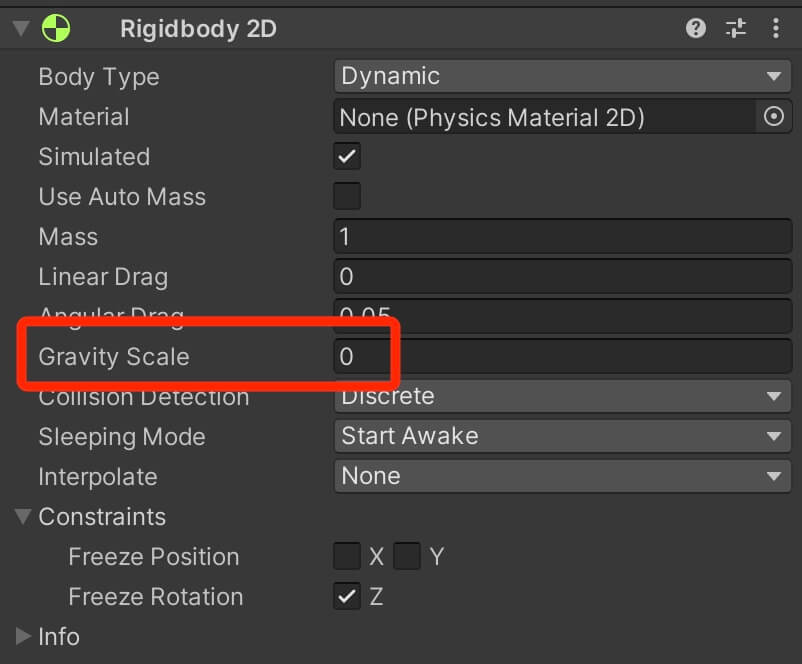
If we want the bullet to move towards the direction where it is fired, then we need to turn off the gravity affect it, otherwise the gravity will pull the bullet down.
Next, open the SpiderBullet script, and below the class declaration add the following lines of code:
					[SerializeField]
    private float moveSpeed = 7f;

    [SerializeField]
    private Rigidbody2D myBody;
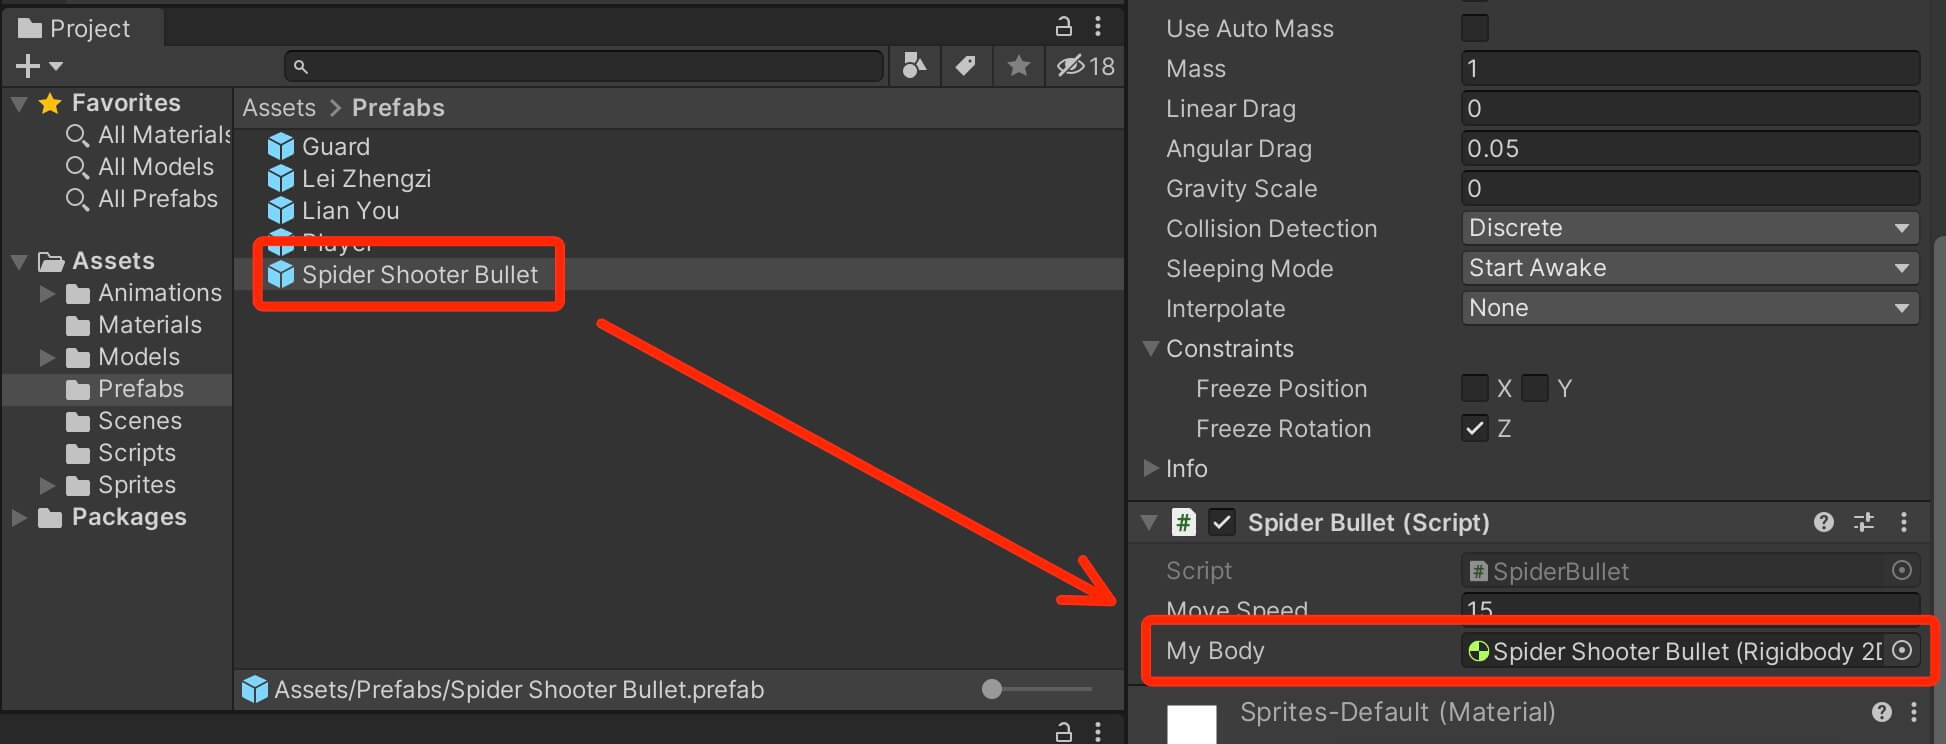
You can already assume what we are going to do with both of these variables. But before we proceed with that, we need to attach the Rigidbody2D component to the appropriate slot in the Inspector tab.
You can drag the Spider Shooter Bullet object in the slot and it will register its Rigidbody2D component:
					public void ShootBullet(Vector3 direction)
    {
        myBody.velocity = direction * moveSpeed;
    }
					private void OnDisable()
    {
        myBody.velocity = Vector2.zero;
    }
					 void FacePlayersDirection()
    {
        direction = playerTransform.position - transform.position;
        angle = Mathf.Atan2(direction.y, direction.x) * Mathf.Rad2Deg;
        transform.rotation = Quaternion.AngleAxis(angle + 90f, Vector3.forward);

        if (Time.time > waitTime)
        {
            waitTime = Time.time + Random.Range(minShootWaitTime, maxShootWaitTime);
            Shoot();
        }
    }
As you can see, we are using the same approach we used so far. Of course, you can also trigger the shooting like we showed in the previous examples.
Now to shoot the bullet, we need to make a couple of changes. First, we are going to change the declaration of the bullets list from:
					[SerializeField]
    private List<GameObject> bullets;
to
					[SerializeField]
    private List<SpiderBullet> bullets;
The reason for this is because we are going to use the Rigidbody2D component of the bullet to make it move e.g. to shoot the bullet. We already created the ShootBullet function inside the SpiderBullet script, and in order to access that function we either need to use GetComponent, which can be performance heavy, or we can store a reference to the SpiderBullet class itself and simply access the function from the stored variable which is more efficient.
Before we proceed, inside the Start function we need to modify the code that is storing the bullet game objects in the list:
					private void Start()
    {
        for (int i = 0; i < initialBulletCount; i++)
        {
            // while instantiating the bullet game object also get the SpiderBullet component
            bullets.Add(Instantiate(spiderBullet).GetComponent<SpiderBullet>());
            bullets[i].gameObject.SetActive(false);
        }

        waitTime = Time.time + Random.Range(minShootWaitTime, maxShootWaitTime);
    }
					 void Shoot()
    {
        canShoot = true;
        bulletIndex = 0;

        while (canShoot)
        {
            if (!bullets[bulletIndex].gameObject.activeInHierarchy)
            {
                bullets[bulletIndex].gameObject.SetActive(true);

                // set the rotation of the bullet to the rotation of the spider(parent game object)
                bullets[bulletIndex].transform.rotation = transform.rotation;
                bullets[bulletIndex].transform.position = bulletSpawnPos.position;

                // call the shoot bullet function to shoot the bullet
                bullets[bulletIndex].ShootBullet(transform.up);

                canShoot = false;
            }
            else
            {
                bulletIndex++;
            }

            if (bulletIndex == bullets.Count)
            {
                // while
                bullets.Add(Instantiate(spiderBullet, bulletSpawnPos.position, transform.rotation).GetComponent<SpiderBullet>());

                // access the bullet we just created by subtracting 1 from
                // the total bullet count in the list
                bullets[bullets.Count - 1].ShootBullet(transform.up);

                canShoot = false;
            }
        }
    }
					using System.Collections;
using System.Collections.Generic;
using UnityEngine;

public class SpiderShooter : MonoBehaviour
{
    [SerializeField]
    private GameObject spiderBullet;

    [SerializeField]
    private Transform bulletSpawnPos;

    [SerializeField]
    private float minShootWaitTime = 1f, maxShootWaitTime = 3f;

    private float waitTime;

    [SerializeField]
    private List<SpiderBullet> bullets;

    private bool canShoot;
    private int bulletIndex;

    [SerializeField]
    private int initialBulletCount = 2;

    private Transform playerTransform;

    private Vector3 direction;
    private float angle;

    private void Awake()
    {
        playerTransform = GameObject.FindWithTag("Player").transform;
    }

    private void Start()
    {
        for (int i = 0; i < initialBulletCount; i++)
        {
            // while instantiating the bullet game object also get the SpiderBullet component
            bullets.Add(Instantiate(spiderBullet).GetComponent<SpiderBullet>());
            bullets[i].gameObject.SetActive(false);
        }

        waitTime = Time.time + Random.Range(minShootWaitTime, maxShootWaitTime);
    }

    private void Update()
    {
        FacePlayersDirection();
    }

    void Shoot()
    {
        canShoot = true;
        bulletIndex = 0;

        while (canShoot)
        {
            if (!bullets[bulletIndex].gameObject.activeInHierarchy)
            {
                bullets[bulletIndex].gameObject.SetActive(true);

                // set the rotation of the bullet to the rotation of the spider(parent game object)
                bullets[bulletIndex].transform.rotation = transform.rotation;
                bullets[bulletIndex].transform.position = bulletSpawnPos.position;

                // call the shoot bullet function to shoot the bullet
                bullets[bulletIndex].ShootBullet(transform.up);

                canShoot = false;
            }
            else
            {
                bulletIndex++;
            }

            if (bulletIndex == bullets.Count)
            {
                // while
                bullets.Add(Instantiate(spiderBullet, bulletSpawnPos.position, transform.rotation).GetComponent<SpiderBullet>());

                // access the bullet we just created by subtracting 1 from
                // the total bullet count in the list
                bullets[bullets.Count - 1].ShootBullet(transform.up);

                canShoot = false;
            }
        }
    }

    void FacePlayersDirection()
    {
        direction = playerTransform.position - transform.position;
        angle = Mathf.Atan2(direction.y, direction.x) * Mathf.Rad2Deg;
        transform.rotation = Quaternion.AngleAxis(angle + 90f, Vector3.forward);

        if (Time.time > waitTime)
        {
            waitTime = Time.time + Random.Range(minShootWaitTime, maxShootWaitTime);
            Shoot();
        }
    }

} // class
					using System.Collections;
using System.Collections.Generic;
using UnityEngine;

public class SpiderBullet : MonoBehaviour
{

    [SerializeField]
    private float moveSpeed = 7f;

    [SerializeField]
    private Rigidbody2D myBody;

    private void OnDisable()
    {
        myBody.velocity = Vector2.zero;
    }

    public void ShootBullet(Vector3 direction)
    {
        myBody.velocity = direction * moveSpeed;
    }

    private void OnTriggerEnter2D(Collider2D collision)
    {
        if (collision.CompareTag("Ground") || collision.CompareTag("Player"))
        {
            gameObject.SetActive(false);
        }
    }
}
Enemy Jumping AI
Moving forward, in the Assets -> Scenes folder open the scene named 2 – Basic Enemy AI Jump Attack. Inside the scene you will see a small spider in the middle, which is going to be our enemy for this example, and you see the player object.
I have prepared the animations of the spider as well as the script and I added some code that will animate him so that we don’t have to do that because that’s not the goal of this tutorial.
The idea of the Spider Jumper is to make him jump and try to kill the player while he is attempting to jump over the spider.
If you checked out the SpiderJumper script that I already prepared you will notice from the variables I’ve prepared that we are going to use a timer to make the spider jump.
But first, let us create the Jump function:
					void Jump()
    {
        if (canJump)
        {
            canJump = false;
            myBody.velocity = new Vector2(0f, Random.Range(minJumpForce, maxJumpForce));
        }
    }
					void HandleJumping()
    {
        if (Time.time > jumpTimer)
        {
            jumpTimer = Time.time + Random.Range(minWaitTime, maxWaitTime);
            Jump();
        }

        if (myBody.velocity.magnitude == 0)
            canJump = true;

    }
					private void Update()
    {
        HandleJumping();
        HandleAnimations();
    }
					using System.Collections;
using System.Collections.Generic;
using UnityEngine;

public class SpiderJumper : MonoBehaviour
{

    private Rigidbody2D myBody;
    private Animator anim;

    [SerializeField]
    private float minJumpForce = 5f, maxJumpForce = 12f;

    [SerializeField]
    private float minWaitTime = 1.5f, maxWaitTime = 3.5f;

    private float jumpTimer;

    private bool canJump;

    private void Awake()
    {
        anim = GetComponent<Animator>();
        myBody = GetComponent<Rigidbody2D>();
    }

    private void Start()
    {
        jumpTimer = Time.time + Random.Range(minWaitTime, maxWaitTime);
    }

    private void Update()
    {
        HandleJumping();
        HandleAnimations();
    }

    void HandleAnimations()
    {
        if (myBody.velocity.magnitude == 0)
            anim.SetBool("Jump", false);
        else
            anim.SetBool("Jump", true);
    }

    void Jump()
    {
        if (canJump)
        {
            canJump = false;
            myBody.velocity = new Vector2(0f, Random.Range(minJumpForce, maxJumpForce));
        }
    }

    void HandleJumping()
    {
        if (Time.time > jumpTimer)
        {
            jumpTimer = Time.time + Random.Range(minWaitTime, maxWaitTime);
            Jump();
        }

        if (myBody.velocity.magnitude == 0)
            canJump = true;
    }

} // class
Enemy AI Movement
All examples we saw so far are using static enemies e.g. enemies that don’t move and only shoot or perform another form of attack.
For this example we are going to see how we can make the enemy move around the level.
Inside the Assets -> Scenes folder, open the scene named 3 – Basic And Intermediate Enemy AI Point A To Point B Movement.
Inside you will see a prepared level and a prepared enemy. I have also prepared a script called GuardPointToPoint and attached it on the enemy object.
When you open the GuardPointToPoint script in visual studio you will see that I’ve already prepared a few variables and one function that will animate the enemy.
To make the movement work, we need to add a few more variables. Above the Awake function, add the following lines of code:
					[SerializeField]
    private Transform[] movementPoints;

    private Vector2 currentMovementPoint;

    private int currentMovementPointIndex, previousMovementPointIndex;

    [SerializeField]
    private float moveSpeed = 2f;
					void MoveToTarget()
    {
        transform.position =
            Vector2.MoveTowards(transform.position, currentMovementPoint, Time.deltaTime * moveSpeed);

        if (Vector2.Distance(transform.position, currentMovementPoint) < 0.1f)
        {

        }

        AnimateMovement(true);
    }
					void SetMovementPointTarget()
    {
        while (true)
        {

            currentMovementPointIndex = Random.Range(0, movementPoints.Length);

            if (currentMovementPointIndex != previousMovementPointIndex)
            {
                previousMovementPointIndex = currentMovementPointIndex;
                currentMovementPoint = movementPoints[currentMovementPointIndex].position;
                break;
            }
        }
    }
					private void Start()
    {
        SetMovementPointTarget();
    }
					void MoveToTarget()
    {
        transform.position =
            Vector2.MoveTowards(transform.position, currentMovementPoint, Time.deltaTime * moveSpeed);

        if (Vector2.Distance(transform.position, currentMovementPoint) < 0.1f)
        {
           // set the new movement point
           SetMovementPointTarget();
        }

        AnimateMovement(true);
    }
One more thing we need to do is add the code that will handle the facing direction depending on where the enemy is going:
					void HandleFacingDirection()
    {
        tempScale = transform.localScale;

        if (transform.position.x > currentMovementPoint.x)
        {
            tempScale.x = Mathf.Abs(tempScale.x);
        }
        else if (transform.position.x < currentMovementPoint.x)
        {
            tempScale.x = -Mathf.Abs(tempScale.x);
        }

        transform.localScale = tempScale;
    }
The logic is simple, based on the position X of the enemy and the current movement point, we will change the facing direction.
When the enemy’s position X is greater than the position X of the current movement point that means that the player is on the right side and he is going towards the left side. In that case we set the Scale X to a positive number, because by default how the enemy sprite is created he is facing the left side.
And if the position X of the enemy is less than the position X of the current movement point, then we set the Scale X to negative value to change the facing direction of the enemy.
To make this work, we are going to call the HandleFacingDirection in the Update function:
					private void Update()
    {
        MoveToTarget();
        HandleFacingDirection();
    }
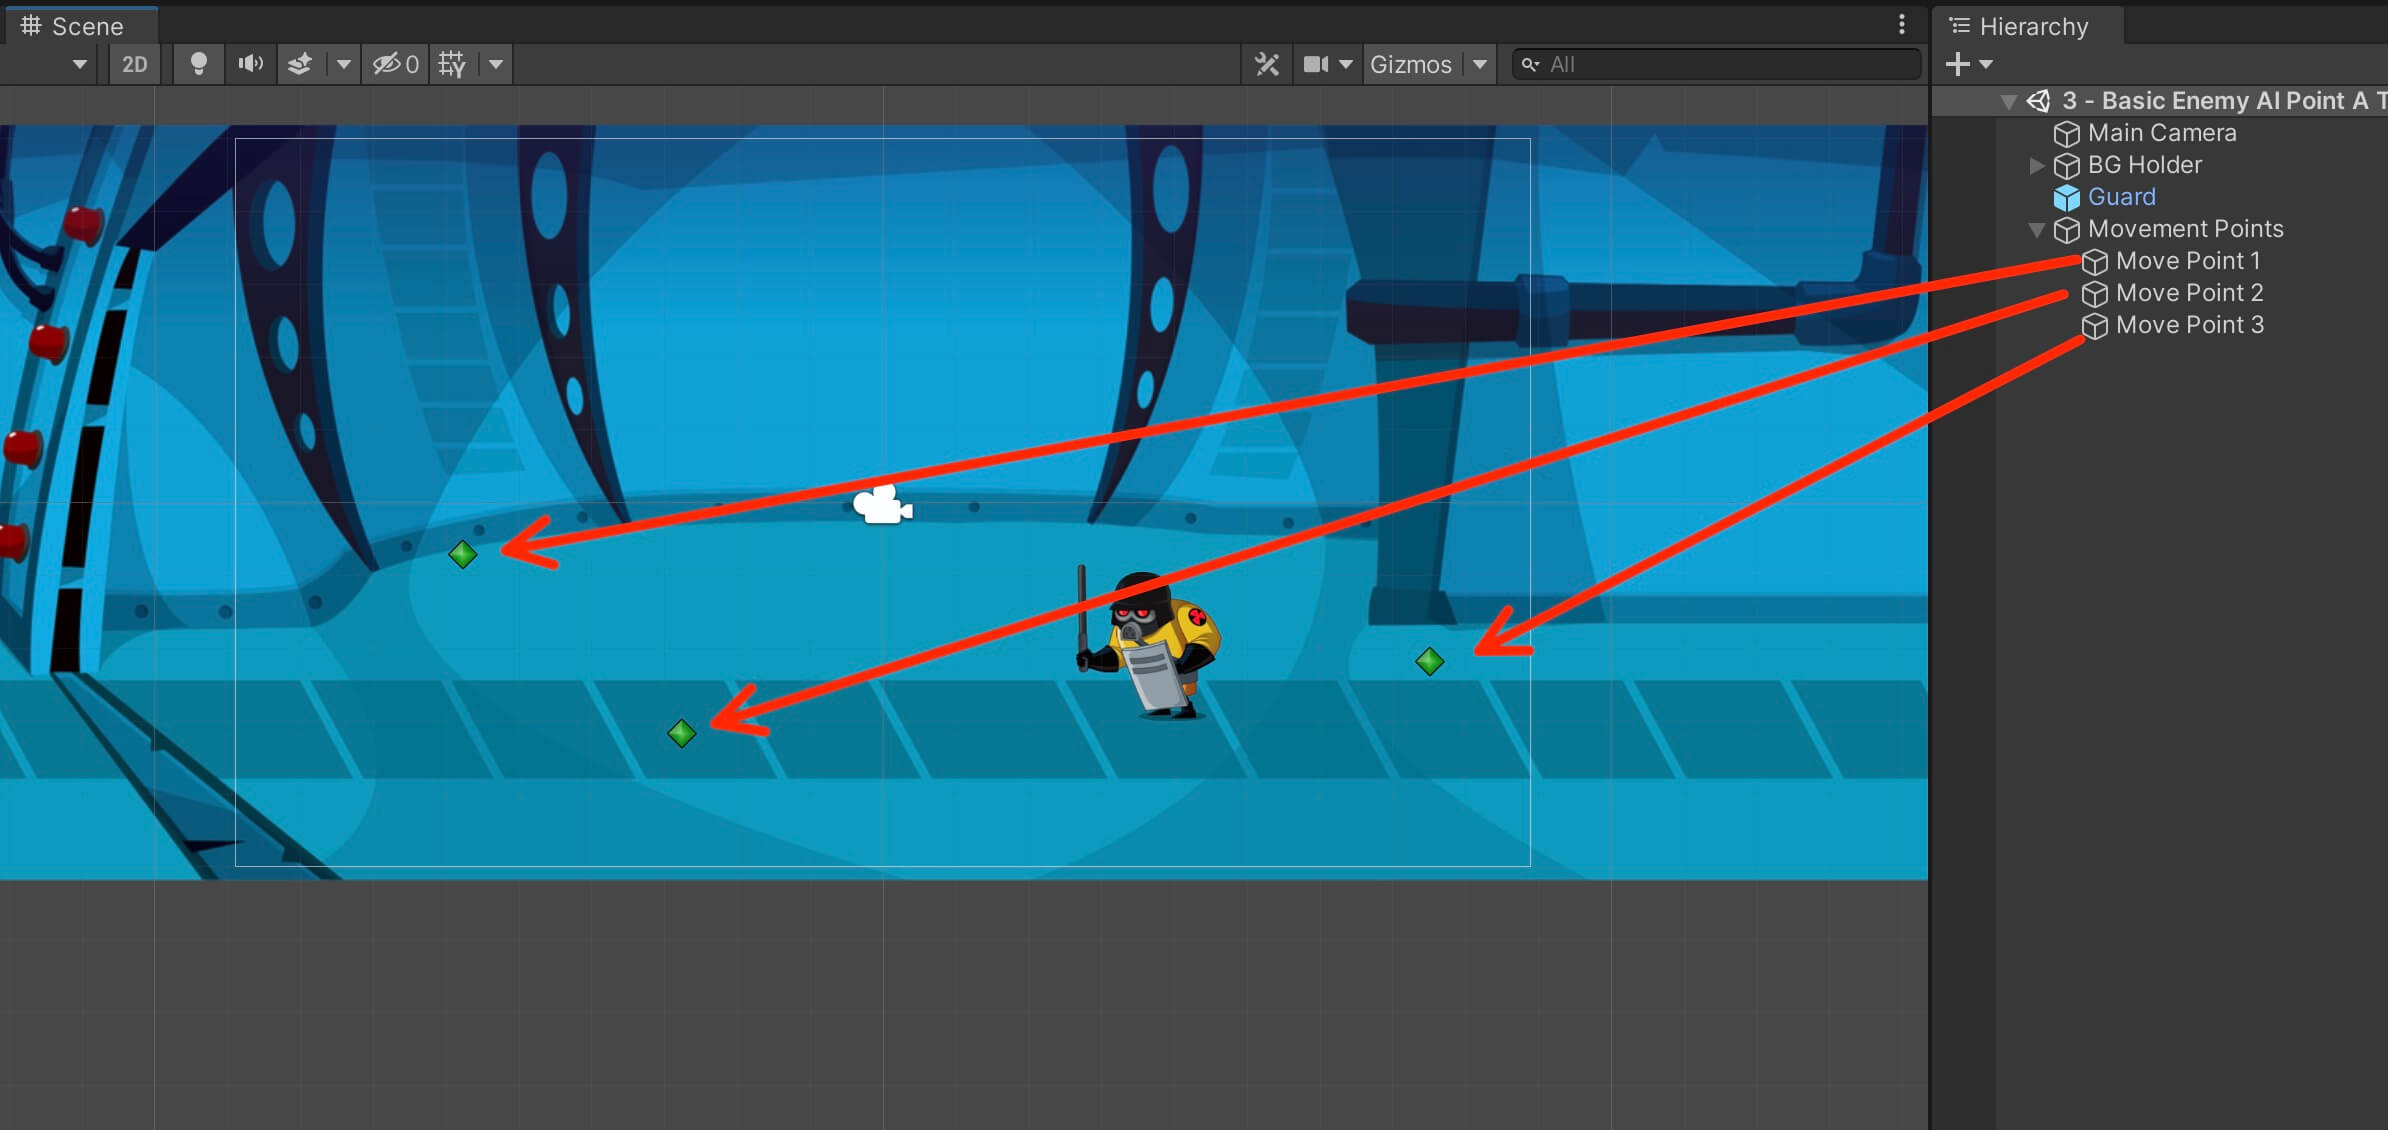
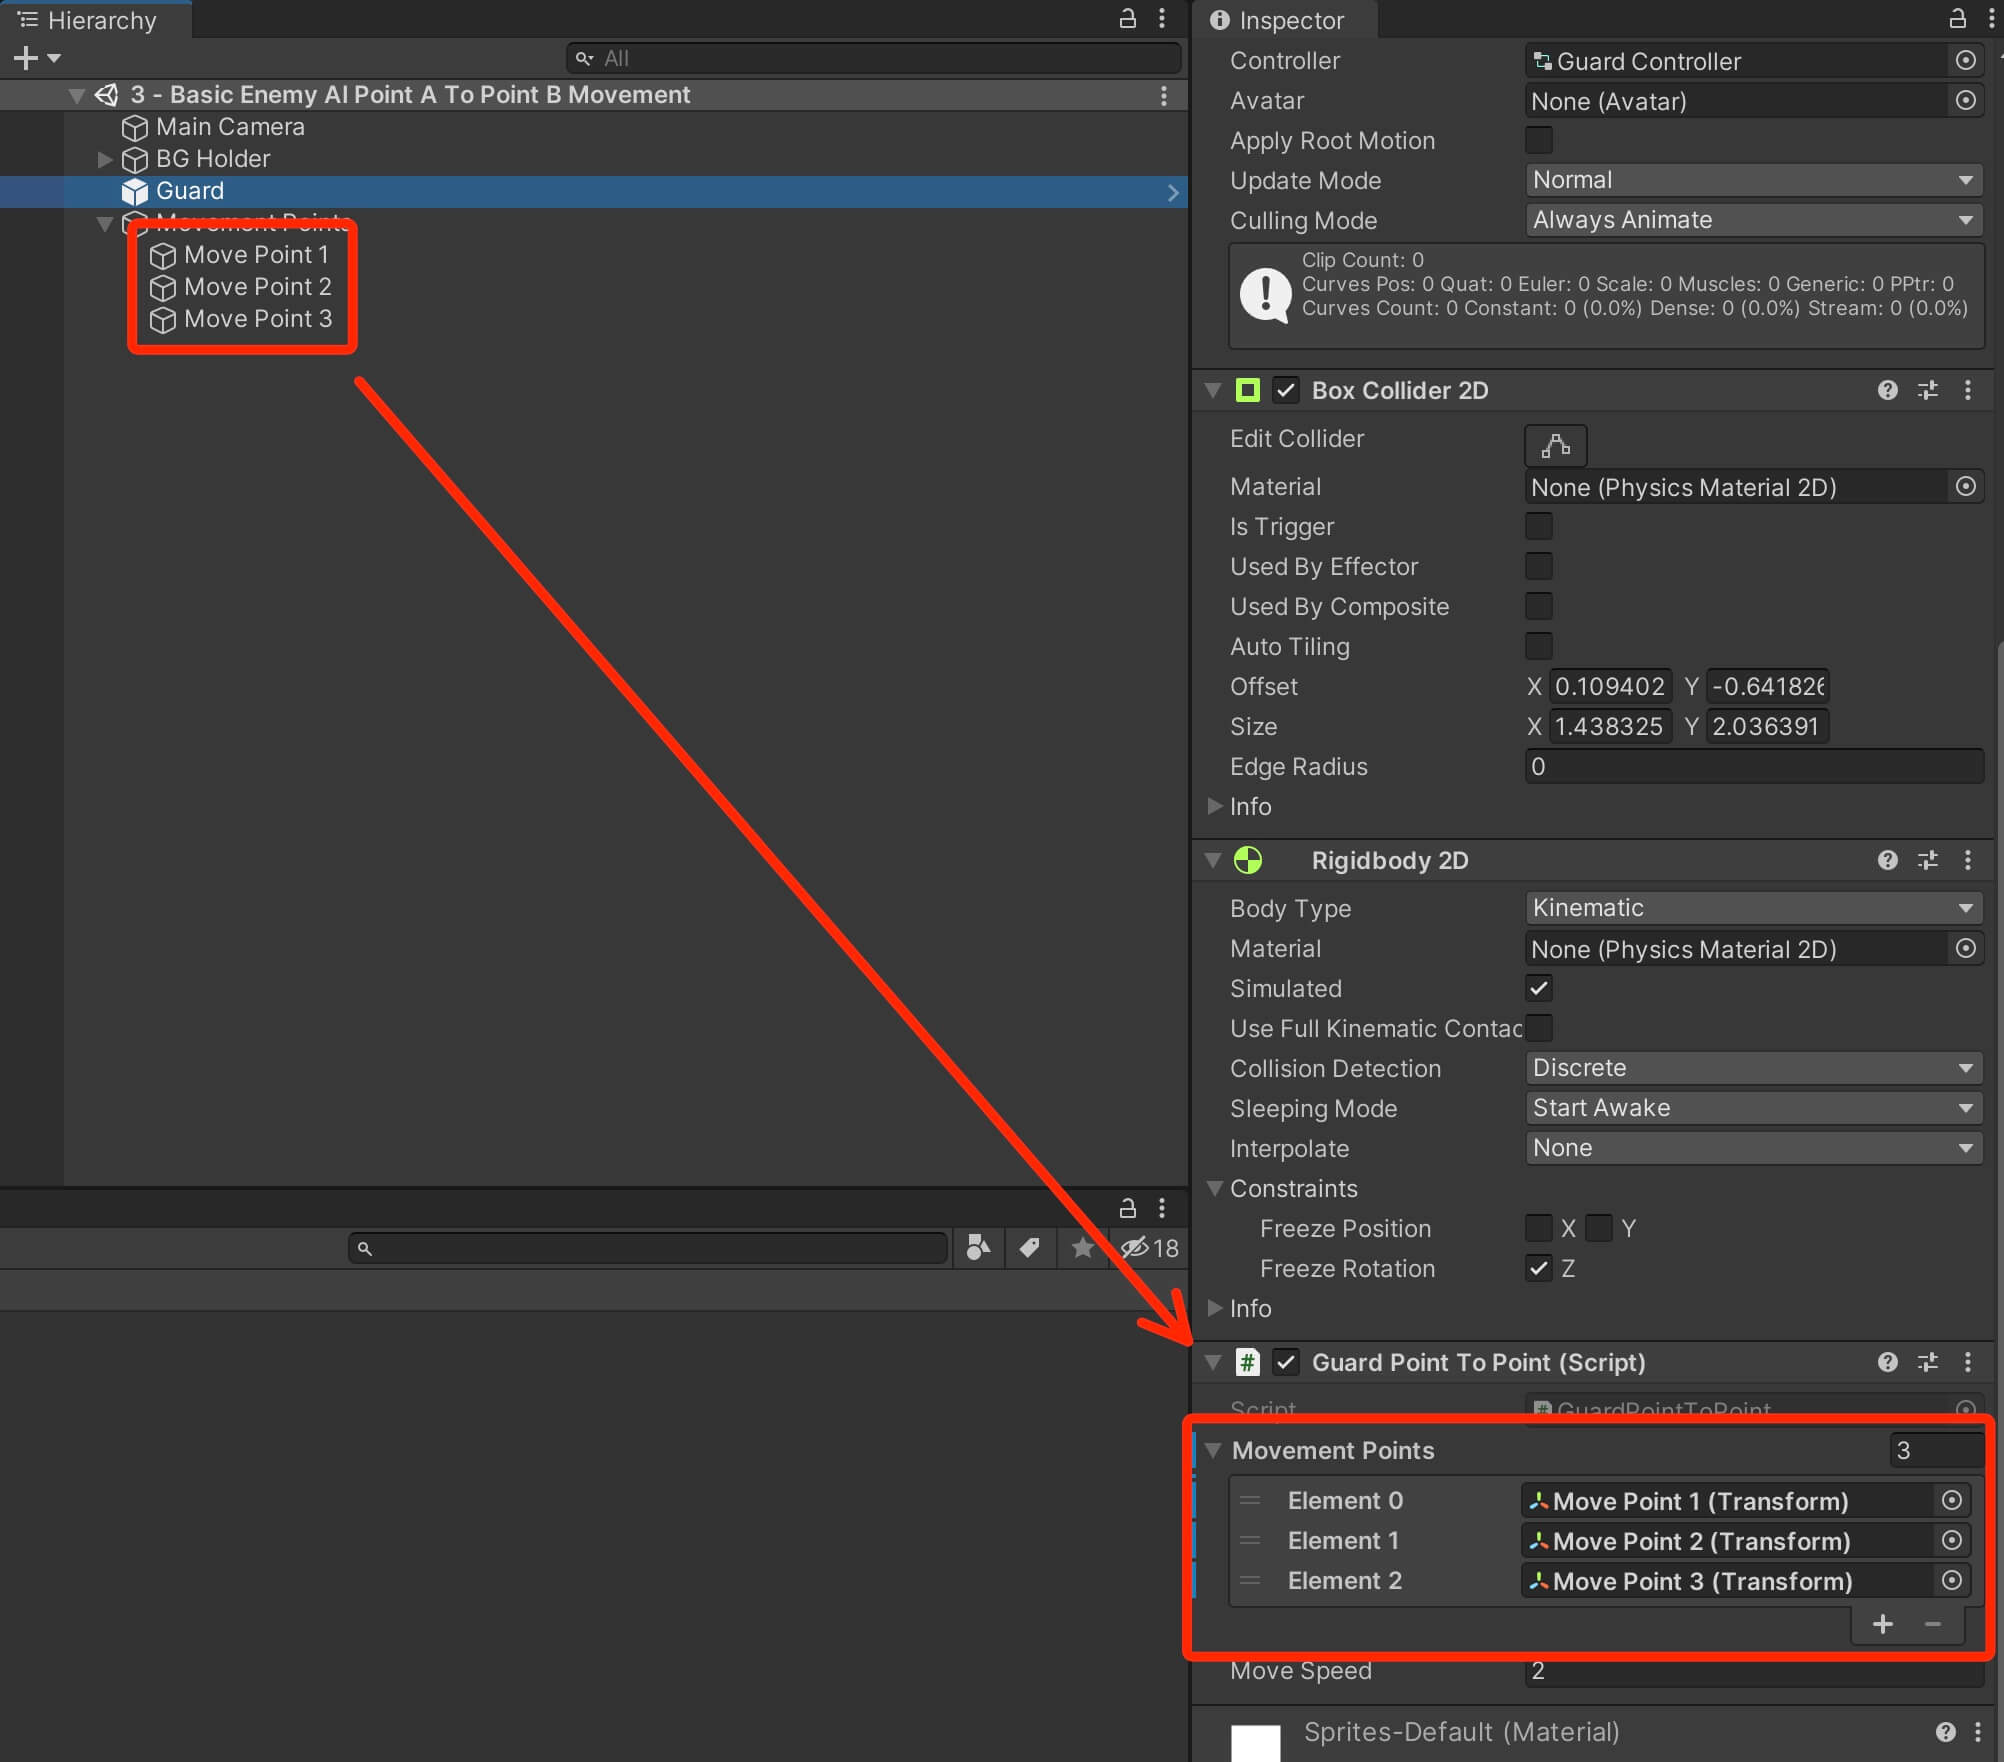
I’ve attached the points from the Hierarchy tab in the Movement Points slots in the GuardPointToPoint script, but you can also tag the movement points and get a reference to them from code by using their tag.
Run the game and let’s test it out:
					using System.Collections;
using System.Collections.Generic;
using UnityEngine;

public class GuardPointToPoint : MonoBehaviour
{

    private Animator anim;

    private Vector3 tempScale;

    [SerializeField]
    private Transform[] movementPoints;

    private Vector2 currentMovementPoint;

    private int currentMovementPointIndex, previousMovementPointIndex;

    [SerializeField]
    private float moveSpeed = 2f;

    private void Awake()
    {
        anim = GetComponent<Animator>();
    }

    private void Start()
    {
        SetMovementPointTarget();
    }

    private void Update()
    {
        MoveToTarget();
        HandleFacingDirection();
    }

    void AnimateMovement(bool walk)
    {
        anim.SetBool("Walk", walk);
    }

    void MoveToTarget()
    {
        transform.position =
            Vector2.MoveTowards(transform.position, currentMovementPoint, Time.deltaTime * moveSpeed);

        if (Vector2.Distance(transform.position, currentMovementPoint) < 0.1f)
        {
            SetMovementPointTarget();
        }

        AnimateMovement();
    }

    void SetMovementPointTarget()
    {
        while (true)
        {

            currentMovementPointIndex = Random.Range(0, movementPoints.Length);

            if (currentMovementPointIndex != previousMovementPointIndex)
            {
                previousMovementPointIndex = currentMovementPointIndex;
                currentMovementPoint = movementPoints[currentMovementPointIndex].position;
                break;
            }
        }
    }

    void HandleFacingDirection()
    {
        tempScale = transform.localScale;

        if (transform.position.x > currentMovementPoint.x)
        {
            tempScale.x = Mathf.Abs(tempScale.x);
        }
        else if (transform.position.x < currentMovementPoint.x)
        {
            tempScale.x = -Mathf.Abs(tempScale.x);
        }

        transform.localScale = tempScale;
    }

} // class
Moving Towards Player Target
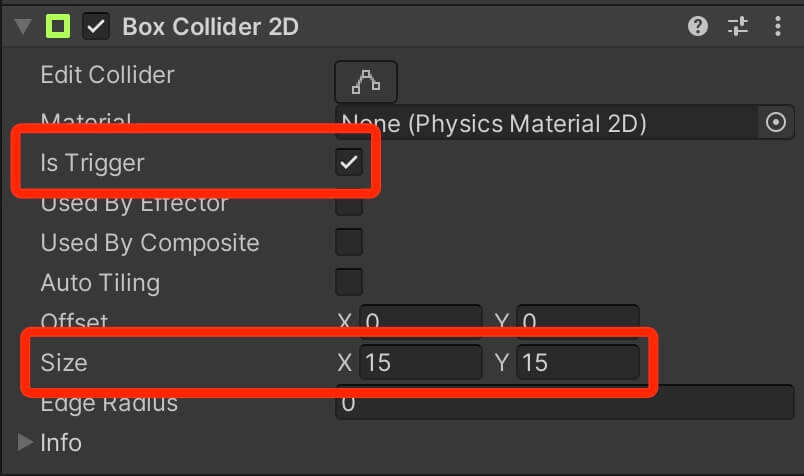
private bool chasePlayer;
In the OnTriggerEnter2D function, we are going to detect when we collide the player and make the enemy move towards the player, and in the OnTriggerExit2D function we will detect when the player leaves the bounds of the enemy’s collider and we will stop chasing him:
					private void OnTriggerEnter2D(Collider2D collision)
    {
        if (collision.CompareTag("Player"))
        {
            chasePlayer = true;
            currentMovementPoint = collision.gameObject.transform.position;
        }
    }

    private void OnTriggerExit2D(Collider2D collision)
    {
        if (collision.CompareTag("Player"))
        {
            chasePlayer = false;
            SetMovementPointTarget();
        }
    }
In OnTriggerEnter2D we compare the tag of the game object the enemy has collided with, and if it’s equal to the Player tag, then we will set the currentMovementPoint to the position of the player.
In OnTriggerExit2D we do the same thing, except that this time we call the SetMovementPointTarget function to set a new movement point for the enemy.
As for the chasePlayer variable, we are going to use to determine if the enemy should move towards the player game object or towards one of the movement points laid out in the level, and we are going to do that in the Update function:
					private void Update()
    {
        if (chasePlayer)
            MoveToPlayer();
        else
            MoveToTarget();

        HandleFacingDirection();
    }
I’ve moved the player outside the bounds of the camera on purpose so that we can see what is happening from the Scene tab. As soon as the enemy detected the player with its collider, it started moving towards him.
Of course, in this example, I only coded the movement AI, but depending on your game, the enemy will deal damage to the player when it reaches its destination.
You can do this by calling the attack animation, or you can create a child game object for the enemy and attach a collider and a damage script on it, and when the child object collides with the player it will deal damage to him and so on.
I will leave the new modified GuardPointToPoint script down below as a reference:
					using System.Collections;
using System.Collections.Generic;
using UnityEngine;

public class GuardPointToPoint : MonoBehaviour
{

    private Animator anim;

    private Vector3 tempScale;

    [SerializeField]
    private Transform[] movementPoints;

    private Vector2 currentMovementPoint;

    private int currentMovementPointIndex, previousMovementPointIndex;

    [SerializeField]
    private float moveSpeed = 2f;

    private bool chasePlayer;

    private void Awake()
    {
        anim = GetComponent<Animator>();
    }

    private void Start()
    {
        SetMovementPointTarget();
    }

    private void Update()
    {
        if (chasePlayer)
            MoveToPlayer();
        else
            MoveToTarget();

        HandleFacingDirection();
    }

    void AnimateMovement(bool walk)
    {
        anim.SetBool("Walk", walk);
    }

    void MoveToTarget()
    {

        transform.position =
            Vector2.MoveTowards(transform.position, currentMovementPoint, Time.deltaTime * moveSpeed);

        if (Vector2.Distance(transform.position, currentMovementPoint) < 0.1f)
        {
            SetMovementPointTarget();
        }

        AnimateMovement(true);
    }

    void SetMovementPointTarget()
    {
        while (true)
        {

            currentMovementPointIndex = Random.Range(0, movementPoints.Length);

            if (currentMovementPointIndex != previousMovementPointIndex)
            {
                previousMovementPointIndex = currentMovementPointIndex;
                currentMovementPoint = movementPoints[currentMovementPointIndex].position;
                break;
            }
        }
    }

    void HandleFacingDirection()
    {
        tempScale = transform.localScale;

        if (transform.position.x > currentMovementPoint.x)
        {
            tempScale.x = Mathf.Abs(tempScale.x);
        }
        else if (transform.position.x < currentMovementPoint.x)
        {
            tempScale.x = -Mathf.Abs(tempScale.x);
        }

        transform.localScale = tempScale;
    }

    void MoveToPlayer()
    {
        transform.position =
            Vector2.MoveTowards(transform.position, currentMovementPoint, Time.deltaTime * moveSpeed);

        if (Vector2.Distance(transform.position, currentMovementPoint) < 0.1f)
        {
            AnimateMovement(false);
        }
        else
        {
            AnimateMovement(true);
        }

    }

    private void OnTriggerEnter2D(Collider2D collision)
    {
        if (collision.CompareTag("Player"))
        {
            chasePlayer = true;
            currentMovementPoint = collision.gameObject.transform.position;
        }
    }

    private void OnTriggerExit2D(Collider2D collision)
    {
        if (collision.CompareTag("Player"))
        {
            chasePlayer = false;
            SetMovementPointTarget();
        }
    }

} // class
Creating Enemy AI Behaviour With Raycasts
					[SerializeField]
    private float moveSpeed = 2.5f;

    private Vector3 tempPos;
    private Vector3 tempScale;

    private bool moveLeft;

    [SerializeField]
    private LayerMask groundLayer;

    private Transform groundCheckPos;

    private RaycastHit2D groundHit;
When it comes to the movement, the variables that we will use and how we will use them is very similar no matter if the movement is done using physics, Transform component, raycasts and so on.
Because of that, from the name of the variables you can already assume for what we are going to use every variable that we declared.
First, change the Start function to Awake, and add the following lines of code:
					private void Awake()
    {
        groundCheckPos = transform.GetChild(0).transform;

        moveLeft = Random.Range(0, 2) > 0 ? true : false;
    }
					void HandleMovement()
    {
        tempPos = transform.position;
        tempScale = transform.localScale;

        if (moveLeft)
        {
            tempPos.x -= moveSpeed * Time.deltaTime;
            tempScale.x = -Mathf.Abs(tempScale.x);
        }
        else
        {
            tempPos.x += moveSpeed * Time.deltaTime;
            tempScale.x = Mathf.Abs(tempScale.x);
        }

        transform.position = tempPos;
        transform.localScale = tempScale;
    }
					void CheckForGround()
    {
        groundHit = Physics2D.Raycast(groundCheckPos.position, Vector2.down, 0.5f, groundLayer);

        if (!groundHit)
            moveLeft = !moveLeft;

        Debug.DrawRay(groundCheckPos.position,
            Vector2.down * 0.5f, Color.red);
    }
					if (!groundHit)
{
}
					if (groundHit == null)
{
}
Both checks perform one and the same test. This means if the ray doesn’t collide with the ground anymore, then change the moving direction and we do that by setting the moveLeft variable to the opposite of its current value.
We know that the exclamation mark makes what’s after it the opposite, so if the current value of moveLeft is true, and when we type:
moveLeft = !moveLeft;
					private void Update()
    {
        HandleMovement();
        CheckForGround();
    }
Going in the Unity editor, there are couple of things we need to do. First, create an empty child object for the Zombie Enemy and set its position to the following values:


I’ve already set the Layer for the Platform game object to Ground, so you don’t need to do that. Now run the game and let’s test it out:
					using System.Collections;
using System.Collections.Generic;
using UnityEngine;

public class EnemyRaycast : MonoBehaviour
{
    [SerializeField]
    private float moveSpeed = 2.5f;

    private Vector3 tempPos;
    private Vector3 tempScale;

    private bool moveLeft;

    [SerializeField]
    private LayerMask groundLayer;

    private Transform groundCheckPos;

    private RaycastHit2D groundHit;

    private void Awake()
    {
        groundCheckPos = transform.GetChild(0).transform;

        moveLeft = Random.Range(0, 2) > 0 ? true : false;
    }

    private void Update()
    {
        HandleMovement();
        CheckForGround();
    }

    void HandleMovement()
    {
        tempPos = transform.position;
        tempScale = transform.localScale;

        if (moveLeft)
        {
            tempPos.x -= moveSpeed * Time.deltaTime;
            tempScale.x = -Mathf.Abs(tempScale.x);
        }
        else
        {
            tempPos.x += moveSpeed * Time.deltaTime;
            tempScale.x = Mathf.Abs(tempScale.x);
        }

        transform.position = tempPos;
        transform.localScale = tempScale;
    }

    void CheckForGround()
    {
        groundHit = Physics2D.Raycast(groundCheckPos.position, Vector2.down, 0.5f, groundLayer);

        if (!groundHit)
            moveLeft = !moveLeft;

        Debug.DrawRay(groundCheckPos.position,
            Vector2.down * 0.5f, Color.red);
    }
}
NavMesh Enemy AI
In this part of the tutorial however, we are going to use a different way of creating enemy AI with the help of Unity’s NavMesh system.
First, in the Assets -> Scenes folder, open the 5 – Intermediate Enemy AI Navigation Movement scene.
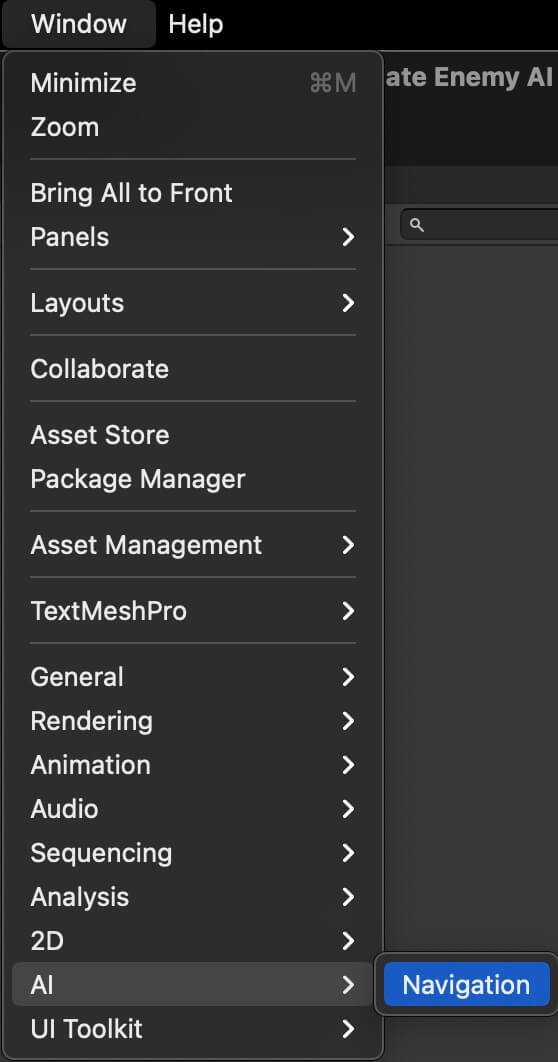
To bake the Ground we have in the level, first we need to make it Navigation Static. This means that we tell Unity that this object can be navigated.
To do this, select the ground object in the Hierarchy tab, and in the Inspector tab click on the drop down list where it says Static, and from the list select Navigation Static:

Next, in the Navigation tab, click on the Bake tab, and then click the Bake button:
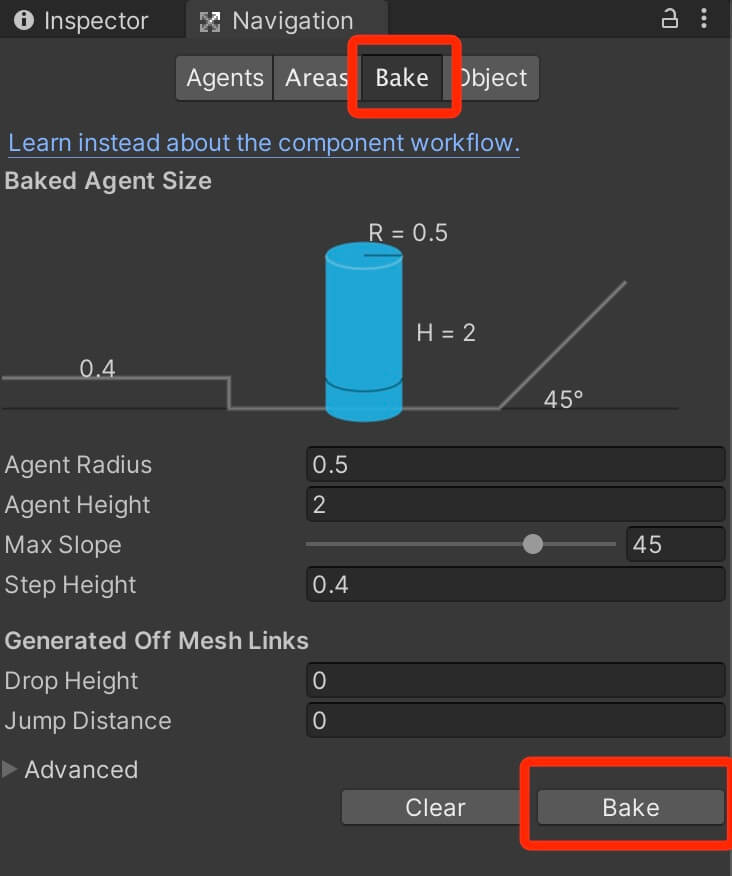
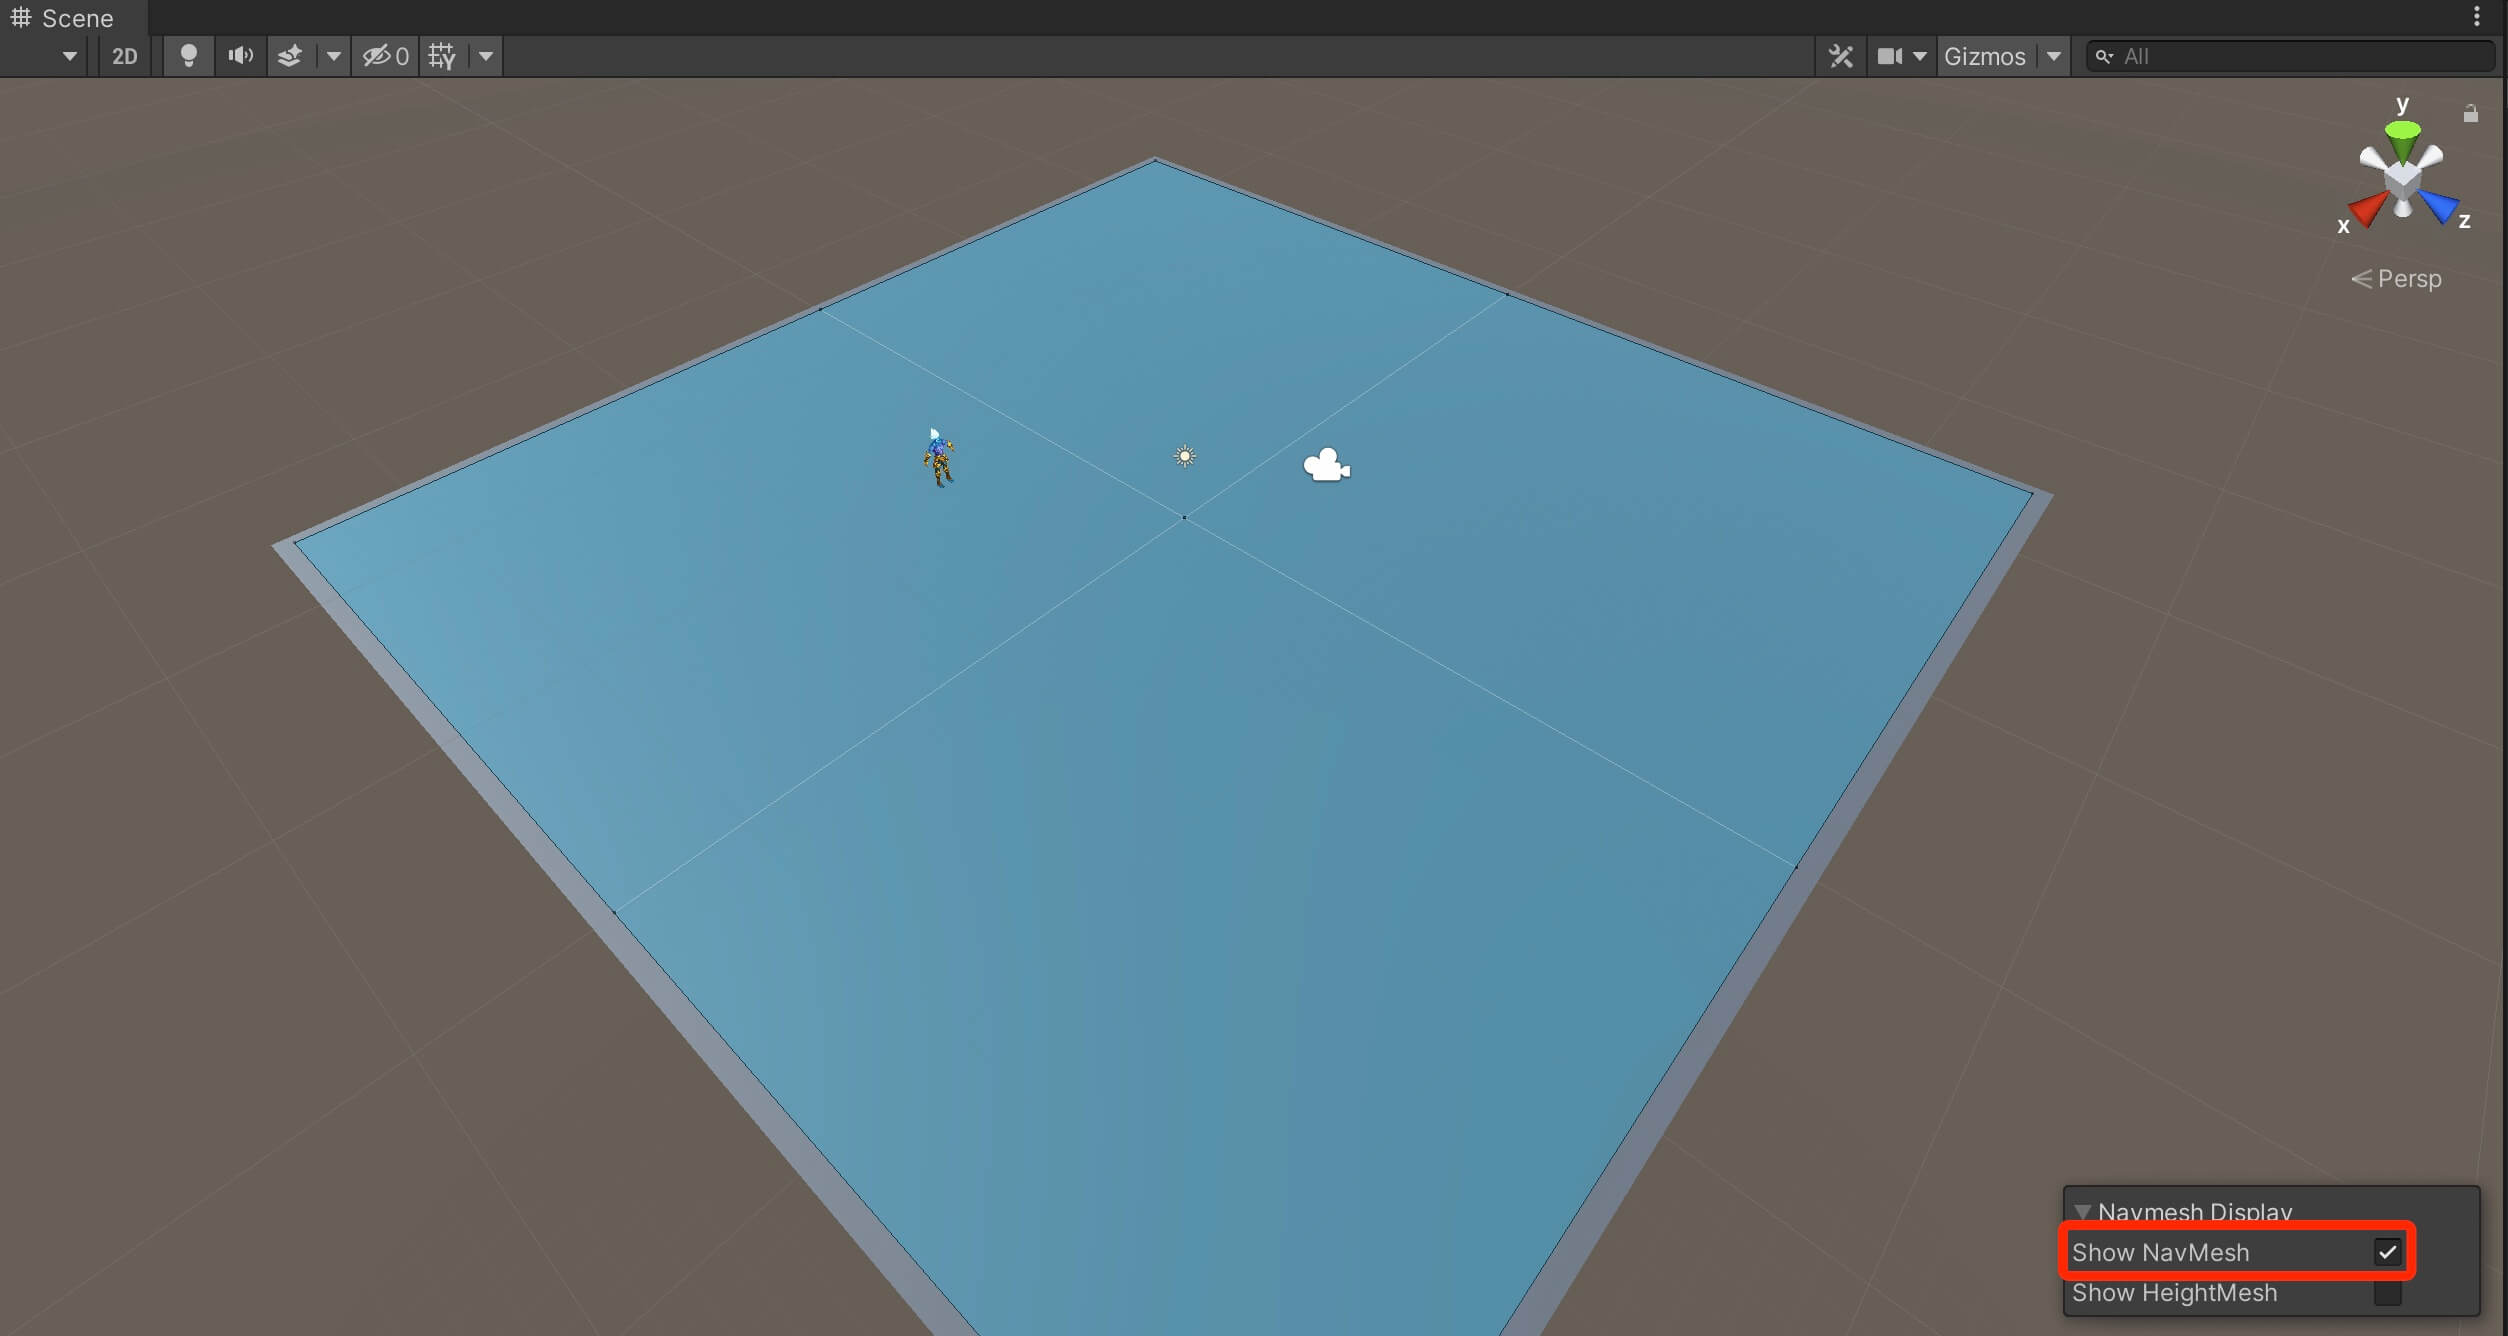
When you finish, you will notice that the Ground object has a blue color on it, if you don’t see it, make sure that you opened the Navigation tab and that the Show NavMesh checkbox is checked:
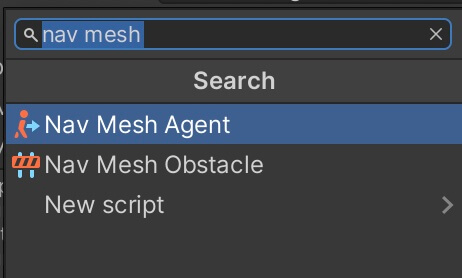
Before we can make our player game object move, we need to attach the Nav Mesh Agent component on him. Select the player game object in the Hierarchy, and in the Inspector tab click on the Add Component button and filter for nav mesh agent and attach it on the player:
using UnityEngine.AI;
					private Animator anim;

    private NavMeshAgent navAgent;

    [SerializeField]
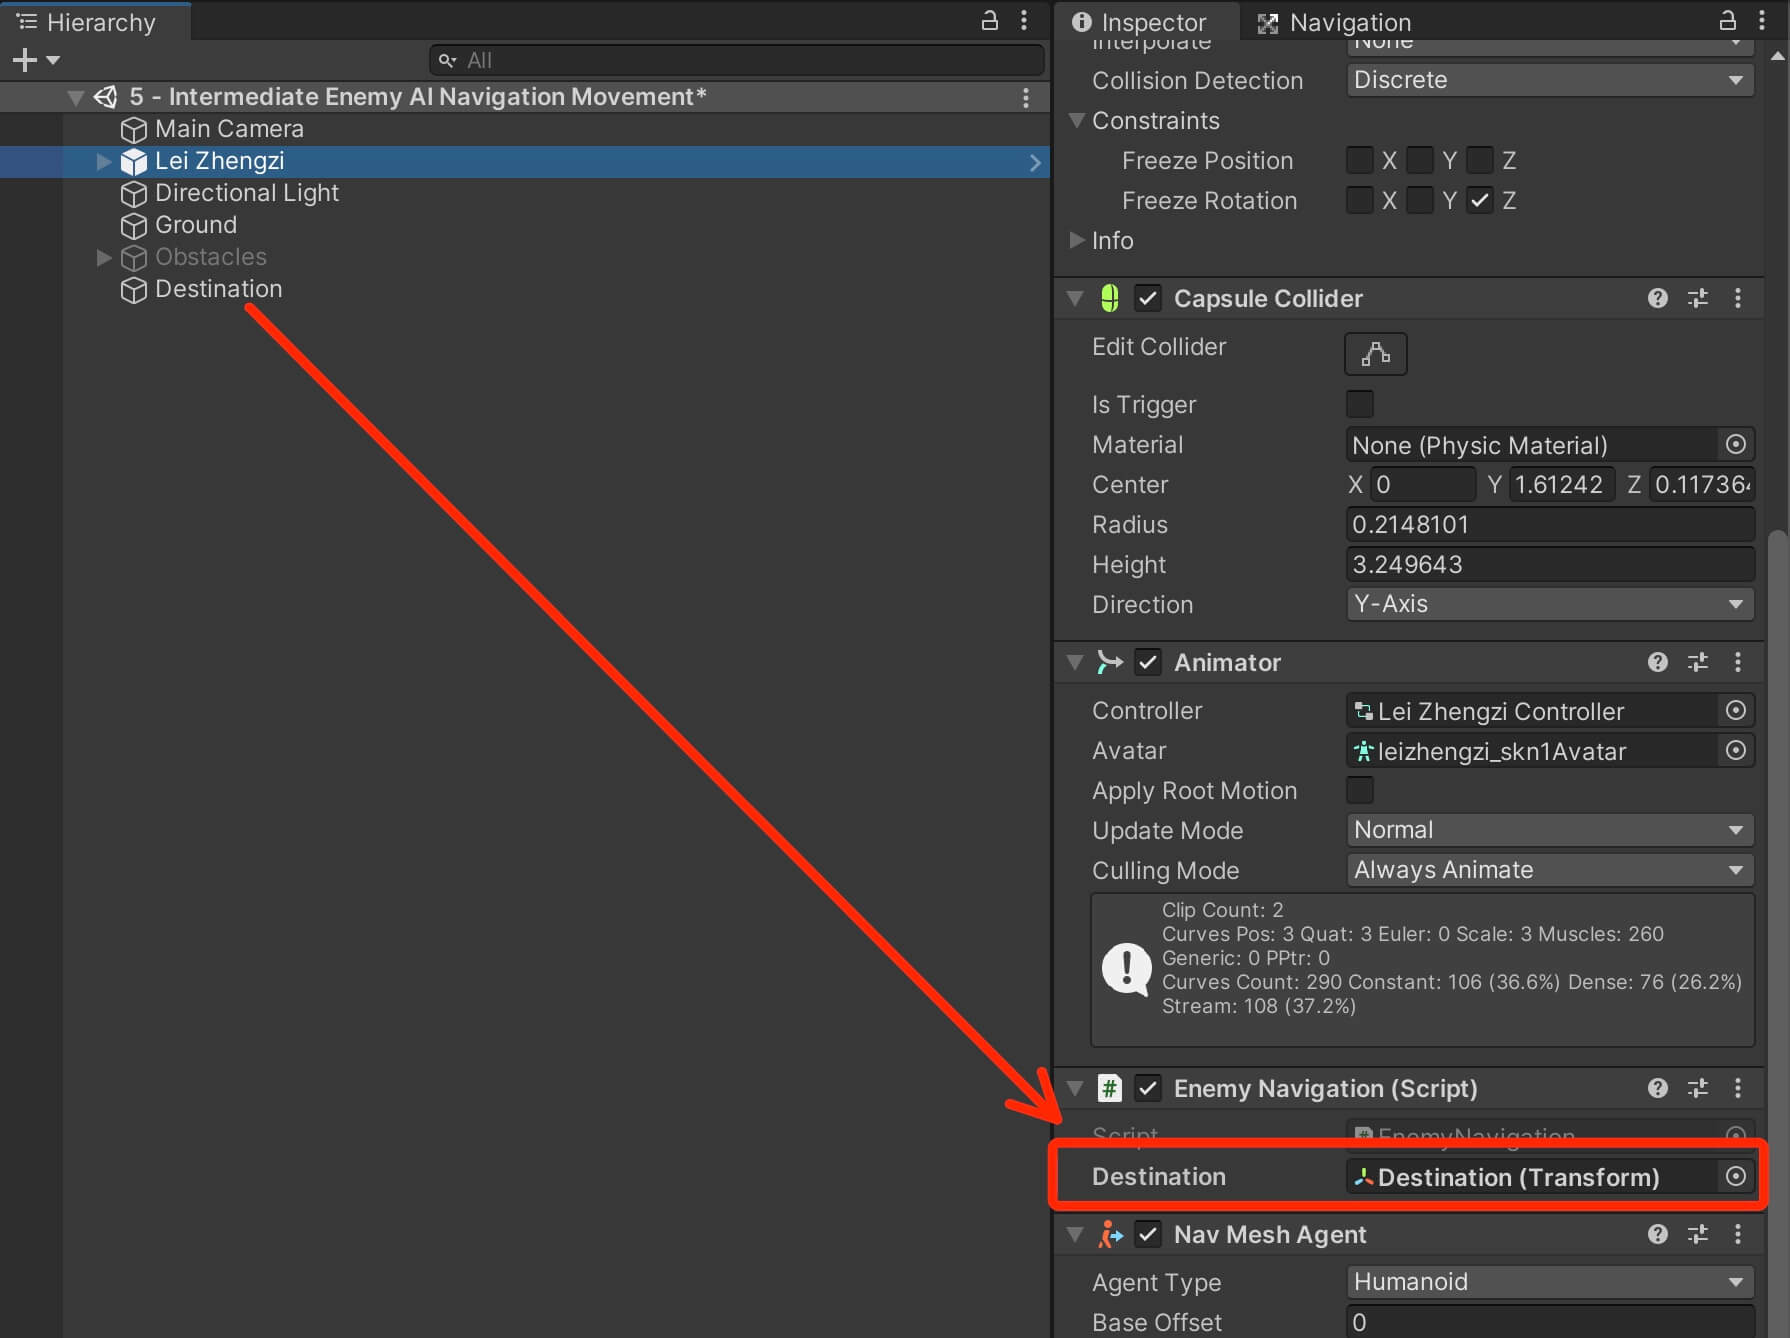
    private Transform destination;
					private void Awake()
    {
        anim = GetComponent<Animator>();
        navAgent = GetComponent<NavMeshAgent>();

        navAgent.SetDestination(destination.position);
    }
To make the agent move, we only need to call its SetDestination function and pass the destination position, and since we have baked the level, the agent will calculate the shortest path it takes for it to reach the destination and move towards it.
Let us also animate the player’s movement:
					private void Update()
    {
        AnimatePlayer();
    }

    void AnimatePlayer()
    {
        if (navAgent.velocity.magnitude > 0)
        {
            anim.SetBool("Walk", true);
        }
        else
            anim.SetBool("Walk", false);
    }
Changing Agent's Destinations In The Level
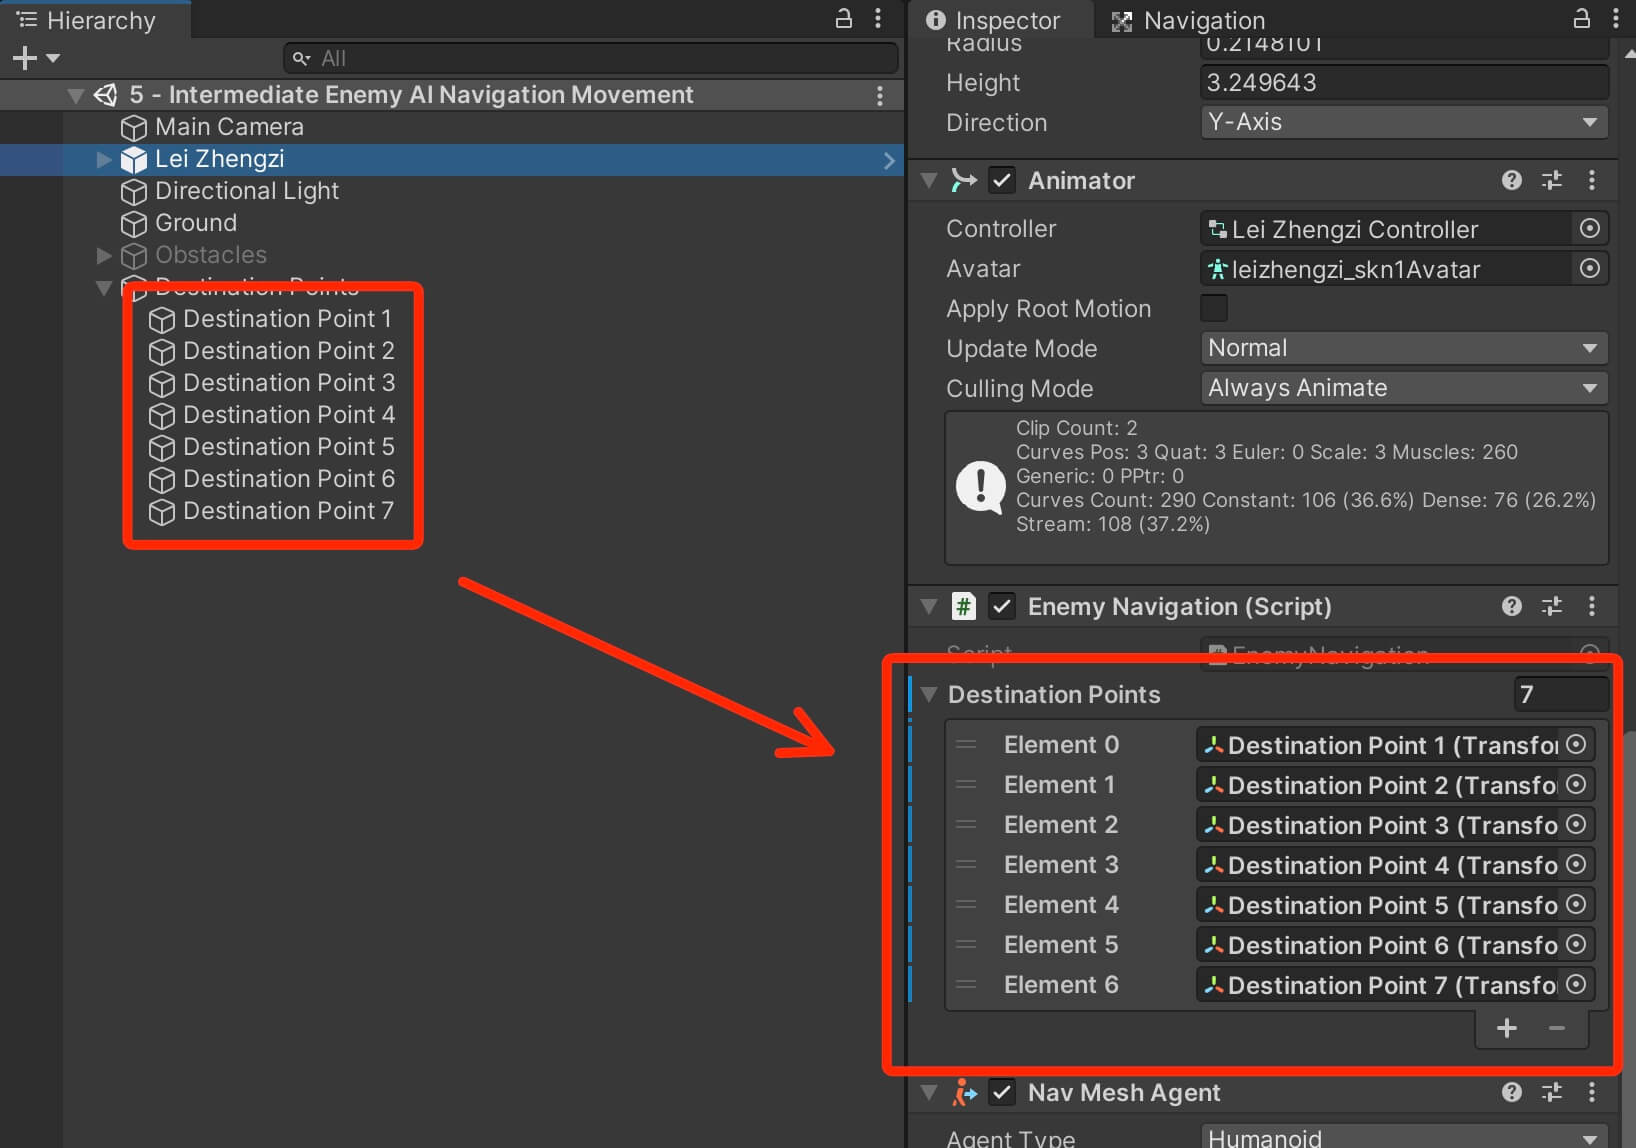
					[SerializeField]
    private Transform[] destinationPoints;

    private Vector3 currentDestination;

    private int destinationIndex;
					private void Awake()
    {
        anim = GetComponent<Animator>();
        navAgent = GetComponent<NavMeshAgent>();

        // get the current desination and make the agent
        // go towards that destination
        currentDestination = destinationPoints[Random.Range(0, destinationPoints.Length)].position;
        navAgent.SetDestination(currentDestination);
    }
					void SetNewDestination()
    {
        while (true)
        {
            destinationIndex = Random.Range(0, destinationPoints.Length);

            if (currentDestination != destinationPoints[destinationIndex].position)
            {
                currentDestination = destinationPoints[destinationIndex].position;
                navAgent.SetDestination(currentDestination);
                break;
            }

        }
    }
					void CheckIfAgentReachedDestination()
    {
        // agent is not moving
        if (navAgent.velocity.magnitude == 0f)
        {
            SetNewDestination();
        }
    }
					private void Update()
    {
        AnimatePlayer();
        CheckIfAgentReachedDestination();
    }
Run the game and let’s test it out:
Every time the agent reaches his current destination, we set a new one for him. Now there are multiple ways how we can check if the agent reached his destination.
In our current example we are using the magnitude of the agent’s velocity. We can also check the remaining distance the agent has left:
					void CheckIfAgentReachedDestination()
    {
        if (navAgent.remainingDistance <= navAgent.stoppingDistance)
        {
            SetNewDestination();
        }
    }
The remainingDistance will returna float value representing the distance that is remaining until the agent reaches its destination. The stoppingDistance represents the distance between the agent and its destination when the agent will stop moving.
We can set that value in the Nav Mesh Agent component:
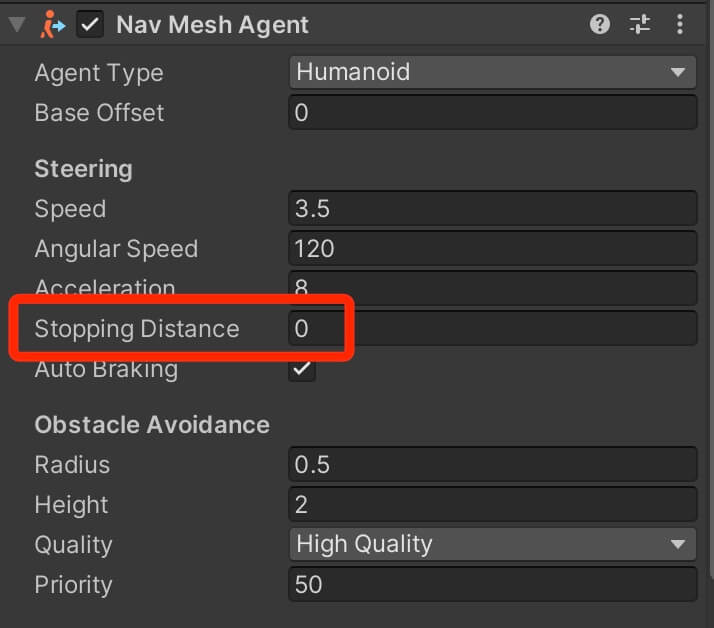
The current value is set to 0, this means the that stopping distance from the destination is 0, but if we set the value to 5 for example, this would mean that the nav agent will stop when the distance between him and the destination is equal to 5.
We can also use the pathPending property to test if the path is currently in the process of being computed e.g. we provided the path and the agent is calculating how to reach it, and we can use hasPath to test if the agent currently has a path that’s in the process e.g. the agent has a destination to be reached:
					void CheckIfAgentReachedDestination()
    {
        // agent is not moving
        if (!navAgent.pathPending)
        {
            if (navAgent.remainingDistance <= navAgent.stoppingDistance)
            {
                if (!navAgent.hasPath || navAgent.velocity.sqrMagnitude == 0f)
                {
                    SetNewDestination();
                }
            }
        }
    }
The reason why you might want to perform these tests is because a distance check isn’t always accurate since the steering behavior portion of the NavMeshAgent may actually still be working even if the distance is less than the stopping distance, so keep that in mind.
I will leave the full version of the EnemyNavigation script below as a reference:
					using System.Collections;
using System.Collections.Generic;
using UnityEngine;
using UnityEngine.AI;

public class EnemyNavigation : MonoBehaviour
{

    private Animator anim;

    private NavMeshAgent navAgent;

    [SerializeField]
    private Transform[] destinationPoints;

    private Vector3 currentDestination;

    private int destinationIndex;

    private void Awake()
    {
        anim = GetComponent<Animator>();
        navAgent = GetComponent<NavMeshAgent>();

        // get the current desination and make the agent
        // go towards that destination
        currentDestination = destinationPoints[Random.Range(0, destinationPoints.Length)].position;
        navAgent.SetDestination(currentDestination);
    }

    private void Update()
    {
        AnimatePlayer();
        CheckIfAgentReachedDestination();
    }

    void AnimatePlayer()
    {
        if (navAgent.velocity.magnitude > 0)
        {
            anim.SetBool("Walk", true);
        }
        else
            anim.SetBool("Walk", false);
    }

    void SetNewDestination()
    {
        while (true)
        {
            destinationIndex = Random.Range(0, destinationPoints.Length);

            if (currentDestination != destinationPoints[destinationIndex].position)
            {
                currentDestination = destinationPoints[destinationIndex].position;
                navAgent.SetDestination(currentDestination);
                break;
            }

        }
    }

    void CheckIfAgentReachedDestination()
    {
        // agent is not moving
        //if (navAgent.velocity.magnitude == 0f)
        //{
        //    SetNewDestination();
        //}

        //if (navAgent.remainingDistance <= navAgent.stoppingDistance)
        //{
        //    SetNewDestination();
        //}

        if (!navAgent.pathPending)
        {
            if (navAgent.remainingDistance <= navAgent.stoppingDistance)
            {
                if (!navAgent.hasPath || navAgent.velocity.sqrMagnitude == 0f)
                {
                    SetNewDestination();
                }
            }
        }
    }

} // class
Setting A Random Destination Within The Baked Area
We can also generate a random destination for the agent within the baked area of the level.
Remove all the current code from the EnemyNavigation script except for the Animator variable and the AnimatePlayer function, and then add the following variables:
					    private NavMeshAgent navAgent;

    private NavMeshHit navHit;

    private Vector3 currentDestination;

    [SerializeField]
    private float maxWalkDistance = 50f;
The variables are pretty much the same except for the NavMeshHit which represents result information for any queries we perform on the NavMesh. In the Awake function we are going to get the reference we need:
					private void Awake()
    {
        anim = GetComponent<Animator>();
        navAgent = GetComponent<NavMeshAgent>();

        SetNewDestination();
    }
Again we are going to use SetNewDestination function to set a new destination for the nav agent, but this time we are going to take a different approach:
					void SetNewDestination()
    {
        while (true)
        {
            NavMesh.SamplePosition(((Random.insideUnitSphere * maxWalkDistance) + transform.position),
                out navHit, maxWalkDistance, -1);

            if (currentDestination != navHit.position)
            {
                currentDestination = navHit.position;
                navAgent.SetDestination(currentDestination);
                break;
            }
        }
    }
The SamplePosition function of the NavMesh class will find the nearest point based on the NavMesh within a specified range.
The first parameter represents the sourcePosition e.g. the starting position from which we are going to get a random point.
To calculate that position, we are using Random.insideUnitySphere which will return a random point inside or on a sphere with a radius of 1.0. We multiply that value with the maxWalkDistance variable because that is the max amount of distance where the agent can walk, and then we add the current position of the enemy to that value.
This means, that we are going to search for a point within the nav mesh baked area from the position of the agent e.g. the enemy, with the radius of insideUnitySphere multiplied with the maxWalkDistance.
Then we pass the navHit variable where the SamplePosition will store the information that will be returned. The out keyword used before the navHit variable means that we are passing the navHit variable as a reference to this function.
If you don’t know what is a reference and what does that mean, you can learn about that concept by clicking here.
The next parameter represents the distance from the sourcePosition parameter in which we are going to search for the random point.
And the last parameter is a LayerMask variable that represents the layer of the game object on which we perform this check. By passing -1 we are including all layers, but if you want to check for the nav point only on a specific nav area, you can use layers for that.
					void CheckIfAgentReachedDestination()
    {
        if (!navAgent.pathPending)
        {
            if (navAgent.remainingDistance <= navAgent.stoppingDistance)
            {
                if (!navAgent.hasPath || navAgent.velocity.sqrMagnitude == 0f)
                {
                    SetNewDestination();
                }
            }
        }
    }
					private void Update()
    {
        AnimatePlayer();
        CheckIfAgentReachedDestination();
    }
Run the game and test it out:
I will leave the new version of the EnemyNavigation script below as a reference:
					using System.Collections;
using System.Collections.Generic;
using UnityEngine;
using UnityEngine.AI;

public class EnemyNavigation : MonoBehaviour
{

    private Animator anim;

    private NavMeshAgent navAgent;

    private NavMeshHit navHit;

    private Vector3 currentDestination;

    [SerializeField]
    private float maxWalkDistance = 50f;

    private void Awake()
    {
        anim = GetComponent<Animator>();
        navAgent = GetComponent<NavMeshAgent>();

        SetNewDestination();
    }

    private void Update()
    {
        AnimatePlayer();
        CheckIfAgentReachedDestination();
    }

    void AnimatePlayer()
    {
        if (navAgent.velocity.magnitude > 0)
        {
            anim.SetBool("Walk", true);
        }
        else
            anim.SetBool("Walk", false);
    }

    void SetNewDestination()
    {
        while (true)
        {
            NavMesh.SamplePosition(((Random.insideUnitSphere * maxWalkDistance) + transform.position),
                out navHit, maxWalkDistance, -1);

            if (currentDestination != navHit.position)
            {
                currentDestination = navHit.position;
                navAgent.SetDestination(currentDestination);
                break;
            }
        }
    }

    void CheckIfAgentReachedDestination()
    {
        if (!navAgent.pathPending)
        {
            if (navAgent.remainingDistance <= navAgent.stoppingDistance)
            {
                if (!navAgent.hasPath || navAgent.velocity.sqrMagnitude == 0f)
                {
                    SetNewDestination();
                }
            }
        }
    }

} // class
Nav Mesh Agent Speed, Rotation, Stopping Distance And Other Settings
While testing the examples we created so far, you probably noticed that the enemy object was rotating in a weird way, and you also noticed that he was moving in a certain speed.
But we didn’t define any of those settings, so how come is the enemy moving without us doing anything on that part?
Well, as you can already assume the movement and everything related to it is controlled and performed by the Nav Mesh Agent.
We can, of course, edit those settings. We can change the speed of the agent, we can also change the speed by which he will rotate, we can even change the stopping distance length from the agents destination and we talked briefly about it.
All of these settings are located on the Nav Mesh Agent component itself:
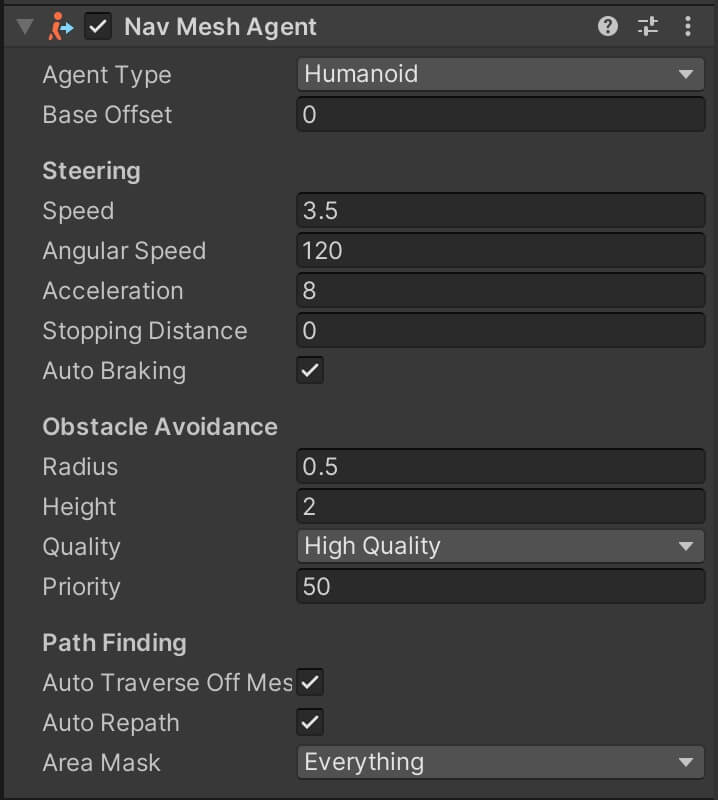
The first option on the nav agent represents the agent’s type. The agent type is controller in the Agents tab in the Navigation settings:
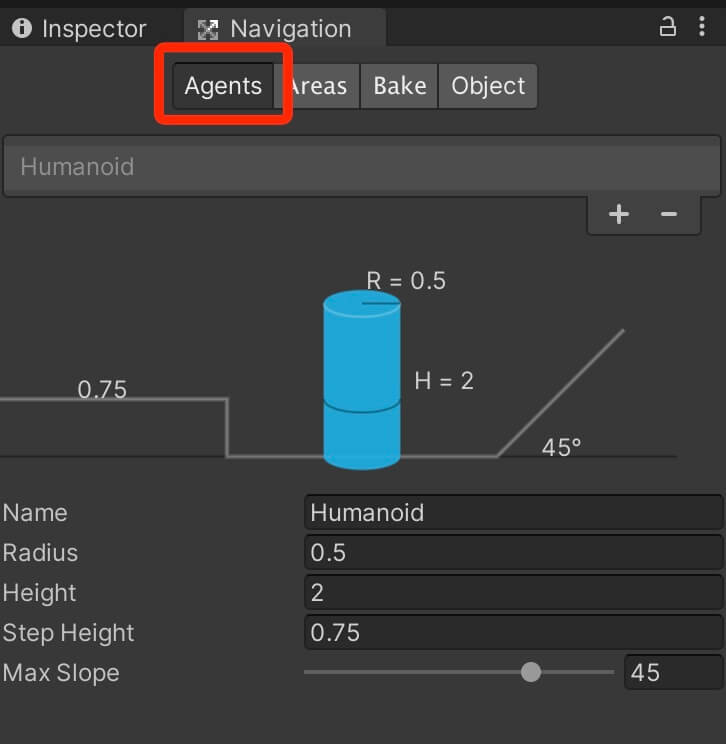
As you can see the agent type has properties that we can change, and these properties affect how the nav mesh is built e.g. how the navigation area will be baked.
We can click on the + button to create a new agent type:
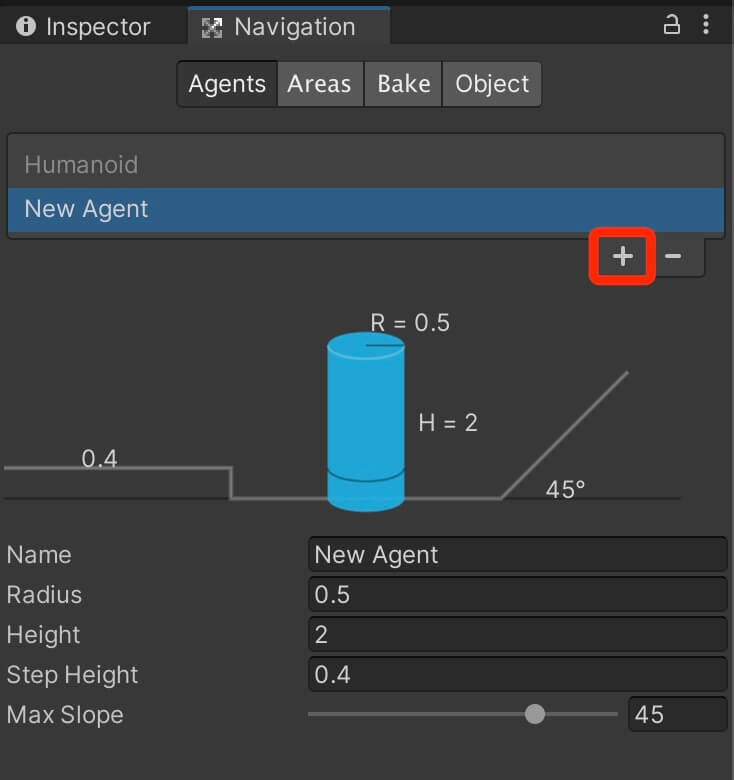
We can now create a new agent type by changing the values for the settings.
The name represents the agent type name.
Radius is the radius of the agent type. If we create an agent type for a lion, then we would set the radius to a larger value because the lion is a large animal.
The height represents the height of the agent type, so if we have a tall game character like a dragon for example, we would set that value to a higher number.
Step height represents the height of the each step the agent will make. If we have a dragon in the game, then the step height would be pretty large.
And the max slope represents how well the agent will climb angled surfaces. Depending on the type of the agent you will adjust this value accordingly.
I am going to create a sample dragon agent type:
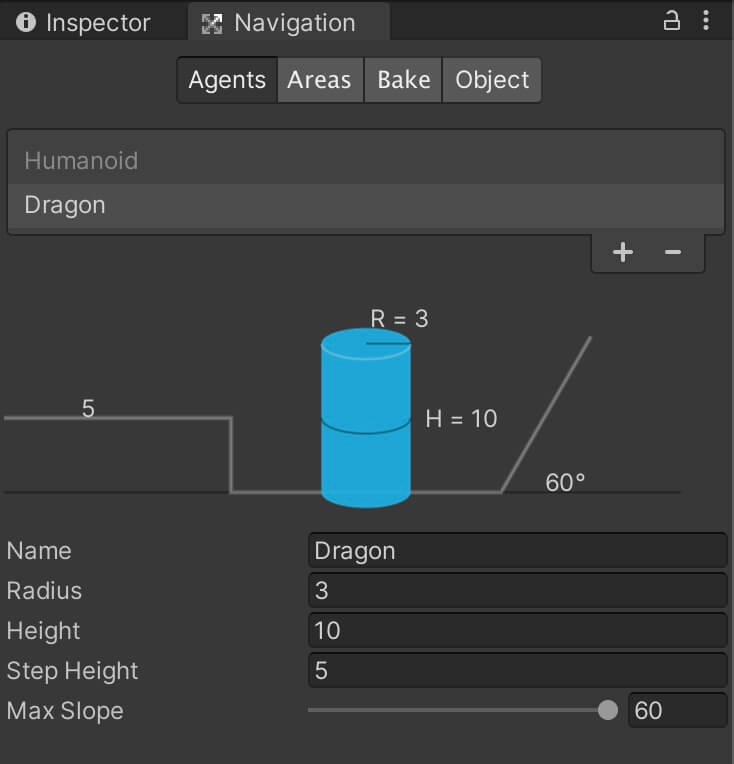
Now that we have two agent types, we can click on the drop down list for the Agent Type property on the Nav Mesh Agent and select our desired type:

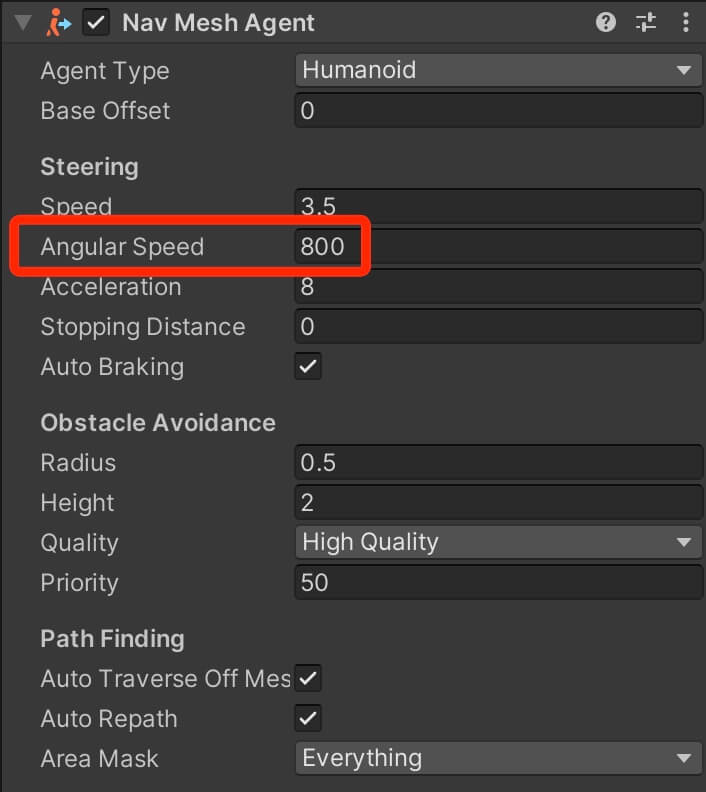
Now when the enemy turns to go in another direction in the game it will look more natural.
Run the game and let’s test it out:
Navigating Between Obstacles
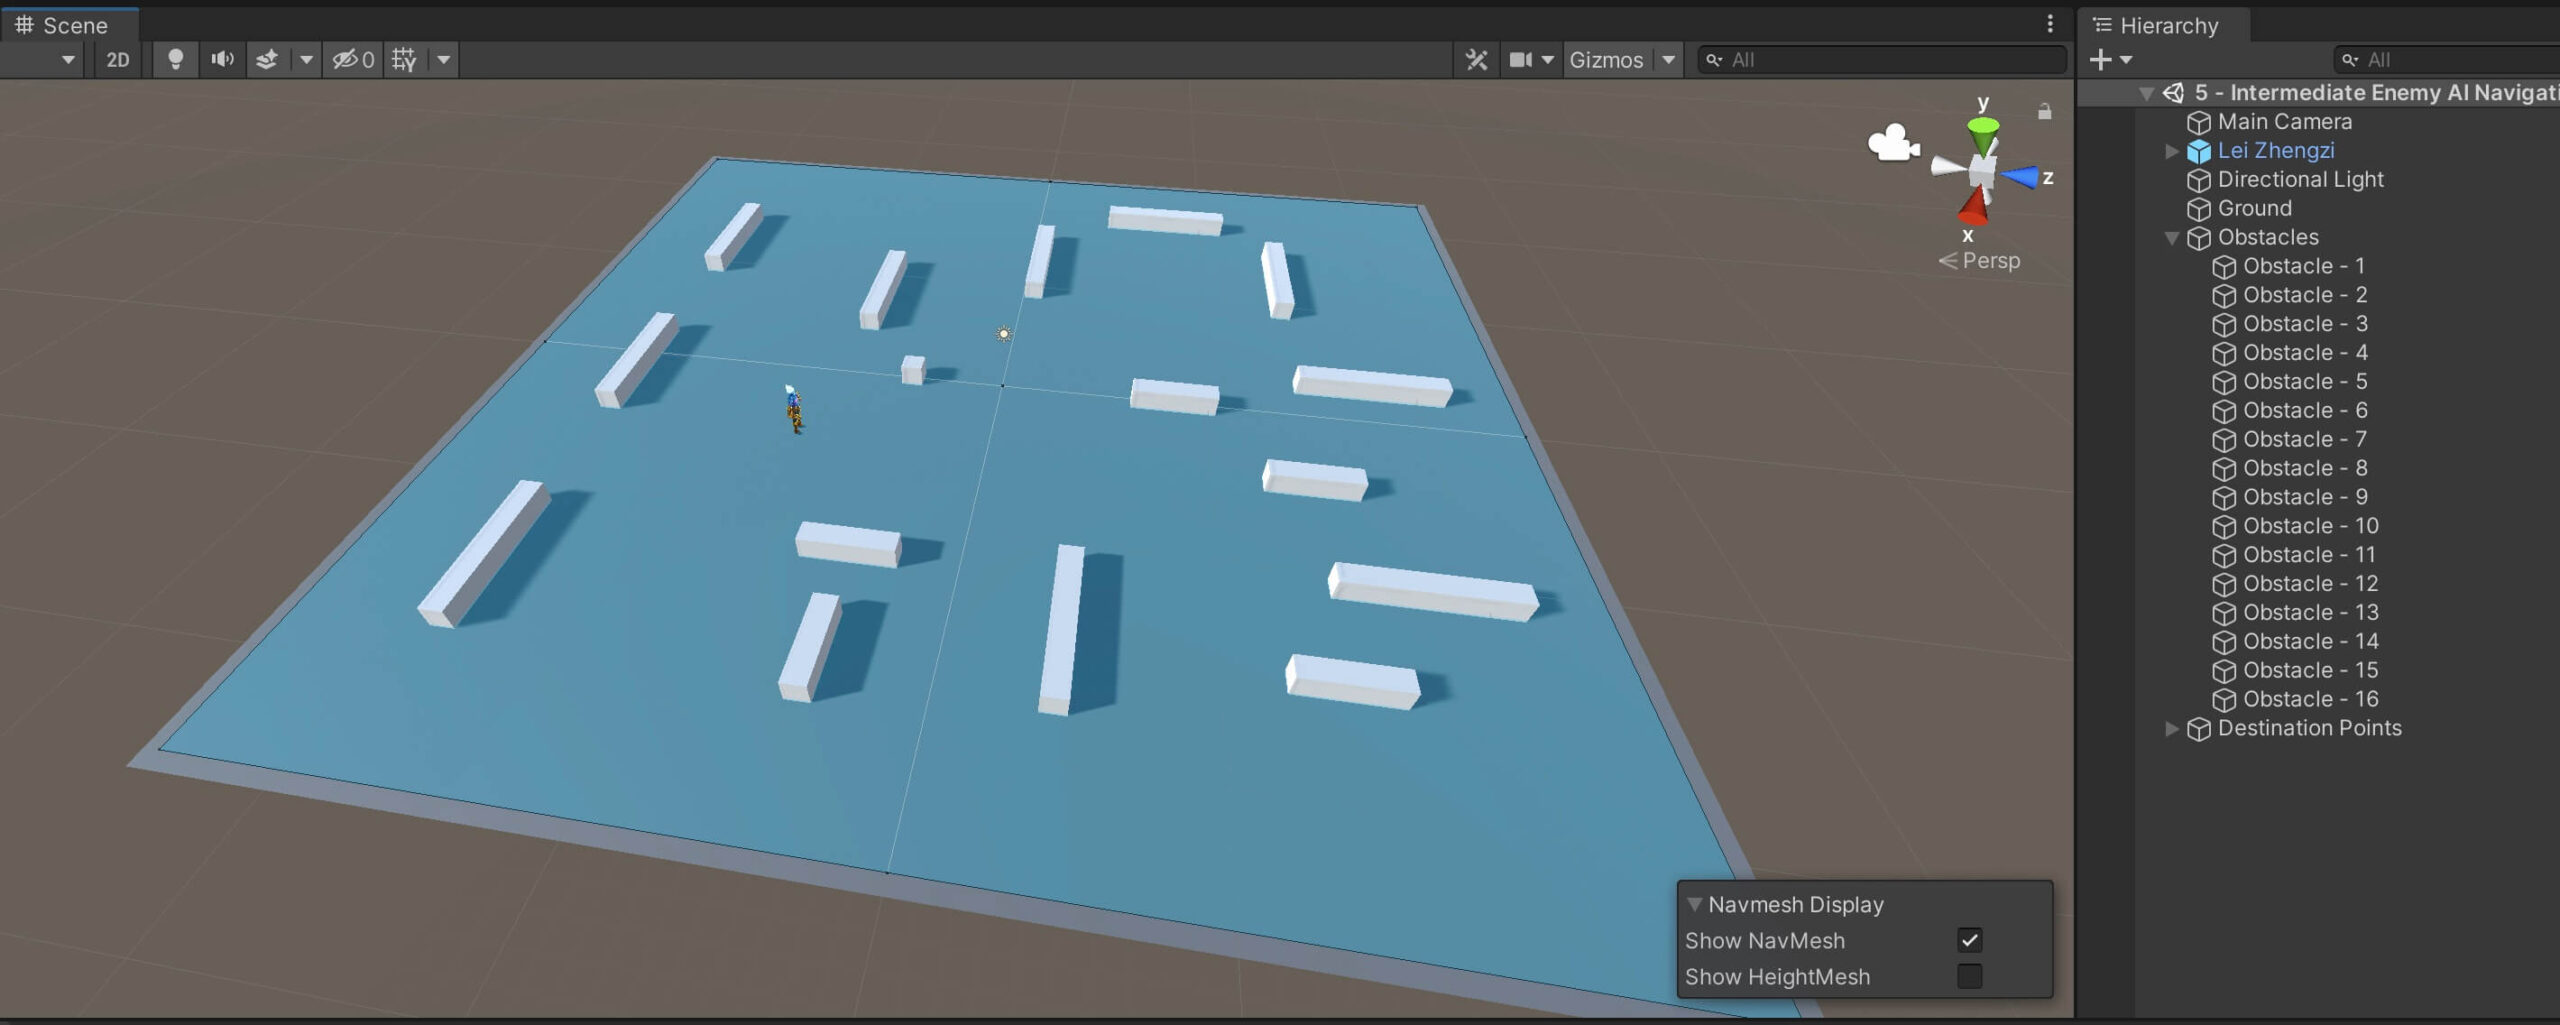
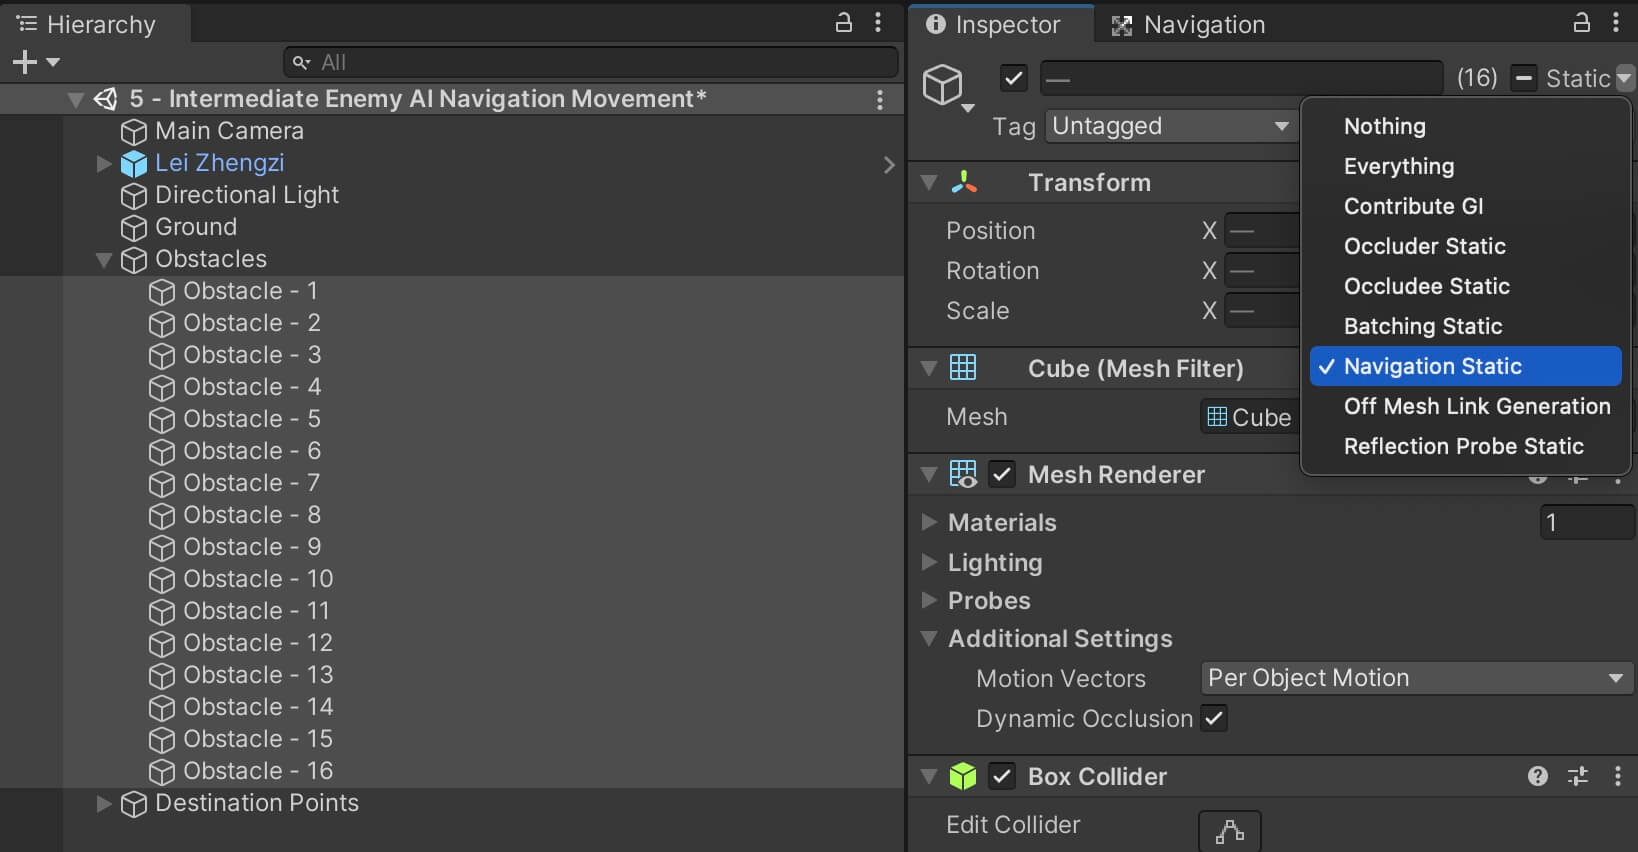
Before we can bake the level with the obstacles, we need to make the obstacles Navigation Static. Select every obstacle in the Hierarchy tab, and in the Inspector tab click on the Static drop down list and make them Navigation Static:
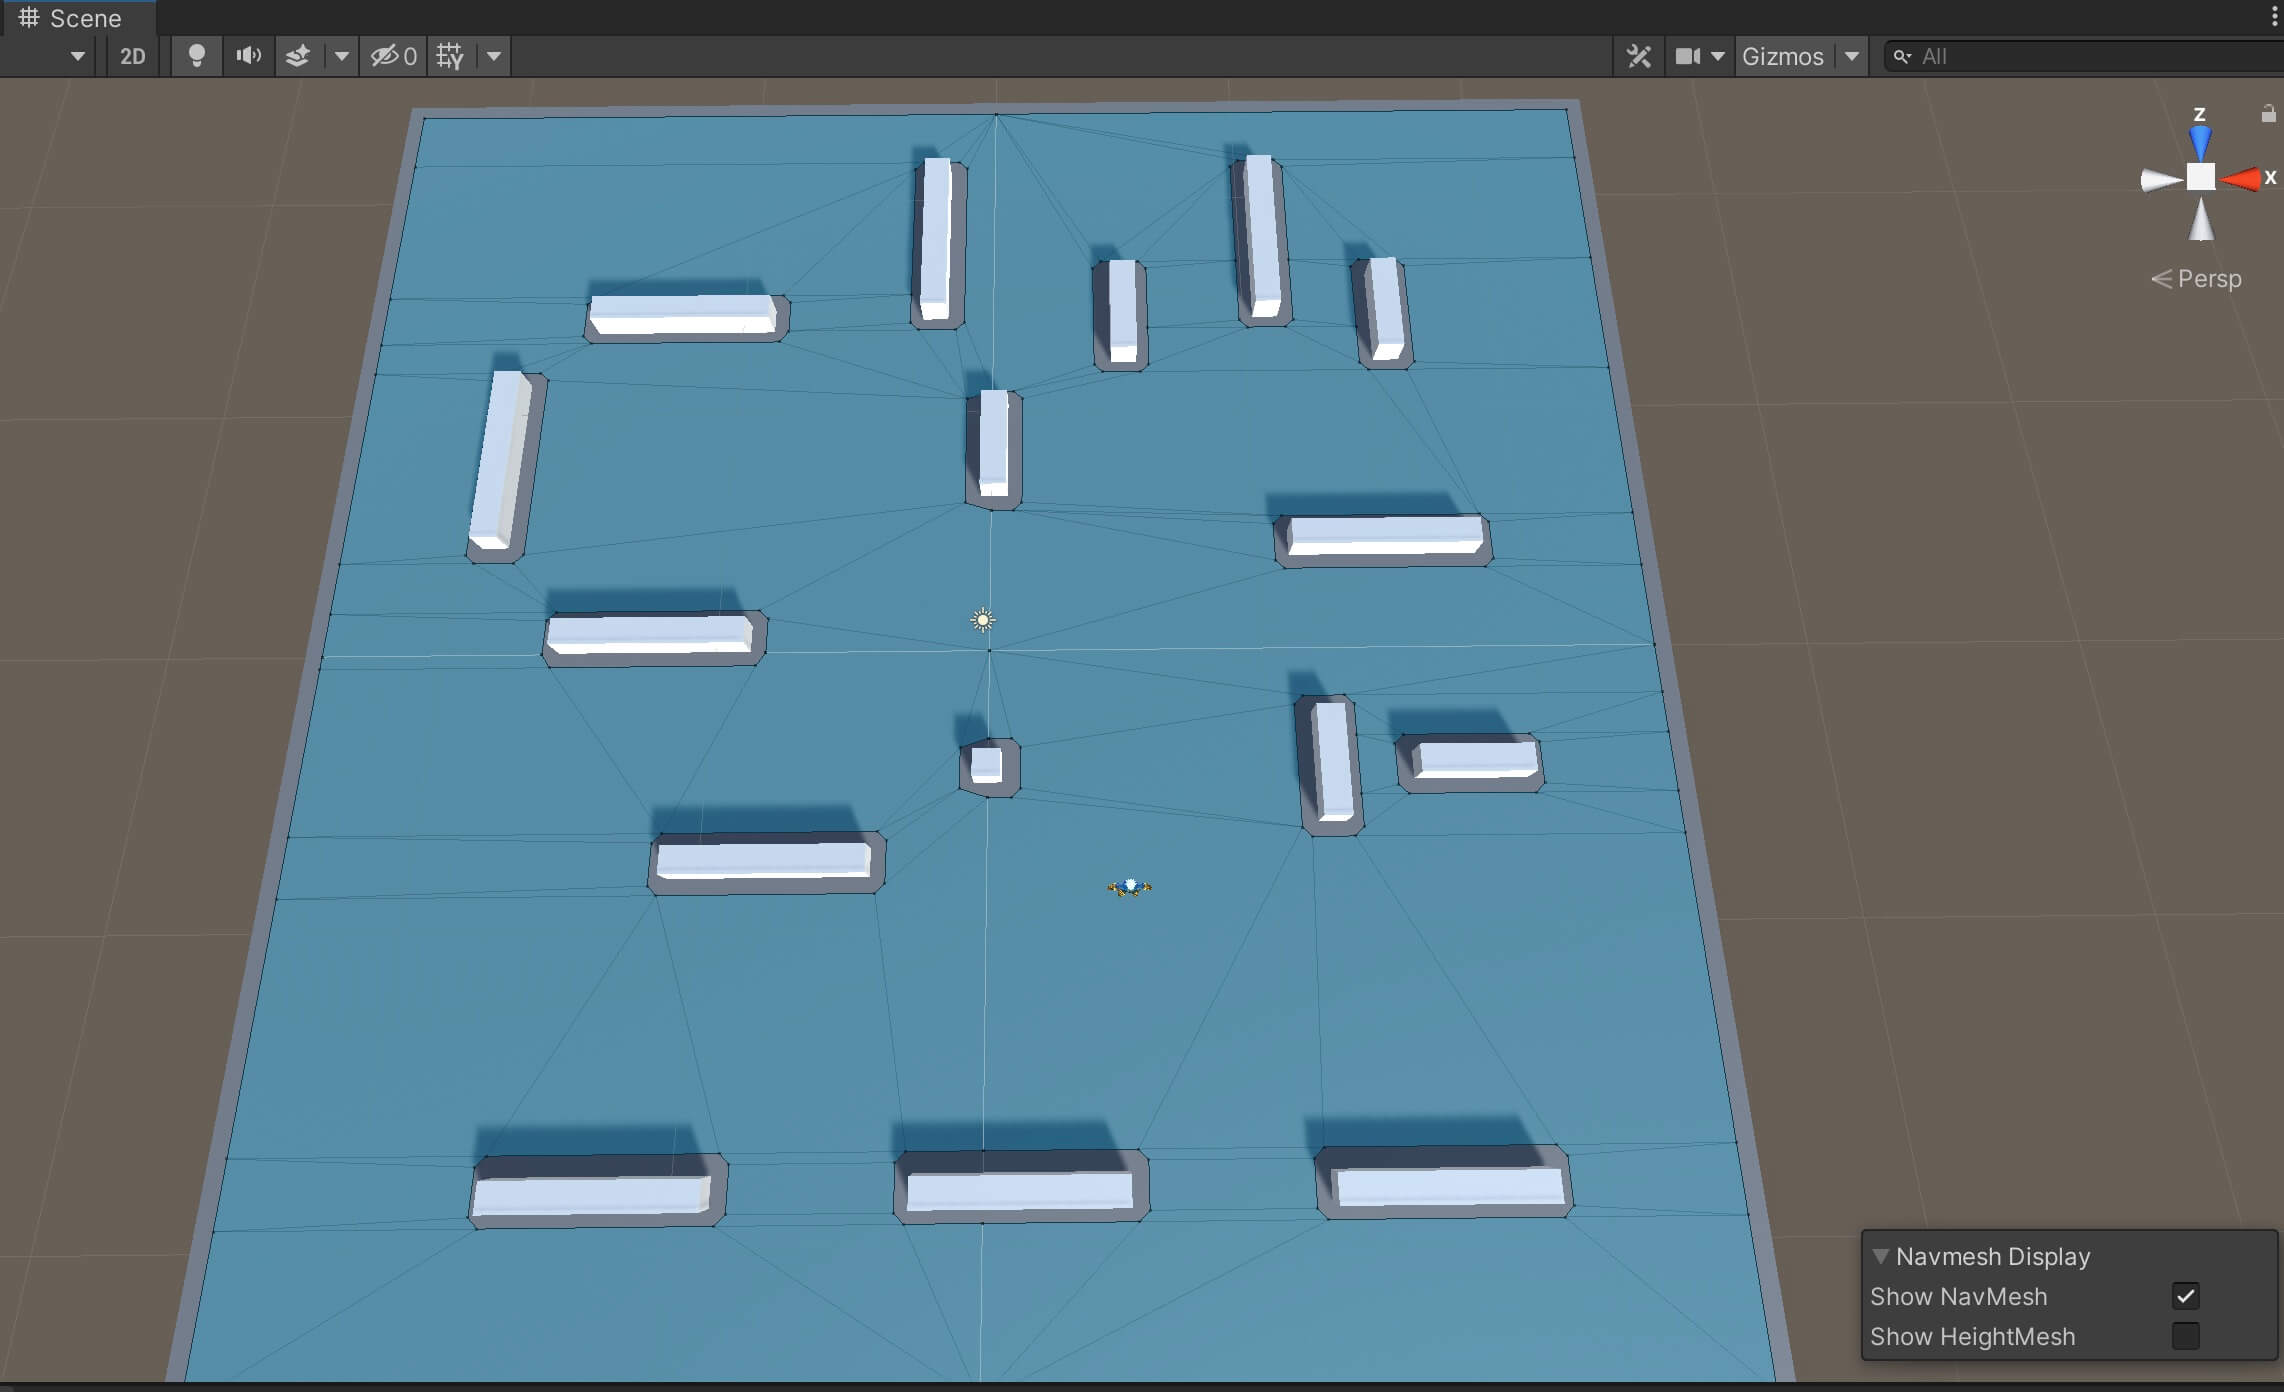
This means that the obstacles are counted as such, and because of that they are not counted as a walkable area in the level, that is why we don’t see the blue color around them.
Of course, by changing the settings values, like the Step Height settings which determines the height the agent can climb on:
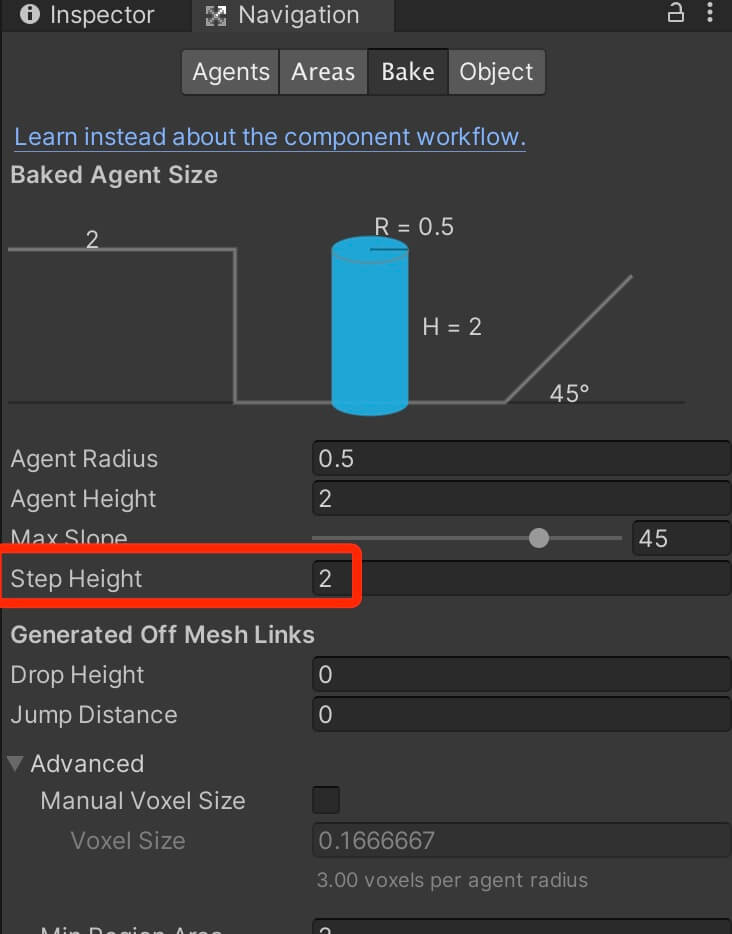
and after that when we bake the level we will see that the obstacles are now counted as a walkable area because their height is less than the Step Height value so now the nav mesh system thinks the player can walk on the obstacles:
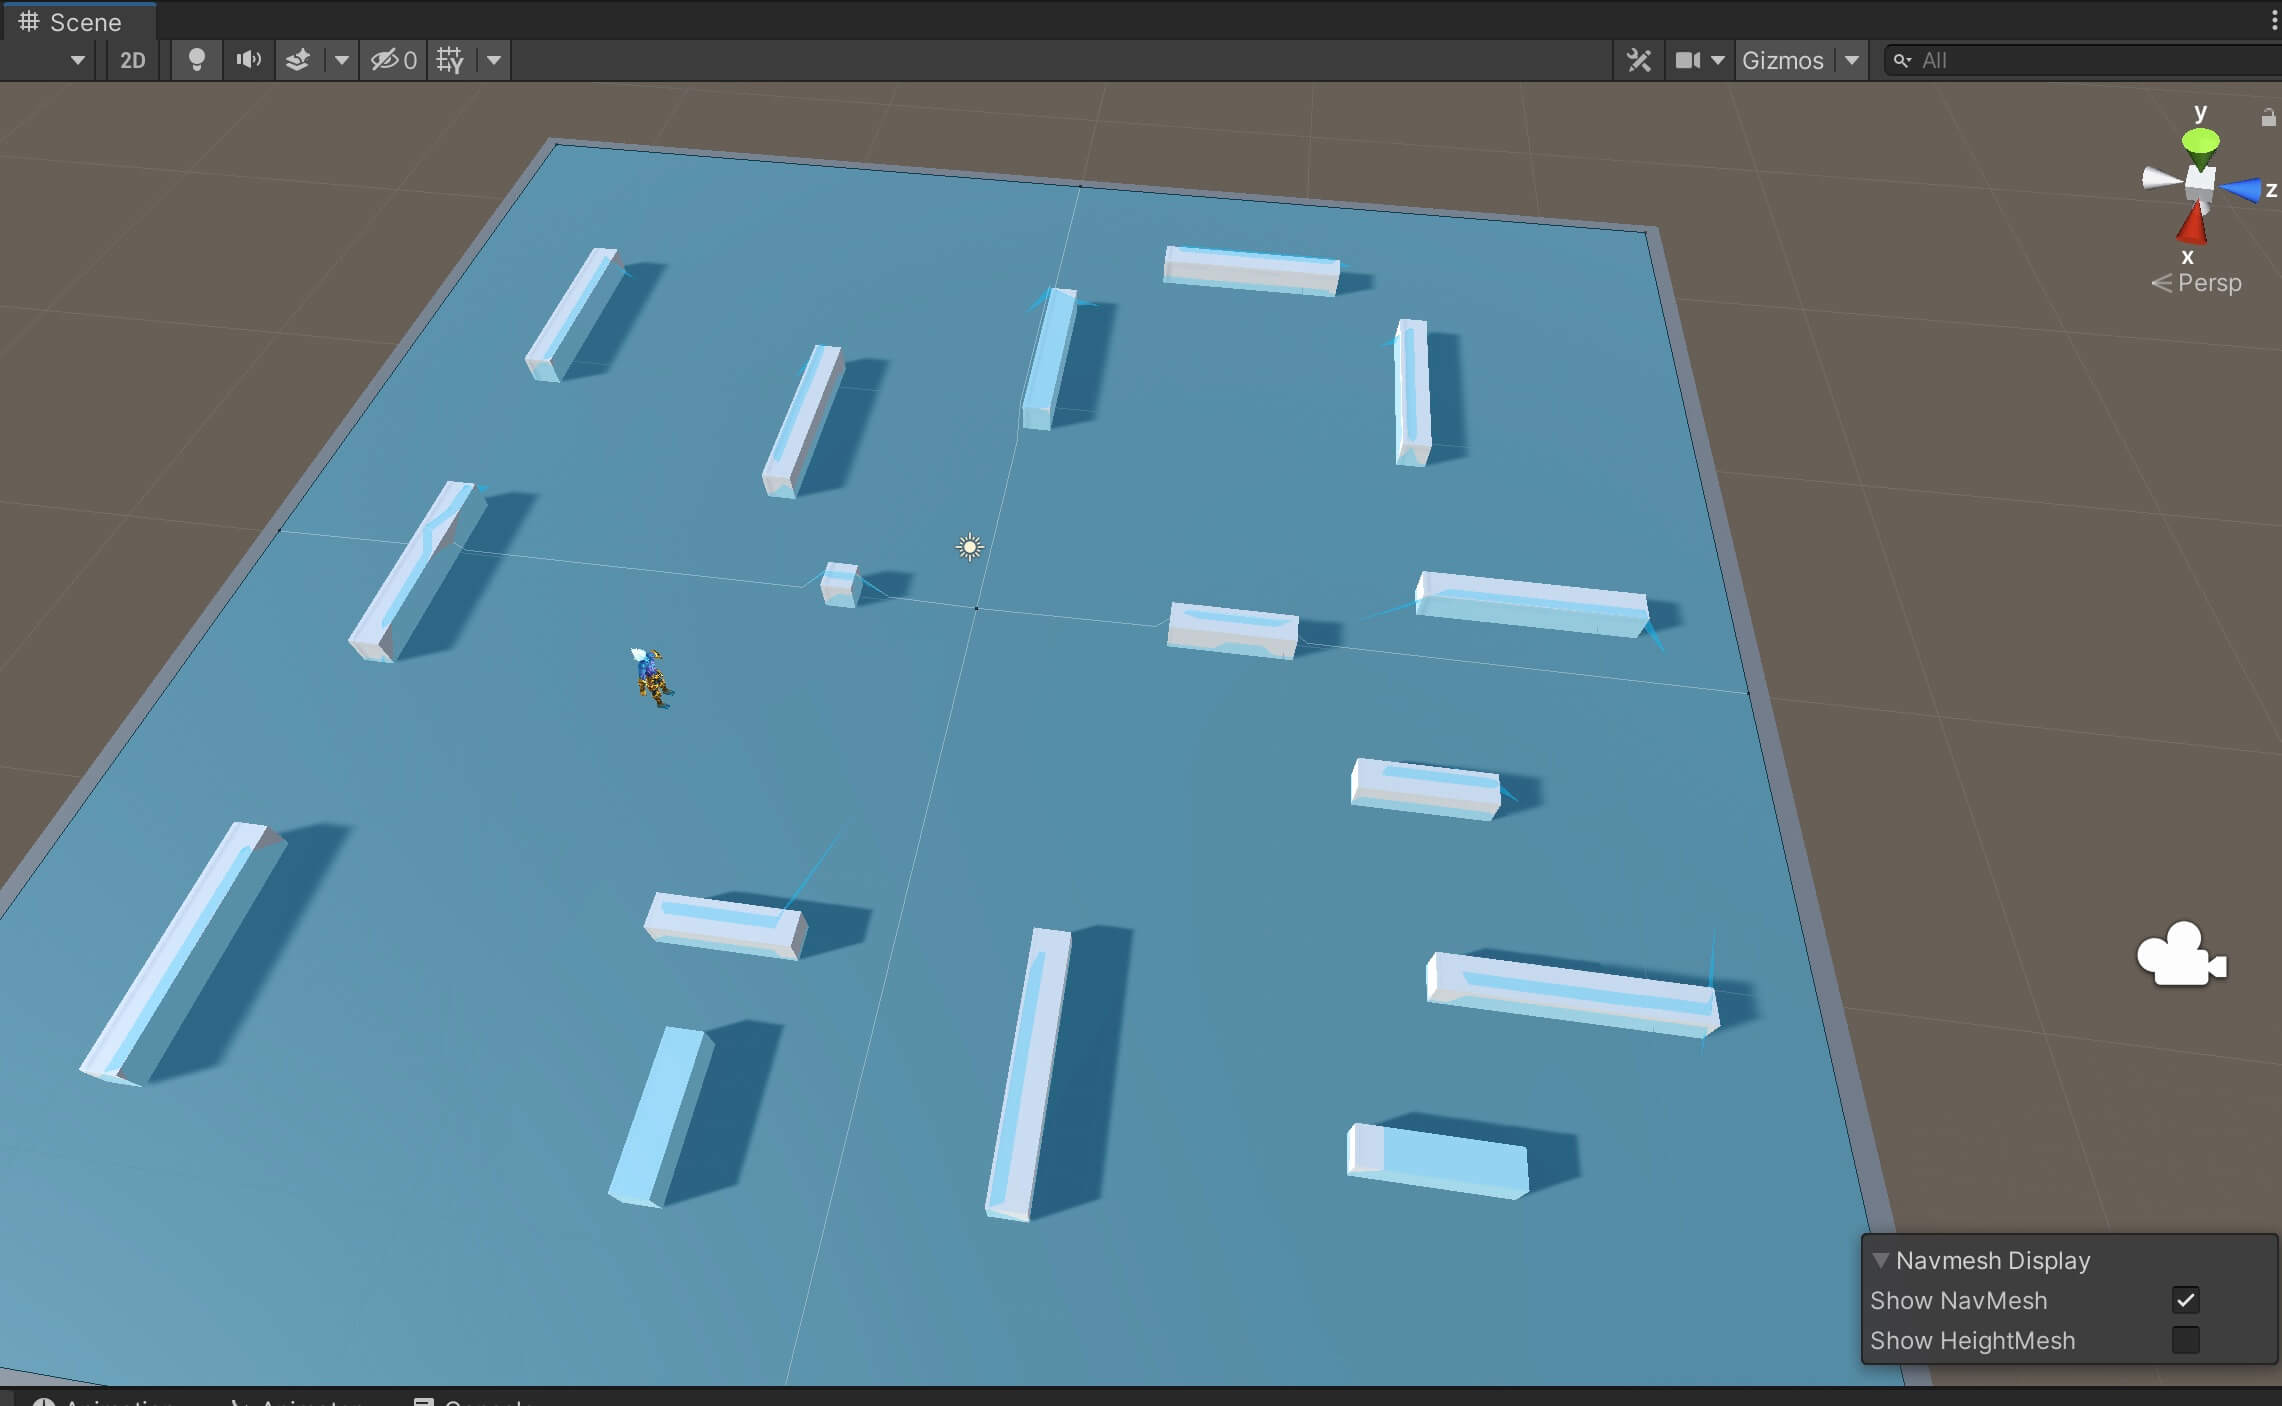
Another way how we can denote that an object is an obstacle is by attaching the Nav Mesh Obstacle component.
Before we do that, select all obstacle child objects, and click the Static drop down list and make sure that the objects are not marked as Navigation Static:
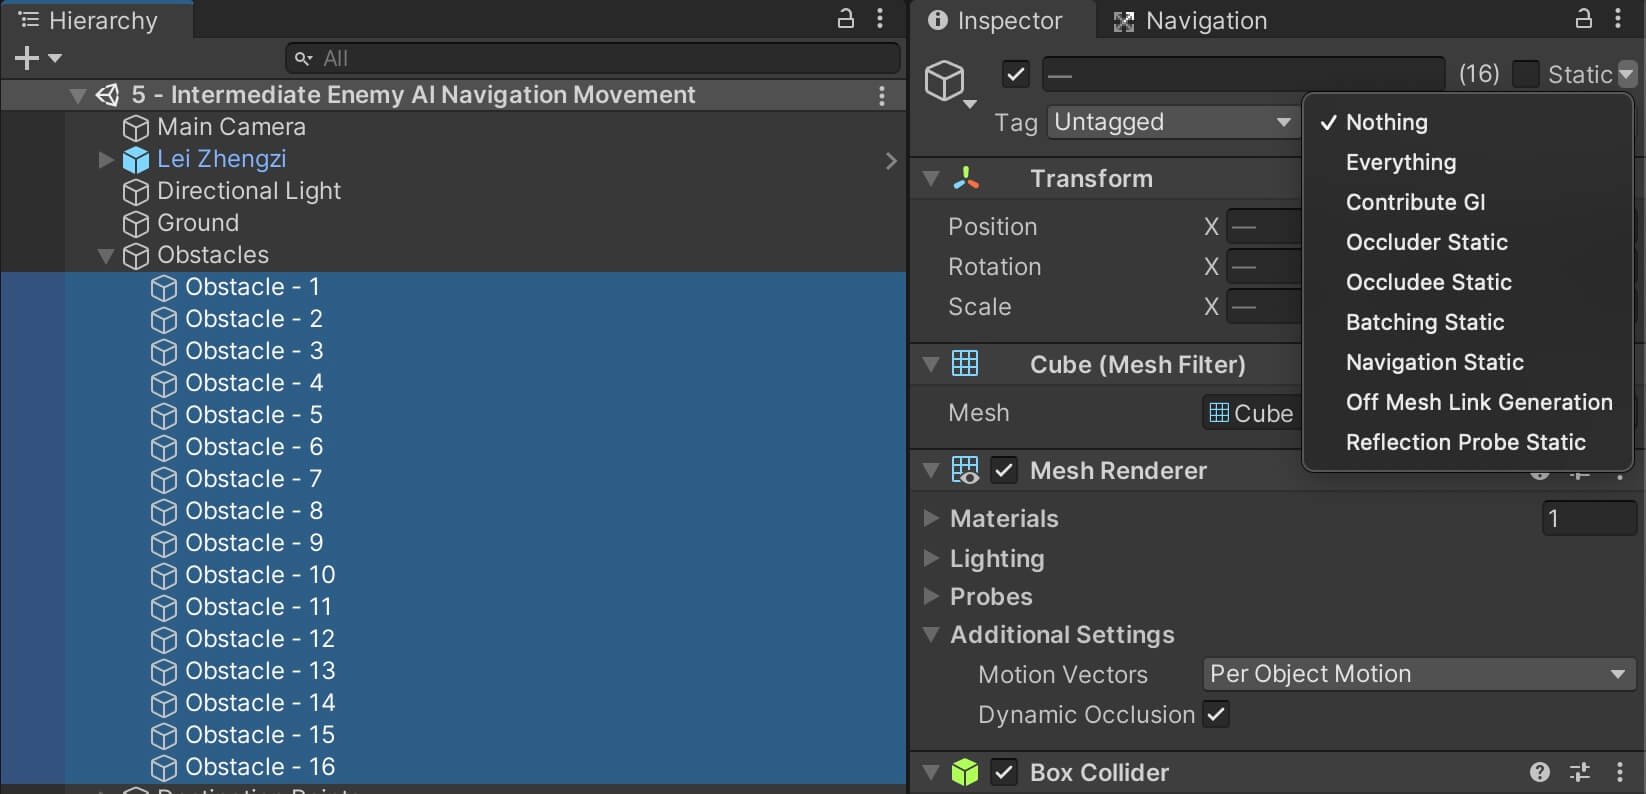
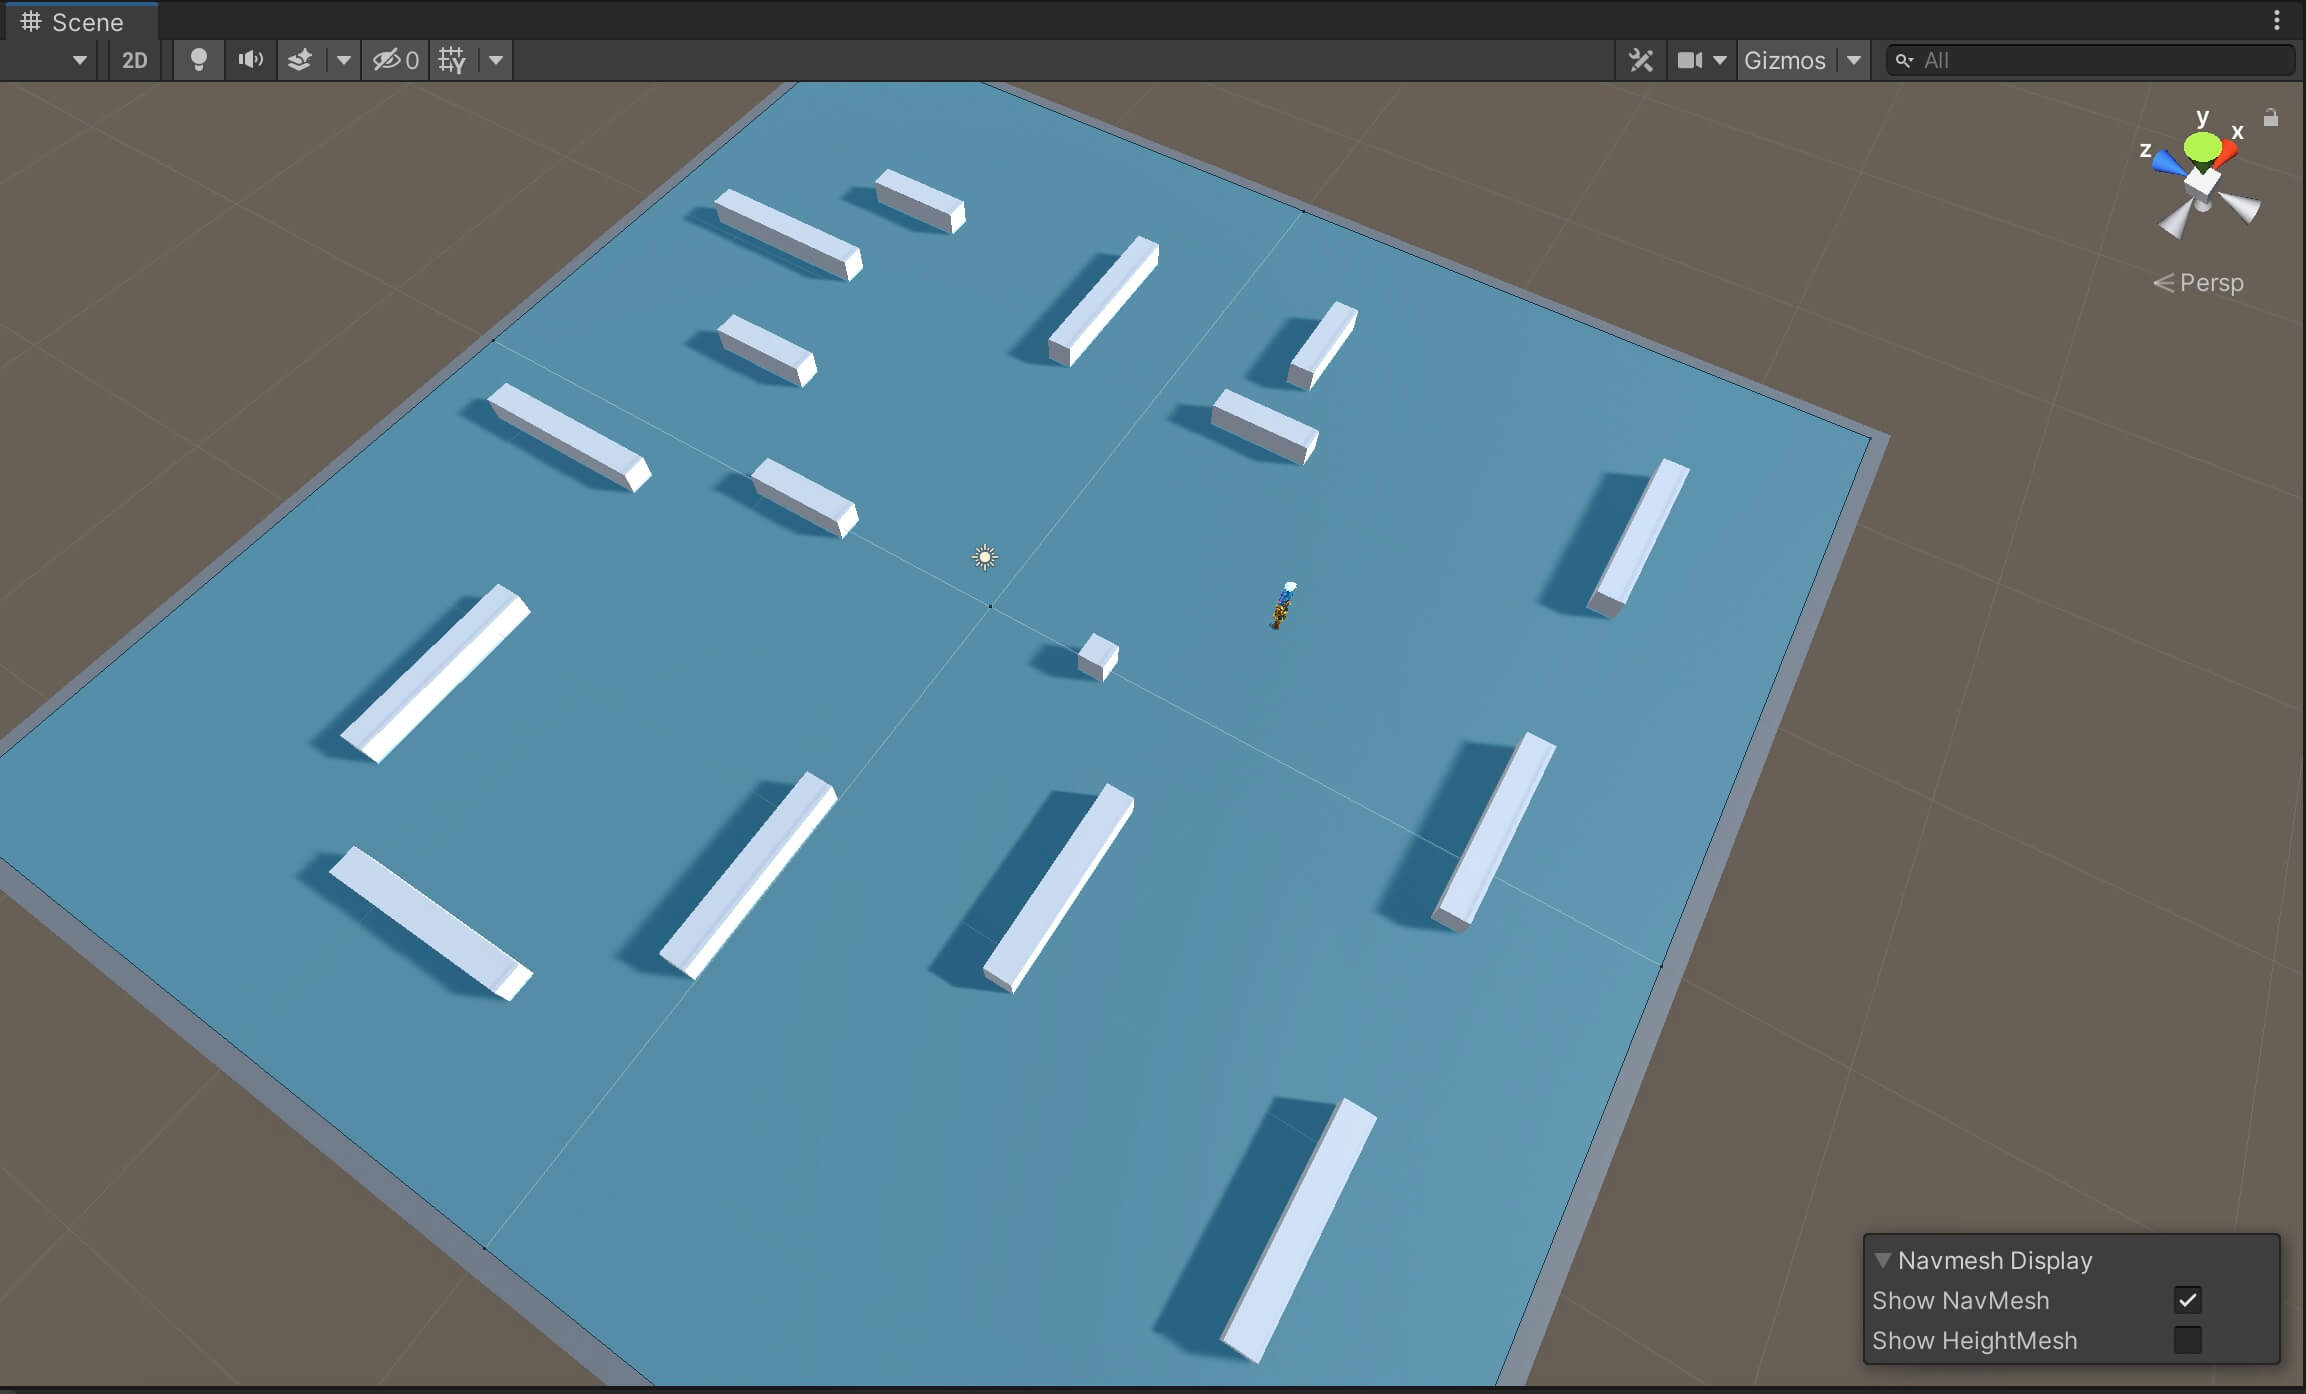
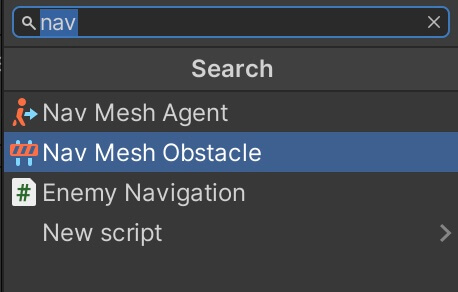
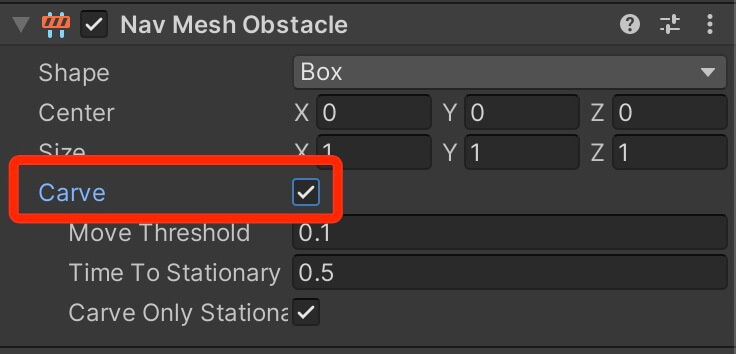
To make the obstacle objects counted as obstacles by the nav mesh system, select all the obstacle objects and in the Nav Mesh Obstacle component check the Carve checkbox:
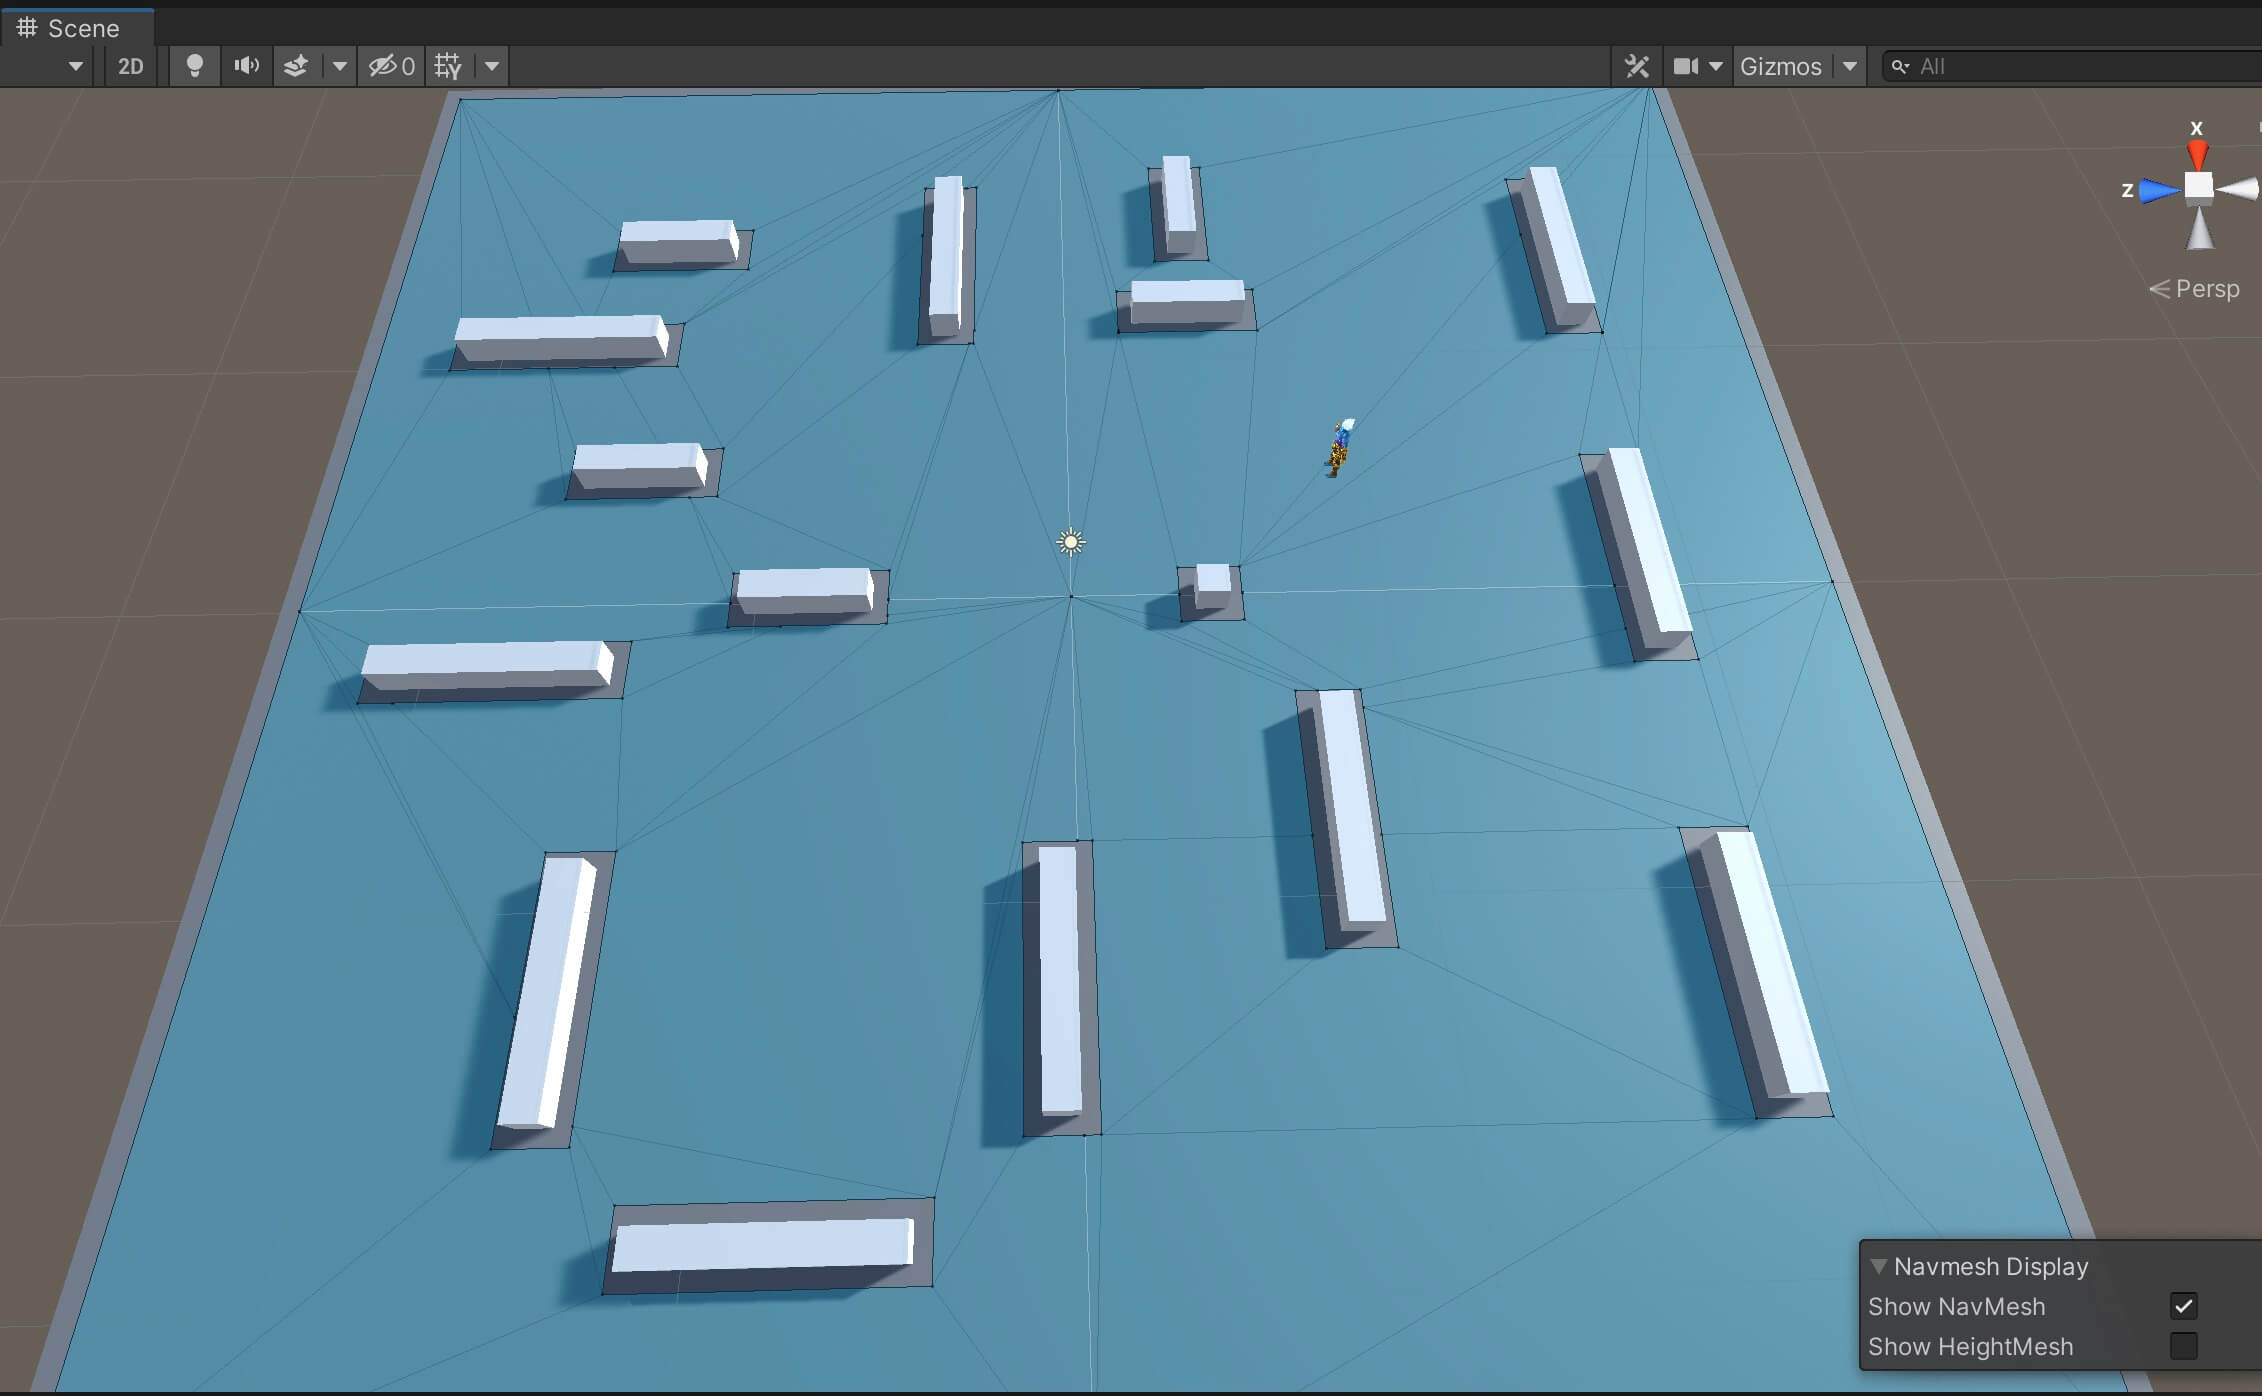
When you do that, you will notice now that around every obstacle in the game there is no blue color:
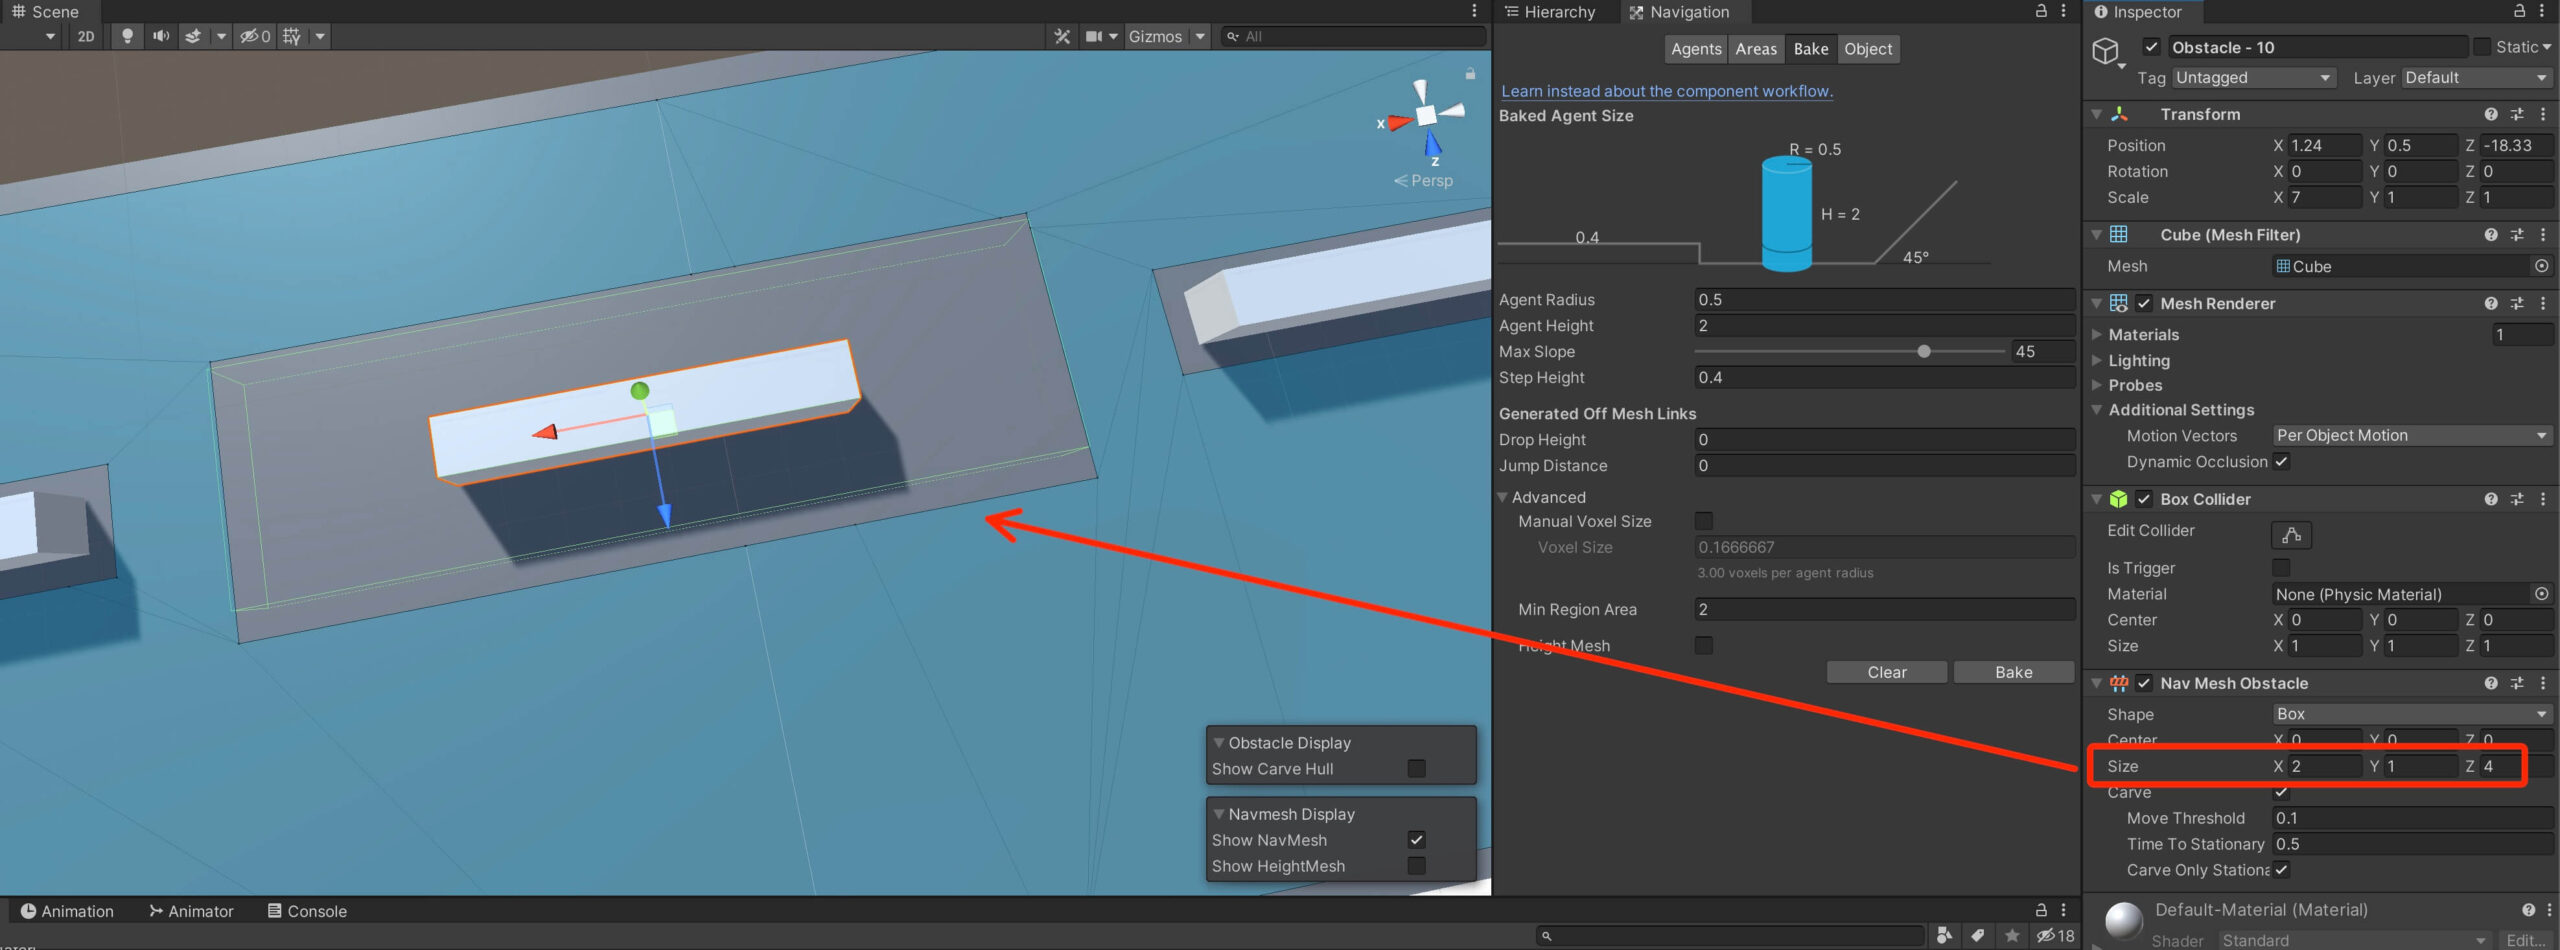
By changing the size property in the Nav Mesh Obstacle component you will also change how large of an obstacle the nav mesh system think a particular game object is:
Before we test this out, make sure that you lay out the destination points near the obstacles so that you can see how the nav agent is avoids the obstacles.
Now run the game and let’s test it out:
Of course, the larger you set the size of the Nav Mesh Obstacle component for a specific obstacle object, the further away from the obstacle the player will be as he is not able to walk on that area.
Moving Towards Player With Nav Mesh Agent
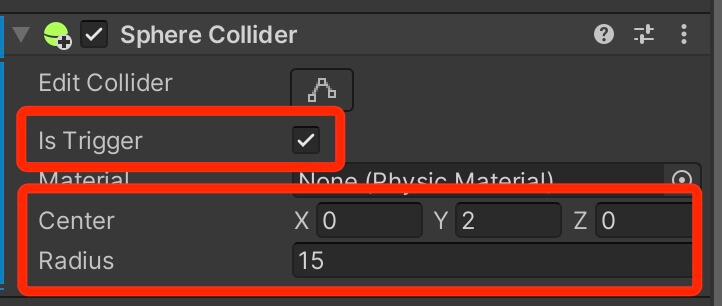
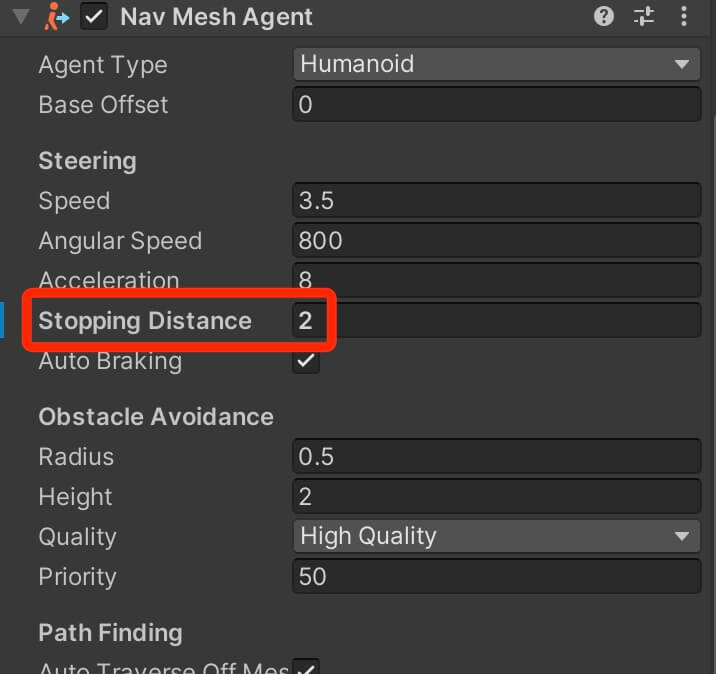
This will make the nav agent stop near the player’s position instead of stopping exactly at the same position where the player is.
For this example I am going to use the same version of the EnemyNavigation script as we did in the previous example e.g. the EnemyNavigation that uses destination points in the level to move.
Above the Awake function add the following variable:
private bool moveToPlayer;
Next, we need to create the functions that will detect when the player enters the sphere collider and when he exits the sphere collider:
					private void OnTriggerEnter(Collider other)
    {
        if (other.CompareTag("Player"))
        {
            moveToPlayer = true;
            navAgent.SetDestination(other.transform.position);
        }
    }

    private void OnTriggerExit(Collider other)
    {
        if (other.CompareTag("Player"))
        {
            moveToPlayer = false;
            SetNewDestination();
        }
    }
In OnTriggerEnter we are testing if we collided with the player. If that is true, then we will set the destination for the nav agent to the player’s position and we will set the moveToPlayer variable to true.
In OnTriggerExit, we are doing the opposite. We set the moveToPlayer value to false, and we call SetNewDestination to get a new moving destination in the game.
Lastly, we need to modify the CheckIfAgentReachedDestination function so that the enemy has one behavior when it is going towards the player, and another behaviour when it is going from one destination point to another:
					void CheckIfAgentReachedDestination()
    {
        if (!navAgent.pathPending)
        {
            if (navAgent.remainingDistance <= navAgent.stoppingDistance)
            {
                if (!navAgent.hasPath || navAgent.velocity.sqrMagnitude == 0f)
                {
                    if (moveToPlayer)
                    {
                        Debug.Log("Attack the player");
                    }
                    else
                    {
                        SetNewDestination();
                    }
                }
            }
        }
    }
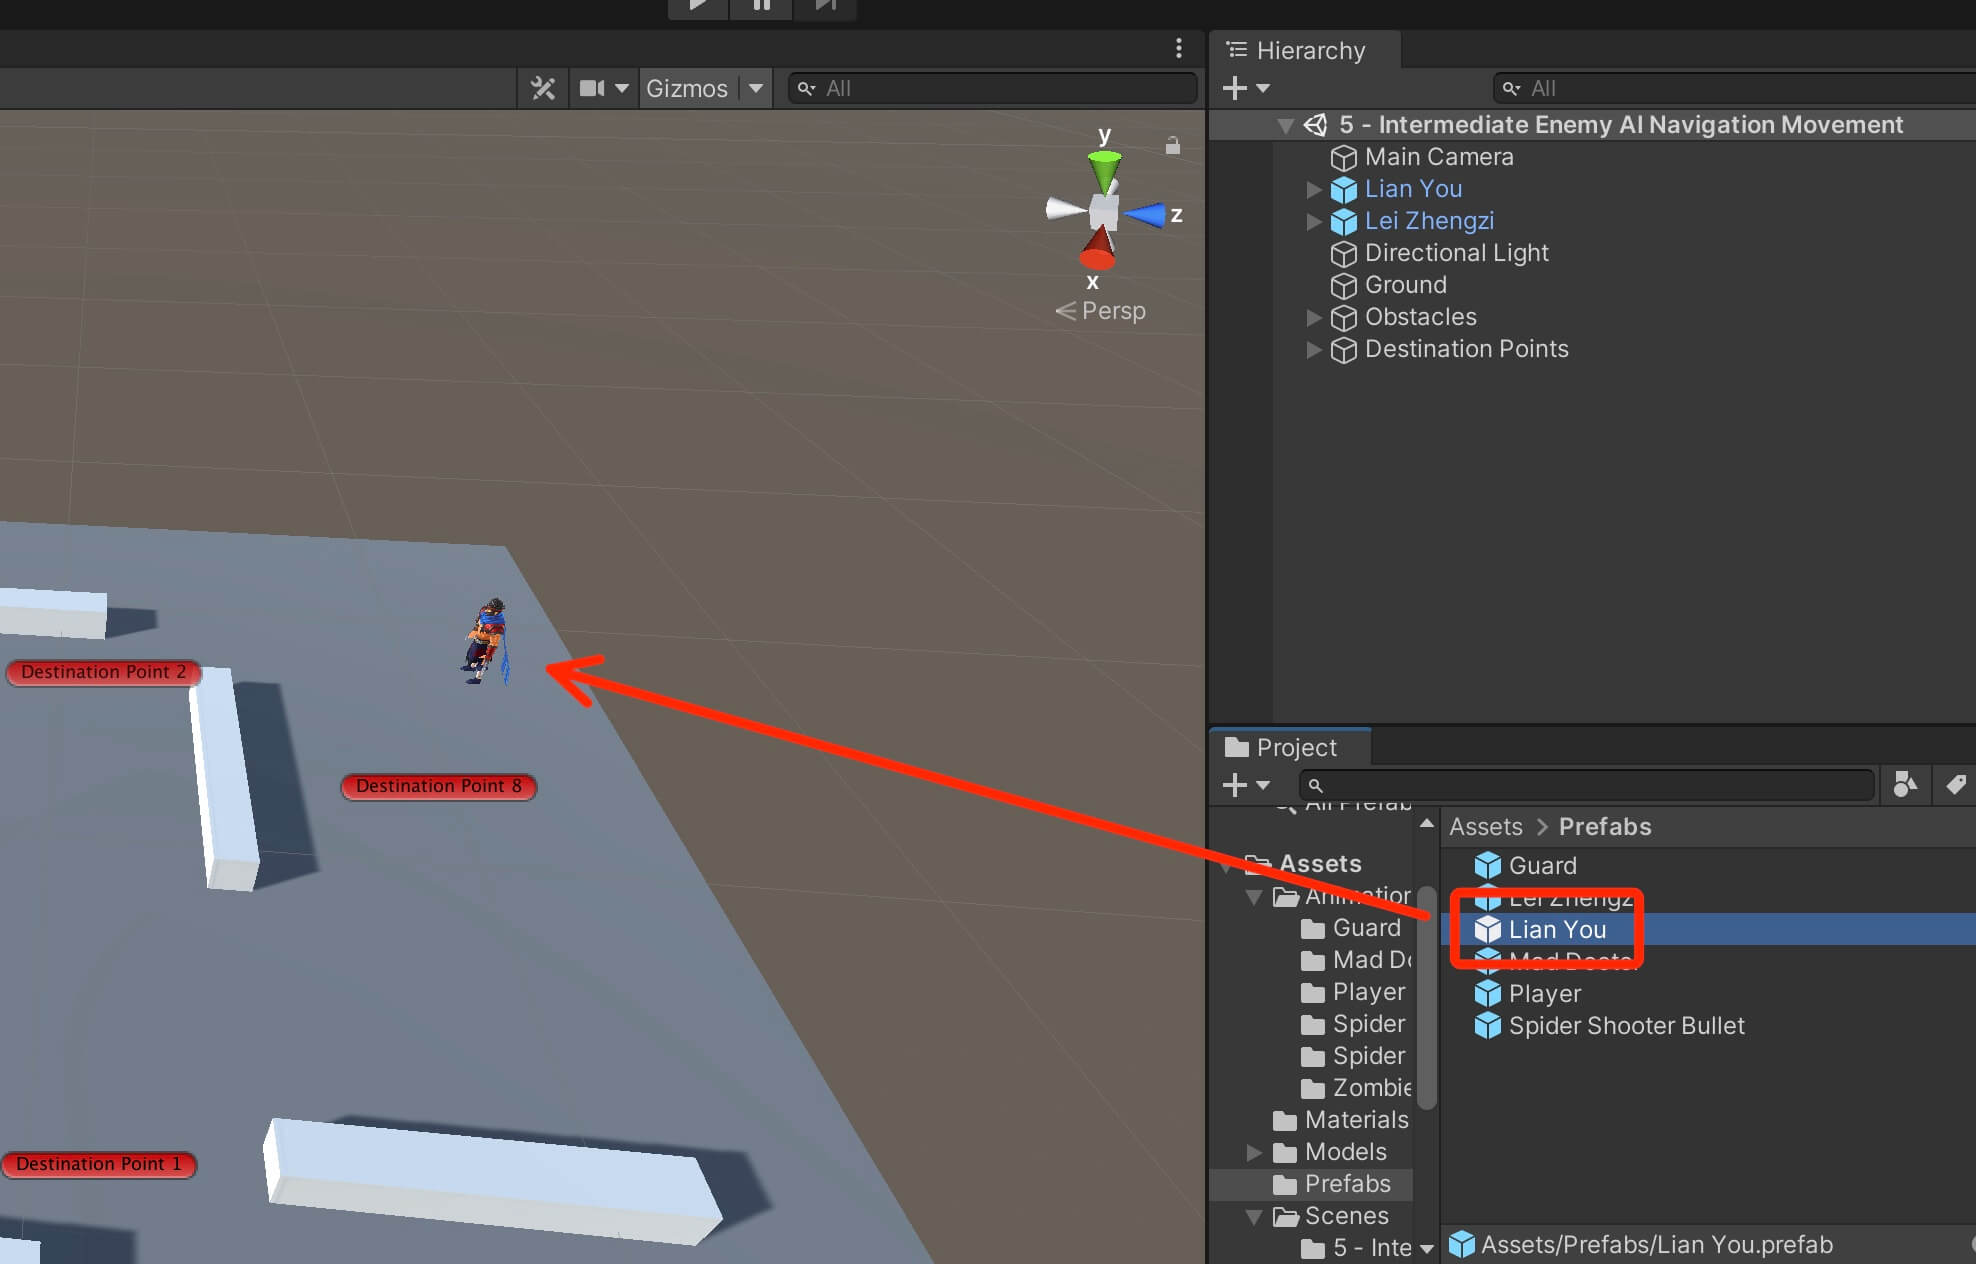
Now let’s run and test the game:
As soon as the player was within the sphere collider’s bounds, we detected the collision and the nav agent started moving towards the player.
When he reached his destination we saw that he didn’t stop exactly at the position of the player, instead he stopped near the player because of the Stopping Distance value.

Comments are closed.