In my previous post about enemy AI we created enemy patrol, chase and attack behavior using Blueprints and C++.
In this post we are going to do the same but we are going to use behavior trees and sensing.
Download Assets And Complete Project For This Tutorial
To follow along with this tutorial, please download the started project by clicking on the green Download assets button above.
In the downloaded folder you will find the finished project, and the started project which I prepared for you to follow this tutorial.
Important Information Before We Start
Blackboards And Behavior Tress
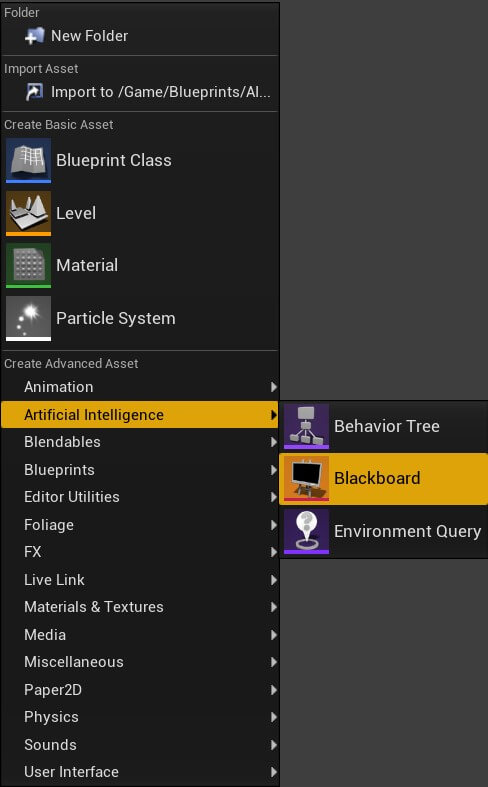
Name the Blackboard BB_EnemyAIData and then Right Click -> Artificial Intelligence -> Behavior Tree:
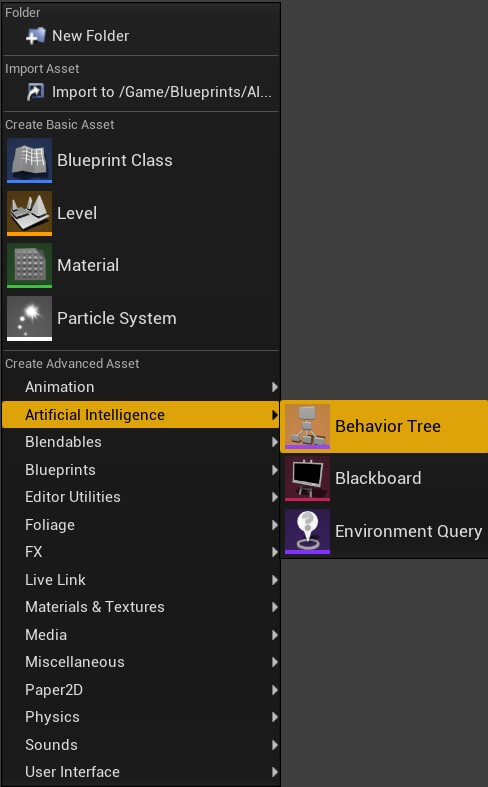
Double click BB_EnemyAIData to open the Blackboard in the editor. You will see two tabs in side the Blackboard editor, one named Blackboard and the other Blackboard Details:

In the Blackboard tab we will see all the keys that we defined which represents the data of the Blackboard, and in the Blackboard Details tab we will see details about specific key we select.
In the Blackboard tab you will see a New Key blackboard icon, this is where we create new keys for the Blackboard.
Click on the New Key icon and create two new keys, one will be a bool named Can See Player, and the other will be a Vector named Random Patrol Location:
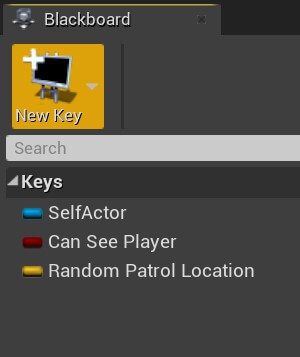
Now select the SelfActor variable and name it Player Target. Make sure that the Key Type is set to Object in the Blackboard Details tab and that the Base Class is set to Actor:

These are the variables that we will use to shape the enemy AI behavior which will happen in the BT_EnemyAI Behavior Tree.
Creating Enemy AI In The Behavior Tree
The first thing we need to do is open the BT_EnemyAI, click on the Root node, and in the Details tab for the Blackboard Asset select the BB_EnemyAIData:
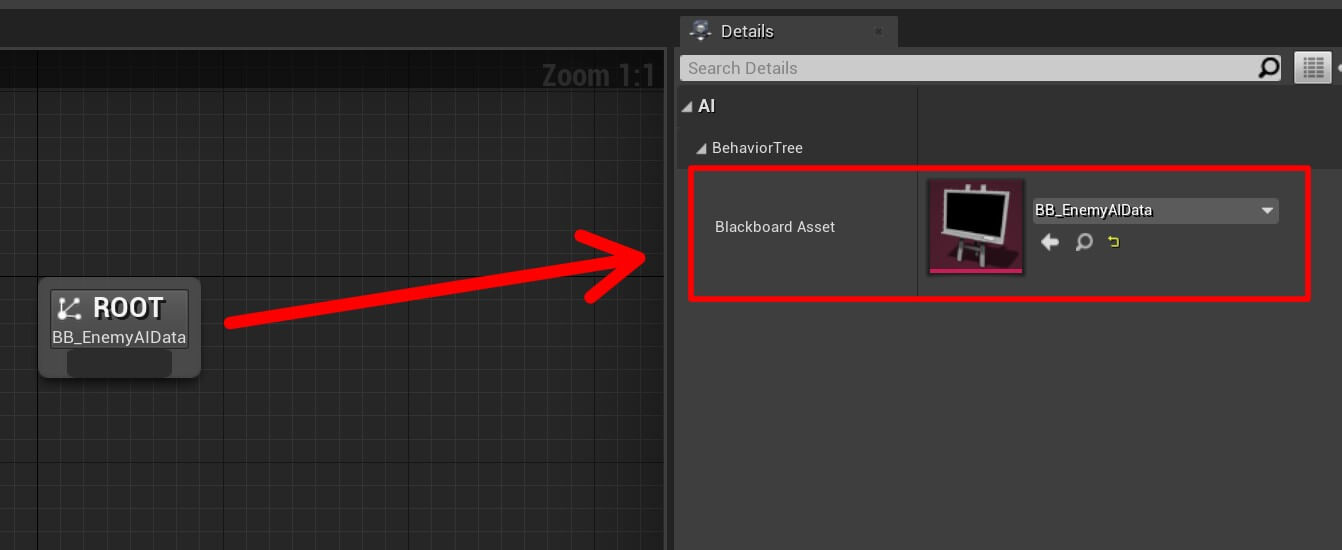
This will allow the Behavior Tree to use the data we defined in the BB_EnemyAIData Blackboard.
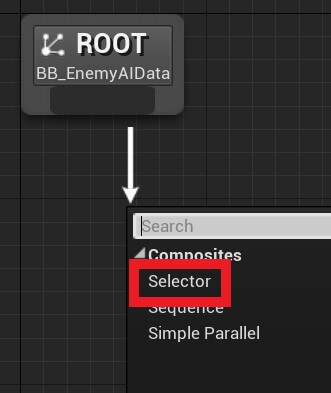
Now Left Click and drag from the Root node, when you release a pop up window will appear and you are going to click on Selector:
You can also Right Click anywhere in the editor for the Behavior Tree and click on the Selector:
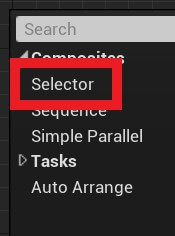
The Selector node executes its children from left to right, and it will stop executing its children when one of their children succeeds. This basically means that the Selector will execute the task nodes we provide, and when that task finishes its execution, the Selector node will start executing again from start.
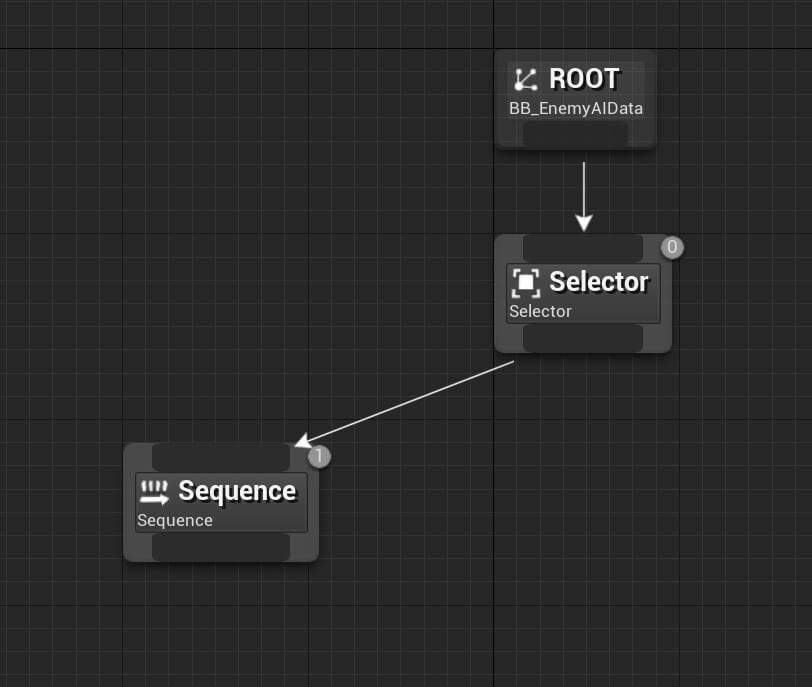
Let’s create a Sequence node and make the Selector node point to it:
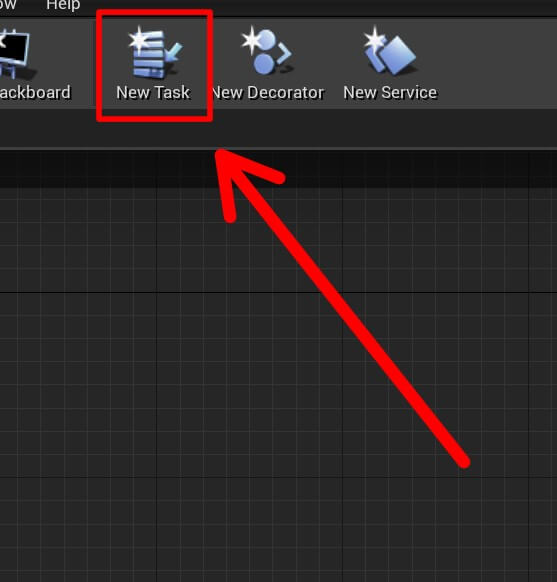
Another way is to Right Click -> Blueprint Class, and in the search bar for All Classes inherit BTTask_BlueprintBase:
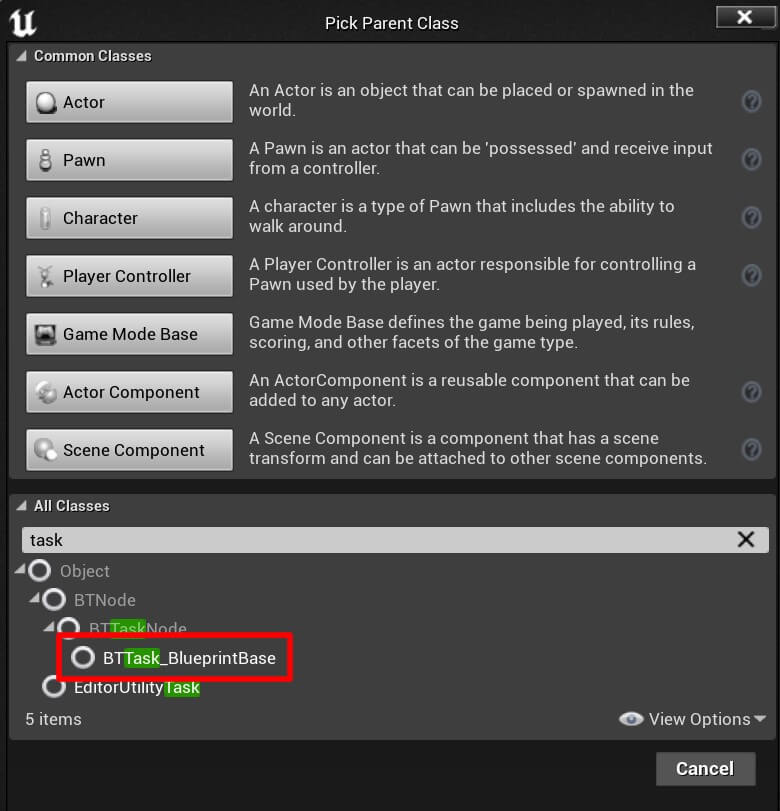
Before we create a new Task, in the AI folder, Right Click -> New Folder and name it Tasks. Now create a new Task and name it Task_GetRandomLocationPoint then open it in the editor.
Inside the My Blueprint tab under Variables, create a new variable of type Blackboard Key Selector Structure, name it Random Location Key and also make it a public variable:
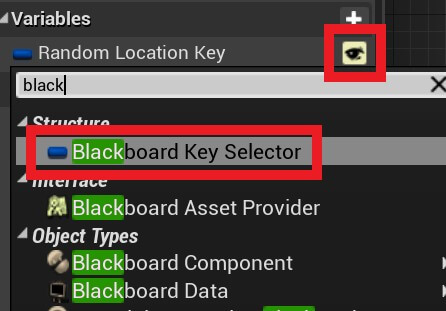
In order to access the Keys we defined in BB_EnemyAIData Blackboard we need to provide the Blackboard Key Selector Structure as the parameter.
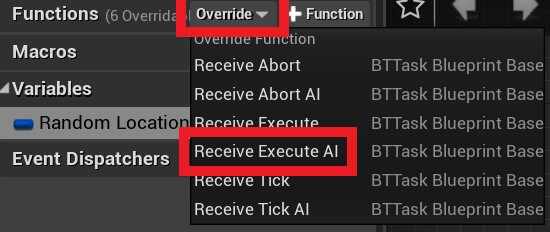
Next, we are going to override a function called Receive Execute AI:

We need to call Set Blackboard Value as Vector because the Random Patrol Location is a Vector type variable. We also need to call the Finish Execute node to indicate that the Task has finished executing, otherwise the Task will only execute once.
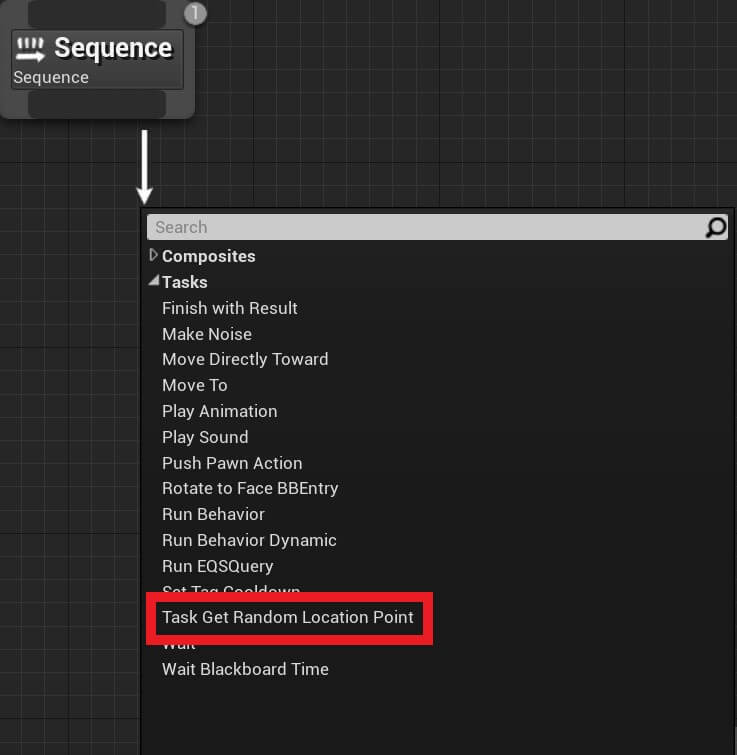
Compile and save the changes we made to Task_GetRandomLocationPoint and open BT_EnemyAI editor. We can either Right Click and under Tasks search for the Task_GetRandomLocationPoint or drag a node from the Sequence node and select the Task_GetRandomLocationPoint:
Now select the new task node, and in the Details tab for the Random Location Key, click on the drop down list and select Random Patrol Location variable:
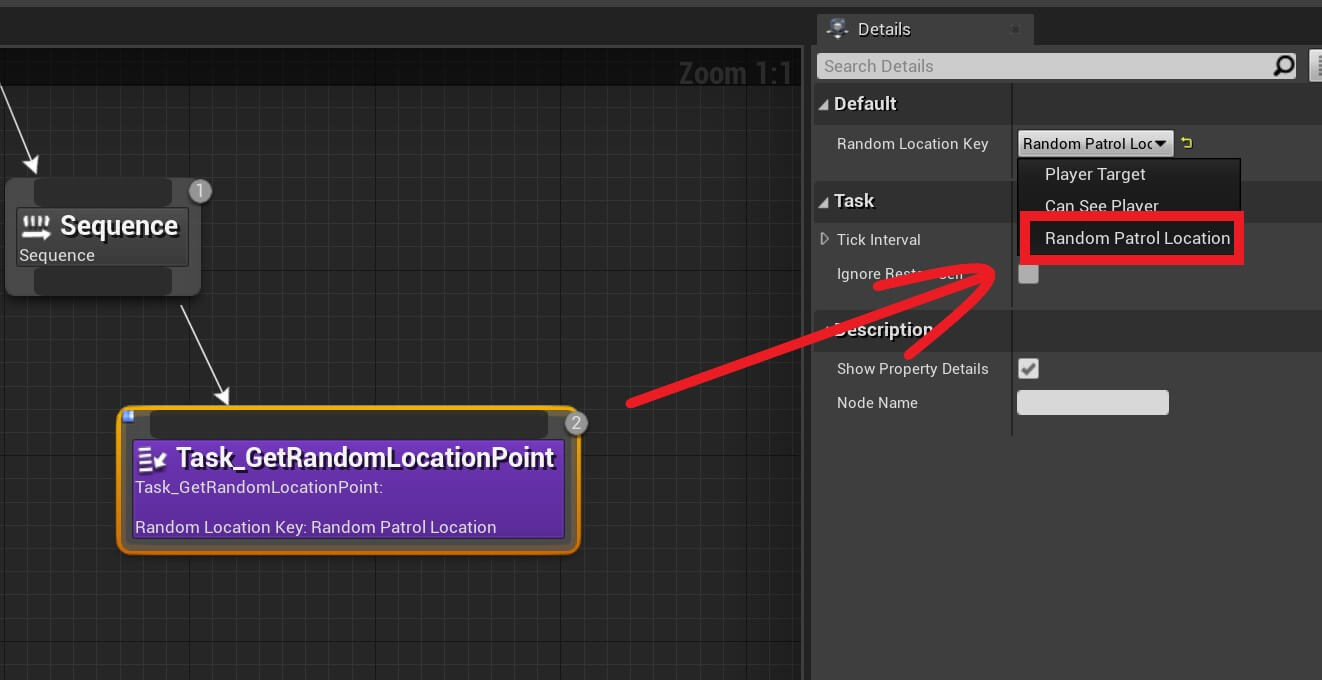
This is how we are going to indicate that the Random Location Key variable we defined in the Task_GetRandomLocationPoint is pointing to the Random Patrol Location variable we defined in BB_EnemyAIData Blackboard.
The last step is to call the Move To Task by Right Click -> Tasks -> Move To:
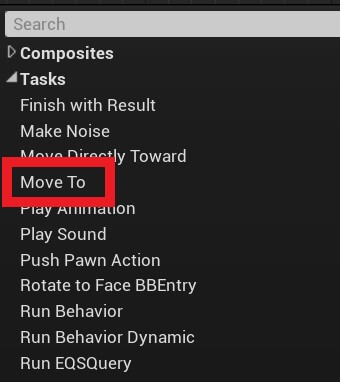
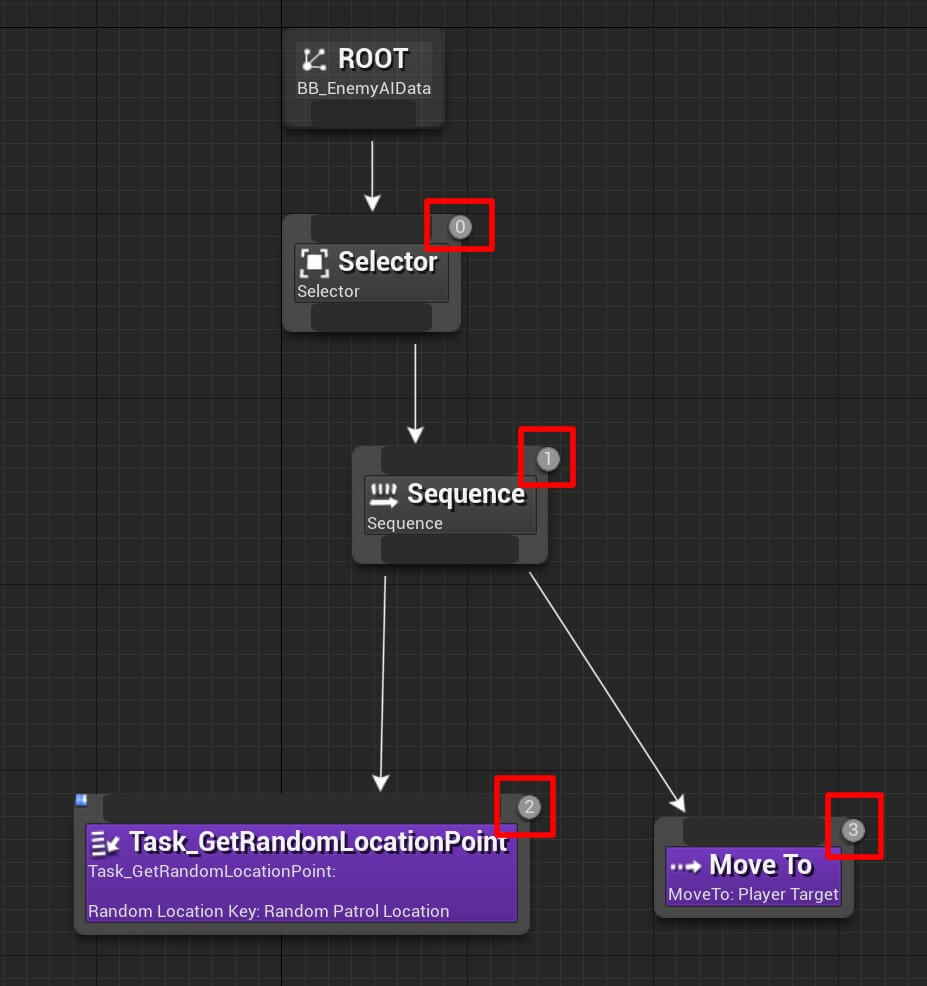
You can also drag a node from the Sequence, but make sure that the Move To task is positioned after the Task_GetRandomLocationPoint because if you remember, the Sequence node will execute its children e.g. tasks, from left to right, so we first need to generate a random location point, and then make the AI move to that location.
The order of execution is also denoted with numbers on each node, the lower the number means the node will be executed first:
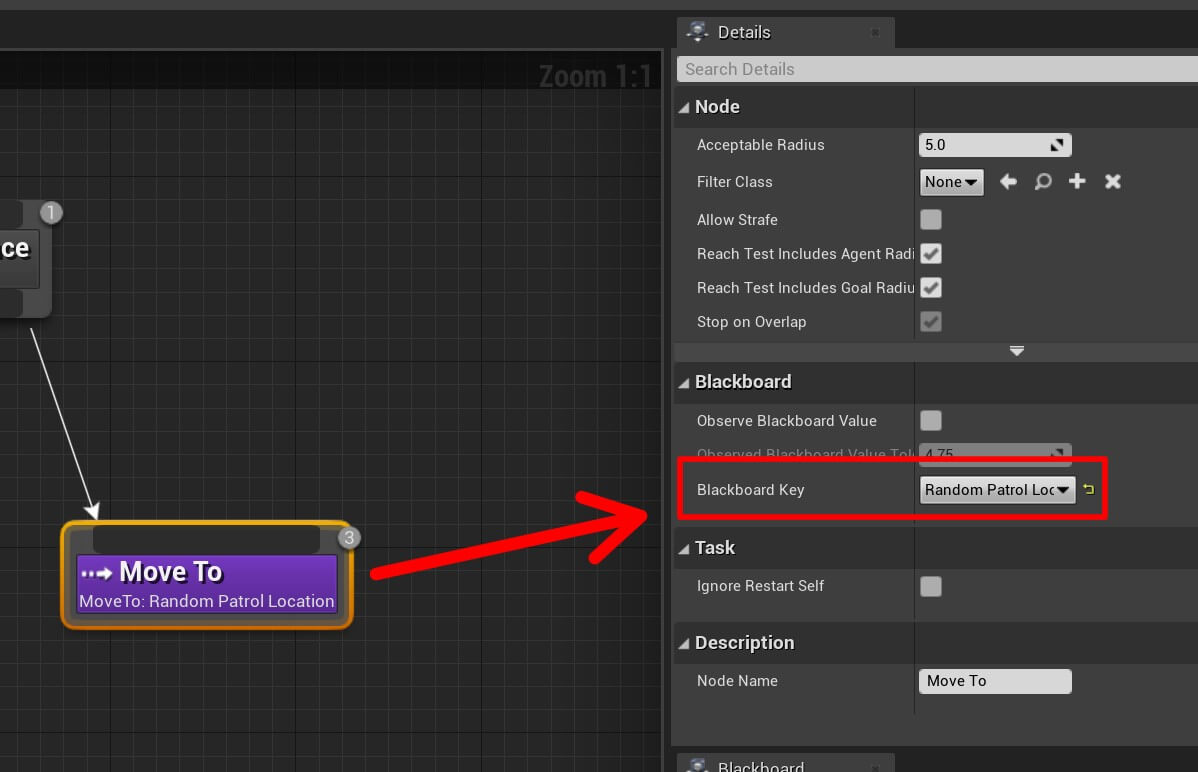
The last step is to select the Move To node, and in the Details tab for the Blackboard Key select the Random Patrol Location:
Running Behavior Tree From AI Controller
To make the Behavior Tree control our enemy character, we need to create an AI Controller Blueprint. Inside the Content -> Blueprint -> AI, Right Click -> New Blueprint Class and inherit from AIController and name the new Blueprint BP_BB_EnemyAIController:
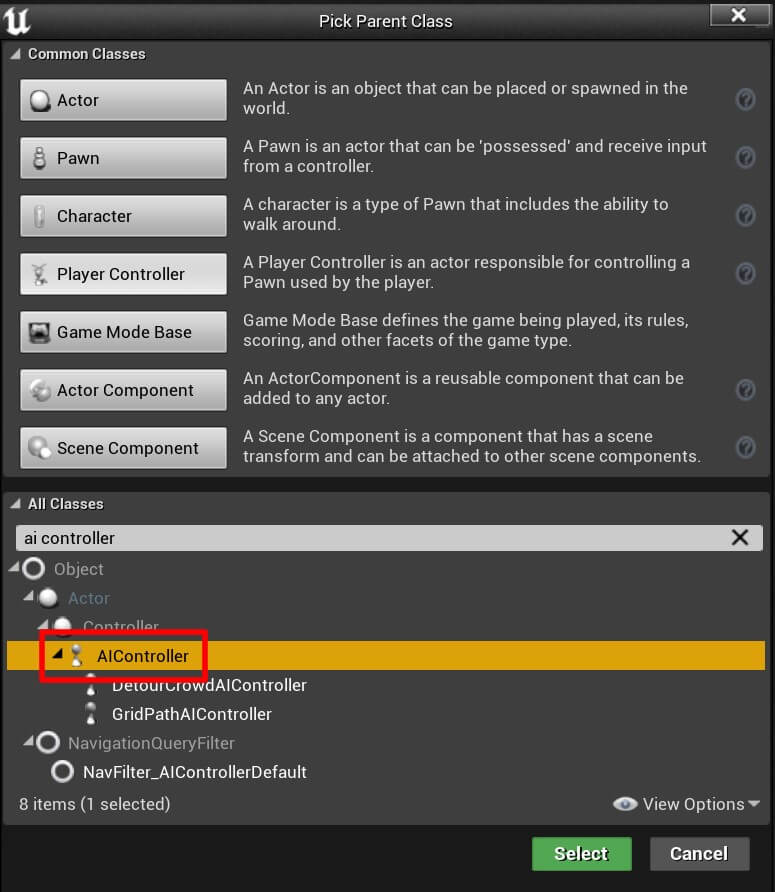
Before we run the Behavior Tree from the AIController Blueprint, open the BP_Enemy_BT located in Content -> Blueprints.
In the Components tab Select the top parent BP_Enemy_BT(self), and in the Details tab under Pawn for the AI Controller Class select BP_BB_EnemyAIController:
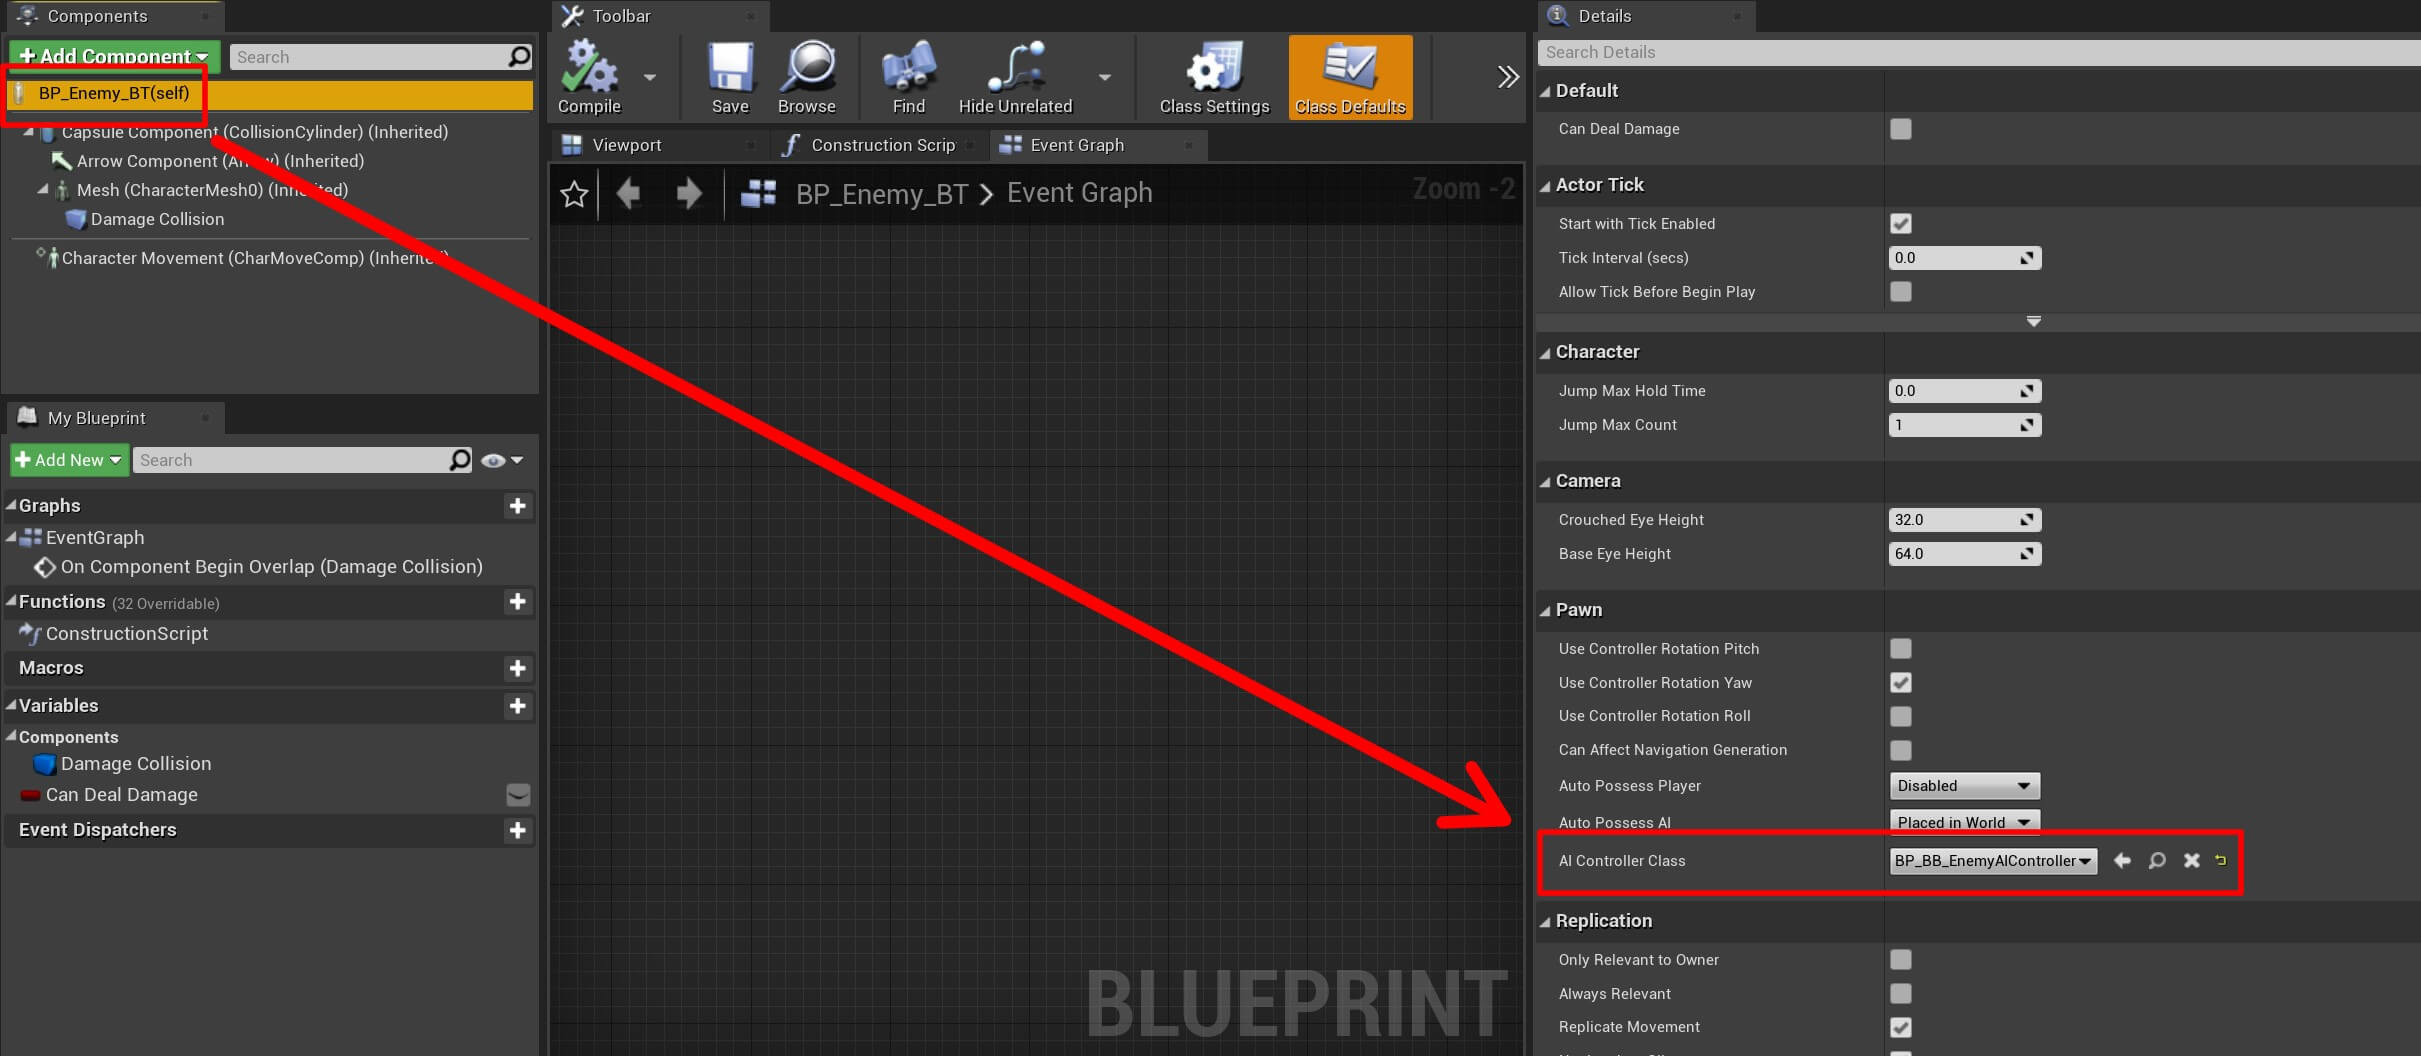
Now open the BP_BB_EnemyAIController Blueprint in the editor. Create a new variable of type Behavior Tree and name it AI Behavior Tree:
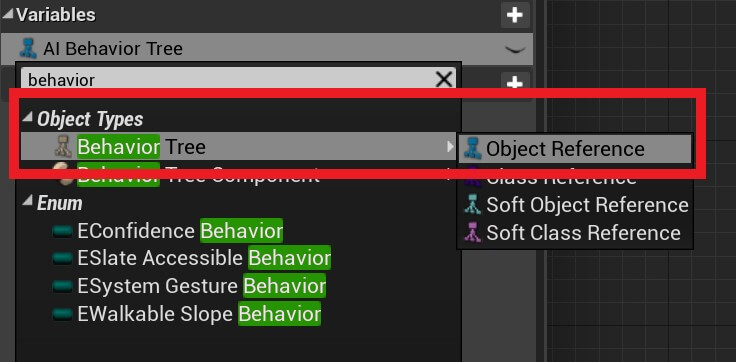
Next, select the AI Behavior Tree variable, and in the Details tab under Default Value select the BT_EnemyAI:

To make the Behavior Tree run, we need to add the following nodes:
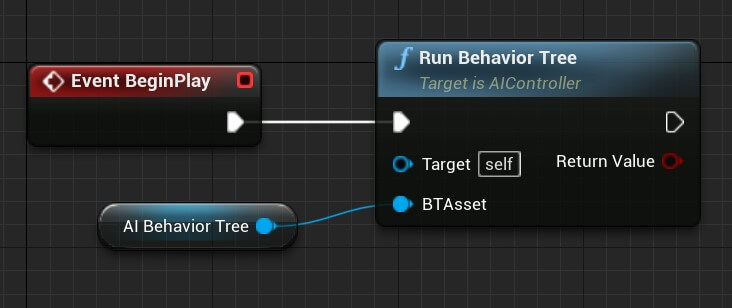
You can copy the nodes from here:
Now let’s run the game and test it out:
Because the BP_BB_EnemyAIController is now controlling the enemy, as soon as the game started and the BeginPlay inside BP_BB_EnemyAIController was executed which has the code to run the Behavior Tree we saw that the enemy started patrolling the level.
We also saw in the BT_EnemyAI the execution flow of the nodes. You can always open the Behavior Tree Blueprint and watch the execution flow for debugging purposes to see if everything works.
Pawn Sensing Component
In the previous post about enemy AI we used collision components to detect the presence of the player, in this post we are going to use PawnSensing component which allows our AI to have human senses like hearing and seeing.
One tip when it comes to setting up the AI system, if you have an AIController like we do in this example, you can attach the PawnSensing component on the AIController.
That way, every enemy in your game that uses that AI controller will have the sensing ability, which is much better than to go in every enemy blueprint and attach a PawnSensing component.
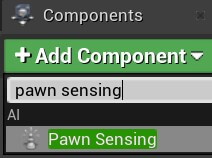
So let’s open BP_BB_EnemyAIController and in the Components tab click on Add Component button and attach the PawnSensing component:
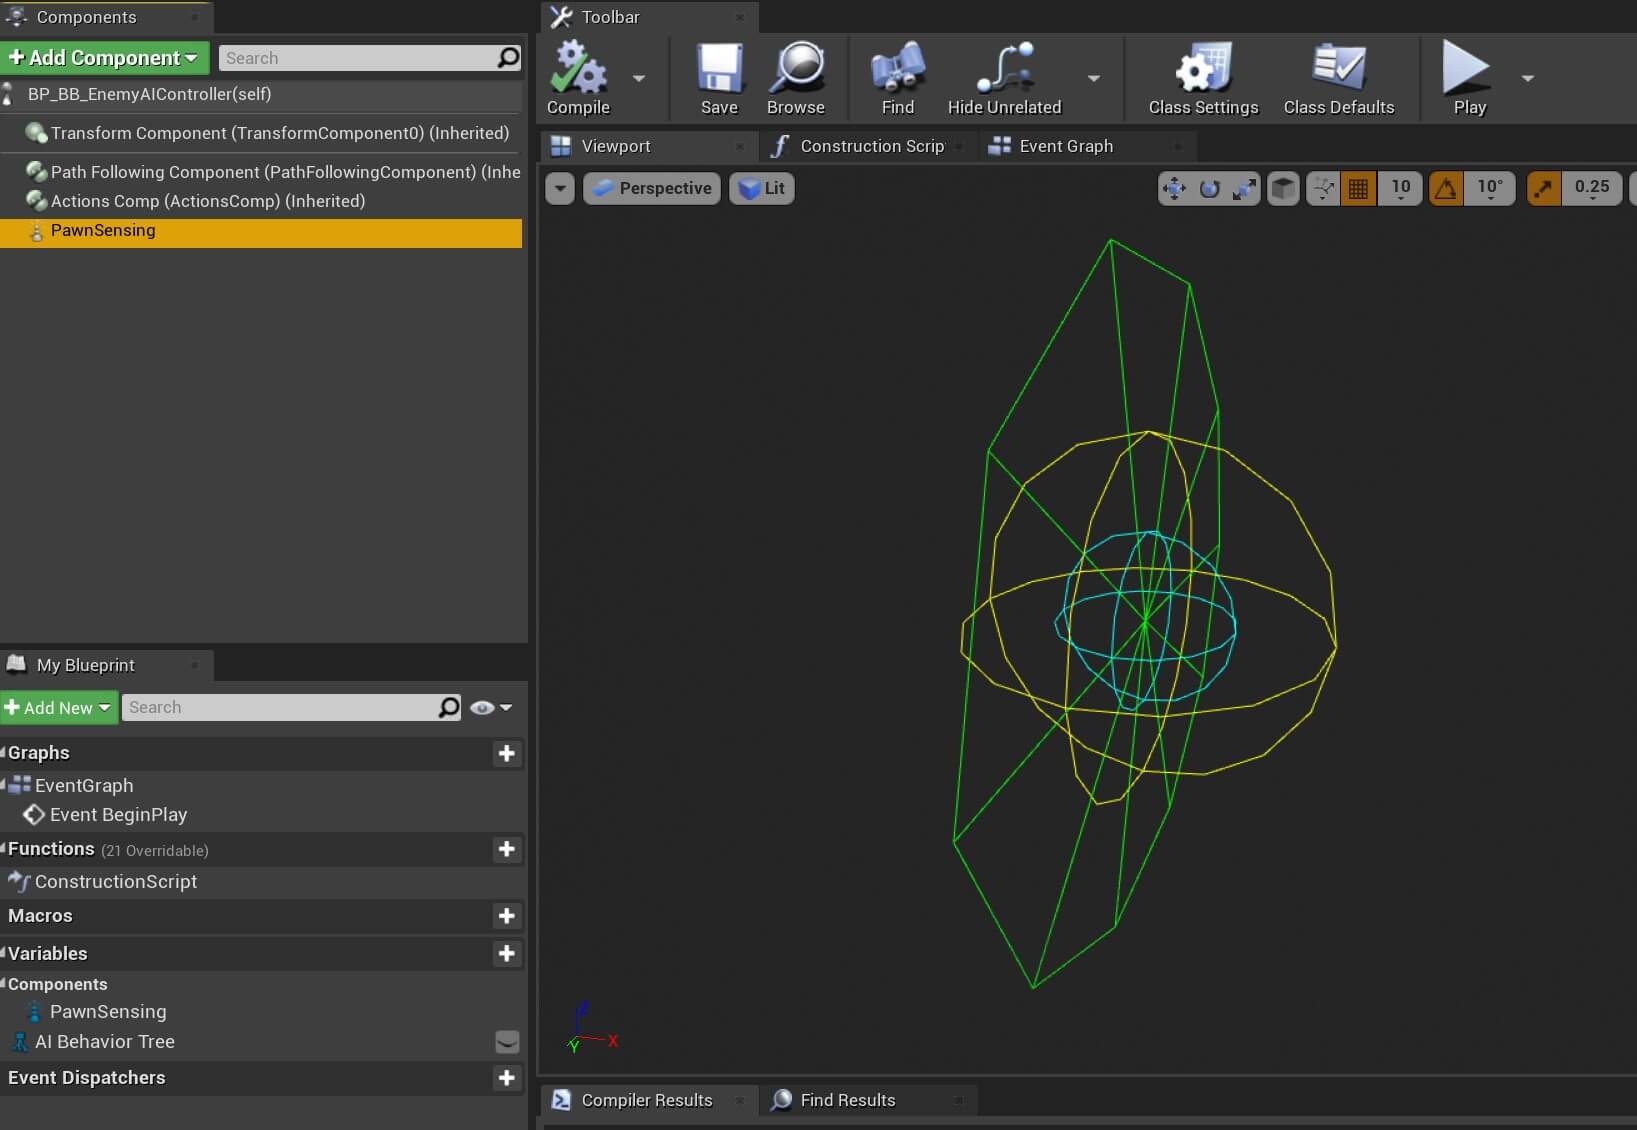
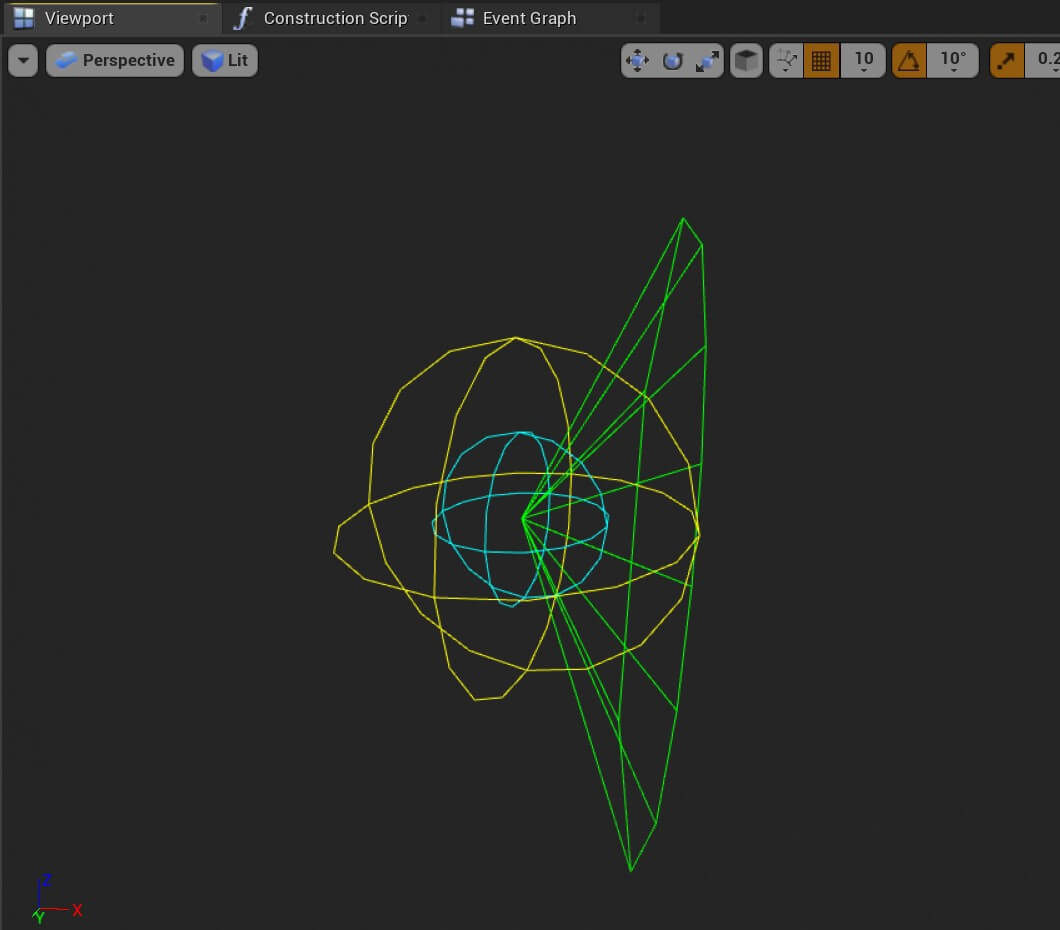
Open the Viewport tab and select the PawnSensing component in the Components tab, this what you will see:
In the Details tab we have the settings for the PawnSensing component, specifically the AI settings which is what we are interested in:
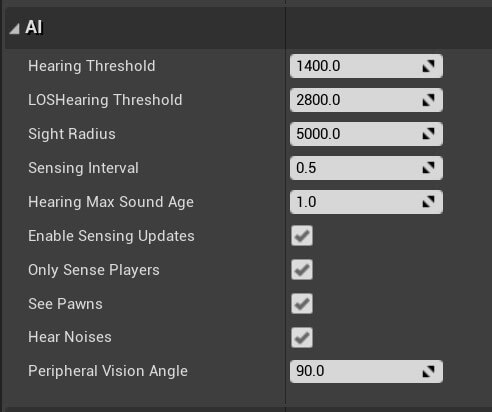
We are going to use sight sensing to make the enemy see the player in the game. For that we have the Sight Radius settings, which is the radius of the enemy’s sight. We also have the Peripheral Vision Angle which is the view angle of the enemy.
We are going to change the Peripheral Vision Angle to 60:
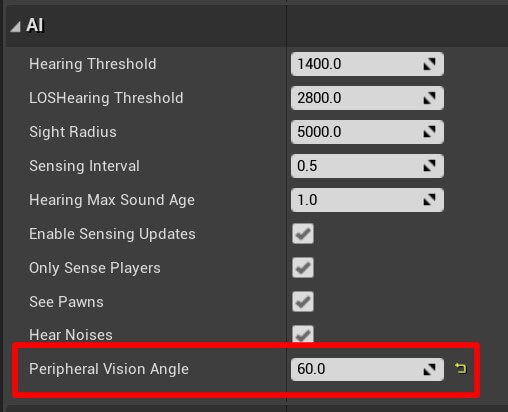
You will notice that this has also change the shape of the PawnSinsing component in the Viewport tab:
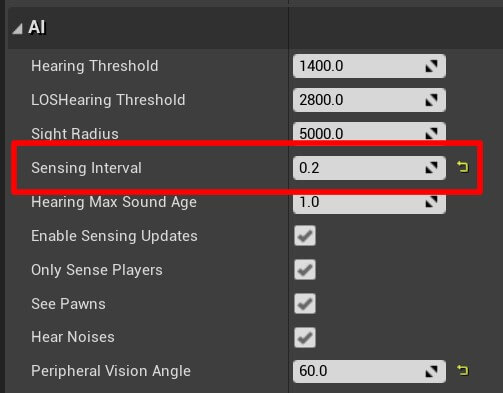
The Sensing Interval implies how often the system will update the senses, setting the value at 0.2 means every 0.2 seconds the system will update the senses and make the AI “see” in the game.
These are the settings that I am going to use for our example, you are, of course, free to experiment with all the values and see the outcome of the changes you made.
You can make the enemy detect the player on large distances or you can make the enemy detect the player only when he is close enough to the enemy, so be my guest and experiment with different options which is the best way to learn.
Next, I am going to select the PawnSensing component and in the Details tab scroll all the way down until you see the Events settings. Click on the + button for the On See Pawn:
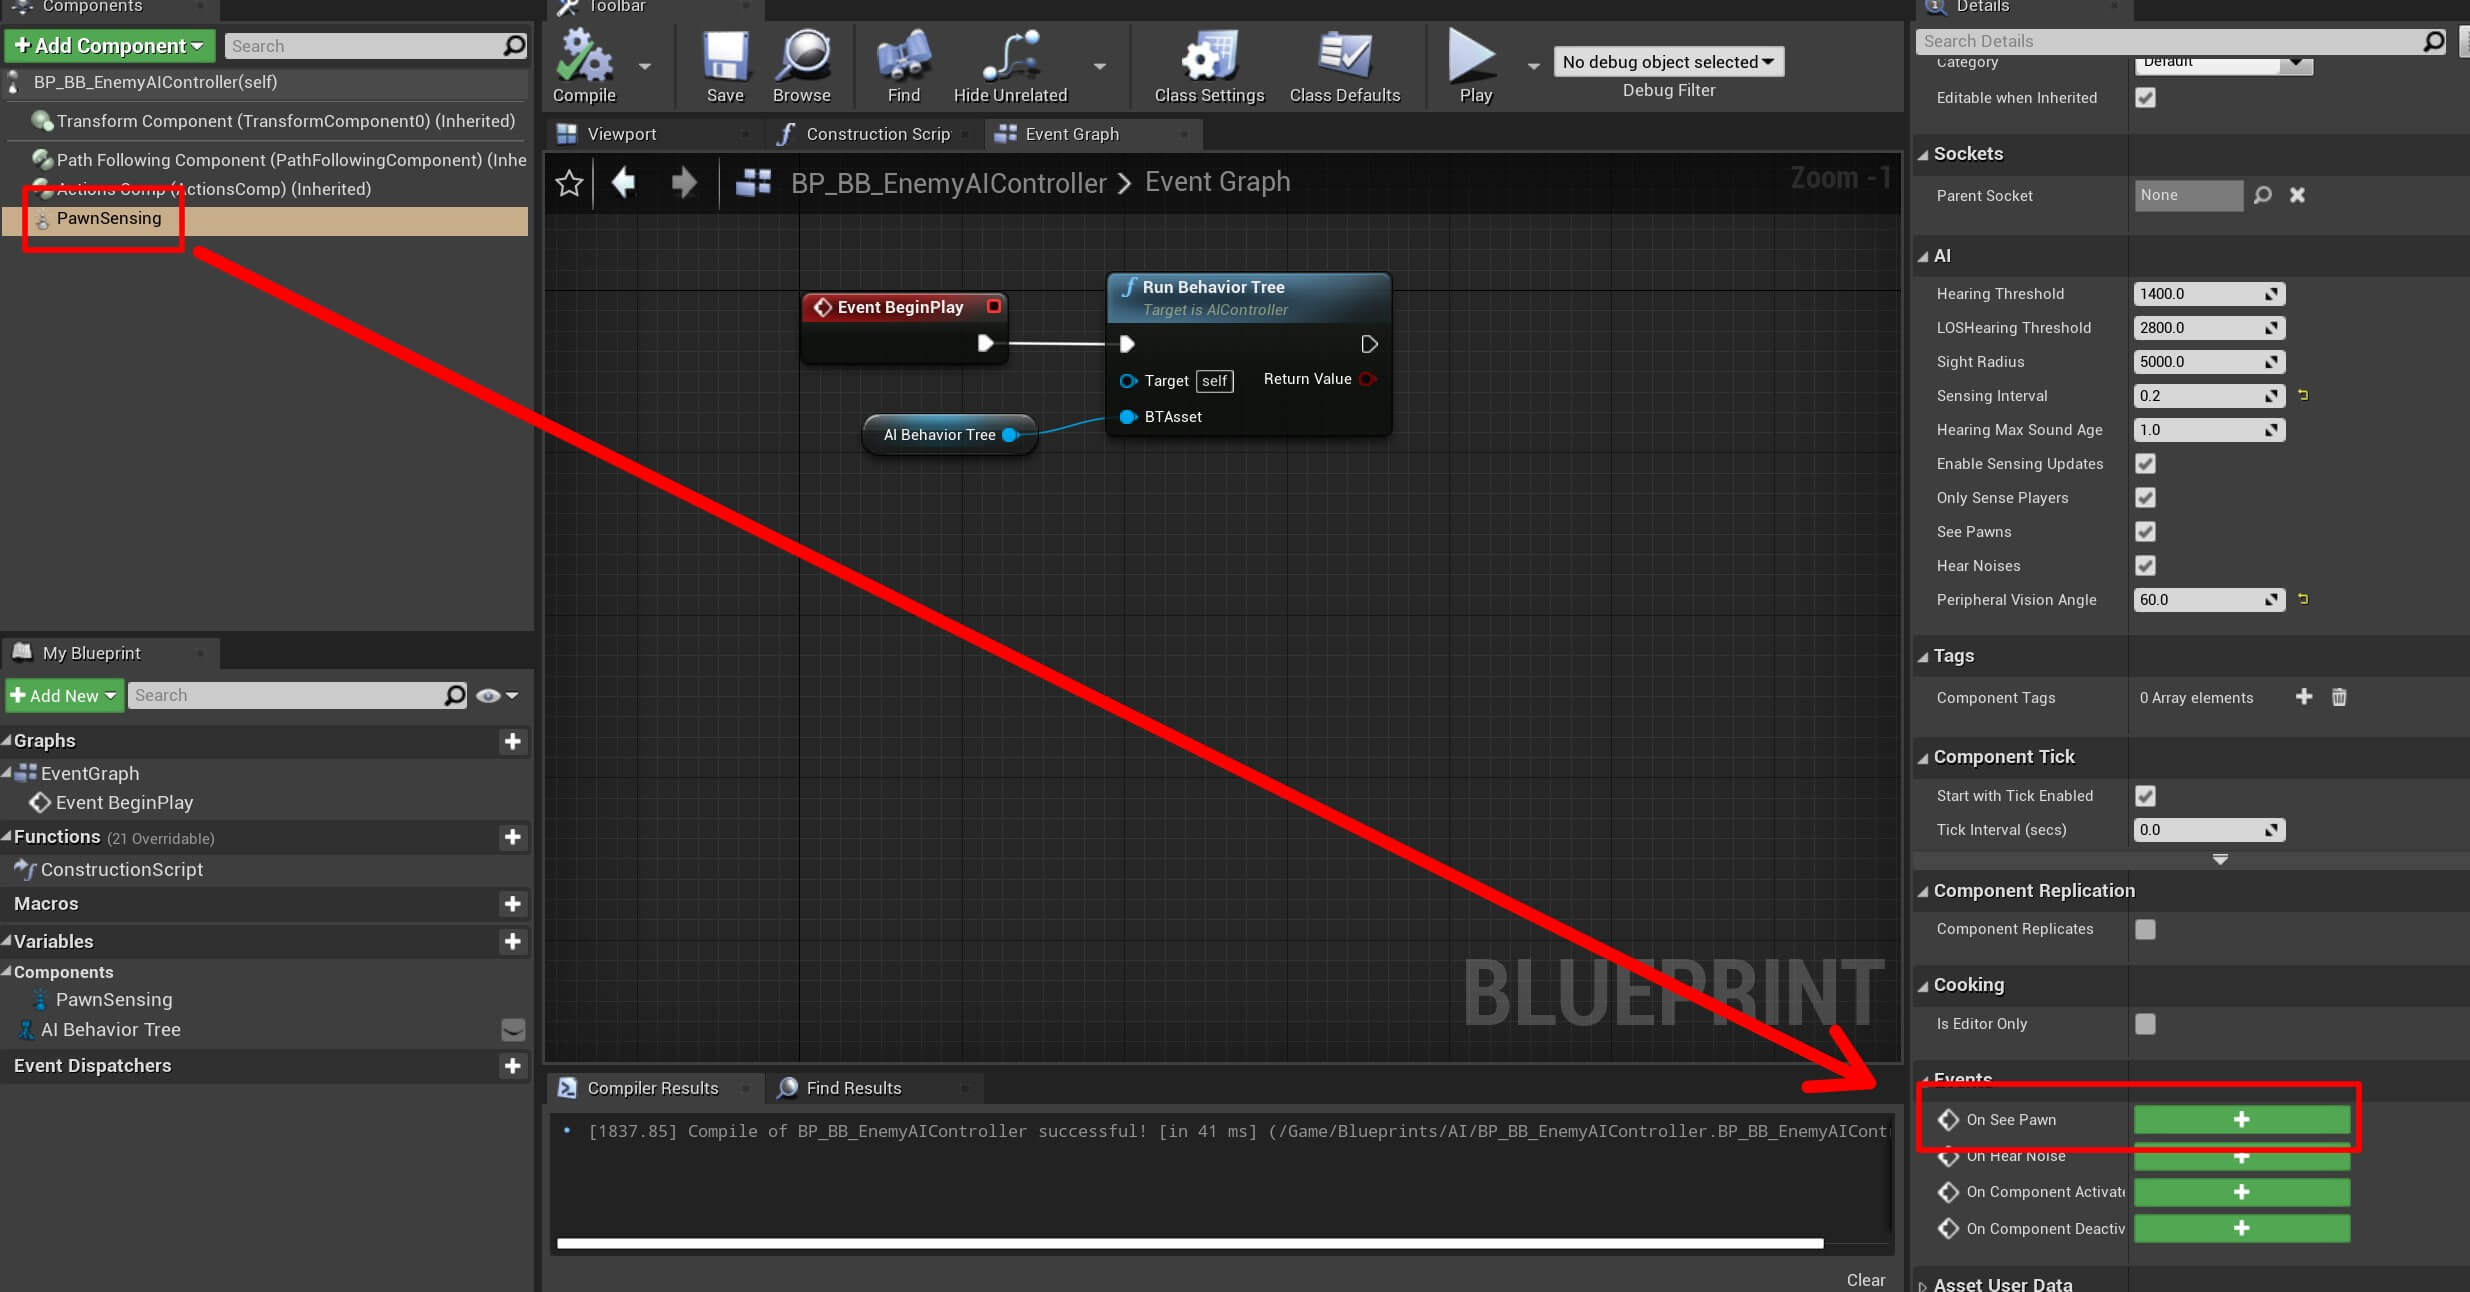
This will create the On See Pawn node in the Event Graph which is called every time the PawnSensing component sees an Actor in the game, and we can use this node to test if the Actor that the PawnSensing component sees is the player character, then we can make the enemy chase the player.
Sensing The Presence Of The Player

This function is going to have two parameters, a bool parameter called Can See Player, and an object parameter called Player Object. We will use these two parameters to denote if we see the player, and if we do, we will also pass a reference to the player actor:
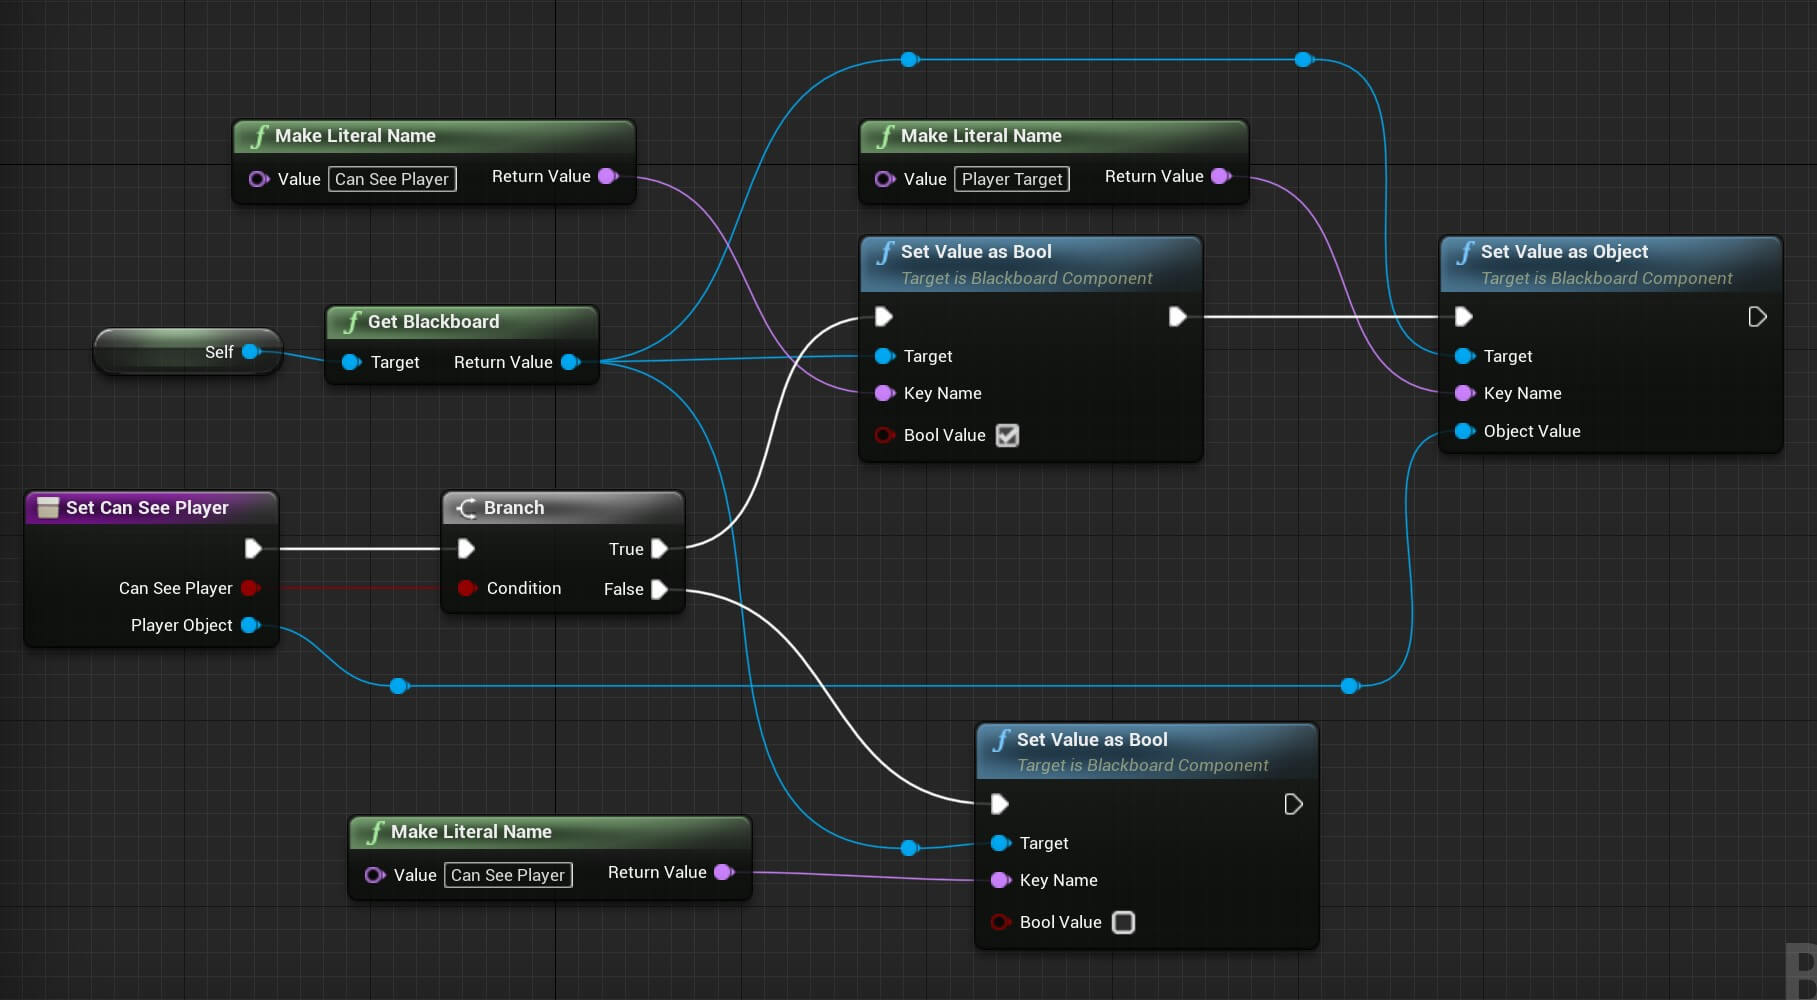
You can copy the nodes from here:
Now that we have the CanSeePlayer function, we can go back in the Event Graph tab and inside the On See Pawn event, the first thing we will do is test if the Pawn the enemy sees, is the player:

Since the project I am using is the Third Person template project, the player character uses the ThirdPersonCharacter Blueprint, that is why we are casting the Pawn parameter from the On See Pawn event to the ThirdPersonCharacter.
If the cast succeeds, that means the enemy can see player, so we call the SetCanSeePlayer function passing true for the Can See Player parameter and passing ThirdPersonCharacter as the Player Object parameter.
If you remember, we set the Sensing Interval for the PawnSensing component to 0.2, meaning every 0.2 seconds the PawnSensing component will be updated.
This is important because currently we only have the logic to make the enemy see the player, but what if the player escapes the enemy’s sight? In that case we need a logic that will inform us that now the enemy doesn’t see the player anymore.
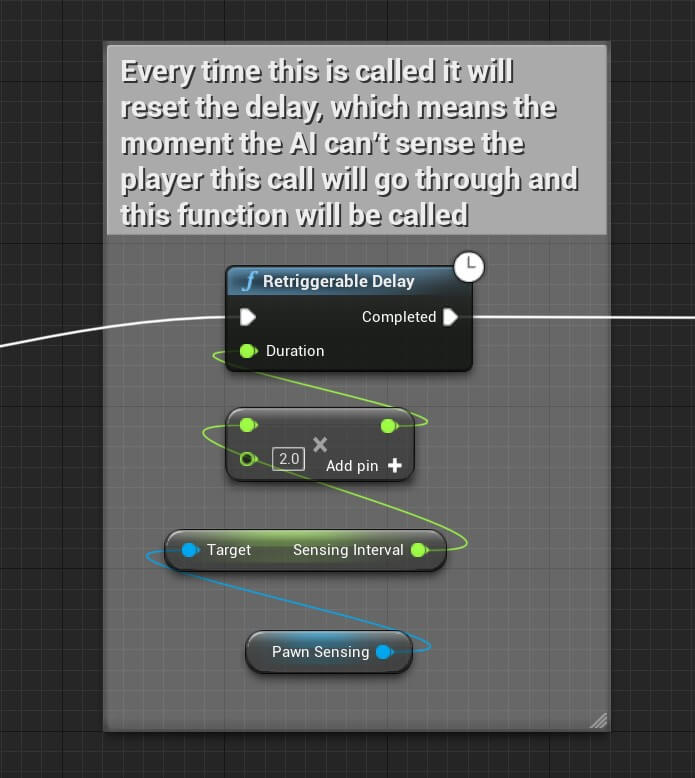
For that I am going to use a function called Retriggerable Delay:

You can copy the nodes from here:
The Retriggerable Delay function has the same functionality as the Delay function, it will wait for the specified duration and after that it will continue executing.
But the difference is, when you call the Retriggerable Delay function while it is counting down, it will reset the countdown and start from scratch.
For that reason, for the Duration parameter I used the Sensing Interval value of the PawnSensing component, and I have multiplied it by 2, which means when the PawnSensing component sees the player, it will call the Retriggerable Delay function which will start its countdown.
In the meantime, the PawnSensing component will continue to run, and if it sees the player again, it will call the Retriggerable Delay function which will reset its countdown, and since we set the Duration of the delay to be 2 times the Sensing Interval, that means if the PawnSensing component doesn’t see the player for 0.4 seconds, then the Retriggerable Delay function will go through and it will call the SetCanSeePlayer to inform us that the enemy doesn’t see the player anymore.
So now that the enemy can see the player, we need to go in the BT_EnemyAI and add another sequence that will call the Move To Task and make the AI move to the Player Target:
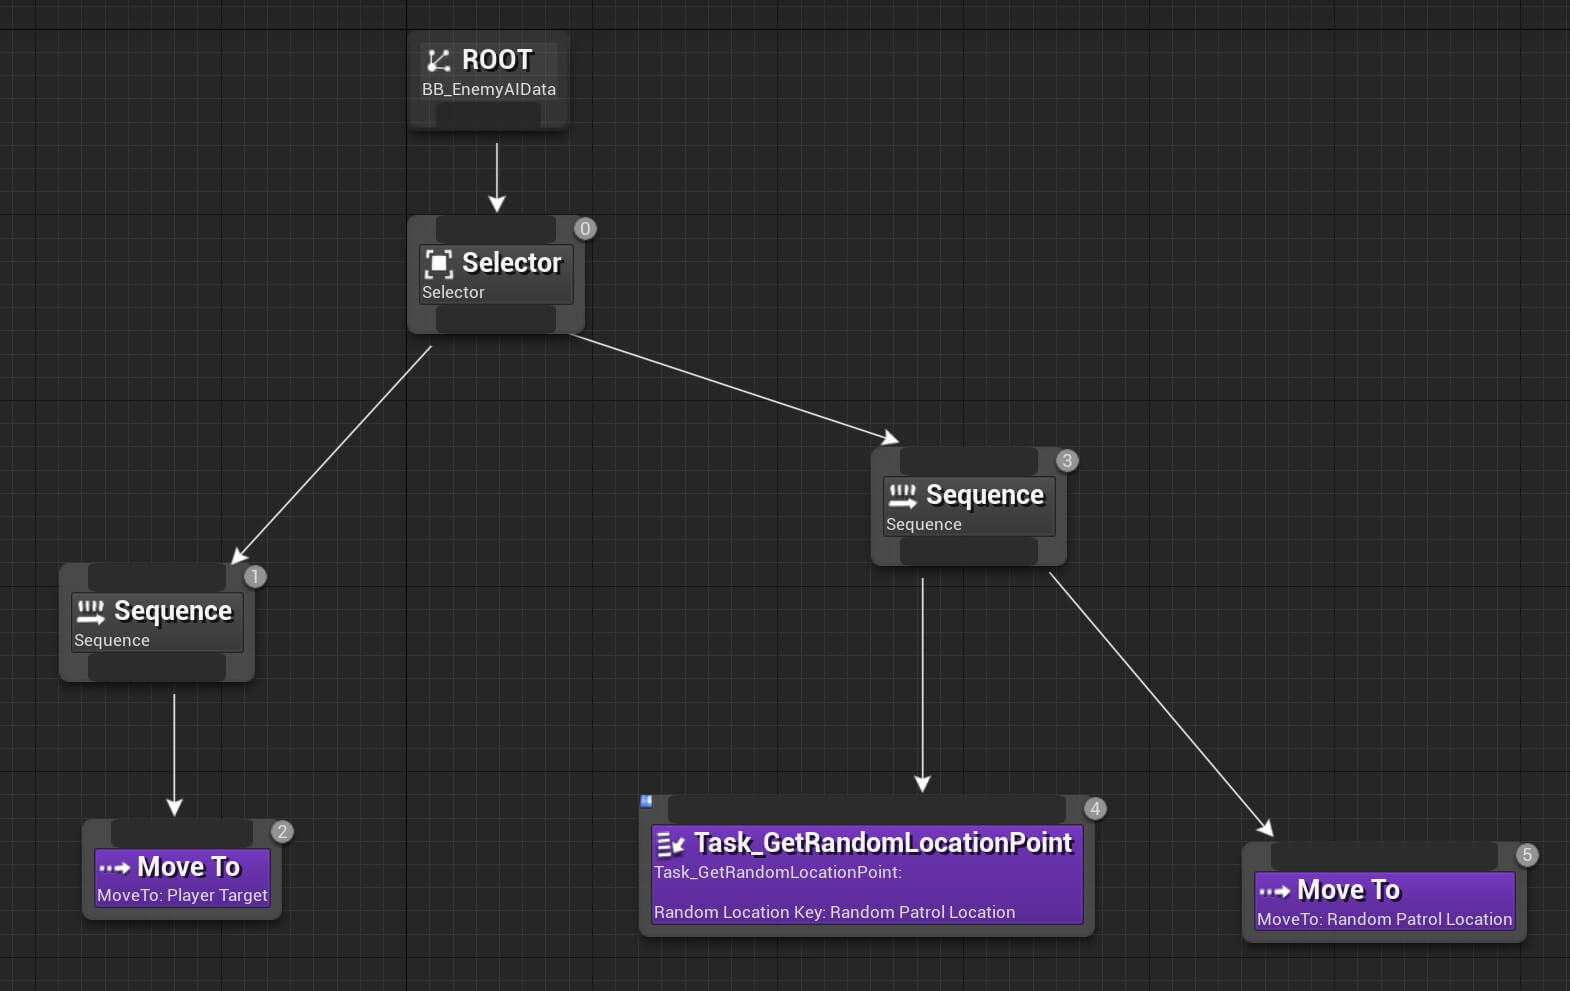
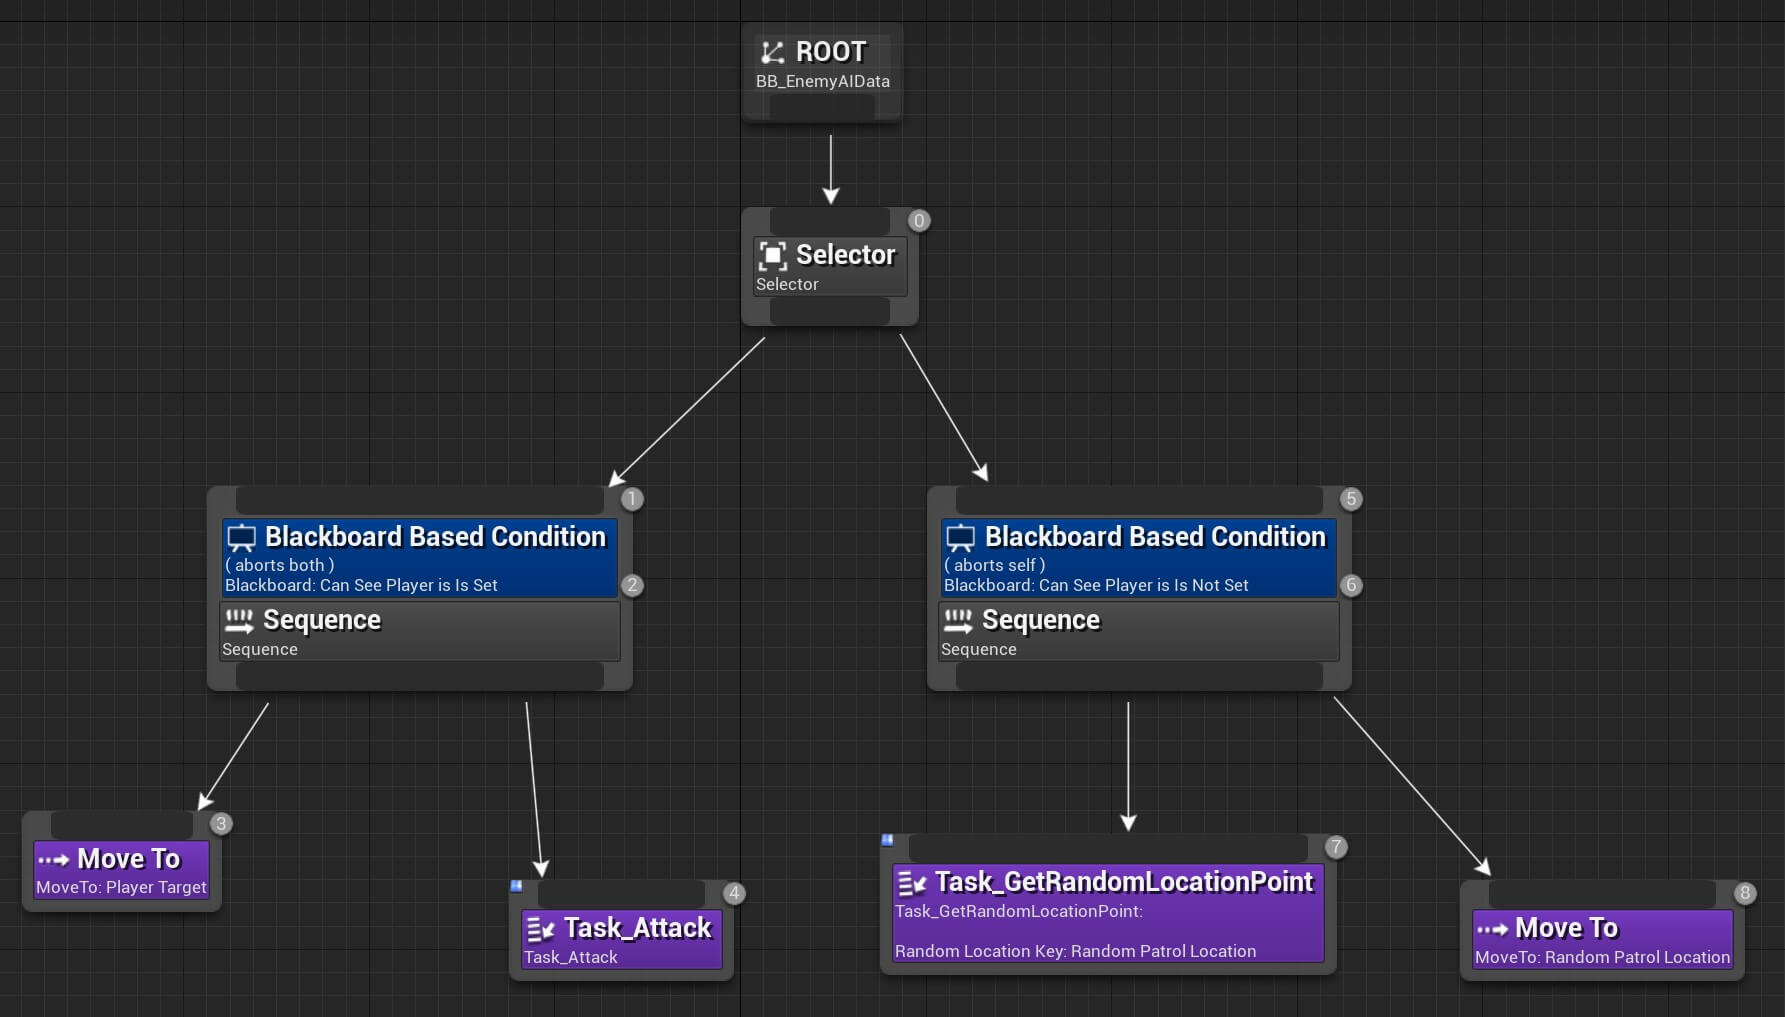
As you can see I’ve set the Sequence that will make the AI chase the player on the left side, because I want that task to be executed first. When that task is finished then the tree will move to the second Sequence.
Don’t forget to select the Move To node and for the Blackboard Key set the Player Target:
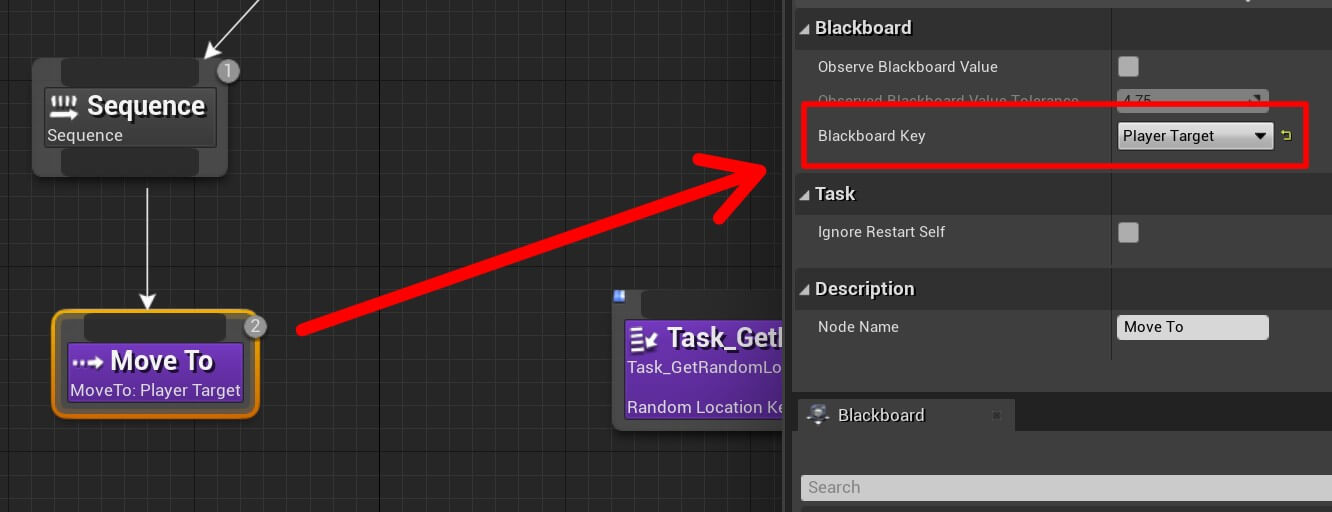
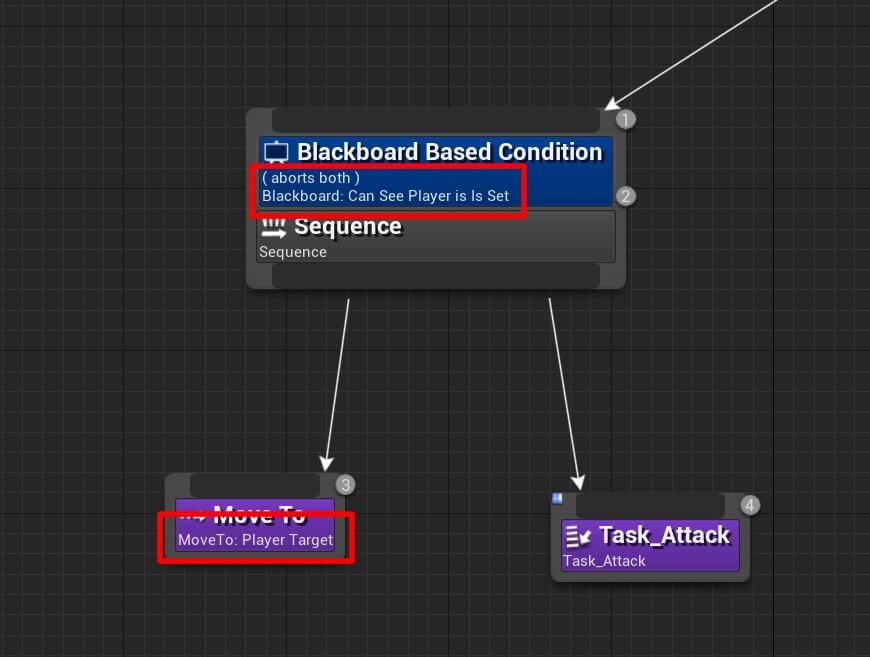
We are still not finished because the current set up of the tree doesn’t have any conditions that need to be checked before we perform each task. For example, if we don’t have a reference to the player, we can’t make the AI move to the player. For that we are going to add a decorator to the Sequence.
To do that, simply Right Click on the Sequence and scroll down where it says Decorator:
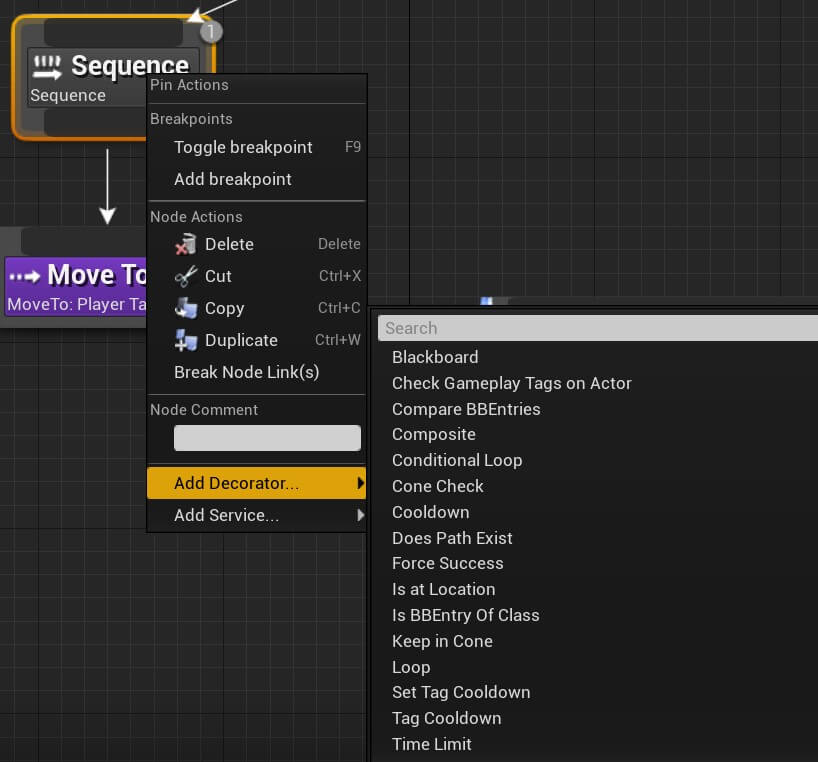
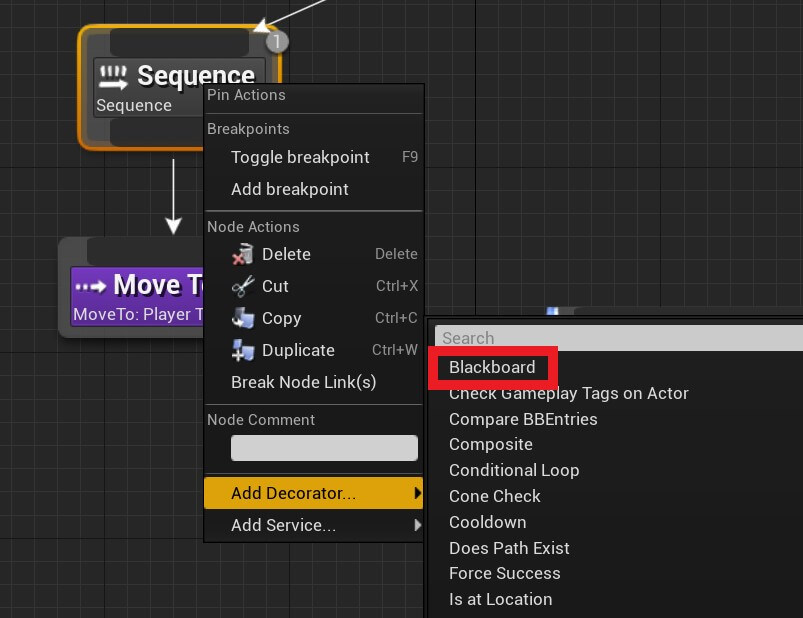
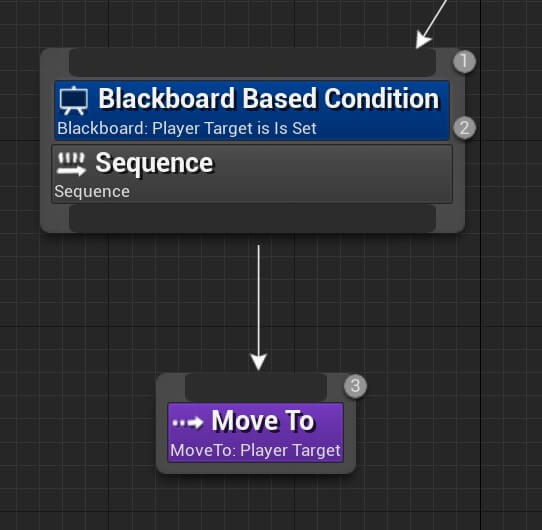
When you click on the Blackboard Based Condition in the Details tab you will see the Flow Control and Blackboard settings which is where you set the conditions for this Blackboard.
To make the AI move to the player, we need to make sure that the enemy can see the player, which means the Can See Player value needs to be set:
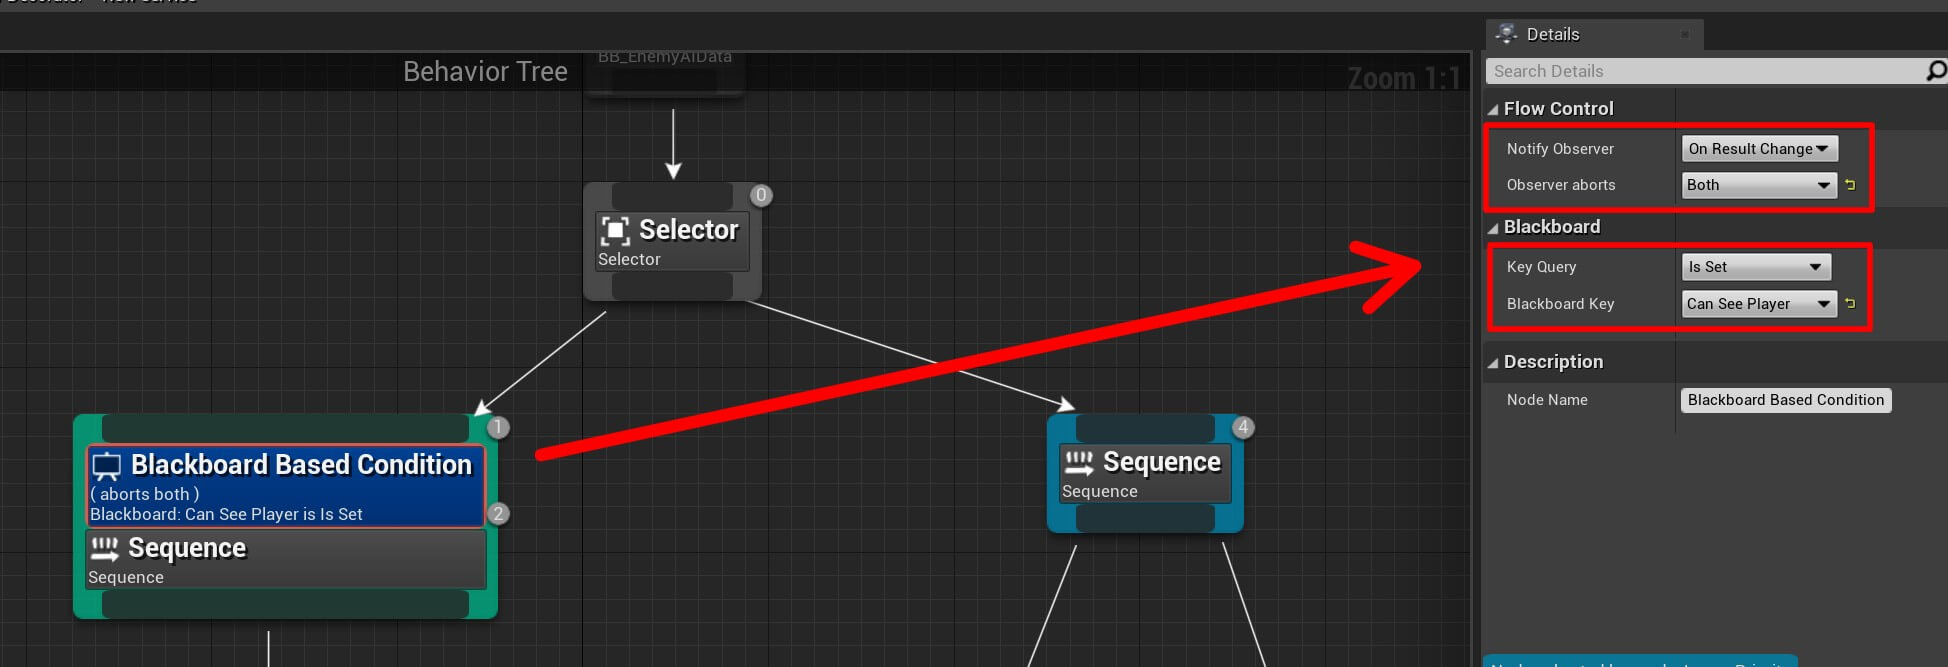
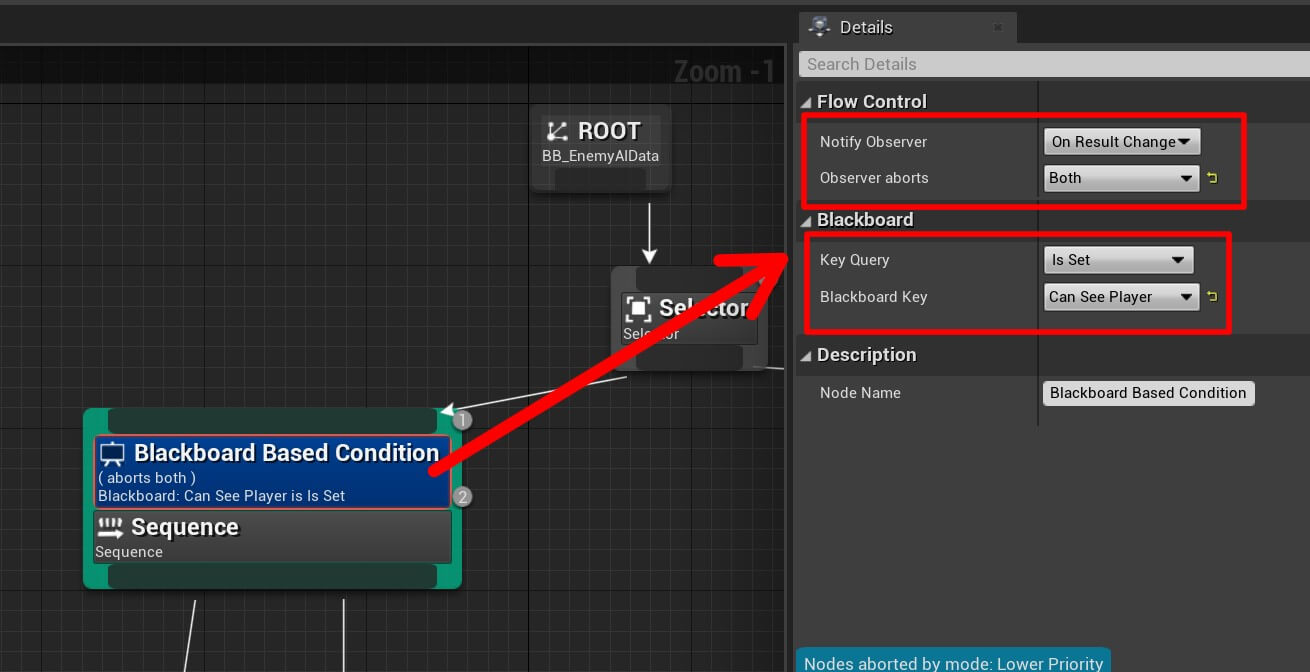
For the Key Query in the Blackboard setting select the Is Set, and for the Blackboard Key select Can See Player, which means Can See Player value needs to be set to true for this condition to evaluate.
I’ve also set the Observer aborts to Both in the Flow Control setting, which means that when the result changes, which is set in the Notify Observer setting for the Flow Control, then the tree will abort this Sequence(node), all of its children and any nodes to the right of this node(Sequence).
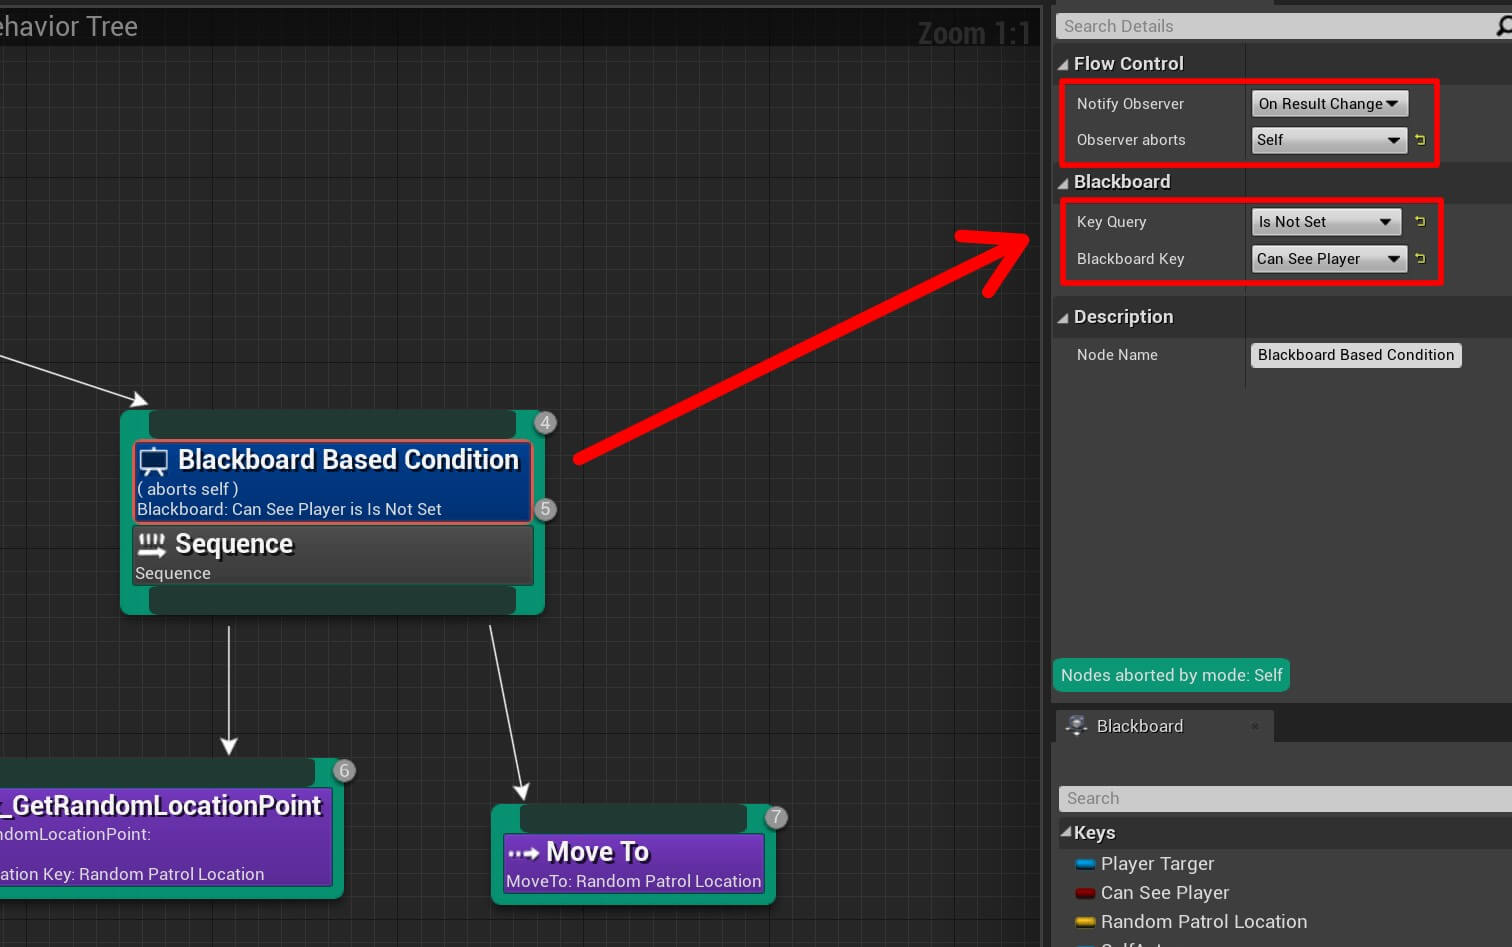
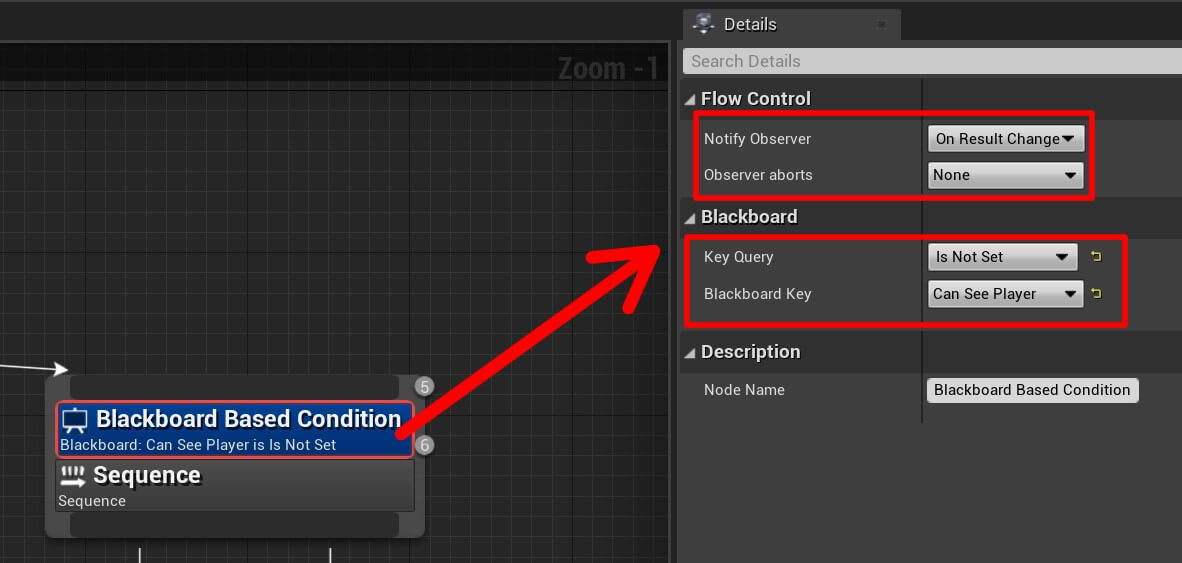
For the Sequence that makes the enemy patrol, we are also going to add a Blackboard Decorator condition, and we are going to set the following settings for it:
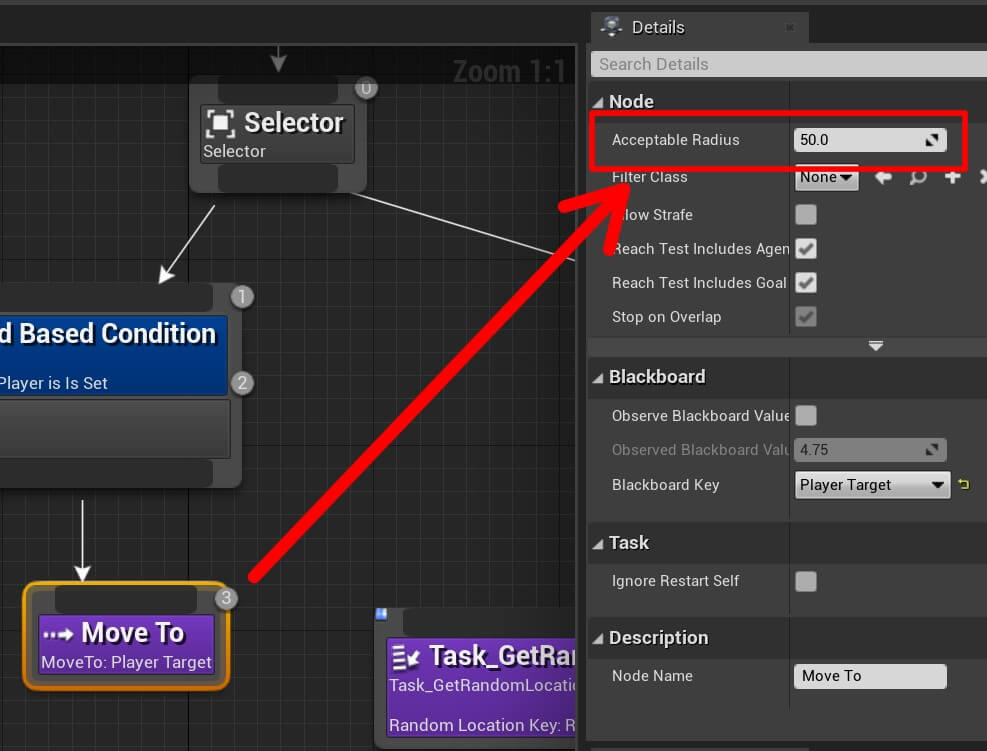
As soon as the enemy sees the player it starts moving towards him, and when it gets close to the player it stops moving. You can select the Move To node and in the Details tab change the Acceptable Radius to a higher value, this will make the enemy stop when the distance to player is equal to the value that you set:
We also saw the execution flow of the Behavior Tree when the enemy was chasing the player and when the enemy was patrolling the level.
You can always play with the AI settings for the PawnSensing component to make the enemy detect the player when he is far away or when he is close and so on.
Attacking The Player
The last step is to make the enemy attack the player. To make this work we need to create a new Task, name it Task_Attack and open it in the editor.
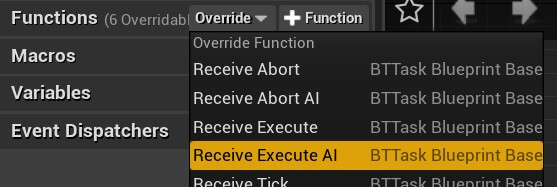
In the Task_Attack we are going to override the Receive Execute AI event:
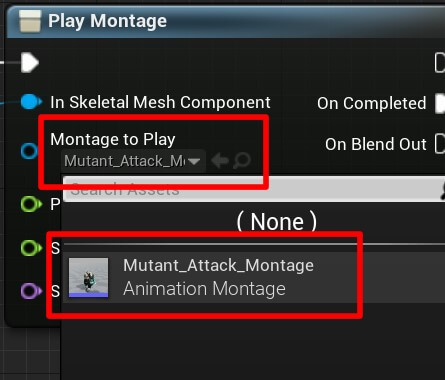
From the Receive Execute AI event we are going to get a reference to BP_Enemy_BT and play the attack montage animation:

Same as for the Task_GetRandomPointLocation, for the attack task we also need to call Finish Execute function to inform the tree that the task has finished executing.
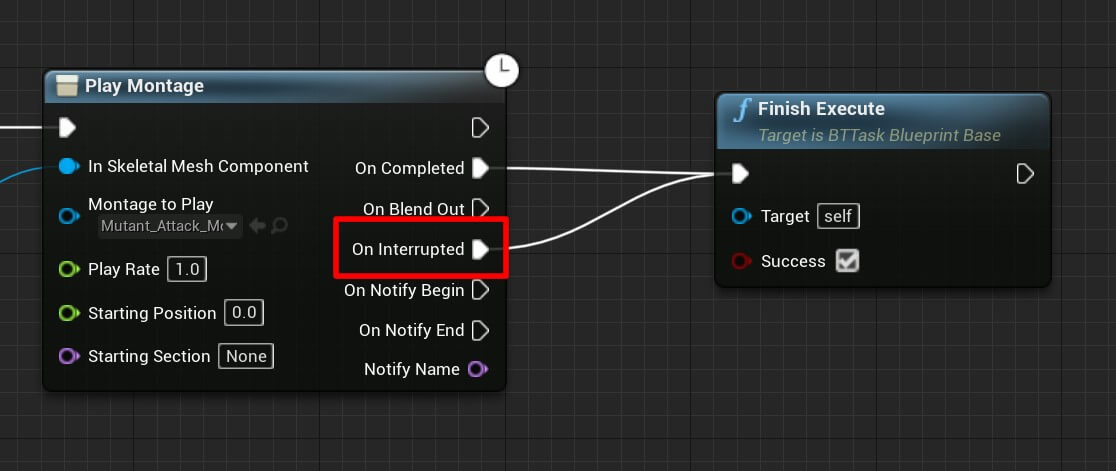
One thing that you will notice is that we are calling the Finish Execute function from the On Complete and On Interrupted events for the Play Montage function:
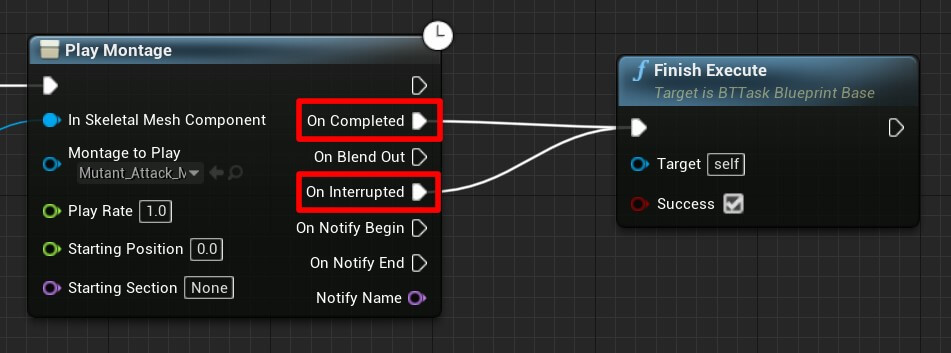
The On Completed part is clear, when the animation finishes playing, then we will call Finish Execute. As for the On Interrupted, it will be called when the animation is interrupted in any way and didn’t finish playing.
The reason why I am using this is because when the enemy tries to attack the player, the player can run away from the enemy, if that happens I want the enemy to abort the attack and continue chasing the player.
Before we can see that in action, we need to call the Task_Attack in the Behavior Tree:
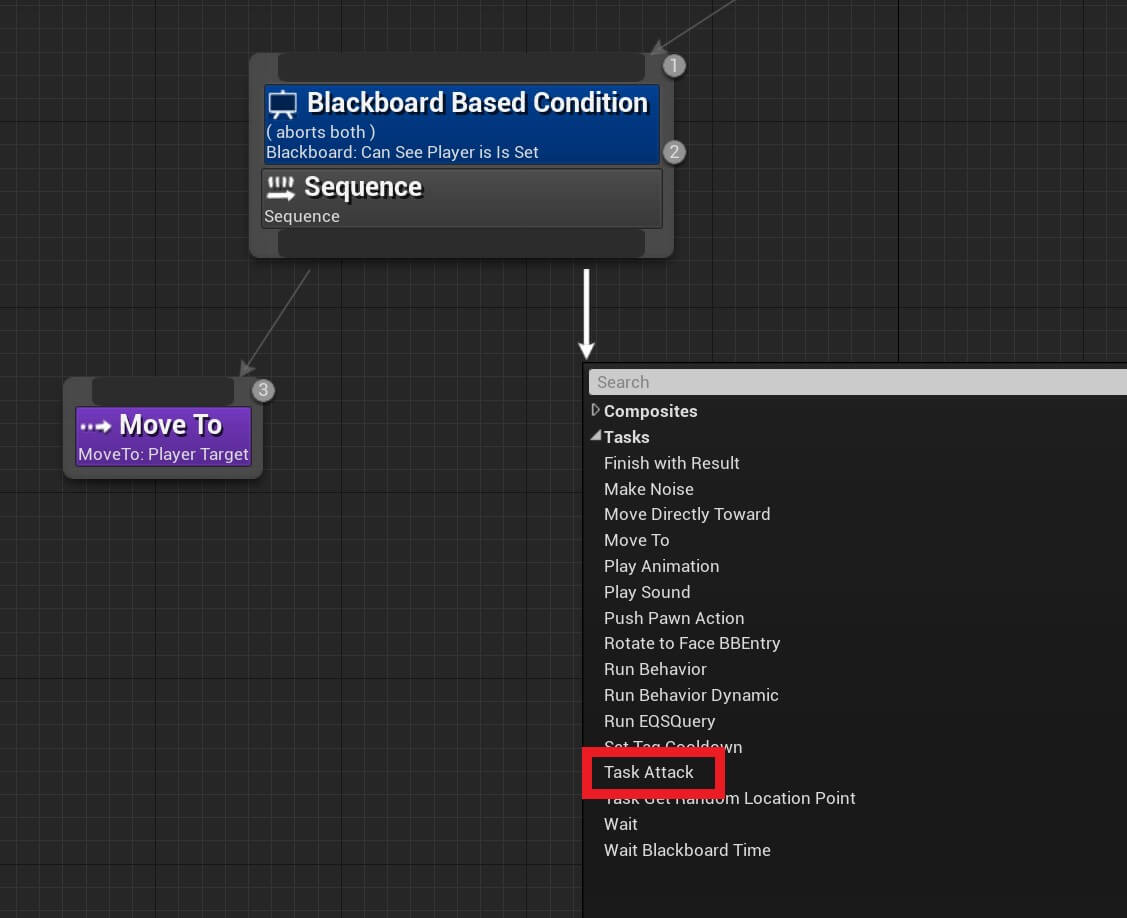
With that node, this is the final version of our Behavior Tree:
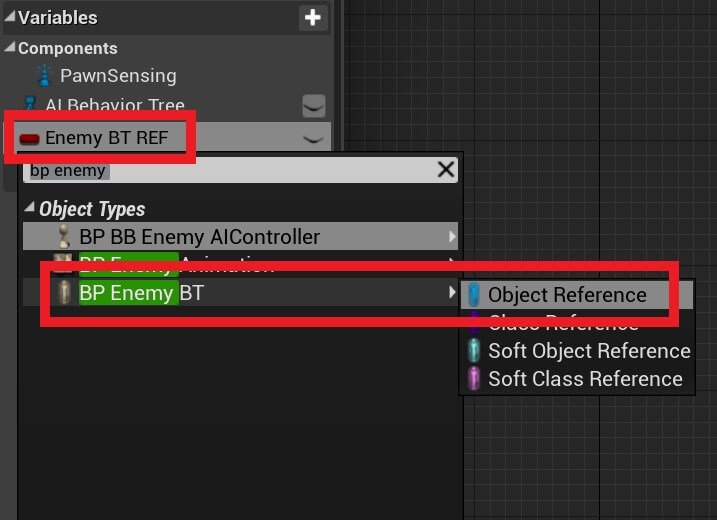
Before we can test this out, we need to do one more thing. Open the BP_BB_EnemyAIController, and in the My Blueprint tab create a new variable and make it type of BP_Enemy_BT:

You can copy the nodes from here:
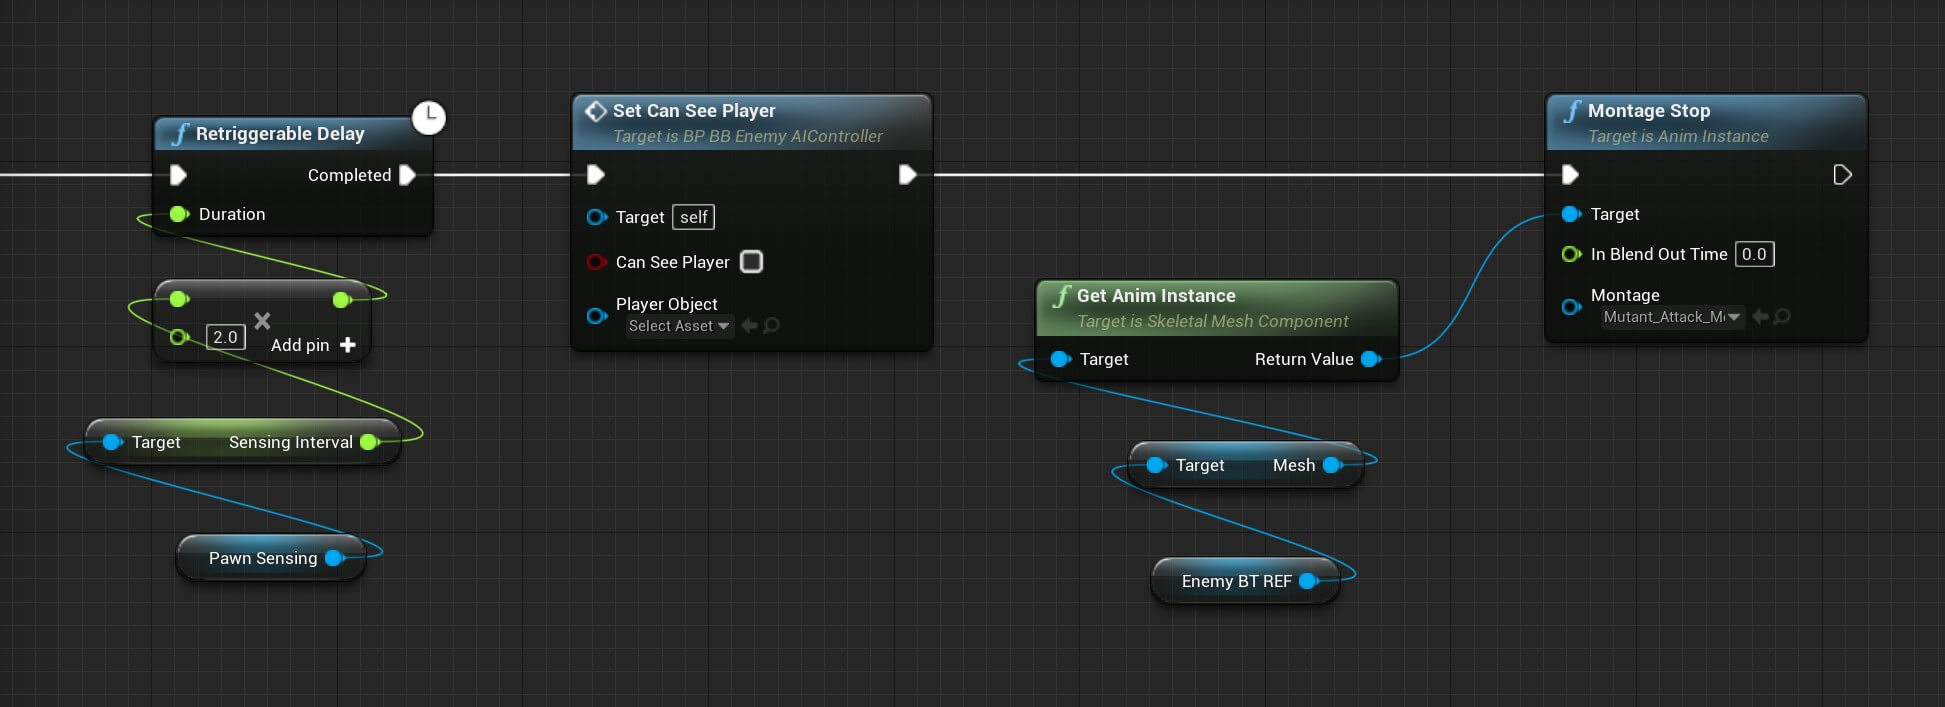
You can copy the nodes from here:
We already know when the Retriggerable Delay function is called that means the enemy doesn’t see the player, and when that happens we are also going to abort the attack animation because the player has escaped the enemy and we need to chase him again.
When we abort the animation, this will also stop the Task_Attack because we are calling Finish Execute when the animation is interrupted in any way:
Let’s test the game out and see the final outcome:
Now when the enemy reaches the player it attacks him, and when the player escapes the enemy in the middle of the attack the enemy stops the attack and starts patrolling.
Of course, you can add additional logic to test if the player is in a certain distance away from the enemy so that the enemy will start chasing him instead of patrolling right away when the player is not in the enemy’s sight anymore which will make a more realistic enemy AI.
C++ Enemy AI Controller
Let us now create the C++ version of our Behavior Tree which starts with creating AI controller class. Inside the C++ Classes -> Enemy_AI folder, Right Click -> New C++ Class and make sure that it inherits from AIController:
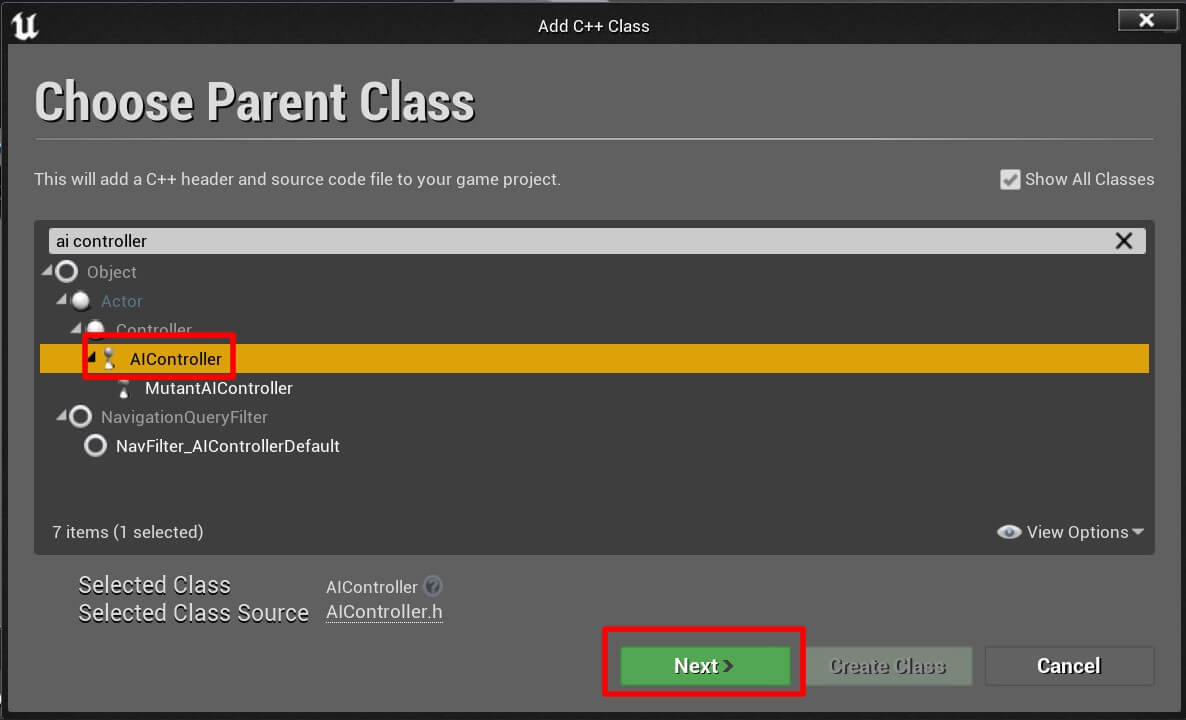
Name the class BTAIController and click Create Class button. Before we proceed to code the AI behavior, we need to add public dependency module names so that we can use things like tasks, AI and navigation system in our code.
Open the Enemy_AI.Build.cs file:
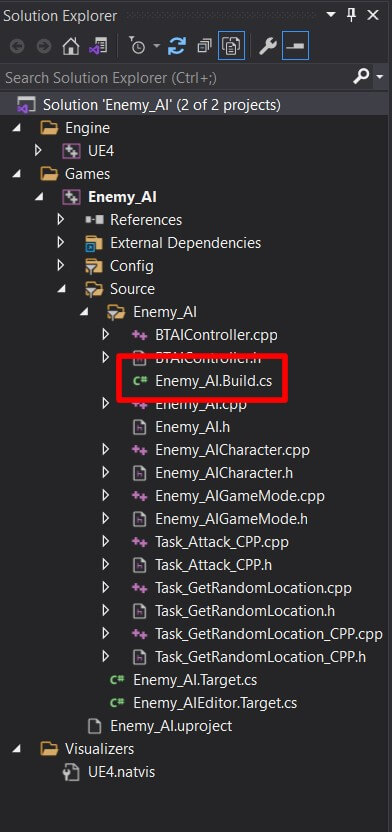
Inside the file, this is how your PublicDependencyModuleNames should look like:
					PublicDependencyModuleNames.AddRange(new string[] { "Core", "CoreUObject",
			"Engine", "InputCore", "HeadMountedDisplay",
			"GameplayTasks", "AIModule", "NavigationSystem" });
You can simply copy and paste this line of code instead of the same line you have in your project.
Now that we have that out of the way, inside the BTAIController.h file, add the following lines of code:
					public:
	void BeginPlay() override;

	UPROPERTY(EditAnywhere, BlueprintReadWrite)
		class UBehaviorTree* BehaviorTree;
If you remember, inside the BP_BB_EnemyAIController we got a reference to the Behavior Tree and then we run the Behavior Tree when the game starts, we are going to do the same thing except with C++.
That is why we have the UBehaviorTree variable on line 5 in the code above. Now open BTAIController.cpp file and first we are going to add includes we need at the top of the file:
					#include "BehaviorTree/BehaviorTree.h"
#include "Perception/PawnSensingComponent.h"
#include "BehaviorTree/BlackboardComponent.h"
#include "Kismet/KismetSystemLibrary.h"
#include "Components/SkeletalMeshComponent.h"
#include "GameFramework/Character.h"
#include "Enemy_AICharacter.h"
Instead of going back and fort adding new includes whenever we need them, I am going to add all the includes we will need for our logic now.
Run the Behavior Tree, we only need to call one line of code which we will do in the BeginPlay function:
					void ABTAIController::BeginPlay()
{
    Super::BeginPlay();

    RunBehaviorTree(BehaviorTree);
}
Make sure that you compile the code by going under Build -> Build solution or pressing CTRL + SHIFT + B in Visual Studio, or pressing the Compile button in Unreal Engine editor.
C++ Behavior Tree
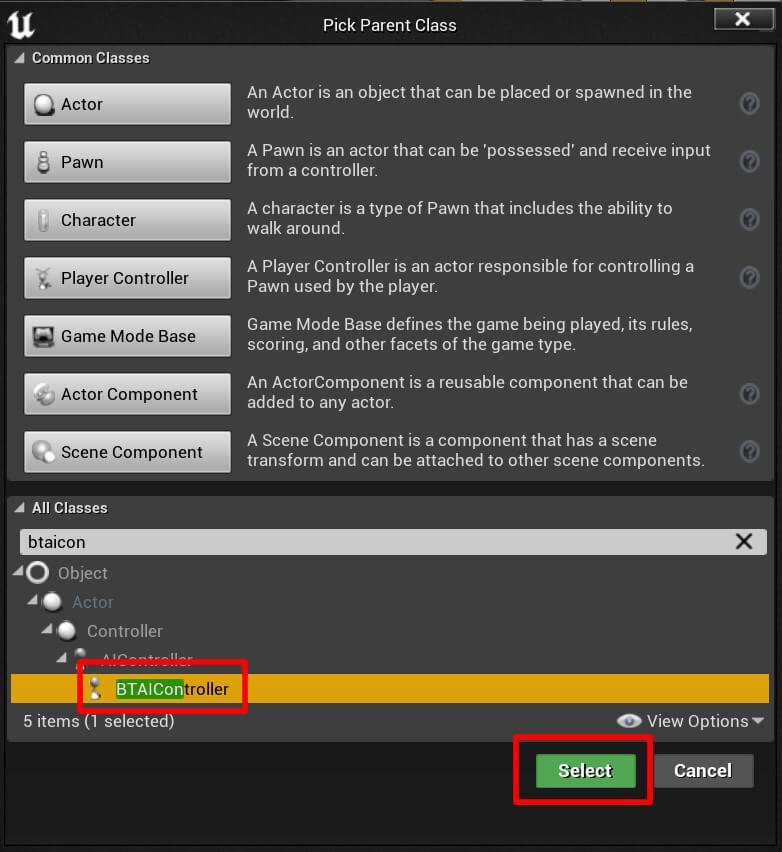
To run the Behavior Tree we need to create a Blueprint out of our BTAIController. Inside the Content -> Blueprints -> AI, Right Click -> Blueprint Class, make sure it inherits from BTAIController and name it BP_BB_EnemyAIController_CPP:
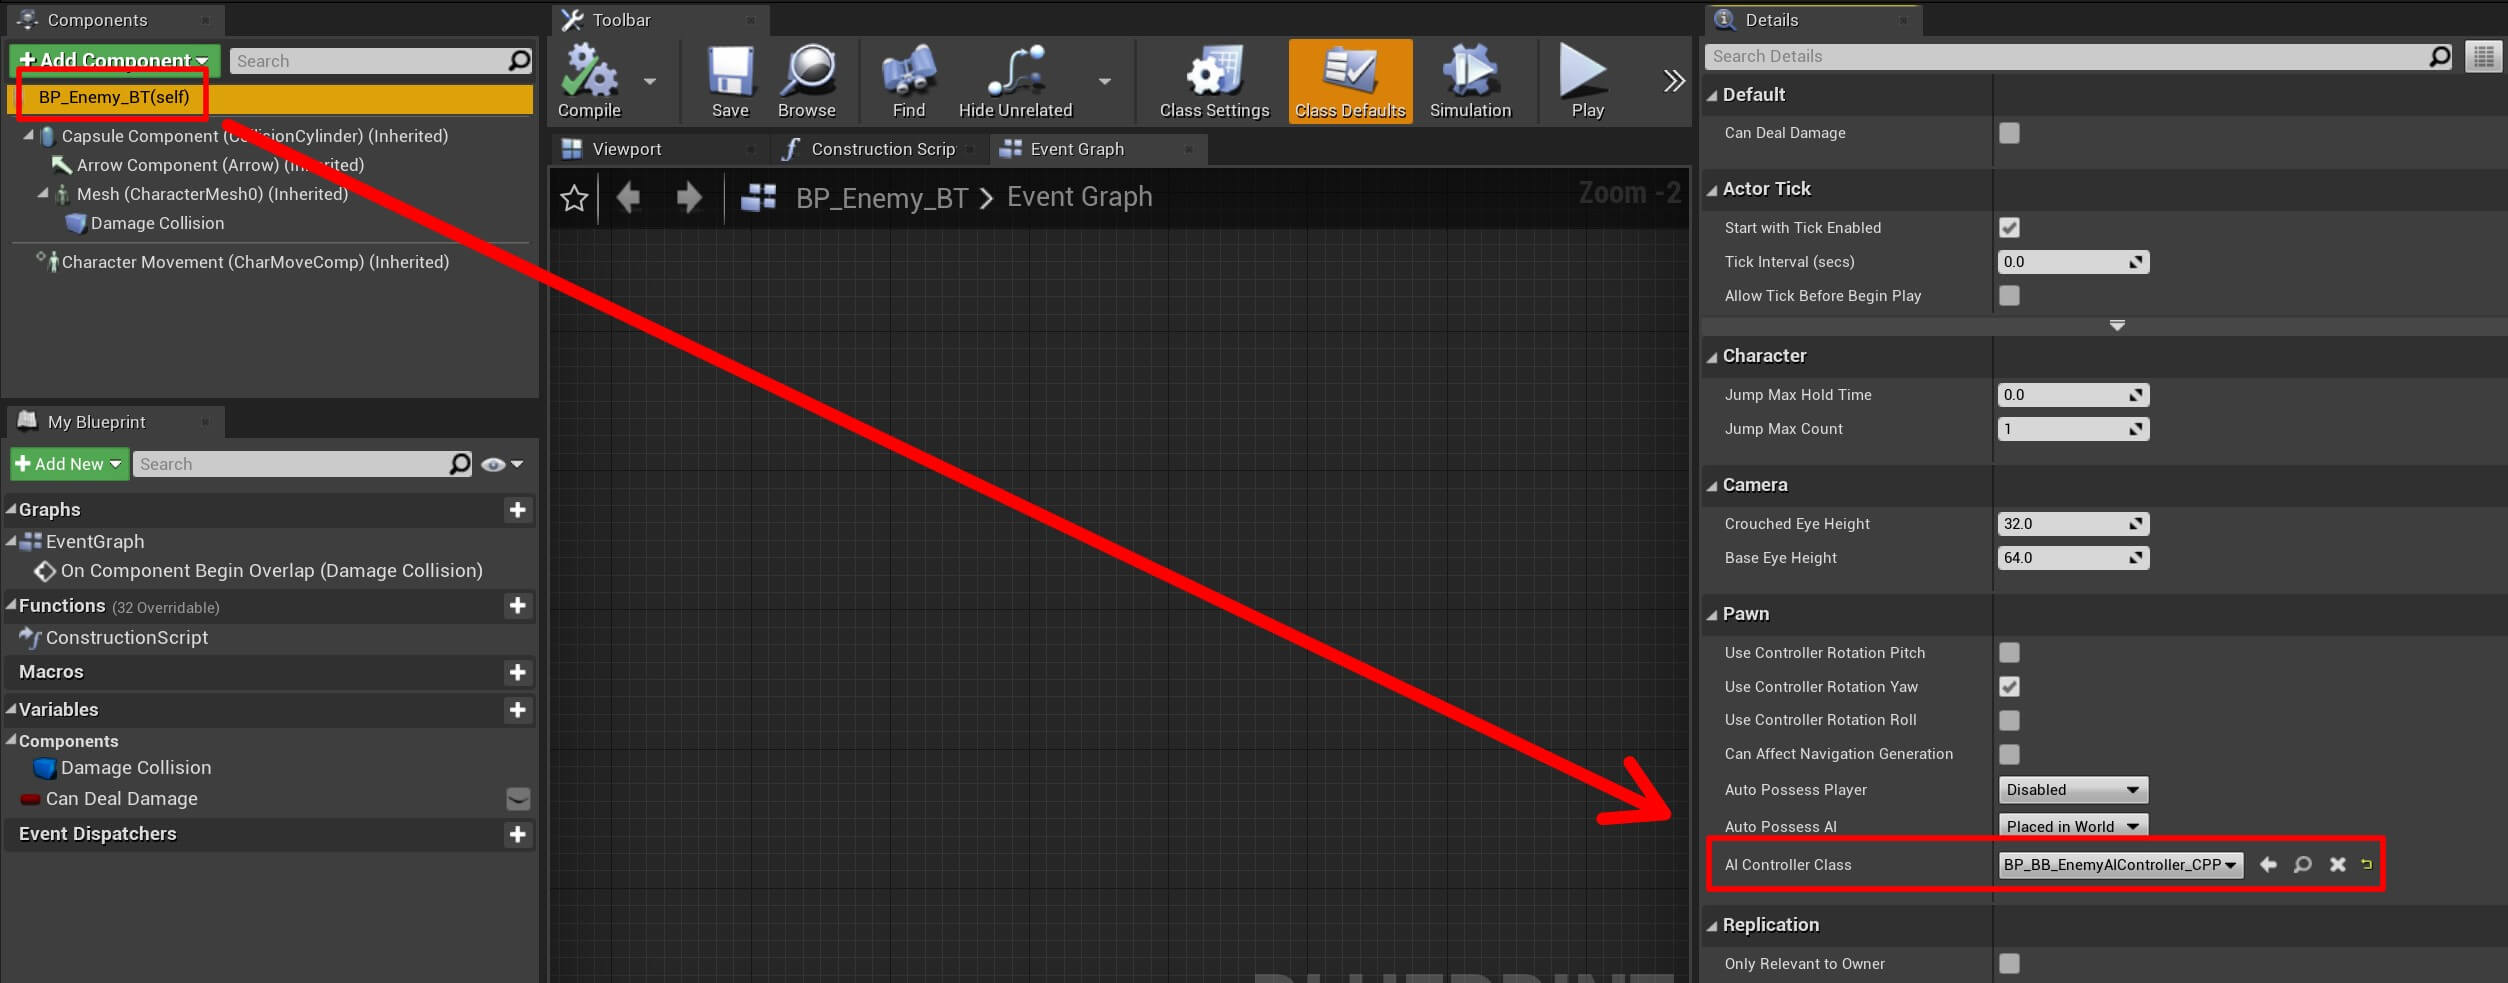
Now open BP_Enemy_BT Blueprint located in Content -> Blueprints folder and in the Components tab, select the BP_Enemy_BT(self), then in the Details tab under Pawn settings set the AI Controller Class to the new BP_BB_EnemyAIController_CPP Blueprint that we just created:
Next, we are going to create a new Behavior Tree that we are going to use with the C++ version of this tutorial. We are not going to create a C++ class for the Behavior Tree because there is no need to do that, instead we are going to create a new Behavior Tree by Right Click -> Artificial Intelligence -> Behavior Tree:
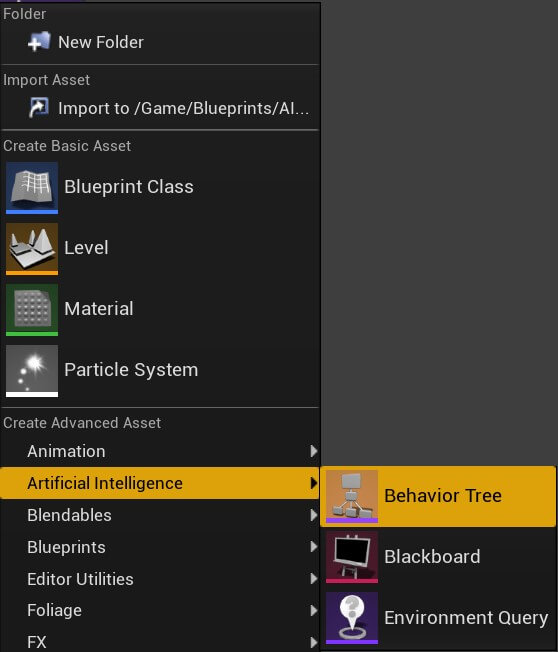
Name the new Behavior Tree BT_EnemyAI_CPP and then open it in the editor. For the Blackboard we are going to reuse the same Blackboard we used in the first part of this tutorial:
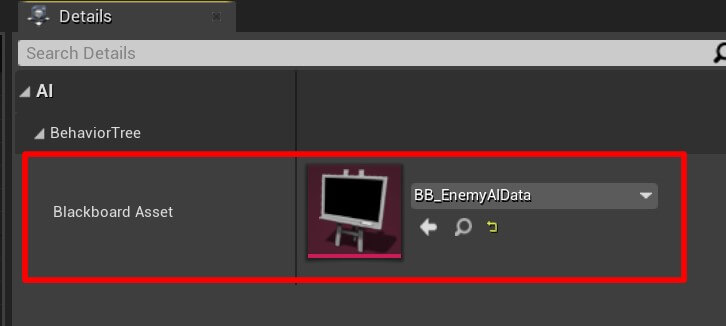
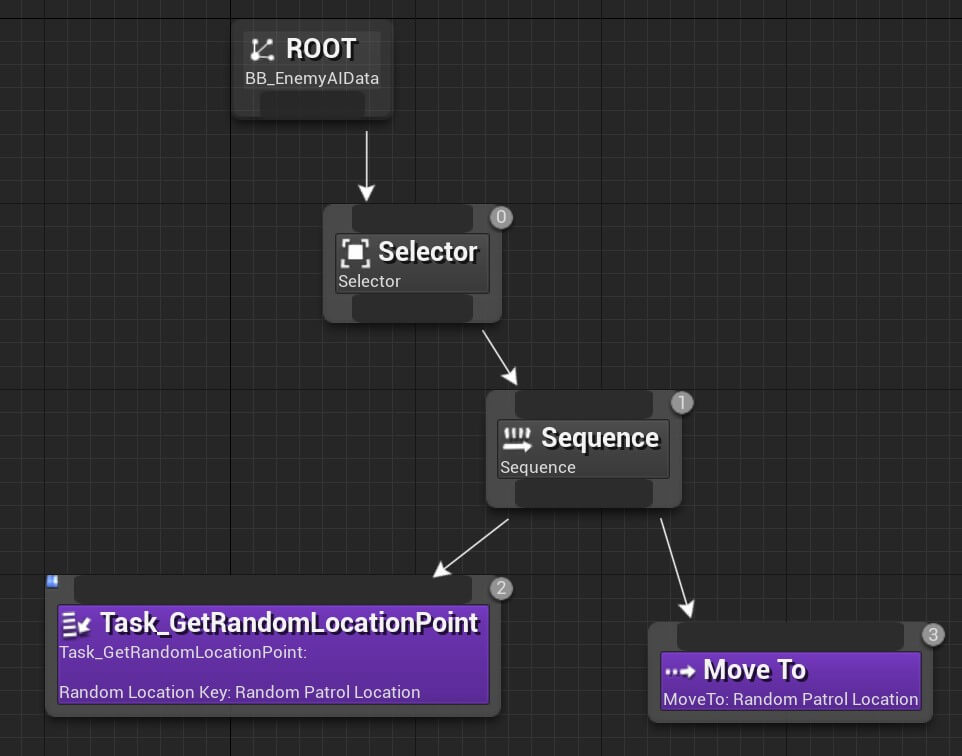
This is only to test if our code for running the Behavior Tree works, after that we will create our own random patrol logic using C++.
Just make sure that you select the correct Blackboard key for both GetRandomLocationPoint and Move To task which is Random Patrol Location.
Open BP_BB_EnemyAIController_CPP in the editor and in the Components tab select BP_BB_EnemyAIController_CPP(self), then in the Details tab for the Behavior Tree select BT_EnemyAI_CPP:

Compile and save the changes to the BP_BB_EnemyAIController_CPP Blueprint and now let’s run the game to test it out:
Creating Behavior Tasks With C++
Now that we see that our initial set up is working, let us create our own task using C++ which is going to generate a random location point.
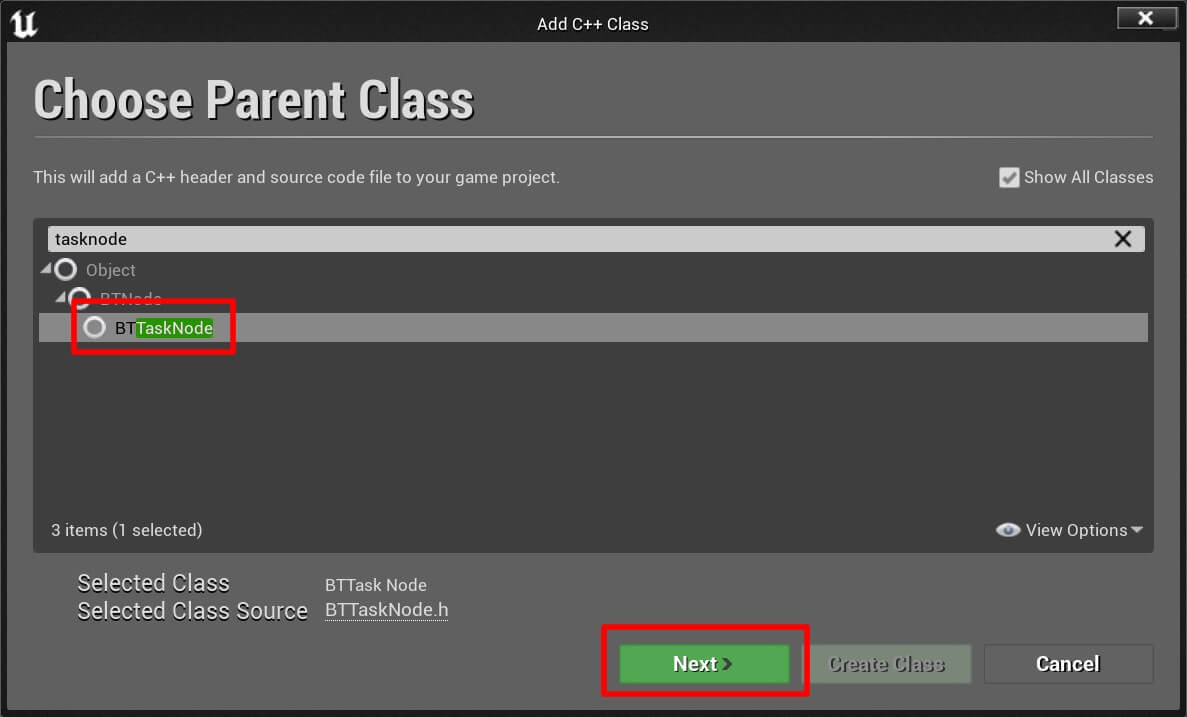
Inside the C++ Classes -> Enemy_AI folder, Right Click -> New C++ Class. In the pop up window search for the BTTaskNode and inherit from it. Name the new class Task_GetRandomLocation_CPP and create the class:
Open the Task_GetRandomLocation_CPP.h file and add the following lines of code:
					private:

	class UNavigationSystemV1* NavArea;

	FVector RandomLocation;

	virtual EBTNodeResult::Type ExecuteTask(UBehaviorTreeComponent& OwnerComp,
		uint8* NodeMemory) override;
To generate a random location, we need to have a reference to the navigation system, that is why we need the variable on line 3. The function on line 7, is the override function which will inform the task that it needs to execute and it will be called automatically by the Behavior Tree.
Now open the Task_GetRandomLocation_CPP.cpp file, and first we are going to add all includes we need:
					#include "Kismet/GameplayStatics.h"
#include "NavigationSystem.h"
#include "BehaviorTree/BlackboardComponent.h"
					EBTNodeResult::Type UTask_GetRandomLocation_CPP::
	ExecuteTask(UBehaviorTreeComponent& OwnerComp, uint8* NodeMemory)
{
	NavArea = FNavigationSystem::
		GetCurrent<UNavigationSystemV1>(UGameplayStatics::GetPlayerPawn(GetWorld(), 0));

	if (NavArea)
	{
		NavArea->K2_GetRandomReachablePointInRadius(GetWorld(),
			GetWorld()->GetFirstPlayerController()->GetPawn()->GetActorLocation(),
			RandomLocation, 15000.0f);
	}
	else
	{
		return EBTNodeResult::Failed;
	}

	// inform blackboard about random location result
	OwnerComp.GetBlackboardComponent()
		->SetValueAsVector(FName("Random Patrol Location"), RandomLocation);

	return EBTNodeResult::Succeeded;
}
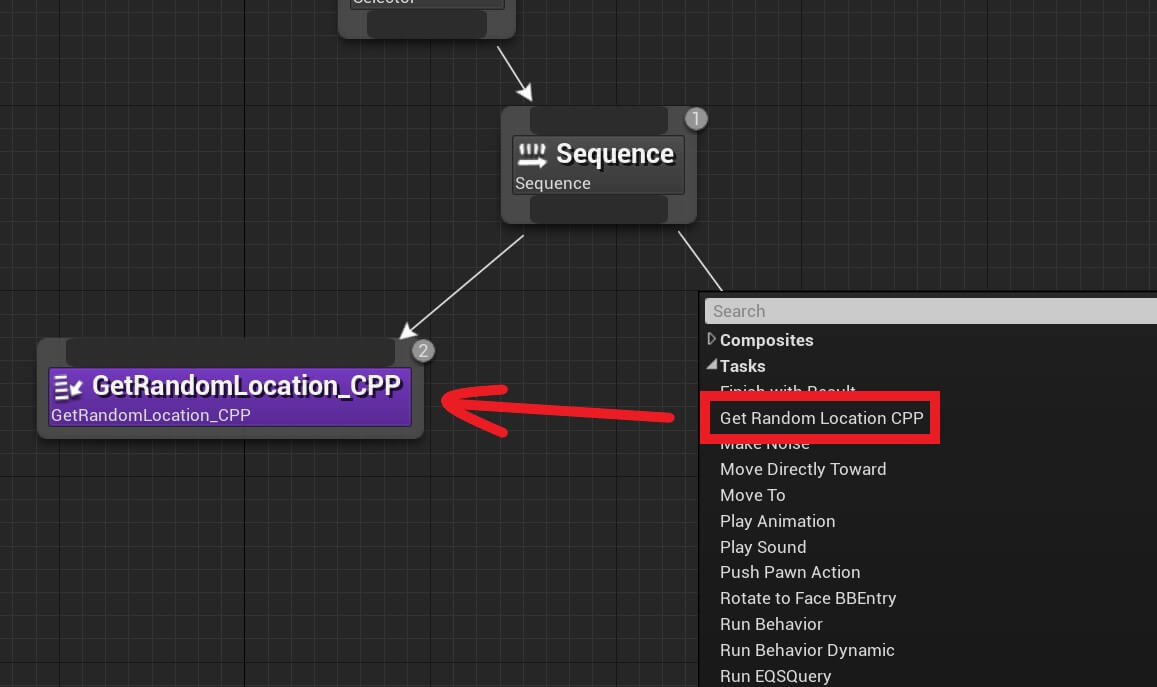
This will replace the task node we created using Blueprints and it will use the C++ task node we just created.
Let’s run the game and test it out:
Creating PawnSensing Component With C++
					ABTAIController();

	UPROPERTY(EditAnywhere)
	class UPawnSensingComponent* PawnSensing;

	UFUNCTION()
		void OnSeePawn(APawn* PlayerPawn);

	UFUNCTION()
	void SetCanSeePlayer(bool SeePlayer, class UObject* Player);

	FTimerHandle RetriggerableTimerHandle;
	FTimerDelegate FunctionDelegate;
	void RunRetriggerableTimer();
Now open BTAIController.cpp file and inside the constructor we are going to create the PawnSensing component:
					ABTAIController::ABTAIController()
{
    PawnSensing = CreateDefaultSubobject<UPawnSensingComponent>(TEXT("PawnSensing"));
}
					void ABTAIController::BeginPlay()
{
    Super::BeginPlay();

    PawnSensing->OnSeePawn.AddDynamic(this, &ABTAIController::OnSeePawn);

    RunBehaviorTree(BehaviorTree);
}
Inside the OnSeePawn function we are going to test if the pawn that the PawnSensing component sees is the player, if that is the case we will inform the Behavior Tree that we see the player and we will pass the player’s reference to the Behavior Tree:
					void ABTAIController::OnSeePawn(APawn* PlayerPawn)
{
    AEnemy_AICharacter* Player = Cast<AEnemy_AICharacter>(PlayerPawn);

    if (Player)
    {
        SetCanSeePlayer(true, Player);
        RunRetriggerableTimer();
    }
}
					void ABTAIController::SetCanSeePlayer(bool SeePlayer, UObject* Player)
{
    if (SeePlayer)
    {
        GetBlackboardComponent()
            ->SetValueAsBool(FName("Can See Player"), SeePlayer);

        GetBlackboardComponent()
            ->SetValueAsObject(FName("Player Target"), Player);
    }
    else
    {
        GetBlackboardComponent()
            ->SetValueAsBool(FName("Can See Player"), SeePlayer);

        ACharacter* EnemyChar = Cast<ACharacter>(GetPawn());
        EnemyChar->GetMesh()->GetAnimInstance()->StopAllMontages(0);
    }
}
In the code example above, we are doing the same thing, except using C++.
And when the SeePlayer parameter is false, then we only pass that value to the Blackboard component without the player pawn, because if the enemy can’t see the player, it will not run towards him and it will not attack him, thus, we don’t need to pass player pawn to the Blackboard component.
We also need to stop the enemy from attacking the player if the attack is currently under way, and we do that on lines 16 and 17 in the code example above.
First we get a reference to the enemy actor, then we stop his montage animations that are currently playing by calling StopAllMontages(0) same as what we did with the Blueprint version of the Behavior Tree.
The 0 parameter in the StopAllMontages functions will make the enemy animation Blueprint stop the attack animation and it will play another animation based on the condition we set for the animations.
The reason why I am mentioning this is if you set 1 as the parameter, then the enemy will finish the attack animation and then play other animations which is not the behavior we want.
Lastly, we need to code the RunRetriggeranbleTimer function, so add the following lines of code:
					void ABTAIController::RunRetriggerableTimer()
{
    GetWorld()->GetTimerManager().ClearTimer(RetriggerableTimerHandle);

    FunctionDelegate.BindUFunction(this, FName("SetCanSeePlayer"),
        false, GetPawn());

    GetWorld()->GetTimerManager().SetTimer(RetriggerableTimerHandle,
        FunctionDelegate, PawnSensing->SensingInterval * 2.0f, false);
}
					#include "CoreMinimal.h"
#include "AIController.h"
#include "BTAIController.generated.h"

/**
 *
 */
UCLASS()
class ENEMY_AI_API ABTAIController : public AAIController
{
	GENERATED_BODY()

public:
	void BeginPlay() override;

	UPROPERTY(EditAnywhere, BlueprintReadWrite)
		class UBehaviorTree* BehaviorTree;

	ABTAIController();

	UPROPERTY(EditAnywhere)
		class UPawnSensingComponent* PawnSensing;

	UFUNCTION()
		void OnSeePawn(APawn* PlayerPawn);

	UFUNCTION()
		void SetCanSeePlayer(bool SeePlayer, class UObject* Player);

	FTimerHandle RetriggerableTimerHandle;
	FTimerDelegate FunctionDelegate;
	void RunRetriggerableTimer();

};
BTAIController.cpp:
					#include "BTAIController.h"

#include "BehaviorTree/BehaviorTree.h"
#include "Perception/PawnSensingComponent.h"
#include "BehaviorTree/BlackboardComponent.h"
#include "Kismet/KismetSystemLibrary.h"
#include "Components/SkeletalMeshComponent.h"
#include "GameFramework/Character.h"
#include "Enemy_AICharacter.h"

ABTAIController::ABTAIController()
{
    PawnSensing = CreateDefaultSubobject<UPawnSensingComponent>(TEXT("PawnSensing"));
}


void ABTAIController::BeginPlay()
{
    Super::BeginPlay();

    PawnSensing->OnSeePawn.AddDynamic(this, &ABTAIController::OnSeePawn);

    RunBehaviorTree(BehaviorTree);
}

void ABTAIController::OnSeePawn(APawn* PlayerPawn)
{
    AEnemy_AICharacter* Player = Cast<AEnemy_AICharacter>(PlayerPawn);

    if (Player)
    {
        SetCanSeePlayer(true, Player);
        RunRetriggerableTimer();
    }
}

void ABTAIController::SetCanSeePlayer(bool SeePlayer, UObject* Player)
{
    if (SeePlayer)
    {
        GetBlackboardComponent()
            ->SetValueAsBool(FName("Can See Player"), SeePlayer);

        GetBlackboardComponent()
            ->SetValueAsObject(FName("Player Target"), Player);
    }
    else
    {
        GetBlackboardComponent()
            ->SetValueAsBool(FName("Can See Player"), SeePlayer);

        ACharacter* EnemyChar = Cast<ACharacter>(GetPawn());
        EnemyChar->GetMesh()->GetAnimInstance()->StopAllMontages(0);
    }
}

void ABTAIController::RunRetriggerableTimer()
{
    GetWorld()->GetTimerManager().ClearTimer(RetriggerableTimerHandle);

    FunctionDelegate.BindUFunction(this, FName("SetCanSeePlayer"),
        false, GetPawn());

    GetWorld()->GetTimerManager().SetTimer(RetriggerableTimerHandle,
        FunctionDelegate, PawnSensing->SensingInterval * 2.0f, false);
}
Make sure that you compile the code and then open BP_BB_EnemyAIController_CPP in the editor. You will see the Pawn Sensing component under the Components tab, select it and in the Details tab change the Sensing Inverval value to 0.2 and for the Peripheral Vision Angle set the value 60:
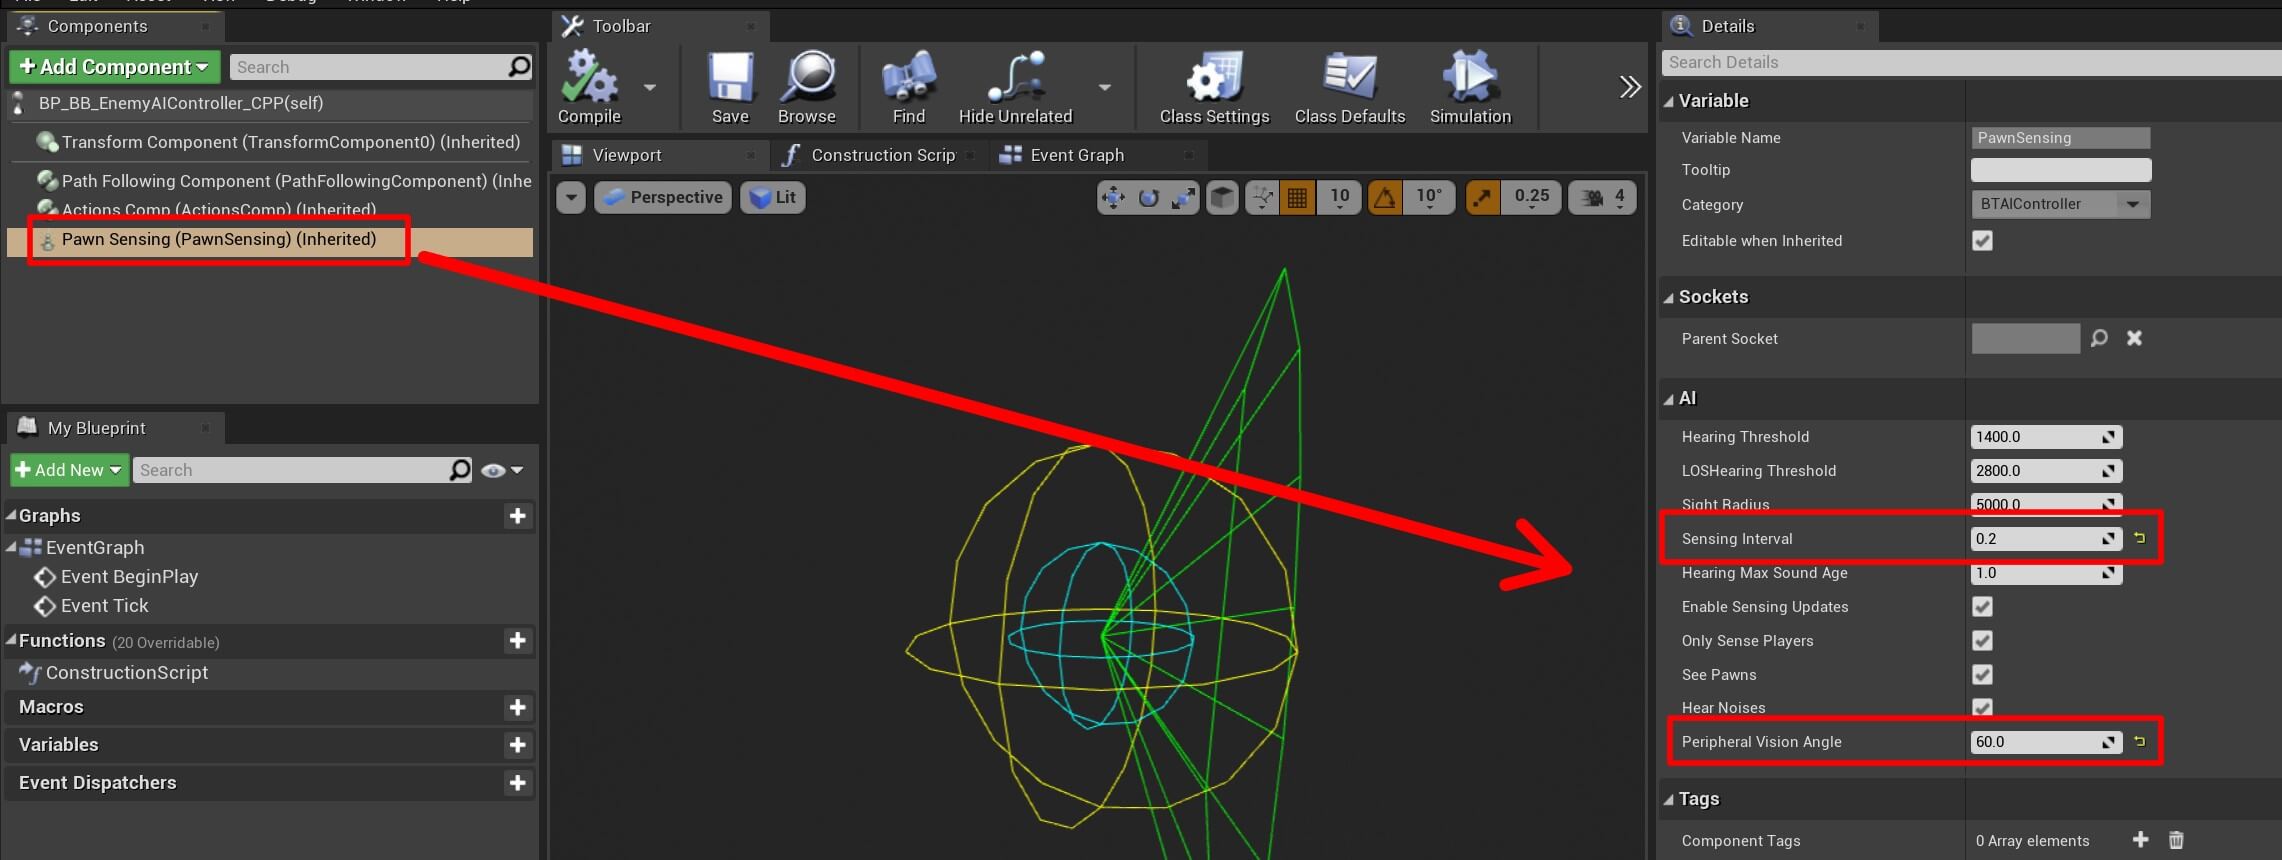
We already explained what these options mean when we edited the Pawn Sensing component in the Blueprint example.
Now open the BT_EnemyAI_CPP in the editor, and the last setup is pretty much the same as the one we had in the Blueprint version:
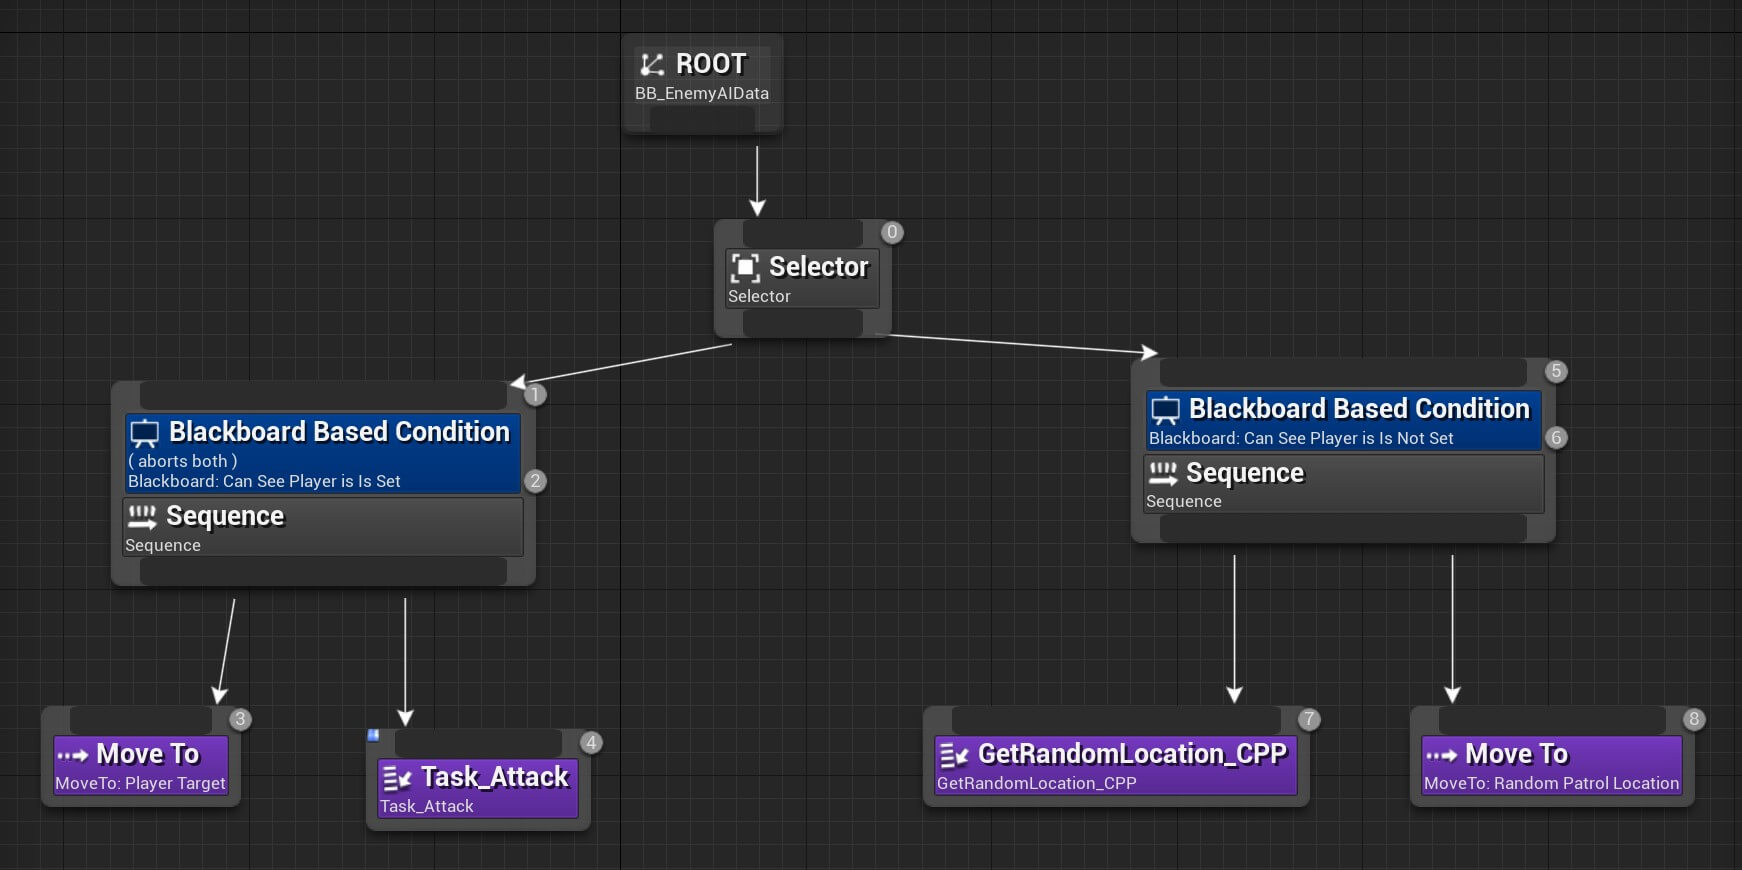
On the left side we have a Sequence node that will make the enemy move towards the player and attack him. The sequence has a Decorator which has the Can See Player as the condition with the Key Query Is Set, and it aborts both nodes when the result changes:
We already tested the Sequence node on the right which makes the enemy patrol, the only thing that changed is that we added a Decorator which also has the Can See Player as the condition with Key Query Is Not Set:
One thing that you will notice is that I have reused the Task_Attack node we created via Blueprints. The reason why I didn’t create an attack task with C++ is, it is complicated to get all the references we need such as the enemy and make him attack and so on, it is a lot easier to do this with Blueprints that is why I reused that node.
And besides, Unreal Engine is all about combining Blueprints and C++, and a lot of games are created purely in Blueprints so throw that Blueprints are not optimized mentality out of the window.
The last thing that is left for us to do is to test the game and see the outcome:


Comments are closed.