Materials are assets that define the surface properties of objects in your game or simply they define how a game object looks like in your game.
Materials are used to determine the appearance of objects, such as their color, texture, transparency, and other visual characteristics.
Materials can be applied to individual objects or to whole surfaces, such as a wall or a floor.
They are an important aspect of game development and play a crucial role in creating visually stunning environments and objects in Unreal Engine.
In this post we are going to take a look at materials in depth, explain how to create, edit, and use them in our games.
Please note, this post is not for complete beginners. We expect that you know how to use Unreal Engine, how to use Blueprints, and how to create simple games.
We also expect that you know and understand how nodes work and the Blueprint editor works overall as we will not explain these concepts in this tutorial.
If you’re a beginner, then we suggest you go through the posts below before you go through this one:
The Basics Of Materials In Unreal Engine
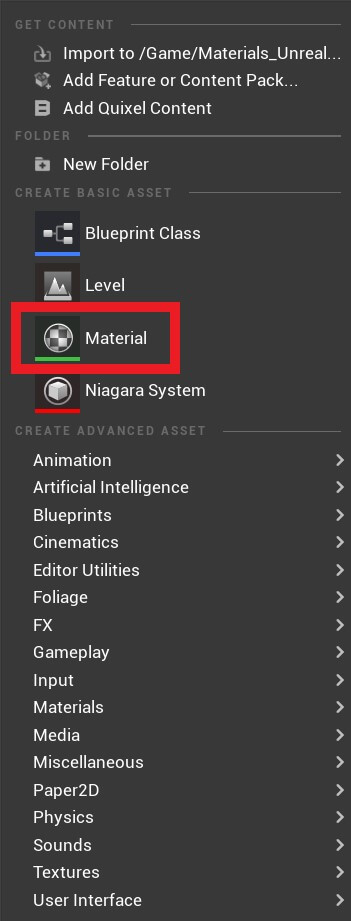
To create a material Right Click -> Material:
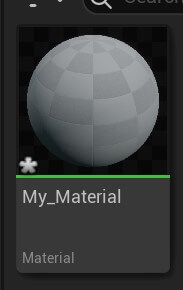
Give the material a name and double click it to open it in the editor:
Inside the editor you’ll see the My_Material node:
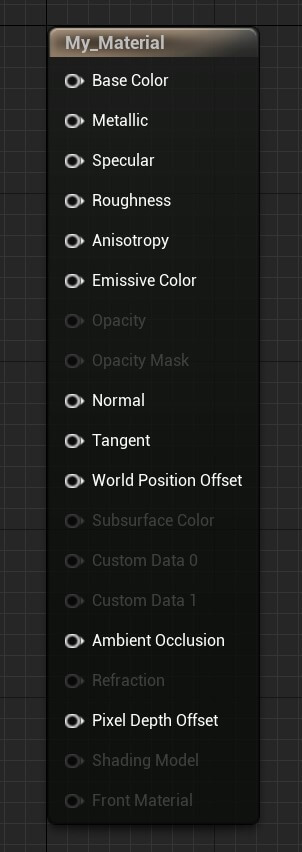
For your project, this node will have the name same as the one you gave to your material.
This node will determine how the material will look like. We can use it to set the color of the material, add the normal map which is used for 3D models, and overall change the appearance of the material.
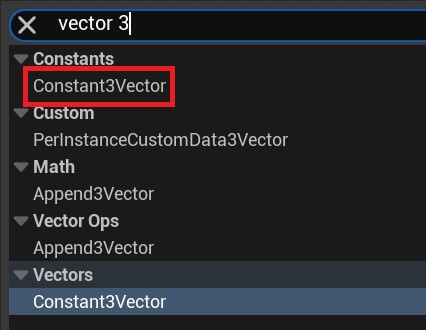
To change the color of the material, Right Click in the editor and in the search tab type vector 3 and select constant3vector:
Plug in the first node of the Vector 3 into the Base Color of the material node:
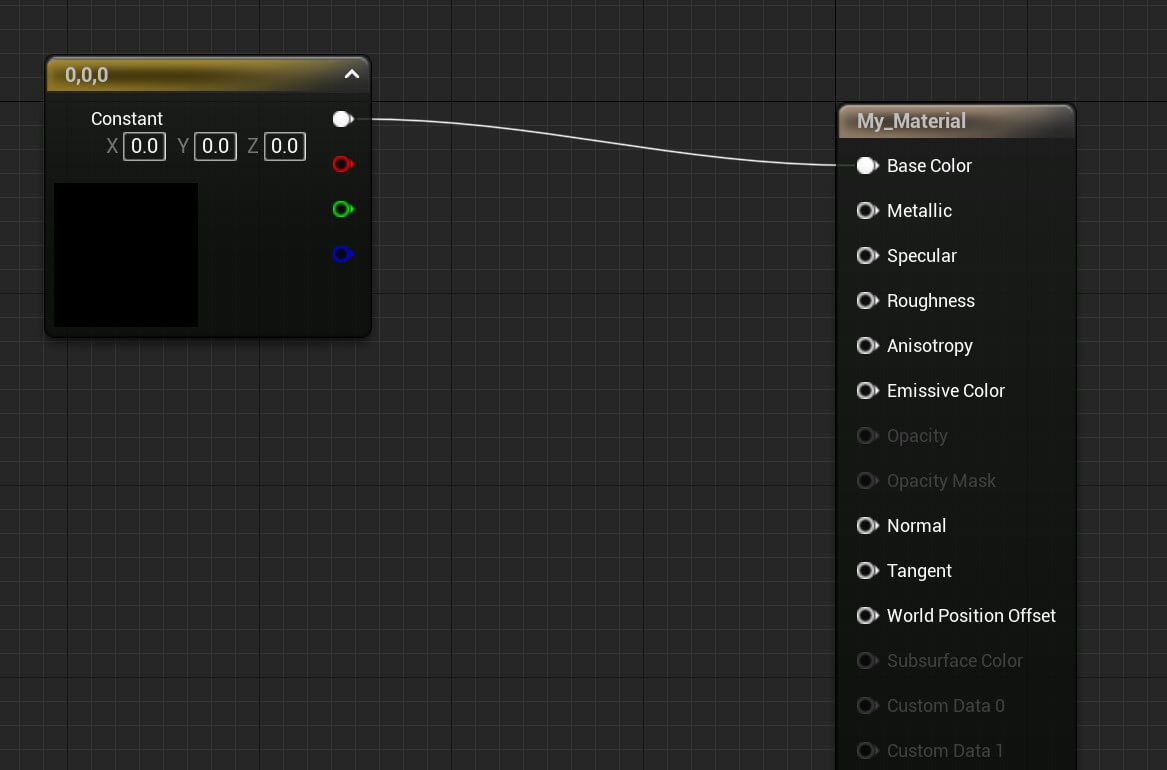
To change the color of the material, double click on the dark square of the vector 3 node and select any color from the color palette:
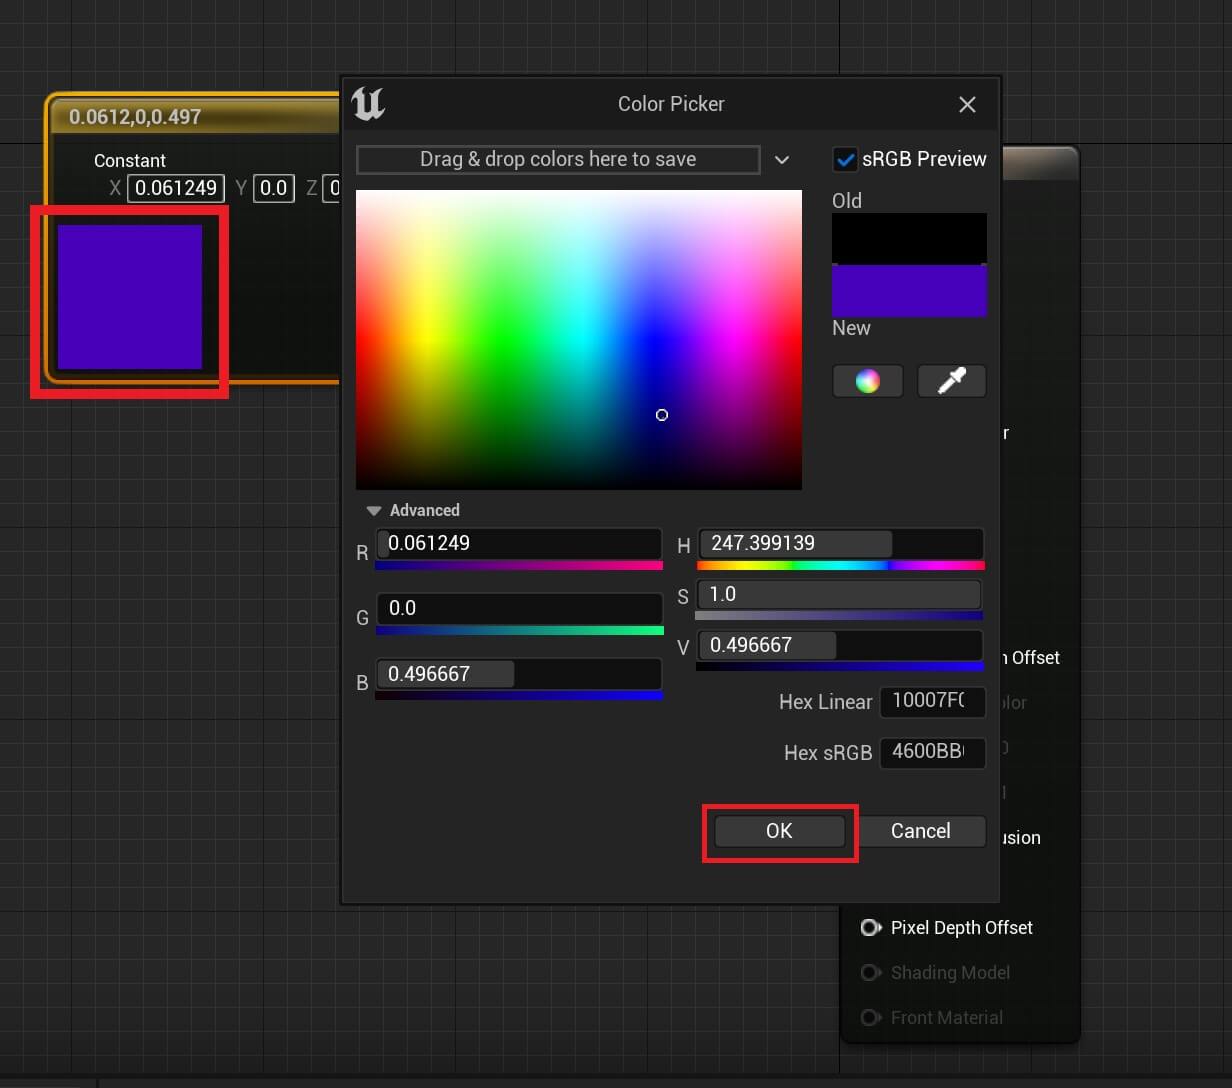
When you select the color, press ok in the color palette window to make the change.
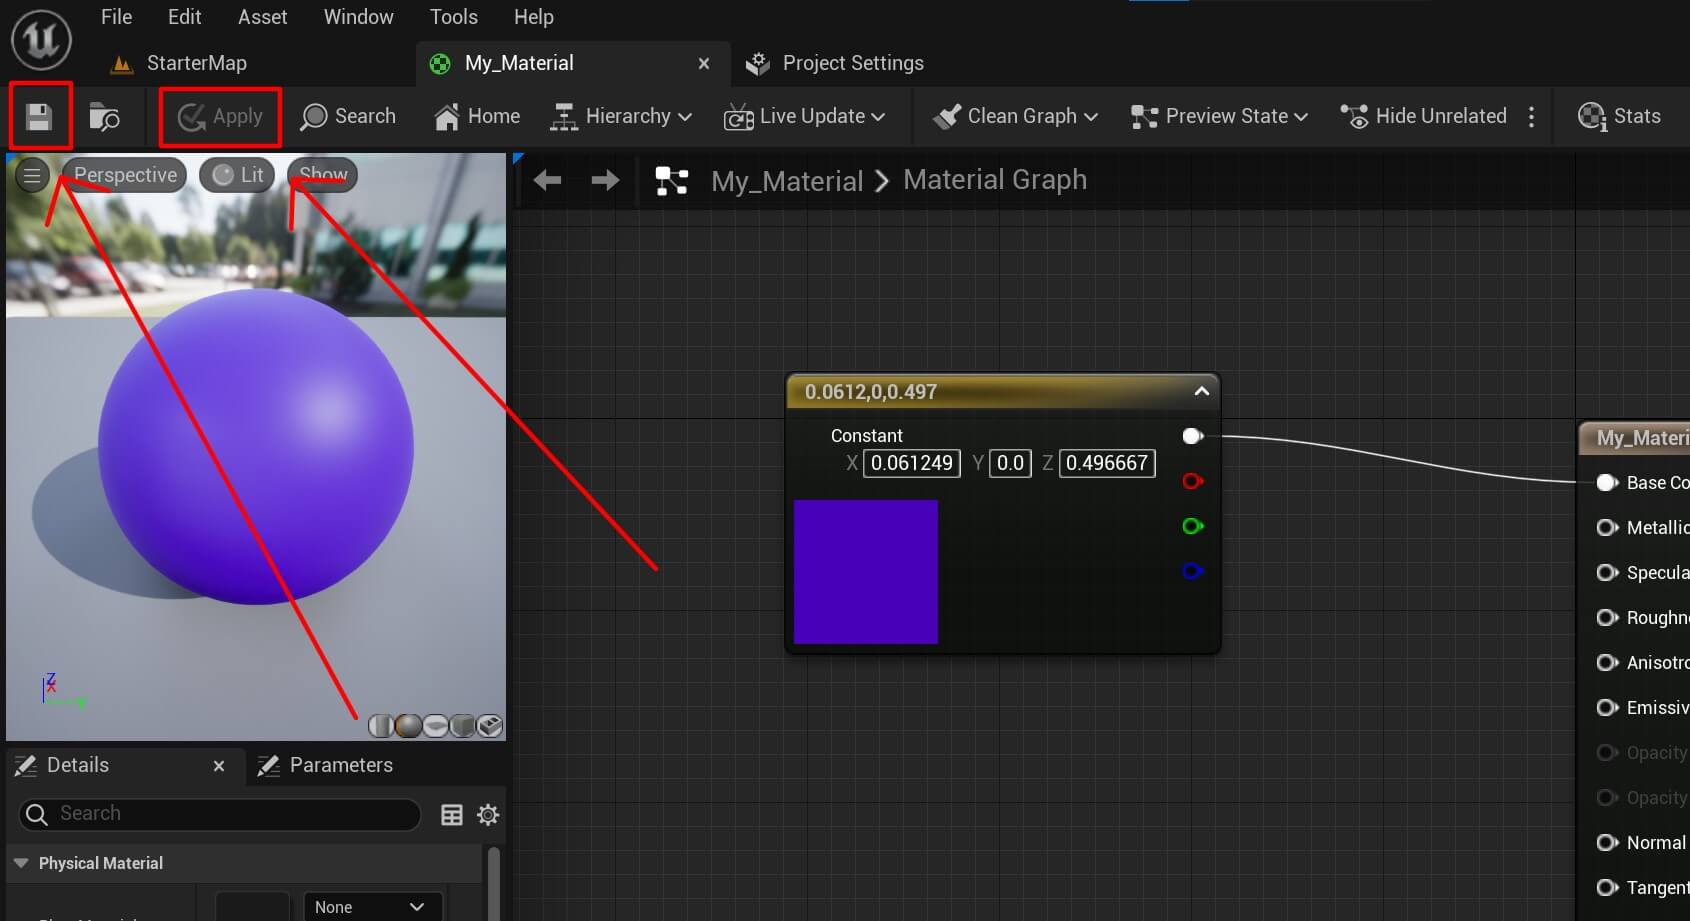
Also, make sure to press Apply and Save at the top left corner in the editor:
To apply this material to a game object, simply drag it on the object in the game level to which you want to apply it to:
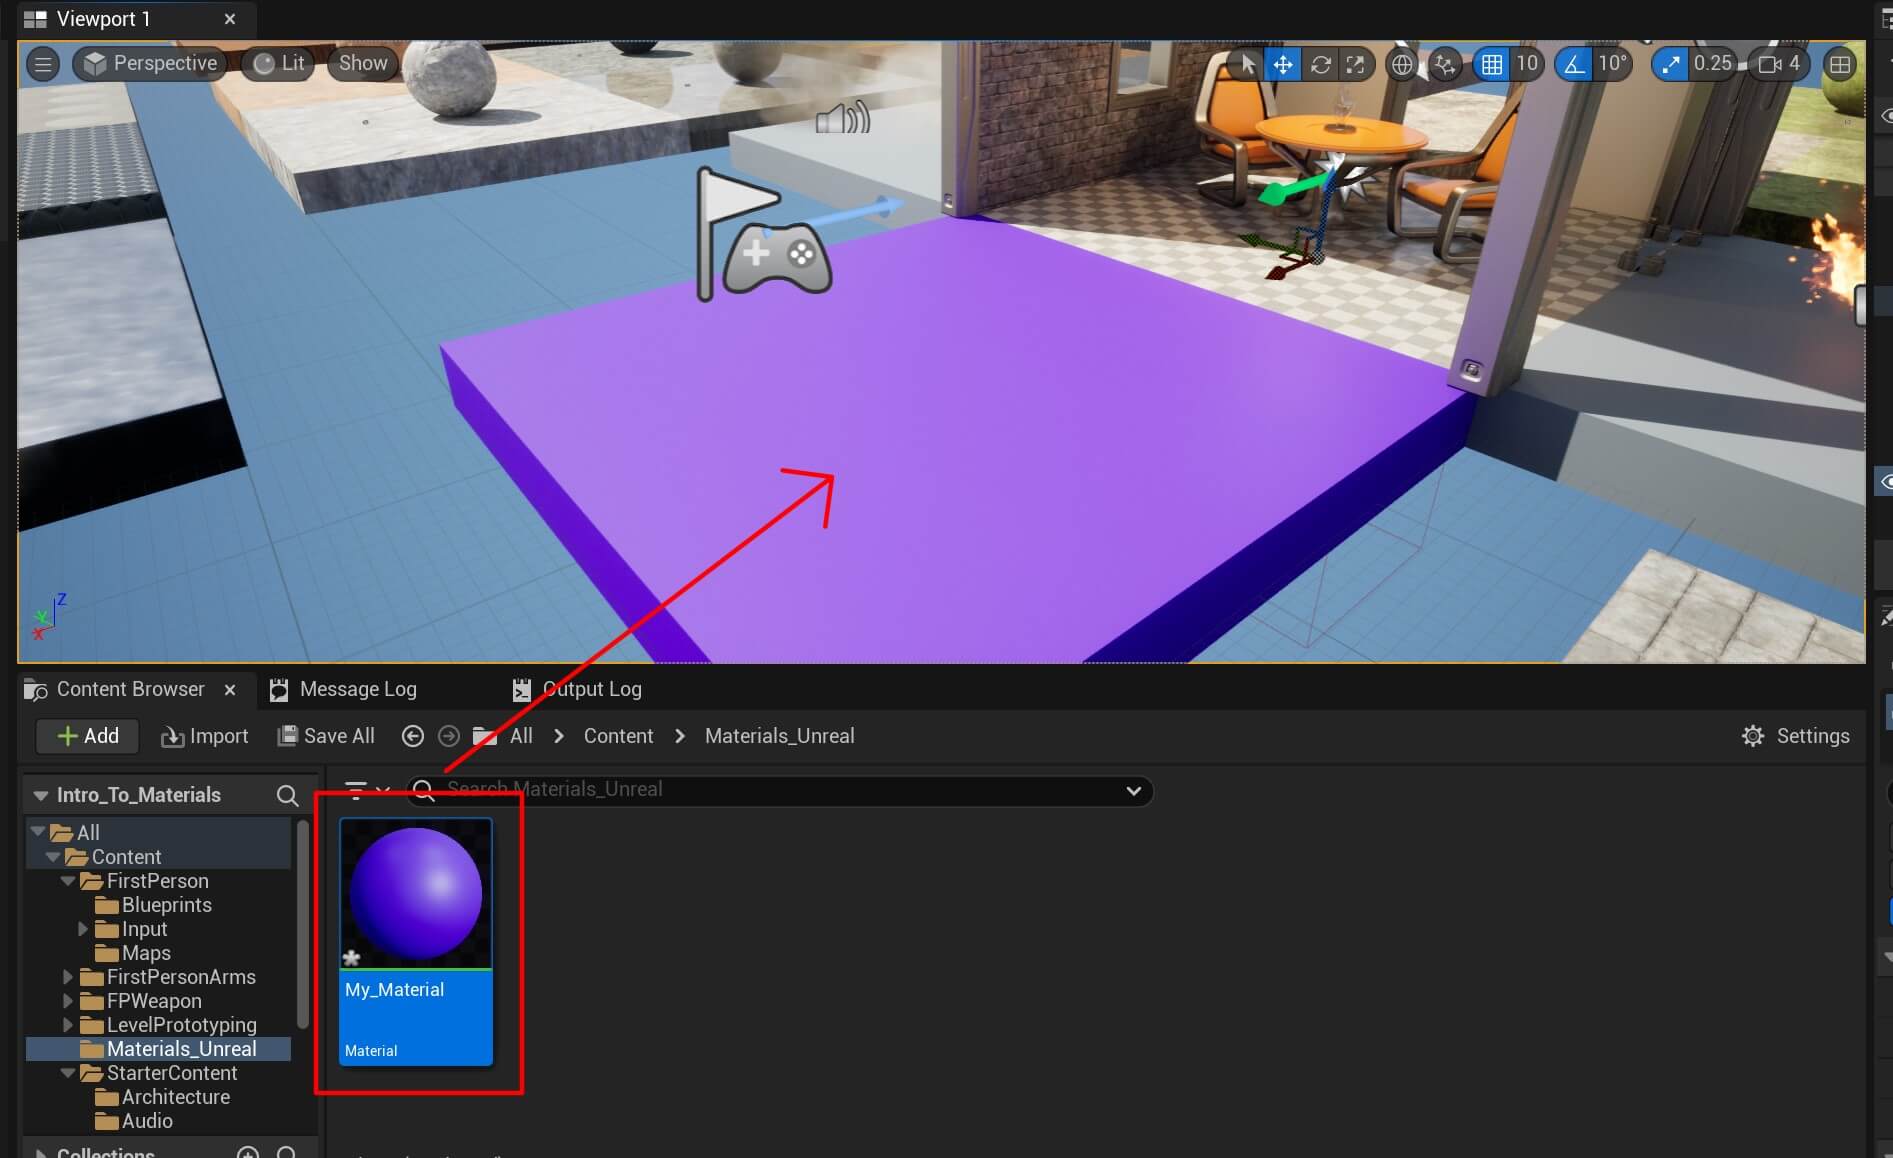
No matter what the game object is, a 3D model, cube, square, and so on, this material will be applied to it as soon as you drag it on the object as you see in the image above.
Metalic, Specular, And Roughness
In the previous example we only played with the base color of the material node which allows us to change the color of the material.
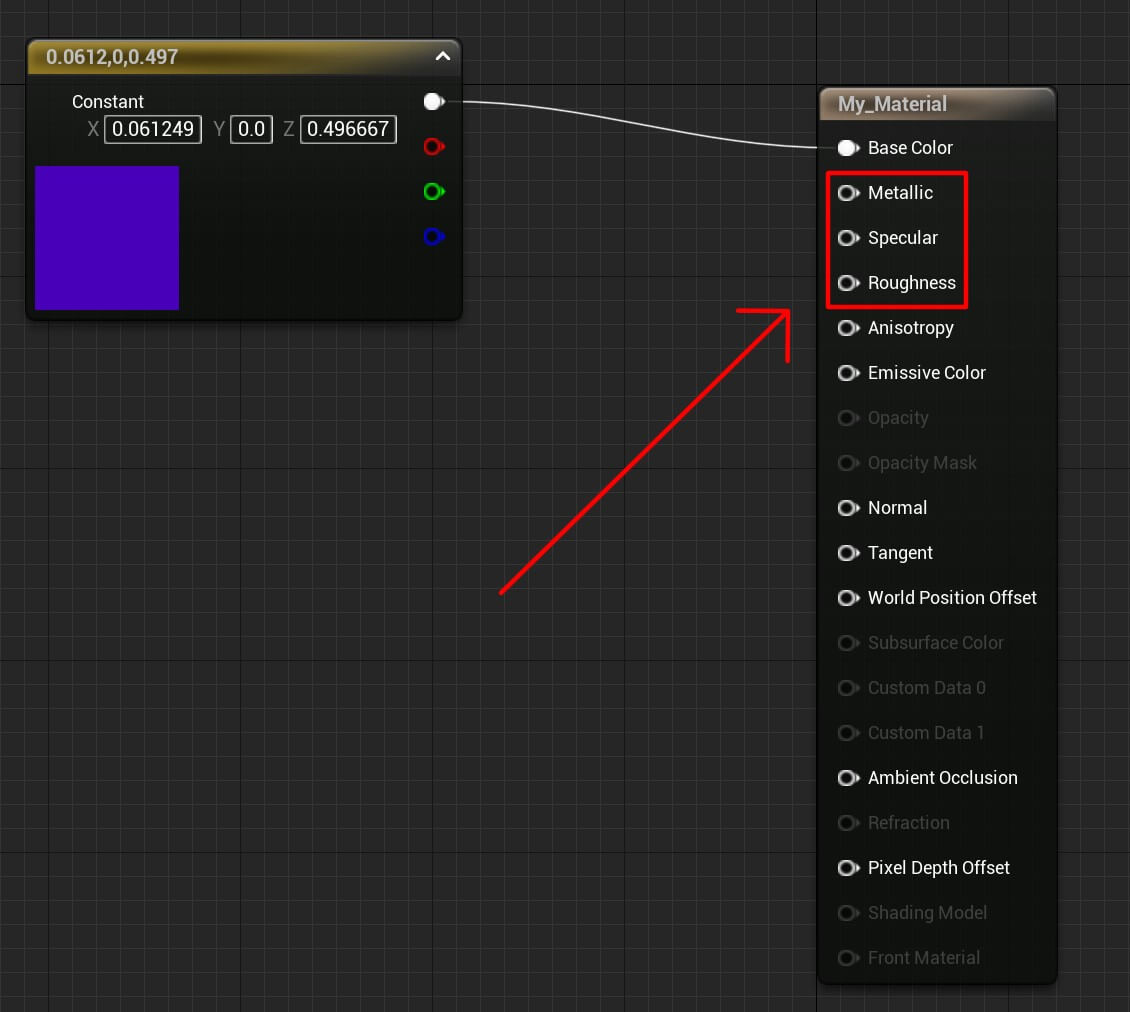
But we have other options that allow us to make the material metal-like, control the reflection of the material, and even make it reflect light.
We do that by changing the values for Metallic, Specular, and Roughness of the material:
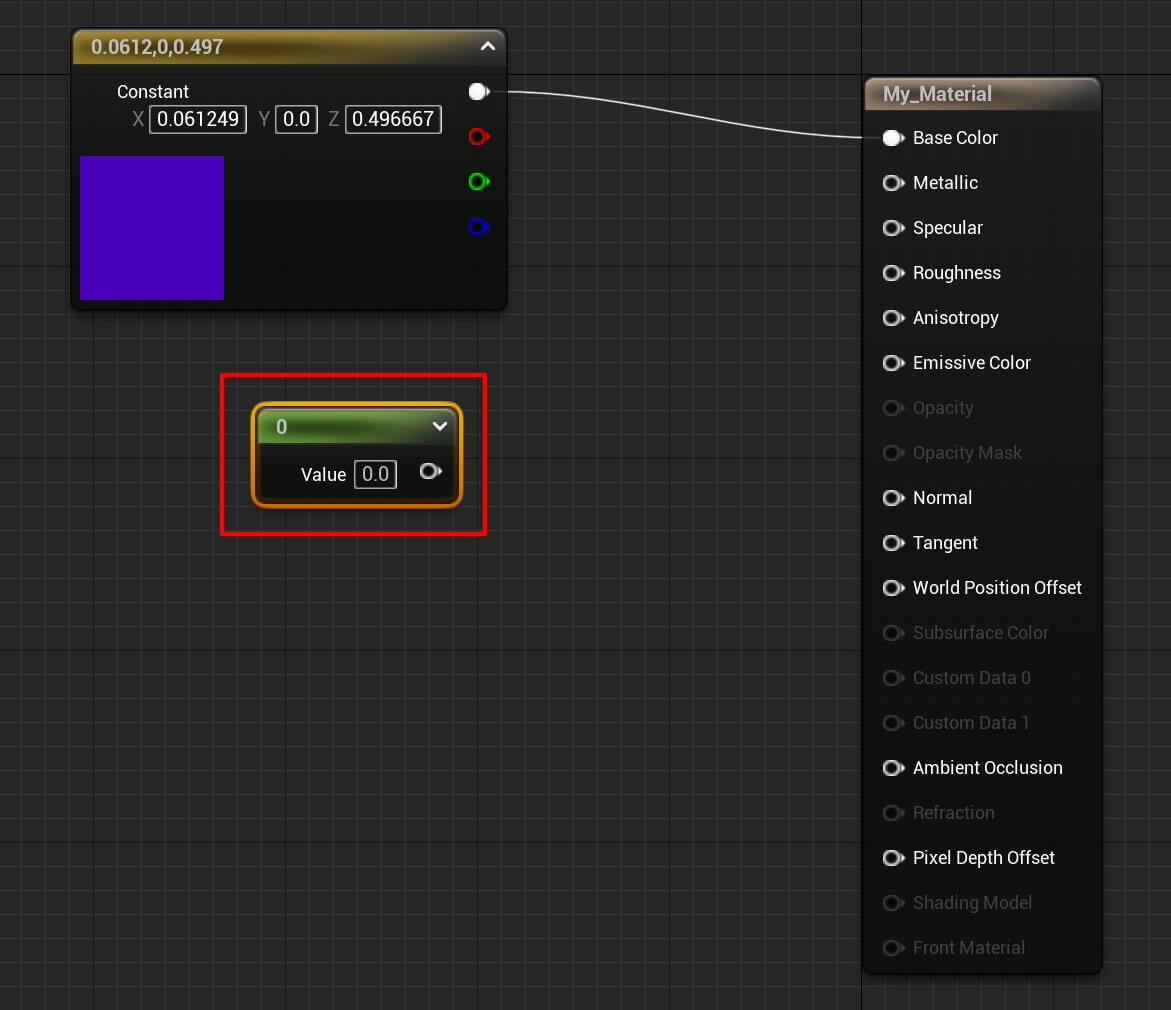
To change these values, press and hold 1 on your keyboard, and then Left Click with the mouse anywhere in the editor and this will create a single float value:
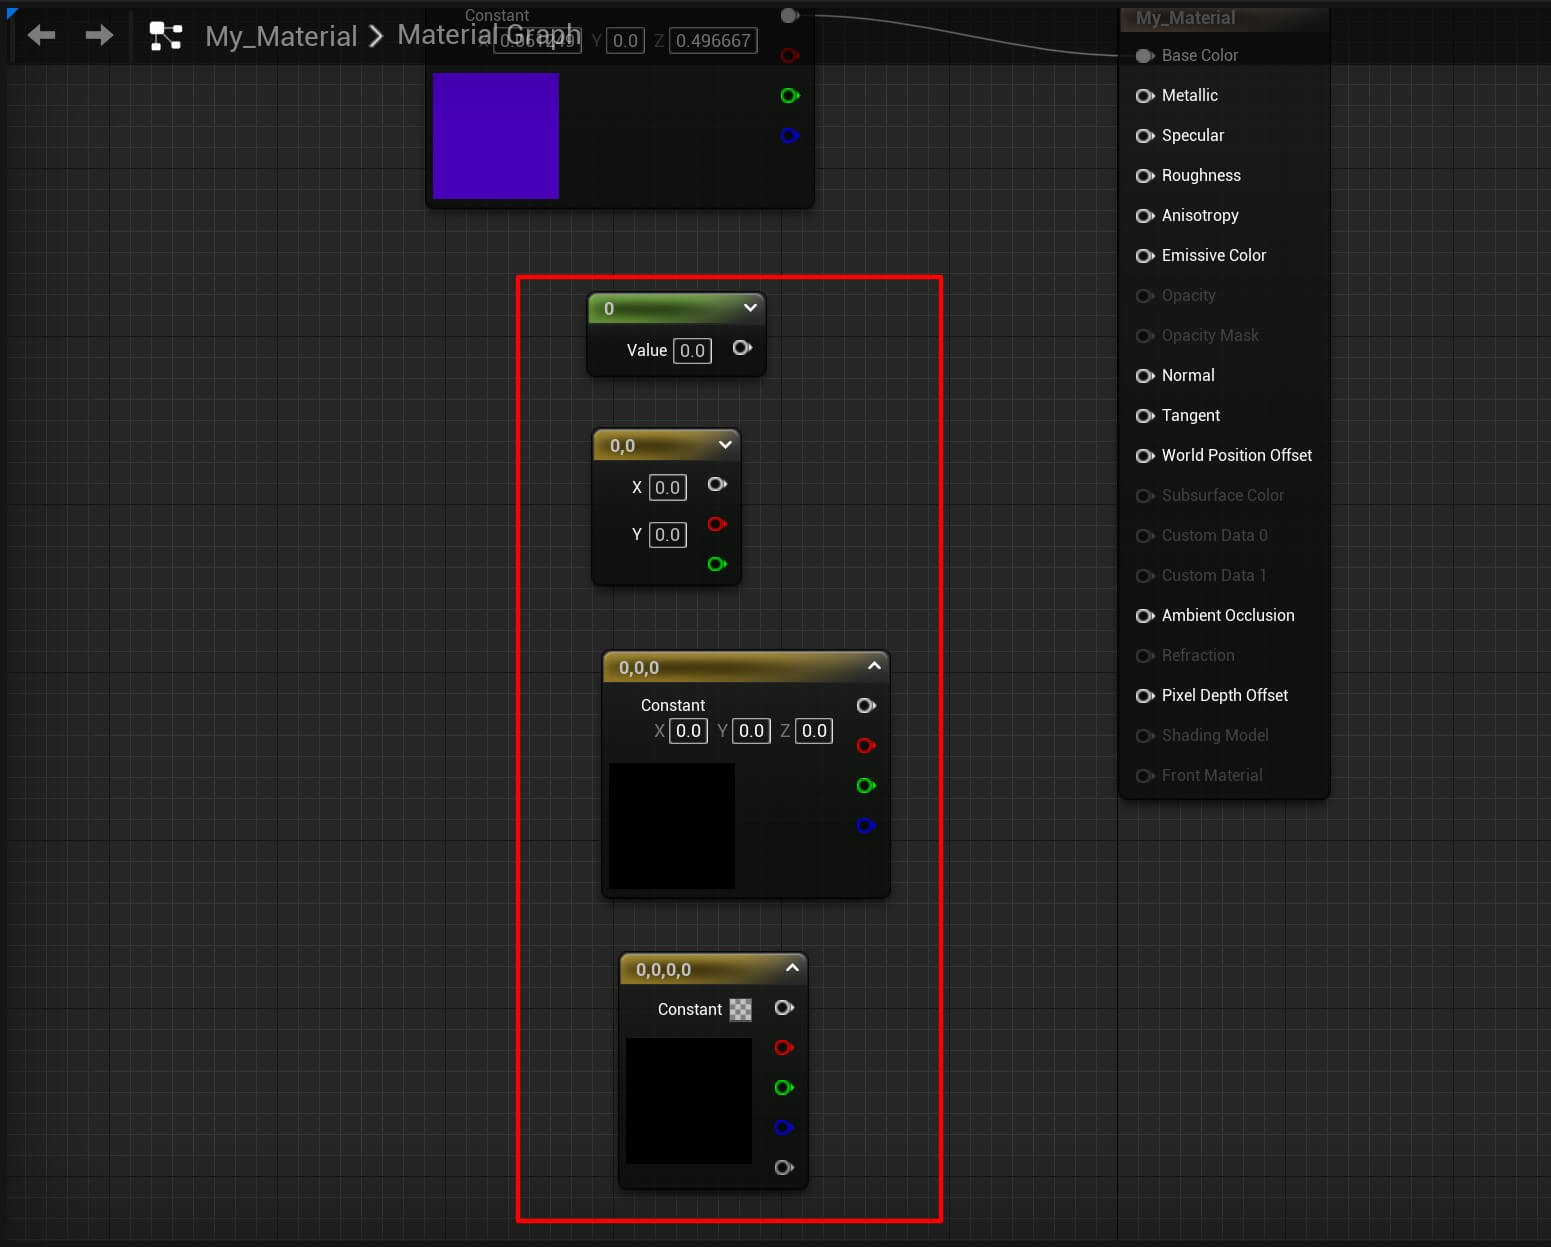
You can also think of this node as a Vector 1 node. The same way, you can hold 2, 3, or 4, then press the Left Click on the mouse to create Vector 2, Vector 3, and Vector 4 values:
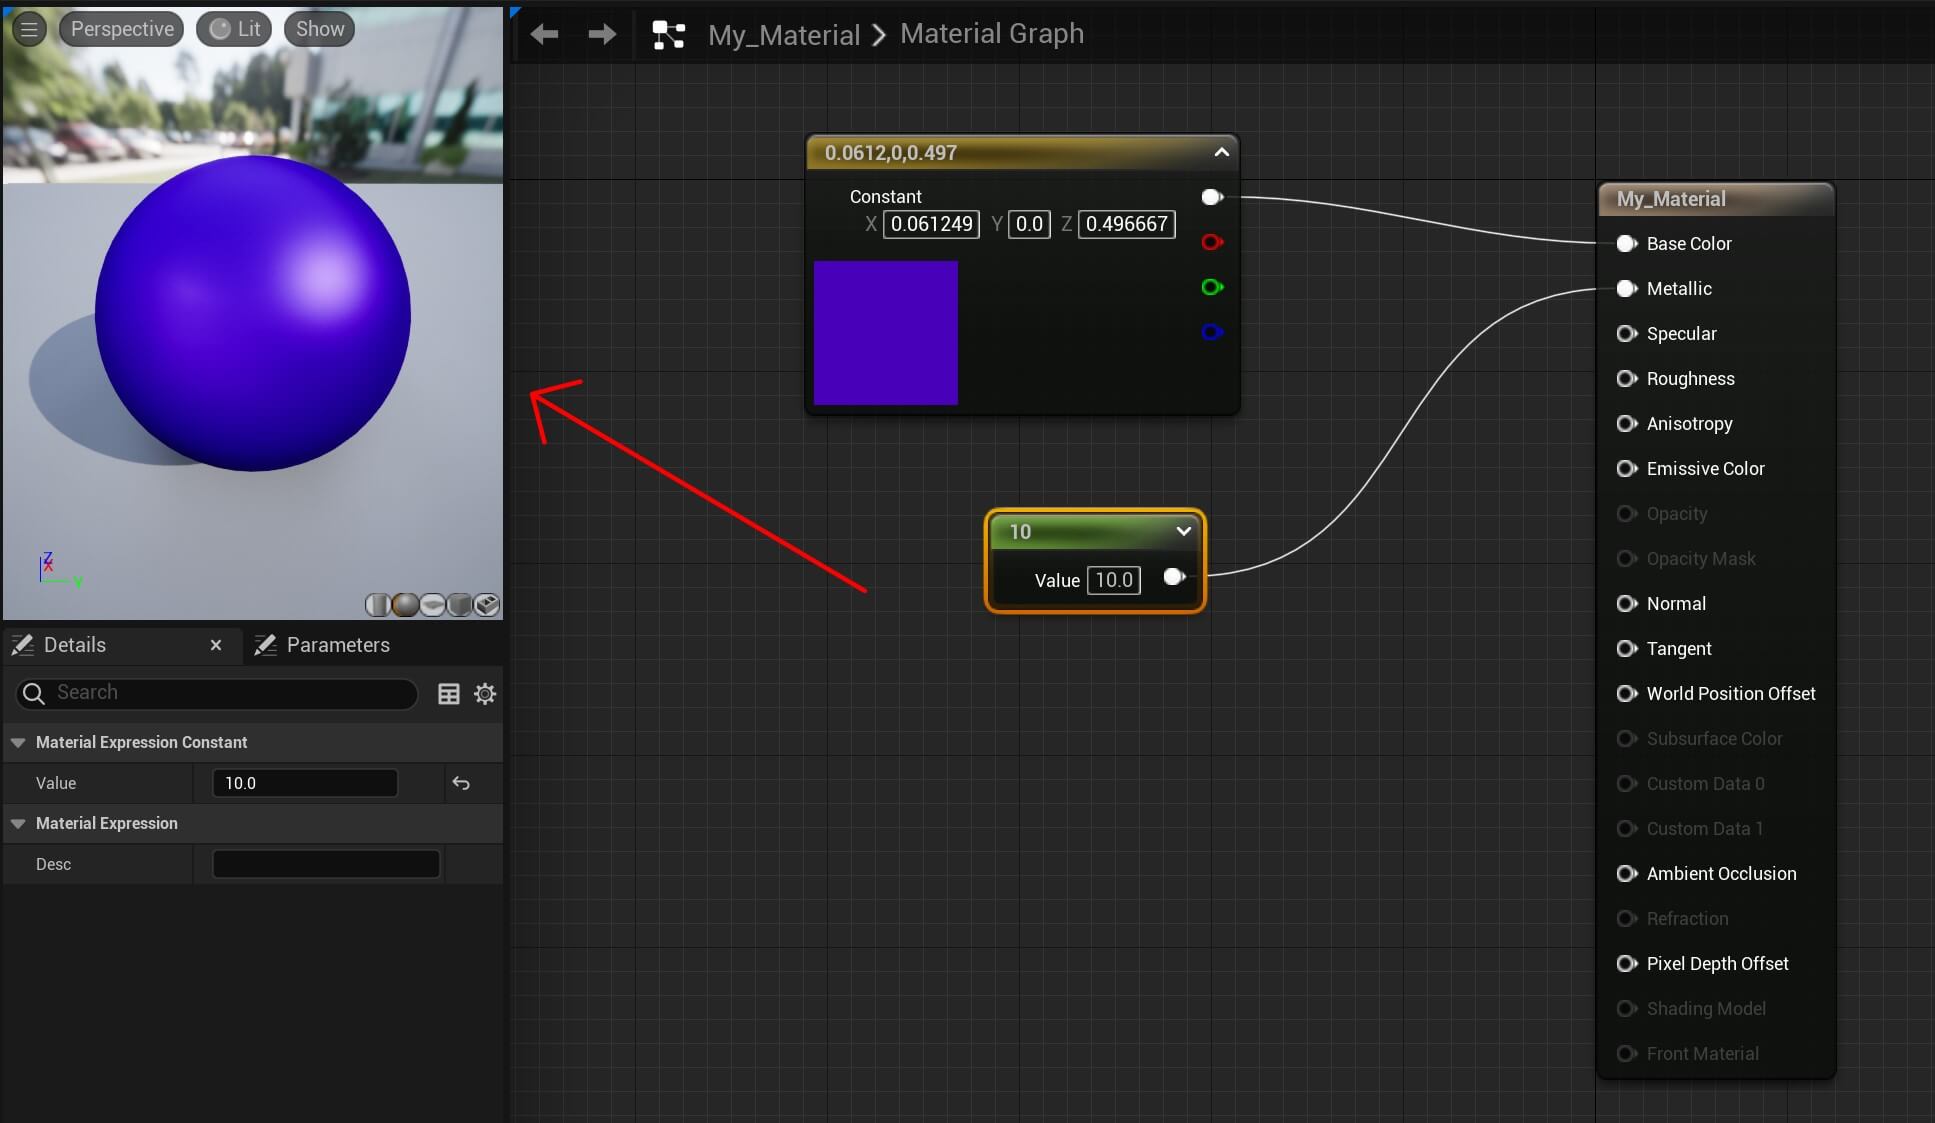
Now, take the Vector 1, or float node, set the value to 10, and plug it in Metallic:
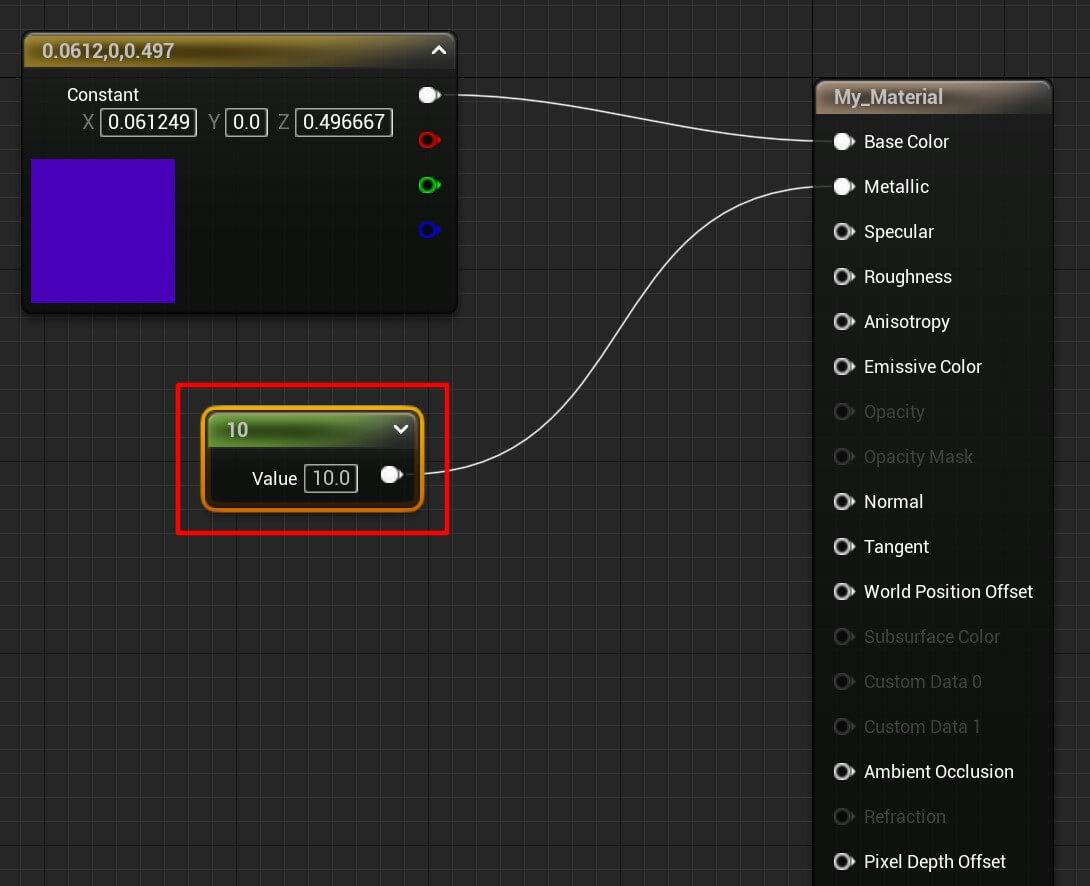
Make sure that you press the Apply and Save buttons at the top left corner so these changes apply to the material. And as soon as they apply, you can see the changes on the material preview in the editor:
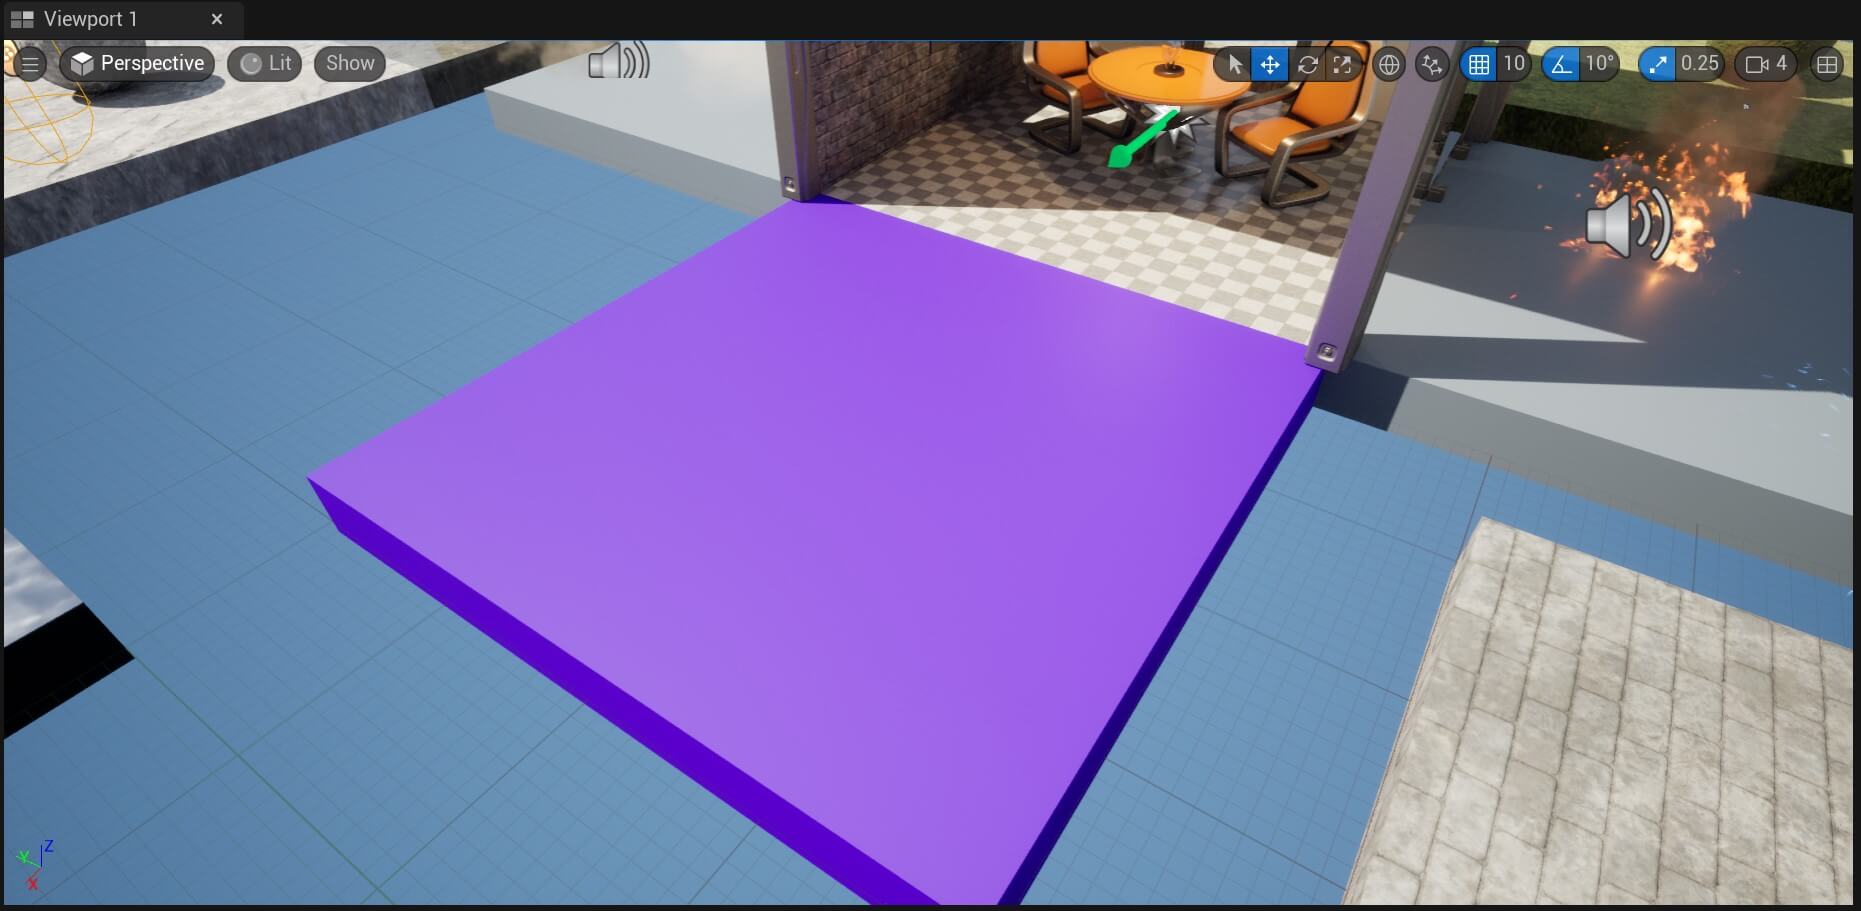
This is how the game object we applied the material to in the scene looked like before we changed the Metallic value:
This is how it looks like after we made the change to the Metallic value:
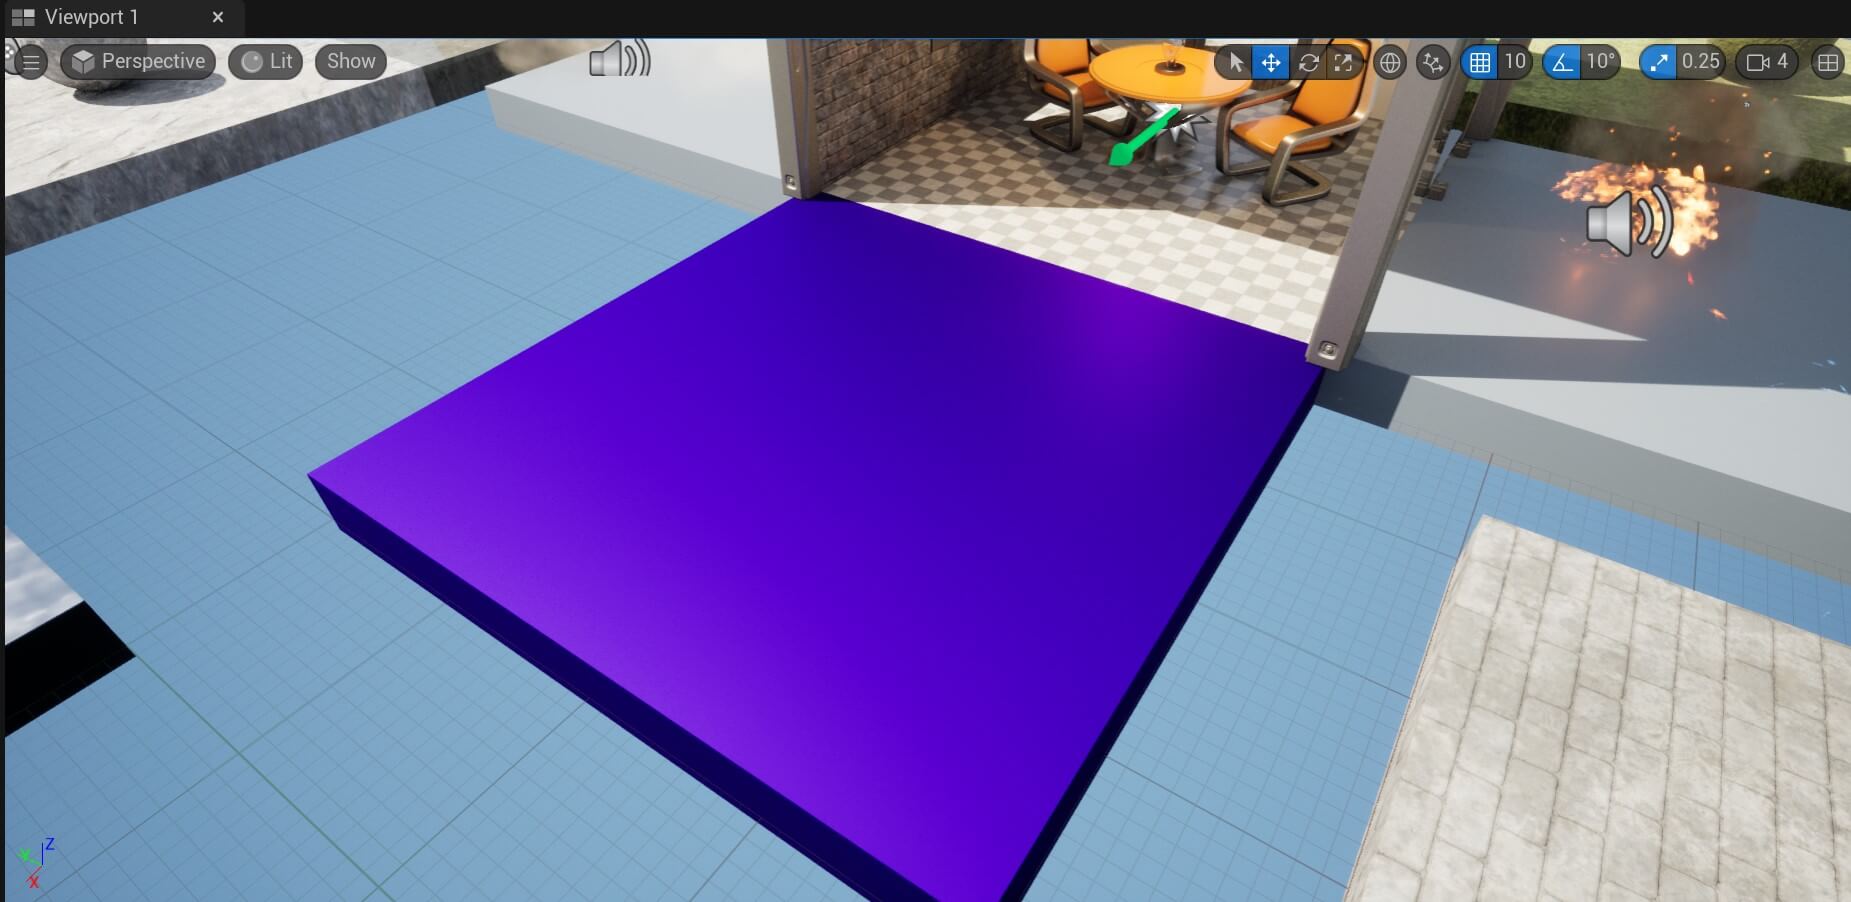
Now the surface looks more like it’s made out of metal. Now let’s change the Roughness of the material to create a mirror effect.
For that, create a new Vector 1 or float node, plug it in the Roughness parameter of the material node, and set the value to 0:
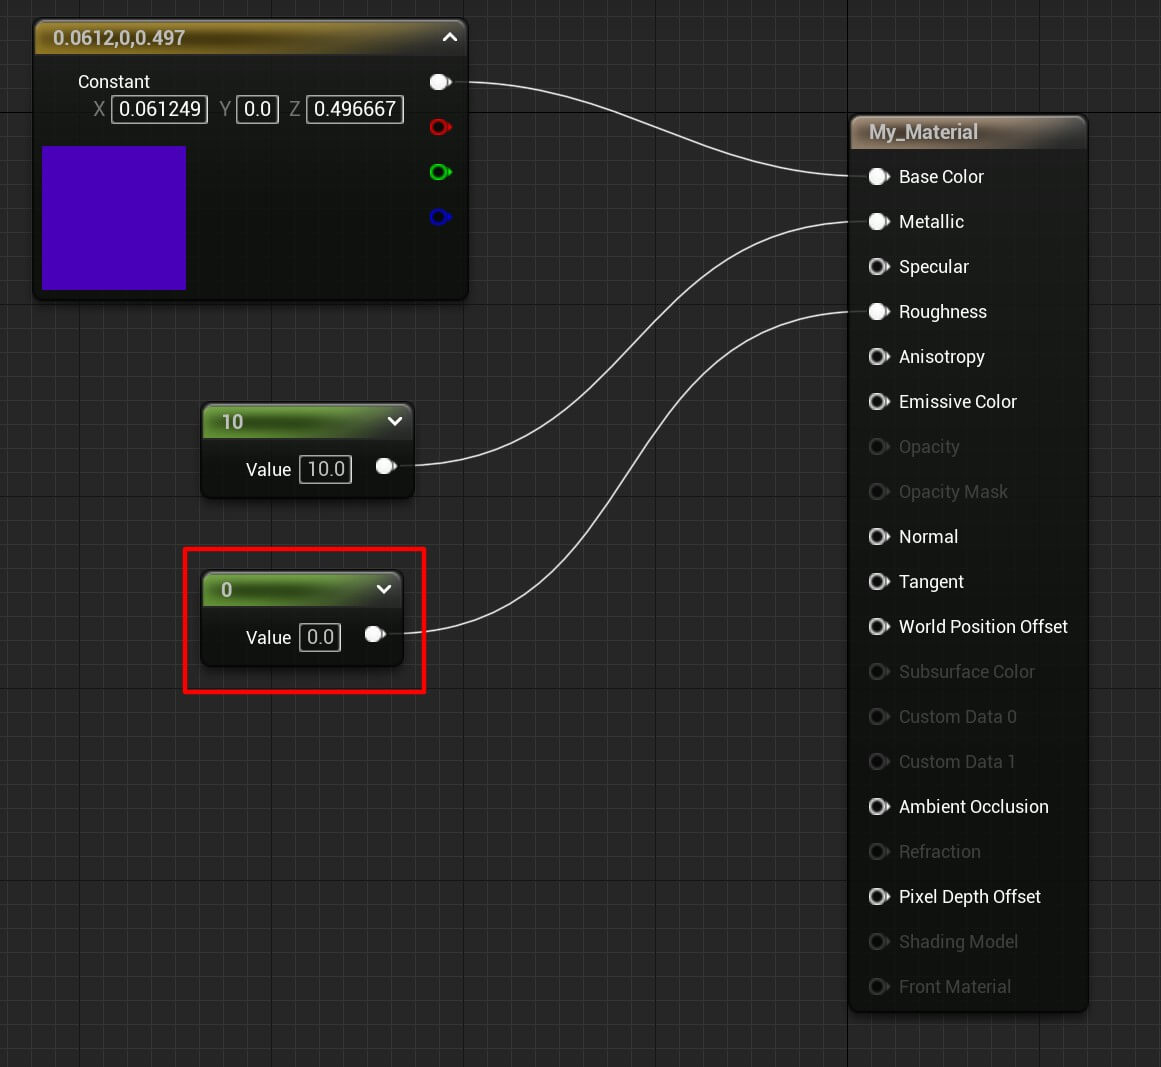
Again, make sure you press the Apply and Save button at the top left corner. When the changes apply, this is how the surface in the game scene looks like now:
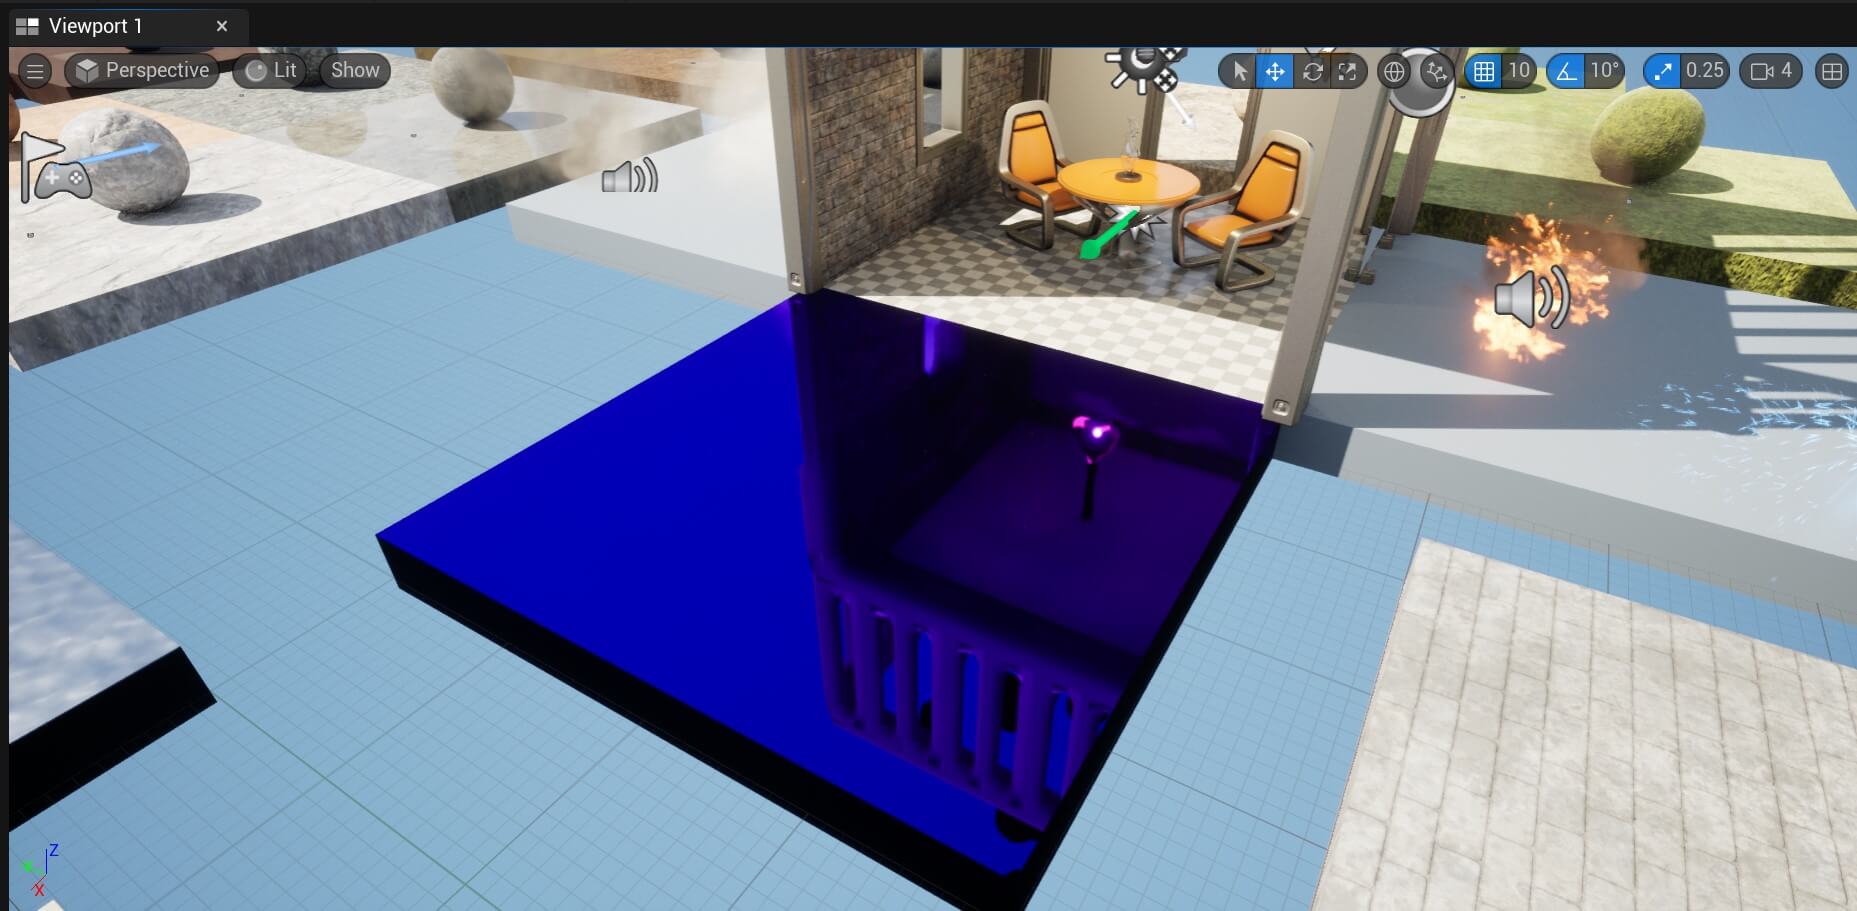
The surface now acts like a mirror and you can see other actors from the game in it. The Roughness value goes from 0.0 to 1.0.
0.0 will create the mirror effect, and 1.0 will make it look like a rough material without mirror effect.
Now remove the nodes which are plugged into Metallic and Roughness. Create a new Vector 1 node, set the value to 0, and plug it in Specular:
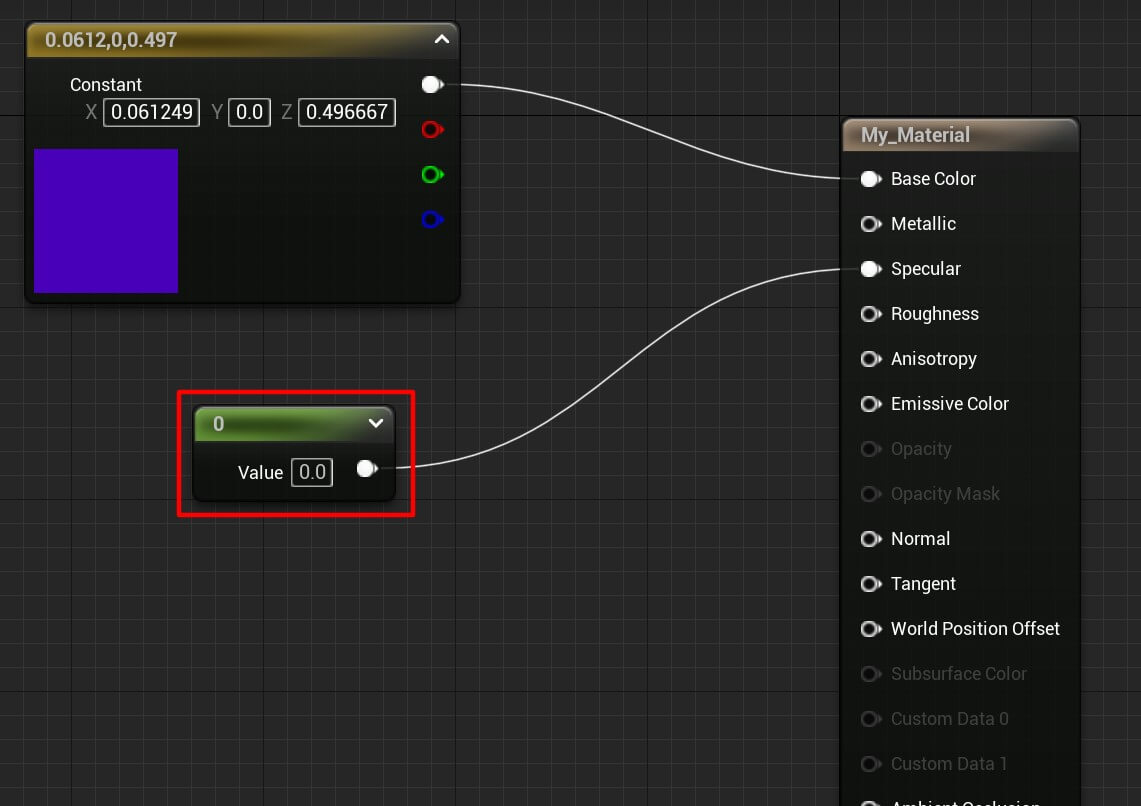
The Specular option works only on non-metallic surfaces. So if you want to have a metallic effect for your material you can’t use the Specular option.
You can, however, have Roughness in combination with Specular. But for the sake of this example, we’re just changing the Specular option.
This is how the surface looks like before we changed the Specular value:

This is how it looks like after we’ve changed the Specular value:
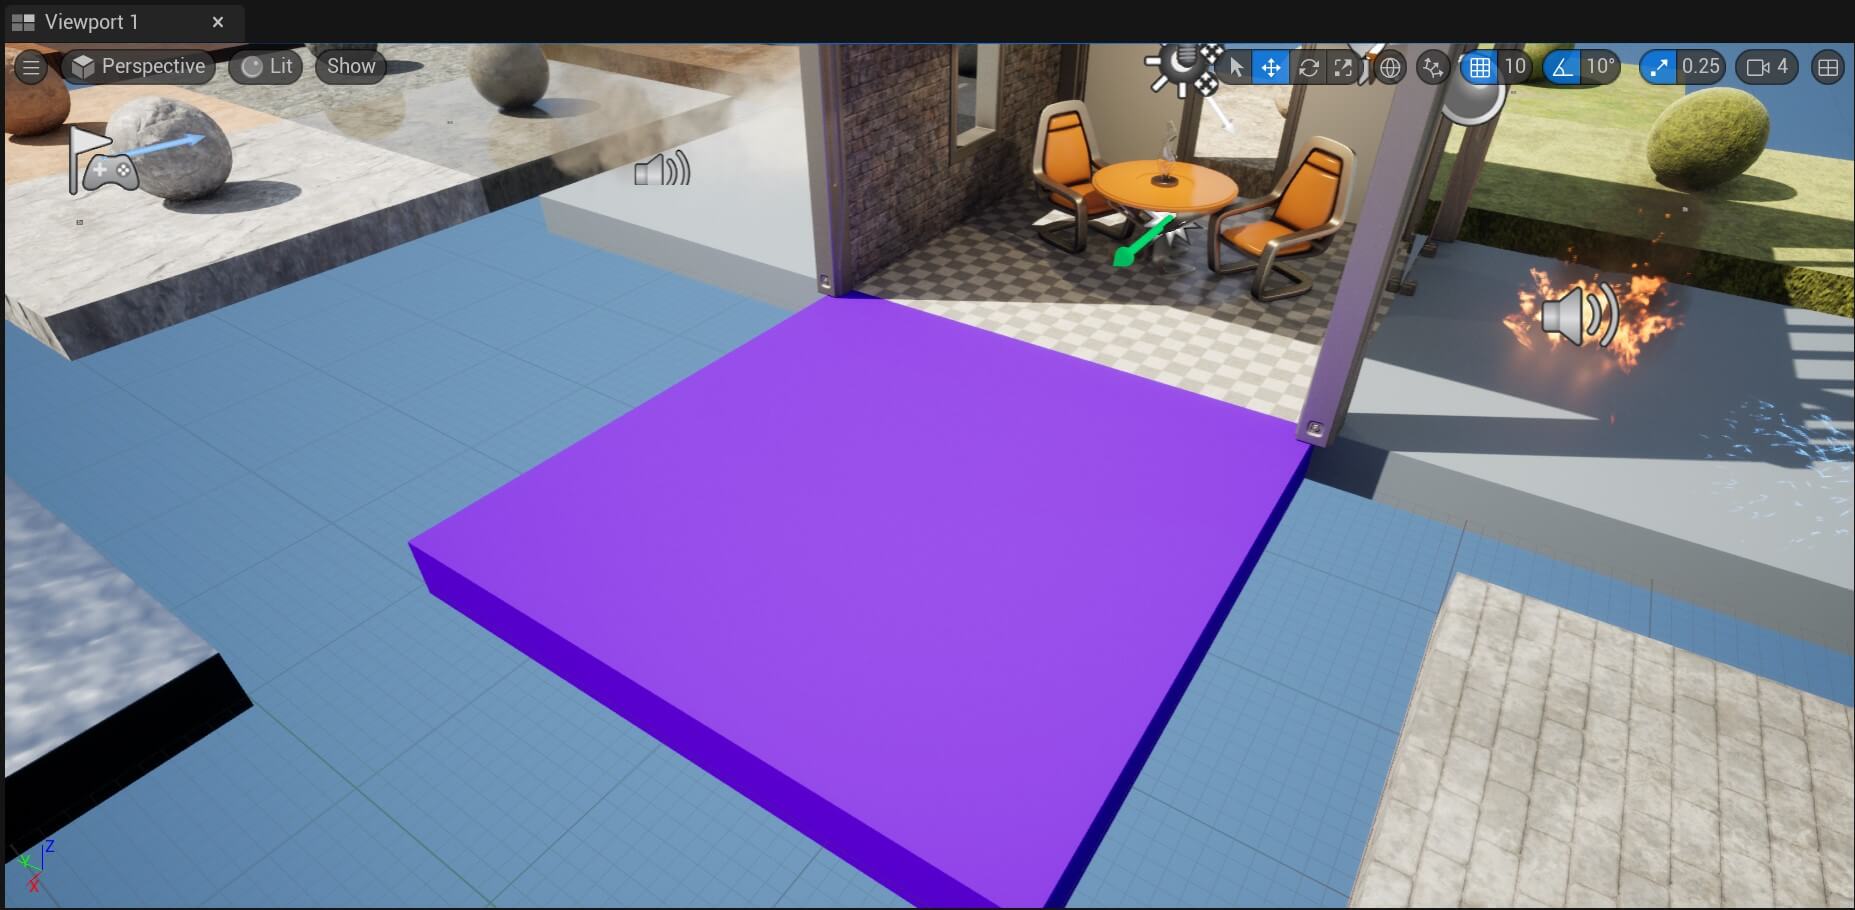
The material attached on the surface can now reflect light. Of course, this is determined by the amount of light and the light settings in the game.
Instance Materials
One thing you noticed when it comes to materials is that the changes we make to them take time to compile. Of course, that’s not the end of the world and we can still use them in the project but there is a better way.
We create instances of the material which inherits all the properties the original material has, but when we make changes to the instance, they are applied much faster.
Plus, we can make these changes during the game’s runtime and it will also apply instantly.
To create a material instance, Right Click -> Materials -> Material Instance:
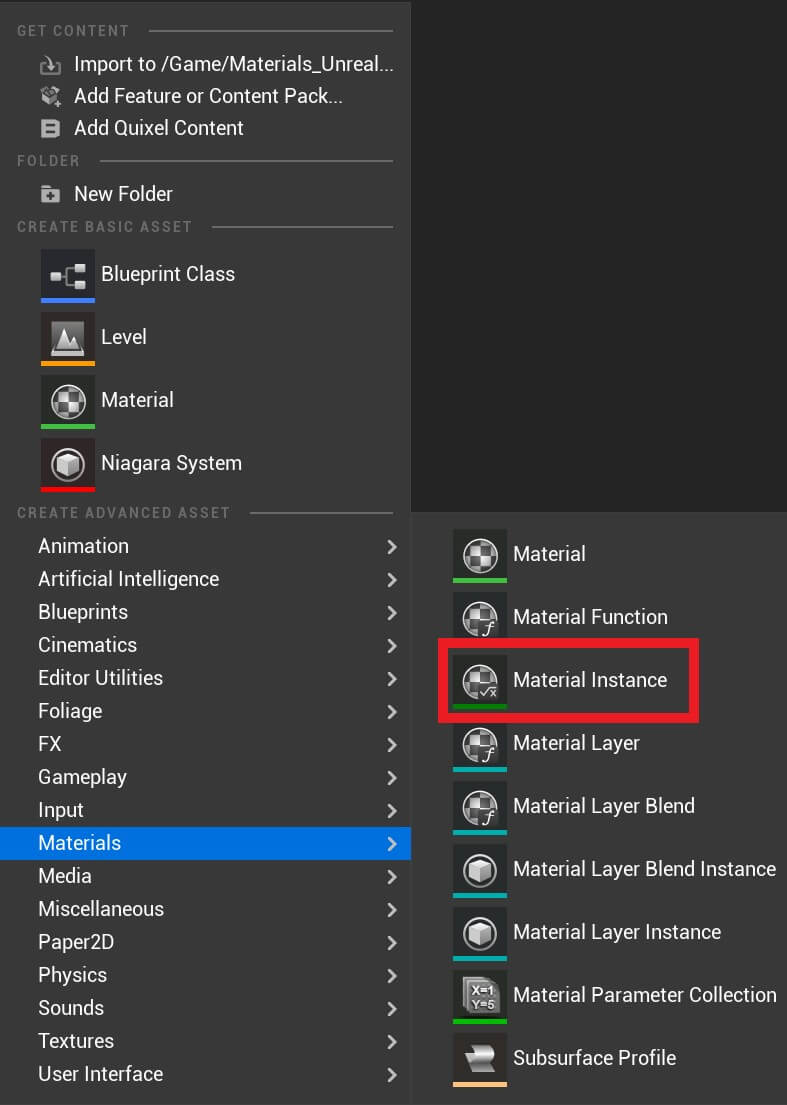
Give the material instance a name and open it in the editor. You’ll notice that the instance doesn’t have the same editor as the material:
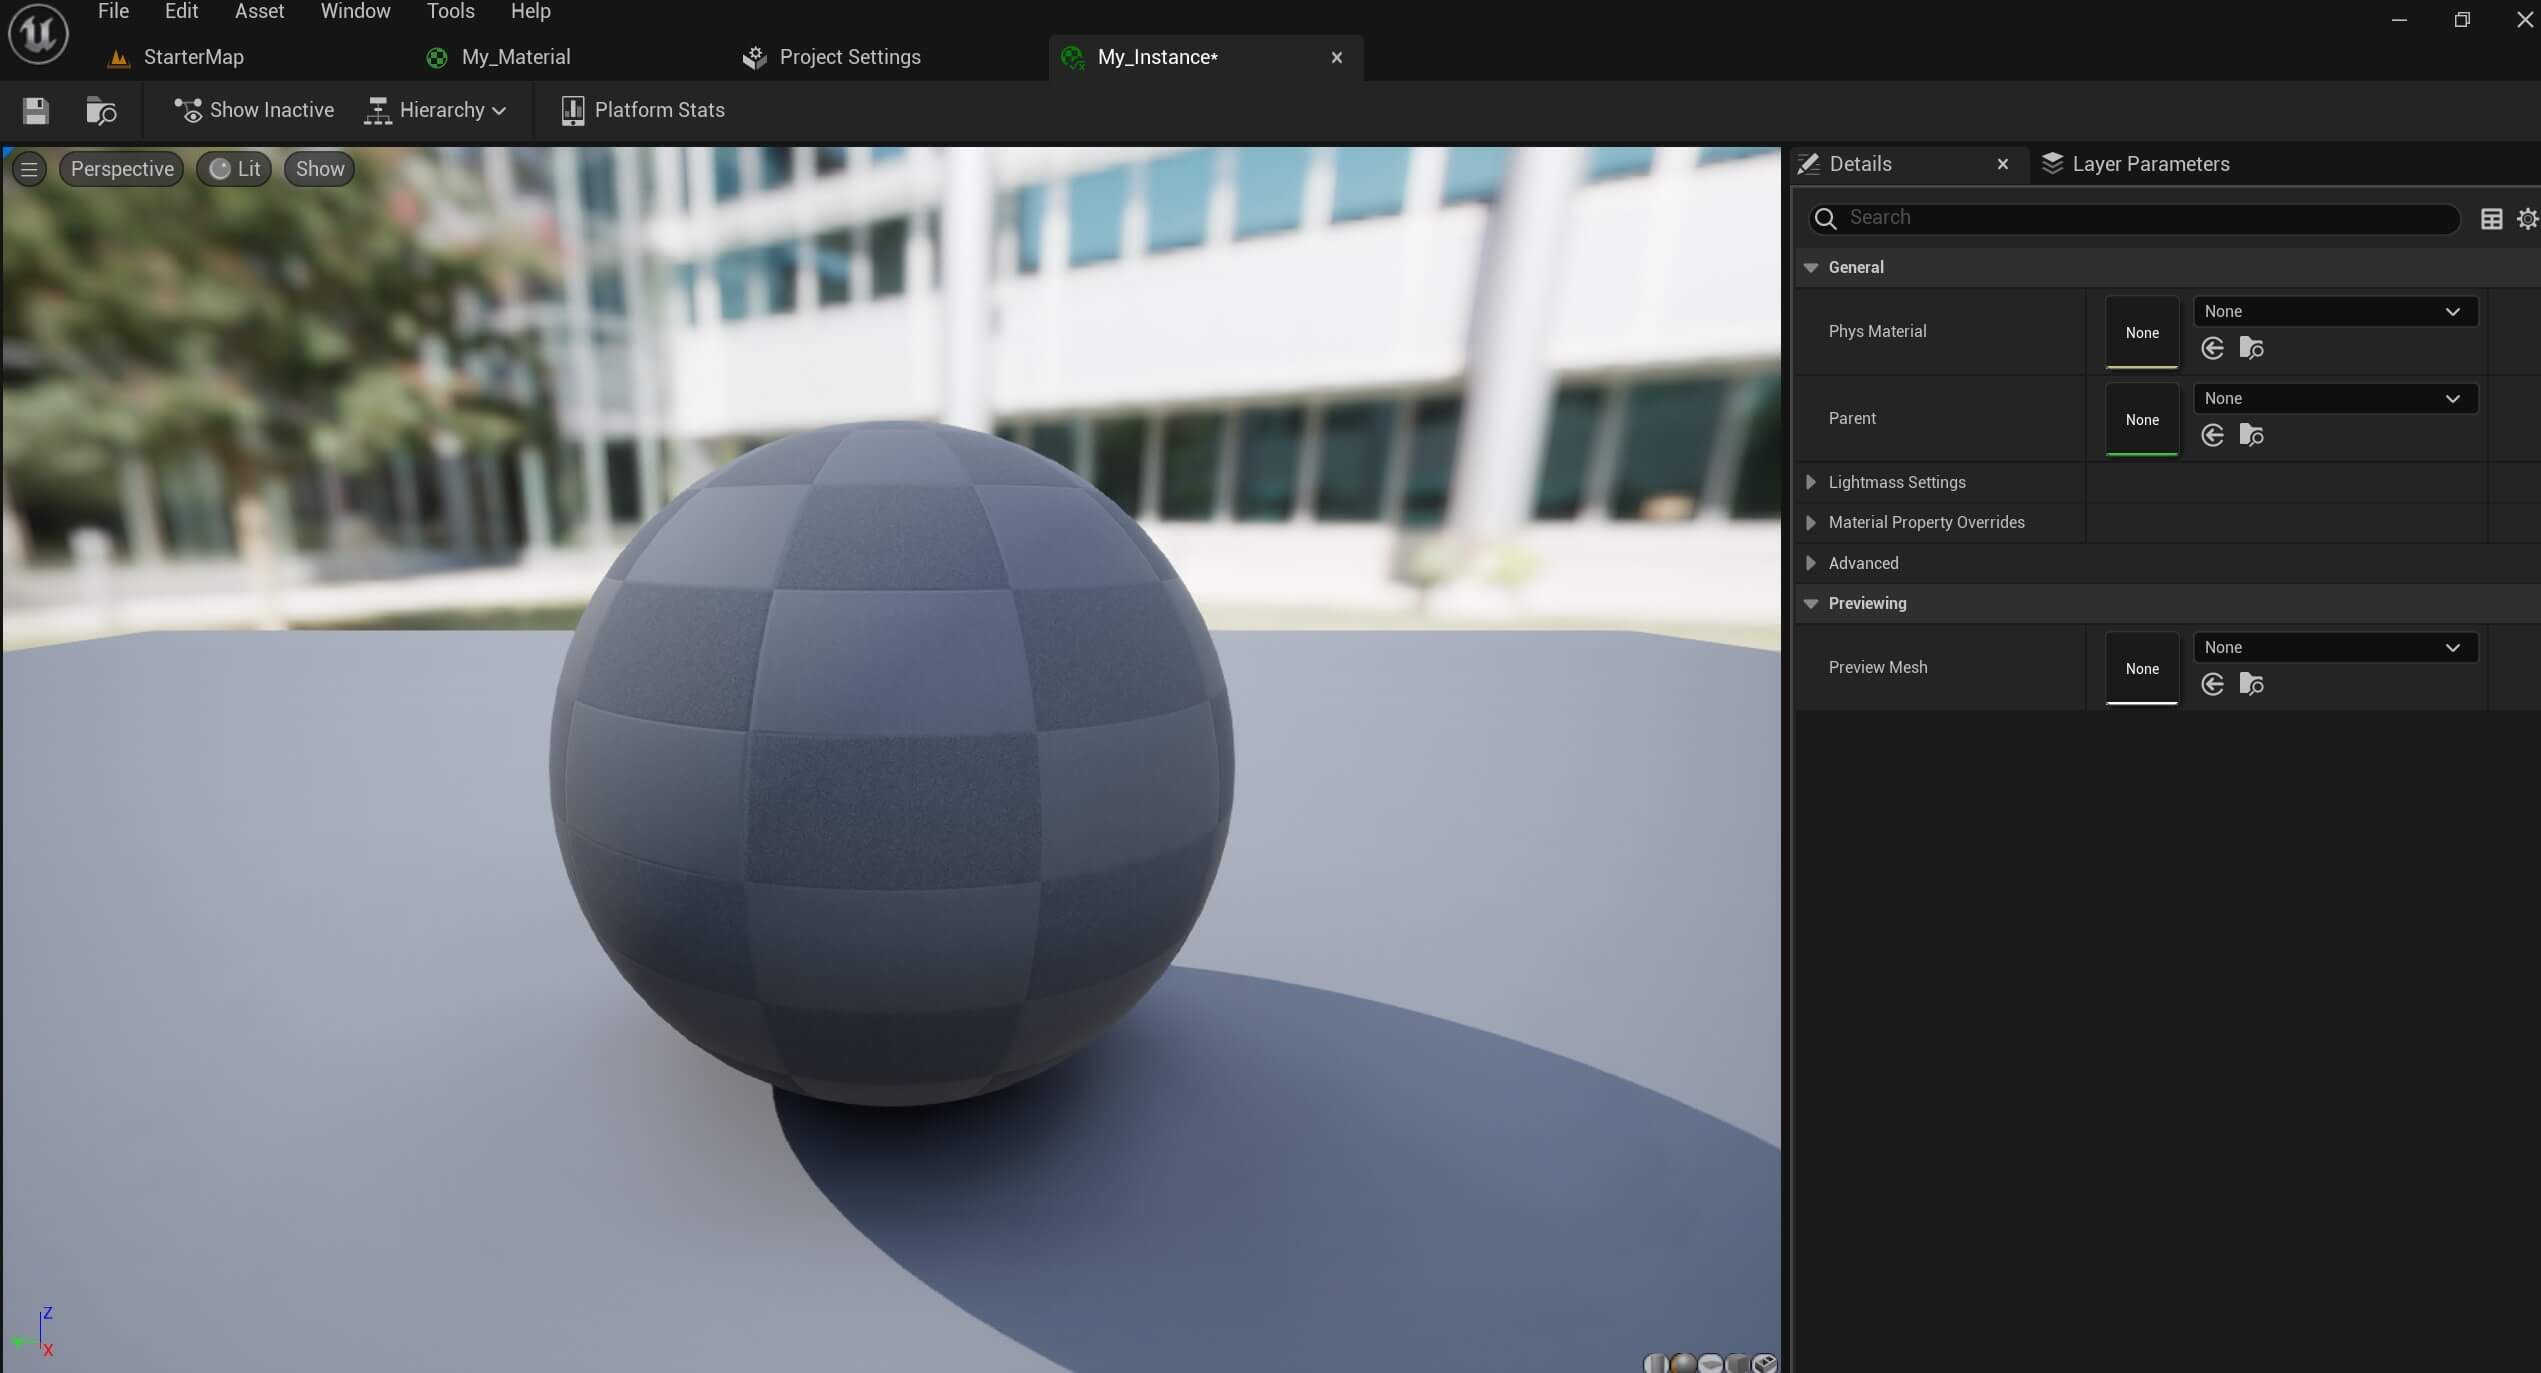
That’s because the instance, inherits everything from the parent material, and we can only change a few things such as the color of the instance.
To do that, we first need to inherit a parent material. In Details tab, for the Parent, click the drop-down list and search for the parent material you want to inherit:
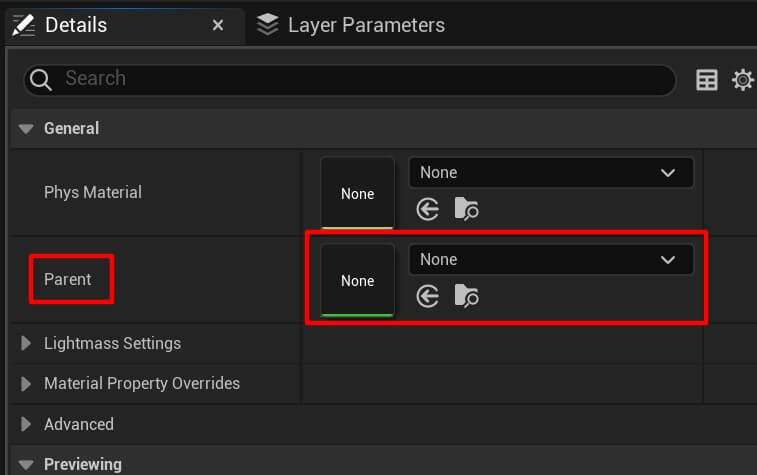
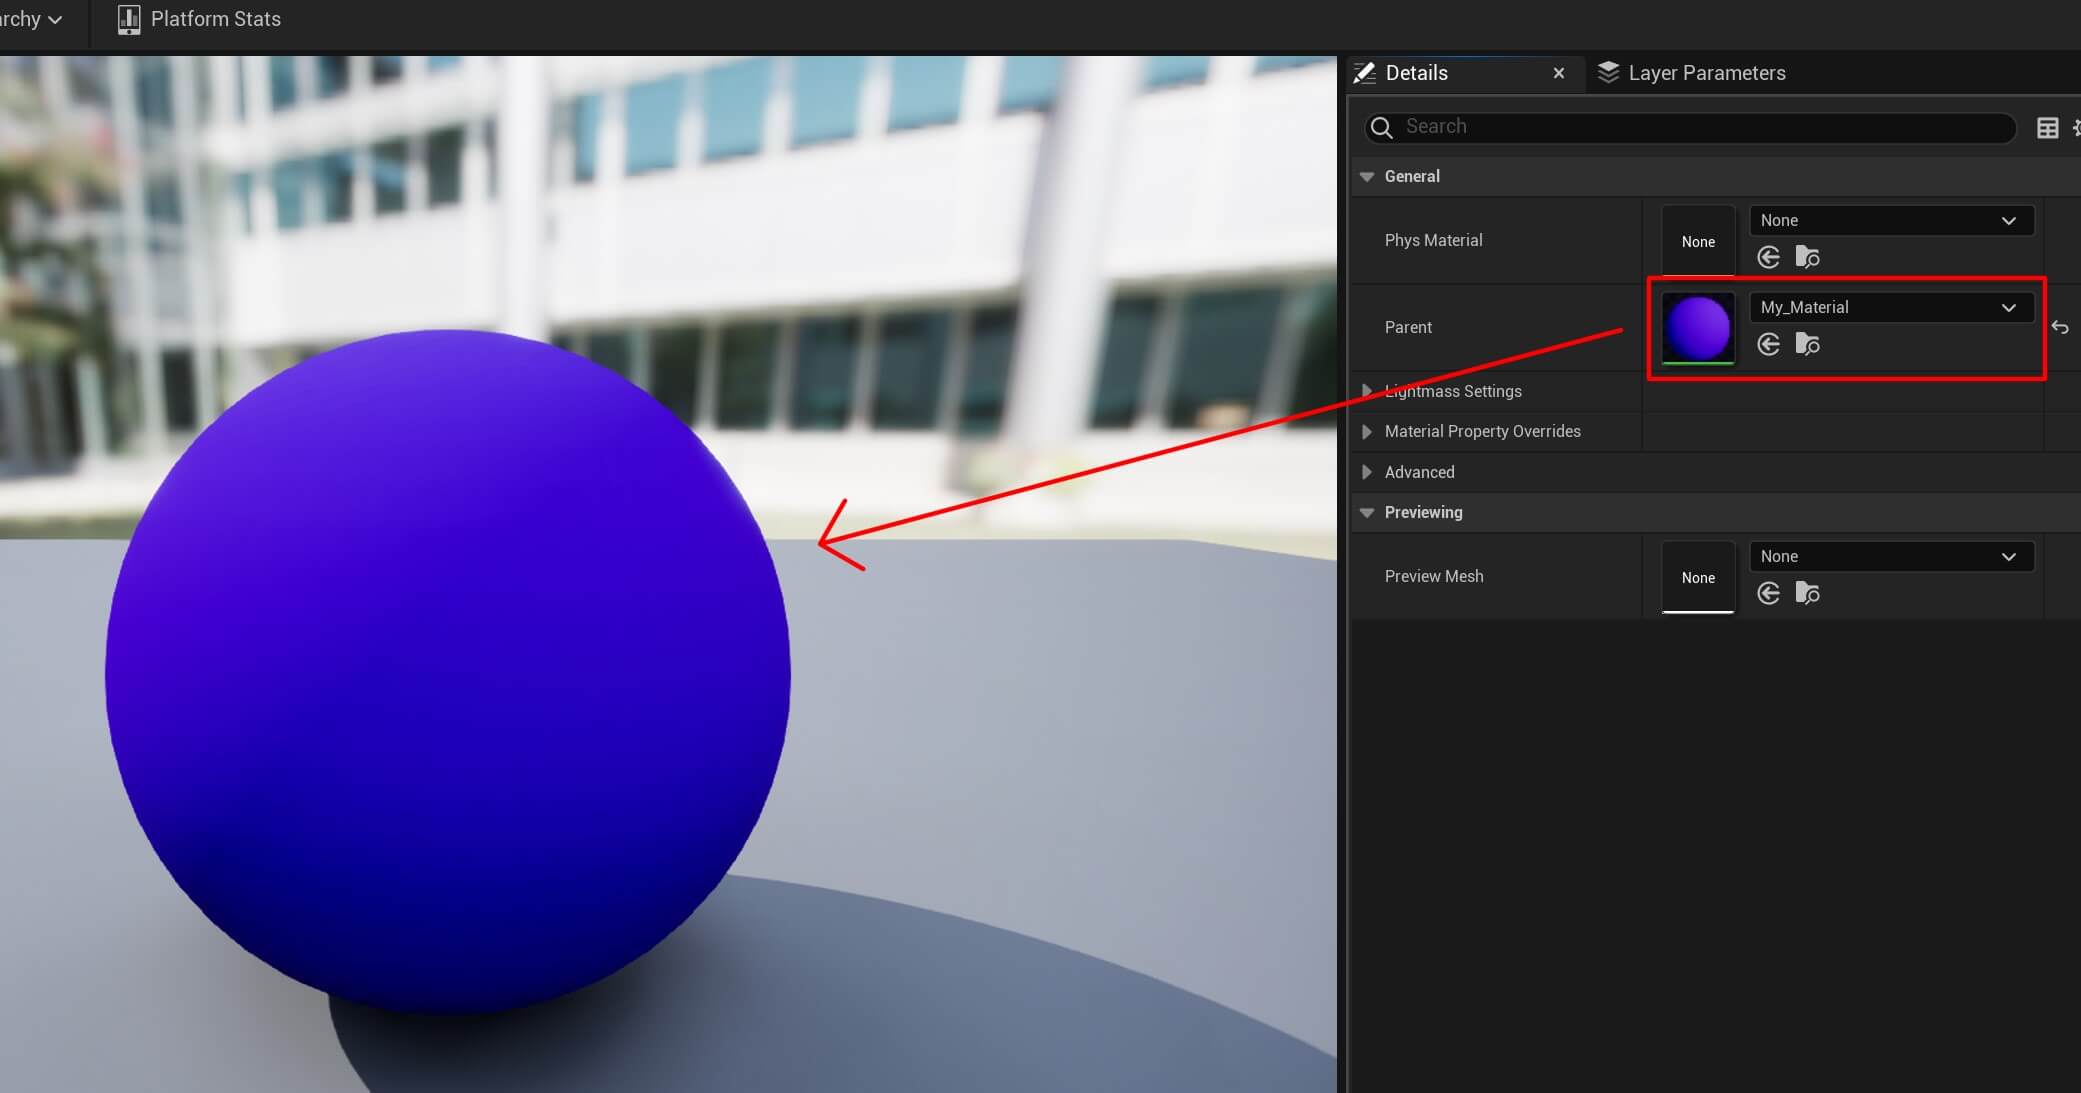
As soon as we selected a parent material, the appearance of the instance material changed to the same color as the parent.
The point of the instance material is to save the rendering power and thus the performance of the game.
If we know that we have a material which will have a lot of properties such as the color, metallic, specular, roughness, and others, we can create instances of that material and any change we make to the instance is applie to it much faster than on the original material.
The reason is because the instance of the material can only have and change properties which it’s parent material has.
So when we change one value, only that one change will be processed by the engine instead all of the other values in material.
Now to change the values of the instance, we need to make the variables as parameters.
We do that by Right Click on the variable, then press Convert To Parameter:
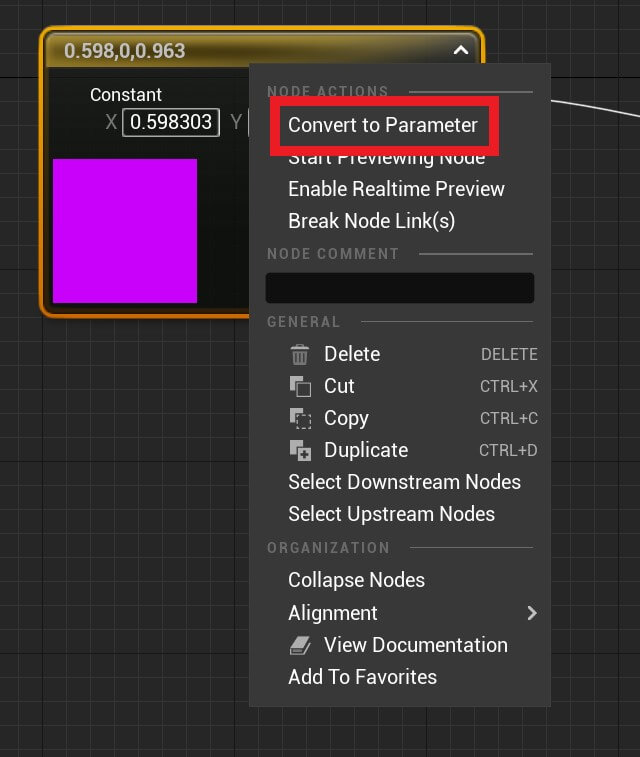
You can also give the parameter a name. We named the vector 3 parameter Color, since we’re using it to change the color of the material.
When the variable is converted into a parameter we can see it in the parameter tab:
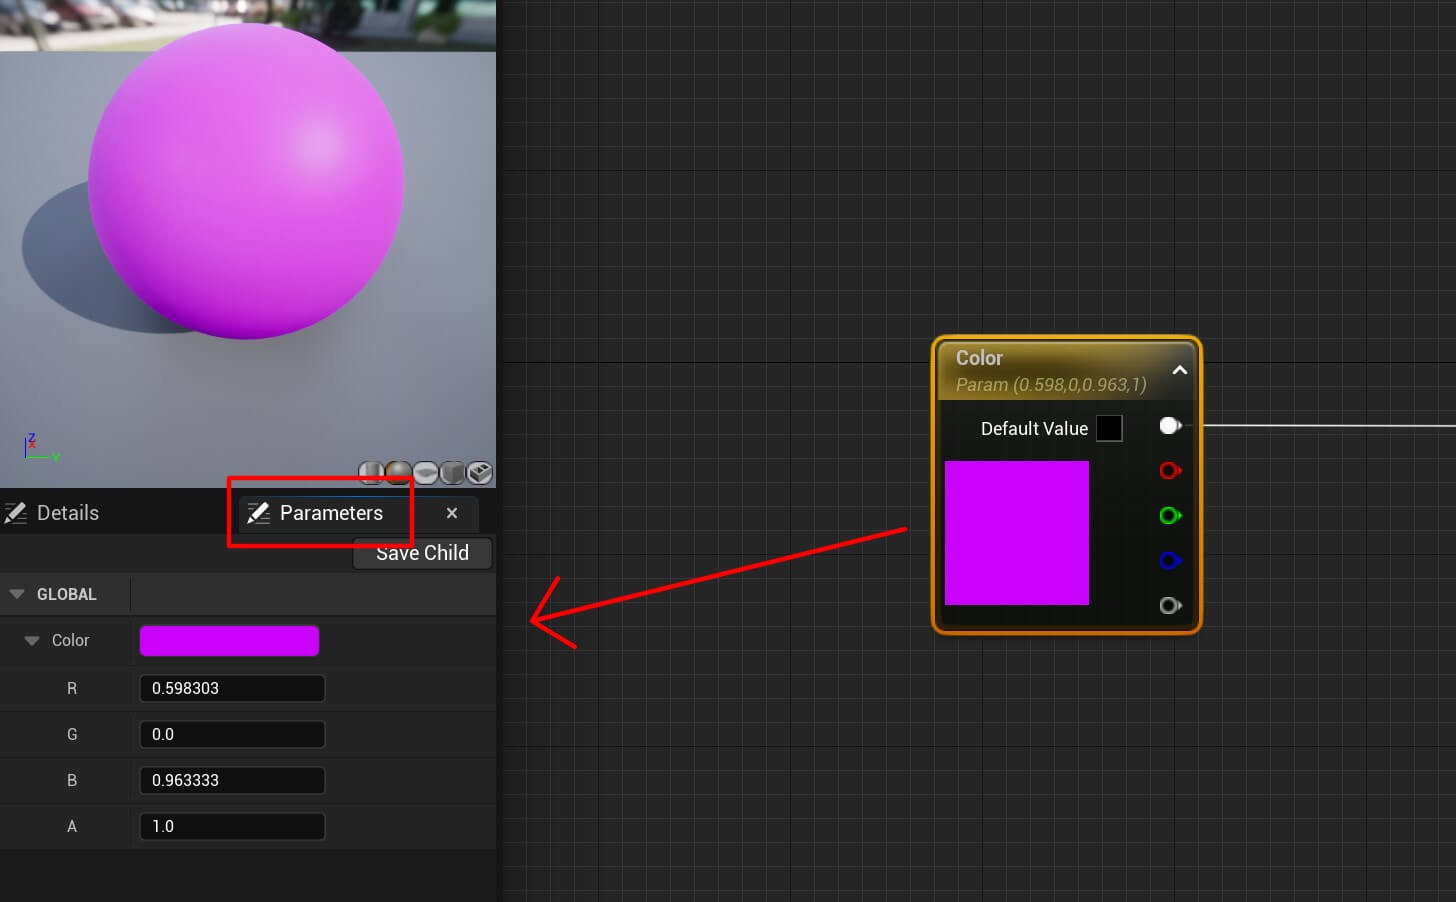
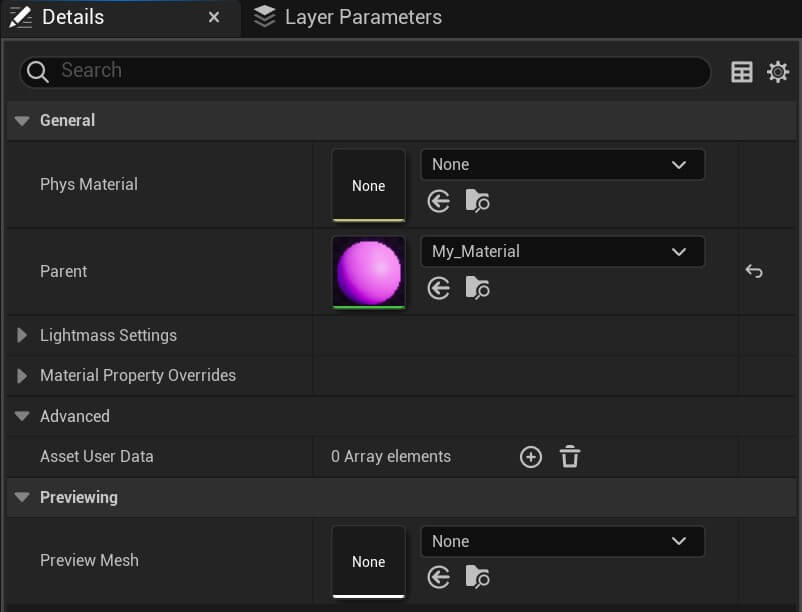
Also, before we changed the Color variable to parameter, we were not able to see it in the Details tab inside the instance material:
But now since we made the Color variable a parameter, we can see it in the Details tab inside the instance material:
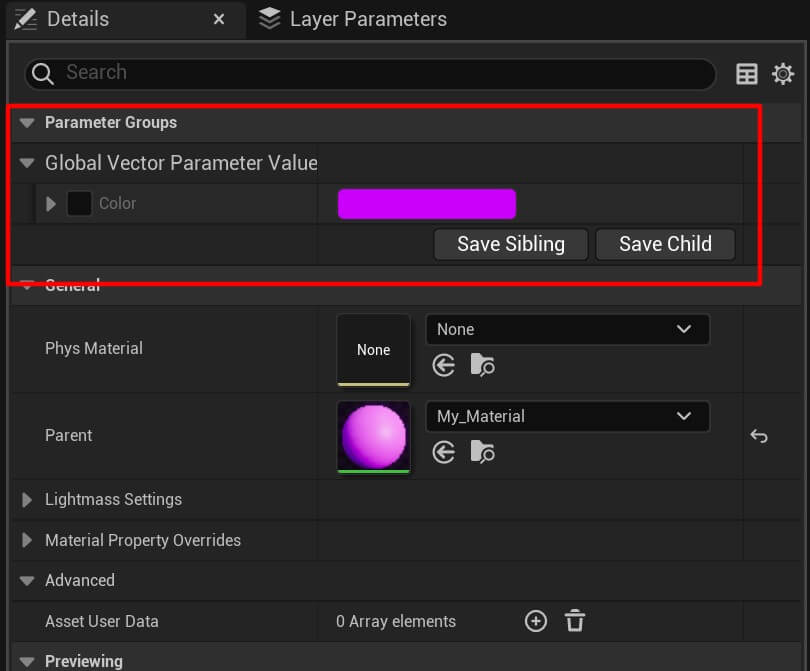
Make sure that you press the Apply and Save button at the top left corner in the original material so the changes are saved. If you don’t do this, you’ll not be able to see the Color parameter inside the instance material.
To change the color fo the instance material, click on the color check box, then click on the color itself to open the palette tab and in the palette change the color:
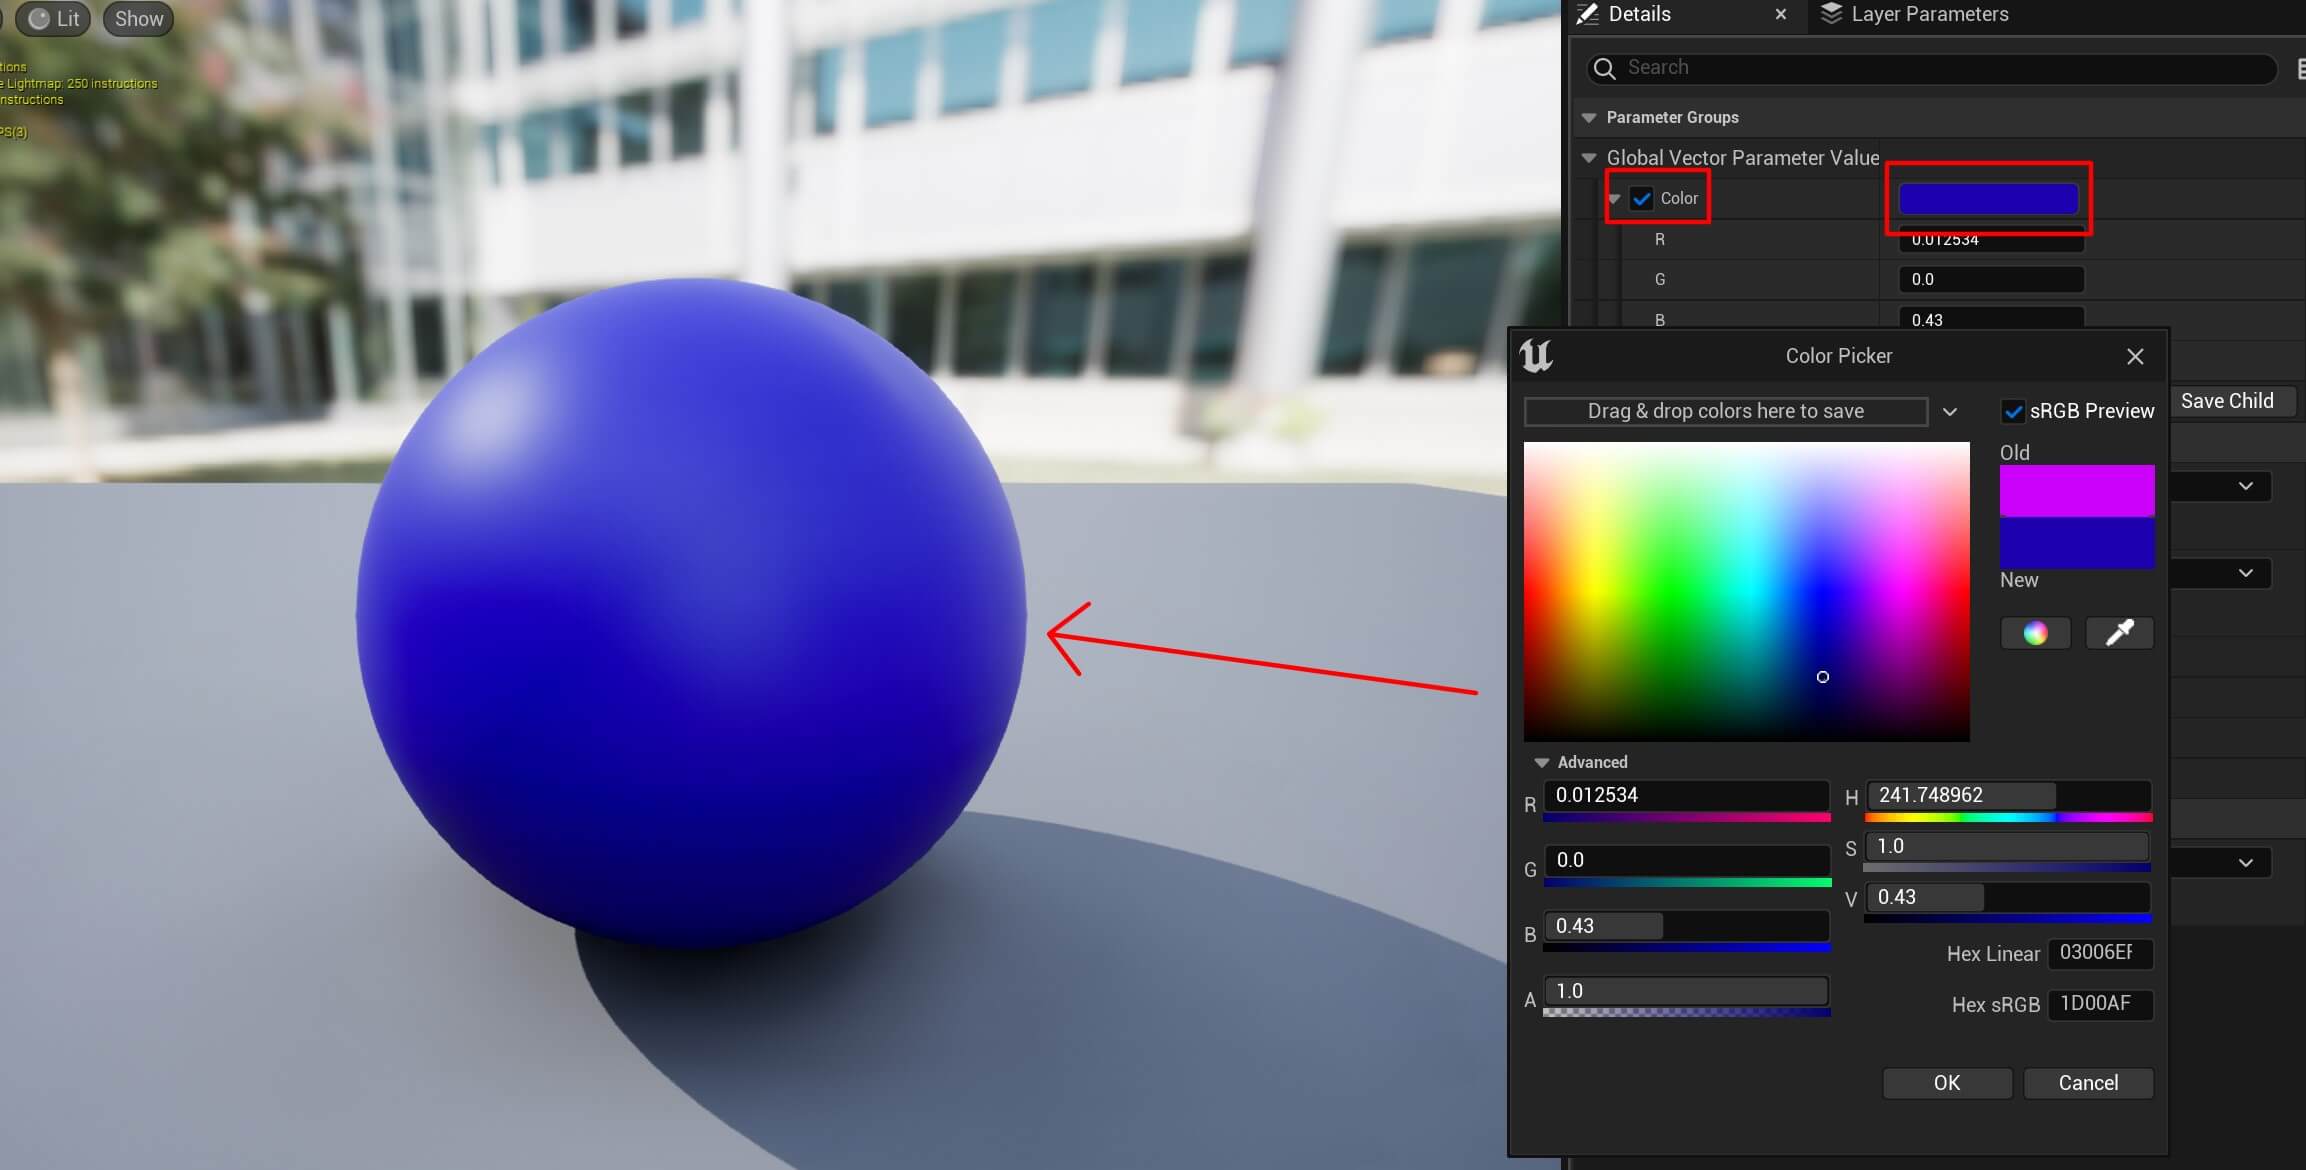
When you set the color you want, simply press the Ok button in the palette tab to apply the change and the instance material will have a new color.
In the same way we created the color Parameter, you can create other parameters such as Metallic and Roughness as you see in the image below:
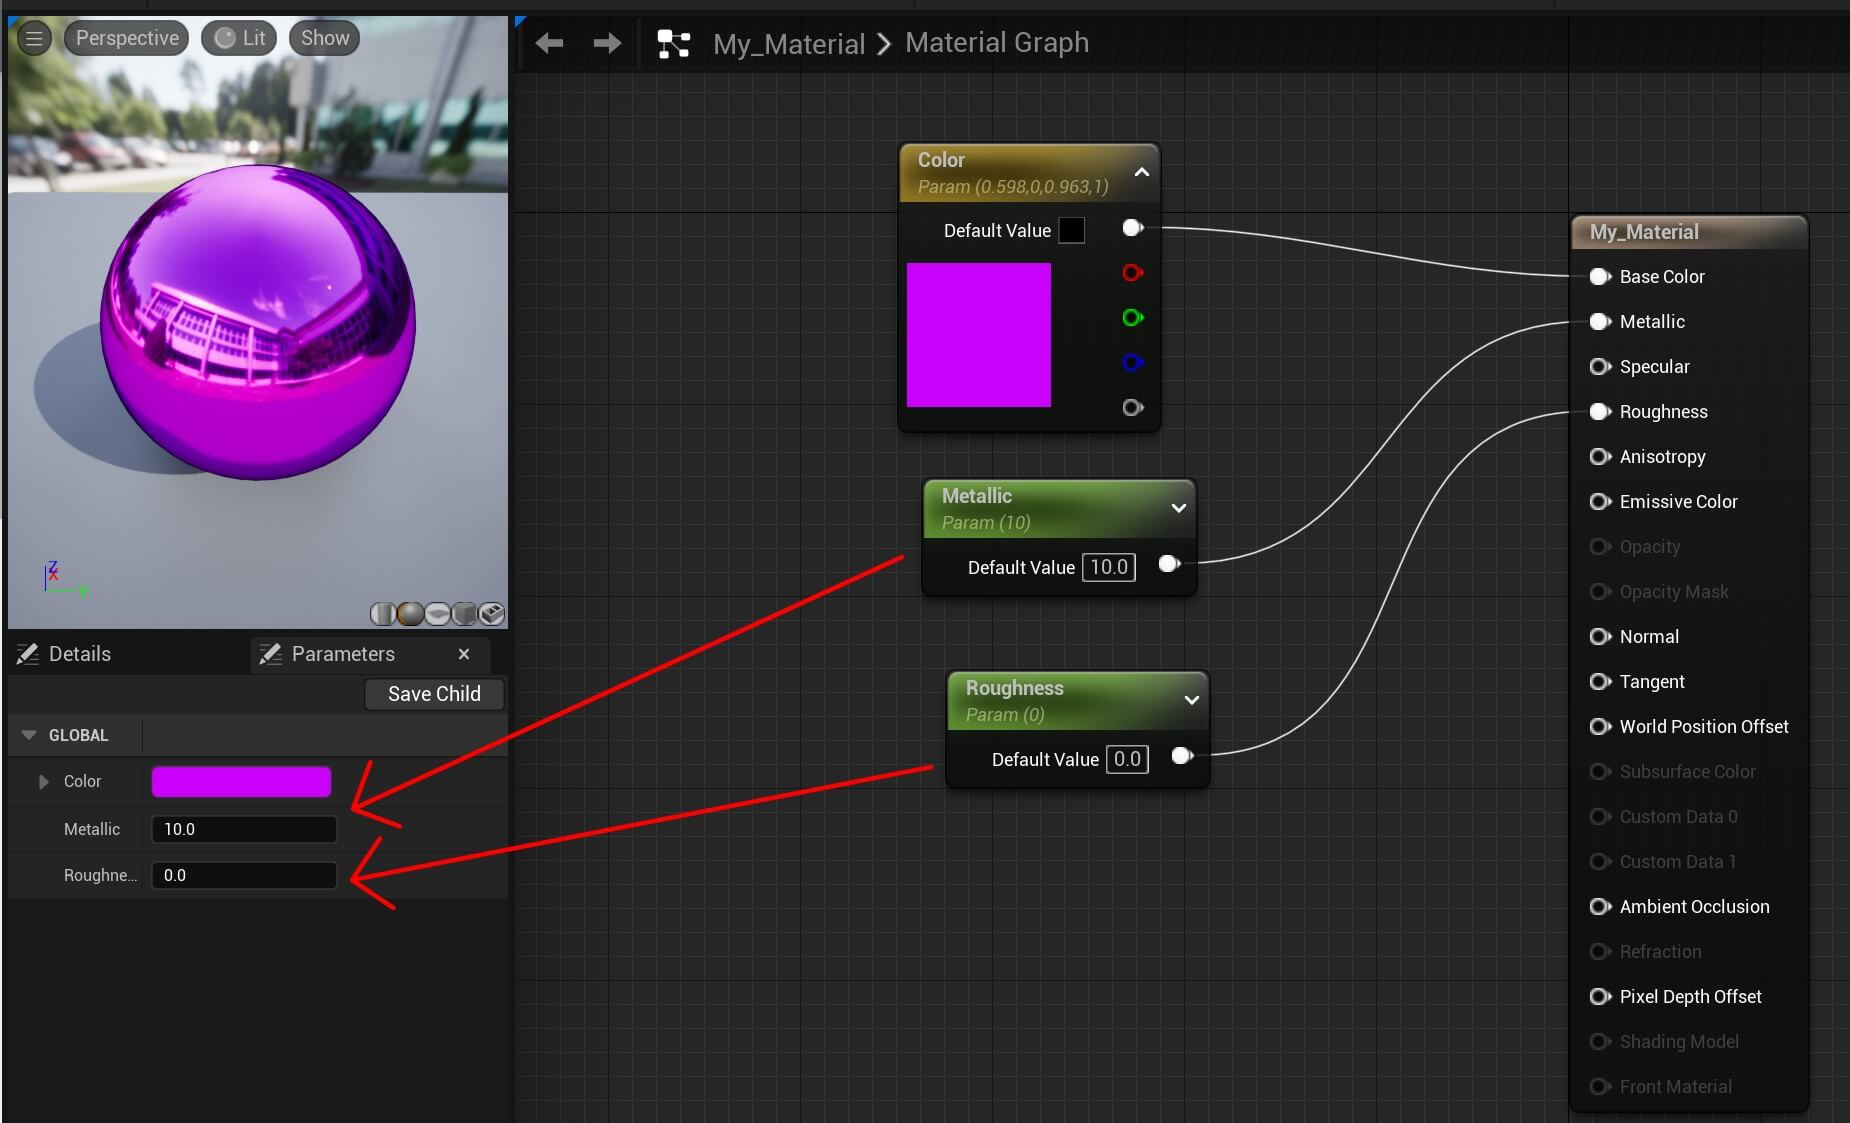
And when you do, you can see them in the Details tab of the instance material:
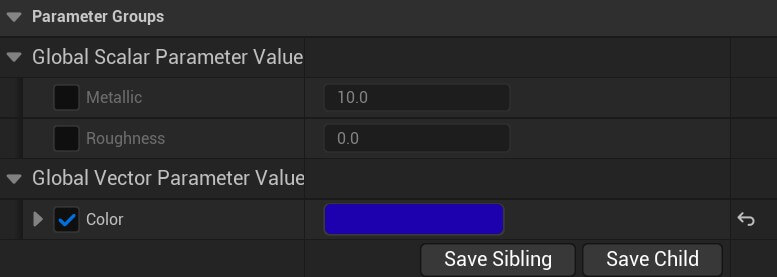
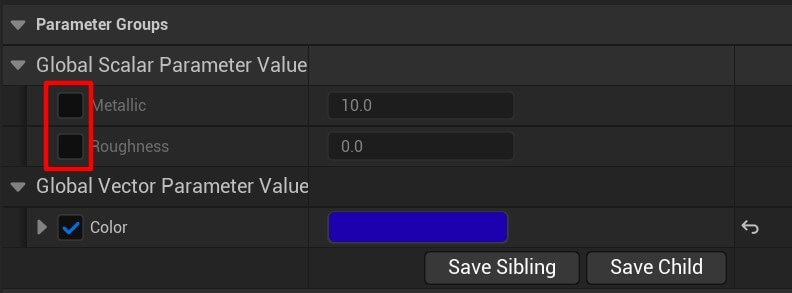
Same as with the Color parameter, you’ll first need to enable the parameters by checkin their checkbox to be able to change their values:
The same way we attached the original material to an object in the game, we can attach the instance material to another object in the game:
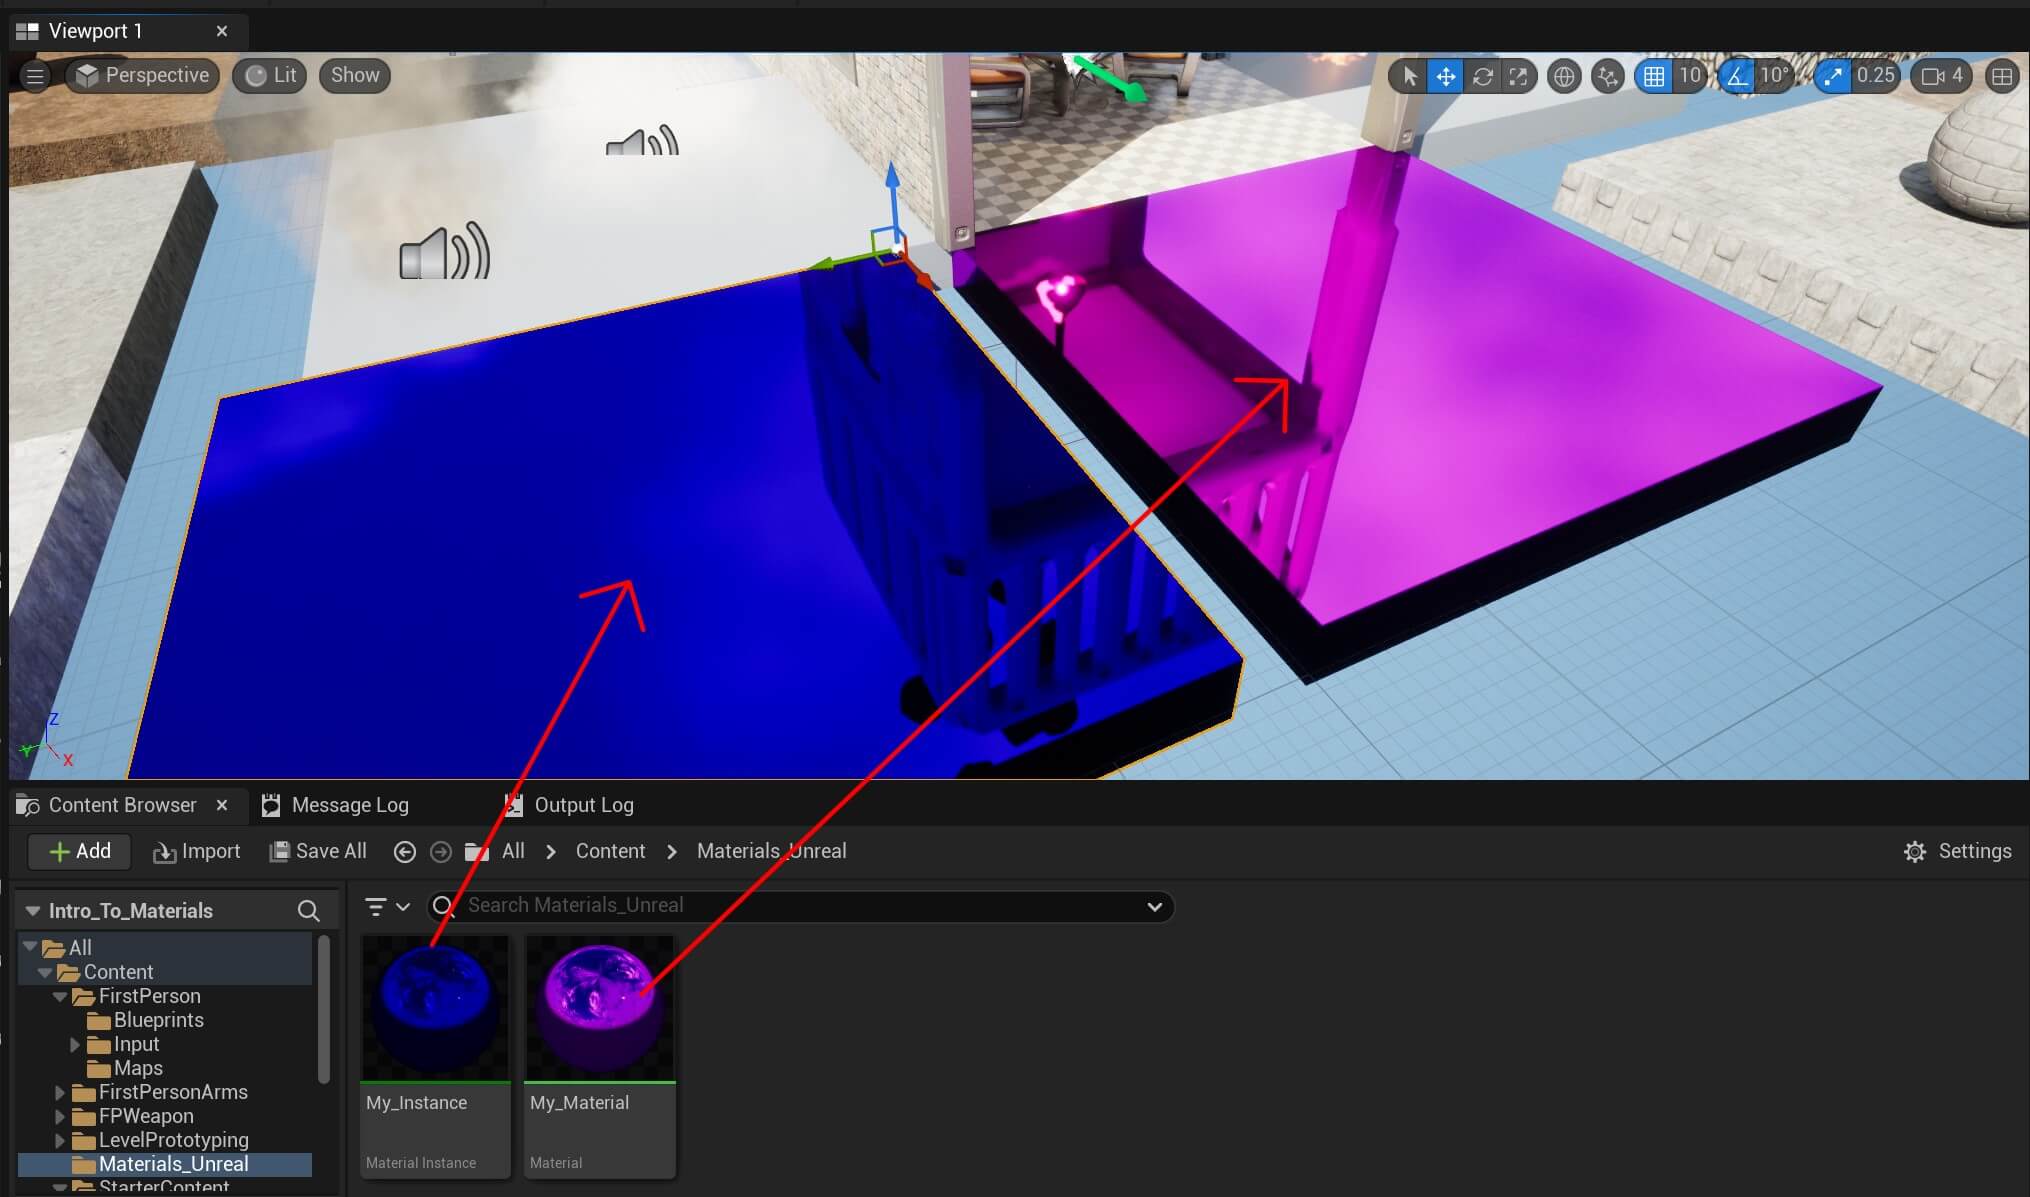
Since we changed the color of the instance material the game object which holds the instance material has the new color while the first game obejct has the color of the original material.
This is how we can use instance materials to apply them to multiple objects in the game and when the instances share one parent material we save rendering power and thus optimize our game.
Texture Materials
Using the methods from the previous example will allow us to create color materials which we can certainly use in our game.
But if you’re creating a FPS game for example, or any other game from any genre, you’re going to use texture materials as well.
Texture materials allow us to make our game objects look realistict. For example, we can create a stone material, attach it on a cube, and the cube will look like it’s made out of stone.
To do this, we need to use textures.
If you know how to create 3D models in blender, zbrush, or any other software, then you already know everything about textures.
And for those who don’t know how to create 3D models here’s a note, textures come with the 3D model. When you purchase any 3D model online, you’ll also find its textures in the download folder. Same as when you hire someone to create a 3D model for you.
If you find free 3D models however, it can happen that they don’t come with texture for whatever reason. So pay attention to these things when you’re getting 3D models for your game.
So, how do you apply a texture to the material?
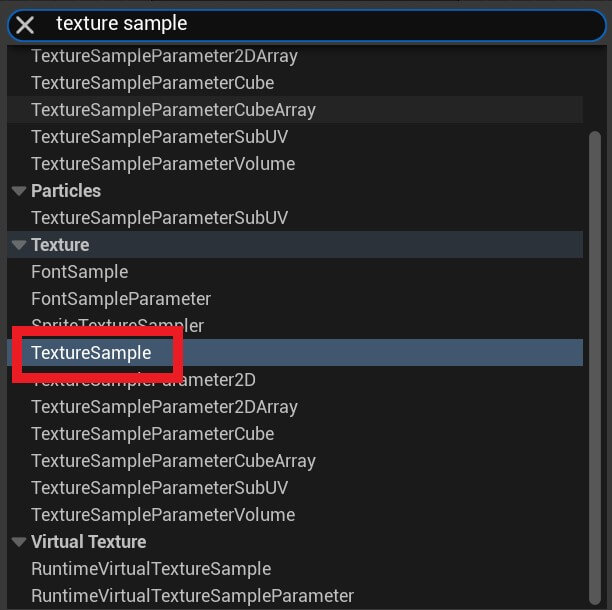
Simple, just Right Click in the editor and find the Texture Sample node:
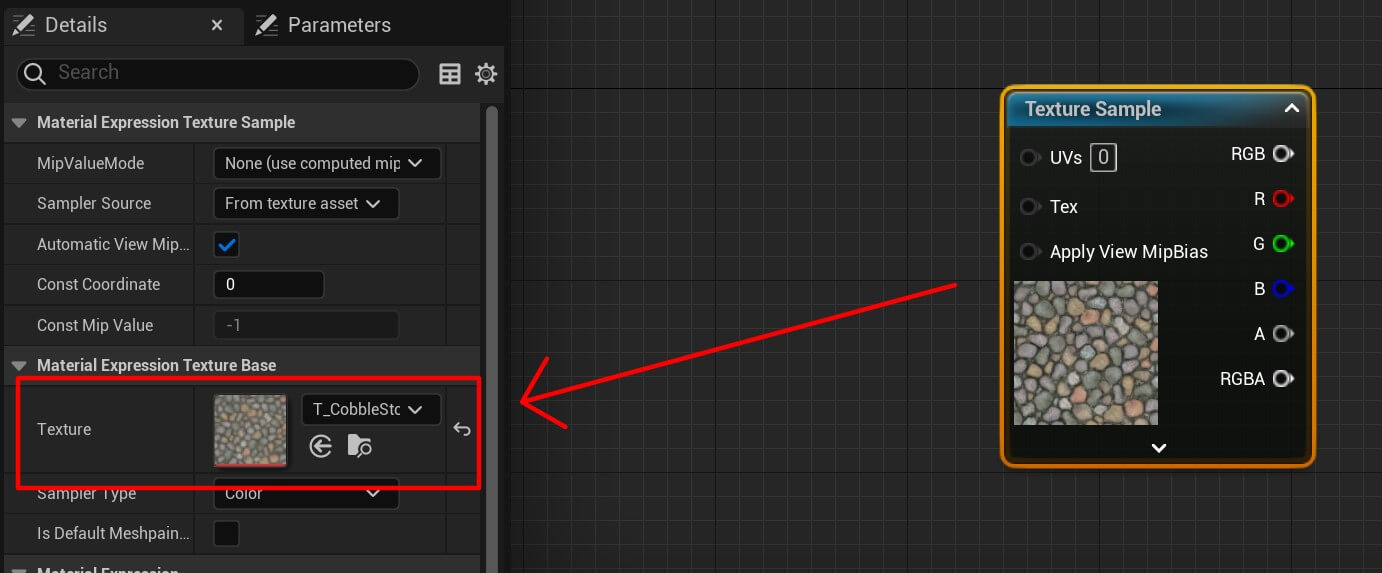
Before we add a texture to the Texture Sample node, note that we’re using a project that includes the Starter Content and the textures we’ll use are textures from the Starter Content pack.
Now select the Texture Sample node, then in the Details tab for the texture click on the drop down list and select any texture. We’ve used T_CobbleStone_Pebble_D:
Now, you can simply plug in the RGB output of the Texture Sample into the Base Color parameter for our material:
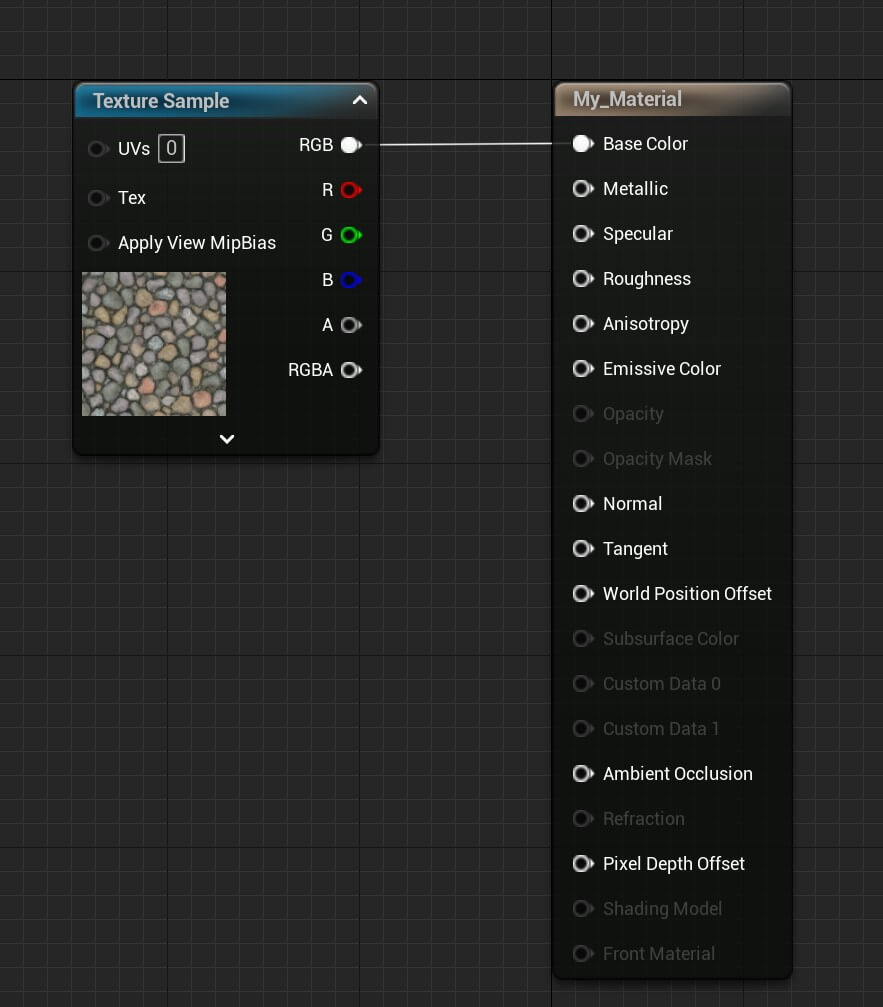
Make sure to press the Apply button at the top left corner so that the change applies to the material.
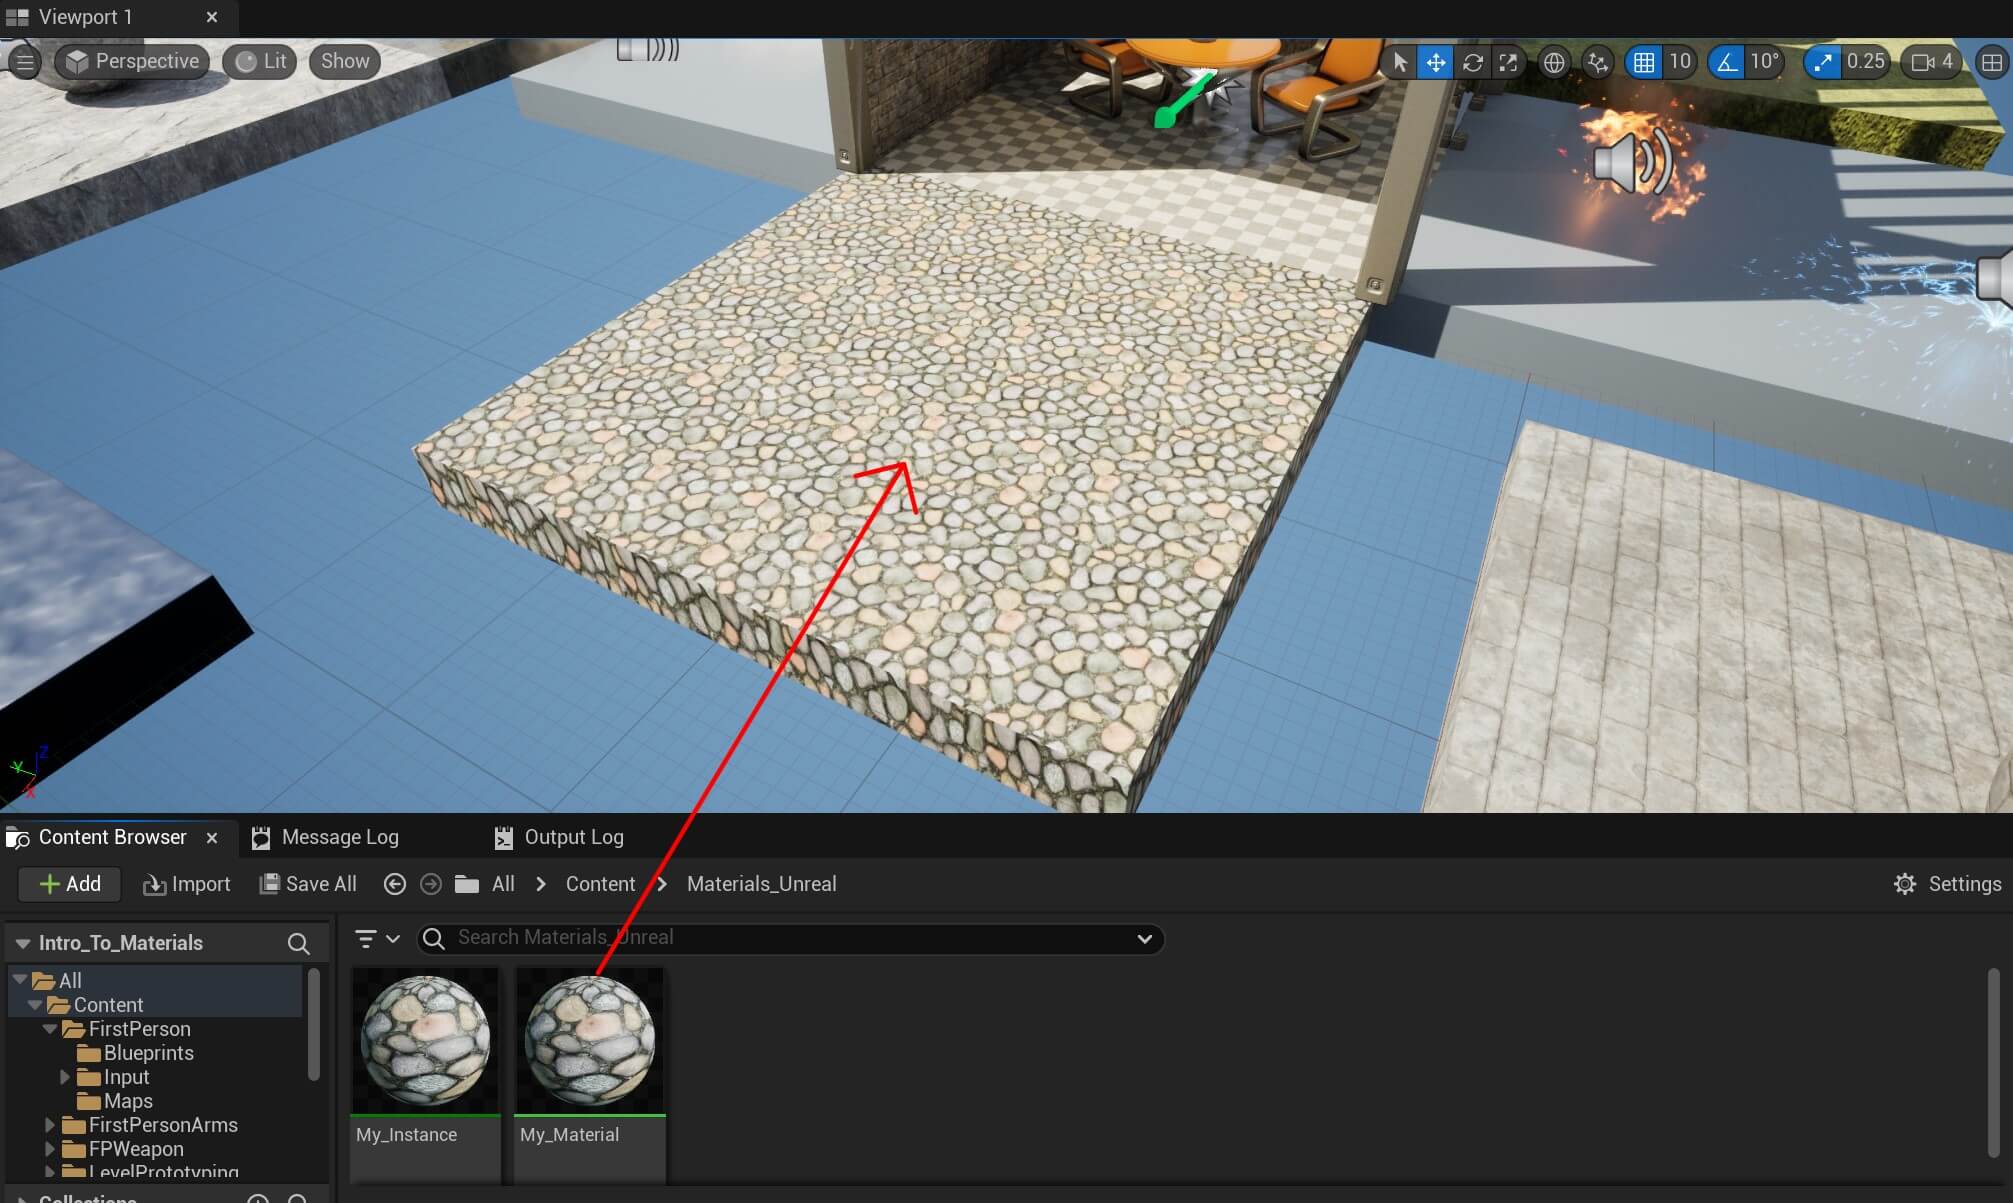
This is how the object holding this material looks like now:
Changing The Appearance Of The Texture Material
The same options we played with in the beginning, can still be used to change the appearance of the material even when it’s using a texture:
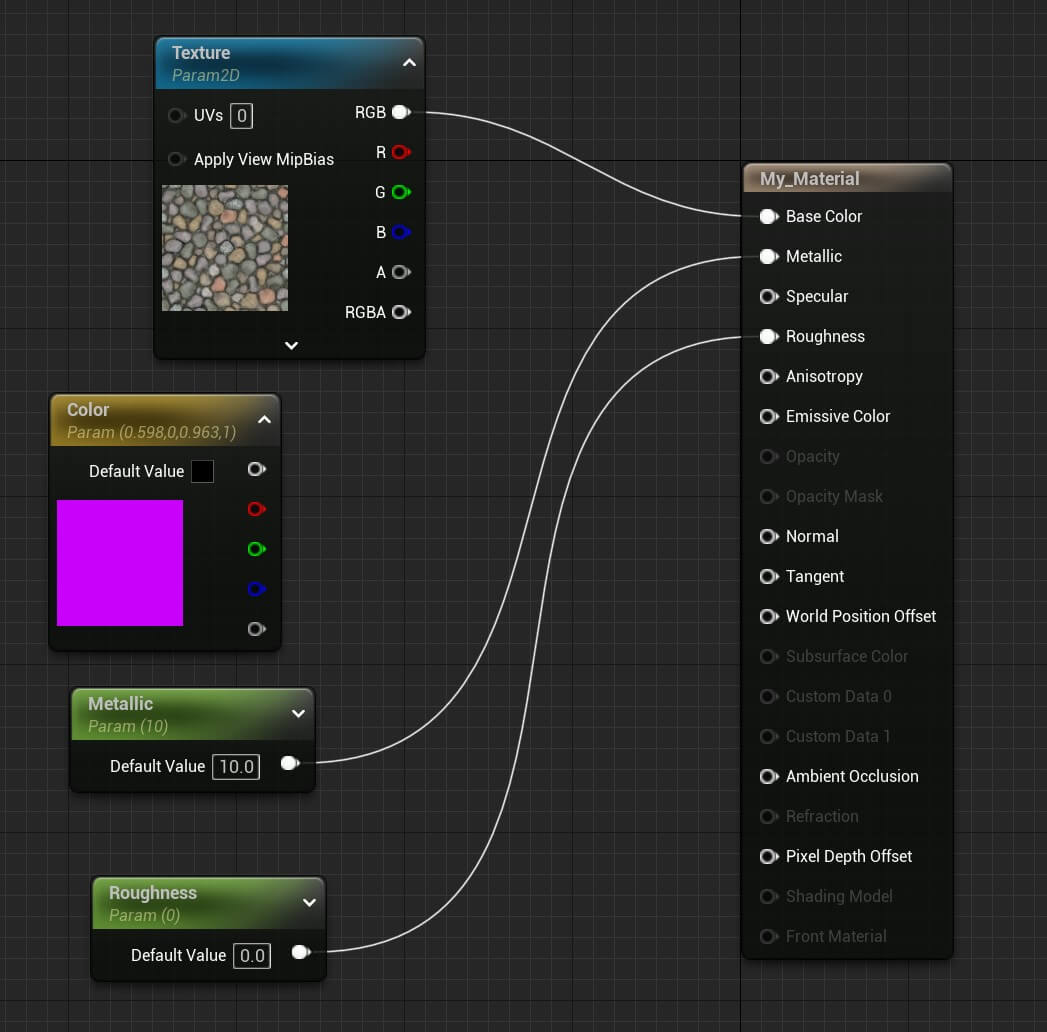
We’re using the Metallic option to make the material look more metallic and we set the Roughness option to 0 which will create a mirror effect.
We also made the Texture Sample into a parameter so we can use it in the instance material as well.
This is how the material looks like in the game:
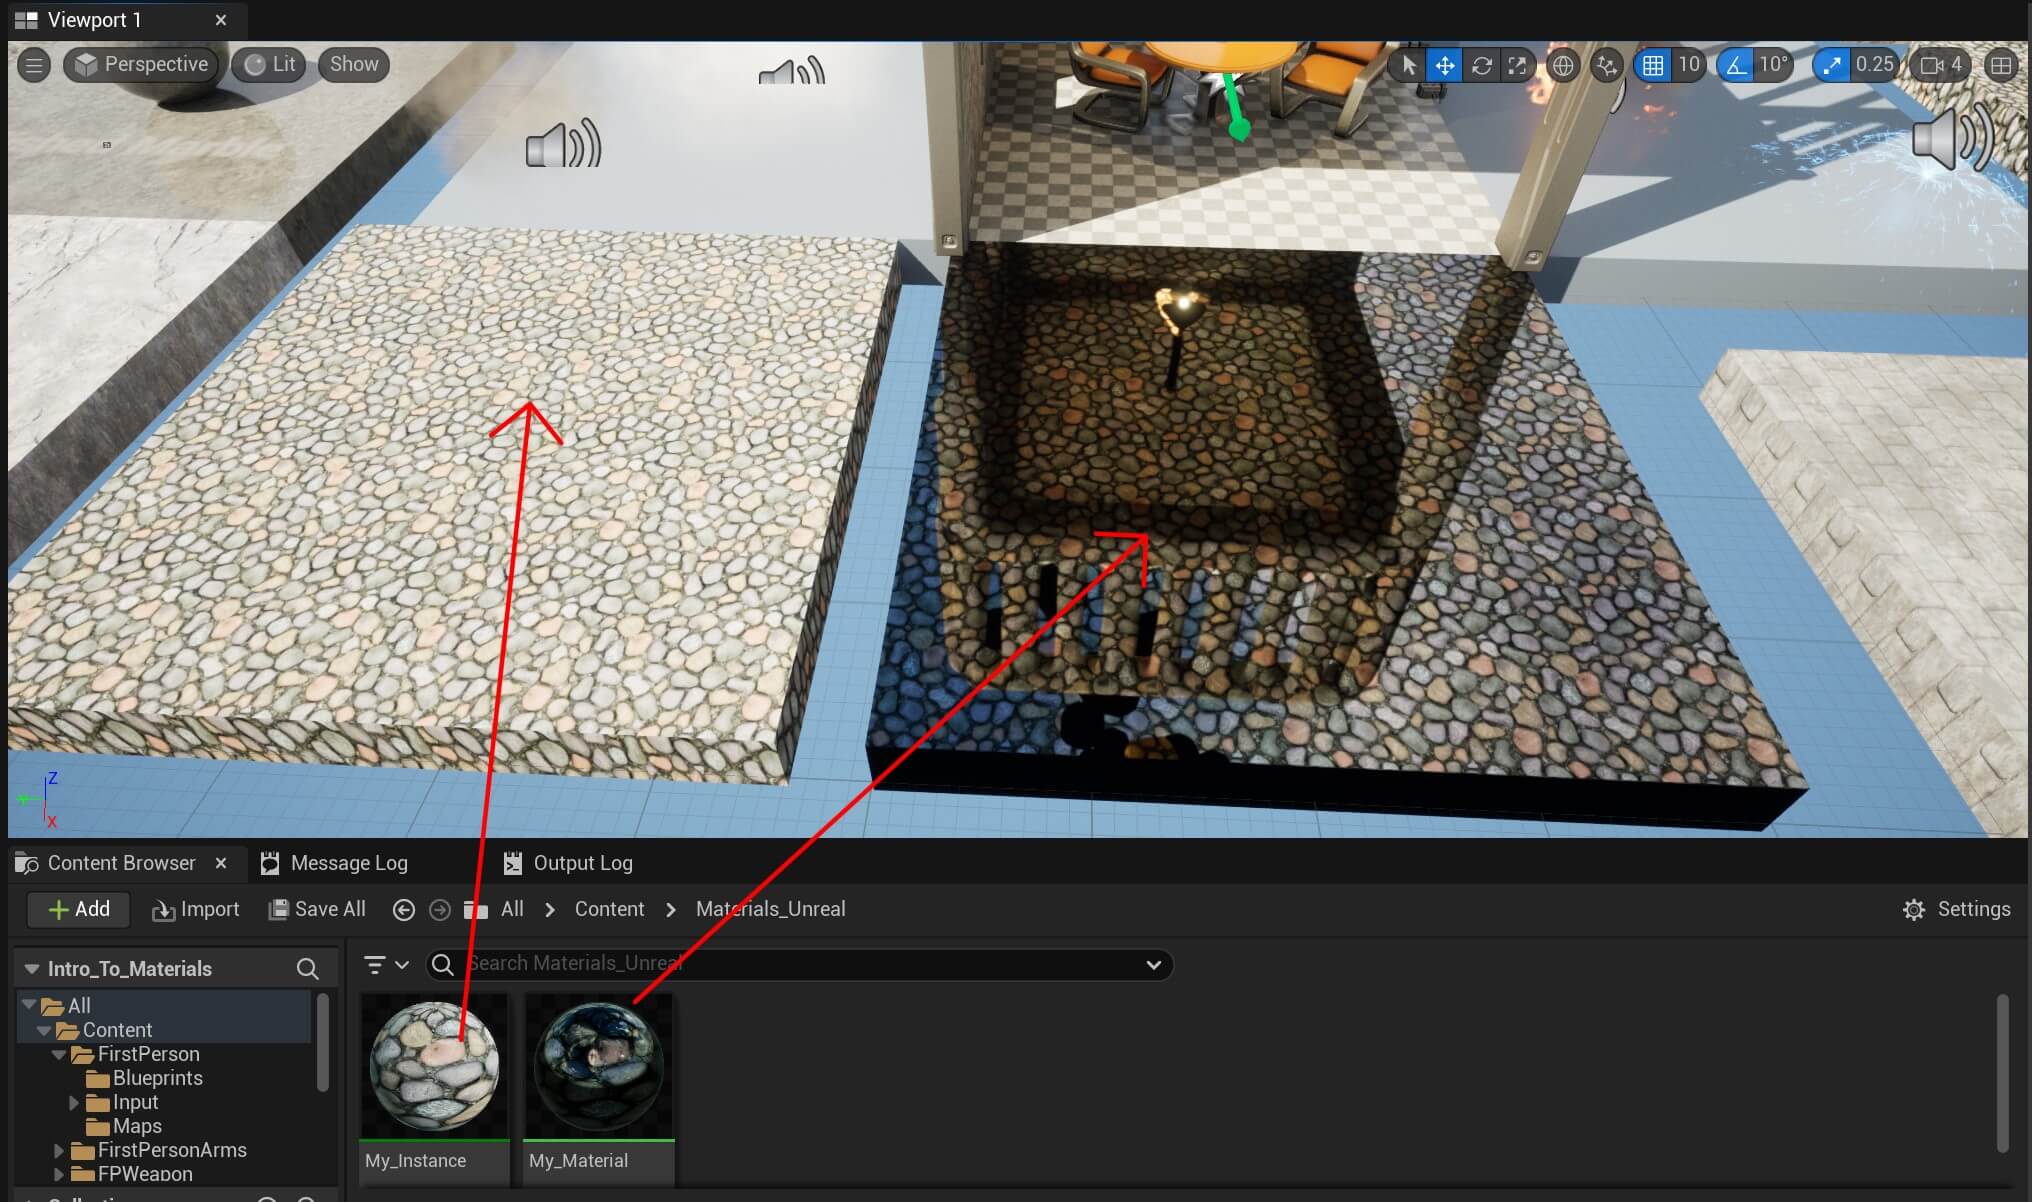
We changed the Roughness and the Metallic parameters for the instance material. That’s why the parent material has the mirror effect while the instance material has concrete effect.
Blending The Colors Of The Material
One thing we can do with materials is blend their colors. This will allow us to change the color of the material and create special FX.
We’ll also be able to change the color or the texture of the material and many other things. And do this, we’ll use math operations.
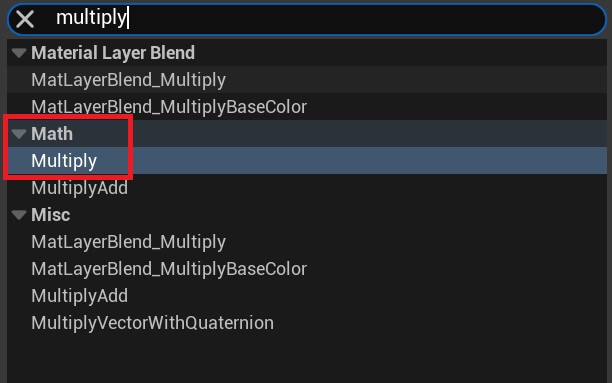
Inside the main material editor, Right Click and search for multiply:
Now, we can multiply the Texture Sample node with the Color node to give the texture a different color:
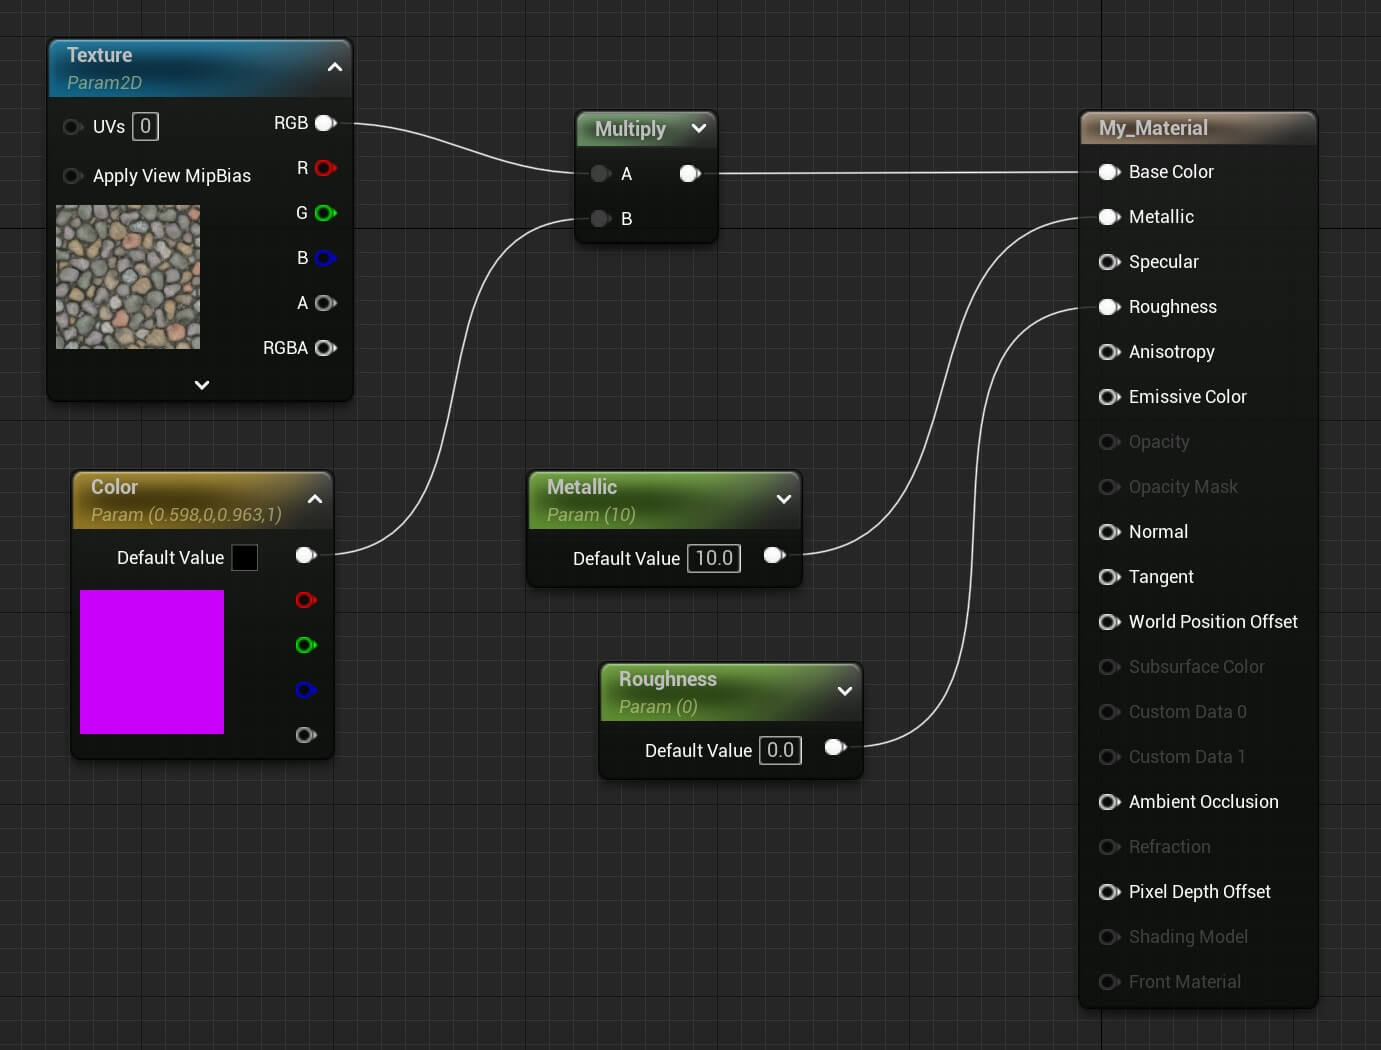
And since we made these nodes parameters inside the main material, we can also change their properties in the instance material. This is how they look like in the game now:
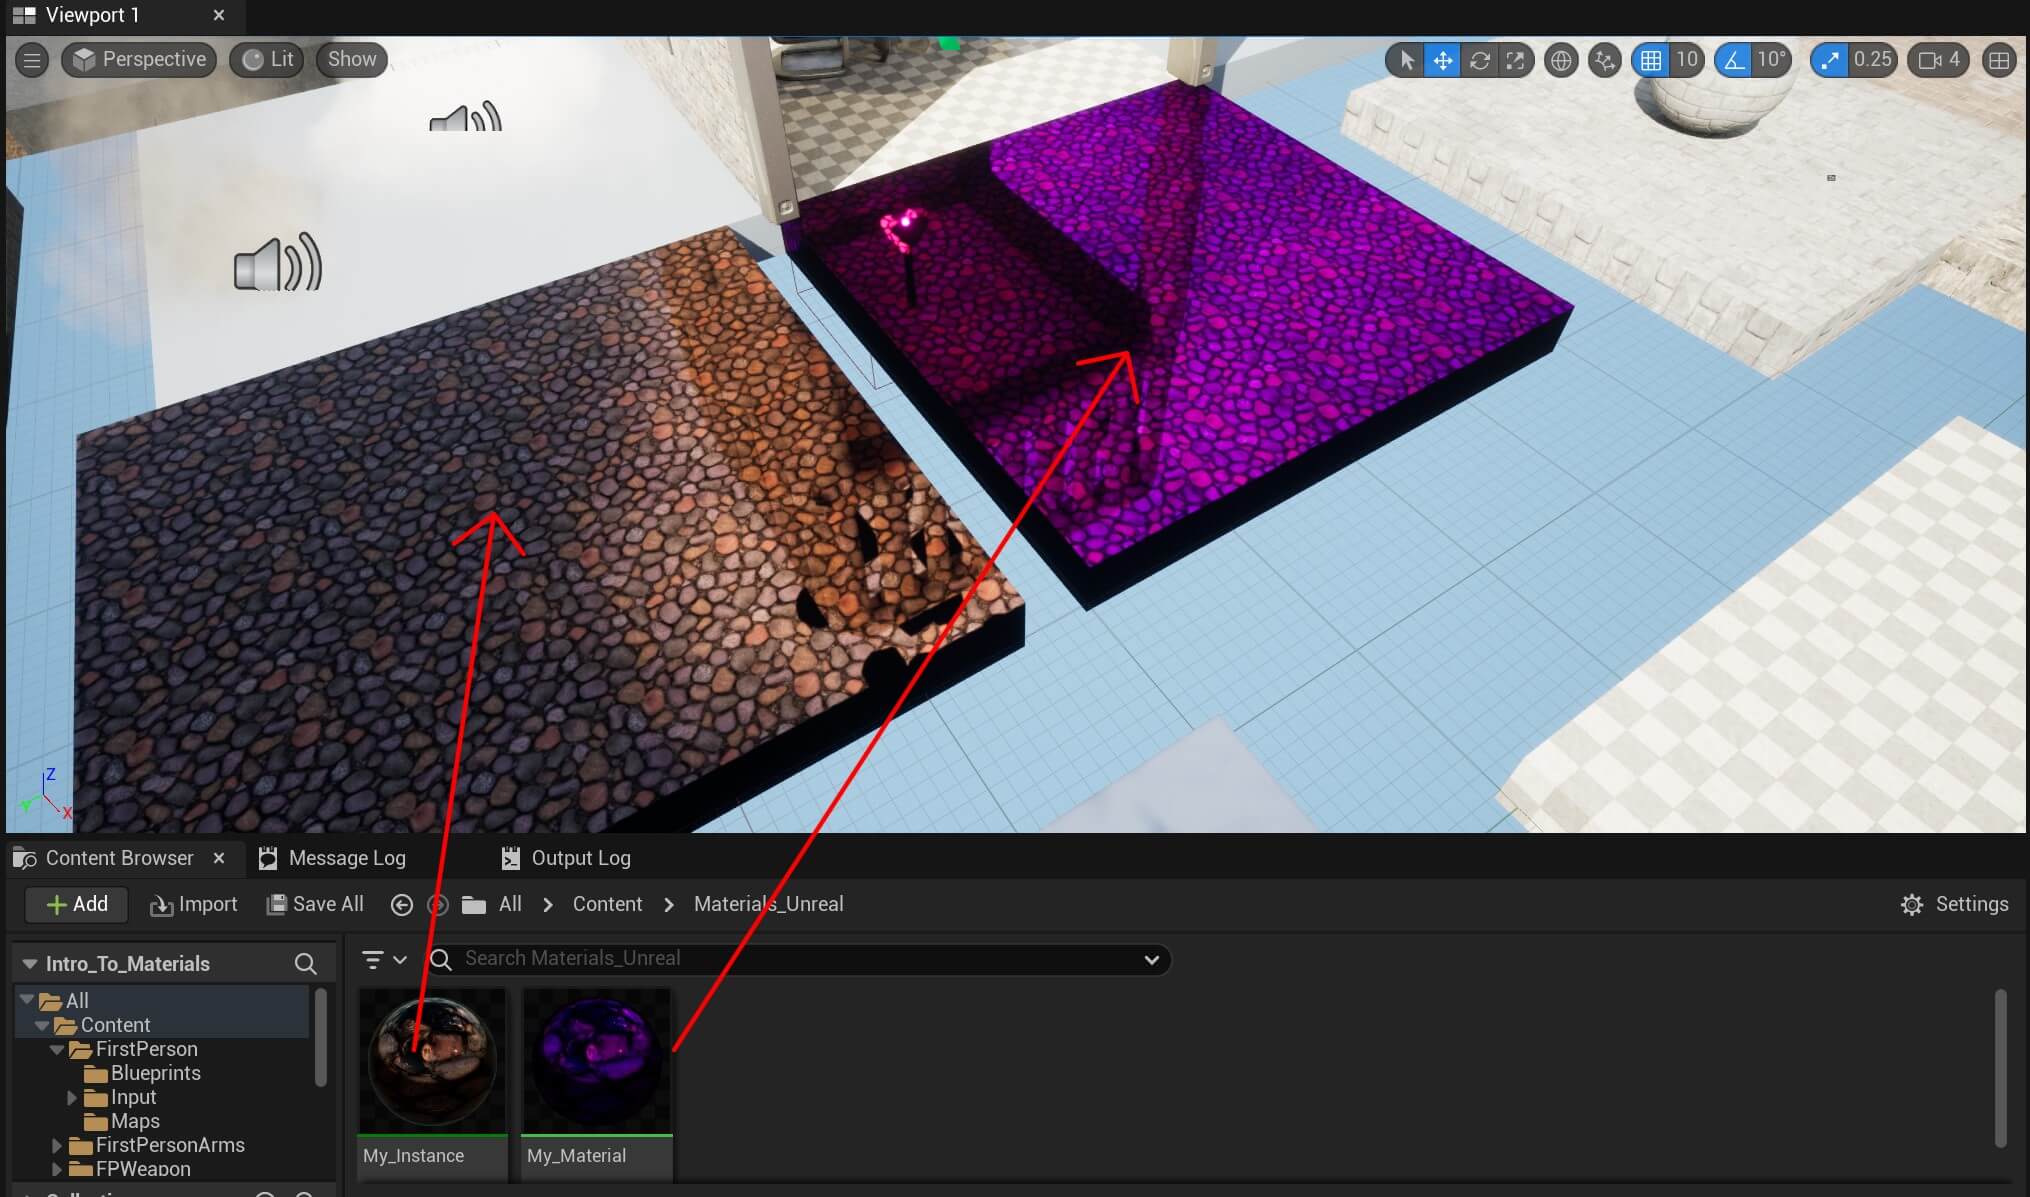
We can also use all other math operations the same way:

The difference between the operations is how the colors are calculated e.g. added, subtracted, multiplied, or divided. And you can test the outcomes for each operation on your own.
These operations can be performed on two color nodes e.g. Vector 3 nodes representing the color. And this way you can combine different colors to create a third color:
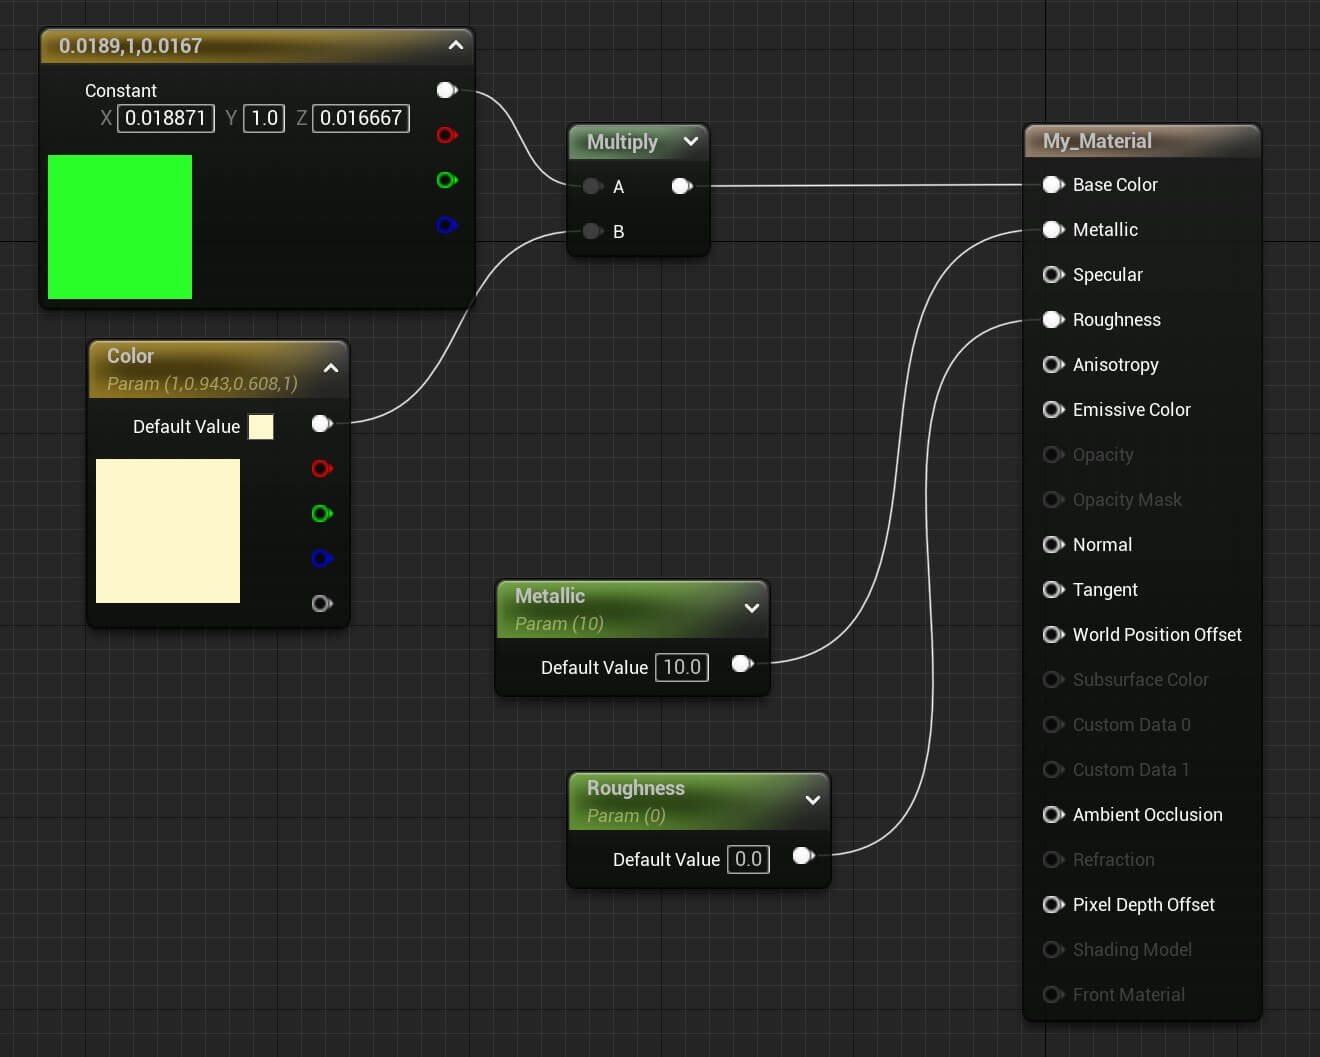
Using Lerp To Blend The Material Colors
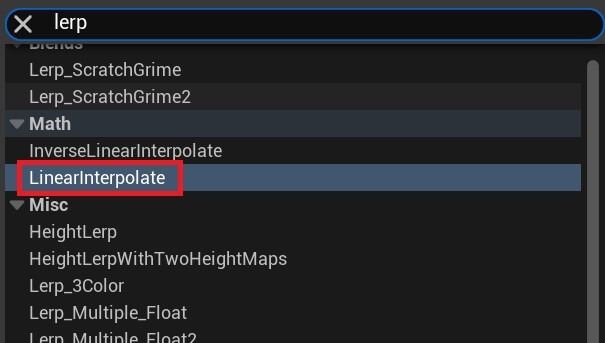
Inside the main material editor, Right Click and search for lerp and select Linear Interpolate:
As you can see the Lerp node has 3 pins:
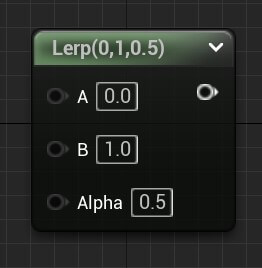
The Alpha pin controls the output of the Lerp node. It can have a value between 0 and 1. 0 meaning black color and 1 meaning white color.
If the value of the Alpha is 0, then the Lerp node will use the A pin for the output. If the Alpha value is 1, then the Lerp node will use the B pin for the output.
All the values in between 0 and 1 will blend the A and B color. Which color will blend more into the other color will depend if the Alpha value is closer to 0 meaning A color, or 1 meaning B color:
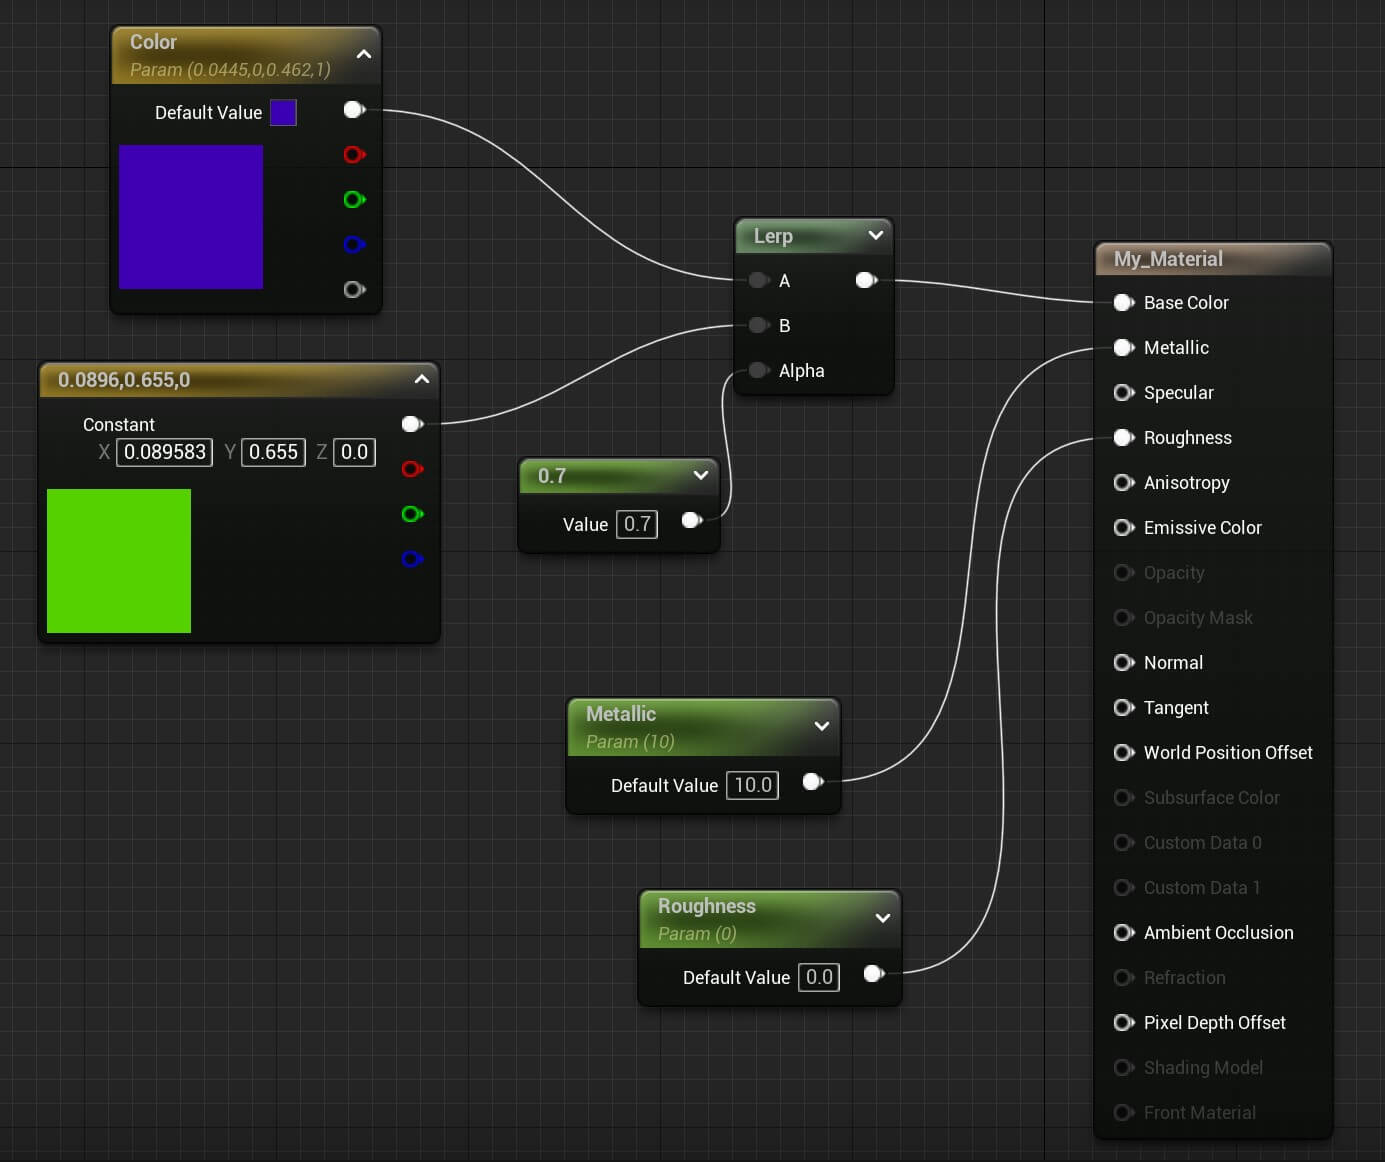
In the example above, you can change the blending output by changing the Vector 1 or single float value plugged into the Alpha pin.
The same way you can combine the Texture Sample node with the color node:
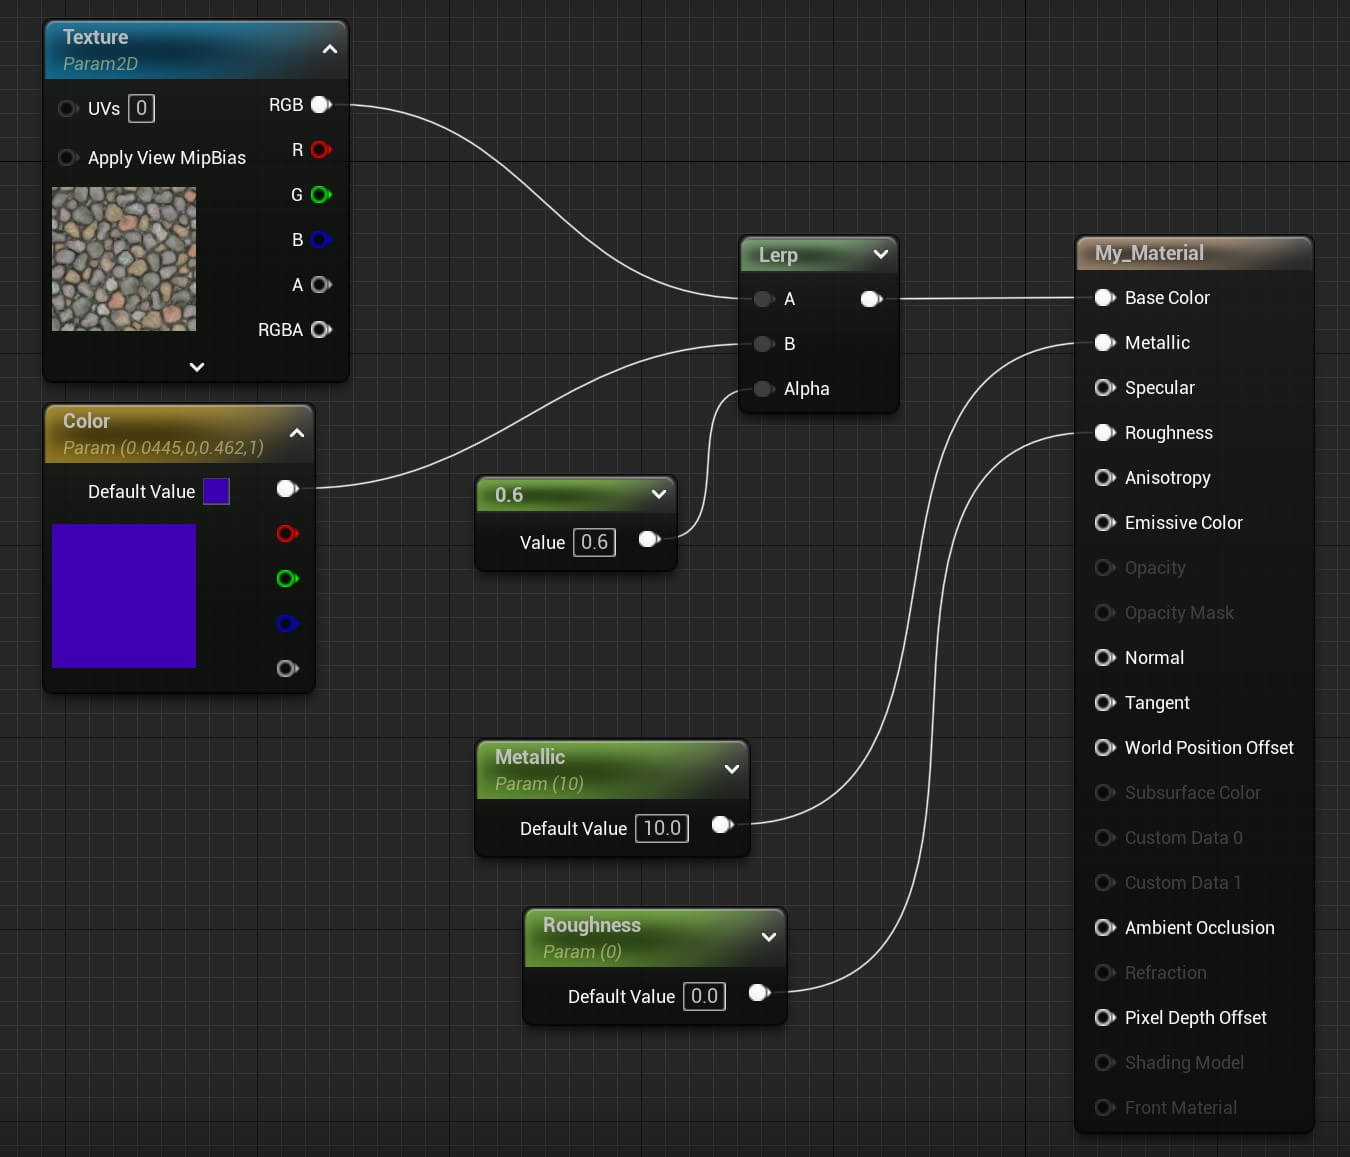
If you put the value of the single float node to 0, then only the pure texture will be shown on the material. If you set the value to 1 only the color will show on the material.
Using a value between 0 and 1 will combine the two and you’ll have a colored texture as the output.
Working With 3D Models
Let’s take a look at textures and materials for a 3D model. We’ve downloaded a ninja model from mixamo.com which is a great website to get stunning character models and animate them as well.
This is the 3D model we’ll use for this example:
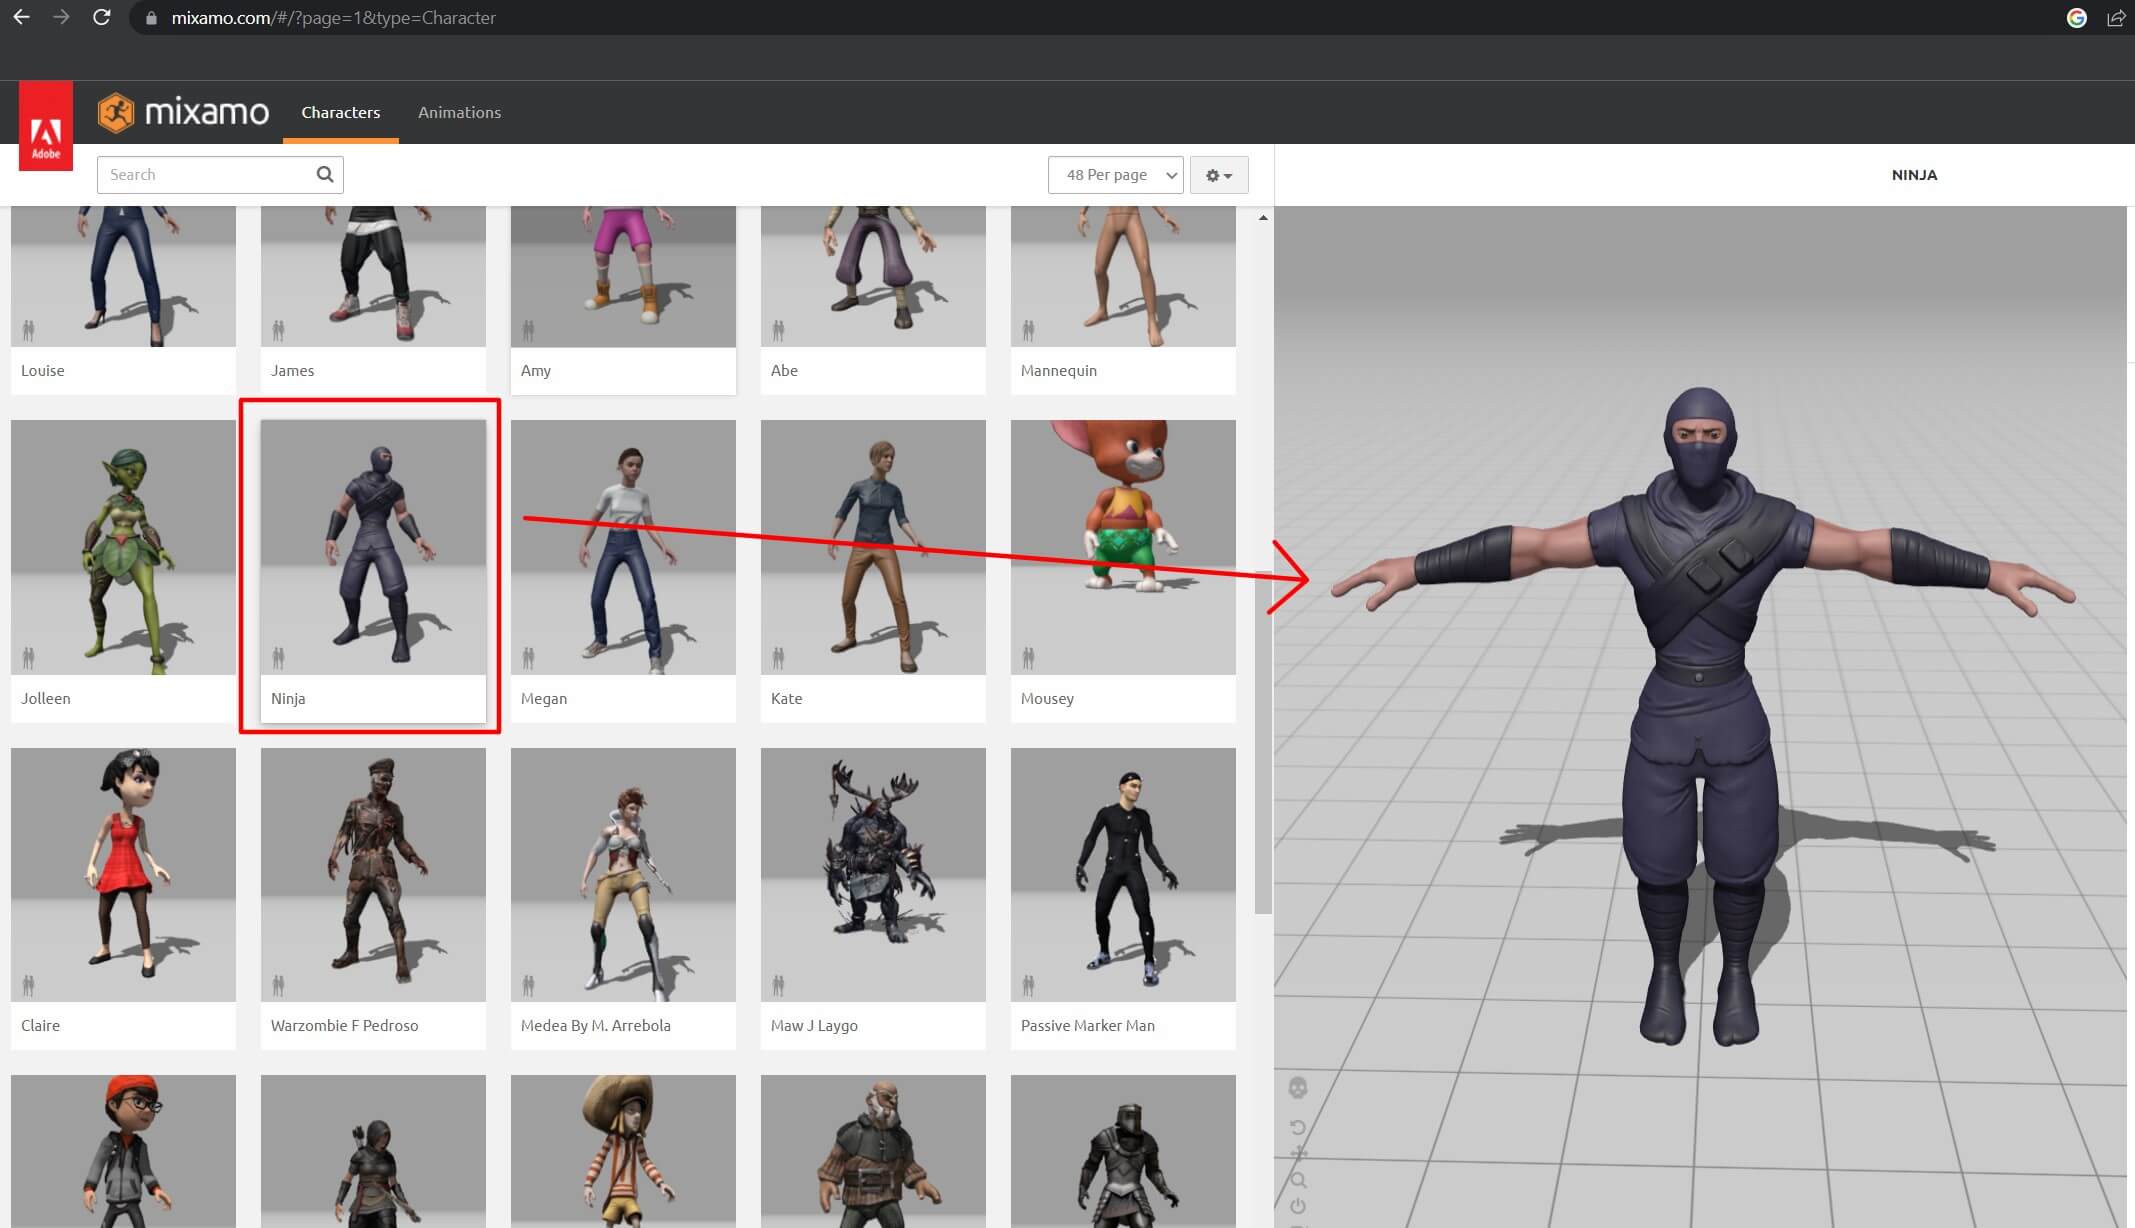
When we imported the 3D model these are the files that are imported along with him:

These are the textures, as well as material and skeletal meshes that all go into making this 3D character.
Since we’re only interested in the material of the ninja character well open it. This is how it looks like in the editor:
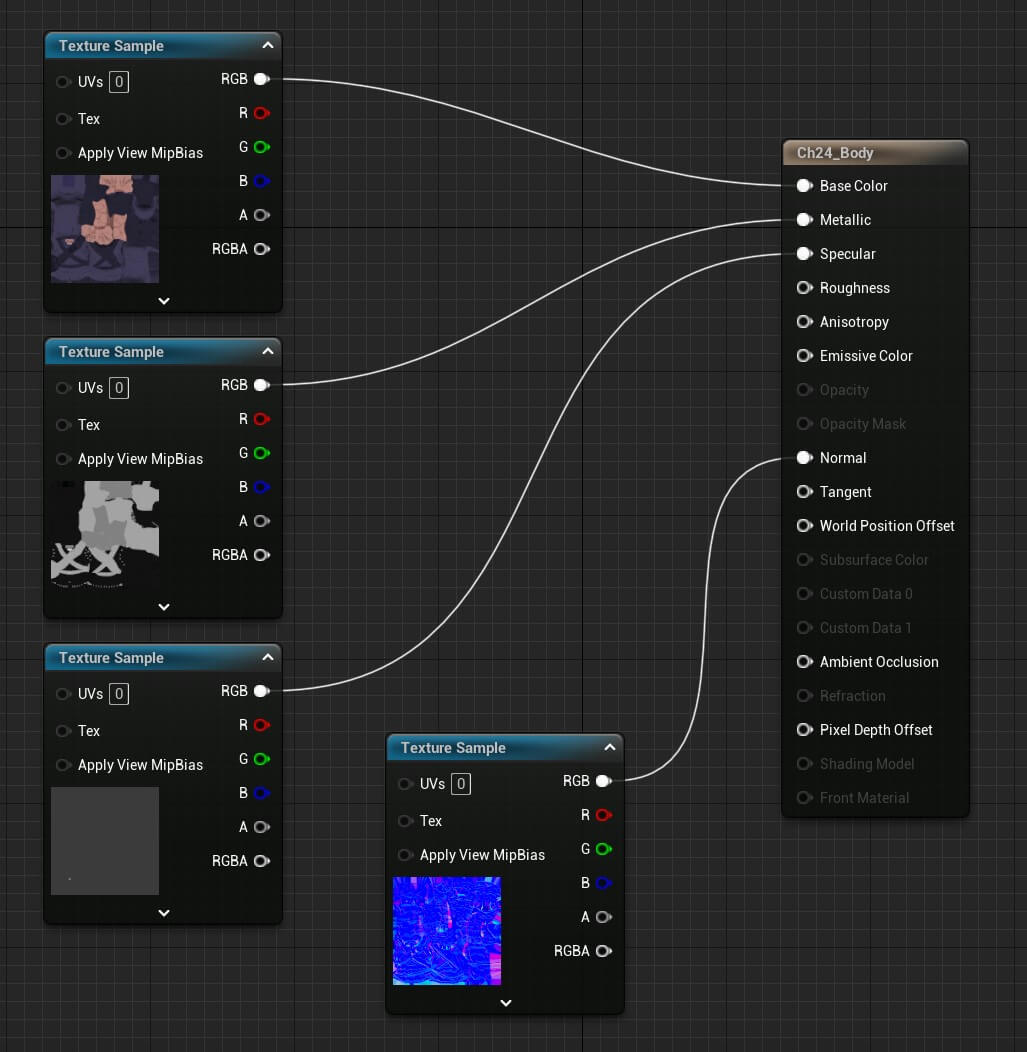
As you can see, the ninja character has textures for Base Color Metallicm Specular, and a Normal Map.
Now in regards to how these textures are created that is beyond the scope of this tutorial and that’s a 3D thing.
So the artist who creates the 3D model, he’ll also create the textures for the model. Of course, there are nuances how the textures are created to allow light to shine on them and all of that stuff.
But again, that’s beyond the scope of this tutorials since this tutorial is only about showing you how to use the already made textures and materials and manipulate them and also create your own materials.
Now in regards to this particular example, we can use everything we talked about so far to edit the output of the ninja material.
We can use addition, subtraction, multiplication, and division along with colors to change the look of the ninja:
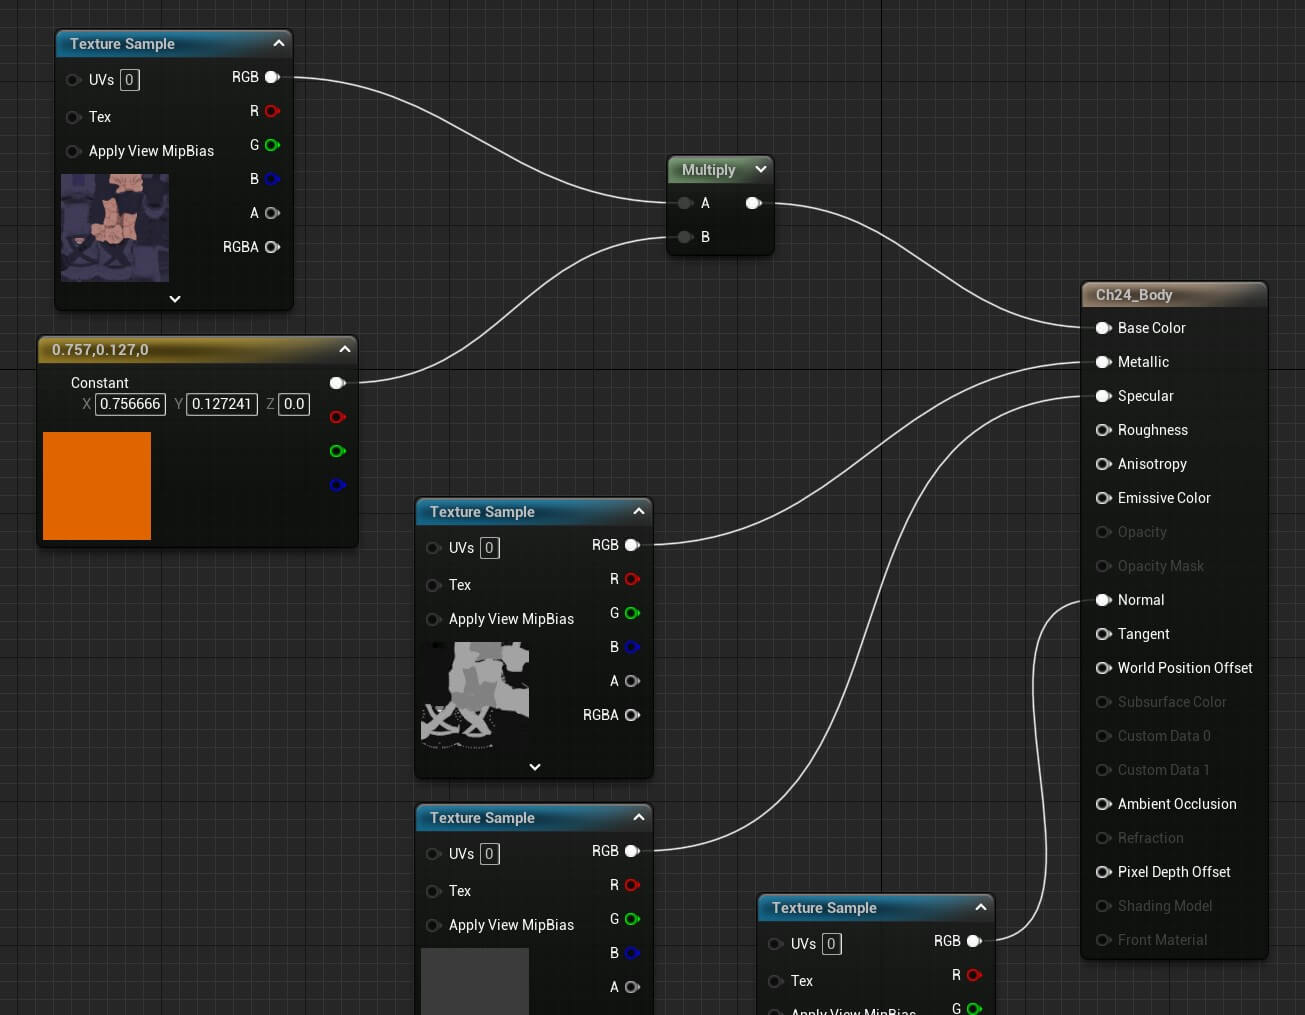
In the example above, we’re only multiplying the texture which goes in the Base Color with a random color we created, in this case orange.
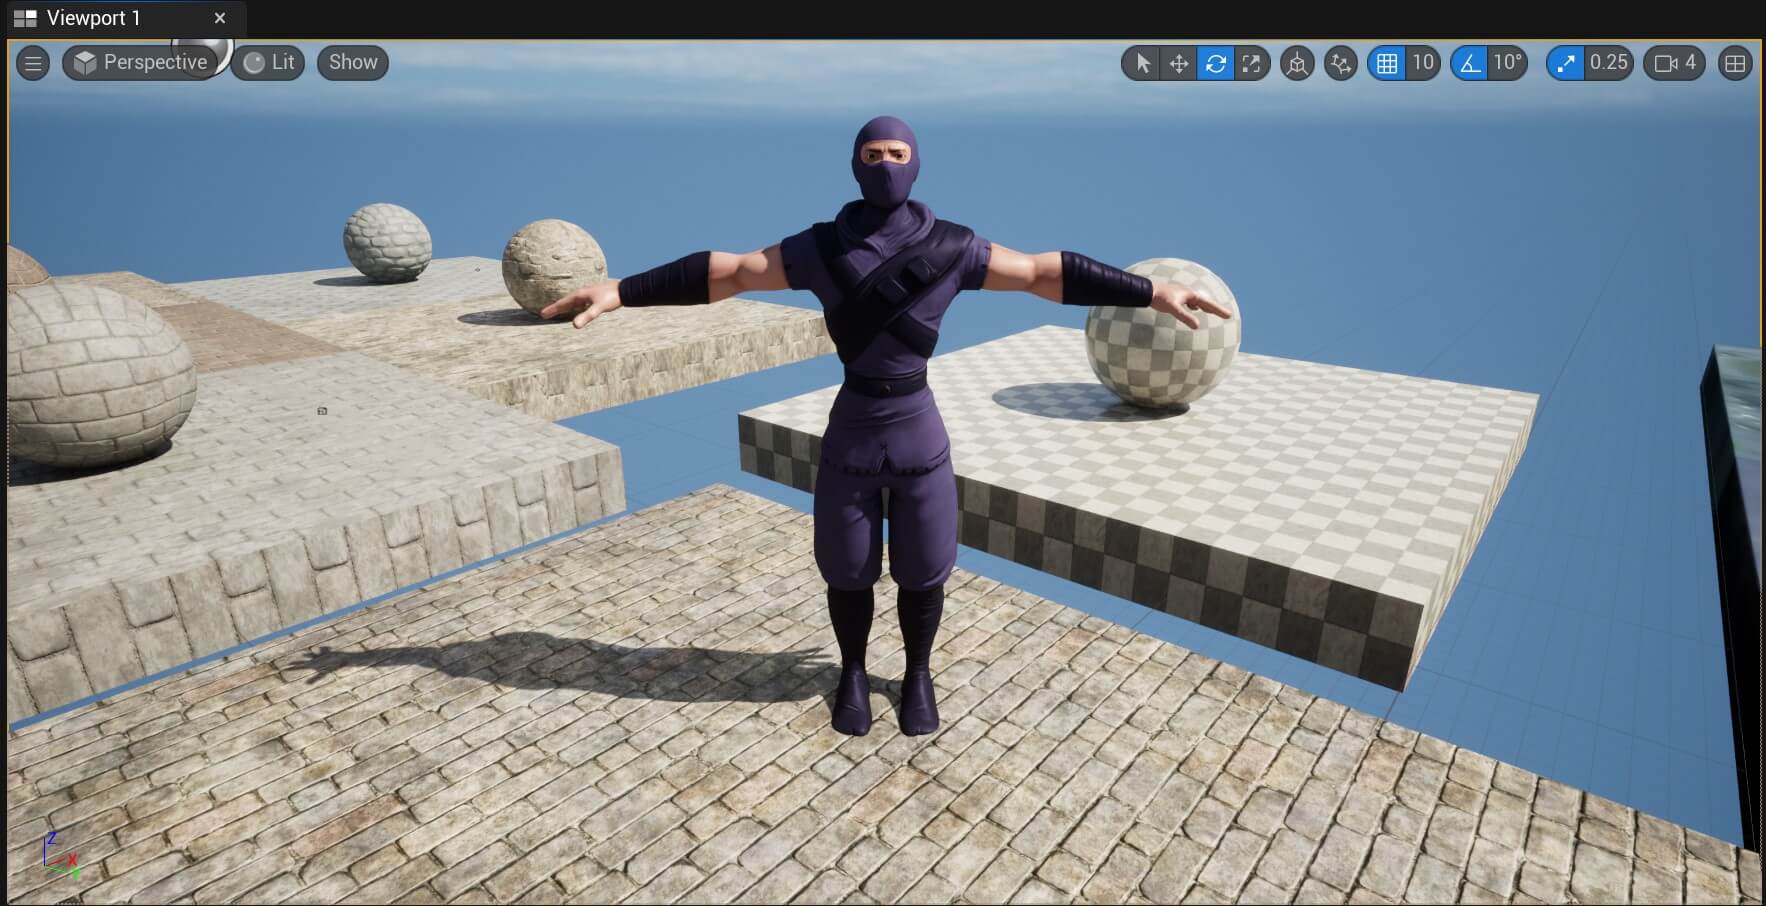
This is how the character looked like before we multiplied the Base Color texture:
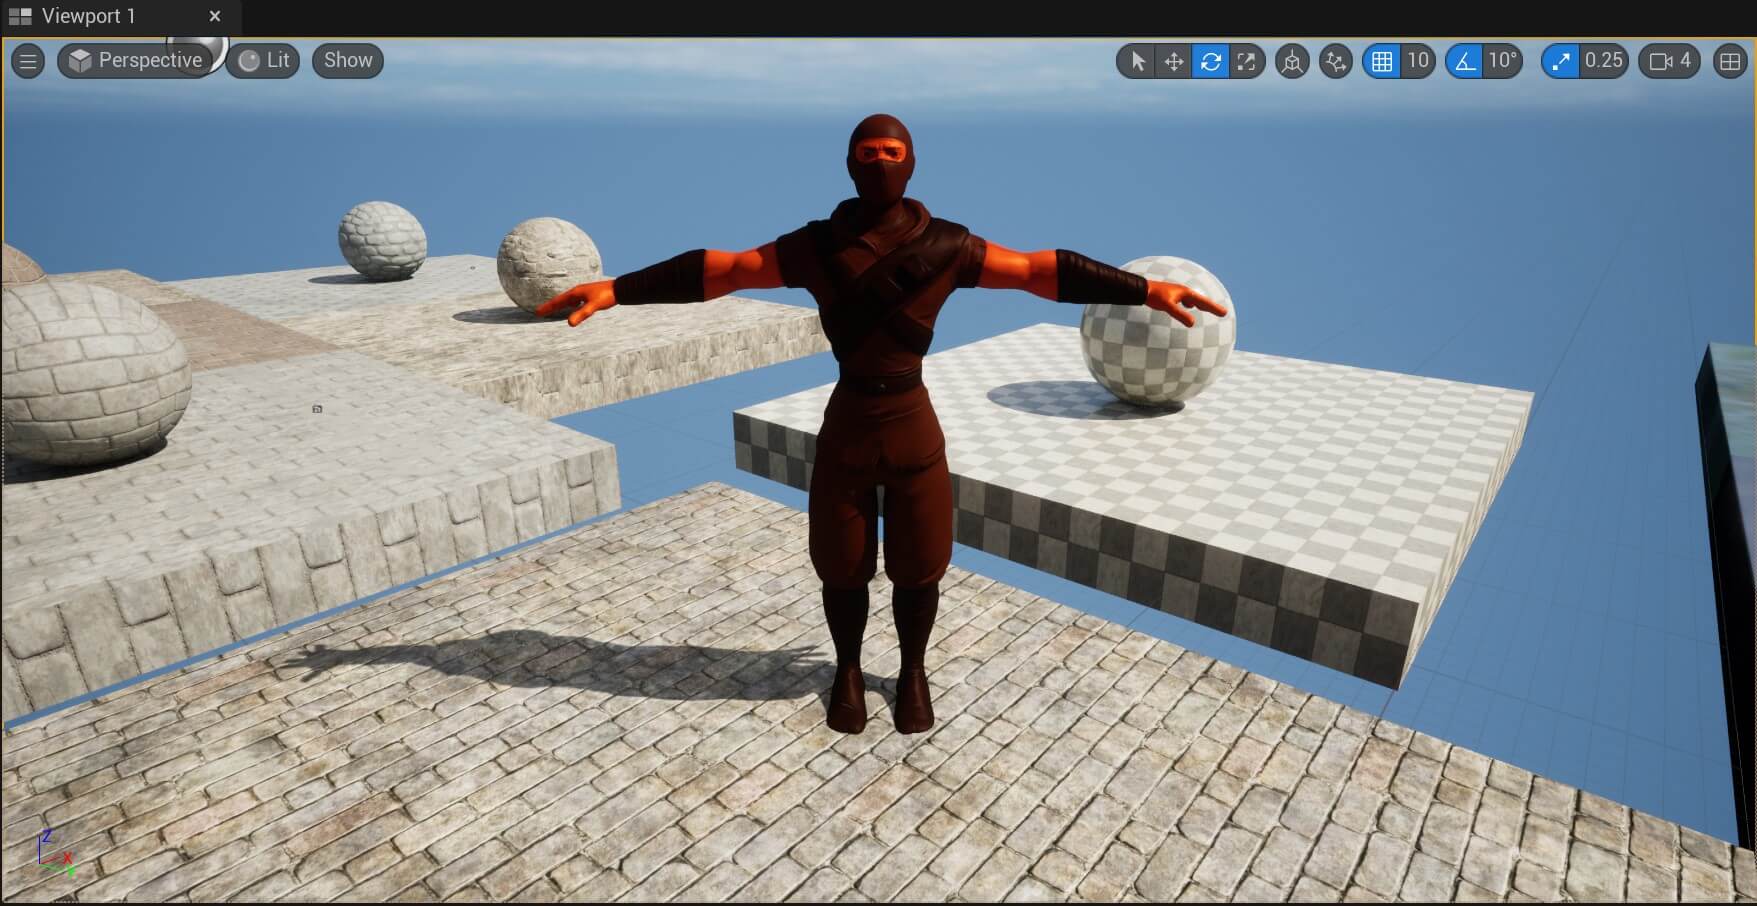
This is how he looks like now after the changes we made:
We encourage you to experiment with everything we learned so far and make changes to the material from a 3D model you download from Mixamo and see the final effect looks like.
This is the best way to learn and understand what each of the parameters in the material nodes actually mean.
Creating Advanced Materials
There are a lot of ways we can manipulate the matrials to make them more realistic.
Specifically we can control how much the lighting affects them, type of shadows they cast, and so on. To do this, just combine everything we learned so far in this post.
And to see the examples of how this is done, in the Starter Content open the Materials folder, and inside open any material and explore it in the editor.
Here’s how the M_CobbleStone_Rough material settings look like:

Of course, not every material has a complex structure like the one you see in the image above.
But depending on what you want to achieve with the material, what effects you want it to have and so on you can play with the settings to see how they work.
Where To Go From Here
If you want to improve your Unreal Engine skills further, check out the Unreal Engine posts archive by clicking the link below:
If your dream is to get hired in a game studio, then check out Game Dev Pro by clicking the link below:


Comments are closed.