Create A Side Scroller C++ Game In Unreal Engine Part 4: Detecting Collisions Between Player And Obstacles And Wrapping Up Our Game

Table of Contents

Create A Side Scroller C++ Game In Unreal Engine Part 4: Detecting Collisions Between Player And Obstacles And Wrapping Up Our Game

Reading Time: 7 minutes
Level: Beginner
Version: Unreal Engine 4.27

Help Others Learn Game Development

In part 3 of this tutorial series we created the LevelSpawner class and we spawned the level in the game using procedural level generation.
 
In this part of the tutorial we are going to destroy the player actor when he collides with the obstacles and we are going to restart the level when that happens, and with that we will finish our game.
 

Creating The Wall Spike Class

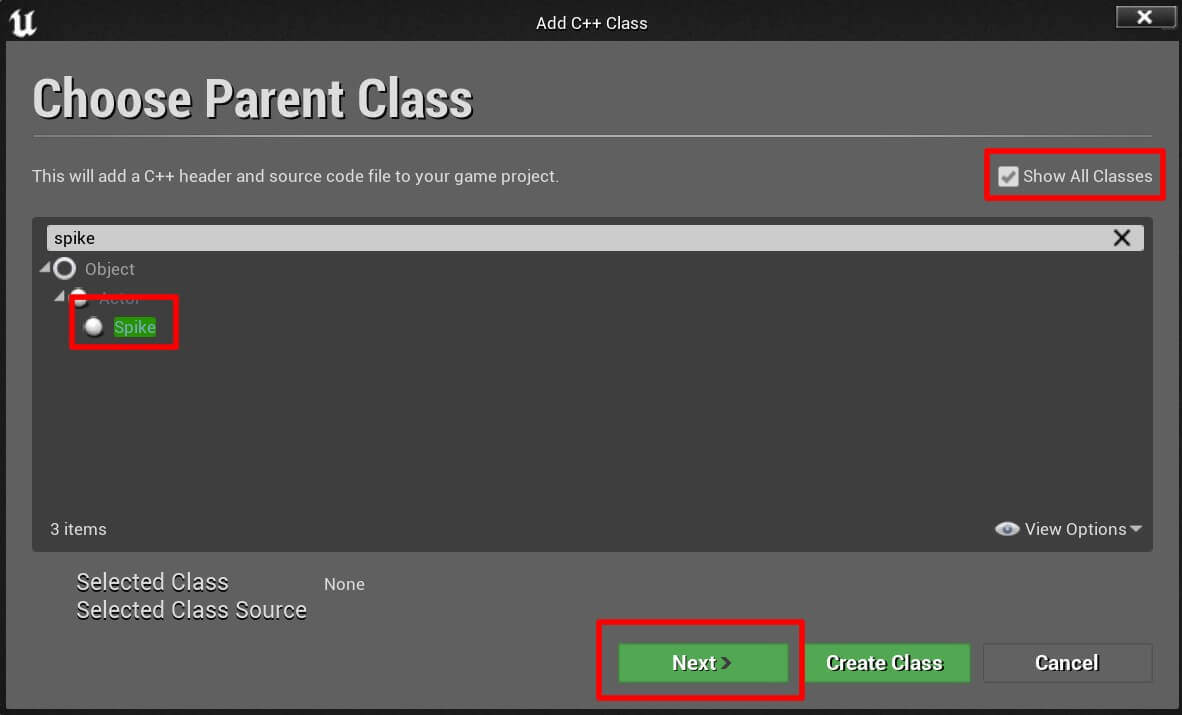
Inside the C++ Classes ->SideRunner, Right Click -> New C++ Class. Click on the Show All Classes checkbox and filter for spike and select the Spike class as the parent class then click Next:
Img 1
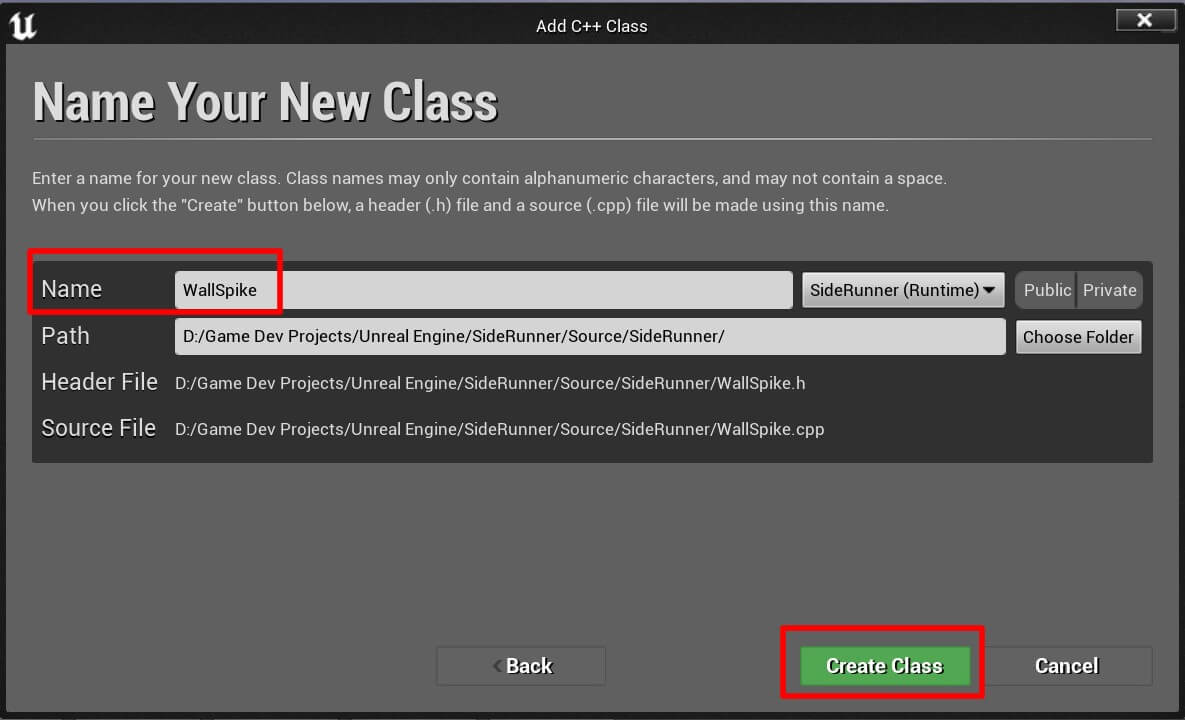
Give the new class a name WallSpike and press Create Class button:
 
Img 2

Open the WallSpike class in Visual Studio and first in the WallSpike.h file declare the constructor, BeginPlay and Tick function:

				
					#include "CoreMinimal.h"
#include "Spikes.h"
#include "WallSpike.generated.h"

/**
 * 
 */
UCLASS()
class SIDERUNNERCPP_API AWallSpike : public ASpikes
{
	GENERATED_BODY()


public:
	
	AWallSpike();

protected:
	virtual void BeginPlay() override;

public:

	virtual void Tick(float DeltaTime) override;

	
};


Now let’s implement these functions in the WallSpike.cpp file one by one starting with the constructor:

				
					AWallSpike::AWallSpike()
{
	PrimaryActorTick.bCanEverTick = true;
}
				
			
The code on line 3 will make sure that the Tick function for this classes is running e.g. it will be called every frame. In case you didn’t know, you can enable and disable the Tick function for every class, in this case we set the value to true which means the Tick function will be enabled, but if you set the value to false then the Tick function will be disabled.
 
Next we are going to implement BeginPlay:
 
				
					void AWallSpike::BeginPlay()
{
	Super::BeginPlay();

	this->GetRootComponent()->ComponentVelocity = FVector(0, 25, 0);
}
				
			
On line 3 we are calling the BeginPlay function in the Super class which is the class we inherited. On line 5 we are getting the root component of this class and setting the component velocity using FVector. The velocity is basically the speed by which the actor will move.
 
And last but not least, we have the Tick function:
 
				
					void AWallSpike::Tick(float DeltaTime)
{
	Super::Tick(DeltaTime);
	SetActorLocation(GetActorLocation() + FVector(0, 350 * DeltaTime, 0), true);
}


Again we first calling the same function in the Super class on line 3. On line 4 we set the location of the actor by calling SetActorLocation and passing the current location of the actor with GetActorLocation function and we move it forward by adding the value we set in the FVector variable that we created to the current location of the actor.

This will move the spike wall actor forward and make him chase the player actor. This is the final version of WallSpike.cpp file:

				
					#include "WallSpike.h"


AWallSpike::AWallSpike()
{
	PrimaryActorTick.bCanEverTick = true;
}

void AWallSpike::BeginPlay()
{
	Super::BeginPlay();

	this->GetRootComponent()->ComponentVelocity = FVector(0, 25, 0);

}

void AWallSpike::Tick(float DeltaTime)
{
	Super::Tick(DeltaTime);
	SetActorLocation(GetActorLocation() + FVector(0, 350 * DeltaTime, 0), true);
}
				
			
Make sure that you compile this code before we proceed with the next step.
 

Adding The Wall Spike Obstacle In The Game
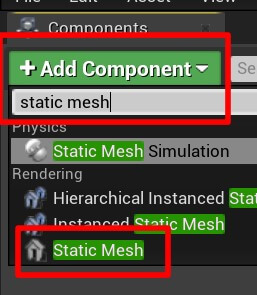
Now that we have the WallSpike class we create a blueprint out of it. In the Content -> Blueprints -> Obstacles folder, Right Click -> Blueprint class.
 
Make sure that you inherit from the WallSpike class, name the blueprint BP_WallSpike and open the blueprint in the editor.
 
First, we are going to add a new Static Mesh component by clicking on the Add Component button in the Components tab:
 
Img 5 fixed

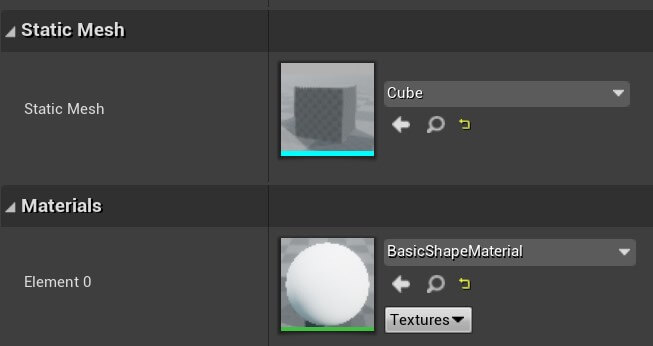
Rename the component to Wall, then select it and in the Details tab under Static Mesh select the Cube model for the mesh, and under Materials select BasicShapeMaterial:
Img 4
Next, change the Scale values in the Transform property:
 
Img 5
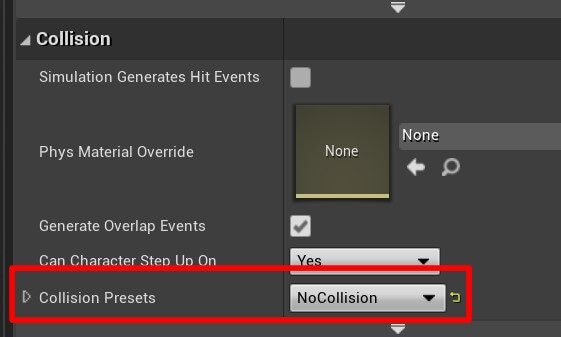
Moving forward, in the Collision settings for the Wall Static Mesh, for the Collision Preset select NoCollision:
 
Img 6

The reason why we choose not to detect any collision with the Wall Static Mesh is because we are going to use a Box Collision component to detect the collision with other actors.

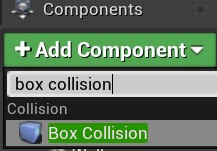
So from the Components tab, click on Add Component button and filter for Box Collision:
Img 7
Rename the Box Collision component to Wall Collision and set the following values for the Scale in the Transform property:
 
Img 8

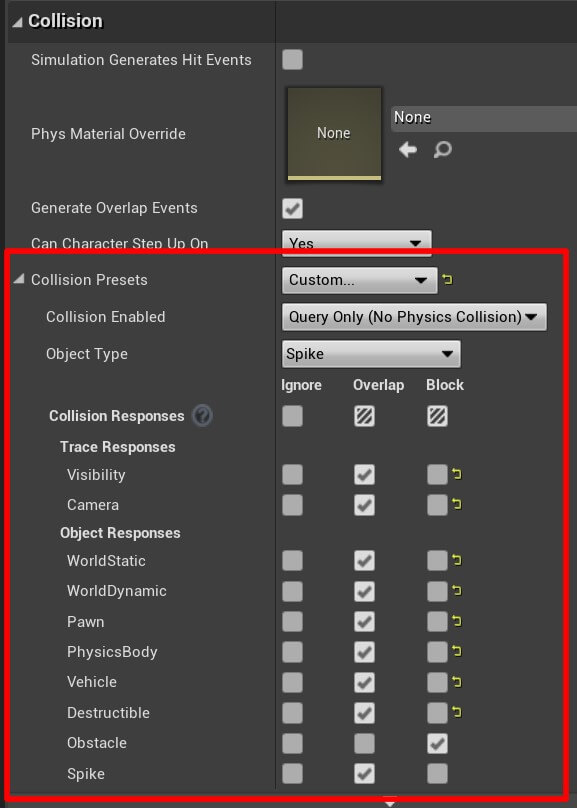
In the Collision settings for the Wall Collision, set the following options:
Img 9
We already did the same thing for the BP_Spike and we explained what all of these options mean.
 
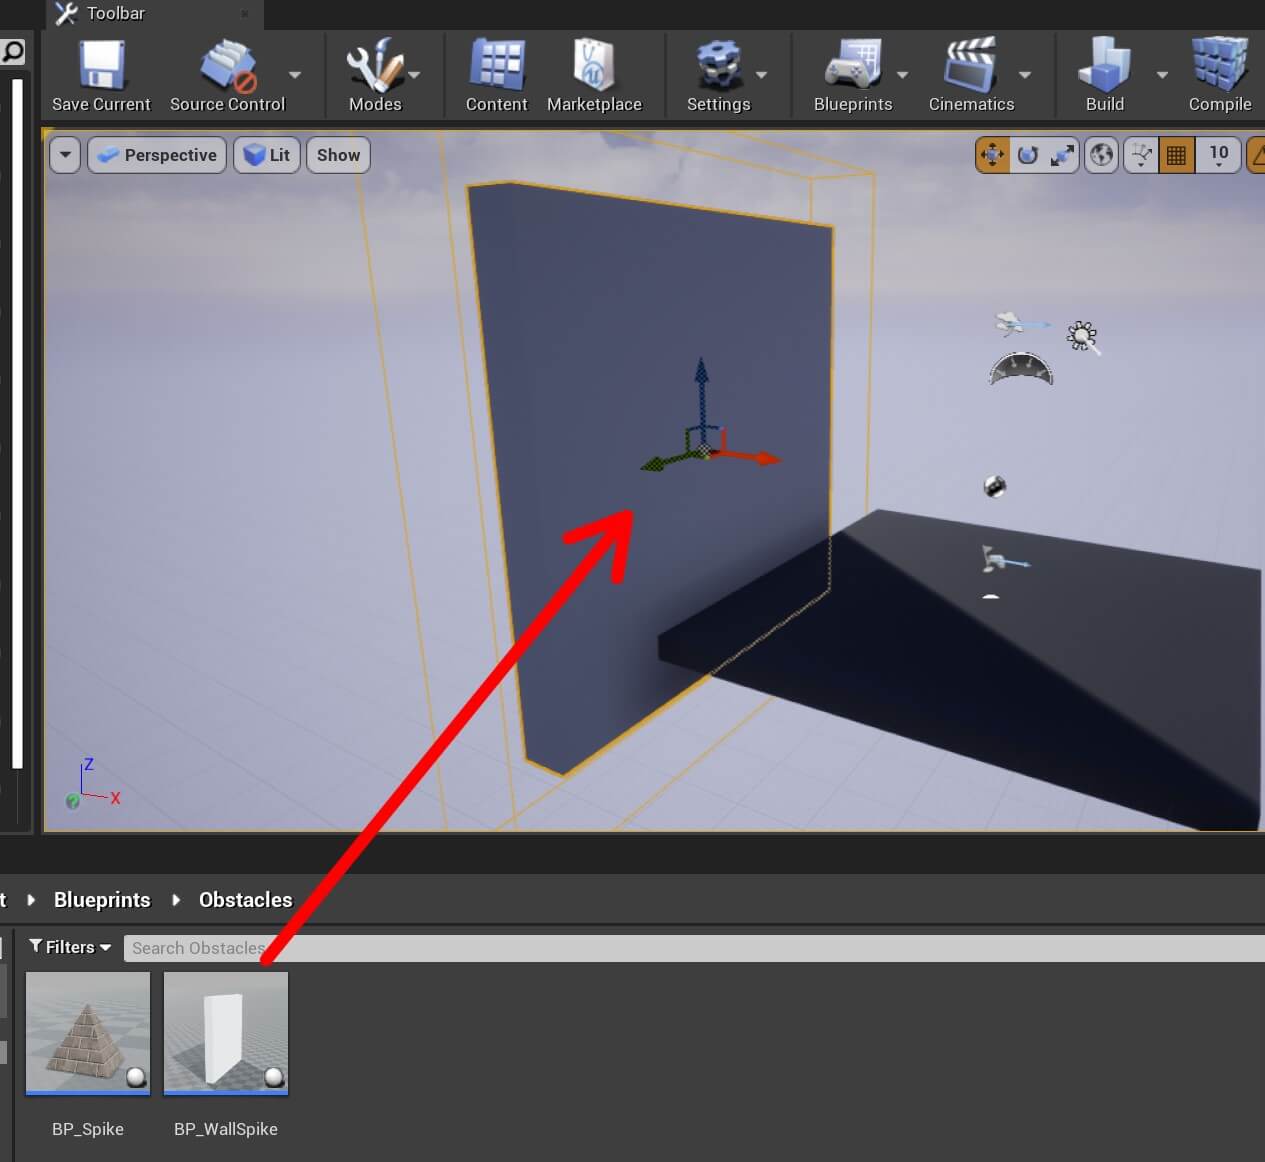
The wall obstacle is ready, we can drag it in the level from the Obstacles folder:
 
Img 10
Next, set the following values for the Location and Rotation in the Transform property of the BP_WallSpike in the Details tab:
 
Img 11
When we run the game, we will see that the wall obstacle is moving towards the player:
 
Of course, when the wall obstacle touches the player actor nothing happens because we didn’t code that functionality and we saw that in the preview above, but what is important is that the wall obstacle is moving and we need to run away from it.
 
You can always change the speed by which the wall obstacle moves by changing the value in the FVector that we are adding to the current location of the wall obstacle actor in the Tick function:
 
				
					void AWallSpike::Tick(float DeltaTime)
{
	Super::Tick(DeltaTime);
	SetActorLocation(GetActorLocation() + FVector(0, 350 * DeltaTime, 0), true);
}
				
			
You can also define a float variable and use EditAnywhere parameter for the UPROPERTY and then change the value of that variable on the blueprint instance to make the wall obstacle move slower or faster.
 

Detecting Collision Between The Player Actor And Game Obstacles

In regards to obstacle actors everything is set up to detect collision with the player actor. Now we need to open the RunnerCharacter.cpp file, and the first thing we are going to do is add the includes for classes that we will use inside the file. So at the top, below the last #include, add the following lines of code:
 
				
					#include "Spike.h"
#include "WallSpike.h"
#include "Engine.h"
				
			
Next, in BeginPlay function, we need to add the code that will bind the player actor’s capsule collider on component begin overlap event with a listener function:
 
				
					void ARunnerCharacter::BeginPlay()
{
	Super::BeginPlay();

	CanMove = true;

	GetCapsuleComponent()->OnComponentBeginOverlap.
		AddDynamic(this, &ARunnerCharacter::OnOverlapBegin);
}


In OnOverlapBegin function, we are going to test if the player actor has collided with either the wall or spike obstacle, if that is true, we are going to stop the game, make the player actor invisible, and restart the game after the specified time:

				
					void ARunnerCharacter::OnOverlapBegin(UPrimitiveComponent* OverlappedComp, AActor* OtherActor, 
	UPrimitiveComponent* OtherComp, int32 OtherBodyIndex, bool bFromSweep, const FHitResult& SweepResult)
{

	if (OtherActor != nullptr)
	{

		ASpike* WallSpike = Cast<AWallSpike>(OtherActor);
		ASpike* Spike = Cast<ASpike>(OtherActor);

		if (WallSpike || Spike)
		{

			GetMesh()->Deactivate();
			GetMesh()->SetVisibility(false);

			CanMove = false;

			FTimerHandle UnusedHandle;
			GetWorldTimerManager().SetTimer(UnusedHandle, this,
				&ARunnerCharacter::RestartLevel, 2.0f, false);

		}

	}

}
				
			
On line 5, we are checking if we the OtherActor parameter is not a nullptr meaning it’s not a null pointer e.g. we have collided with an actor.
 
Then, on line 8 and 9 we try to cast the OtherActor parameter to wall obstacle and spike obstacle. Of course only one of the two will work because we can’t detect collision with two actors in the same function at the same time.
 
On line 11 we are testing if either WallSpike or Spike variable are not equal to null, if that is the case, the cast has succeeded and the player actor did collide with one of the obstacles.
 
If that is the case, we deactivate the mesh of the player actor on line 14, then we make the mesh invisible in the game on line 15 which will create the invisibility effect for the player actor.
 
On line 17 we set CanMove to false which will not allow us to move the player actor by pressing the keys on our keyboard.
 
And lastly, we call the world timer manager to call the RestartLevel function after 2 seconds on line 20.
 
The world timer manager takes a FTimerHandle object as a parameter, that is why we created one on line 19 and passed it as the first parameter in the function.
 
The second parameter e.g. keyword this, is referring to the class where the SetTimer function is called.
 
The third parameter is the function we want to execute, in our case Restart level.
 
The fourth parameter is the seconds after which the function will be called. I set that number to 2, but you can always change it to a higher or lower value. You can also create a variable and make it editable on the blueprint instance and from there change the wait time value.
 
And the last parameter denotes should we call the specified function forever, which is not what we want to do, we only want to call the function once, that is why we pass the value false.
 
The last step is to actually code the RestartLevel function, so inside add the following line:
 
				
					void ARunnerCharacter::RestartLevel()
{
	UGameplayStatics::OpenLevel(this, FName(*GetWorld()->GetName()));
}
				
			
We need to call GameplayStatics and its OpenLevel function to load a new level, or reload the current level.
 
The first parameter is the world object context, we can pass this referring to this class as the parameter.
 
The second parameter is the name of the level we want to load, and we used GetWorld and its GetName function to get the name of the current level we are in, which will simply restart the game.
 
Compile the code and run the game to test it out:
 

Every time we collide with the wall or the spike obstacle the player actor disappears from the game, and the level is restarted after 2 seconds as you saw in the preview above.

And with that we have finished our game. Thank you for going through this cool tutorial and sticking until the end, I hope that you had fun learning all of the things we covered as much as I had fun creating this tutorial series.

1 thought on “Create A Side Scroller C++ Game In Unreal Engine Part 4: Detecting Collisions Between Player And Obstacles And Wrapping Up Our Game”

  1. Hi, thank you for your great tutorial! You explains a lot of things in details which truly help to comprehend the meaning of each step.
    However, I’m still a bit confused on Wall Spike vs Spike collision.
    On BP_Spike, you set the custom collision on Static Mesh component. However, for BP_WallSpike, you create a new Component (Box Collision) to set the custom collision instead of setting the collision directly on the Static Mesh.
    Can you help me to understand why?
    Thanks before. 🙏

    Reply

Leave a Comment