No matter what type of game you are creating you will need a system that will save and load the data about the progress in your game.
In this post we are going to take a look at how can we create save/load system with Blueprints and C++.
Important Information Before We Start
This tutorial is not for complete beginners. To follow this tutorial you will have to know your way around Unreal Engine, Blueprints and C++.
It is not required that you are an expert in Blueprints and C++, but it is required that you know the basics, and you are comfortable creating simple games using Blueprints and C++.
For this tutorial I am using the ThirdPerson template project, so if you want to follow along with the tutorial create a new project and select the ThirdPerson template so that you have the same set up as I.
Modeling Game Data Blueprint
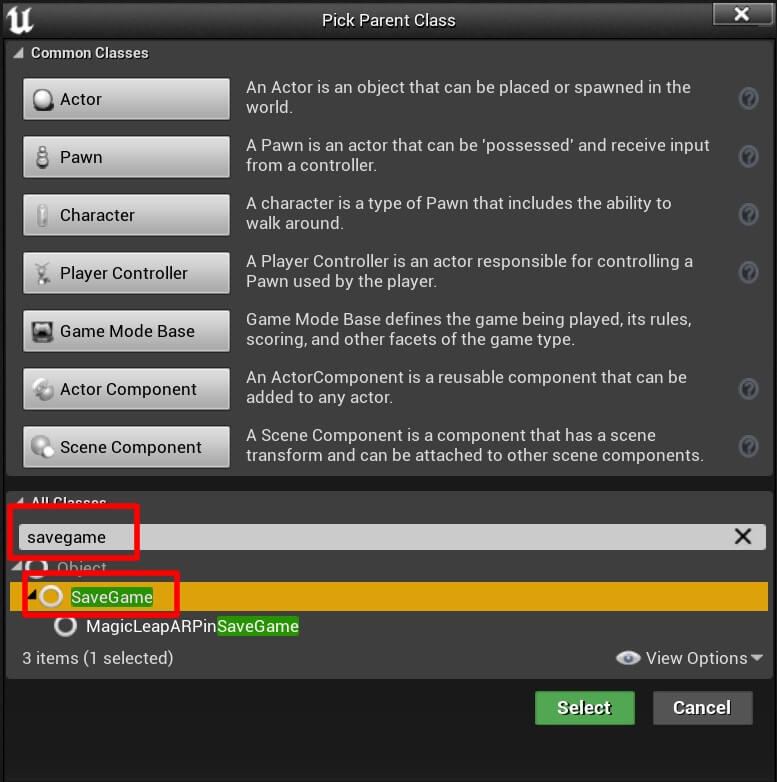
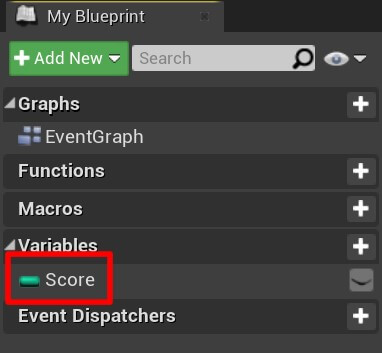
Give the new Blueprint name GameData. Now open GameData Blueprint in the editor, and under My Blueprint tab create a new variable type of Integer and name it score:
Create A Custom Game Instance Blueprint
The one who is going to be responsible for saving and loading game data is our game instance. The reason why I am using game instance for this task is because can carry our game instance across our whole game, so no matter in which map we are in, we can use the game instance to save and load game data.
To create a game instance Right Click -> Blueprint Class, and in the search bar type game instance:
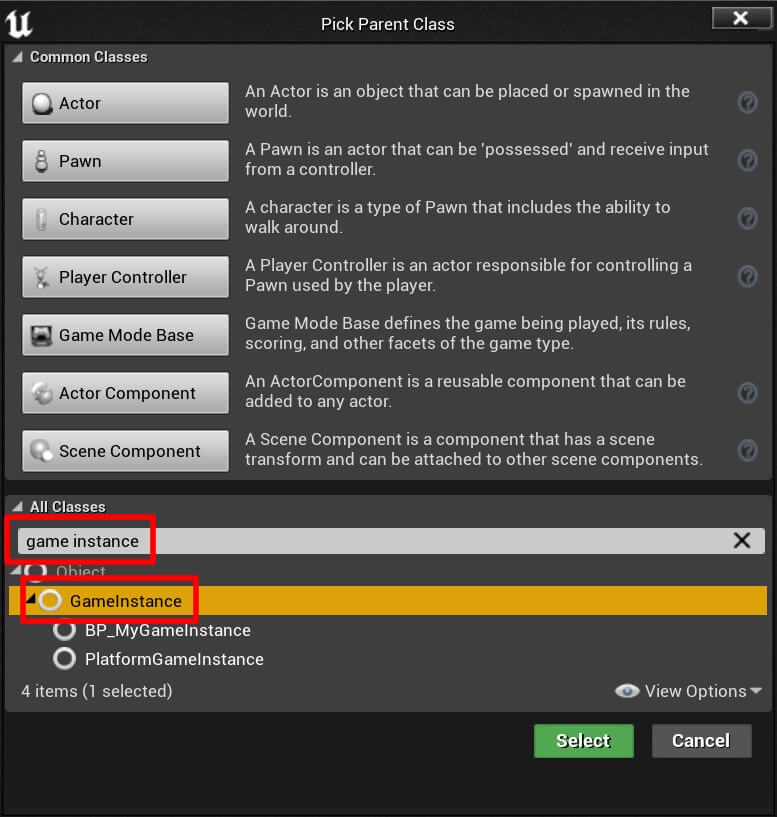
Name the new Blueprint BP_MyGameInstance. Open BP_MyGameInstance Blueprint in the editor and in My Blueprints tab create two variables, one called Save Slot Name type of String, and the other Game Data type of GameData Blueprint that we created.
Select the Save Slot Name variable, and in the Details tab under Default Value type GameData:

Initializing Game Data
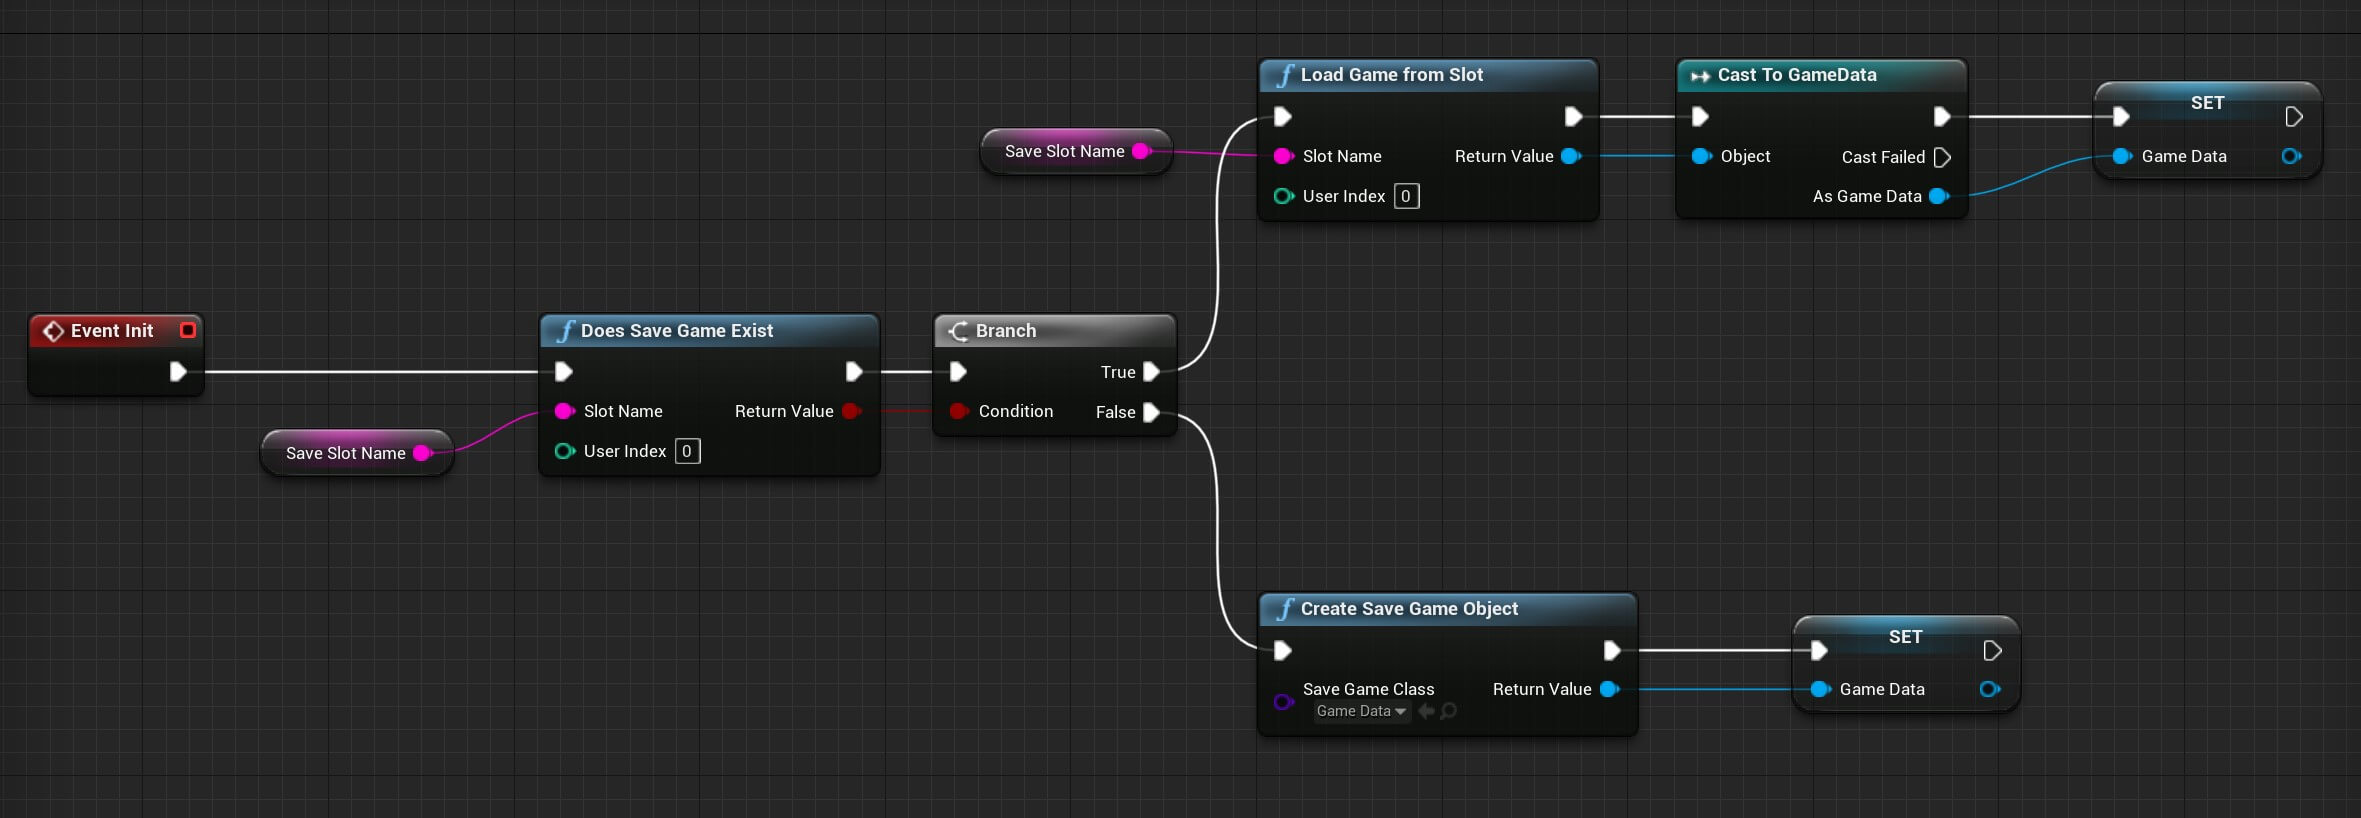
In the Event Graph tab of BP_MyGameInstance Blueprint we are going to initialize our game data. This means that when the game starts, we are going to check if the game data exists, if that is true we will load the game data, if the game data doesn’t exist, that means we are running the game for the first time so we need to create a new game data.
This is how we are going to do that:
Creating Functions That Will Save And Load Game Data
Even though this example is simple, it is always a good practice to create functions that will save and load game data, because if you don’t, then you will be creating the same code in every Blueprint where you want to save game data which will lead to duplicate code and unnecessary work.
In My Blueprint tab under functions create two functions. Name one SaveGameData and the other LoadGameData:
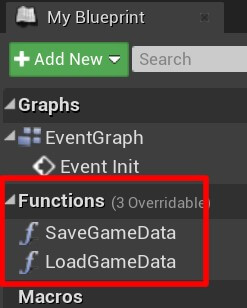
The SaveGameData function will have a parameter of type of Integer called New Score:

This will allow us to pass a new integer value to the function and it will save it without the need for us to get a reference to Game Data variable. Here is the Save Game Data function:


And this is the implementation of the LoadGameData function:

Saving And Loading Game Data
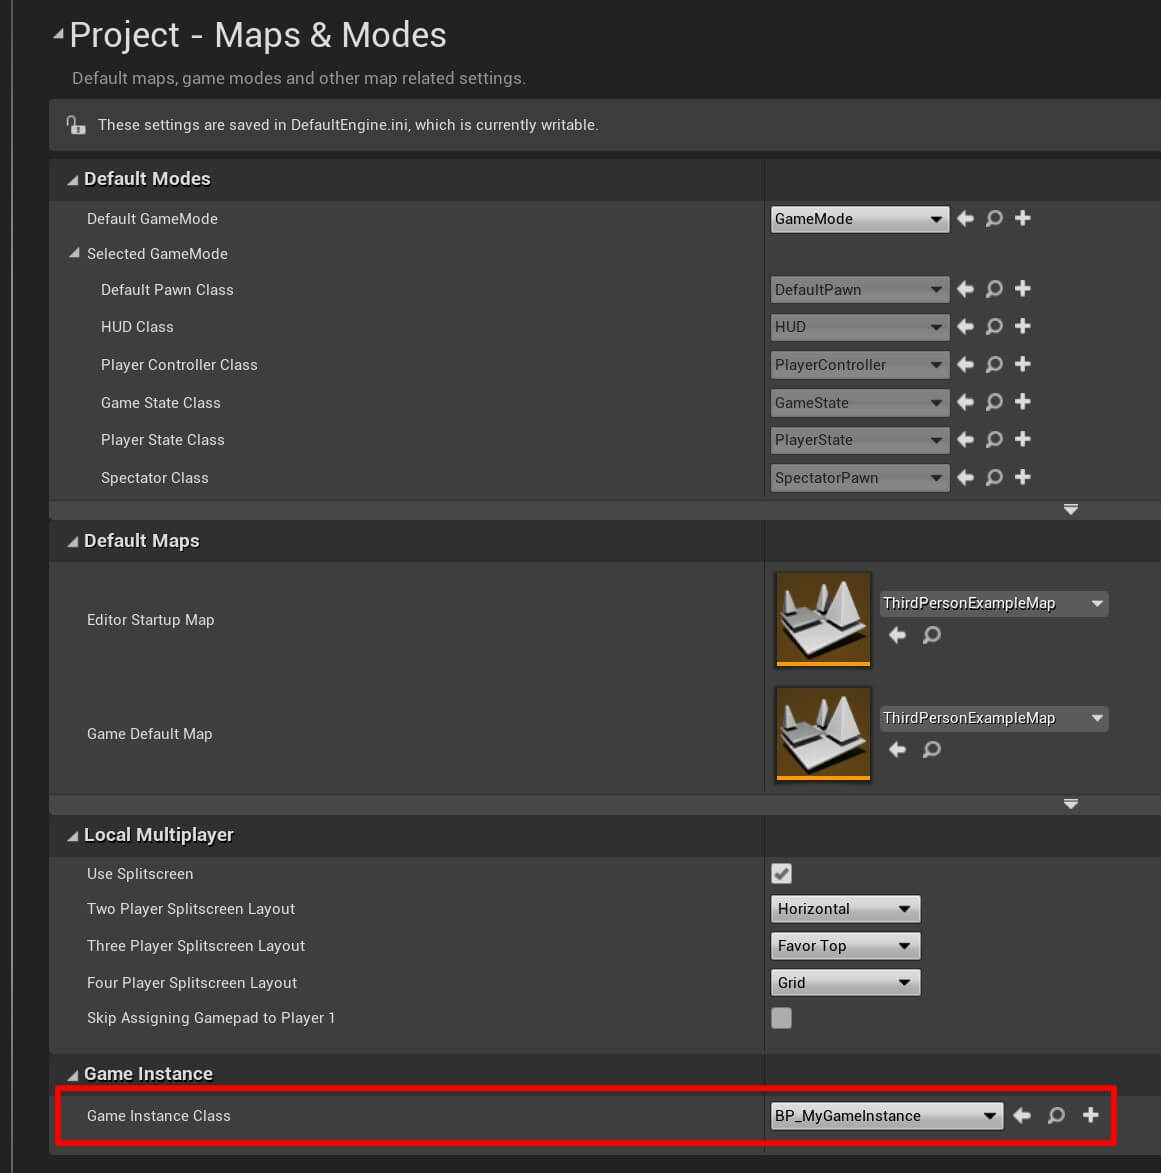
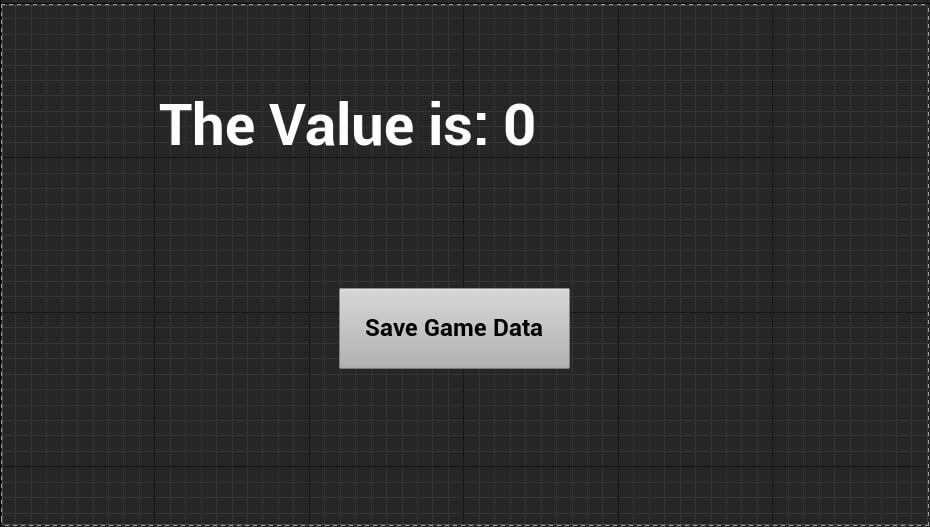
I have also created a simple UI widget that has a text that will display the game data and a button that will save the game data:
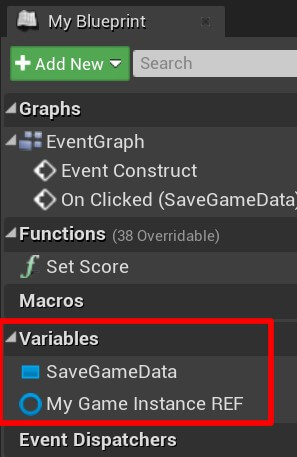
In the My Blueprint tab under variables I have created a reference to the game instance type of BP_MyGameInstance:
And from the Event Construct node I will get a reference to the game instance:

You can copy the nodes from here:
I have also created a function called Set Score that is bound to the text widget which will display the score:

You can copy the nodes from here:
The Set Score function will call the Load Game Data function from our game instance and it will take the returned value and pass it to our text widget.
Lastly we have the On Clicked event for our button:
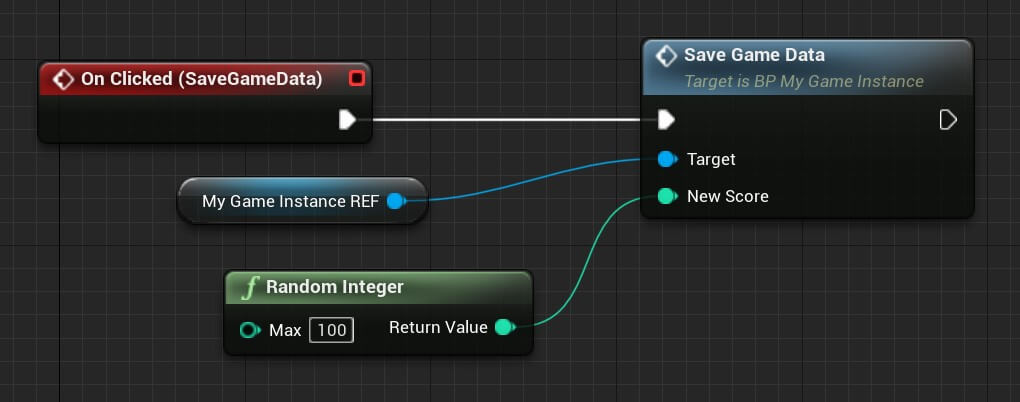
You can copy the nodes from here:
Essentially when we press the button we are going to generate a random Integer from 0 to 100 and save it with the help of our game instance.
It is not mandatory that you create the same set up, but I am using this to demonstrate how saving and loading game data works.
Since we need to create the widget and display it in our game, I am going to create a new GameMode Blueprint, so Right Click -> Blueprint Class and in the search bar type game mode:
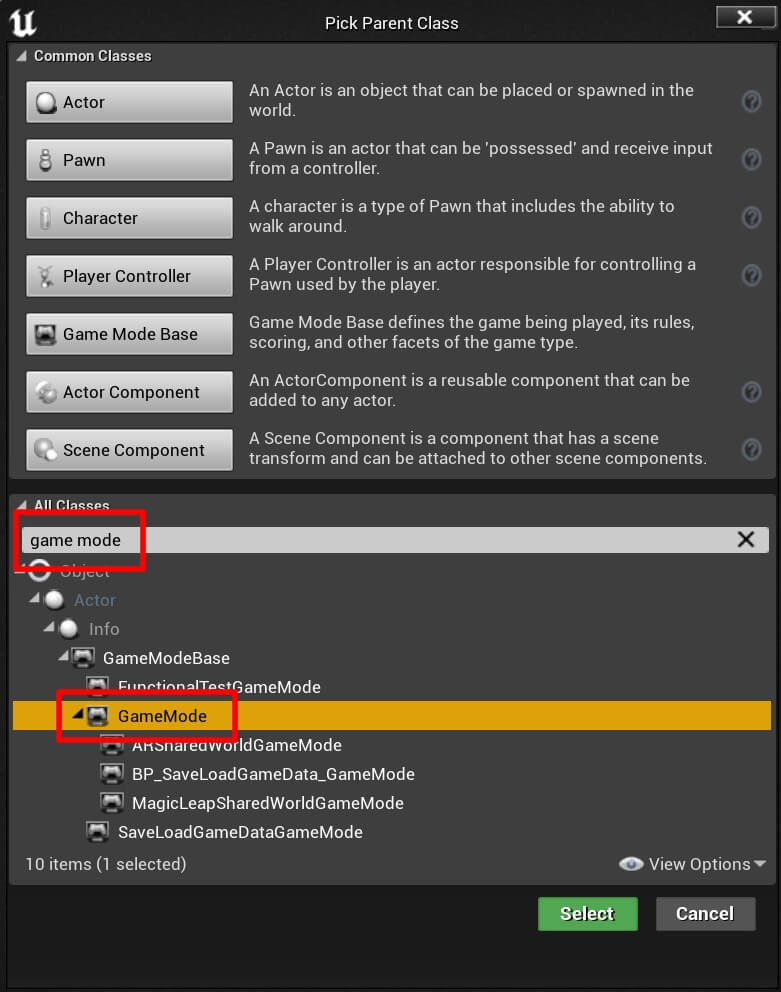
Name the new Blueprint BP_SaveLoadGameData_GameMode and inside Edit -> Project Settings -> Maps & Modes for the default game mode set our newly created game mode Blueprint:
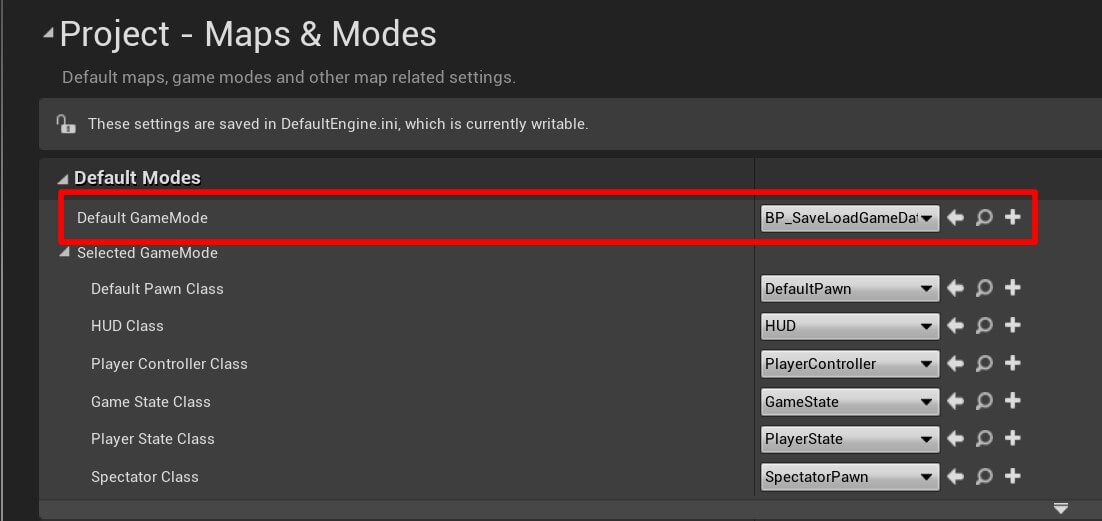
Now we can test the game:
Every time we pressed the button we generated a new random Integer that was saved, and when we stopped and run the game again that same data was loaded and displayed with the help of the text widget.
Saving Player's Location
The first example was a simple one that we used to demonstrate how saving and loading game data works, now we are going to save player’s location inside the game and next time when we play the game we can continue from the player’s last location.
To do that, first we need to create a Vector variable inside the GameData Blueprint and name it Player Location:
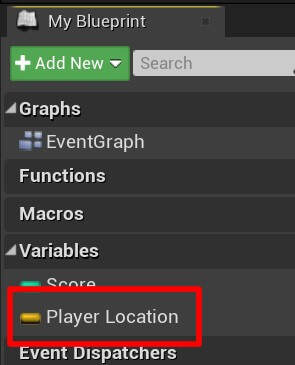
Inside the BP_MyGameInstance Blueprint I am going to create two functions, one for saving the player’s location called SavePlayerLocation and one for loading player’s location called LoadPlayerLocation:


You can copy the nodes from here:
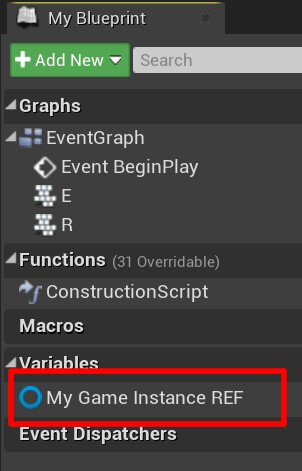
Then, from BeginPlay we are going to get a reference to BP_MyGameInstance:

You can copy the nodes from here:
When we press the E button on the keyboard we are going to save the player’s location, and when we press the R button we are going to load the player’s location:
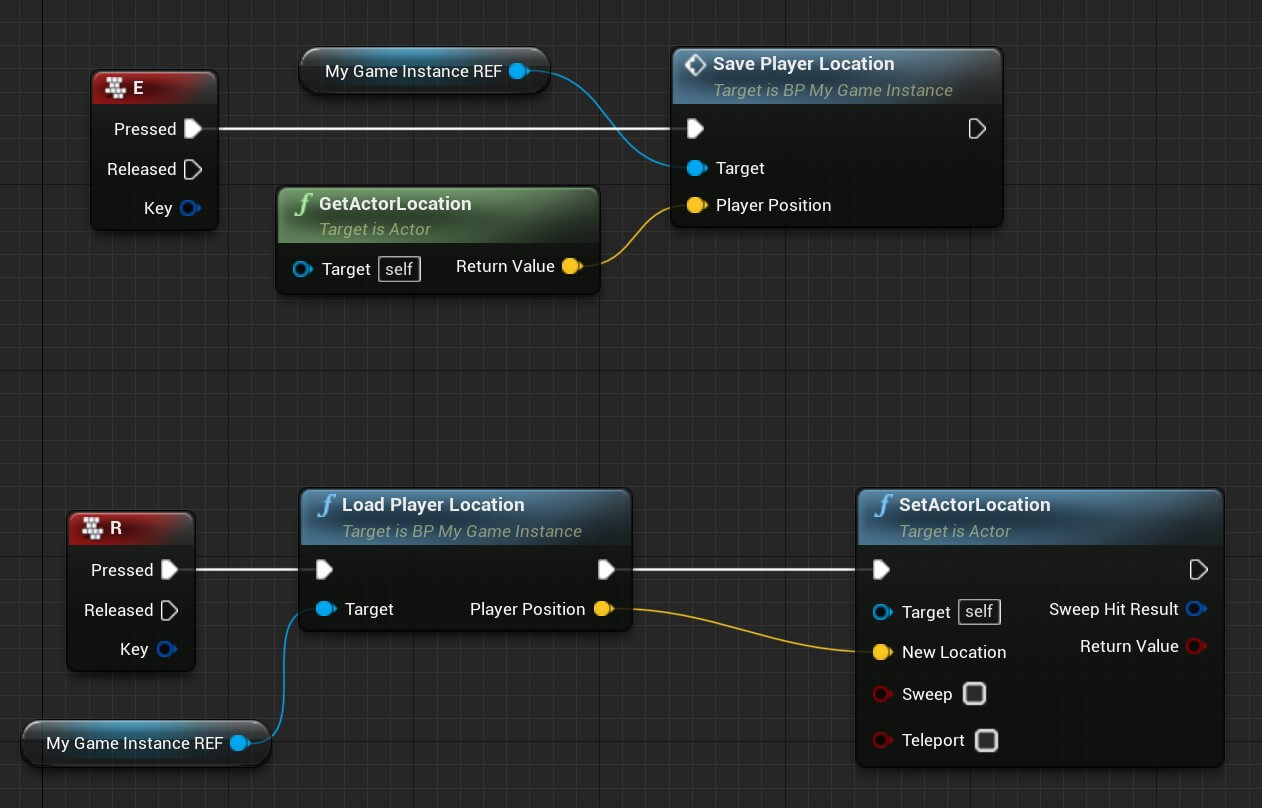
You can copy the nodes from here:
Let’s run the game and test it out:
Every time we press the E key we save the player’s position in the game, then no matter where we are in the level, when we press the R key, the player will be moved to the saved position. This mechanic can be a nice idea for a game 😉
Of course, if you want to start the game from the player’s last saved position, you can load player’s position from the GameMode Blueprint.
A Better Way To Save Data
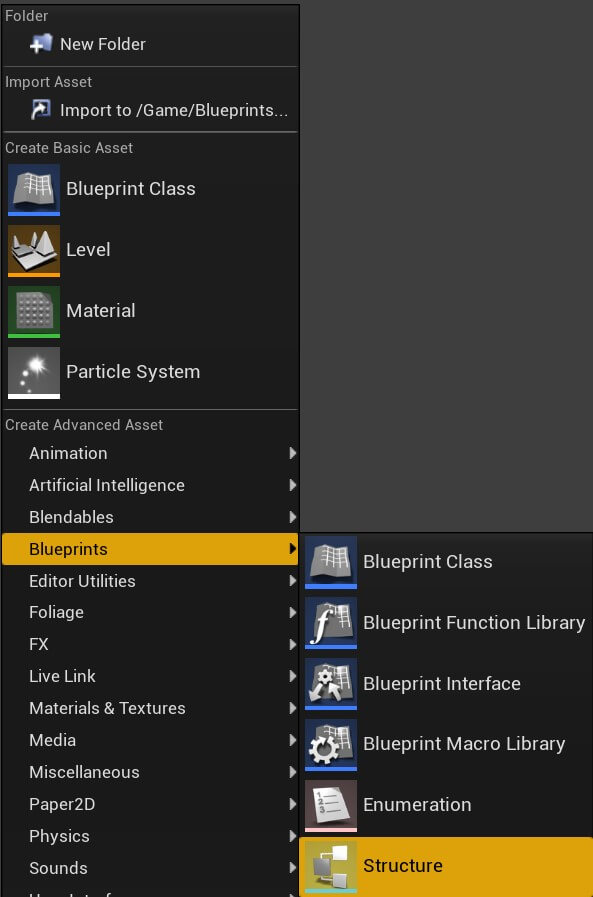
I am going to rename the SaveData Blueprint to SaveGameData, and name the struct we just created GameData.
Next, inside the BP_MyGameInstance I am going to change the SaveGameData function:

You can copy the nodes from here:
Previously the SaveGameData function was only saving the Score variable, now it is saving the Game Data struct.
We are also going to change the LoadGameData function so that it loads the Game Data struct instead of the Score variable:

You can copy the nodes from here:
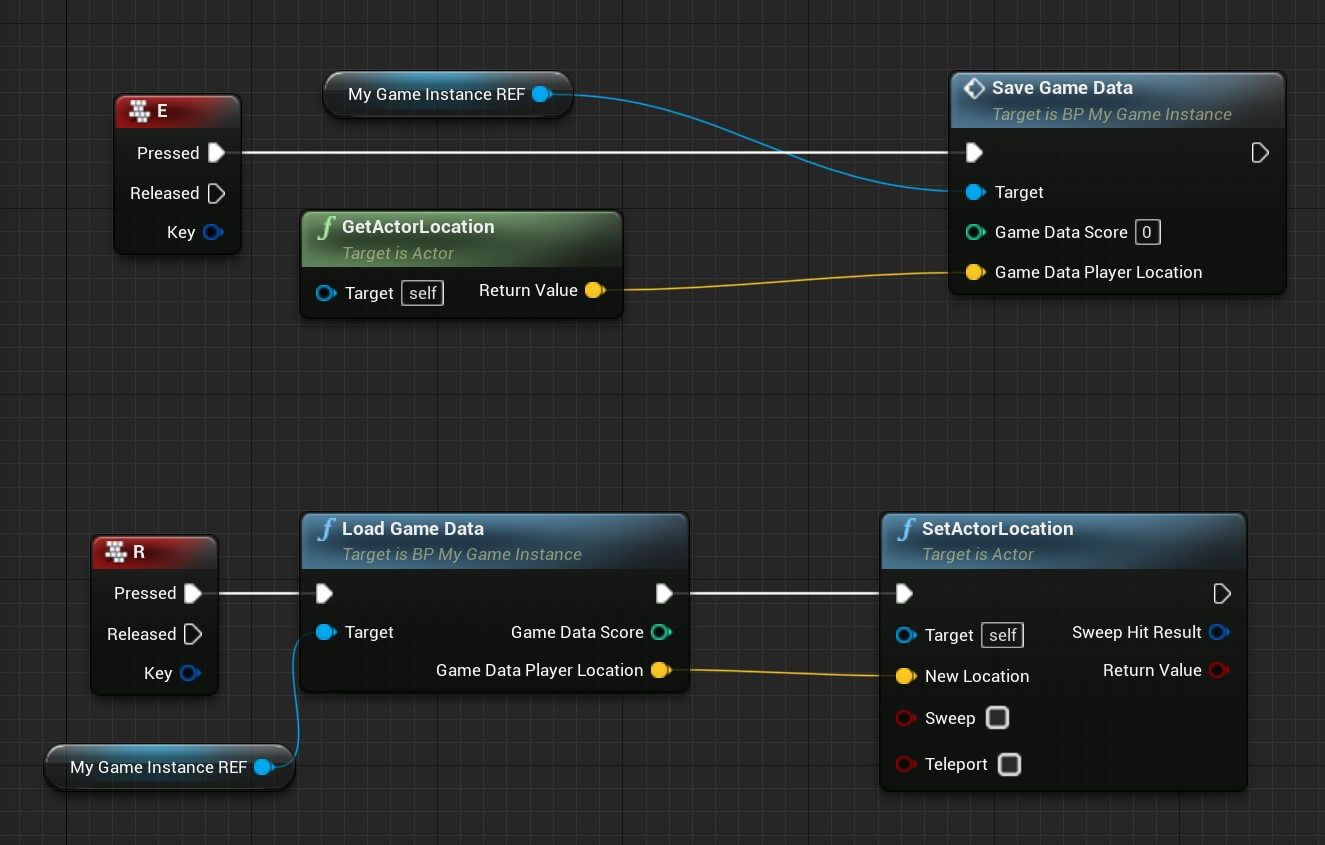
Going back inside ThirdPersonCharacter Blueprint, one thing that you will notice when we want to save our game data we need to pass our GameData struct, and when we are loading the game data the return value is the GameData struct:
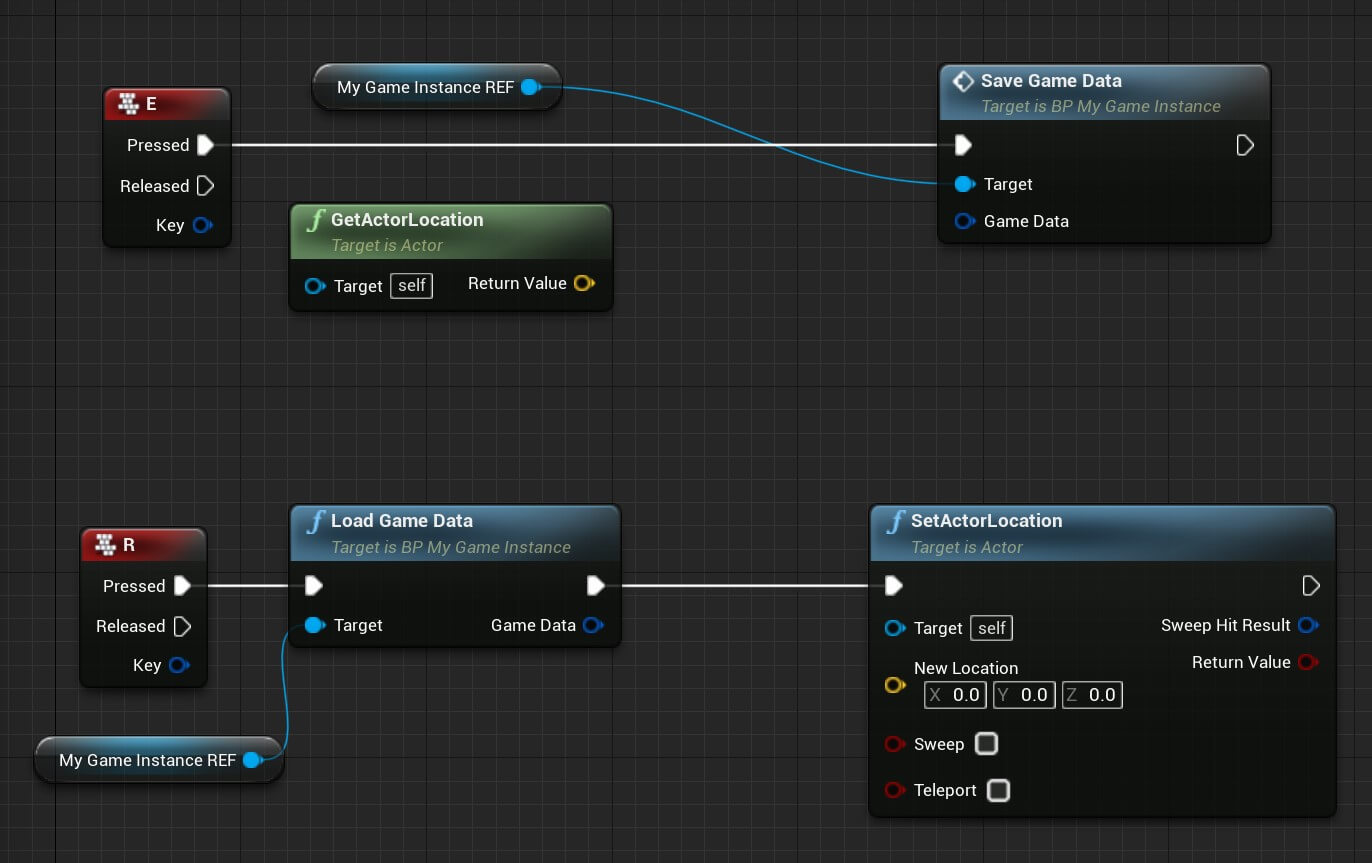
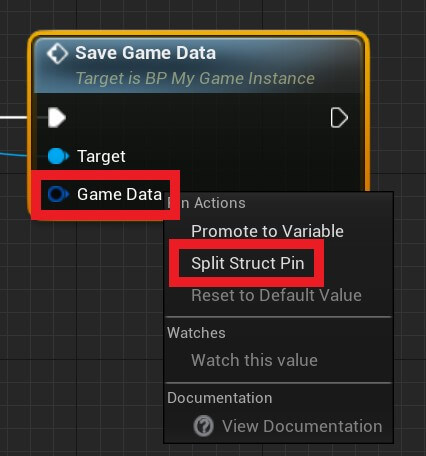
In order to pass the desired data, in our case player’s location, we need to right click on the game data parameter and then press Split Struct Pin:
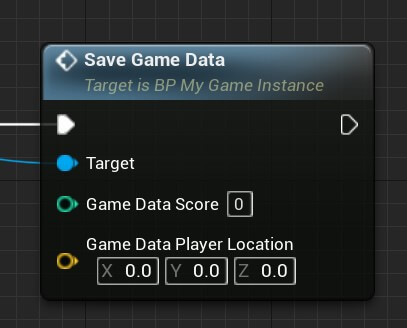
Repeat the same process for the return value of the Load Game Data function, and when you do that it will reveal all the pins that represent individual values that we can pass:
Save Game C++ Class
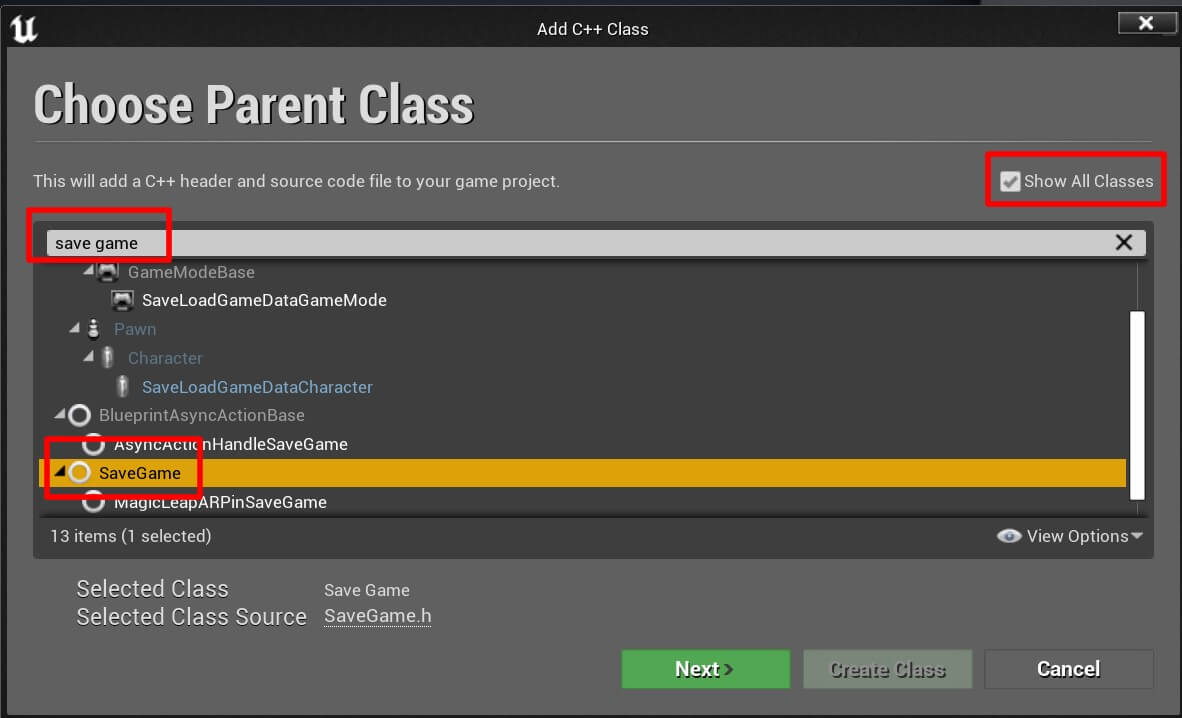
Click the Next button and give the class name SaveGame_CPP and create it. To make this work, we need to create variables that we will save. Open the SaveGame_CPP.h file and add the following lines of code:
					#include "CoreMinimal.h"
#include "GameFramework/SaveGame.h"
#include "SaveGame_CPP.generated.h"

UCLASS()
class SAVELOADGAMEDATA_API USaveGame_CPP : public USaveGame
{
	GENERATED_BODY()

public:
	UPROPERTY()
		FVector PlayerLocation;

	UPROPERTY()
		int32 Score;

};
Creating Functions For Saving And Loading Game Data With C++
Same as in the Blueprint example, we are going to use our game instance to save and load game data. First create the game instance class by Right Click -> New C++ Class and filter for game instance in the search bar and select the game instance as the parent class:
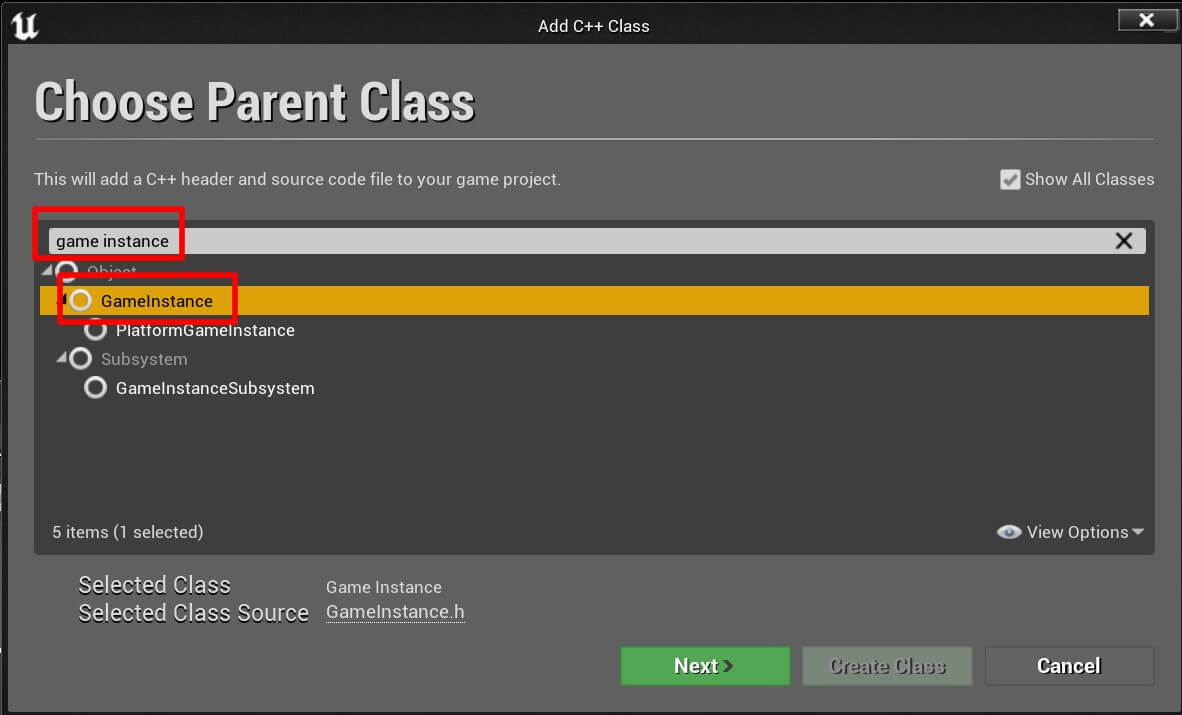
Click the Next button and name the class GameInstance_CPP. When the class is created, open GameInstance_CPP.h file and add the following lines:
					#include "CoreMinimal.h"
#include "Engine/GameInstance.h"
#include "GameInstance_CPP.generated.h"

/**
 *
 */
UCLASS()
class SAVELOADGAMEDATA_API UGameInstance_CPP : public UGameInstance
{
	GENERATED_BODY()

	void Init() override;

	FString SaveSlot = "GameData";

	class USaveGame_CPP* GameData;

public:
	void SaveGameData(FVector PlayerLocation, int32 Score);
	class USaveGame_CPP* LoadGameData();

};
Now open GameInstance_CPP.cpp file and implement the functions we defined in the .h file:
					#include "GameInstance_CPP.h"
#include "SaveGame_CPP.h"
#include "Engine.h"

void UGameInstance_CPP::Init()
{
	// check if there is game data to load it
	// or create a new one if the game is just starting
	GameData = Cast<USaveGame_CPP>(UGameplayStatics::LoadGameFromSlot(SaveSlot, 0));

	if(!GameData)
	{
		// create a new game data
		GameData = Cast<USaveGame_CPP>(UGameplayStatics::
			CreateSaveGameObject(USaveGame_CPP::StaticClass()));

		GameData->PlayerLocation = FVector(0, 0, 0);
		GameData->Score = 0;

		UGameplayStatics::SaveGameToSlot(GameData, SaveSlot, 0);
	}

}

void UGameInstance_CPP::SaveGameData(FVector PlayerLocation, int32 Score)
{
	if (GameData)
	{
		GameData->PlayerLocation = PlayerLocation;
		GameData->Score = Score;

		UGameplayStatics::SaveGameToSlot(GameData, SaveSlot, 0);
	}
}

USaveGame_CPP* UGameInstance_CPP::LoadGameData()
{
	if (GameData)
		return GameData;
	else
		return nullptr;
}
Inside the Init function we first check if we have a save game data by trying to load it from the save slot on line 9.
If we don’t have the game data, that means we are starting the game for the first time and we need to create a new game data which we are doing on line 14. Then we set the default values for the data on line 17 and 18, and then we save the game data to the save slot on line 20.
For the SaveGameData function, first we check if we have the game data object reference on line 27, if that is the case we simply pass the parameter values to the game data and them we save it.
And for LoadGameData function, we check if we have the game data, and if that is the case we simply return it.
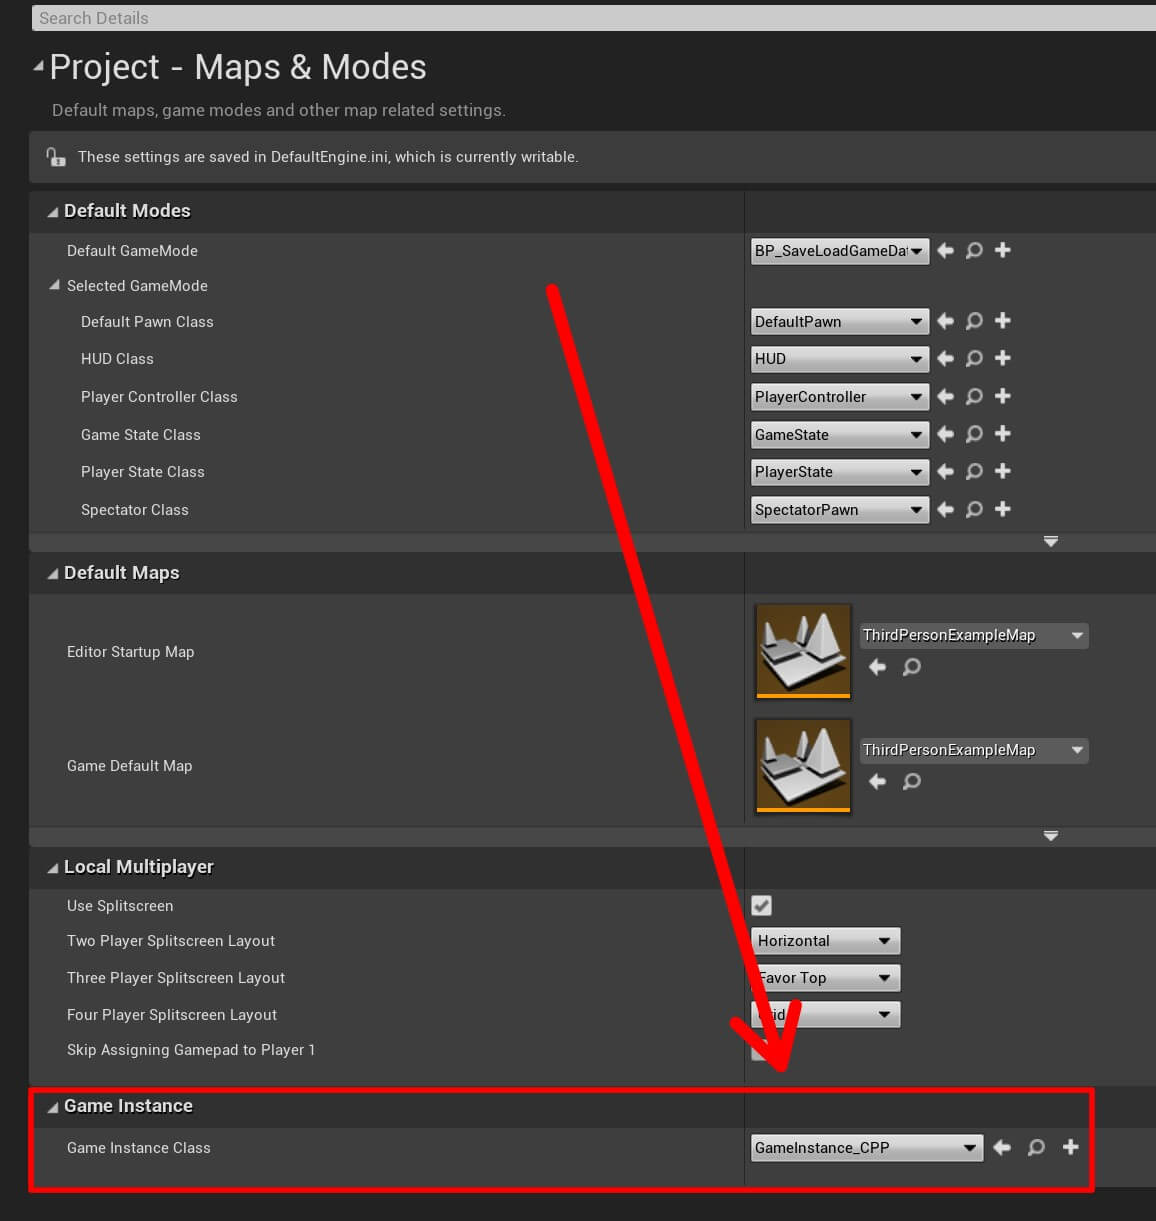
To make this work, we need to go to Edit -> Project Settings -> Maps & Modes and at the bottom for the Game Instance Class select the GameInstance_CPP:
Saving And Loading Game Data Using The Game Instance With C++
Since I am using the ThirdPerson template project, I am going to configure the default game character class that comes with that project.
First I need to set up the input, which I will do in Edit -> Project Settings -> Input. For the Action Mappings I am going to add two new mappings for saving and loading player’s location:
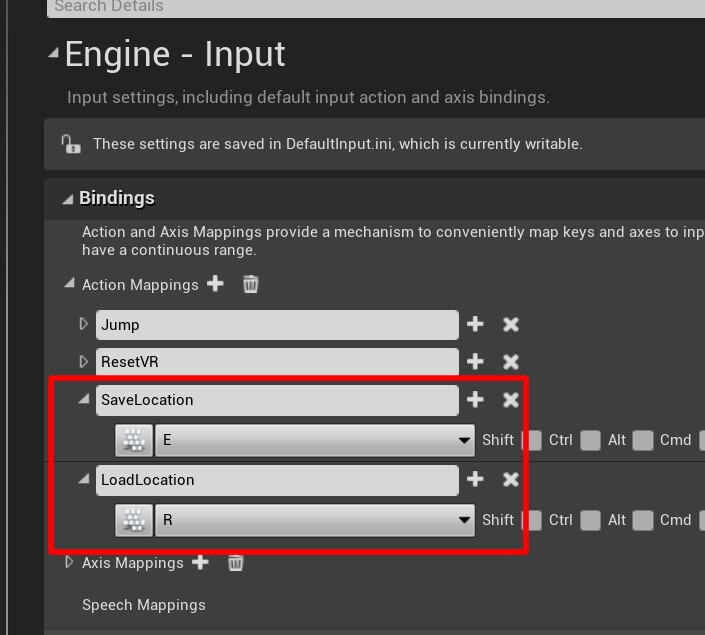
Now I am going to open the .h file of the character class that comes with the project, and add the following lines of code at the bottom of the file:
					public:
	virtual void BeginPlay() override;

private:

	class UGameInstance_CPP* MyGameInstance;

	void SavePlayerLocation();
	void LoadPlayerLocation();
Next, inside the .cpp file of the default character class, I am going to add the includes that we will need to make this work:
					#include "Engine.h"
#include "SaveGame_CPP.h"
#include "GameInstance_CPP.h"
I have placed these includes below the the ones that come with the class. In the BeginPlay function we are going to get a reference to the game instance because all the saving and loading goes through that class:
					void ASaveLoadGameDataCharacter::BeginPlay()
{
	Super::BeginPlay();

	// get a ref to game instance
	MyGameInstance = Cast<UGameInstance_CPP>
		(UGameplayStatics::GetGameInstance(GetWorld()));
}
Next, we need to bind the input inside the SetupPlayerInputComponent function:
					void ASaveLoadGameDataCharacter::SetupPlayerInputComponent(class UInputComponent* PlayerInputComponent)
{
    // other code for binding movement and mouse input

	PlayerInputComponent->BindAction("SaveLocation",
		IE_Pressed, this, &ASaveLoadGameDataCharacter::SavePlayerLocation);

	PlayerInputComponent->BindAction("LoadLocation",
		IE_Pressed, this, &ASaveLoadGameDataCharacter::LoadPlayerLocation);
}
And the last step is to save and load the player’s position when we press the appropriate buttons:
					void ASaveLoadGameDataCharacter::SavePlayerLocation()
{
	MyGameInstance->SaveGameData(this->GetActorLocation(), 0);
}

void ASaveLoadGameDataCharacter::LoadPlayerLocation()
{
	SetActorLocation(
		MyGameInstance->LoadGameData()->PlayerLocation);
}
Compile the code and let’s run the game:
Every time I pressed the E key on my keyboard the position was saved, and every time I pressed the R key the position was loaded no matter where in the level the player was located.
You will notice that even though I’ve added the Score as another variable that we can save, I only saved and loaded the player’s position vector variable.
This is for the sake of example, but the same way we saved and loaded the location variable, we can save and load the Score variable as well.

Comments are closed.