Important Information Before We Start
Always Cache Your Components
					void FixedUpdate()
    {
        GetComponent<Rigidbody>().AddForce(new Vector3(200f, 300f, 300f));
    }
Rigidbody body;
and then in Awake get a reference to that variable:
					void Awake()
{
    body = GetComponent<Rigidbody>();
}
I know that we can also use the Start function for this purpose, even the OnEnable function, but I used the Awake function for this example because the Awake function is the first initialization function that is called when the game starts, and if I want to get a reference to variables or initialize variables I always do it in the Awake function as that will be the first thing that will be executed and then the game can start normally.
After that you can safely apply force to your Rigidbody variable:
					void FixedUpdate()
    {
        body.AddForce(new Vector3(200f, 300f, 300f));
    }
Caching Components VS SerializeField
There is another way how we can get a reference to cached variables and that is by adding the SerializeField keyword above the variable declaration:
					[SerializeField]
    private Rigidbody body;
This will expose the variable in the Inspector tab and we can now drag the game object itself providing that it has the desired component attached on it, in the exposed variable field to get a reference to it:
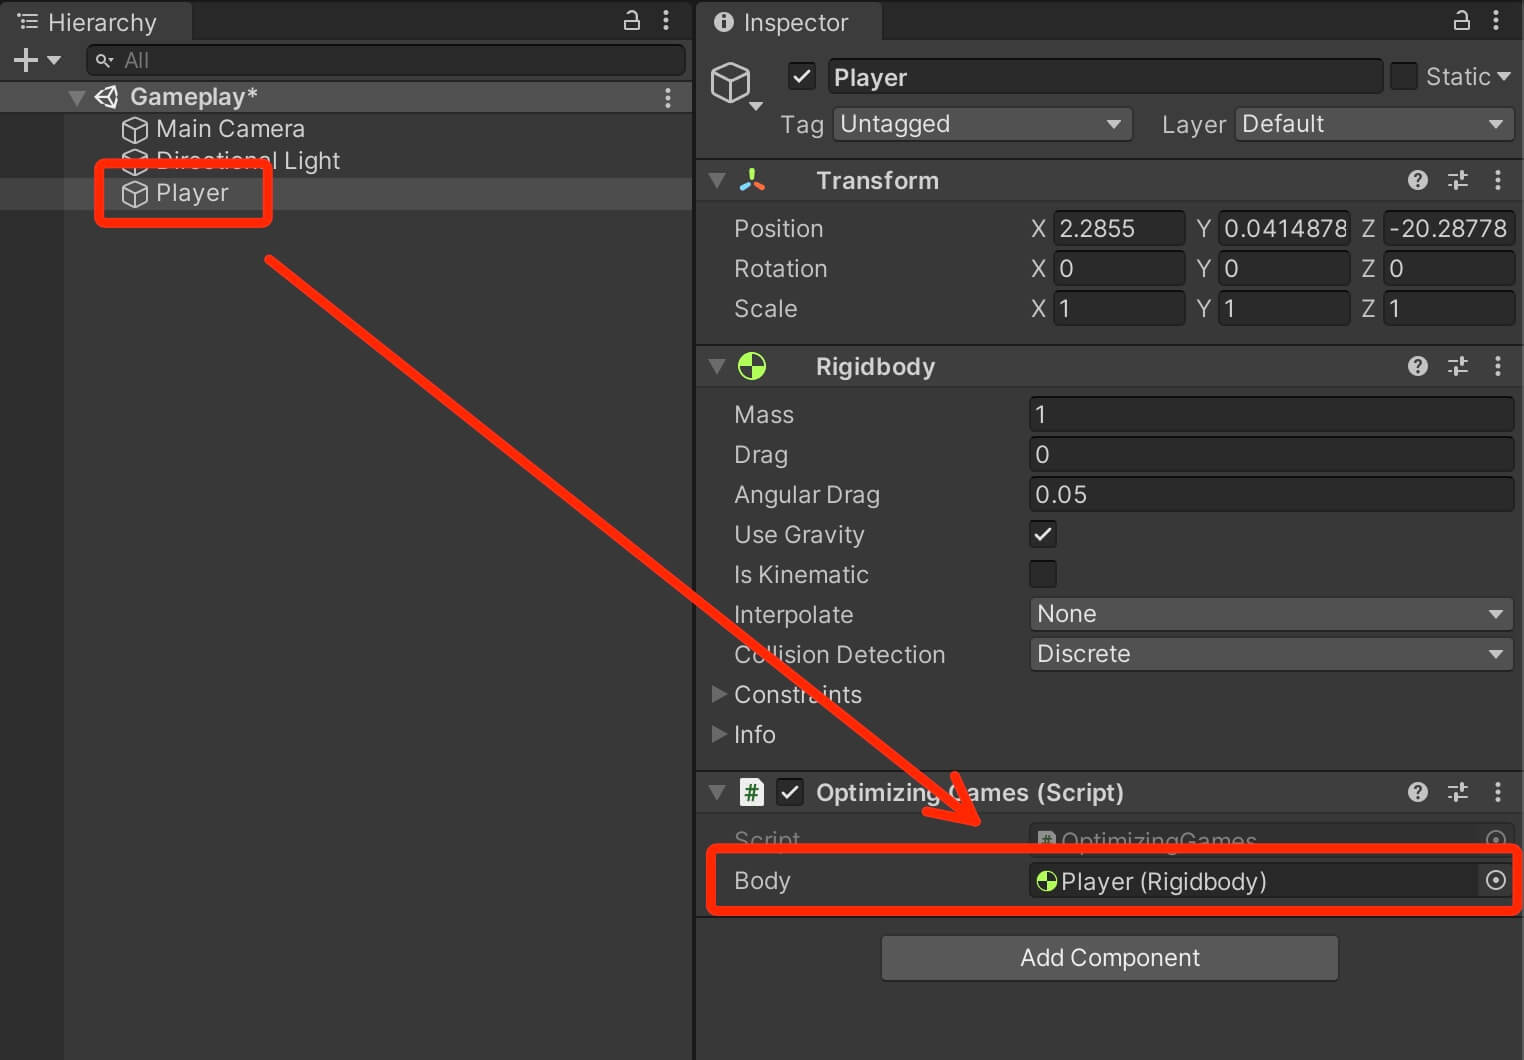
Now which of the two methods is more optimized, the answer is SerializeField. Because you don’t need to use code to get a reference to the desired component, and this is very effective especially if you have a lot of game objects such as enemies or collectable items that need to get a certain component when they are spawned.
Now there will be times where you need to get a reference to a component via code, but whenever you can, try to get a reference to the component of a game object by using SerializeField and attaching the desired component in the appropriate slot in the Inspector tab.
Cache Your Non-Component Variables As Well
					void Update()
    {
        Vector3 distanceToEnemy = transform.position - enemyPosition;
    }
					Vector3 distanceToEnemy;

    void Update()
    {
        distanceToEnemy = transform.position - enemyPosition;
    }
This is also a rule for any other variable types. It is always better to do
					float distance;

    void Update()
    {
        distance = Vector3.Distance(transform.position, enemyPosition);
    }
than
					void Update()
    {
        float distance = Vector3.Distance(transform.position, enemyPosition);
    }
Don't Use Camera.main
Camera.main
					Camera mainCam;

    private void Awake()
    {
        mainCam = Camera.main;
    }
Avoid Repeated Access to MonoBehaviour Transform
Another thing that you need to be careful of is reusing the transform property of MonoBehaviour. This internally calls GetComponent<Transform> to get the Transform component attached on the game object.
Again, the solution for this is to cache the transform variable:
					Transform myTransform;

    private void Awake()
    {
        myTransform = transform;
    }
Optimizing Strings
					private void OnTriggerEnter2D(Collider2D collision)
    {
        if (collision.tag == "Player")
        {
        }
    }
This is not the way to go. When you are checking the tag of the collided game object it is better to use CompareTag function:
					private void OnTriggerEnter2D(Collider2D collision)
    {
        if (collision.CompareTag("Player"))
        {
        }
    }
Another common mistake is when declaring an empty string people usually write:
private string playerName = "";
A better way is to use string.Empty:
private string playerName = string.Empty;
Strings And Text UI
When using strings and text UI you need to be careful when you are updating the text often, especially if that happens in the Update function.
This is something a lot of people do with timers, the usually write code that looks like this:
					[SerializeField]
    private Text timerTxt;

    private float timerCount;

    private void Update()
    {
        timerCount += Time.deltaTime;
        timerTxt.text = "Time: " + (int)timerCount;
    }
While this looks like a very simple operation, it is going to slow down your game significantly, especially a mobile.
The reason for that is because a string is an object type variable. Every time you concatenate a string like you see in the line 9 in the code above, you create a new object.
Now imagine doing this in the Update function which is called every frame. You are creating a new object that is stacked up memory every single frame and this is something mobile devices can’t handle.
The solution is to use StringBuilders.
					// needed for importing string builder
using System.Text;

public class OptimizingGames : MonoBehaviour
{
    [SerializeField]
    private Text timerTxt;

    private float timerCount;

    private StringBuilder timerTxtBuilder = new StringBuilder();

    private void Update()
    {
        CountTime();
    }

    void CountTime()
    {
        timerCount += Time.deltaTime;

        timerTxtBuilder.Length = 0;
        timerTxtBuilder.Append("Time: ");
        timerTxtBuilder.Append((int)timerCount);

        timerTxt.text = timerTxtBuilder.ToString();
    }

}
Avoid Using Instantiate Function During Gameplay
When it comes to Instantiate function, which creates a copy of the provided prefab, you will find different opinions online. The majority say don’t use Instantiate during gameplay.
This is somewhat true. I say somewhat because I’ve used Instantiate during gameplay in one of my mobile games and when I profiled the game it was running smoothly never going below 60 FPS.
This goes to show that you should always revert back to the Profiler and the stats you see there.
That being said, it is always a better idea to use the pooling technique instead of relying on Instantiate, especially if you are spawning bullets, collectable items or any other game element that is often spawned in the game.
					using System.Collections;
using System.Collections.Generic;
using UnityEngine;

public class BasicPool : MonoBehaviour
{
    [SerializeField]
    private GameObject bulletPrefab;

    [SerializeField]
    private Transform bulletSpawnPos;

    [SerializeField]
    private float minShootWaitTime = 1f, maxShootWaitTime = 3f;

    private float waitTime;

    [SerializeField]
    private List<GameObject> bullets;

    private bool canShoot;
    private int bulletIndex;

    [SerializeField]
    private int initialBulletCount = 2;

    private void Start()
    {
        for (int i = 0; i < initialBulletCount; i++)
        {
            // while instantiating the bullet game object also get the SpiderBullet component
            bullets.Add(Instantiate(bulletPrefab));
            bullets[i].gameObject.SetActive(false);
        }

        waitTime = Time.time + Random.Range(minShootWaitTime, maxShootWaitTime);
    }

    private void Update()
    {
        if (Input.GetMouseButtonDown(0) && Time.time > waitTime)
        {
            Shoot();
            waitTime = Time.time + Random.Range(minShootWaitTime, maxShootWaitTime);
        }
    }

    public void Shoot()
    {
        canShoot = true;
        bulletIndex = 0;

        while (canShoot)
        {
            // search for inactivate bullet to reuse
            if (!bullets[bulletIndex].gameObject.activeInHierarchy)
            {
                bullets[bulletIndex].gameObject.SetActive(true);

                bullets[bulletIndex].transform.rotation = transform.rotation;
                bullets[bulletIndex].transform.position = bulletSpawnPos.position;

                bullets[bulletIndex].ShootBullet(transform.up);

                canShoot = false;
            }
            else
            {
                bulletIndex++;
            }

            if (bulletIndex == bullets.Count)
            {
                bullets.Add(Instantiate(bulletPrefab, bulletSpawnPos.position, transform.rotation));

                // access the bullet we just created by subtracting 1 from
                // the total bullet count in the list
                bullets[bullets.Count - 1].ShootBullet(transform.up);

                canShoot = false;
            }
        }
    }

} // class
But sometimes there will be situations where you simply need to use Instantiate as that is the shortest solution, and there is no harm in using it if you see that the Profiler is not showing any issues, so keep that in mind.
Remove Empty Callback Functions
As you already know, Awake, Start, and OnEnable initialization functions are called when the game object is spawned.
Update and LateUpdate are called every frame and LateUpdate is called every fixed frame rate.
The issue with these functions is that they will be called even if they are empty because Unity doesn’t know that these functions are empty e.g. they don’t have any code inside.
If you leaved them defined in your script
					private void Awake()
    {

    }

    private void Start()
    {

    }

    private void Update()
    {

    }

    private void FixedUpdate()
    {

    }
					using System.Collections;
using System.Collections.Generic;
using UnityEngine;

public class NoEmptyCallbacks : MonoBehaviour
{

}
					using System.Collections;
using System.Collections.Generic;
using UnityEngine;

public class WithEmptyCallbacks : MonoBehaviour
{
    // Start is called before the first frame update
    void Start()
    {

    }

    // Update is called once per frame
    void Update()
    {

    }
}
					[SerializeField]
    private GameObject withFunctions, noFunctions;

    private int spawnNum = 1000;

    [SerializeField]
    private bool instantiateWithFunctions;

    private void Awake()
    {
        for (int i = 0; i < spawnNum; i++)
        {
            if(instantiateWithFunctions)
                Instantiate(withFunctions);
            else
                Instantiate(noFunctions);
        }
    }
As you saw from the example, just by having empty Start and Update functions in the class the spike on the Profiler skyrocketed when we created objects which had that class attached to them.
When Raycasting Use Zero Allocation Code
Avoid using raycast code that allocates memory. All raycast functions have their non memory allocation version:
					// instead of
    Physics.OverlapBox

    // use
    Physics.OverlapBoxNonAlloc

    // instead of
    Physics.OverlapCapsule

    // use
    Physics.OverlapCapsuleNonAlloc

    // instead of
    Physics.OverlapSphere

    // use
    Physics.OverlapSphereNonAlloc

    // instead of
    Physics.RaycastAll

    // use
    Physics.RaycastNonAlloc
When Calculating Distance With Vectors Use Distance Squared
					Vector3 playerPos = new Vector3();

    private void Start()
    {
        float mag = playerPos.magnitude;
    }
					Vector3 playerPos = new Vector3();
    Vector3 enemyPos = new Vector3();

    private void Start()
    {
        float dist = Vector3.Distance(playerPos, enemyPos);
    }
we are asking the computer to perform a square root calculation. Now, square root calculations are complex to perform so calling square root operations often can lead to optimization problems.
The solution is to use the square root calculation:
					Vector3 playerPos = new Vector3();
    Vector3 enemyPos = new Vector3();

    float distanceFromEnemy = 5f;

    private void Start()
    {
        float dist = (playerPos - enemyPos).sqrMagnitude;

        if (dist < (distanceFromEnemy * distanceFromEnemy))
        {
            // your code
        }
    }
Using Coroutines And Invoke Functions For Timers
					private int timerCount;
    private bool canCountTime = true;

    private int endOfTimeValue = 1000;

    private void Start()
    {
        StartCoroutine(CountTimer());
    }

    IEnumerator CountTimer()
    {
        while (canCountTime)
        {
            yield return new WaitForSeconds(1f);
            timerCount++;
            // display timer count

            if (timerCount > endOfTimeValue)
                canCountTime = false;
        }
    }
					private int timerCount;
    private bool canCountTime = true;

    private int endOfTimeValue = 1000;

    private void Start()
    {
        InvokeRepeating("CountTimer", 1f, 1f);
    }

    void CountTimer()
    {
        if (!canCountTime)
        {
            CancelInvoke("CountTimer");
        }

        timerCount++;
        // display timer count

        if (timerCount > endOfTimeValue)
            canCountTime = false;
    }
					 private float timerCount;
    private bool canCountTime = true;

    private float endOfTimeValue = 1000;

    private void Update()
    {
        CountTimer();
    }

    void CountTimer()
    {
        if (!canCountTime)
            return;

        if (Time.time > timerCount)
            timerCount = Time.time + 1f;

        // display time

        if (timerCount >= endOfTimeValue)
        {
            canCountTime = false;
        }
    }
					private float timerCount;
    private bool canCountTime = true;

    private float endOfTimeValue = 1000;

    private void Update()
    {
        if (Time.time > timerCount)
            CountTimer();
    }

    void CountTimer()
    {
        if (!canCountTime)
            return;

        timerCount = Time.time + 1f;

        // display time

        if (timerCount >= endOfTimeValue)
        {
            canCountTime = false;
        }
    }
Create Prefabs Out Of Your Levels Instead Of Scenes
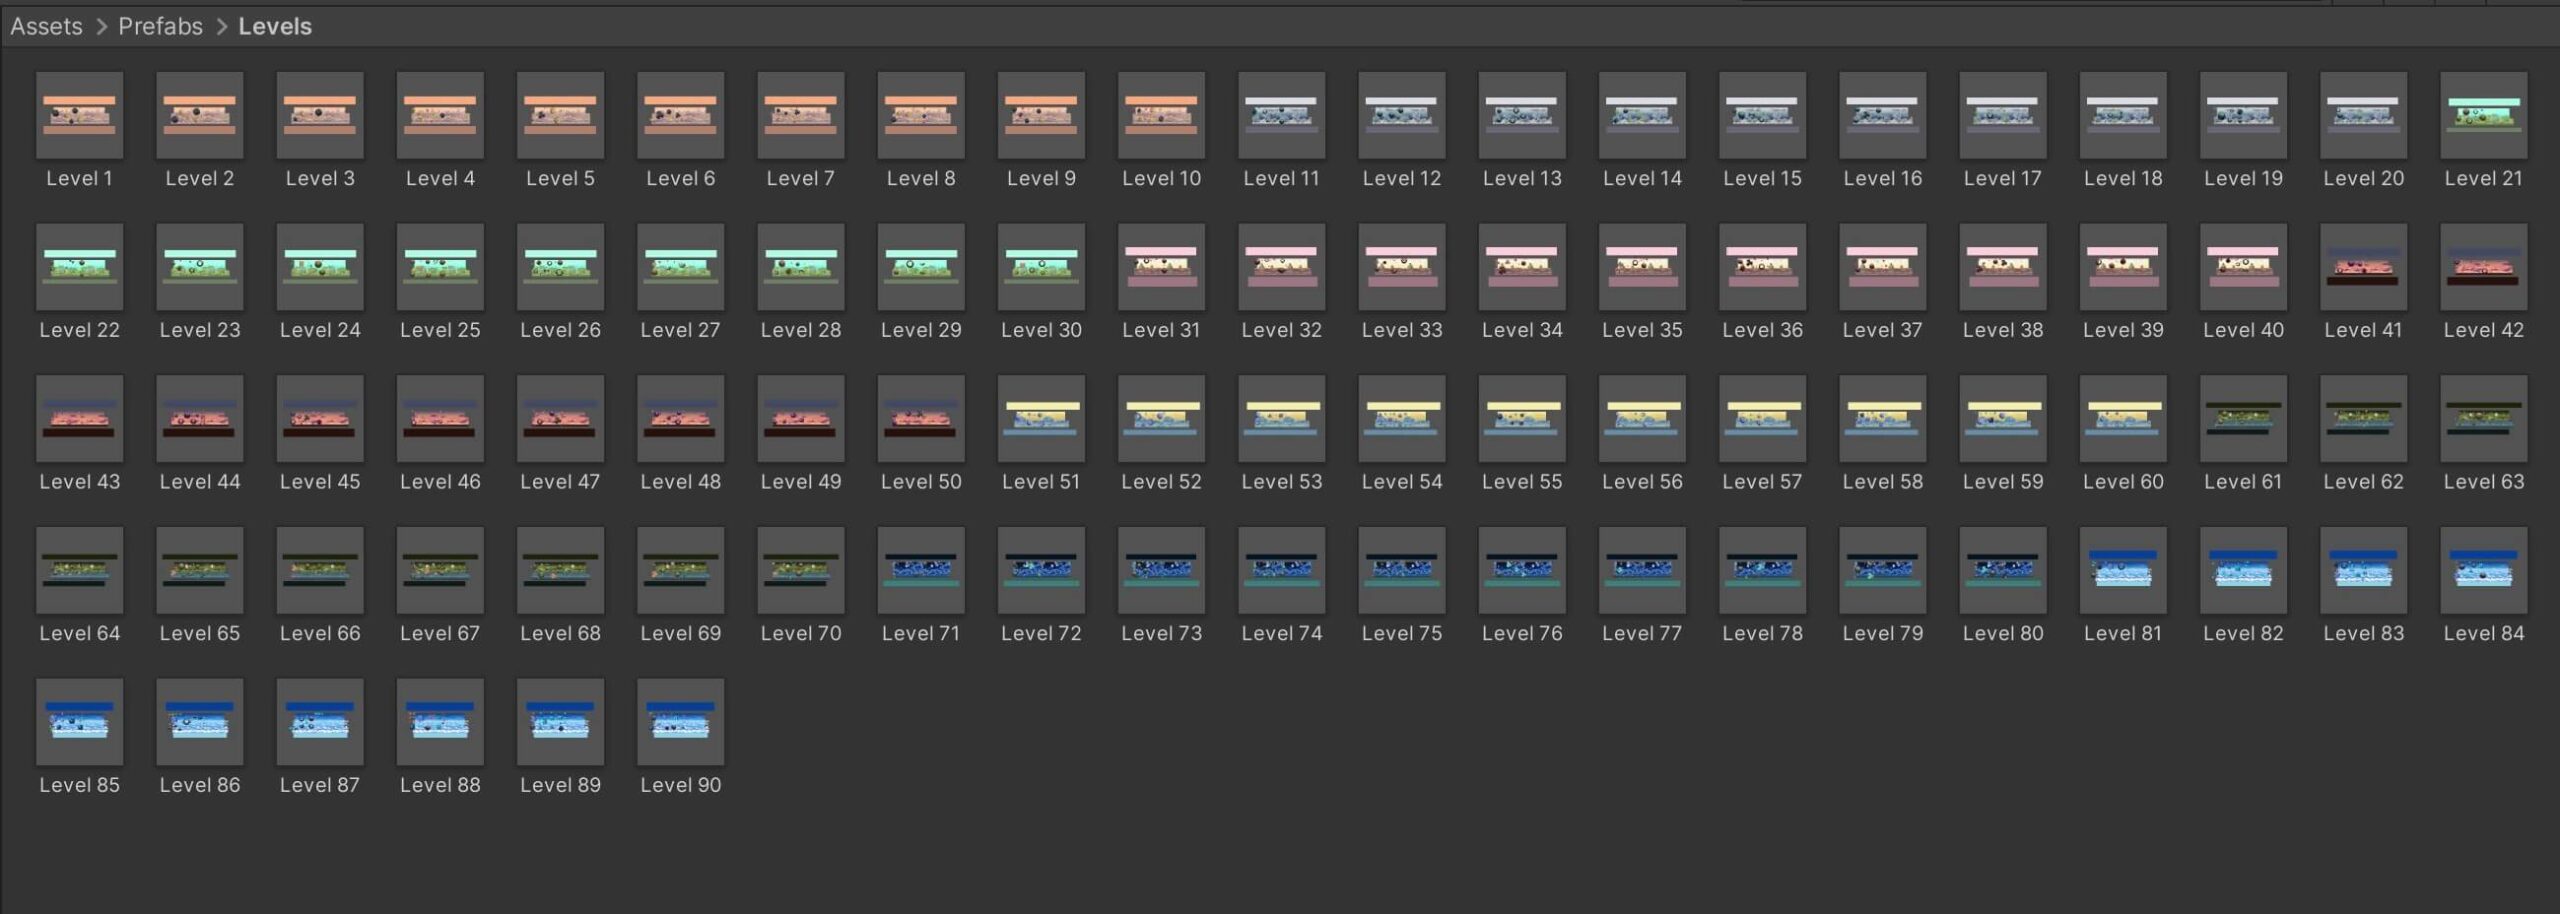
When I want to “load” a new level, instead of using
					SceneManager.LoadScene("Scene Name");

or

SceneManager.LoadScene(sceneIndex);
I will simply use Instantiate to create the new level
Instantiate(levelPrefab);
This is more optimized because when we load a new scene, all objects in the previous scene will be destroyed.
Depending on your gameplay and how many game managers you have in your scenes, this means that every time you load a new scene all those objects will be destroyed and when you load a new scene new objects will be created.
By making your level a prefab, you only destroy the level prefab, and then instantiate a new one which you can do while you preview a simulated loading screen to the player.
You need to be careful if your level is too complex and has a lot of objects, in that case a better approach would be to have all your levels in the scene and you would activate and deactivate the levels you need and don’t need, I used this approach in one of my mobile games.
A very important part when using this approach is to test it in the Profiler and see what it has to say just to be sure.
Load Scenes Asynchronously
SceneManager.LoadScene("Scene Name");
use
SceneManager.LoadSceneAsync("Scene Name");
The difference between the two is when you use LoadScene the main game thread will block until the scene loads which will result in poor user experience.
But when we use LoadSceneAsync the scene will load gradually in the background without causing a significant impact on the user experience.
With LoadSceneAsync we can also display a realtime loading screen to the user. This can be accomplished with the following code:
					private AsyncOperation sceneLoadOperation;

    IEnumerator LoadSceneAsynchronously(int sceneIndex)
    {
        sceneLoadOperation = SceneManager.LoadSceneAsync(sceneIndex);

        while (!sceneLoadOperation.isDone)
        {
            Debug.Log("Loading: " + sceneLoadOperation.progress + "%");
            yield return null;
        }
    }
Use Arrays Over Lists
With its dynamic feature lists are more attractive than arrays, but with that feature also comes performance issues.
In general, if you need a fixed list of items then definitely go with arrays as they are much more efficient. If you need a resizable list of items then you need to use lists.
Now this topic can be debatable and if you searched online you probably saw people recommending lists over arrays and vice-versa, of course the Profiler will help you clear your doubts, but when you are working on a game, especially if the game has more than 200mb of file size, then you will have a lot of features in your game and a lot of the times you will have a need for a fixed size container so to say. So depending on your need you will choose the appropriate way to go.
For example if you have 20 collectable items in your game and you want to spawn them randomly, you will store those items in an array. But if you are using a pooling technique like I did in the example in this post, then you will use a list because you are dynamically adding new objects in the list.
Use For Loop Over Foreach
					foreach (GameObject bullet in bullets)
{

}
with
					for (int i = 0; i < bullets.Count; i++)
{
}
Be Careful With GameObject.Find Functions
We all know that every Find function is notoriously expensive and it should be avoided at all cost. BUT, this is not quite true.
Well, it is true that any Find function is expensive, but if you know how to use it then you will not have issues with it, because, let’s face it, there are times where we simply can’t avoid using Find functions.
The way Find(“Name of game object”) and FindWithTag(“Tag of game object”) work is that they iterate through every game object in the scene until they find the object with the specified name or tag.
So if your scenes are not loaded with hundreds or thousands of game object, using Find or FindWithTag to get a reference to a specific game object will not be an issue if you make that call in one of the initialization functions.
This means that you should avoid using Find functions in the Update or any type of loop structure or otherwise face the consequences. So when you are using Find functions, use them in Awake, Start, or OnEnable, and always check with the Profiler for any issues.
IL2CPP VS Mono
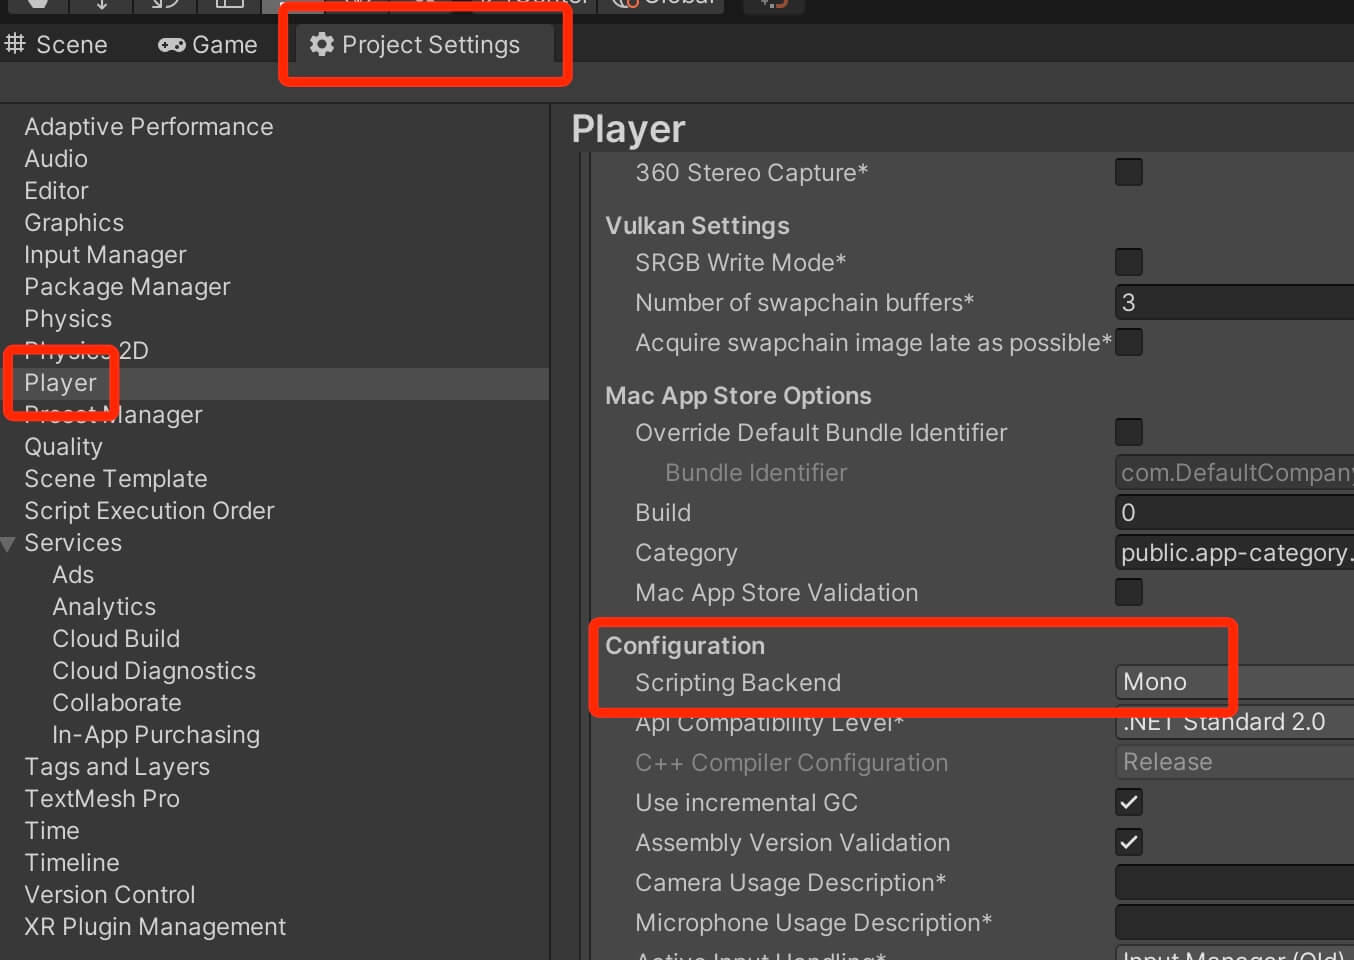
One setting that is connected to programming but it doesn’t involve writing code is the Scripting Backend settings.
You can find it under Edit -> Project Settings -> Player -> Configuration -> Scripting Backend:

Set Objects That Are Not Supposed To Move To Static
If you attach a collider on a game object, be that 2D or 3D, but you don’t plan to move that game object in the game, it is a good idea to mark it as static:

Collision Detection Settings
The default Collision Detection settings for every Rigidbody is set to Discrete:
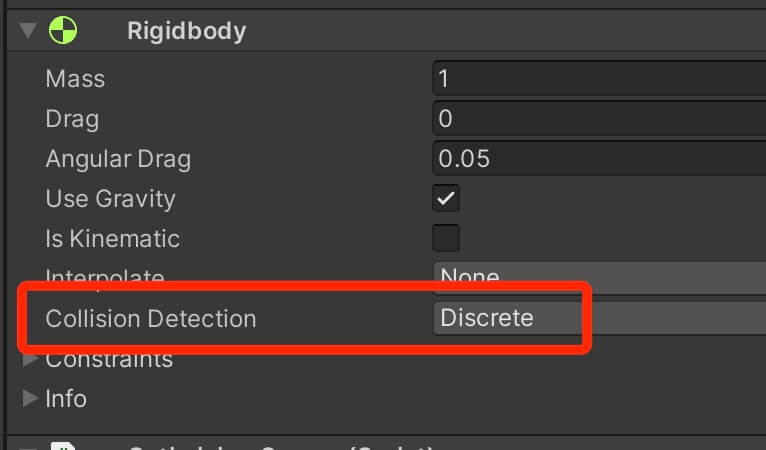
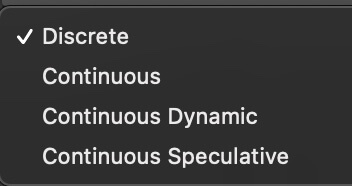

But in Rigidbody component we also saw two additional settings: Continuous Dynamic and Continuous Speculative.
These additional collision detection settings are further optimizations unique to Unity’s 3D physics system because 3D collision detection is much more expensive than 2D collision detection.
To understand the difference between the Continuous Dynamic and Continuous Speculative setting, we first need to understand how the Continuous mode actually works.
When you set a Rigidbody to Continuous collision detection mode, it will only use continuous collision detection on static objects e.g. objects that have a collider but don’t have a Rigidbody component.
This means that if we have two game objects who have colliders and their rigidbodies are set to Continuous collision detection, and they collide with each other, then it is possible that they might pass through each other.
Game objects that use Continuous Dynamic collision detection setting will not have these issues as they will continuously detect collision against all game objects except for game objects that have their Rigidbody set to Discrete collision mode.
Continuous Speculative setting is even more advanced because it collides against everything be that static or dynamic game object and no matter which collision detection mode they are using. This settings is also faster than the normal Continuous and Continuous Dynamic mode and it also detects collisions that are missed by other continuous collision settings.
Reuse Collision Callbacks
When an MonoBehaviour.OnCollisionEnter, MonoBehaviour.OnCollisionStay or MonoBehaviour.OnCollisionExit collision callback occurs, the Collision object passed to it is created for each individual callback. This means the garbage collector has to remove each object, which reduces performance.
Unbind The Transform Component From The Physics System
Collision Layers
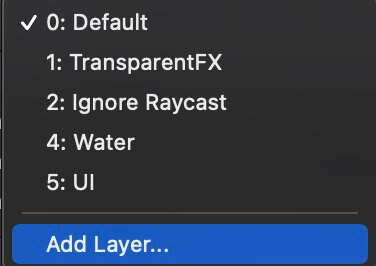
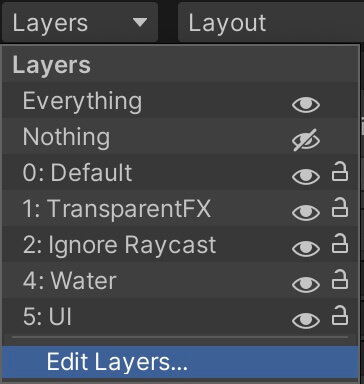
Or above the Inspector tab you can click on the Layers drop down list and click Edit Layers:
From there click on the Layers drop down list and in the User Layer fields define your layers:
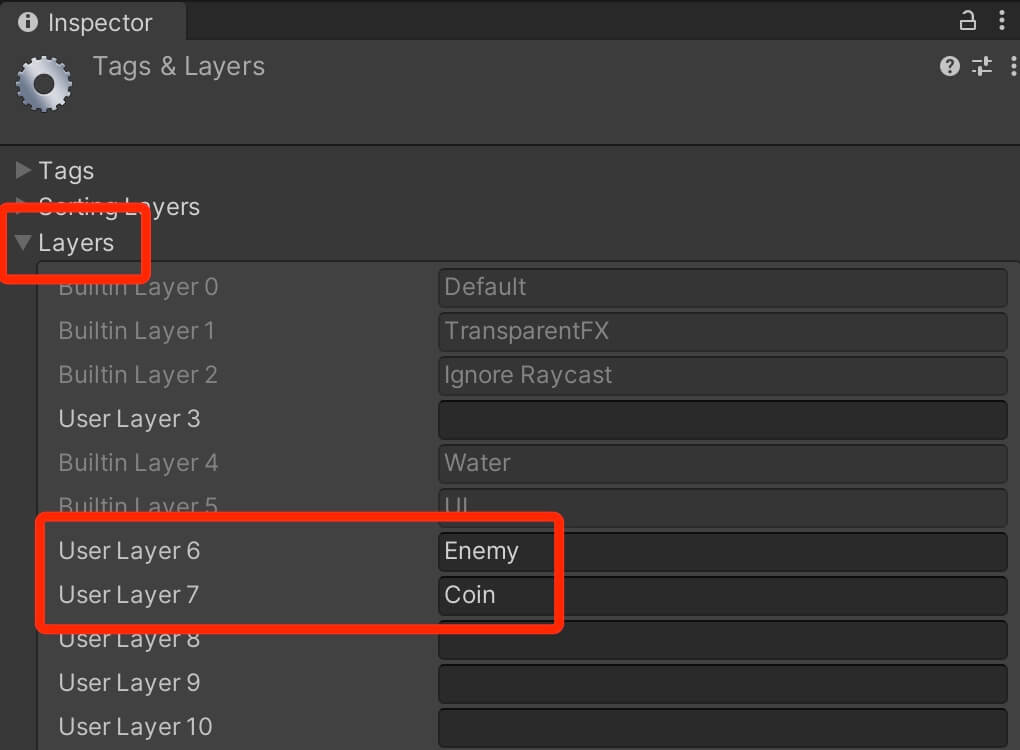
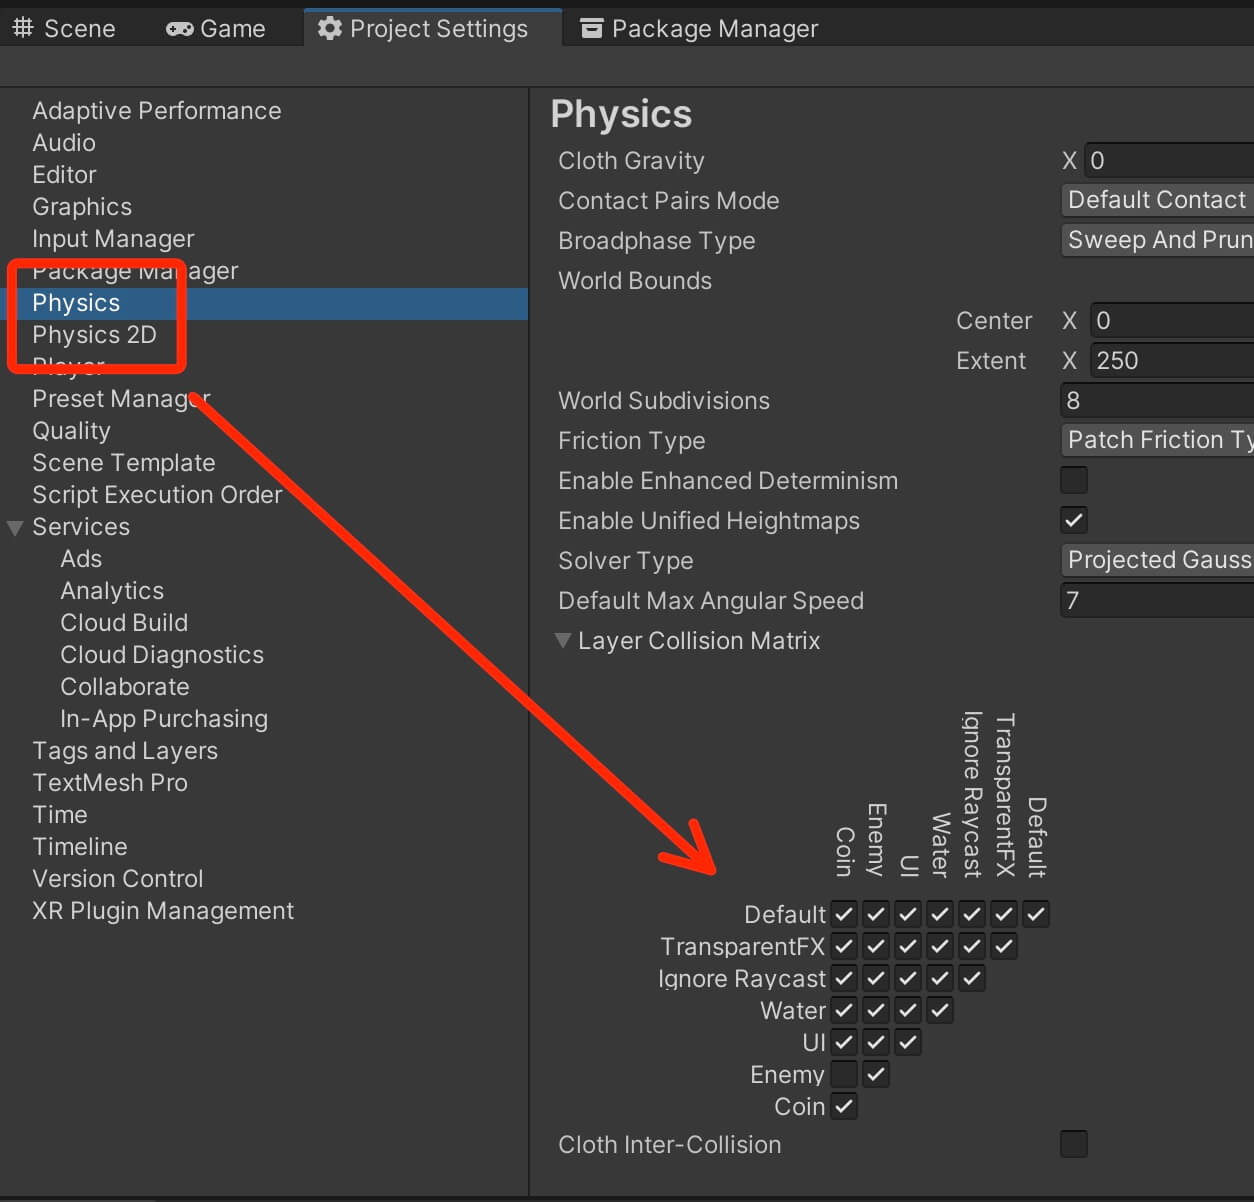
Let’s say you don’t want the enemy objects to collide with coin objects. Assuming that you defined Enemy and Coin layer, you can go in Edit -> Project Settings -> Physics or Physics 2D if it’s a 2D game, and in the Layer Collision Matrix uncheck the checkbox for the layers that you don’t want to collide with each other:
Be Careful With Collider Types
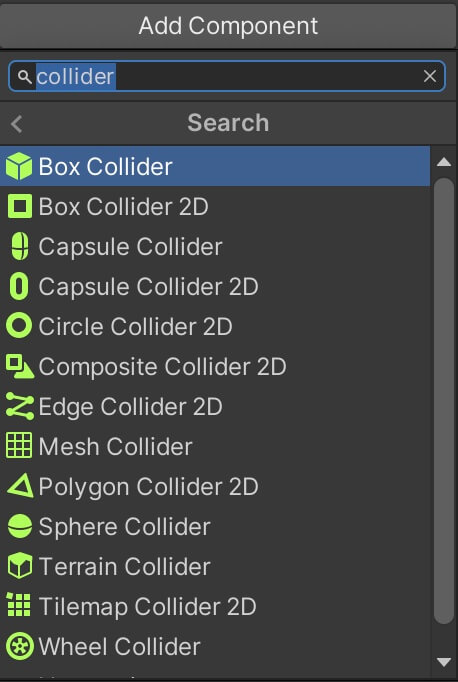
Depending on your game and the shape of the game objects in your game you will select different types of colliders. What you need to keep in mind is that the most expensive colliders are the ones that take the shape of the game object.
In 2D that is Polygon collider and in 3D that is the Mesh collider. If there is a need for you to use these colliders make sure that the collider points are at the lowest as they can be in a 2D game:
By pressing the Edit collider button you can remove unnecessary points that are connecting with each other in order to form the Polygon Collider 2D. You remove the points by holding CTRL on Windows or CMD on MacOS and left clicking on the points you want to remove.
Unfortunately this is not possible to do with a Mesh collider for 3D games, so you need to be careful which type of collider you pick for your game objects.
If the game object is a stone for example and you absolutely need the collider to have the same shape as the stone, then you can use a Mesh collider, especially if you want other game objects to collide with that stone, but as a general rule try avoid the Mesh collider as well as Polygon Collider 2D as much as possible.
Reducing Draw Calls With Dynamic And Static Batching
Every object visible in a scene is sent by Unity to the GPU to be drawn. Drawing objects can be expensive if you have a lot of them in your scene, especially on mobile devices.
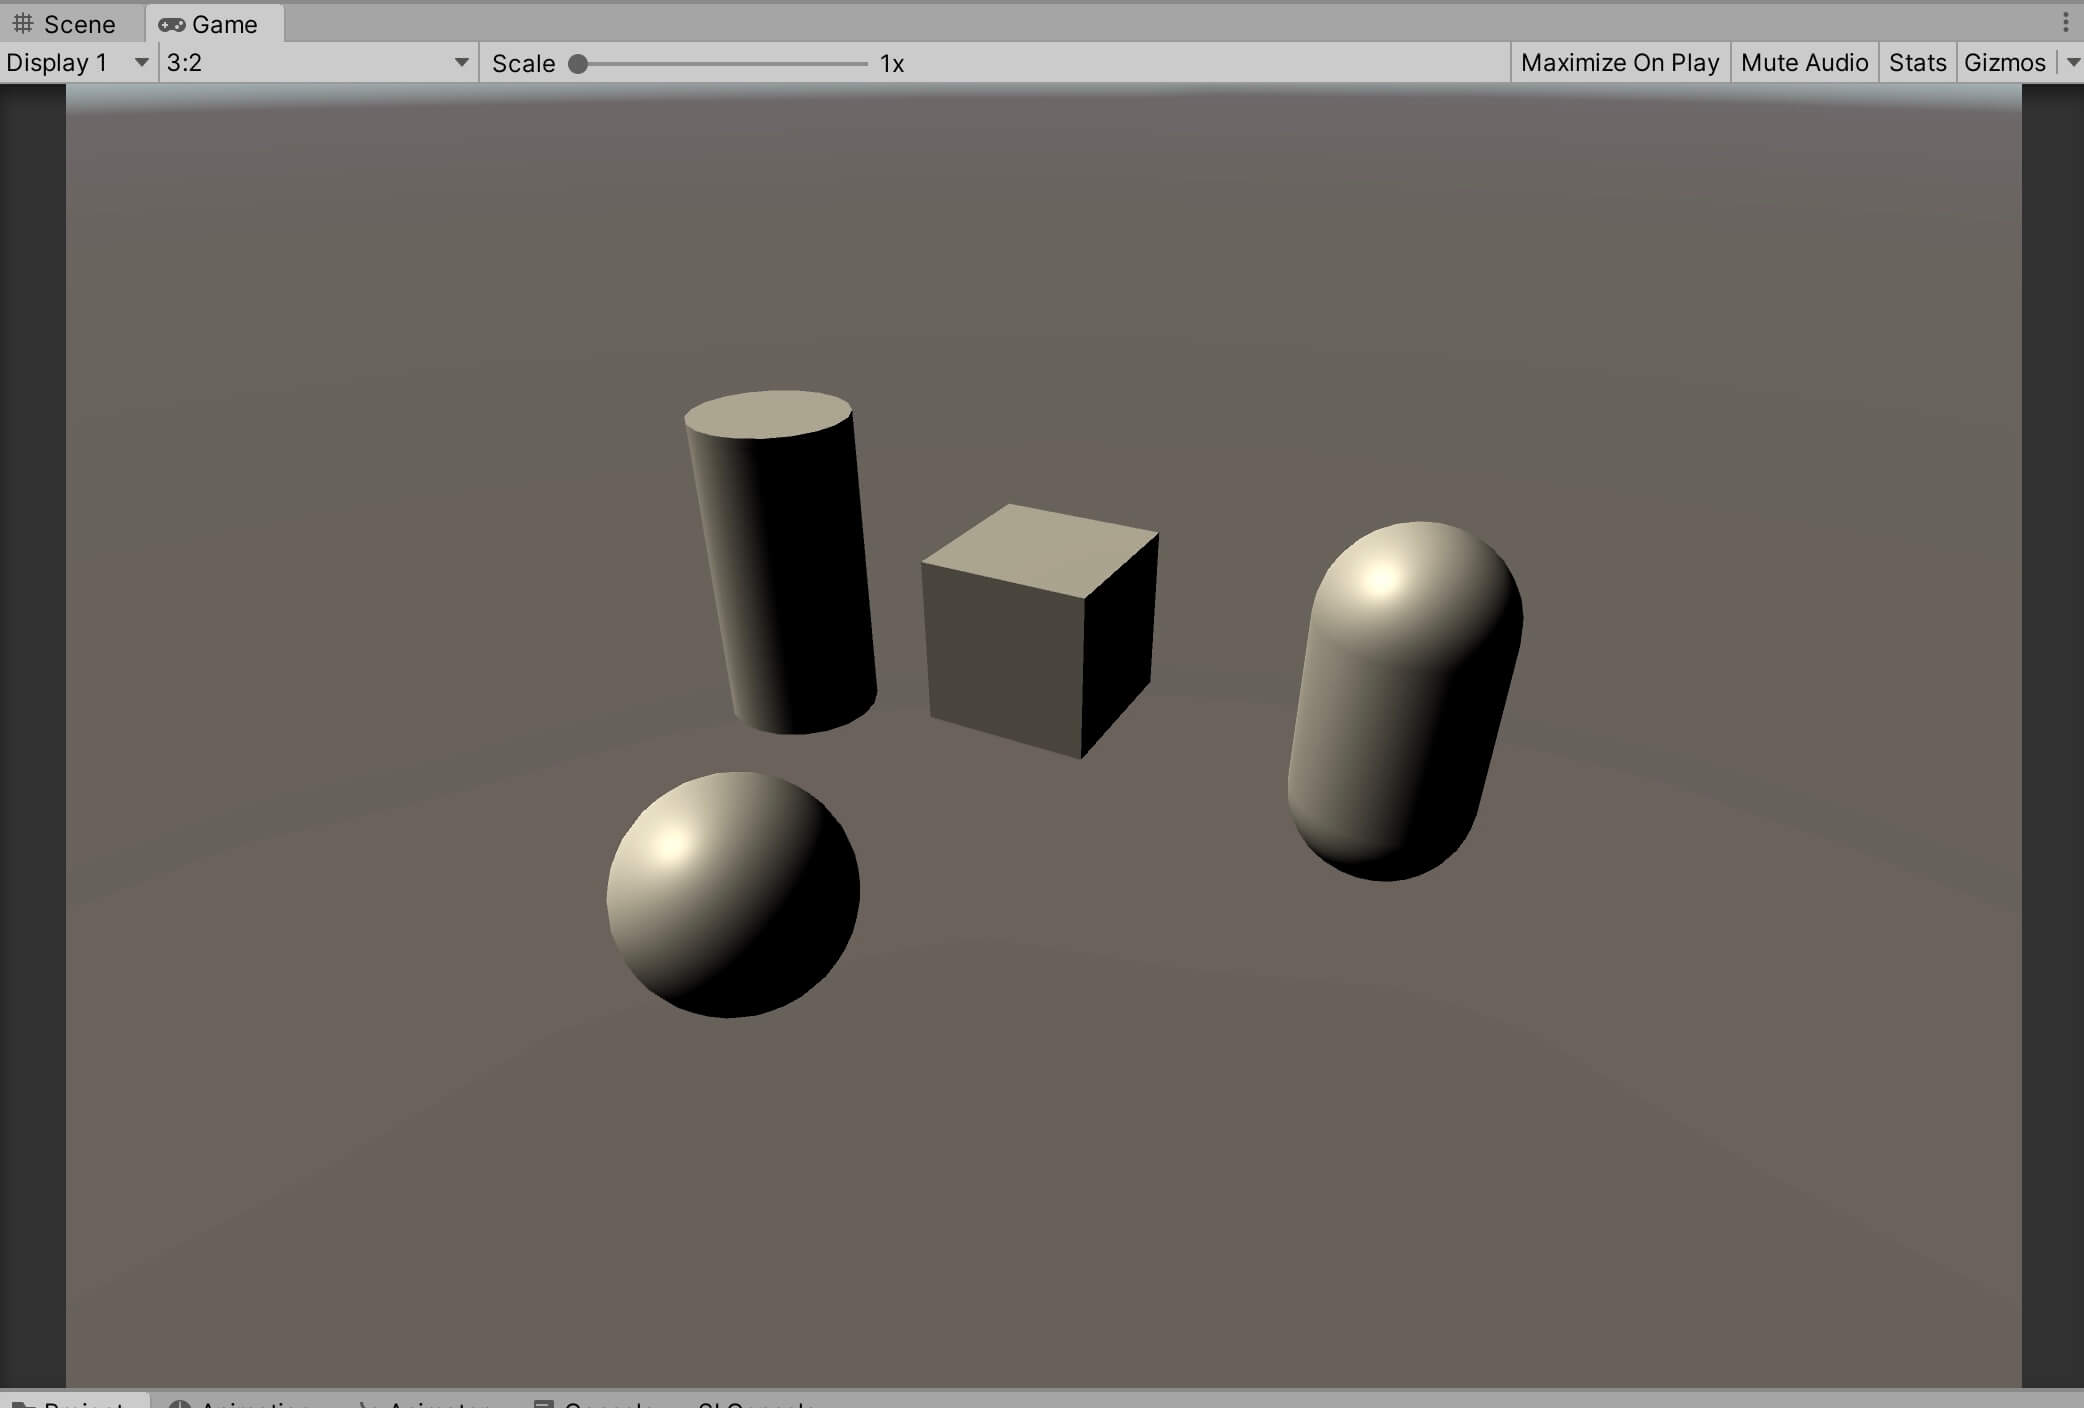
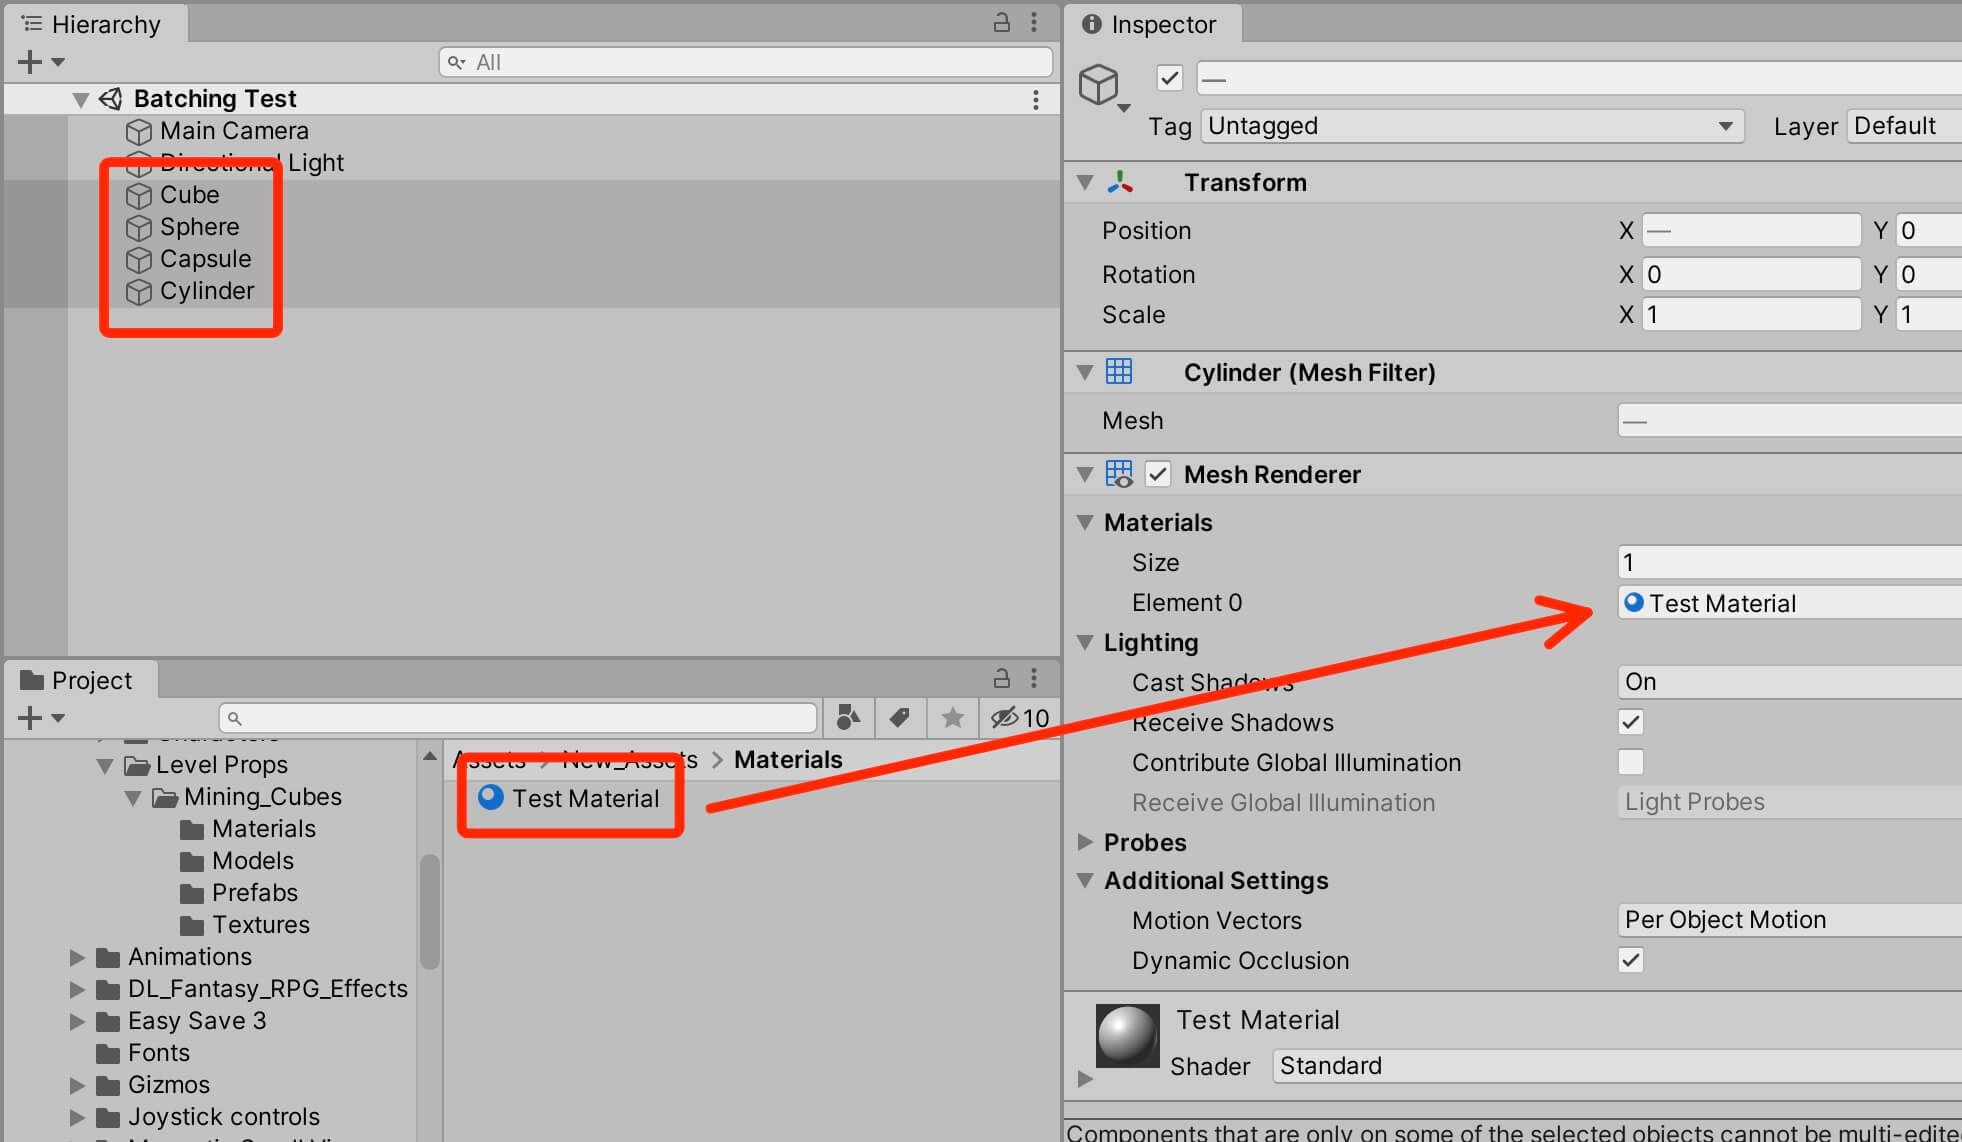
When we run the game and open on the Stats window, we will see that it takes 19 batches e.g. draw calls to render the scene:
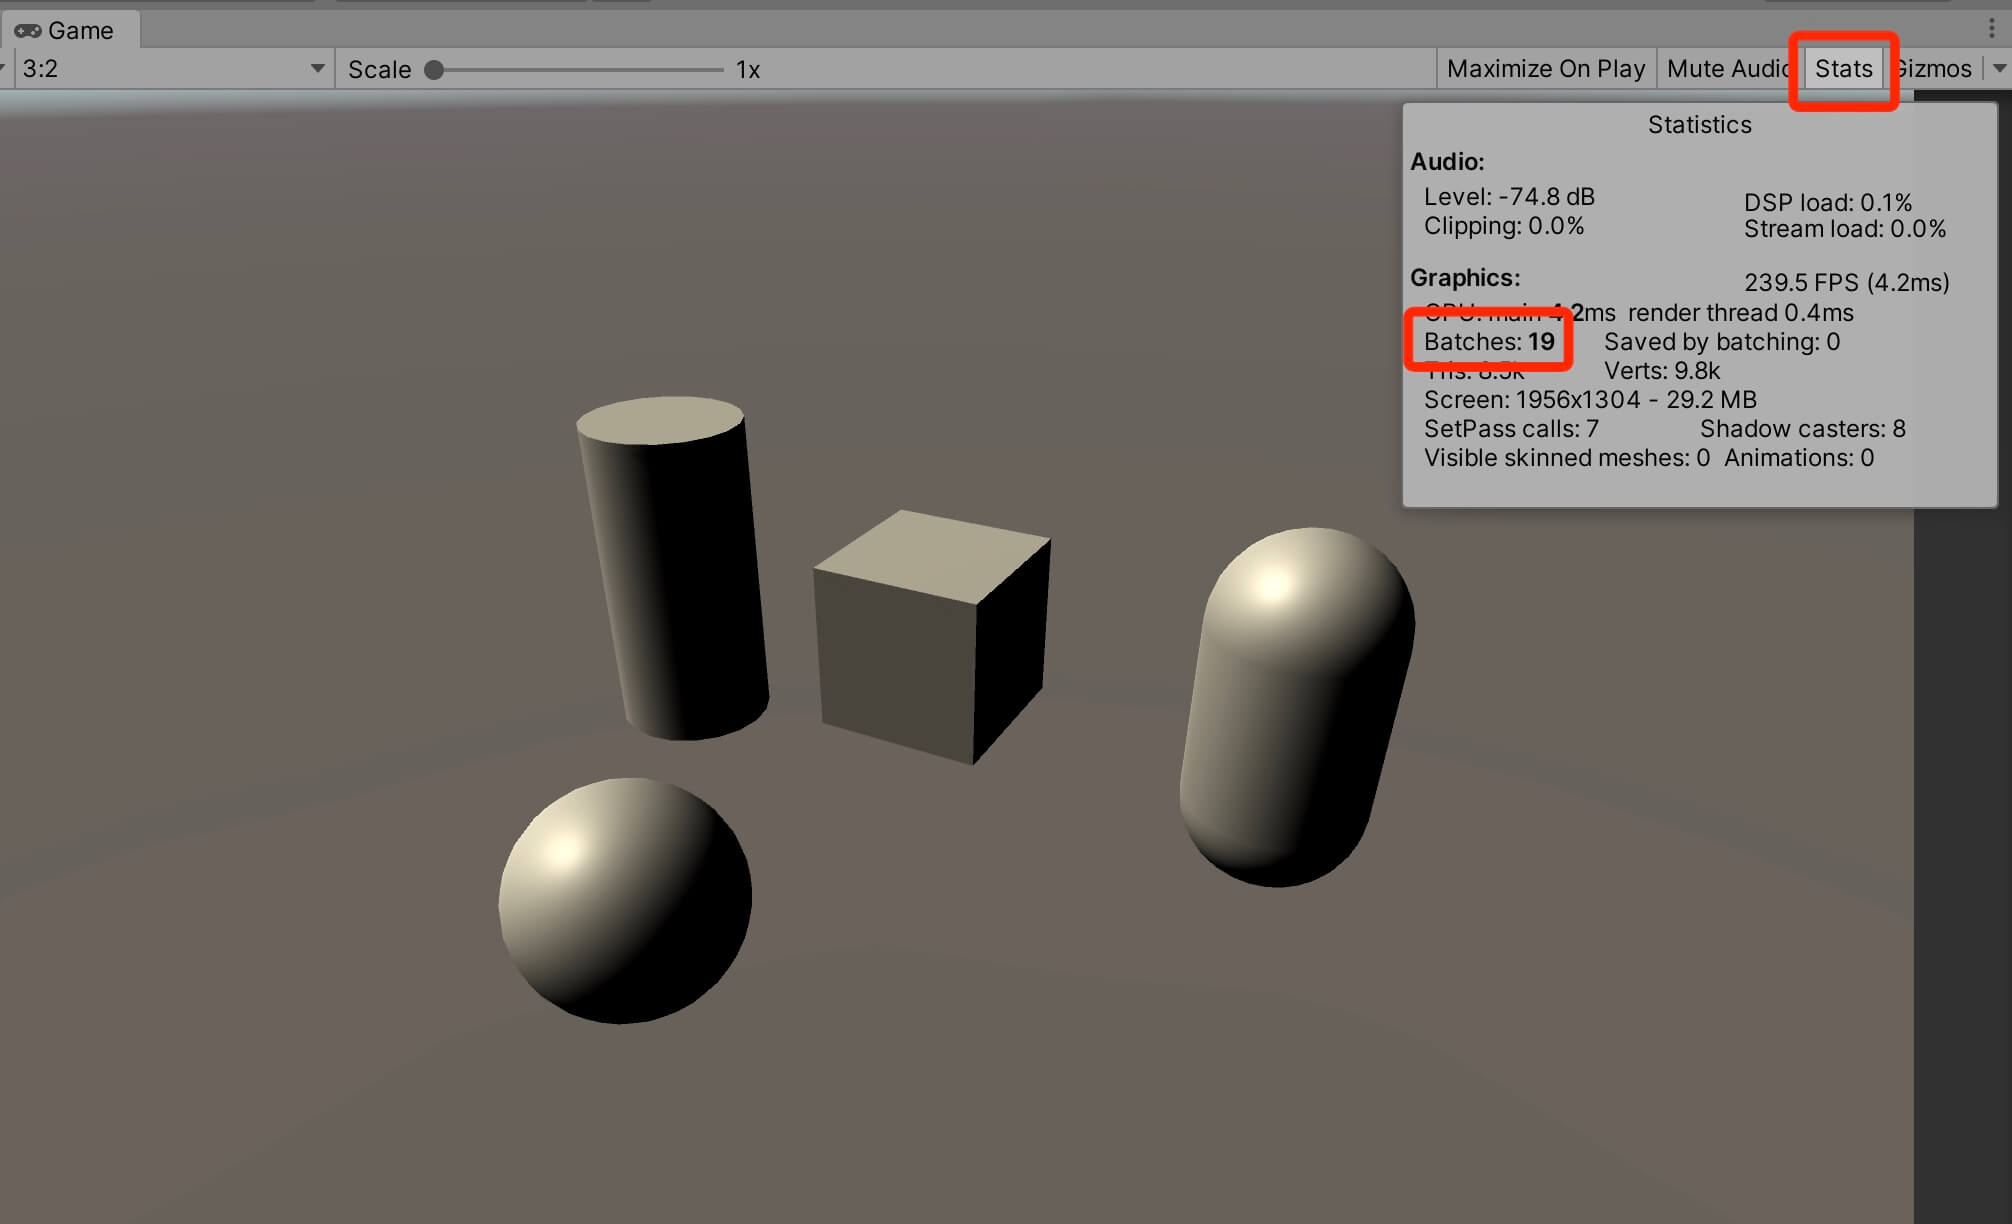
To enable static batching, all we have to do is select all 4 game objects, and in the Inspector tab click on the Static drop down list and select Batching Static:

If we run the game now and open the Stats window we will see that now it takes 7 batches(draw calls) to render the scene:
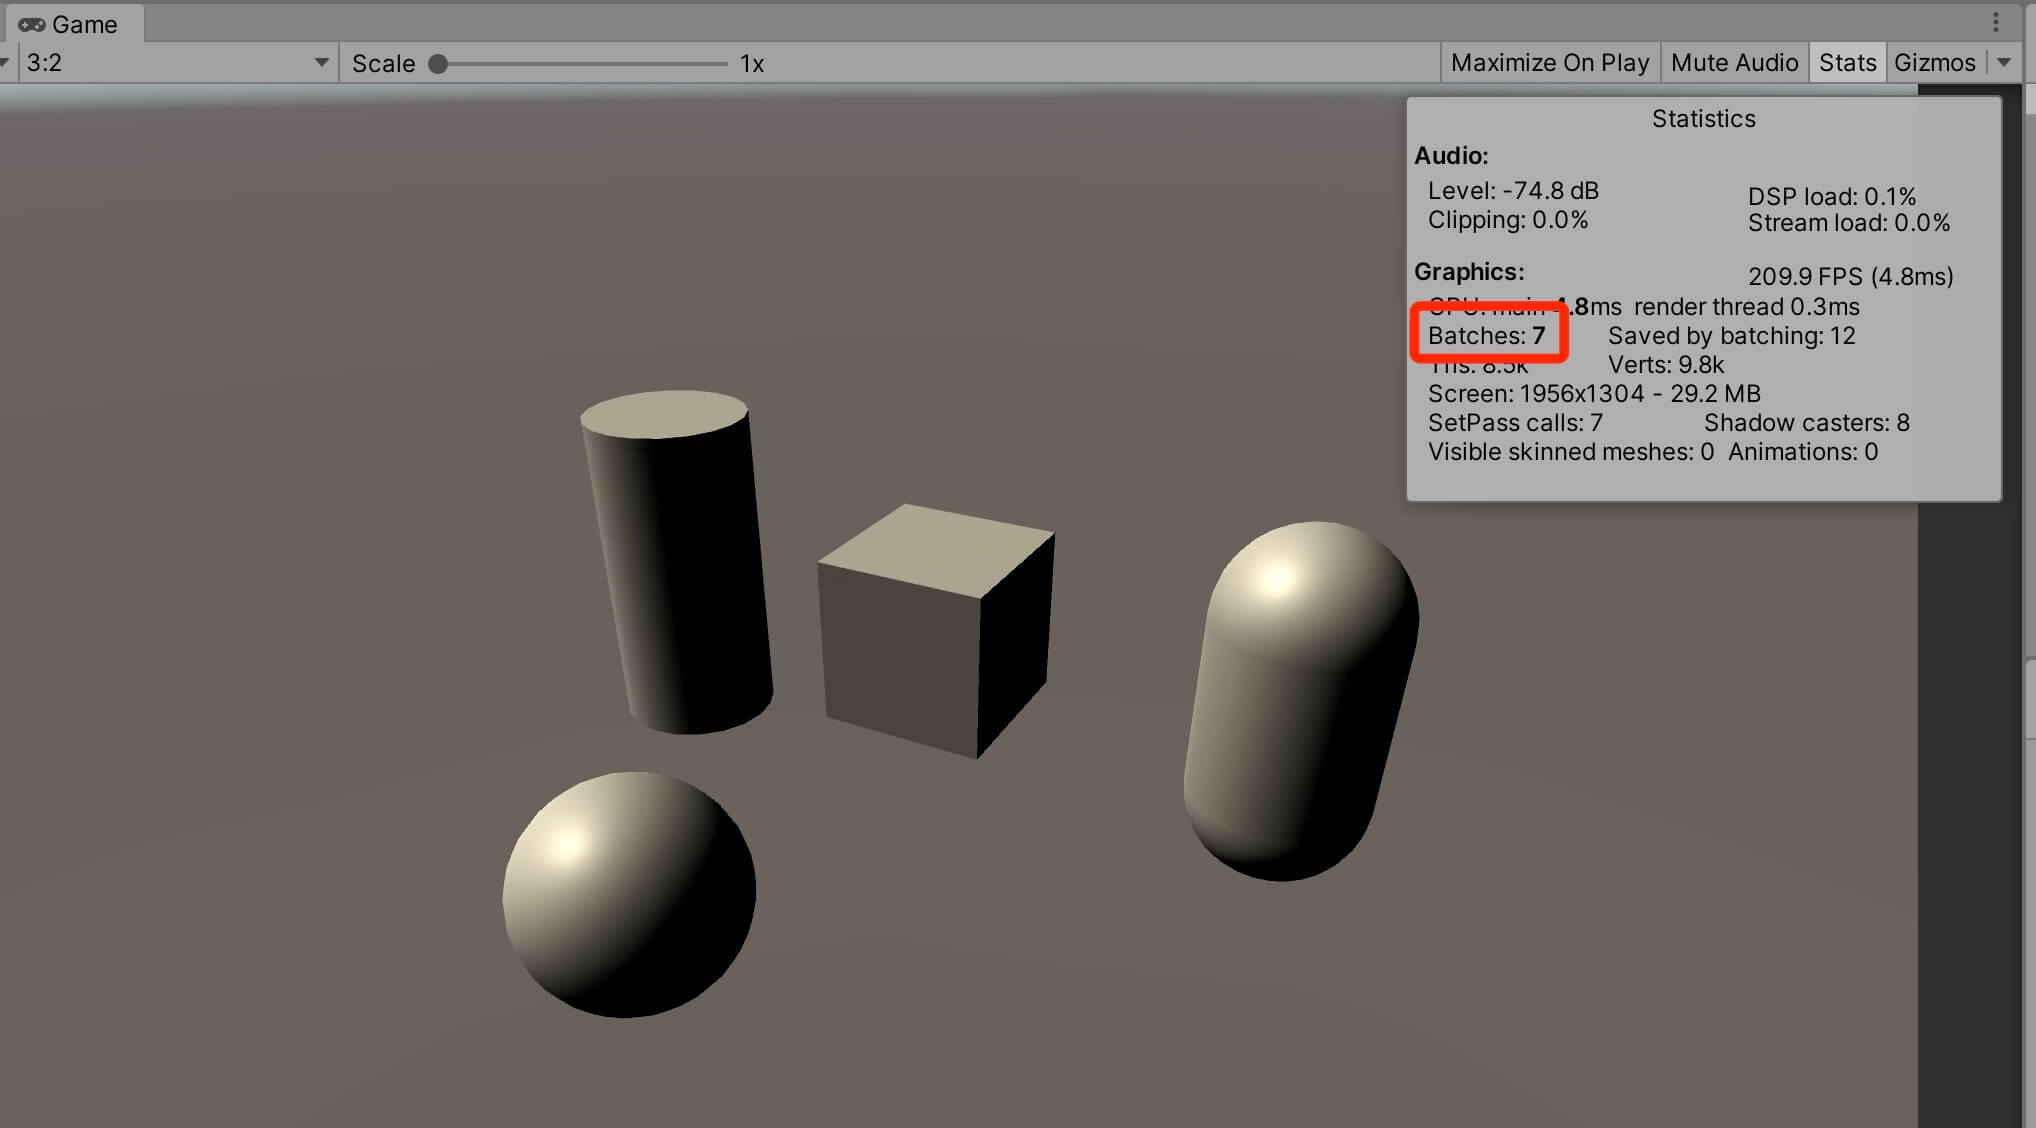
Keep in mind that you can only use static batching on game objects that are not moving and they share the same material or texture.
When it comes to dynamic batching the batches are generated at runtime(during the gameplay of the game), the objects that are contained in the batch can vary from frame to frame depending on which objects are currently visible to the camera, and even objects that move can be batched.
For dynamic batching to work, the game objects needs to use the same material or texture, and it needs to have the same mesh, and in some cases the scale needs to be the same as well depending on the situation.
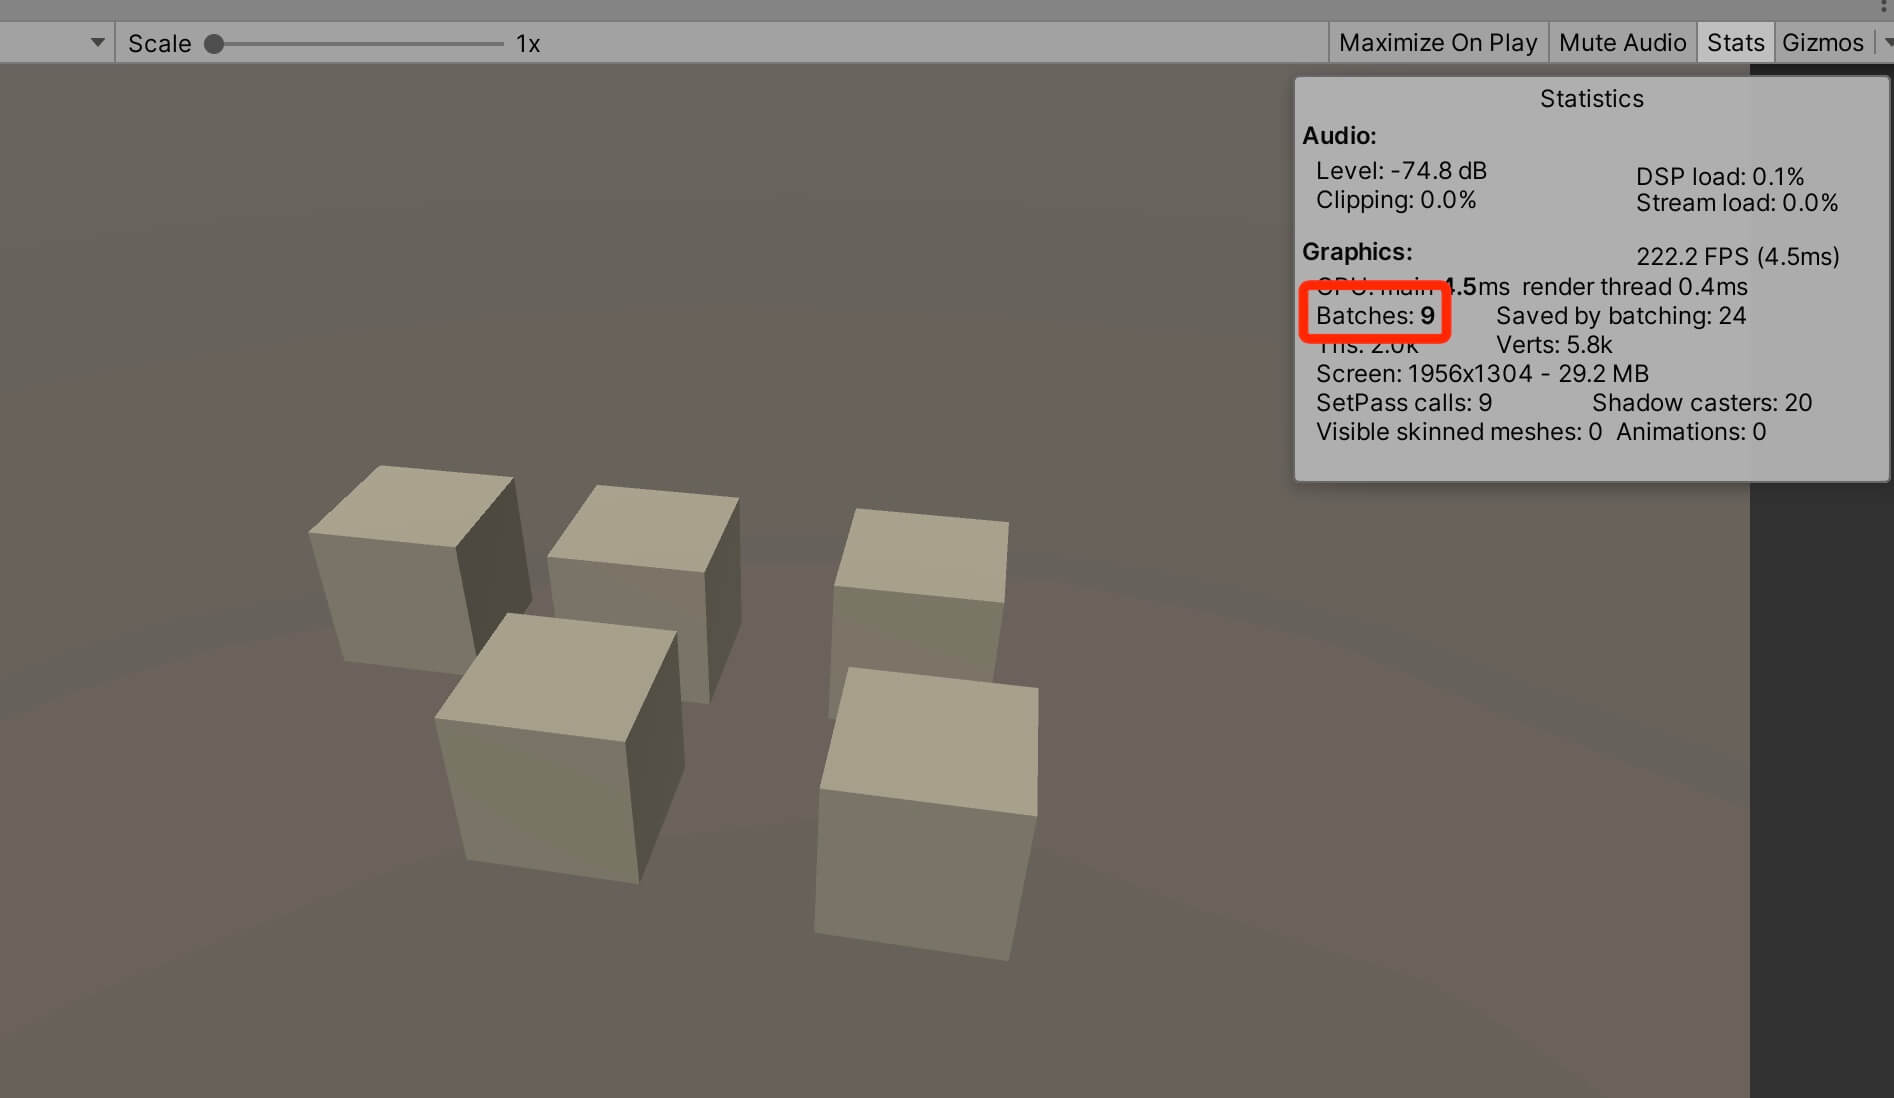
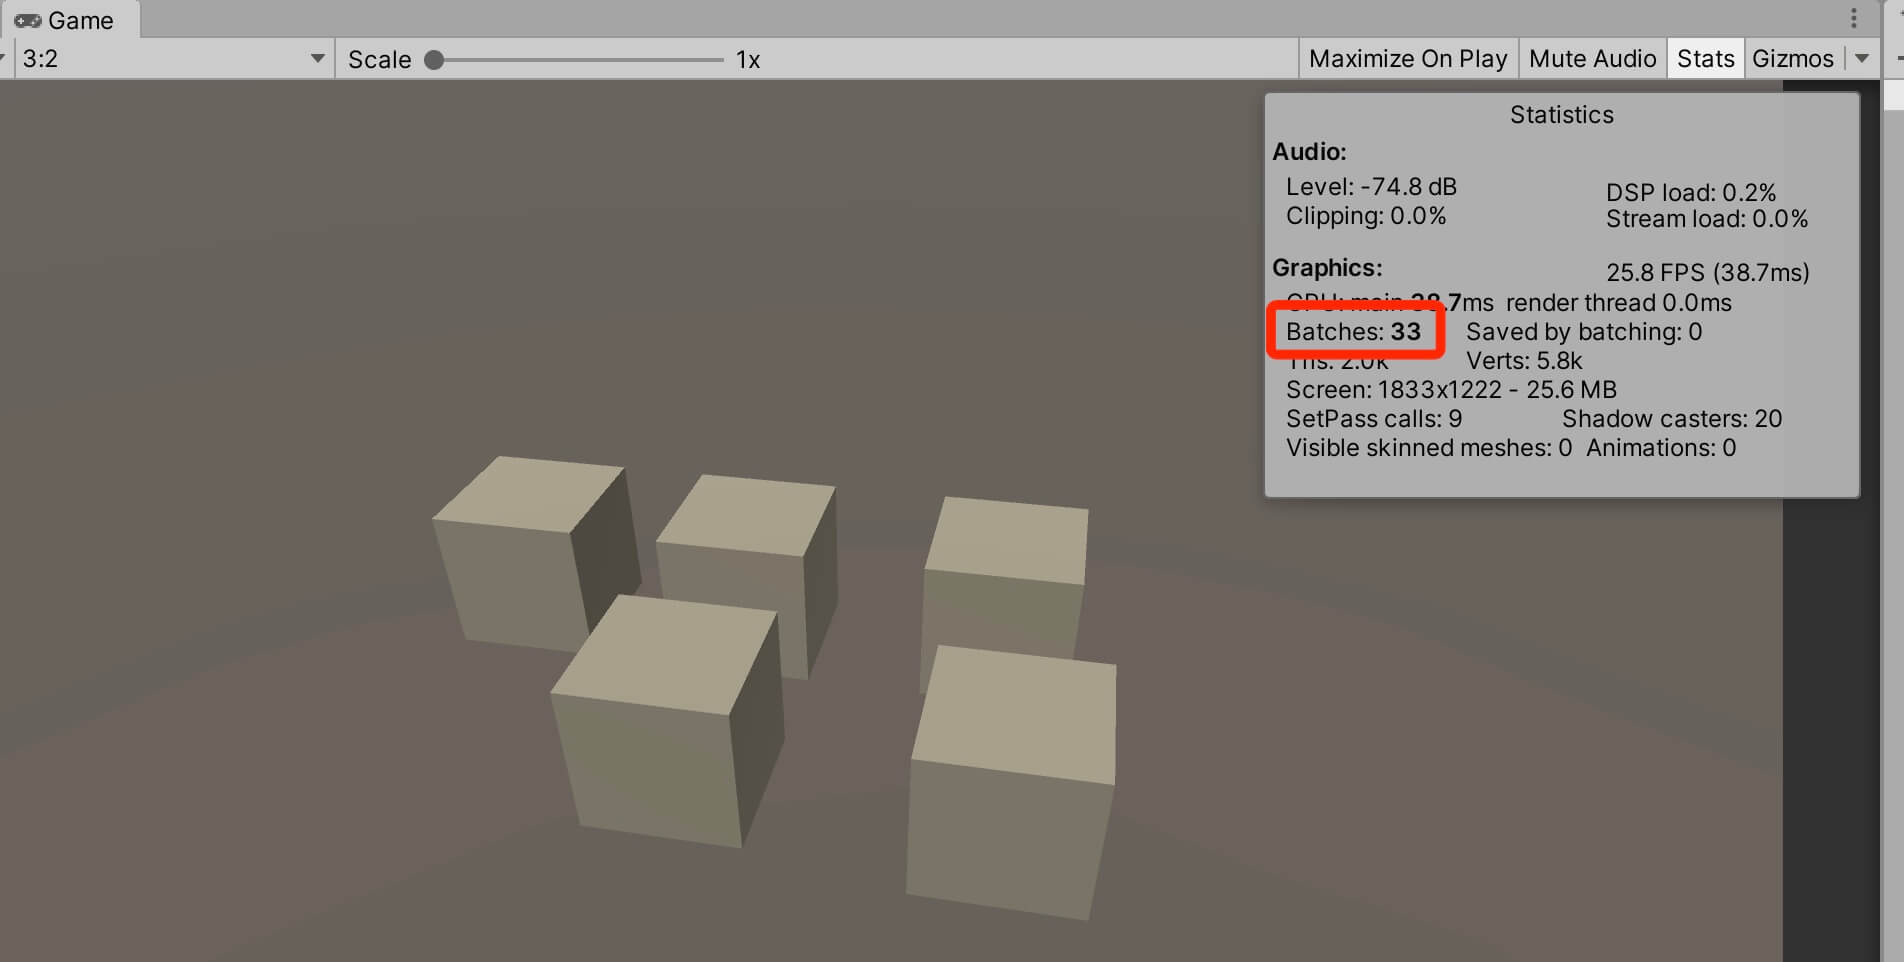
In the new scene I have 5 cubes that share the same material. Let’s run the game and take a look at the Stats window:
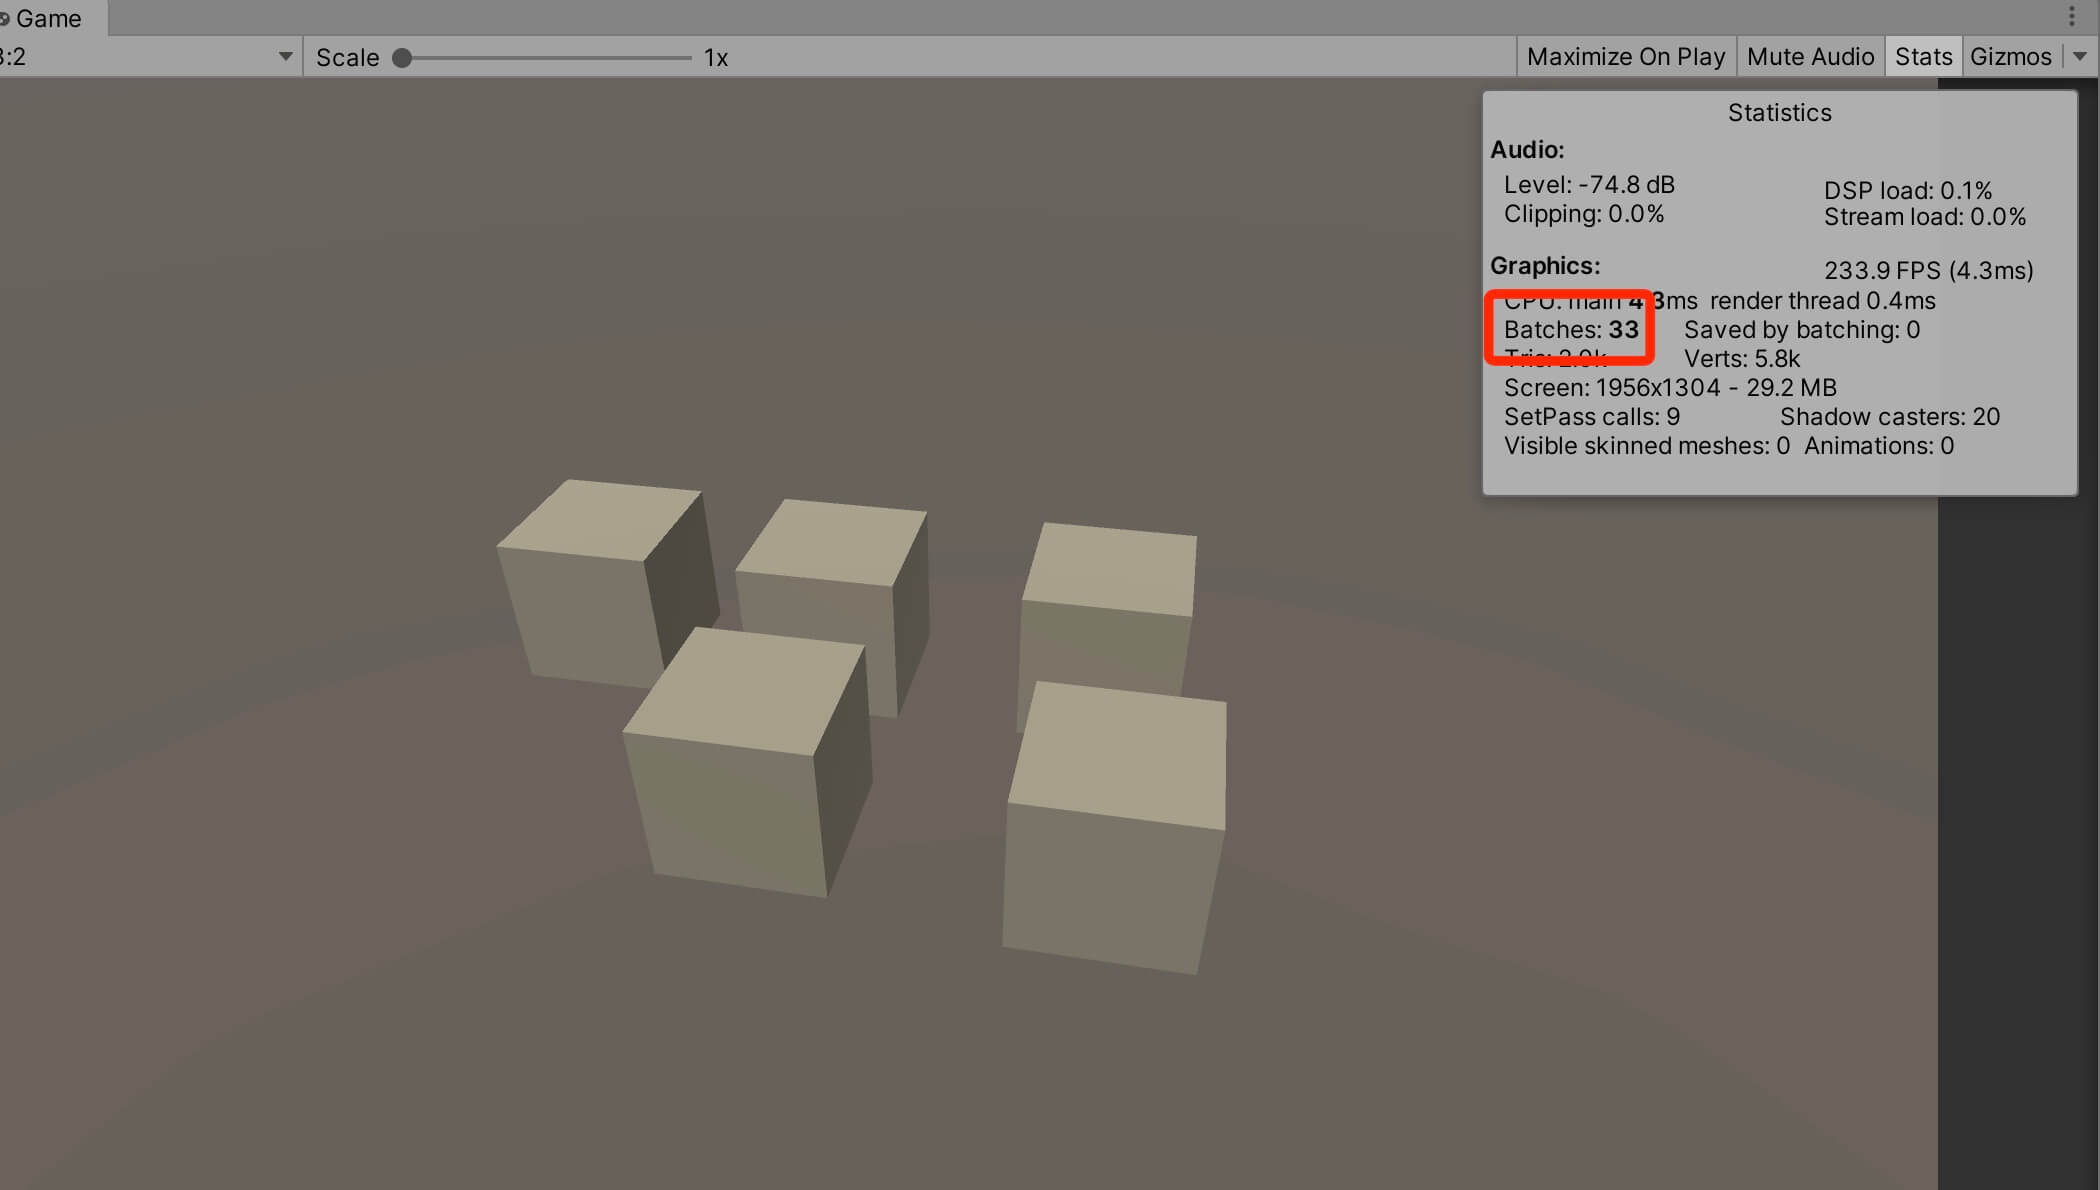
It takes 33 batches(draw calls) to draw the scene. Now let’s turn on dynamic batching by going under Edit -> Project Settings -> Player -> Other Settings:
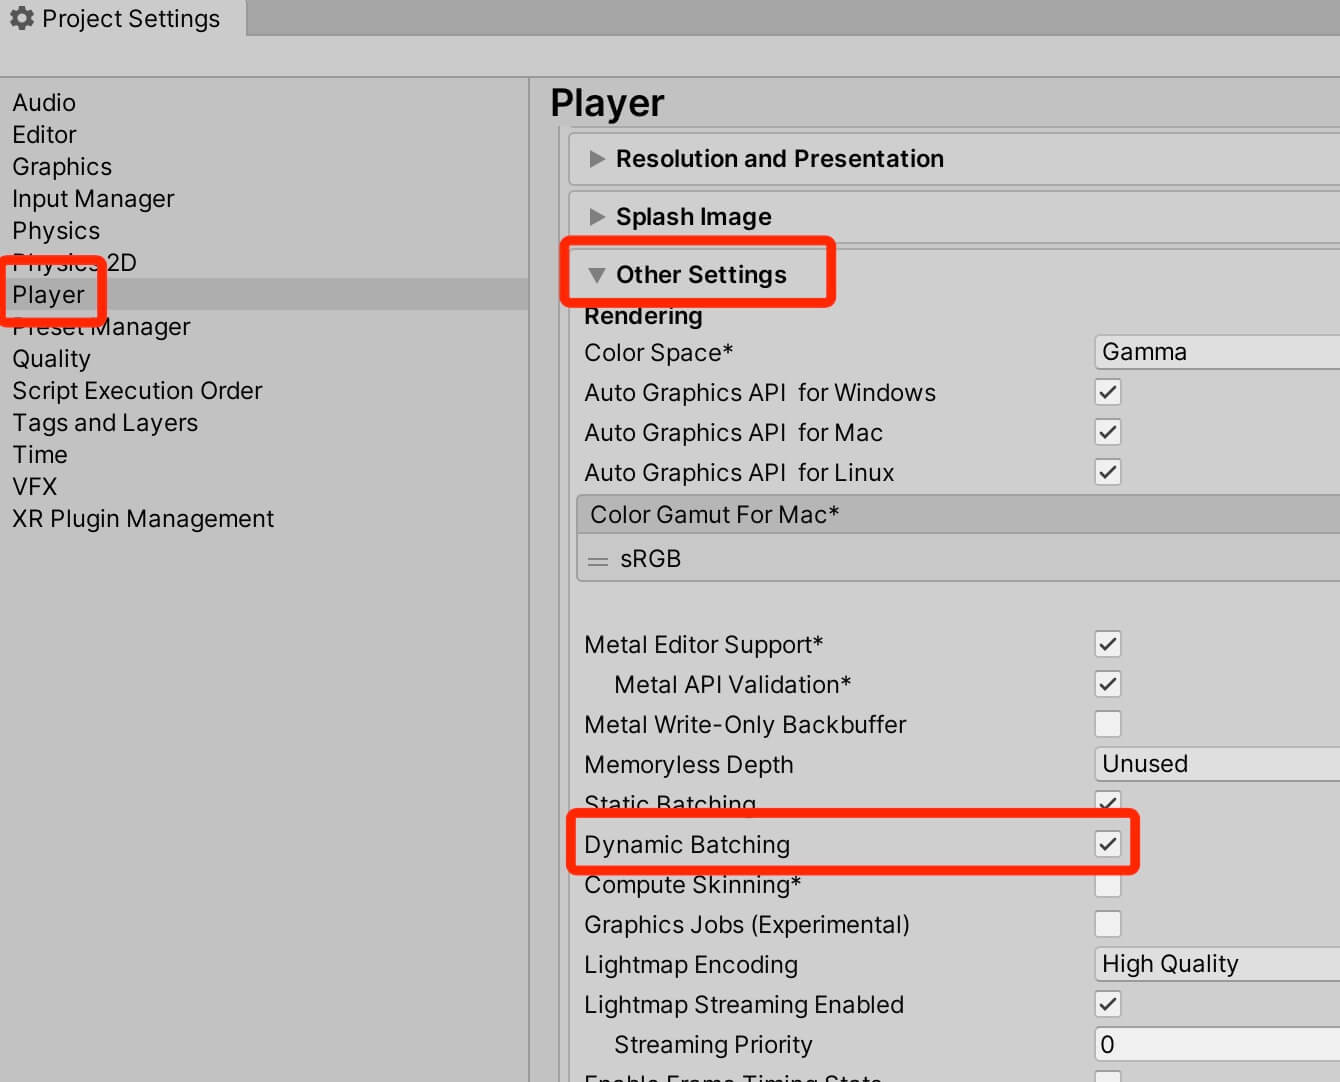
When we run the game now, we will see that it takes only 9 batches to render the scene:
Reducing Draw Calls With GPU Instancing
Another way how we can reduce draw calls is by using GPU instancing. One important thing to note here is that we can’t combine dynamic batching and GPU instancing, we can use only one of the two.
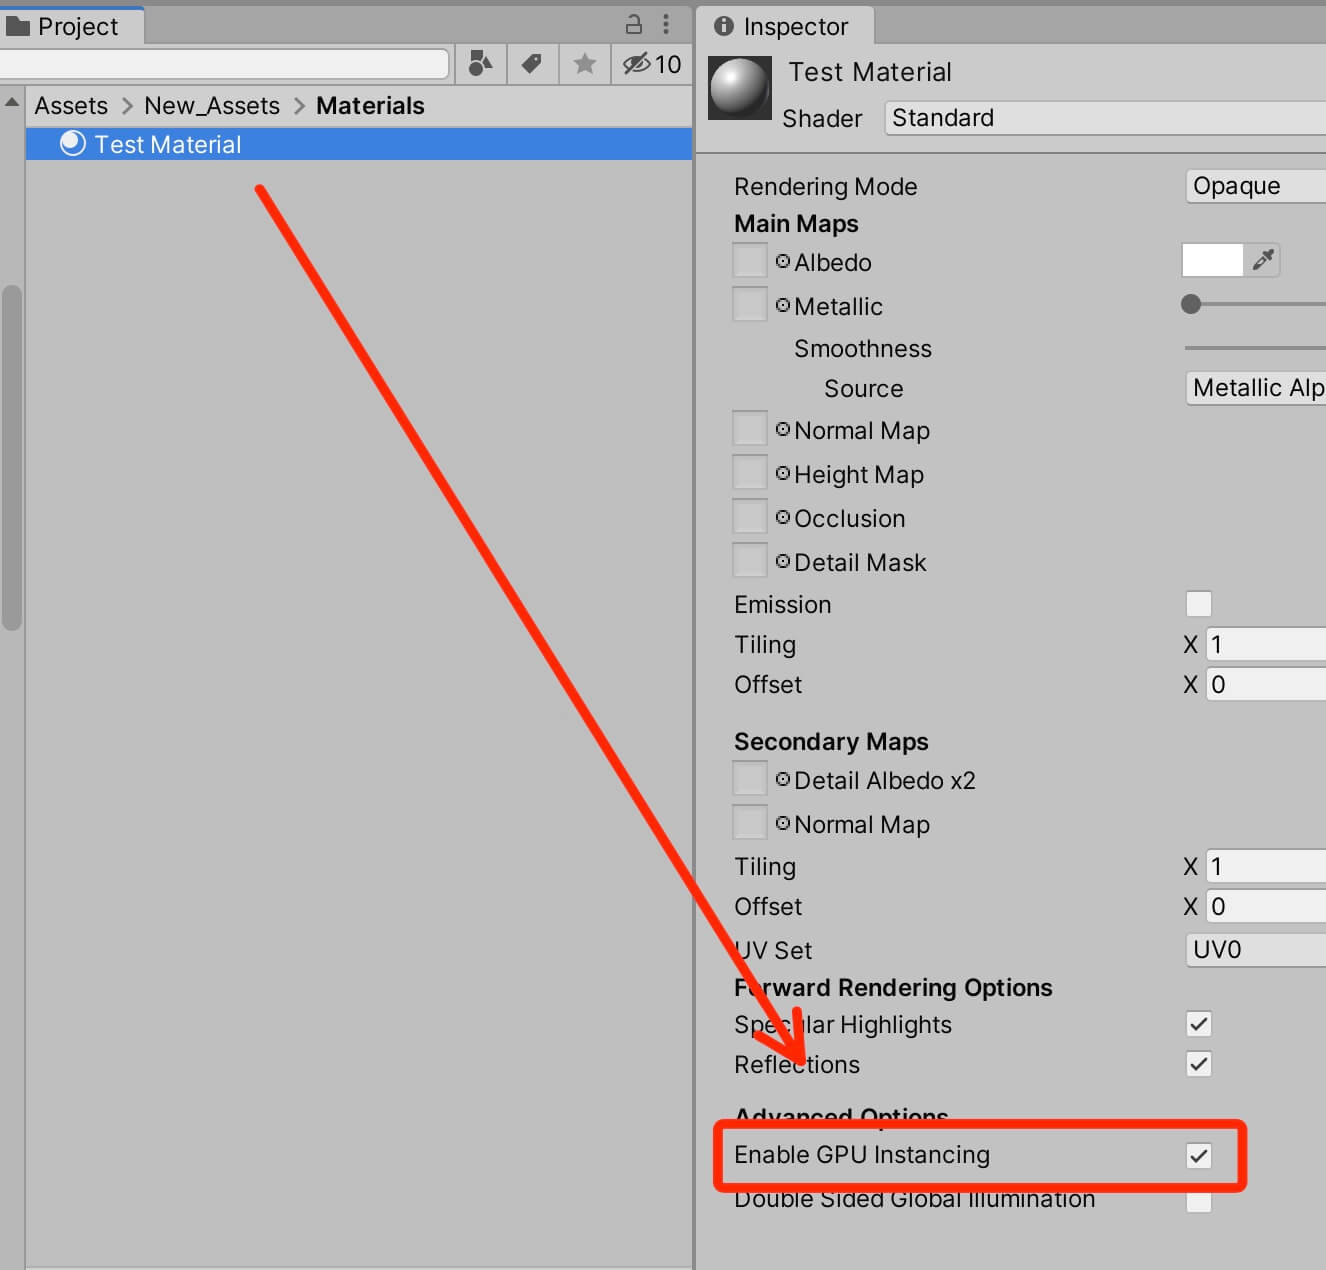
So in cases where dynamic batching can’t help, you can turn on GPU instancing, and this is very simple to do. You just select the material, and check the checkbox where it says Enable GPU Instancing:
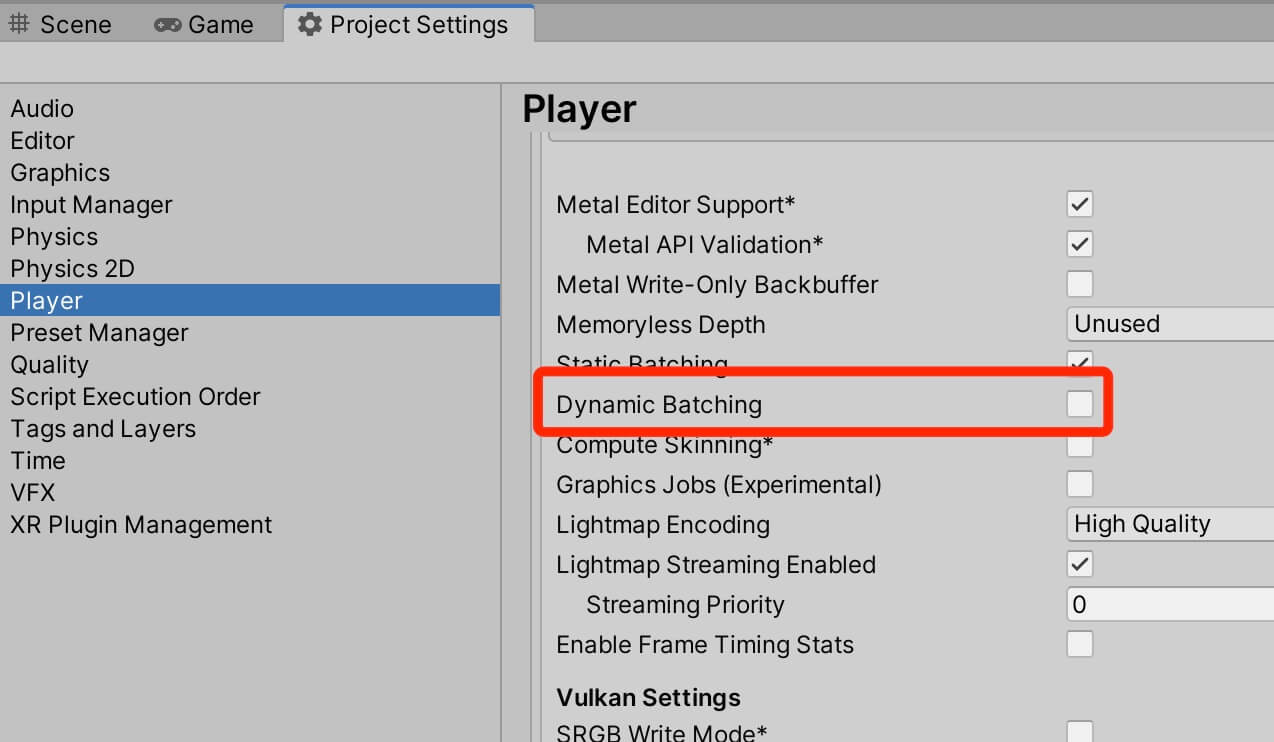
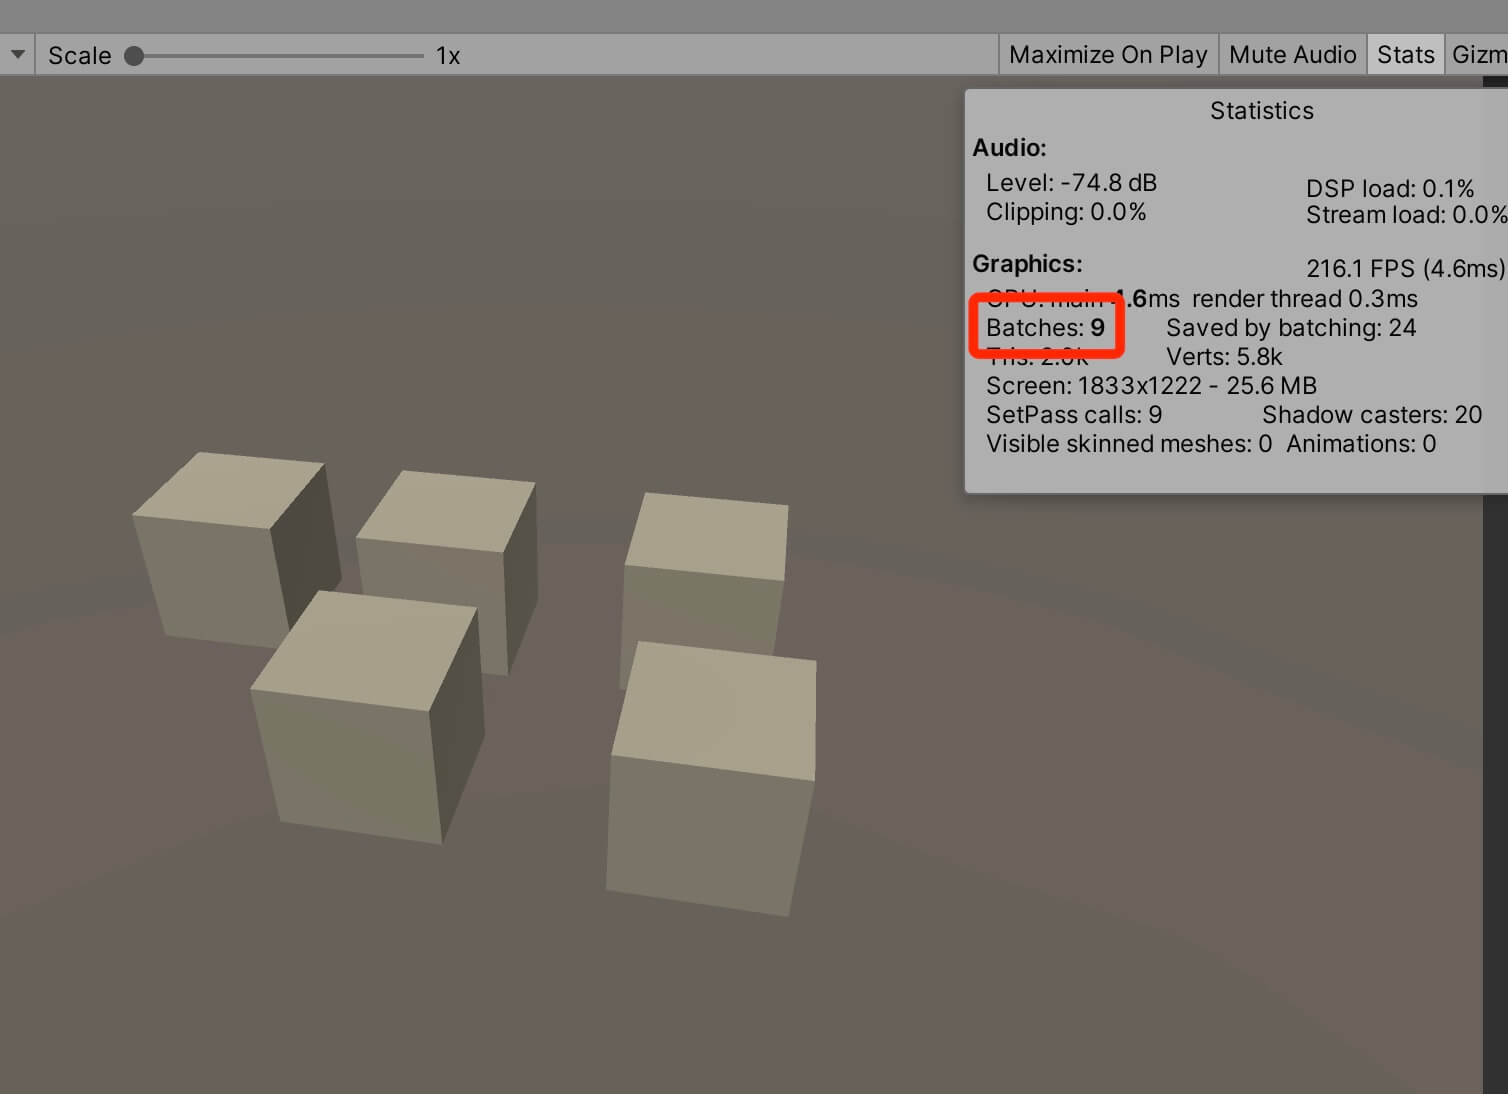
As I already mentioned, we can’t combine dynamic batching and GPU instancing, so before we test this out, we need to turn off dynamic batching in the Project Settings:
Optimizing Lights For Better Game Performance
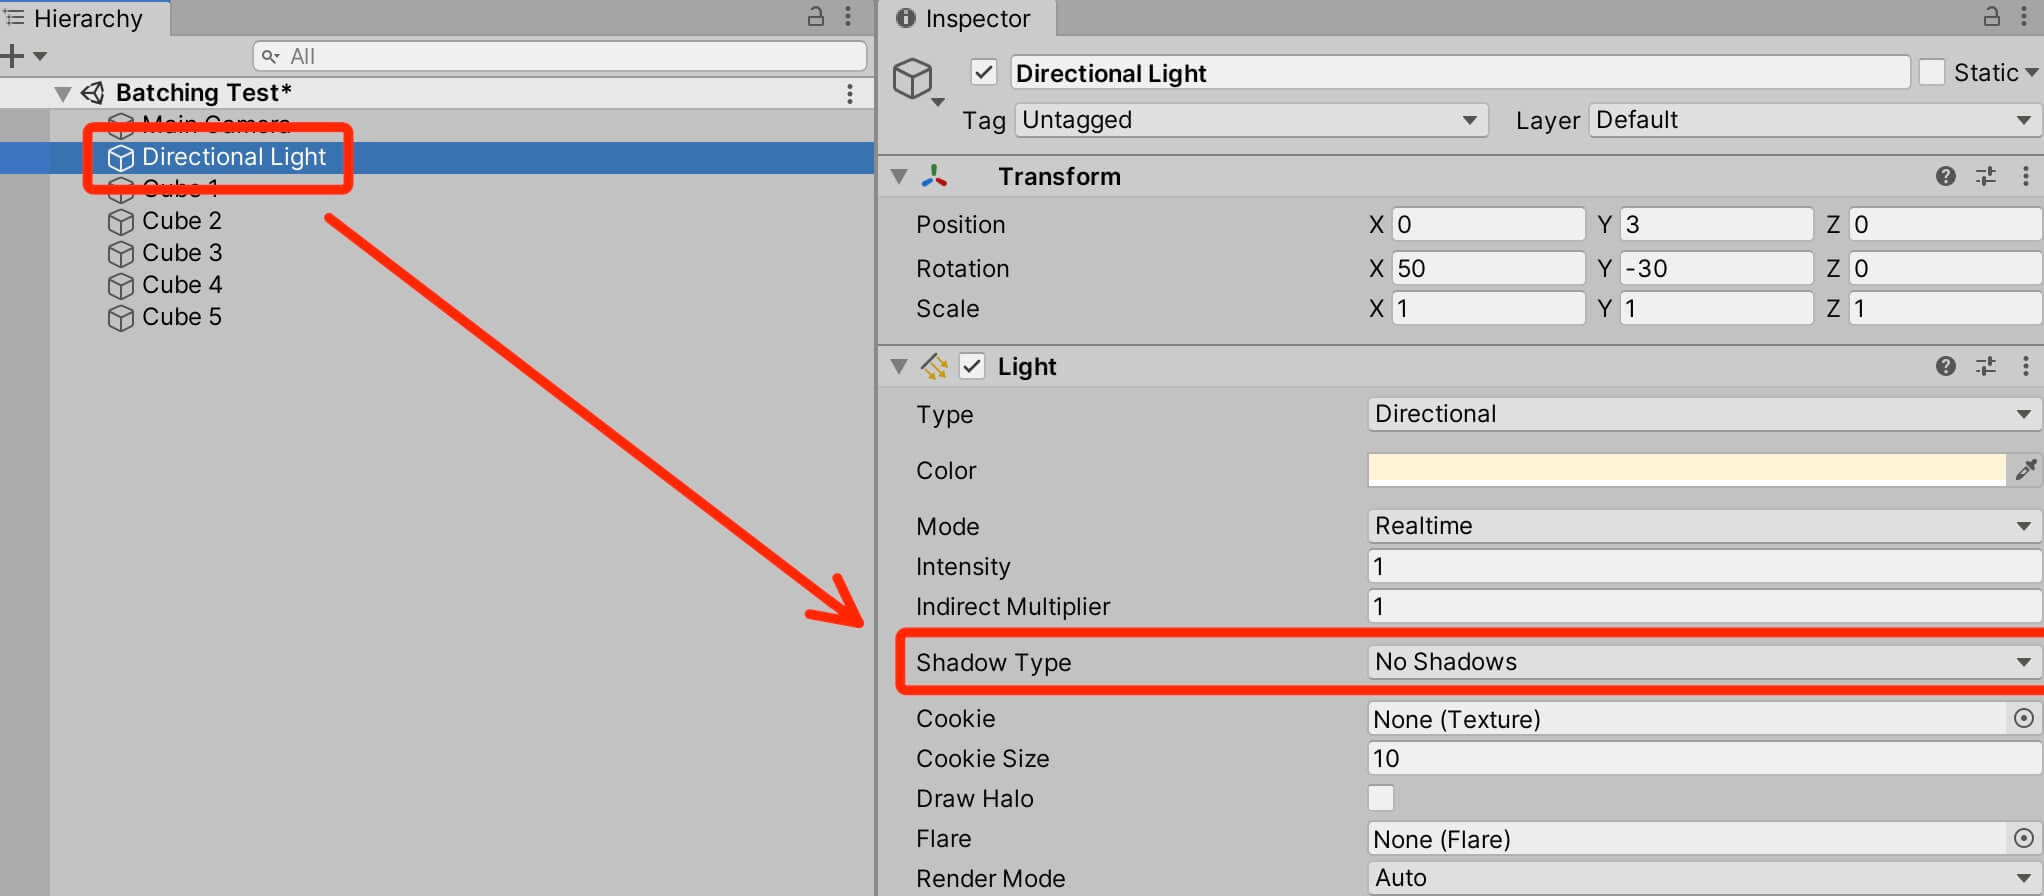
Now I am going to change the Shadow Type settings for the Directional Light we have in the scene, from Soft Shadows to No Shadows:
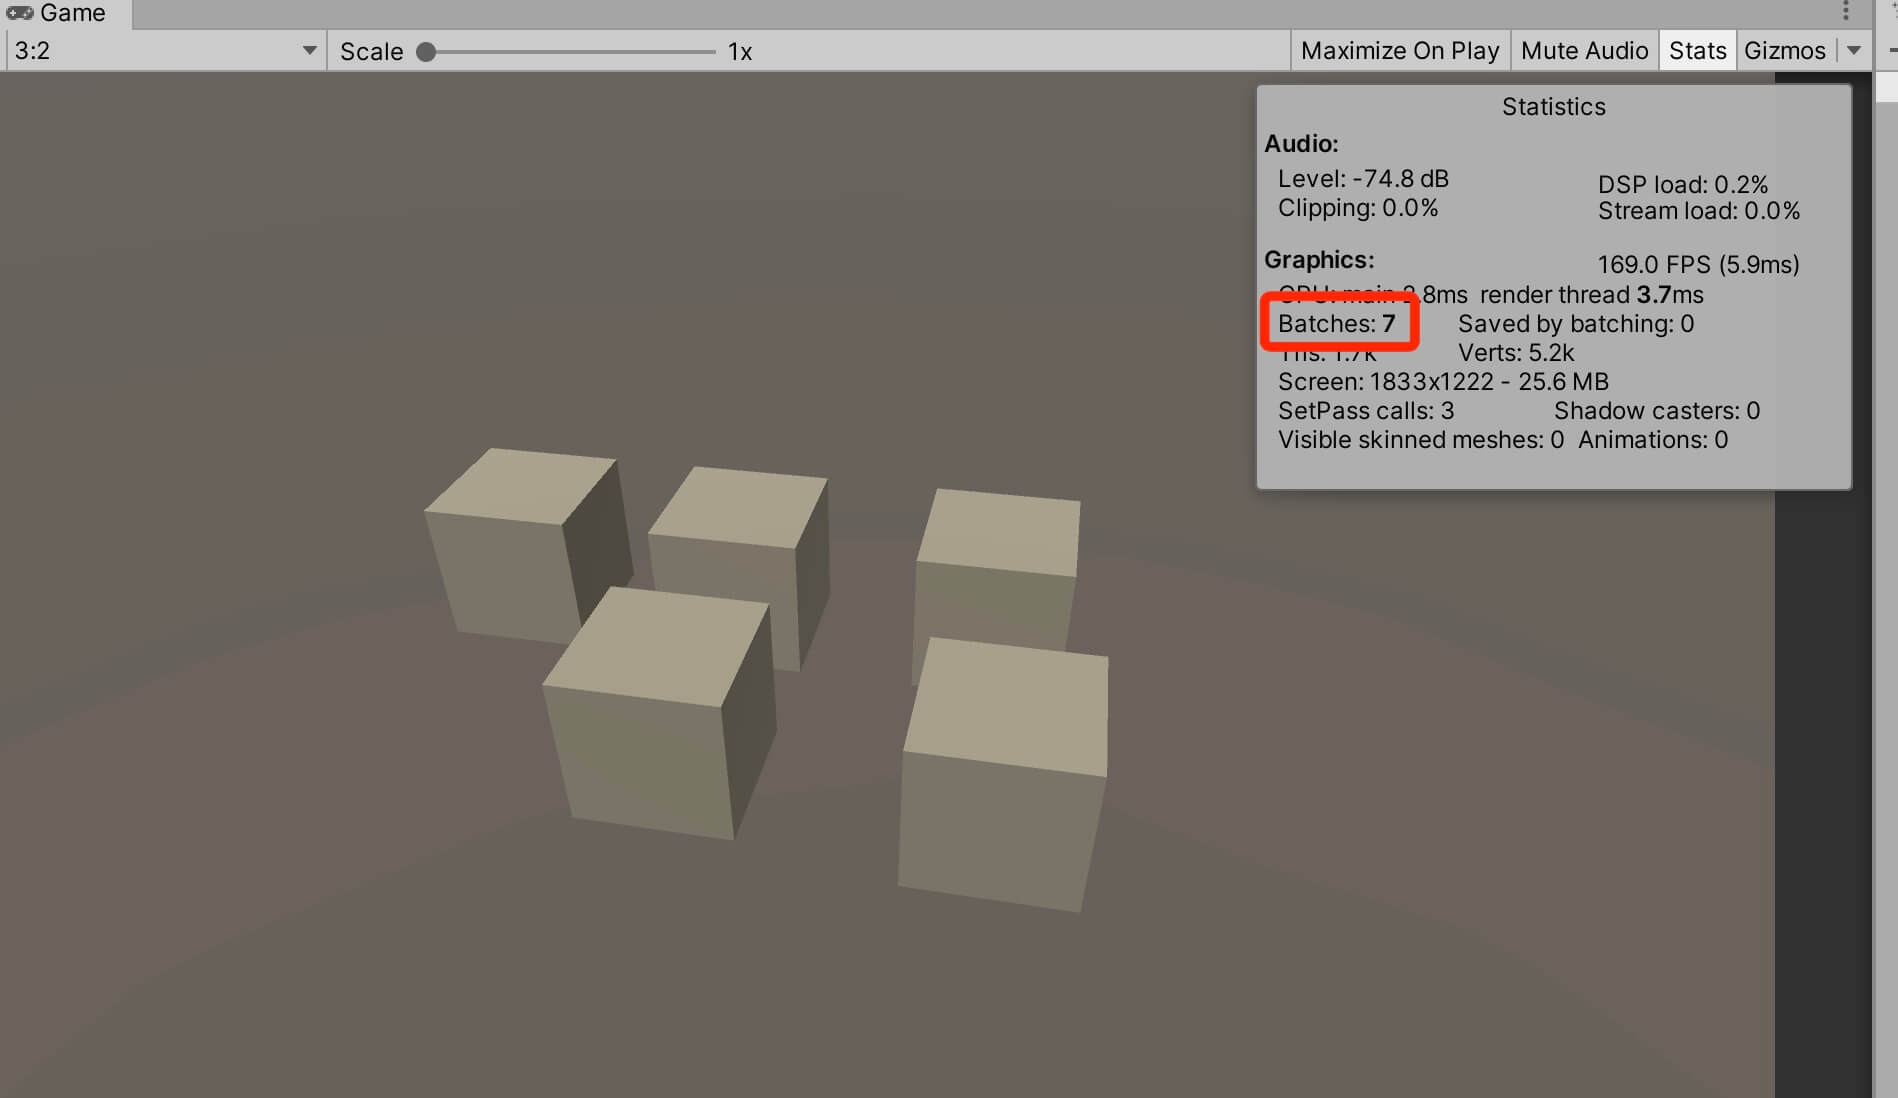
Now open the Stats window and take a look at the batches number:
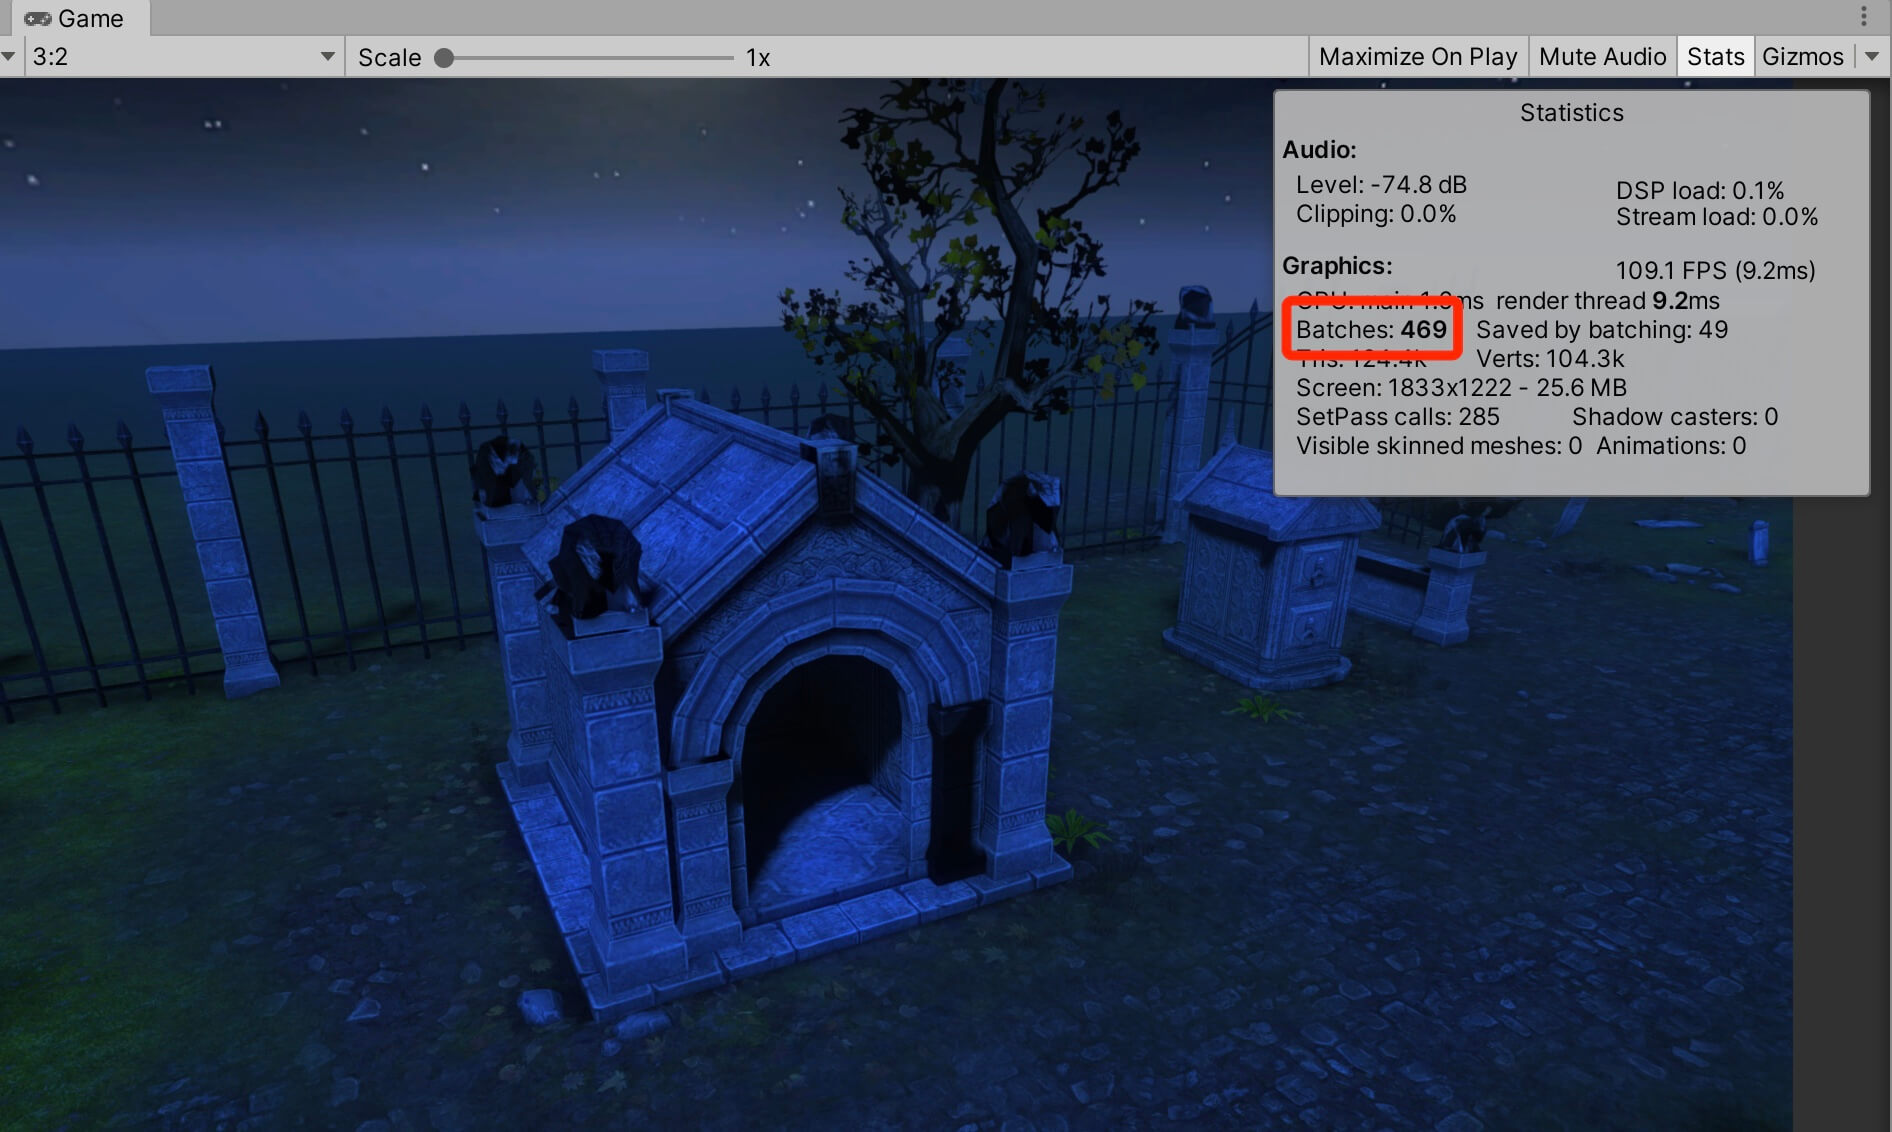
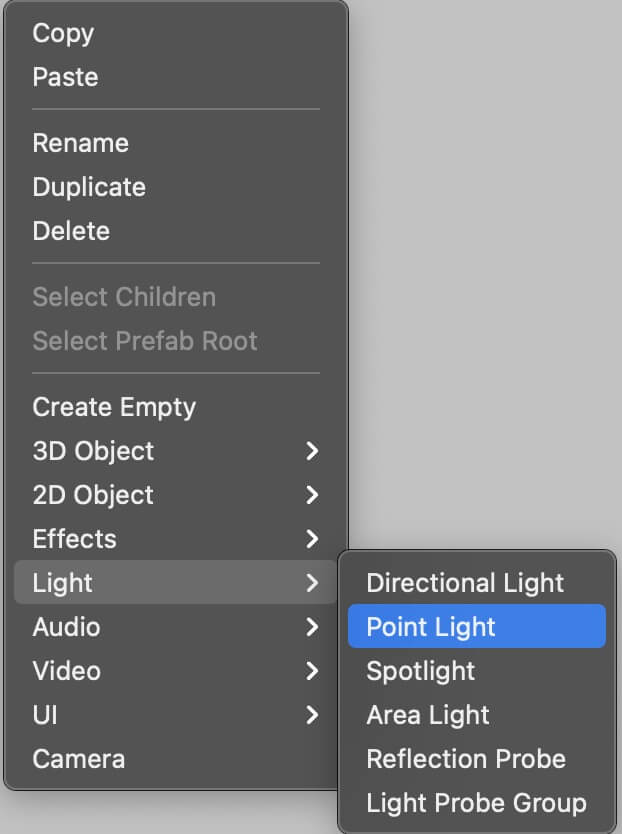
We see that it currently takes 469 batches to render this scene. I am going to add a simple Point Light by Right Click -> Light -> Point Light in the Hierarchy tab:
I am going to change the color of the Point Light and move it inside of this temple 3D model:
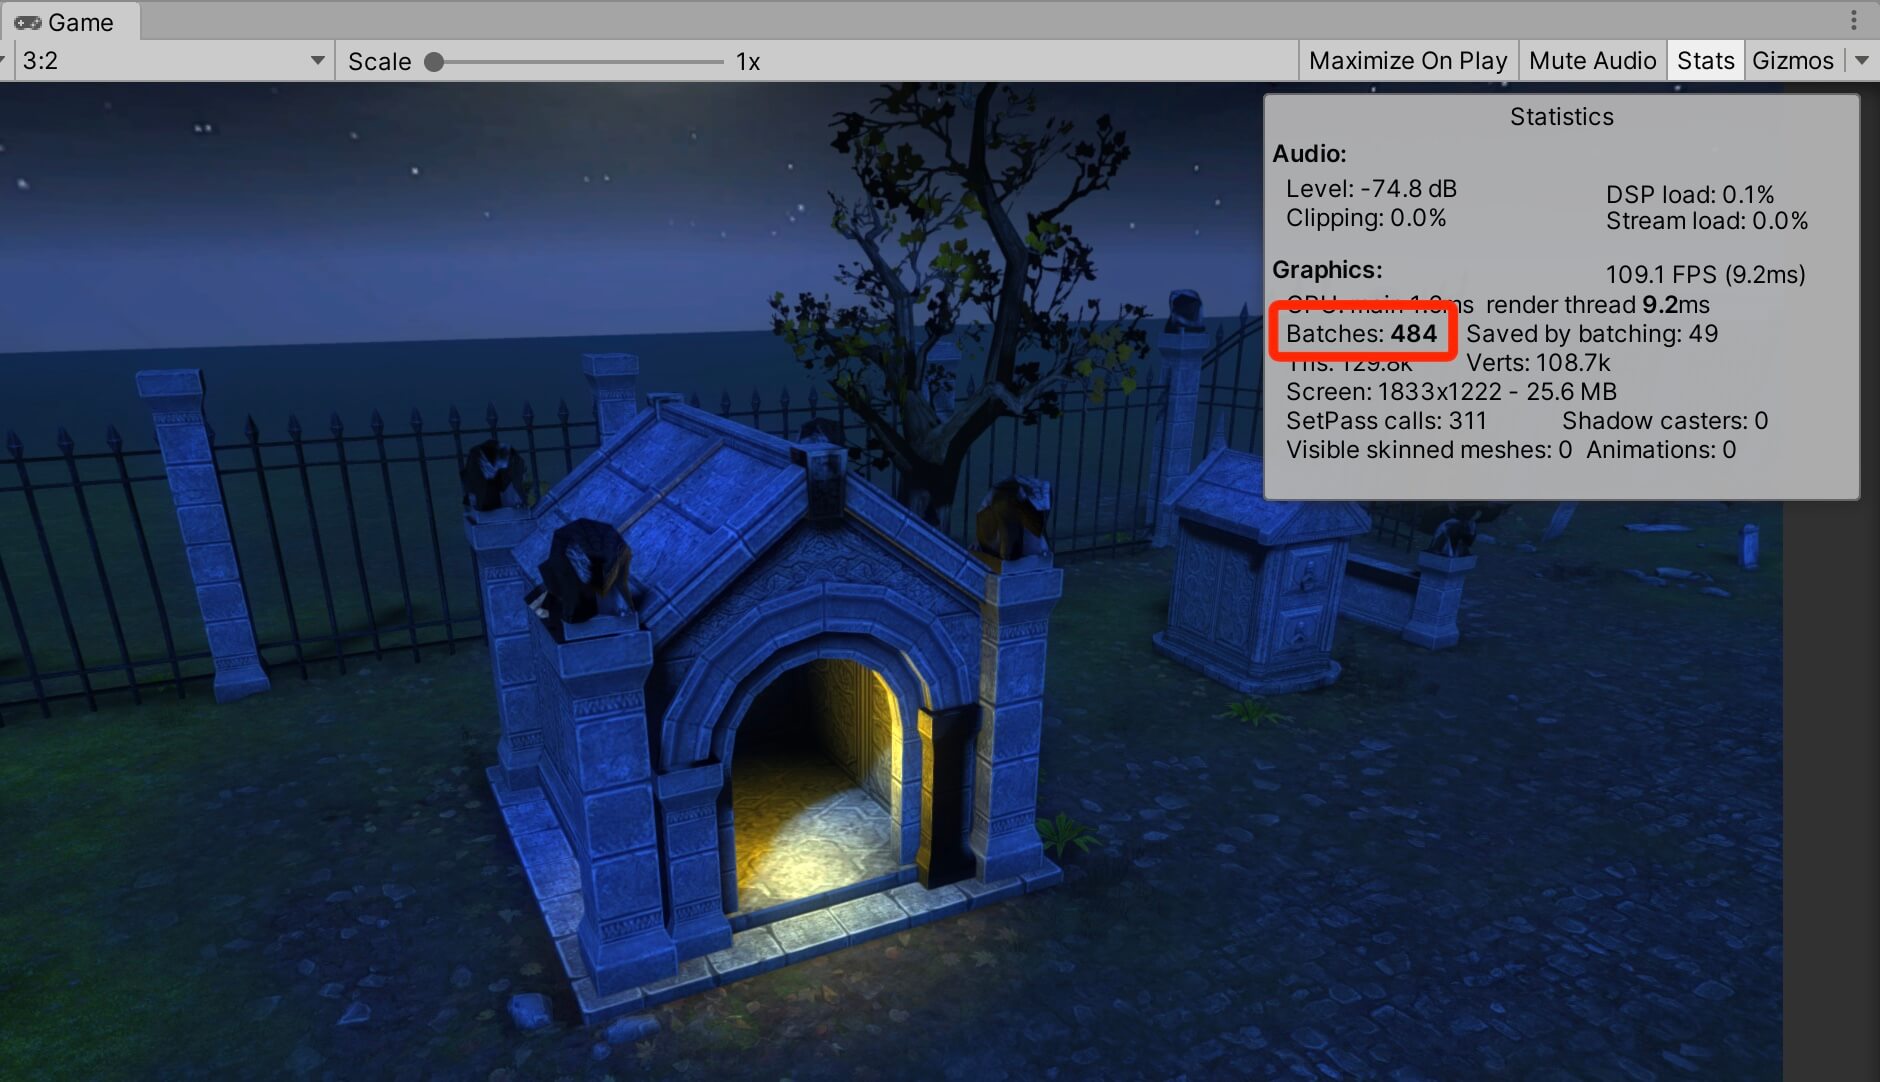
Now it takes 484 batches to render this scene, which means it takes 15 batches just to render this simple light effect. This is where baking comes into play.
When you bake lights, Unity performs calculations for baked lights in the scene and saves the results as lighting data. This means that after we bake the lights, we can turn them off e.g. deactivate or even delete the light game object, but the light effect will stay in the same place where it was baked and this saves a lot of performance.
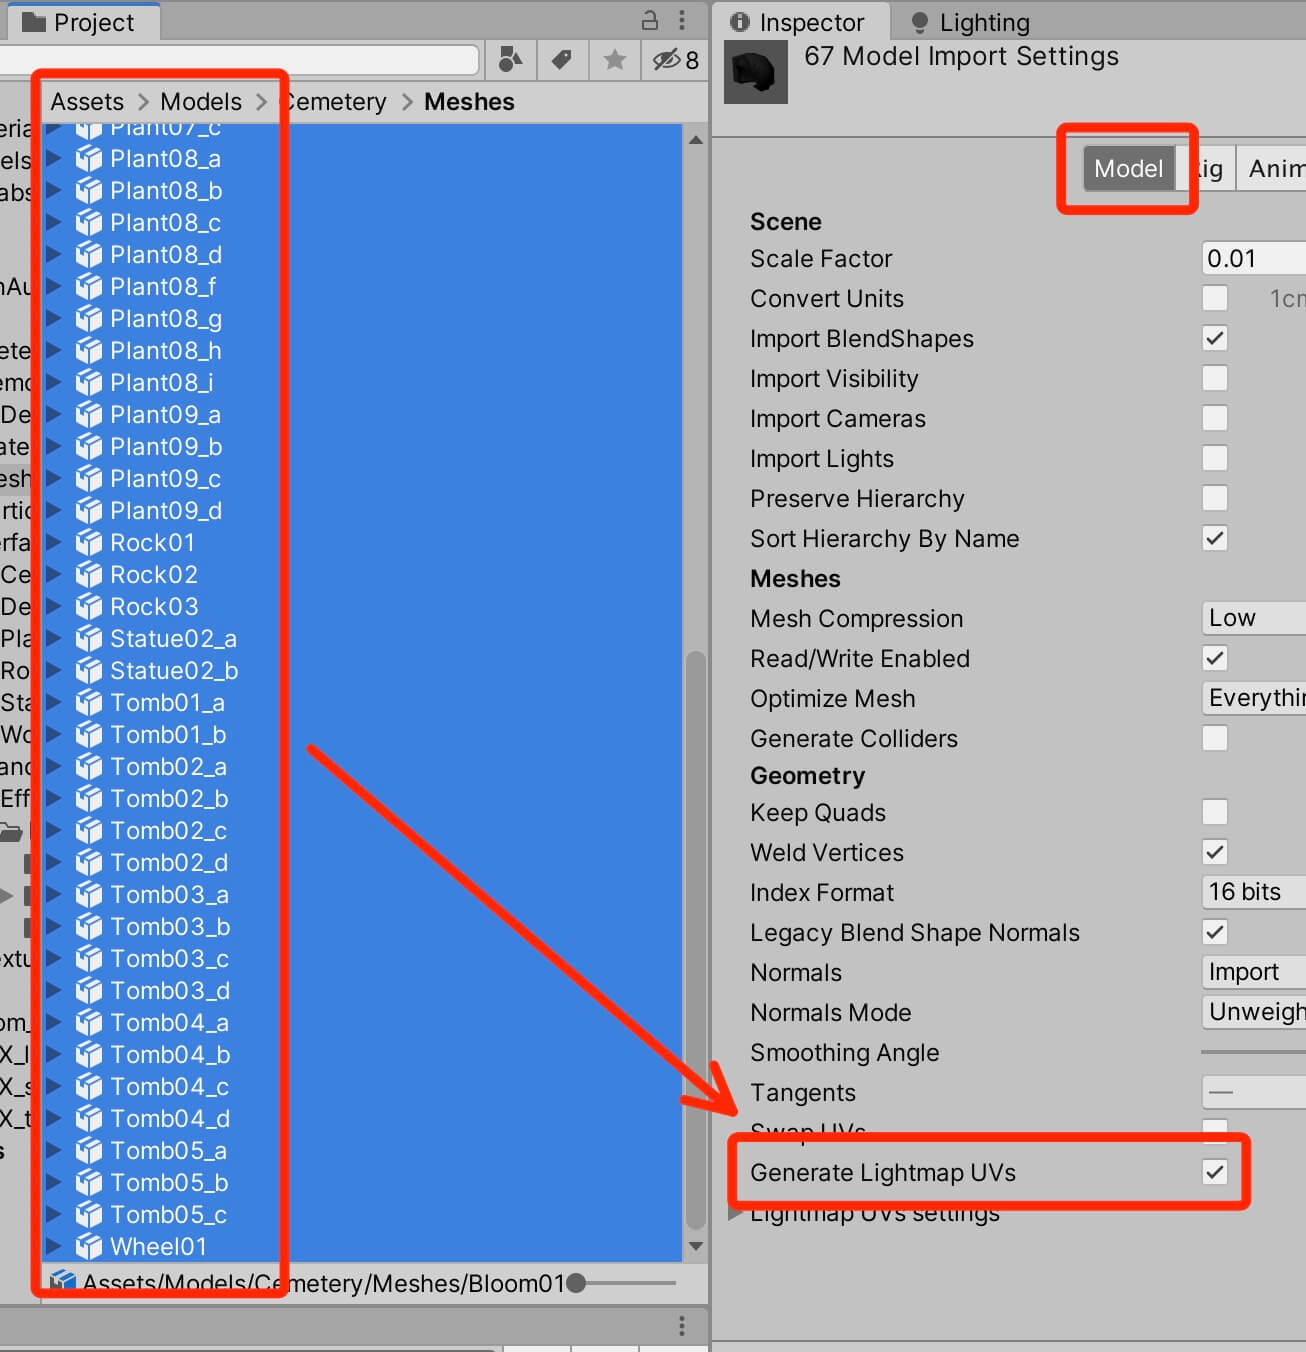
The first thing we need to do to enable baking is to select all 3D models on which we want to apply backing, and in the Inspector -> Model tab check the Generate Lightmap UVs:
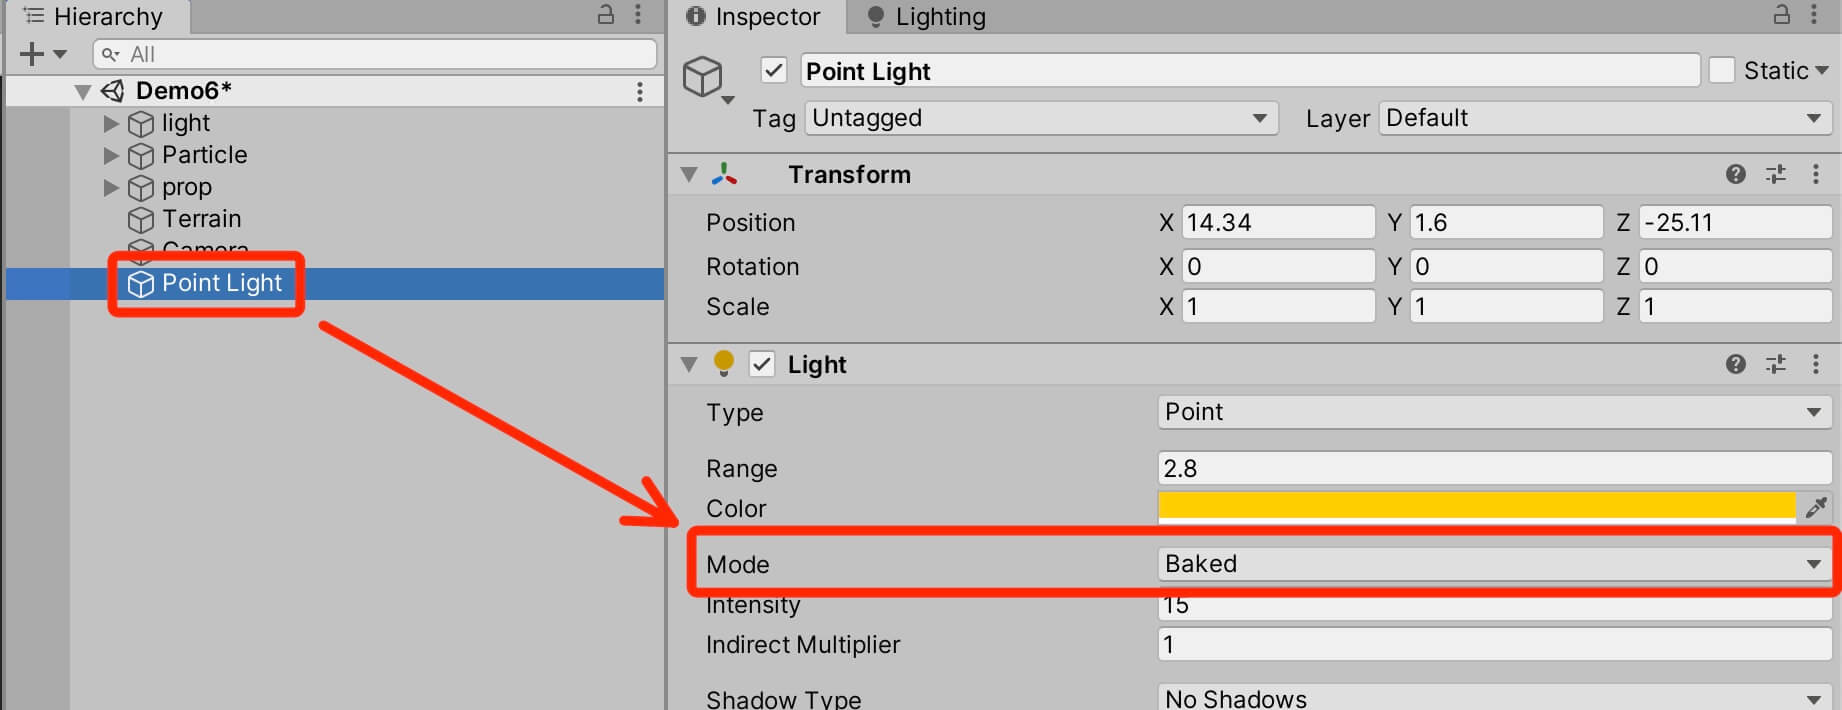
Next, you need to select the light you want to bake in the scene, and in the Inspector tab change the Mode to Baked:
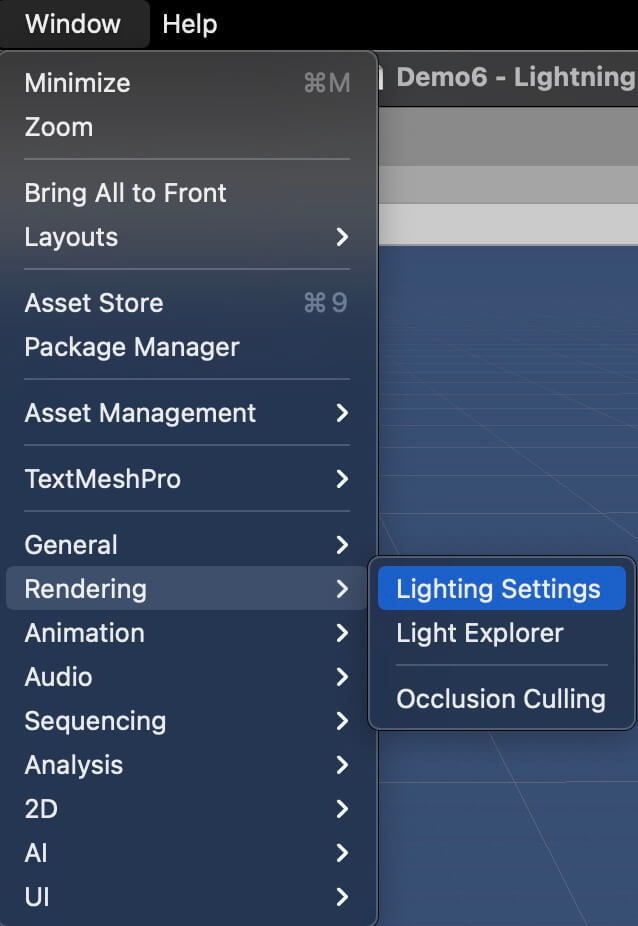
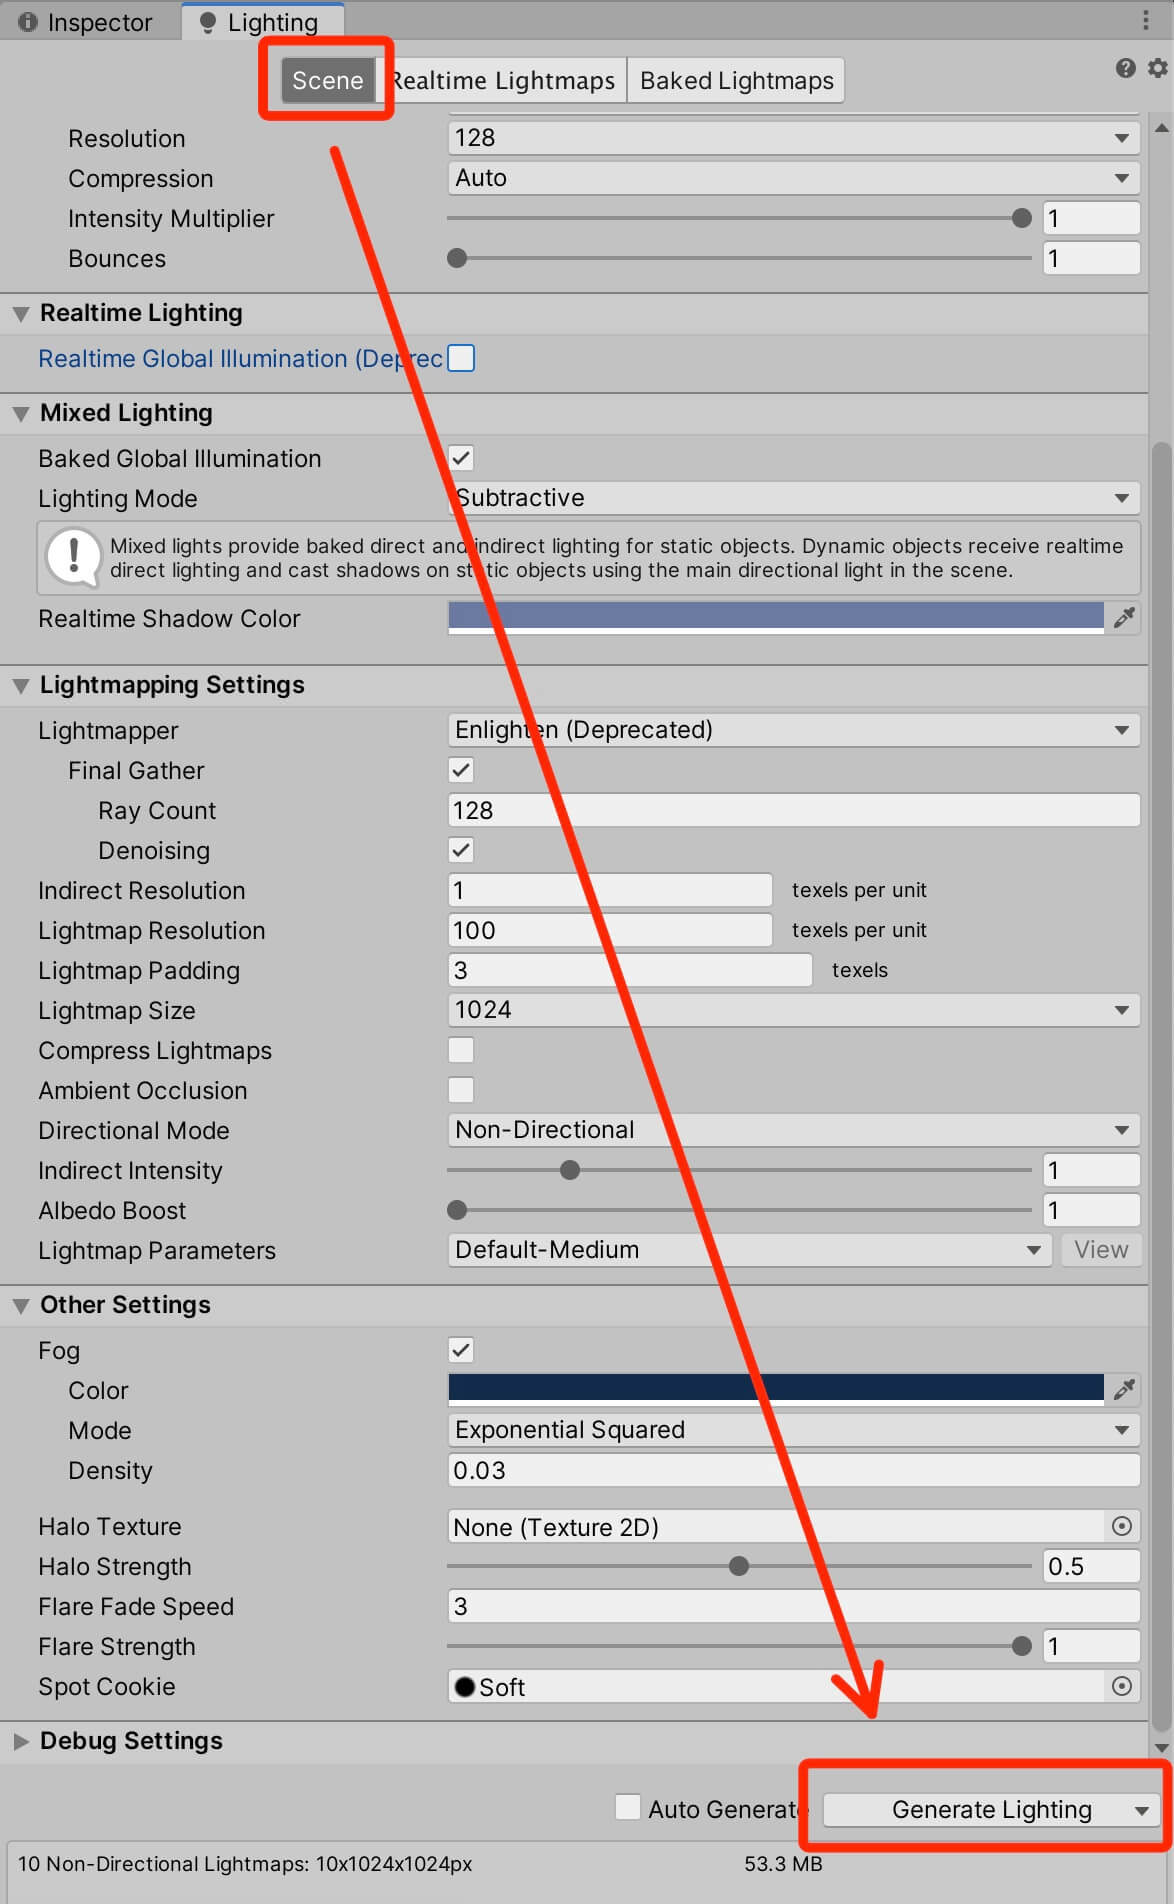
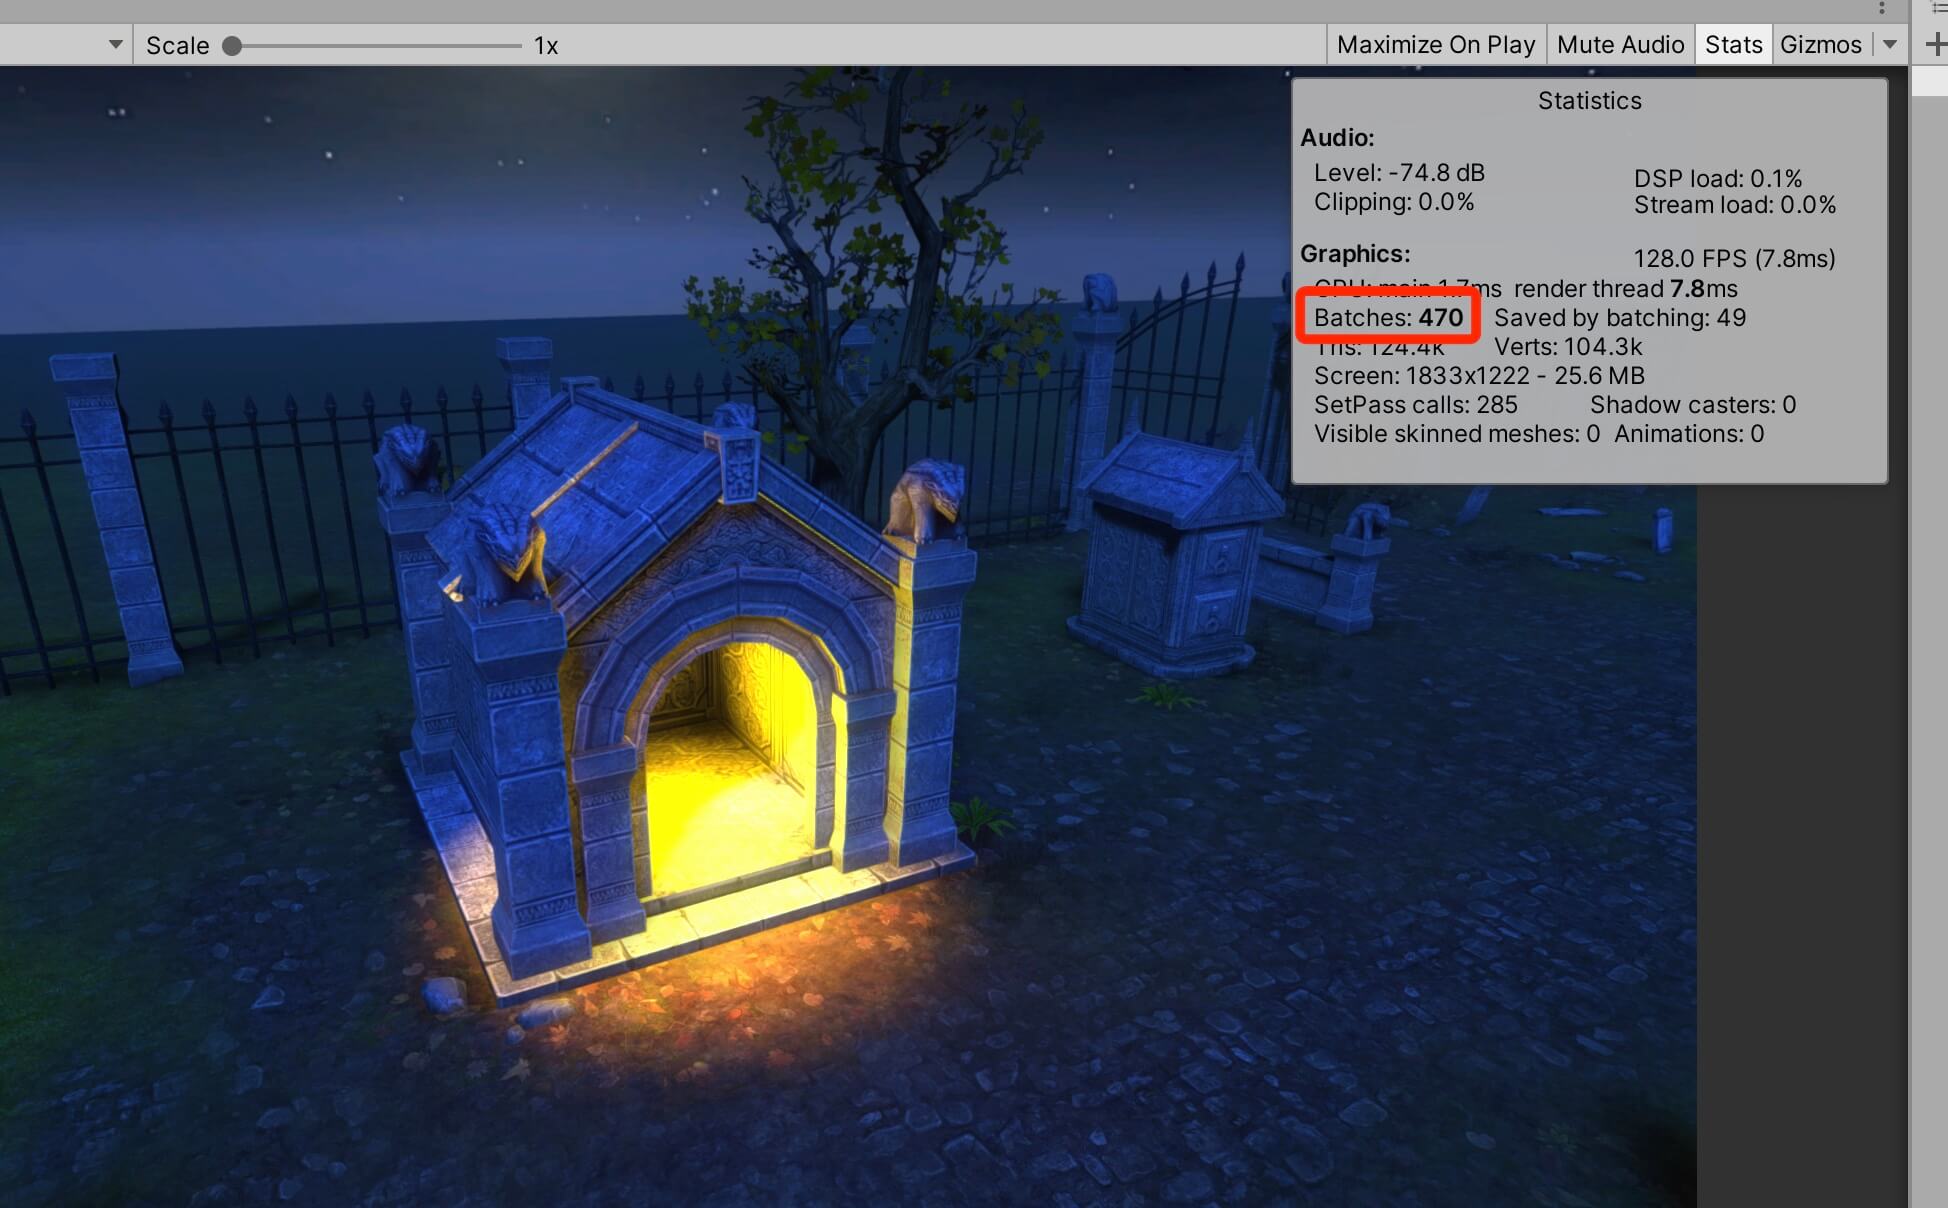
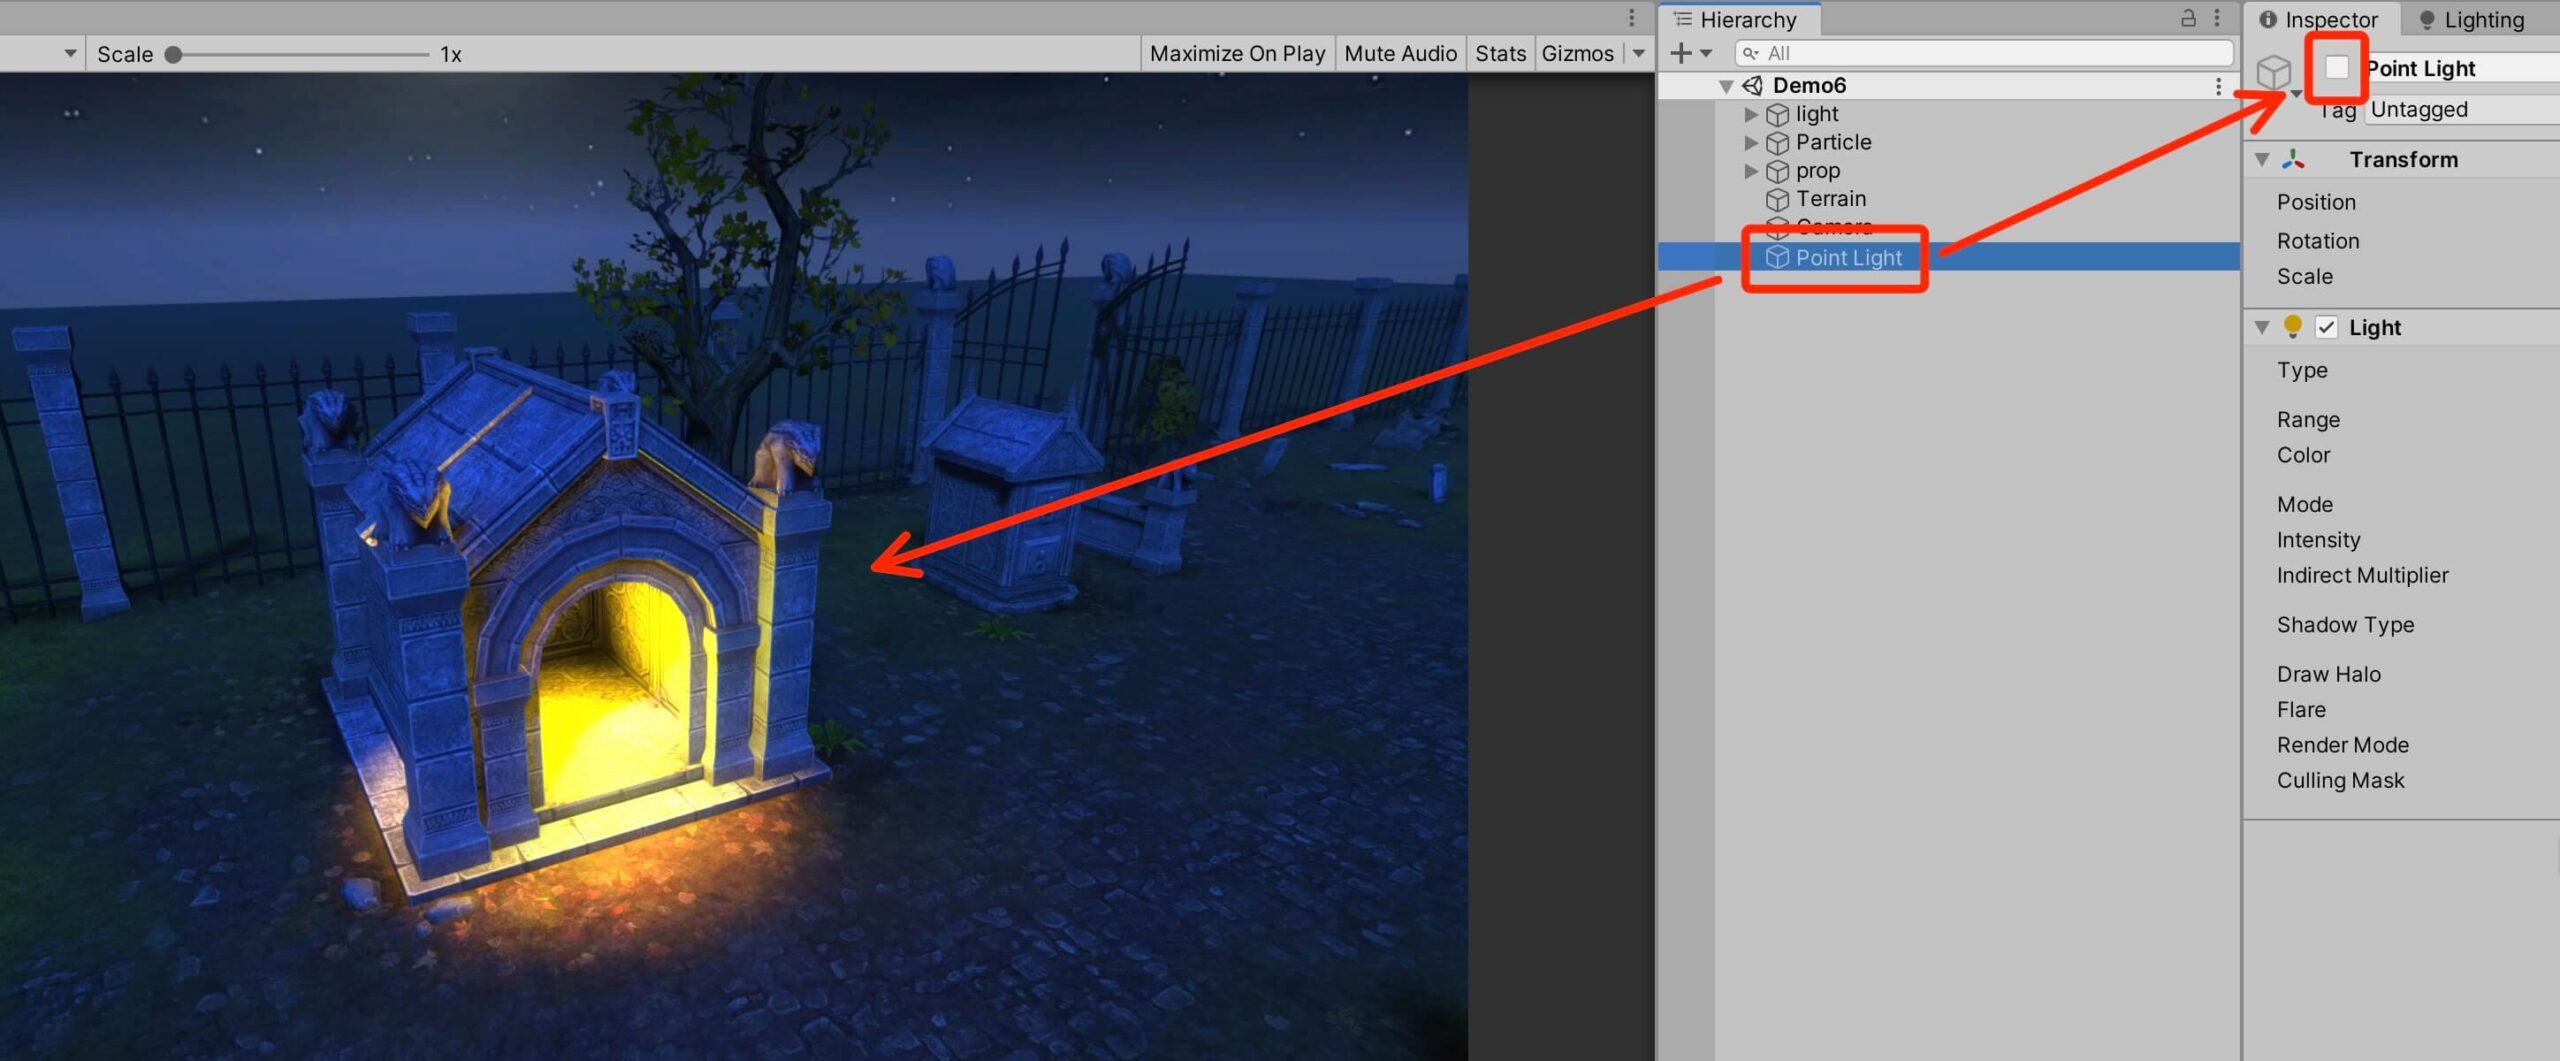
This is the power of baking, it literally takes the light information, creates data for it, and stores it in the game so that now we can use that data to simulate lights in our game instead of using real time lights which is a huge performance saver.
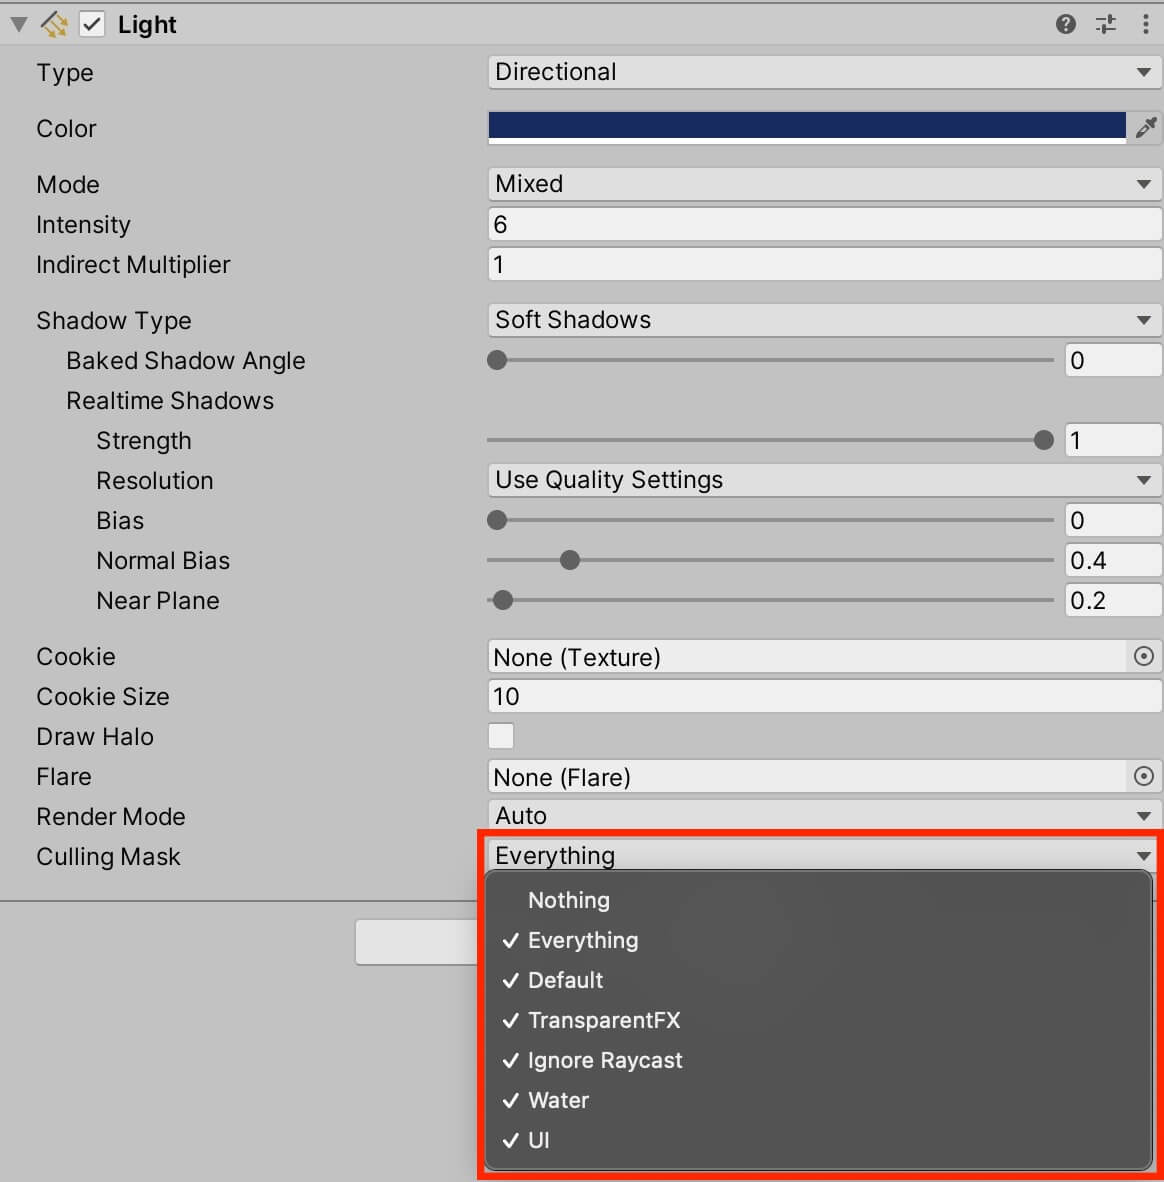
We can also take advantage of the Culling Mask property for every Light component. The culling mask works like collision layers, it determines which layers are affected by the light component:
Selecting The Right Settings For Your Sprites
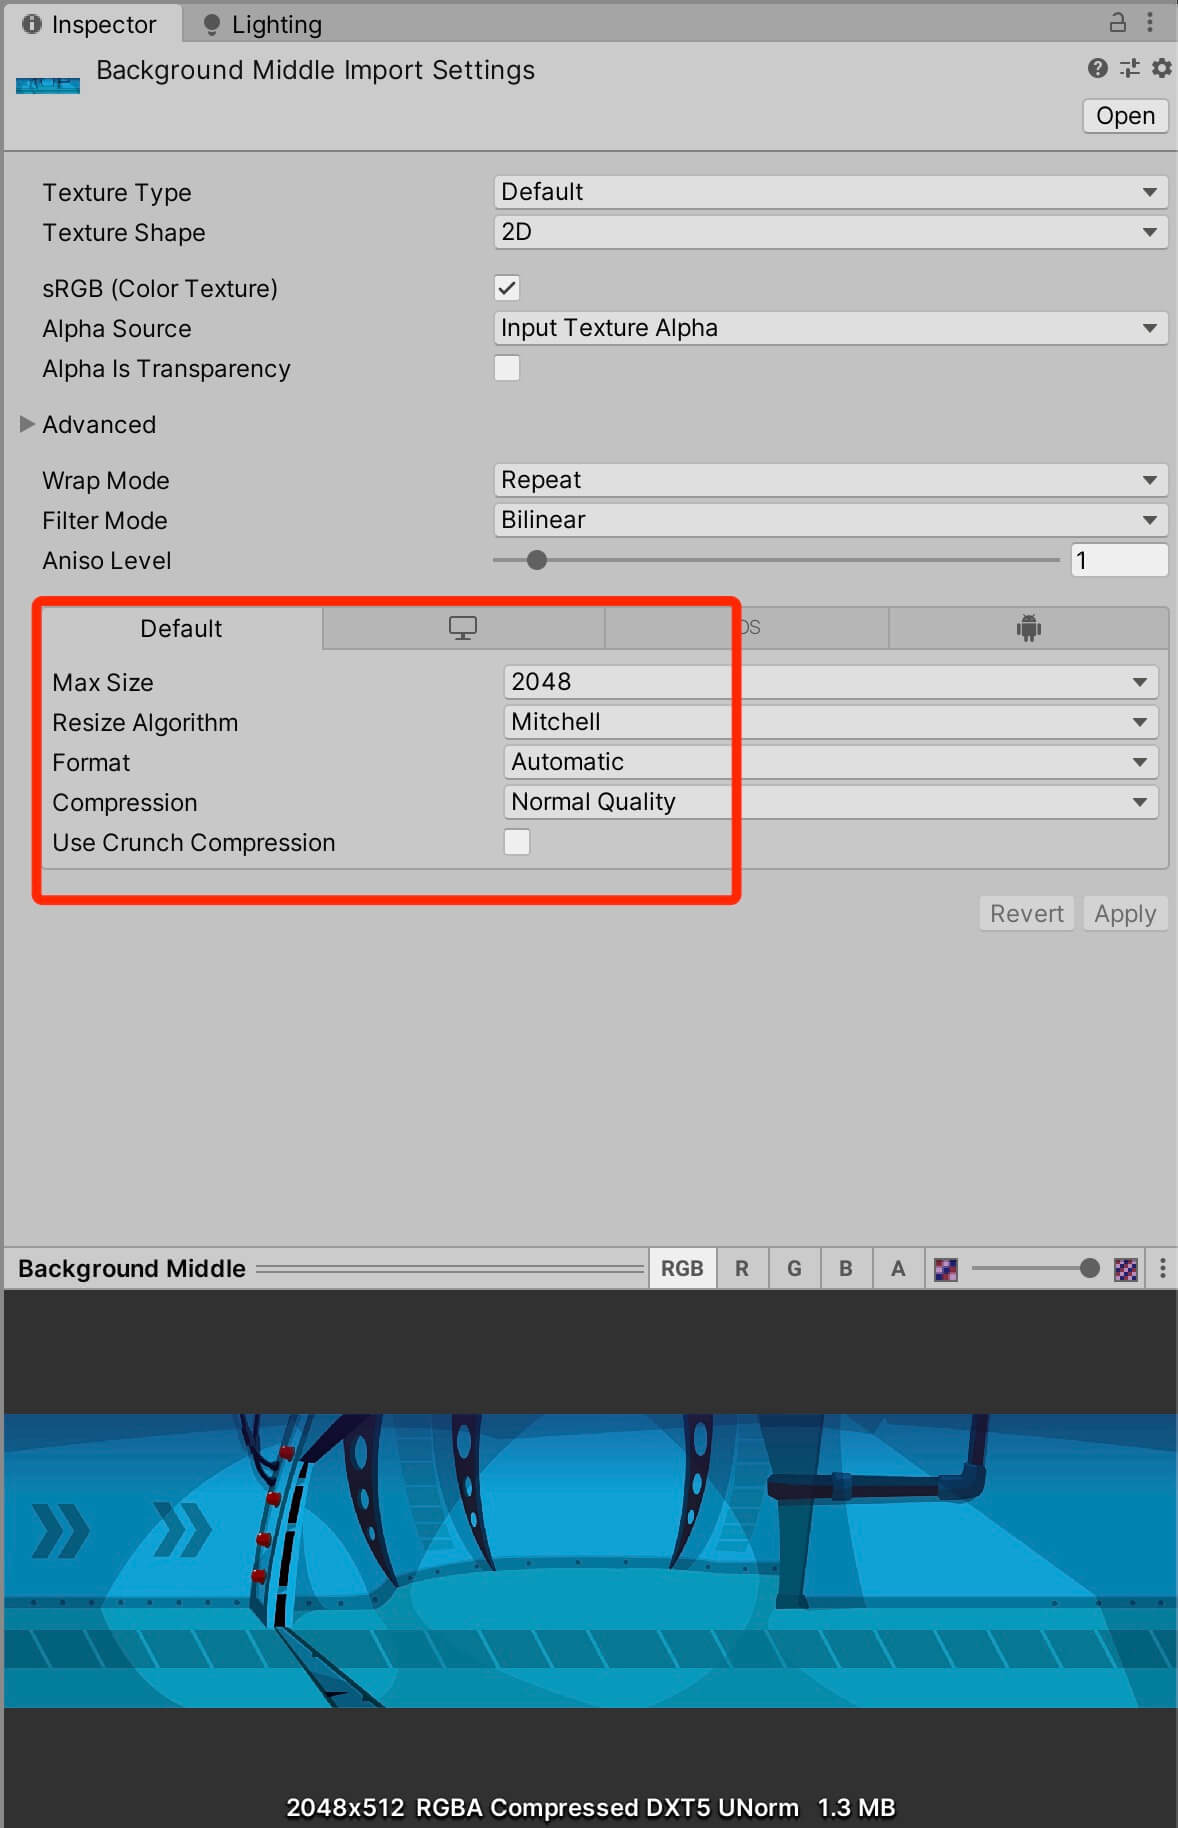
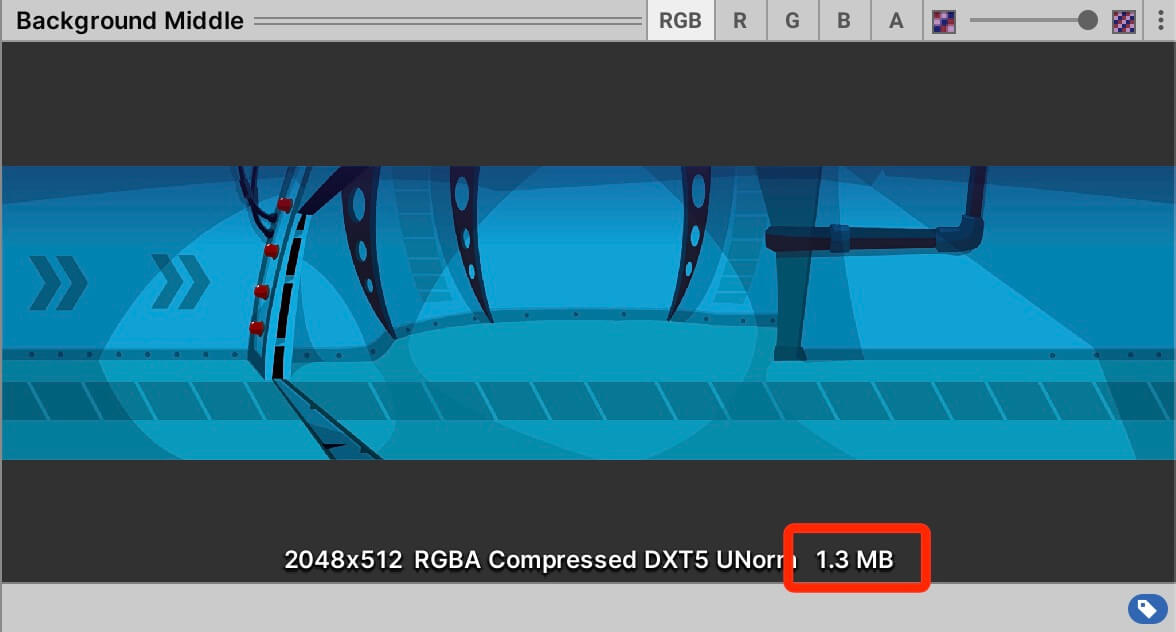
This represents the actual file size this image will have in our game. Now imagine creating a mobile game where you have 1000 assets and you don’t optimize their size, your game is going to have over 2GB of size and if it’s not some stunning action game that will get you hooked up after 2 seconds of playing it, no one is going to download your 2 GB game.
Now the settings that you will set will depend on the actual size of your sprite image and the platform for which you are creating the game, because with the settings you also determine the quality of that sprite in the game.
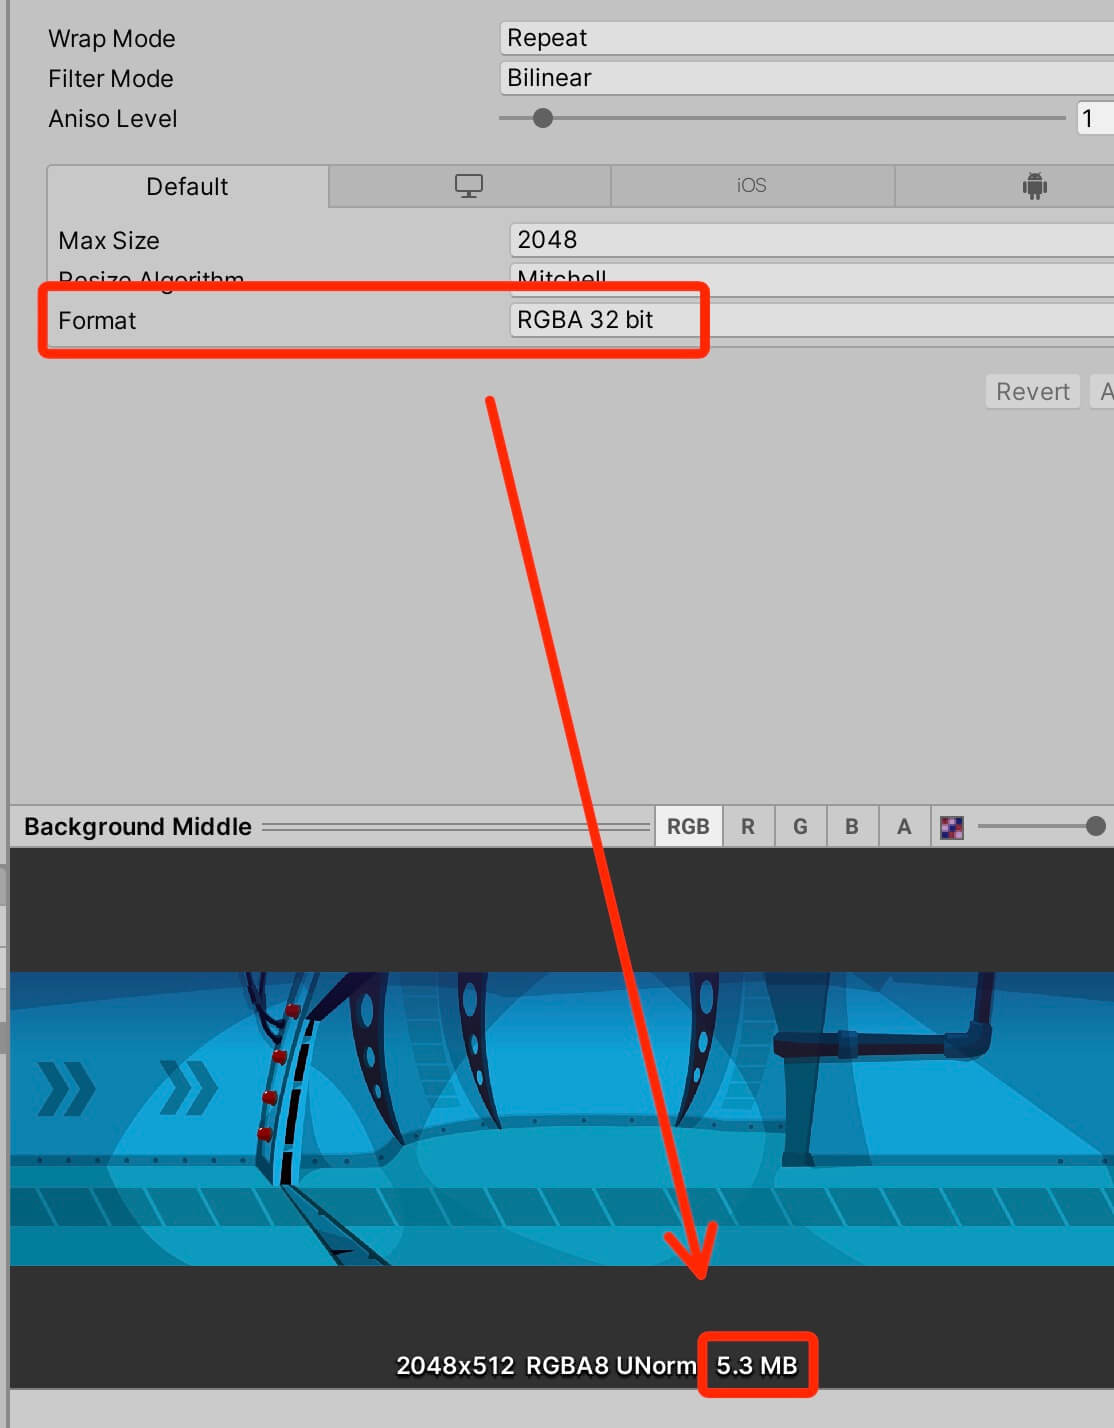
As you can see, this one setting made our file 3x bigger in size. It went from 1.3MB to 5.3MB and this will be the file size of this sprite in your game. Imagine, this one image has 5.3MB, so you can see how this can get ugly pretty quickly in a game where you have a lot of assets.
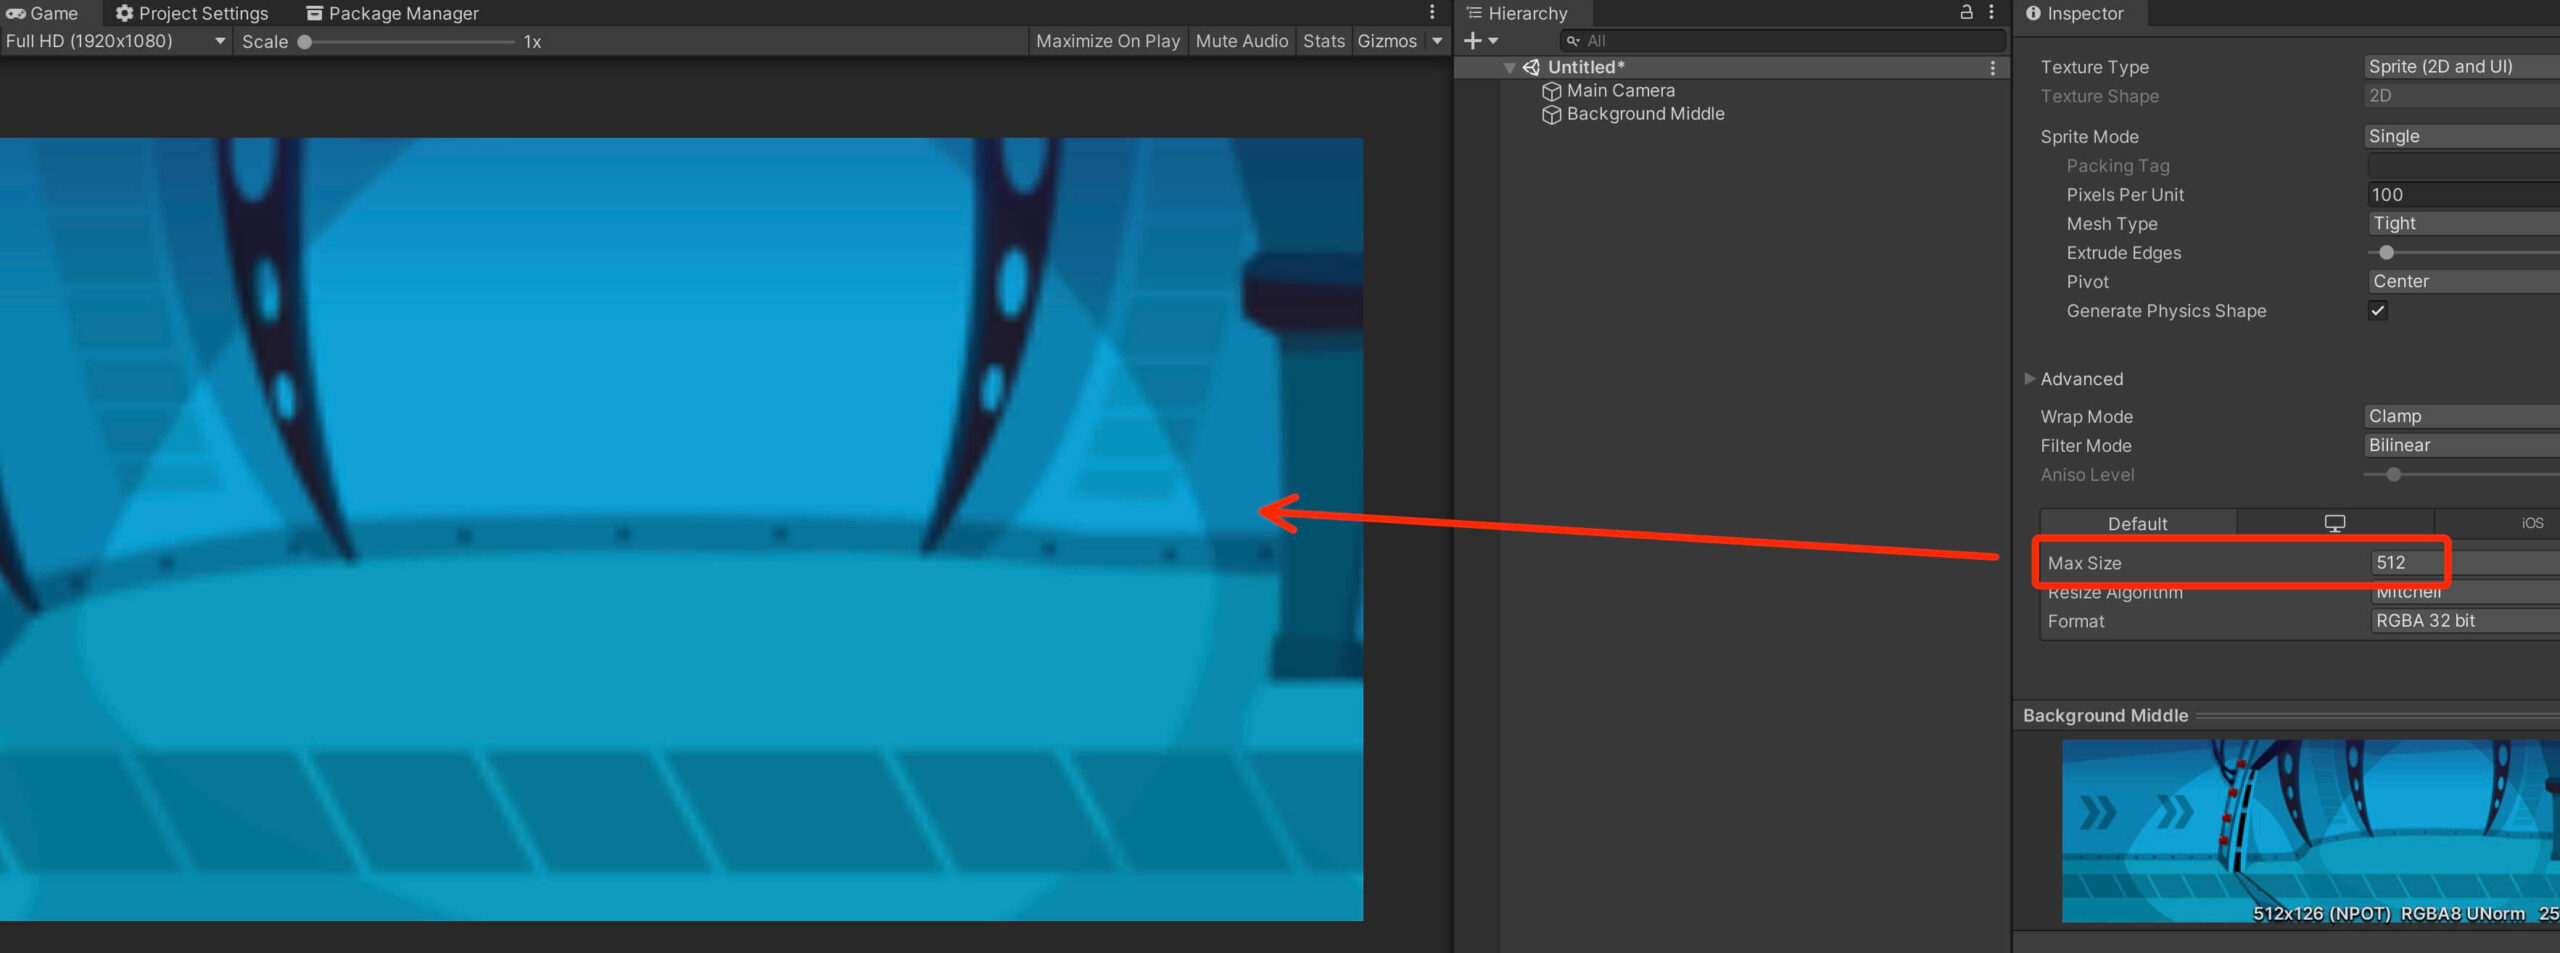
I am also going to demonstrate what happens if we change the Max Size settings from 2048 to 512 for the background sprite:
Optimizing Audio Files
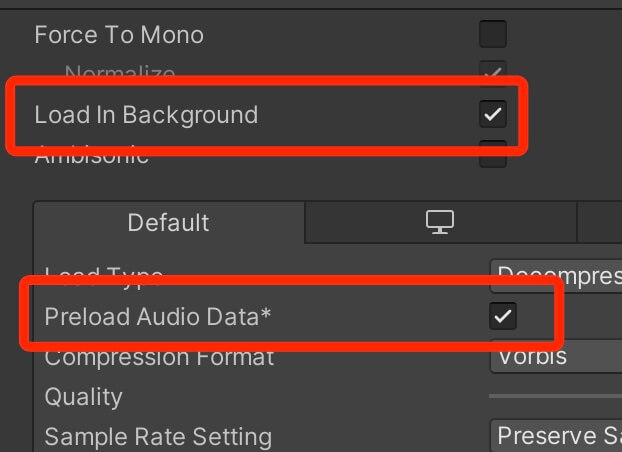
When both settings are enabled, and the scene starts loading, the audio file will begin loading without stalling the main thread. The audio file doesn’t finish loading by the time the scene has finished loading, then the audio file will continue to load in the background while the scene is playing.
Next we have:
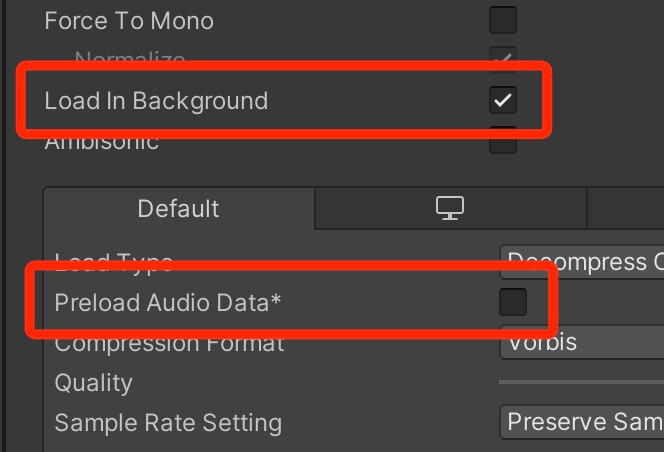
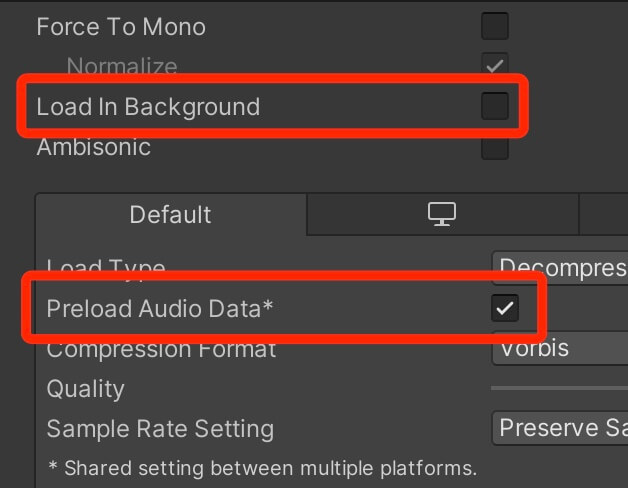
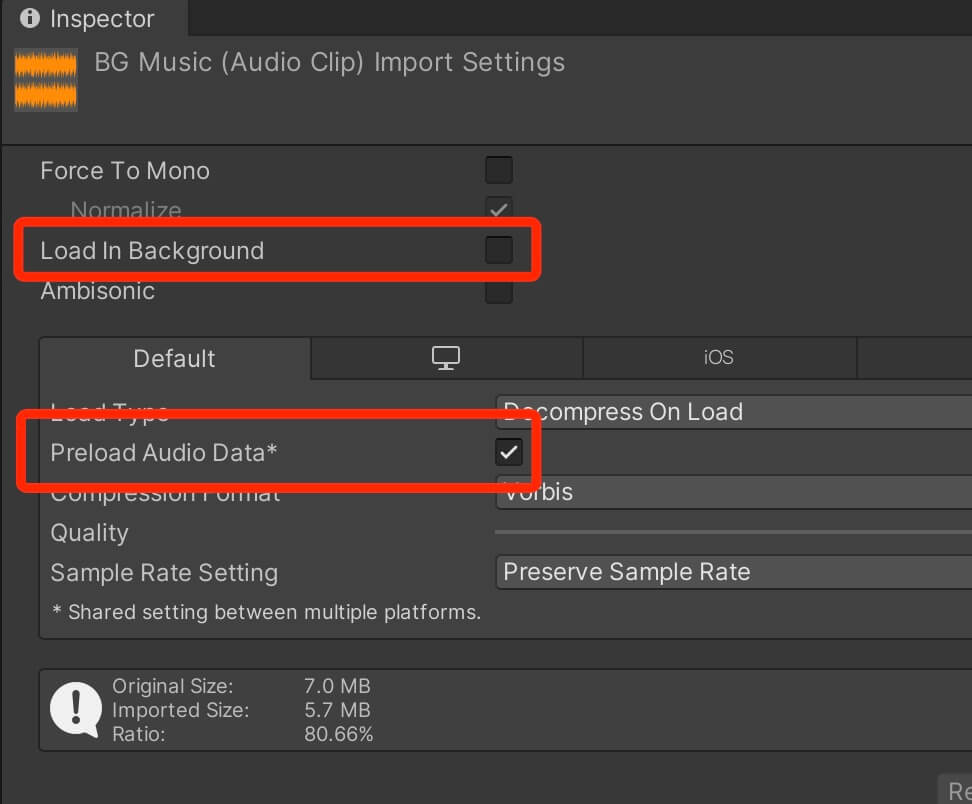
With these settings the audio file is loaded in the same time the scene is loaded. The problem here is that the scene will not start until all the sound files with this setting are loaded into memory.
And finally we have:
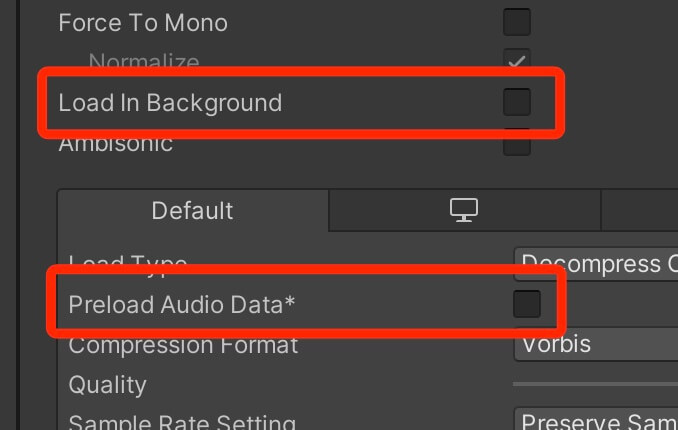
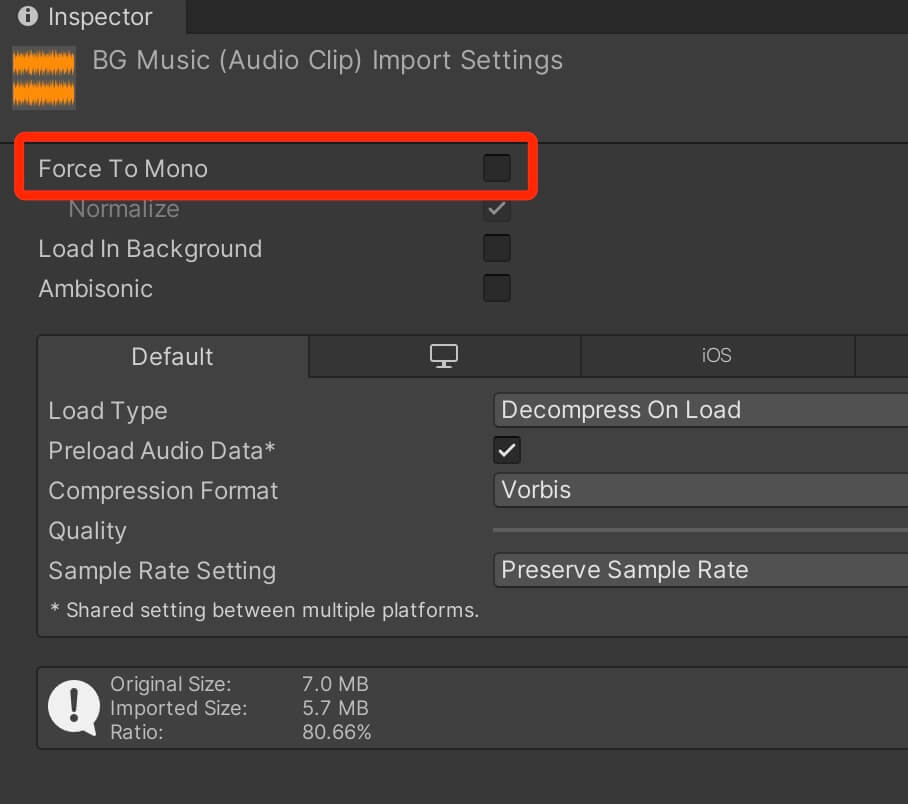
When both settings are turned off, the first time the audio file is triggered to play, it will use the main thread to load itself in memory. If the file is large, this can cause a frame freeze. This will not be a problem every next time you play the same file.
I recommend that you be careful when using this setting, you can do it with smaller files but even then the Profiler is your best friend so use it to measure the impact it has on your game.
Next we have the Ambisonic option:
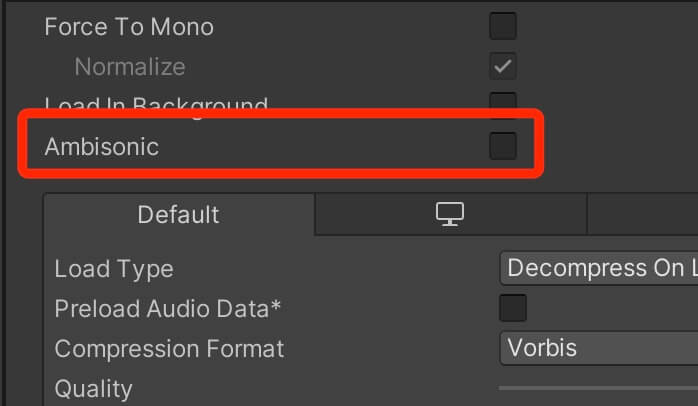
This option is mainly used for VR and AR applications provided that the audio file has ambisonic encoded audio.
Moving to the Load Type. Here we have three options:
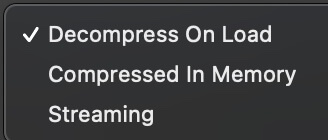
Compressed In Memory: This will keep the audio file compressed in memory, and it will decompress it while playing. As a result this takes less RAM and less loading time, but it is heavy on the CPU because the file needs to be decompressed every time it is played.
Streaming: The audio file will be stored on device’s persistent memory(storage) and it will be streamed when played. With this option RAM is not affected at all instead the loading is done with the CPU. This doesn’t have a huge impact on performance as long as you don’t play a lot of audio files simultaneously. Especially you need to pay attention to mobile devices when using this option.
Next we have three Compression Format settings:
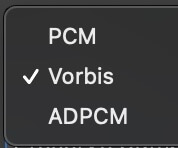
PCM: With this option the audio file will be loaded as is e.g. with its original size which takes up storage space and RAM. But playing this file is almost cost free because it doesn’t require to be decompressed.
ADPCM: This option is very effective because it is very cheap to compress and decompress files which will reduce the CPU load significantly, but the down side is that the sound file might have some noise. You can always preview the audio file after you set this settings, if it sounds the same as the original file, then you are good to go.
Vorbis: This option supports most major platforms. It can handle very high compression ratios while maintaining the sound quality but is expensive to compress and decompress on the go.
Next we have the Quality option:

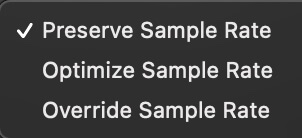
Preserve Sample Rate: This option will keep the original sample rate of the audio file.
Optimize Sample Rate: This option will determine and use the lowest sample rate without losing sound quality.
Override Sample Rate: With override you can manually set sample rates, but if you are not a professional audio manager or a DJ at least, I would not mess with this option.
Optimizing The UI Canvas
Disable Raycast Target For Non-Interactive UI Elements
Another way to optimize UI elements is to disable Raycast Target option on every non-interactive UI element:
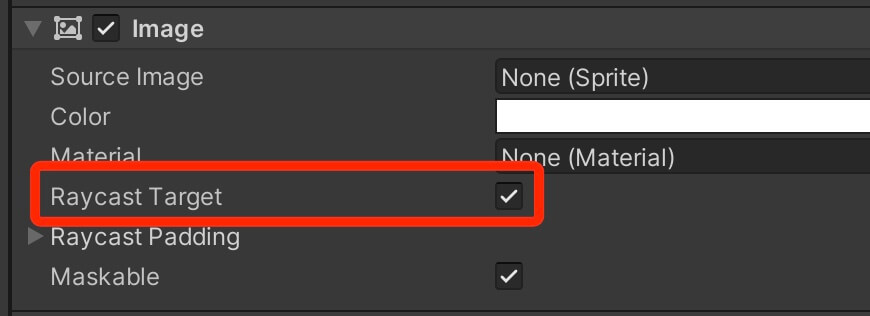
If you have backgrounds, labels, icons, and other UI elements that are not supposed to interact with the user e.g. react to the users input, then you should disable Raycast Target option on every single element.
Deactivate The Canvas Component Instead Of Deactivating The Game Object Holding The Canvas
When hiding and showing a Canvas, it is better to deactivate and activate the Canvas component itself instead of deactivating and activating the whole game object:
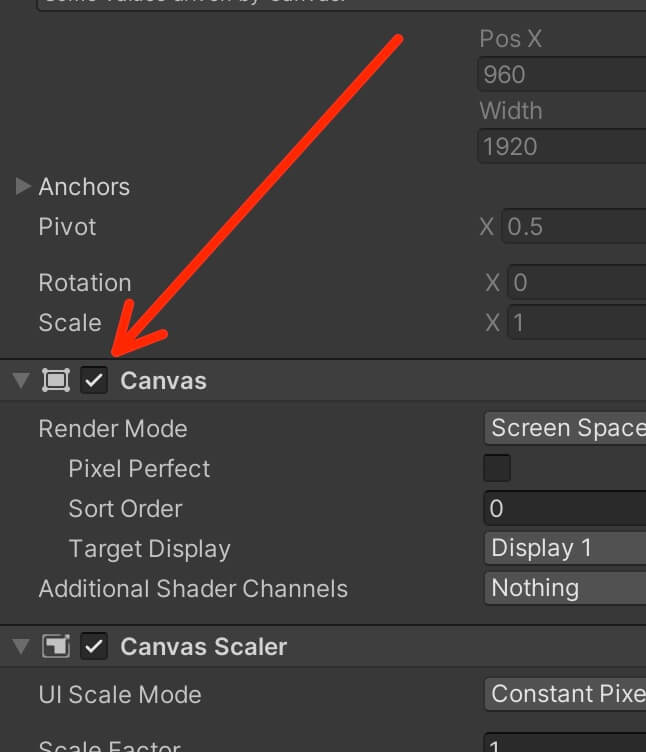
The reason for this is, when a game object that has a Canvas component is activated prior to being deactivated, it will make the Canvas rebuild all its UI elements before issuing a draw call, but if you activate a Canvas component prior to being deactivated, it will continue drawing UI elements where it stopped when it was deactivated and it will not rebuild them before doing that.
Don't Animate UI Elements With Unity's Animator
Be Careful With UI Scroll View
This is something that I struggled with a lot in my mobile games because I use the Scroll View in my level scenes to enable the user to scroll through the available levels.
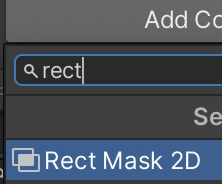
Luckily, there is a really good way how we can fix this issue and that is by using a RectMask2D component:
Don't Hide UI Elements Using The Alpha Property Of Its Color
If you want to hide a UI element then don’t do it by setting the alpha property in its color to 0, because this will still issue a draw call for that UI element.
Instead, disable the UI component that you want to hide, be that Image, Text, Button and so on.

Comments are closed.