Depending on the type of enemies you have in your game, you will create different AI behavior. And there are multiple ways how to create enemy AI in Unreal Engine, from the basic enemies that move between two points all the way to creating complex AI behavior using Behavior Trees and Blackboards.
In this post we are going to learn about AI in Unreal Engine by creating basic, intermediate and advanced enemy AI behavior using C++ and blueprints.
Download Assets And Complete Project For This Tutorial
To follow along with this tutorial, please download the starter project by clicking on the green Download assets button above.
In the downloaded folder you will find the finished project, and the starter project which I prepared for you to follow this tutorial.
Important Information Before We Start
One of the labels for this tutorial is beginner, however this is not a tutorial for complete beginners.
I expect you to know how to create basic games in Unreal, but you are a beginner when it comes to AI programming in Unreal. So it is mandatory that you know how to code in C++ and blueprints, and know how to use Unreal and its interface.
Another thing to note is that I am using Unreal Engine 4.27 for this tutorial, but the techniques that I am going to teach you can be applied to any Unreal Engine version.
Enemy AI Patrol
First we are going to create a basic patrol behavior for the enemy where the enemy is going to roam in the level.
Open the Enemy_AI_Starter_Project that you downloaded. Open the EnemyAI_Map located in Content -> Maps folder. In the map you will notice the enemy and the player actor are already prepared.
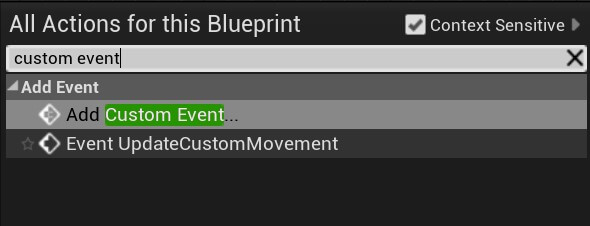
Open the BP_Enemy blueprint located in Content -> Blueprints folder. In the Event Graph tab, Right Click and search for custom event:
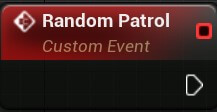
To make the enemy patrol in the level, we are going to use AI MoveTo function, and we are going to provide it a random destination within the navigationable bounds volume:

You can copy the nodes from here:
For AI MoveTo parameters we provided self, which is a reference to the enemy blueprint, and for the destination we used the GetRandomReachablePointInRadius which is a function that will give us a reachable point in the radius we provide from the origin.
This function will calculate all the collisions that are in the way of the AI and that way the enemy will cleverly avoid any obstacles in his path.
For the origin parameter of the GetRandomReachablePointInRadius function we provided the location of the enemy, because we are going to patrol from the enemy’s location.
For the radius I’ve set 1500 as the value, which means it will try to get a reachable point from the enemy’s location in the 1500 value radius. Of course, we can change the radius value to a higher or a lower number anytime we want to make the enemy patrol further in the level.
When the AI MoveTo function finishes, we are going to delay for 1 second using the Delay function, and then call the Random Patrol node we create so that the enemy will randomly patrol the level again.
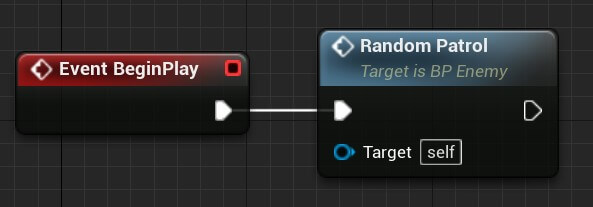
Before we proceed to test this out, from the BeingPlay call the Random Patrol node we created:
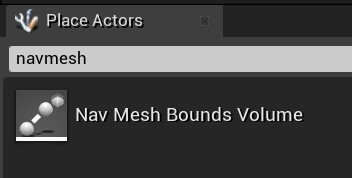
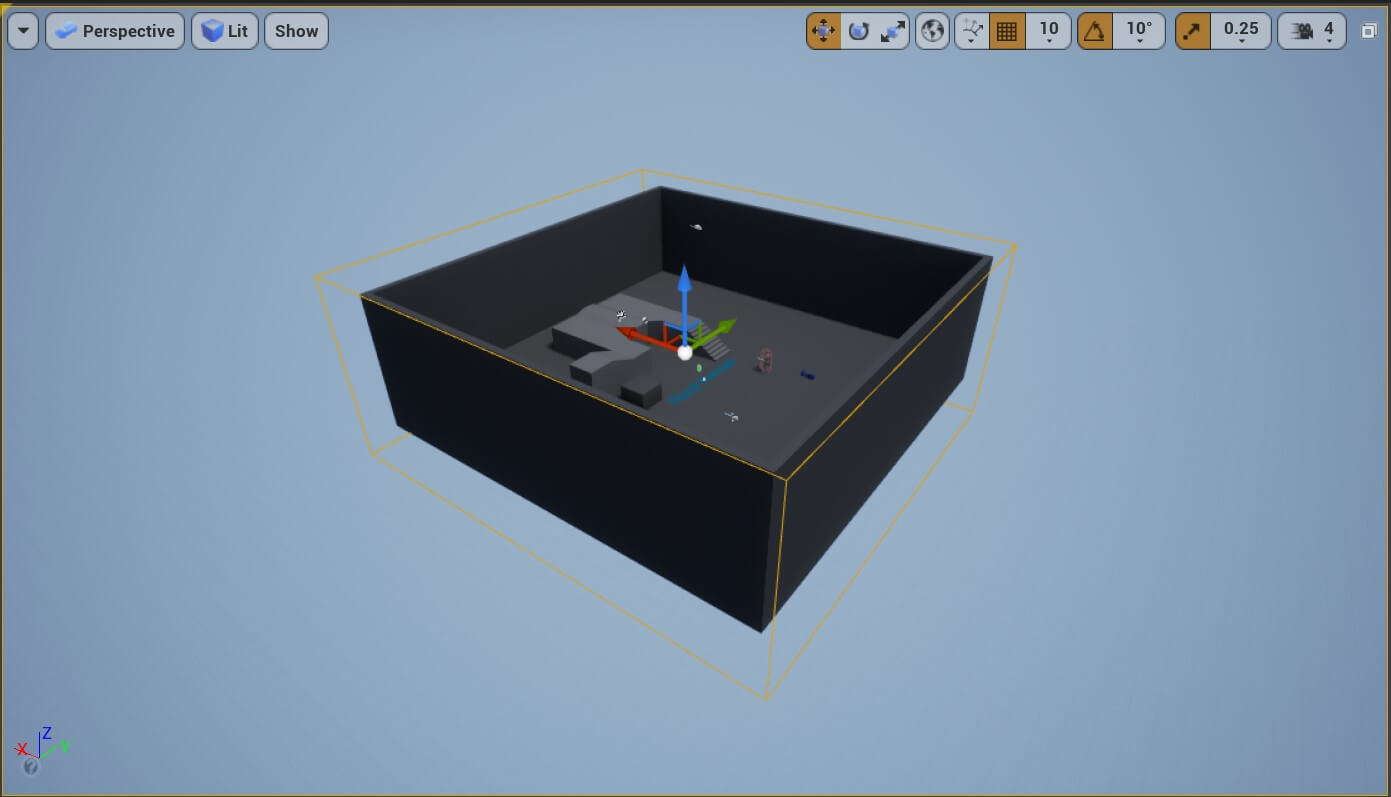
Drag the NavMeshBoundsVolume in the level and set the following values for its Location and Scale:

This will make the NavMeshBoundsVolume cover the whole level and this will be the navigationable area where the enemy can move with the help of AI MoveTo function:
Let us now run the game and test it out:
We can also remove the delay that happens after AI MoveTo function finishes which will make the enemy patrol the level without stopping.
Detecting The Player's Presence And Moving Towards Him
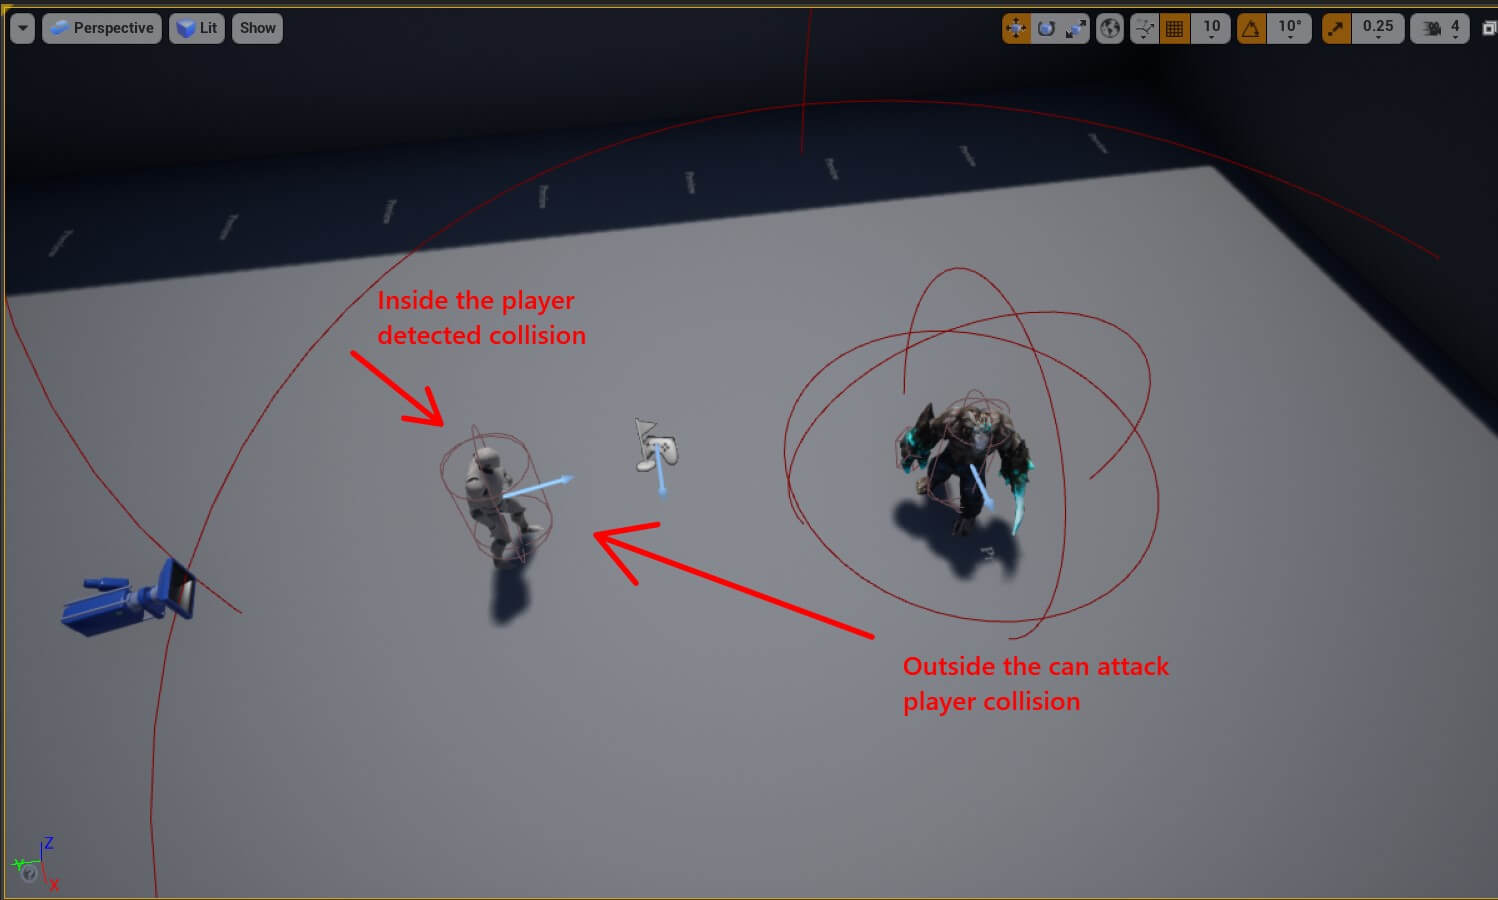
We can use the same function to make the enemy run towards the player. But first, we need a way to detect the player’s presence near the enemy. For that we are going to attach a Sphere Collision component to the enemy.
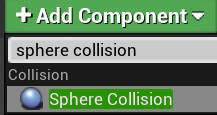
In the blueprint editor for the BP_Enemy, in the Components tab click on Add Component and filter for sphere collision:
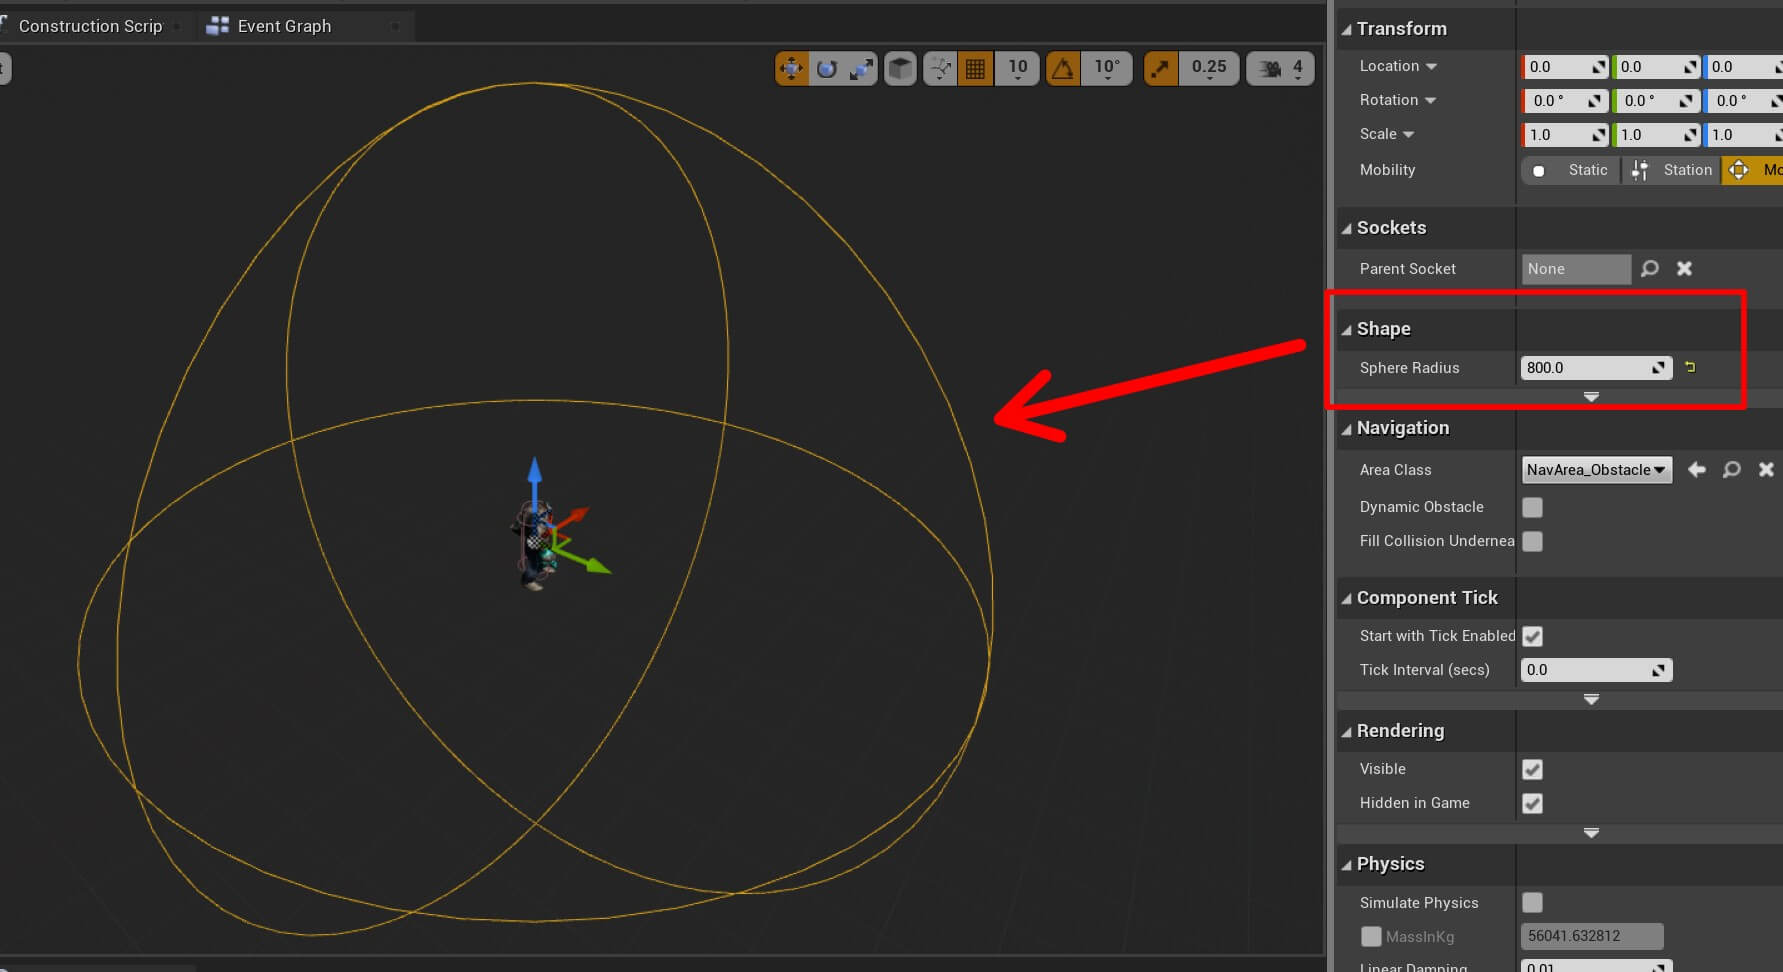
In the My Blueprint tab, under variables create a new boolean variable and name it Player Detected. Then create another variable and for the variable type, click on the variable icon:
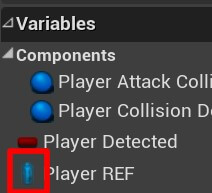
In the search bar filter for third person and select the Object Reference for the Third Person Character:

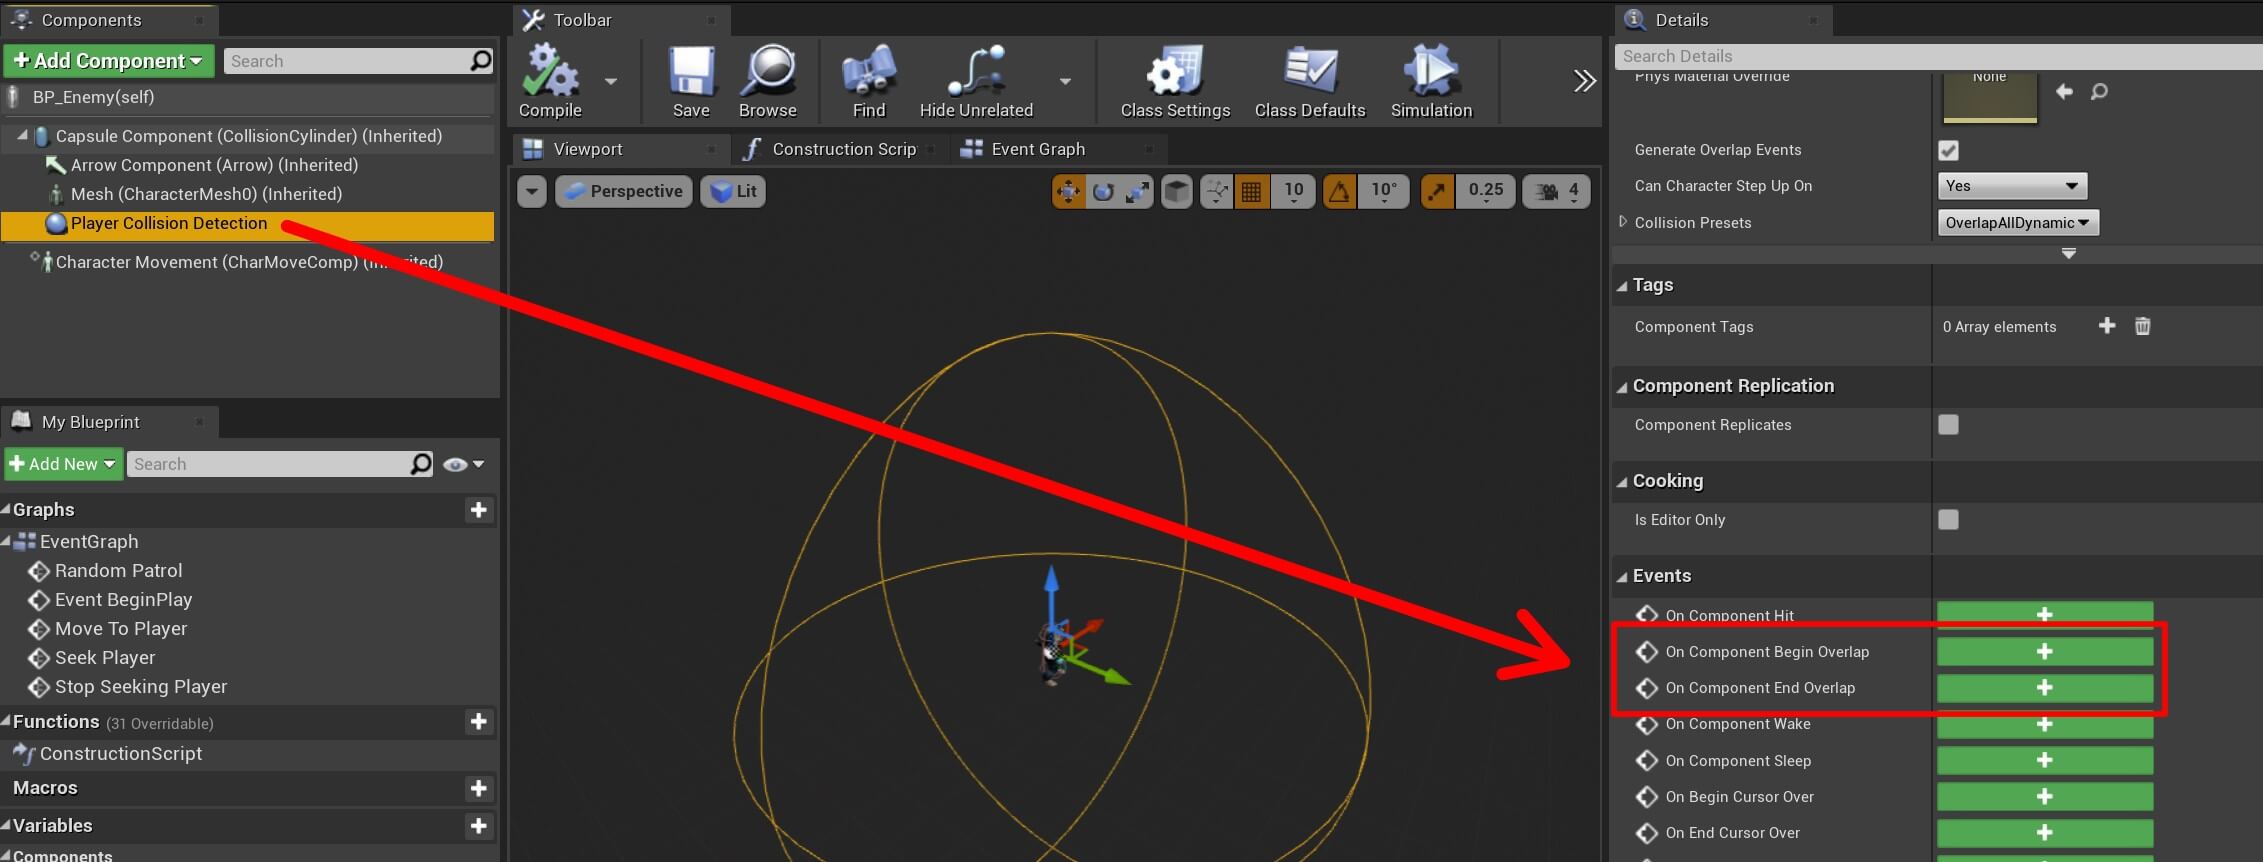
With these two functions we are going to detect when the Player Collision Detection sphere collides with the player actor so that we can chase him, and when the player actor exists the collision so that we can stop chasing him.
But before we do that, we are going to create a custom event and name it Move To Player, which is going to make the enemy move towards the player actor:
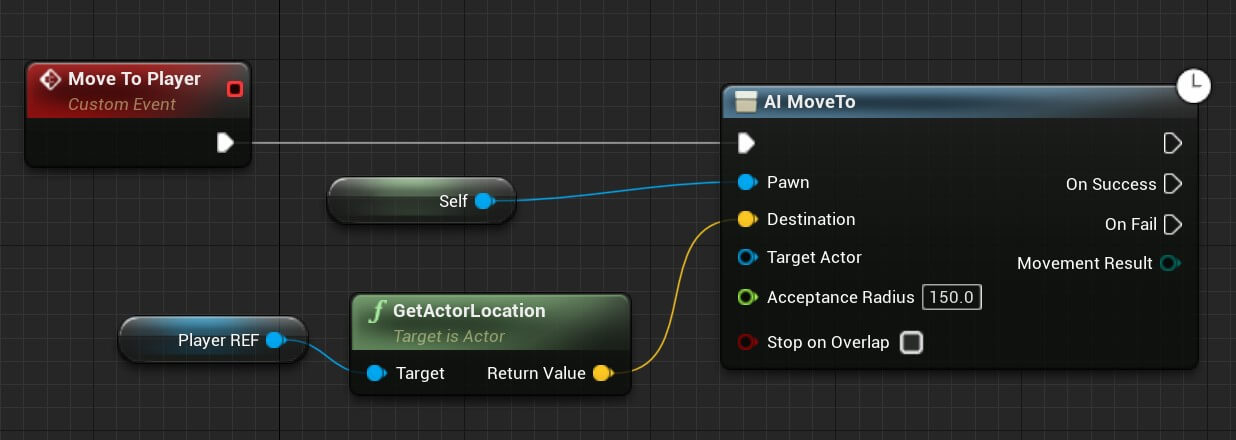
You can copy the nodes from here:
As you can see, we are using the Player REF variable, which is a reference to the player actor in the game, to get the location of the player and make the enemy move towards him.
The Acceptance Radius parameter for the AI MoveTo function is how far from the target will the AI stop moving, in this case we set the value to 150 units.
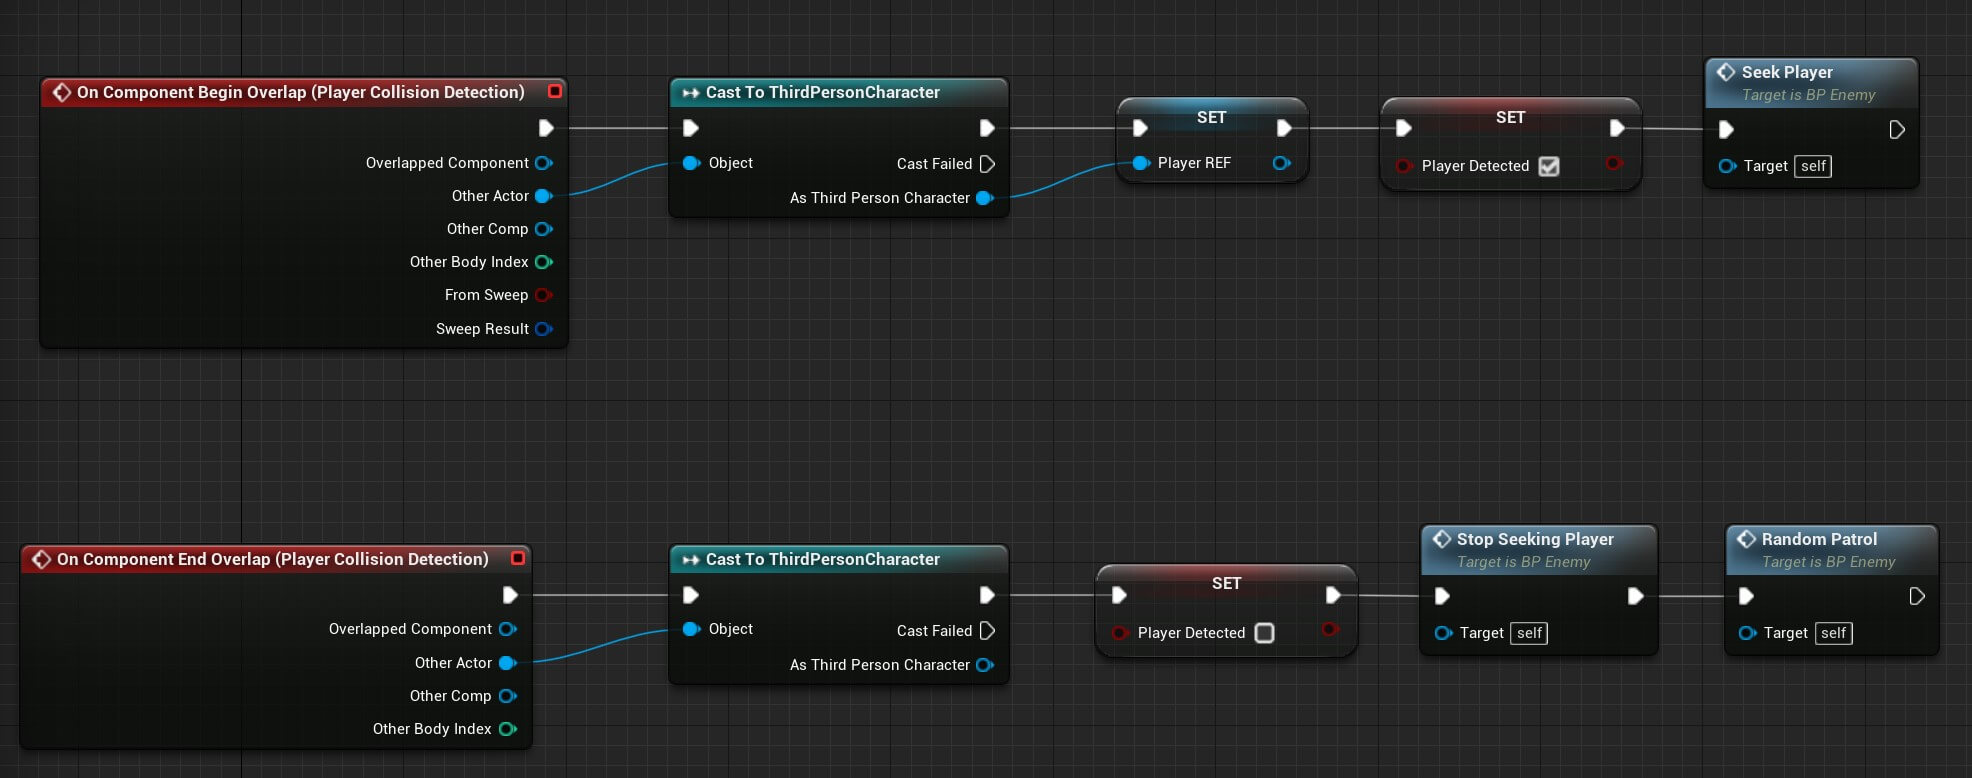
To get a reference to the player actor, we need to detect collision in On Component Begin Overlap that we created:

In OnComponentBeginOverlap we first perform a cast to test if the player actor has collided with the sphere, if that is true, we will get a reference to the player actor and we set the Player Detected bool value to true. We will use this variable to control the enemy AI logic.
And then, we make the enemy go towards the player using the Move To Player custom event node we created.
In OnComponentEndOverlap, when the player actor collides with the sphere, we are going to set the Player Detected value to false, and make the enemy patrol randomly again:

Compile and save the changes and now let’s run the game and test it out:
While the enemy is detecting the player’s presence and going towards his location, we have one big issue, and that is the enemy is not following the player when he moves around, instead it goes towards the first location where the player was when we detected the collision with the player.
We can fix this issue by calling the Move To Player in the Tick event, but this will make a problem when we want to attack the player. Instead there is a better solution to this problem that we are going to implement now.
A Smarter Way To Make The Enemy AI Chase The Player
Since the AI MoveTo function will move the AI to the first position we pass to it, we need a way to test if the target position has changed so that the AI will move towards the changed position.
For that, I am going to create a new custom event, name it Seek player and add the following nodes to it:

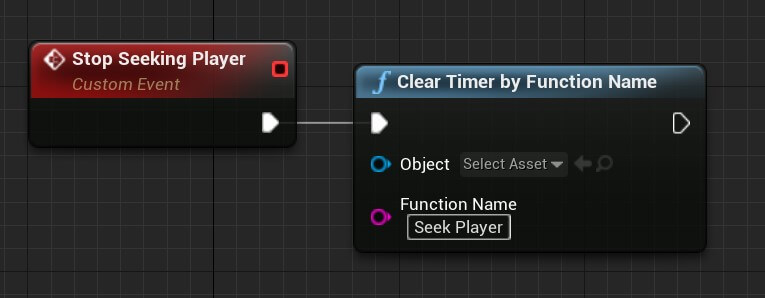
You can copy the nodes from here:
The Clear Timer By Function name will stop the timer from calling the function with the specified name, in our case Seek Player which we provided in the Function Name parameter.
We need to do this because we specified that the Set Timer By Function Name should loop, which means it will run all the time until we stop it by using Clear Timer By Function Name.
Now, we need to edit the Move To Player function:

You can copy the nodes from here:
Compile and save the new changes to the BP_Enemy blueprint and let’s run the game to test it out:
As you can see now, even when the player changes his location the enemy is constantly chasing him.
Enemy AI Attack

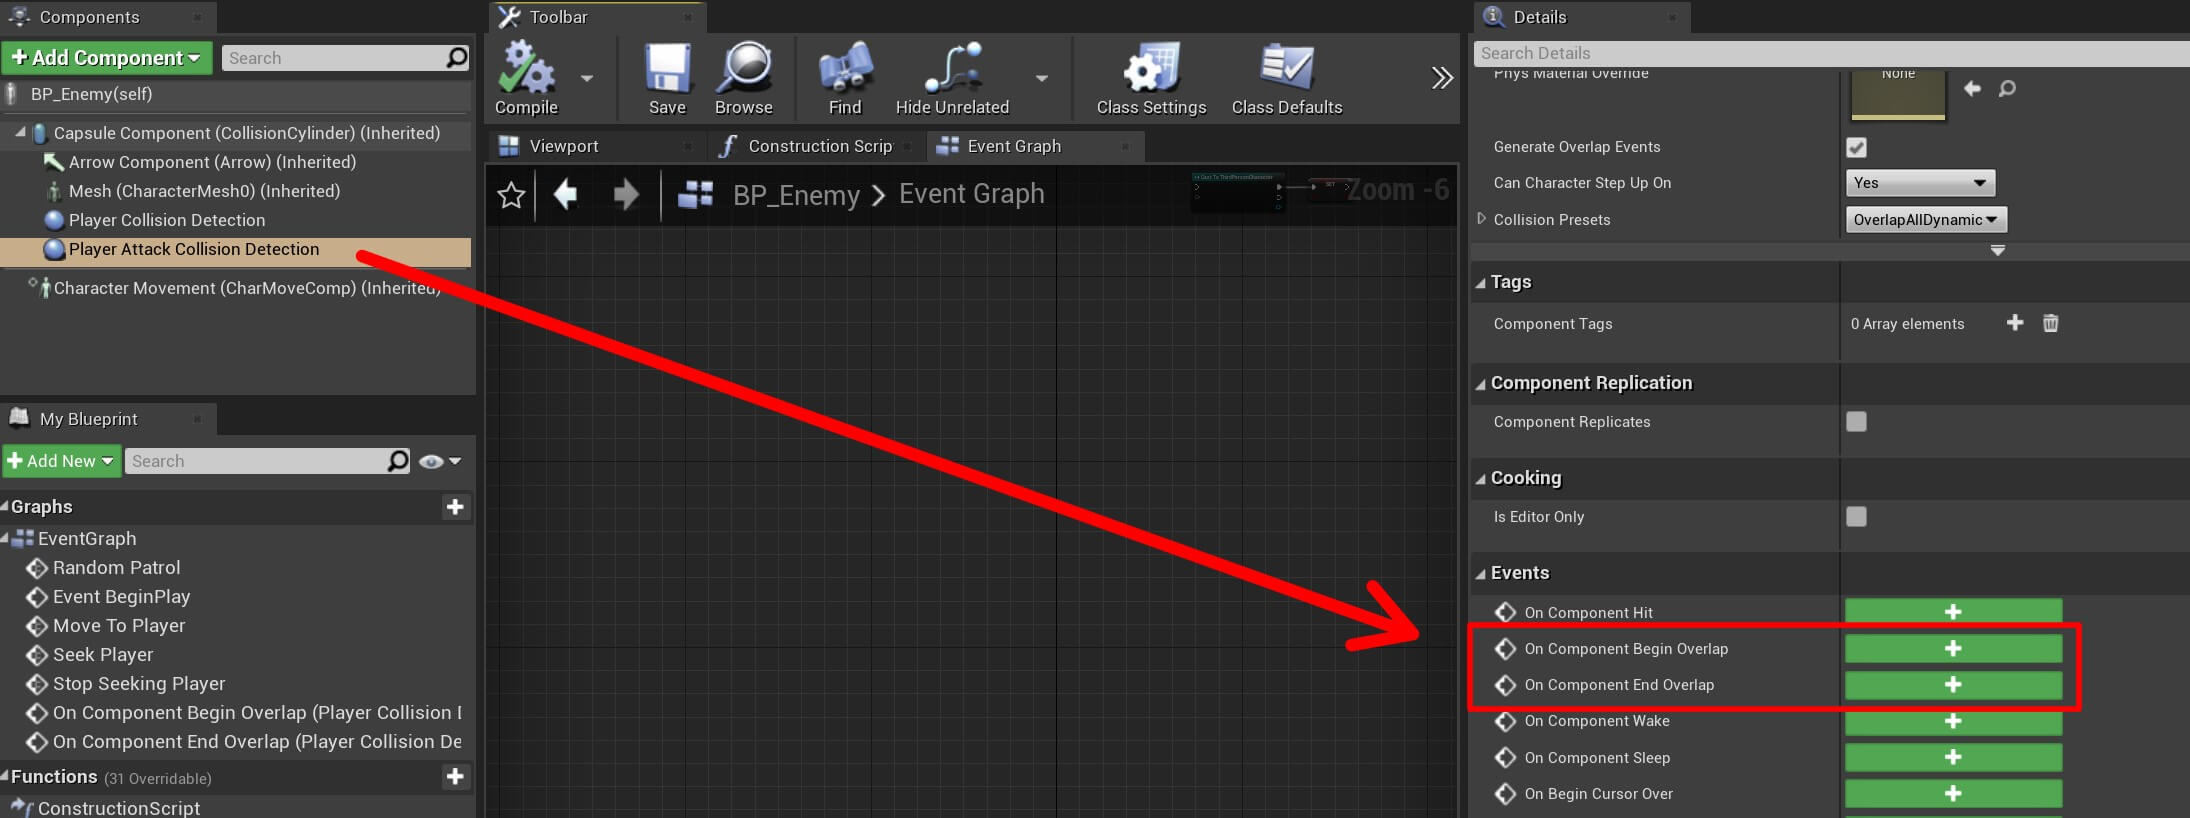
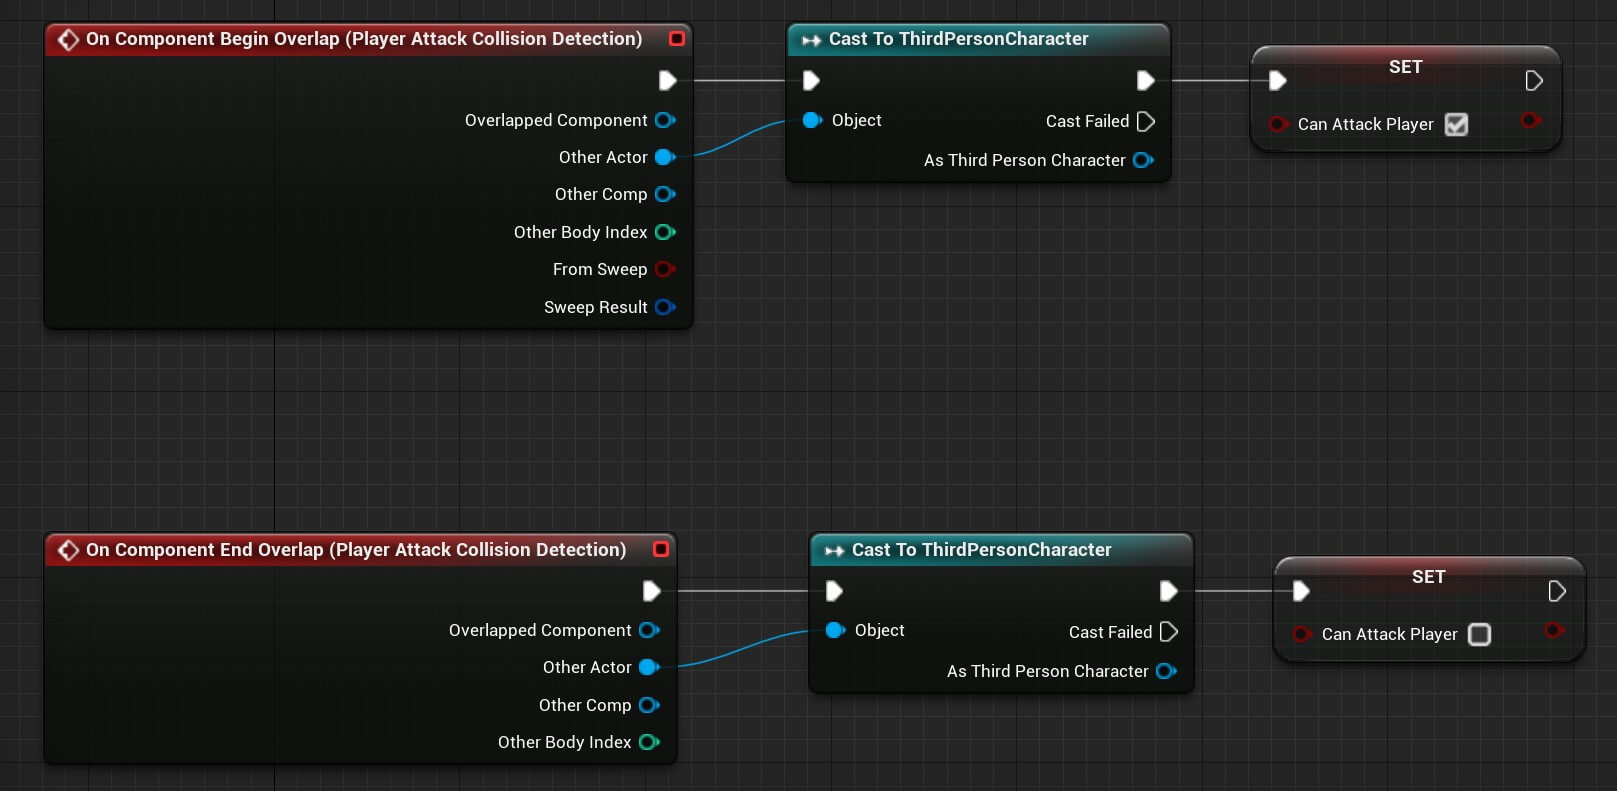
The idea is when we detect player collision with the Player Attack Collision Detection component, we will set the Can Attack Player value to true, and when the player exists that collision we will set the value to false:
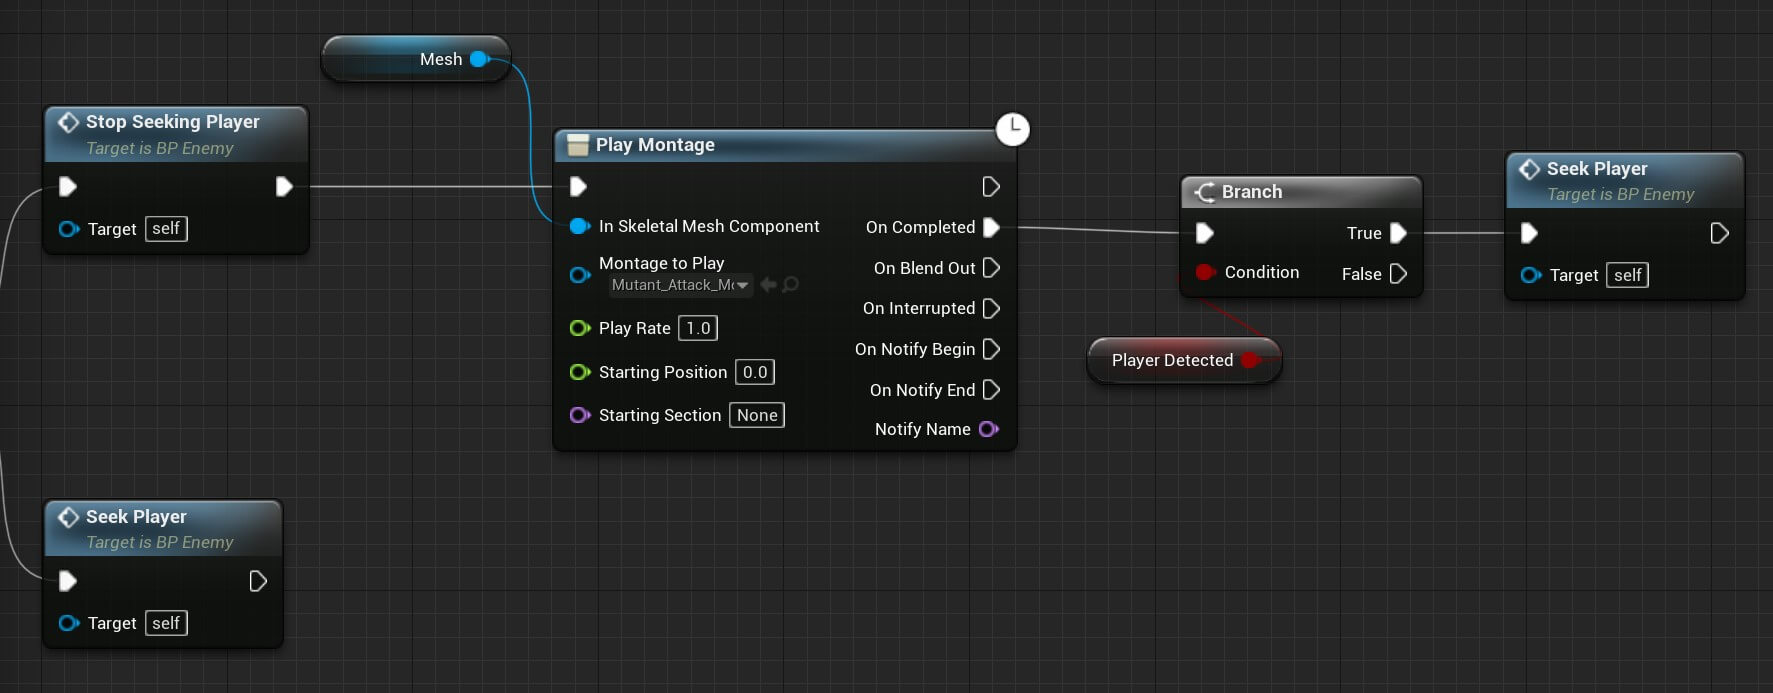
We also need to make changes in the Move To Player node so that the enemy attacks the player when it gets close to him. First we are going to create a new condition when the AI MoveTo finishes:

When the enemy gets to the player’s location we are going to check if the enemy can attack the player, if that is true we will call Stop Seeking Player because now we need to attack him, if the enemy can’t attack the player, then we will call Seek Player again.
To attack the player, we are going to use the montage animation I’ve prepared which is the enemy’s attack animation:
You can copy the nodes from here:
The Play Montage function takes a few parameters that we need to provide. The first one is the Mesh which represents the Skeletal Mesh Component on which the animation will be played.
For that, I provided the Mesh component from the BP_Enemy:
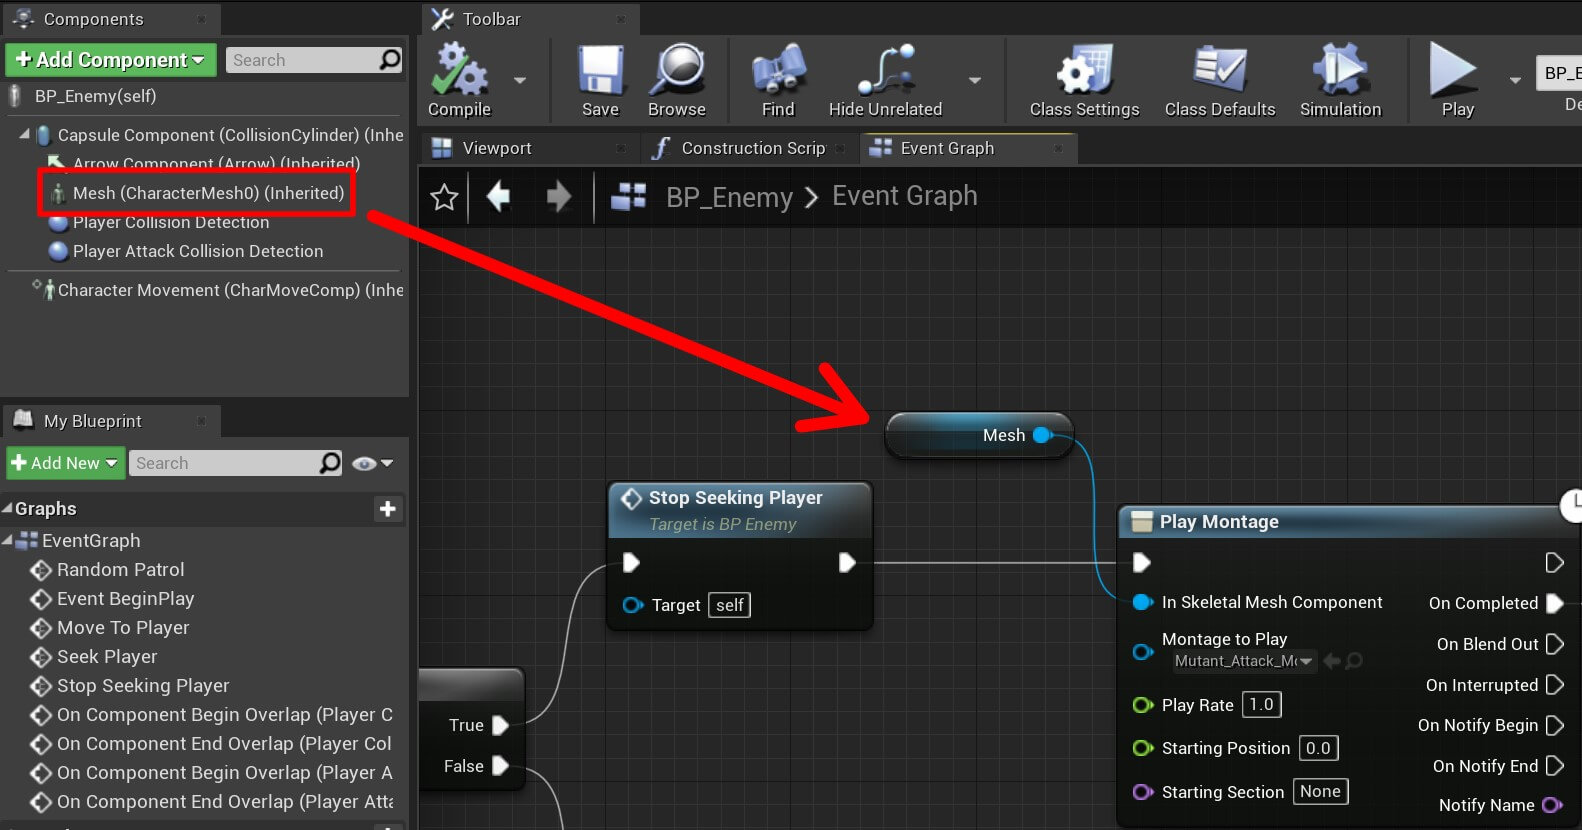
For the Montage To Player click on the drop down list and select the Mutant_Attack_Montage:
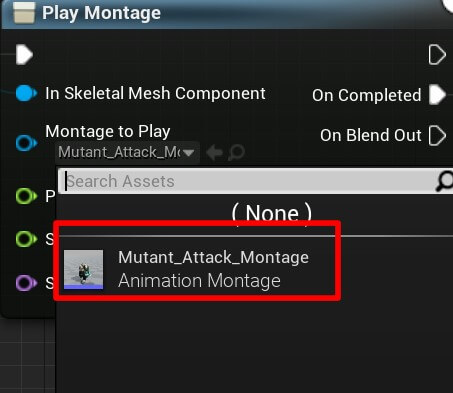
When the montage finishes playing, we test if Player Detected is true, if that is the case we will make the enemy move towards the player by calling Seek Player and that will repeat this same process over again.
Compile and save the changes and let’s run the game to test it out:
Attaching Collision Components To Sockets
Now that we are attacking the player, let us also deal damage. To do this, we need to edit the skeleton of the mutant model. In the Content -> Enemy_Model folder open Mutant_Skeleton in the editor:

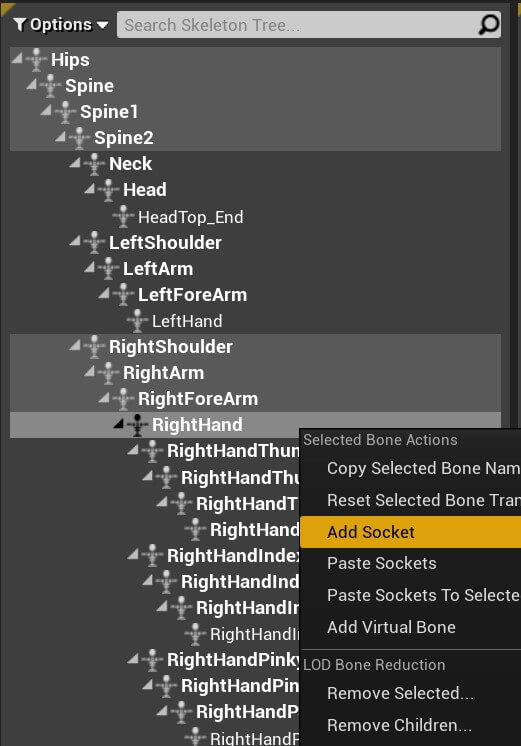
In the options tab on the left side, locate the RightHand in the skeleton hierarchy and Right Click ->Add Socket:
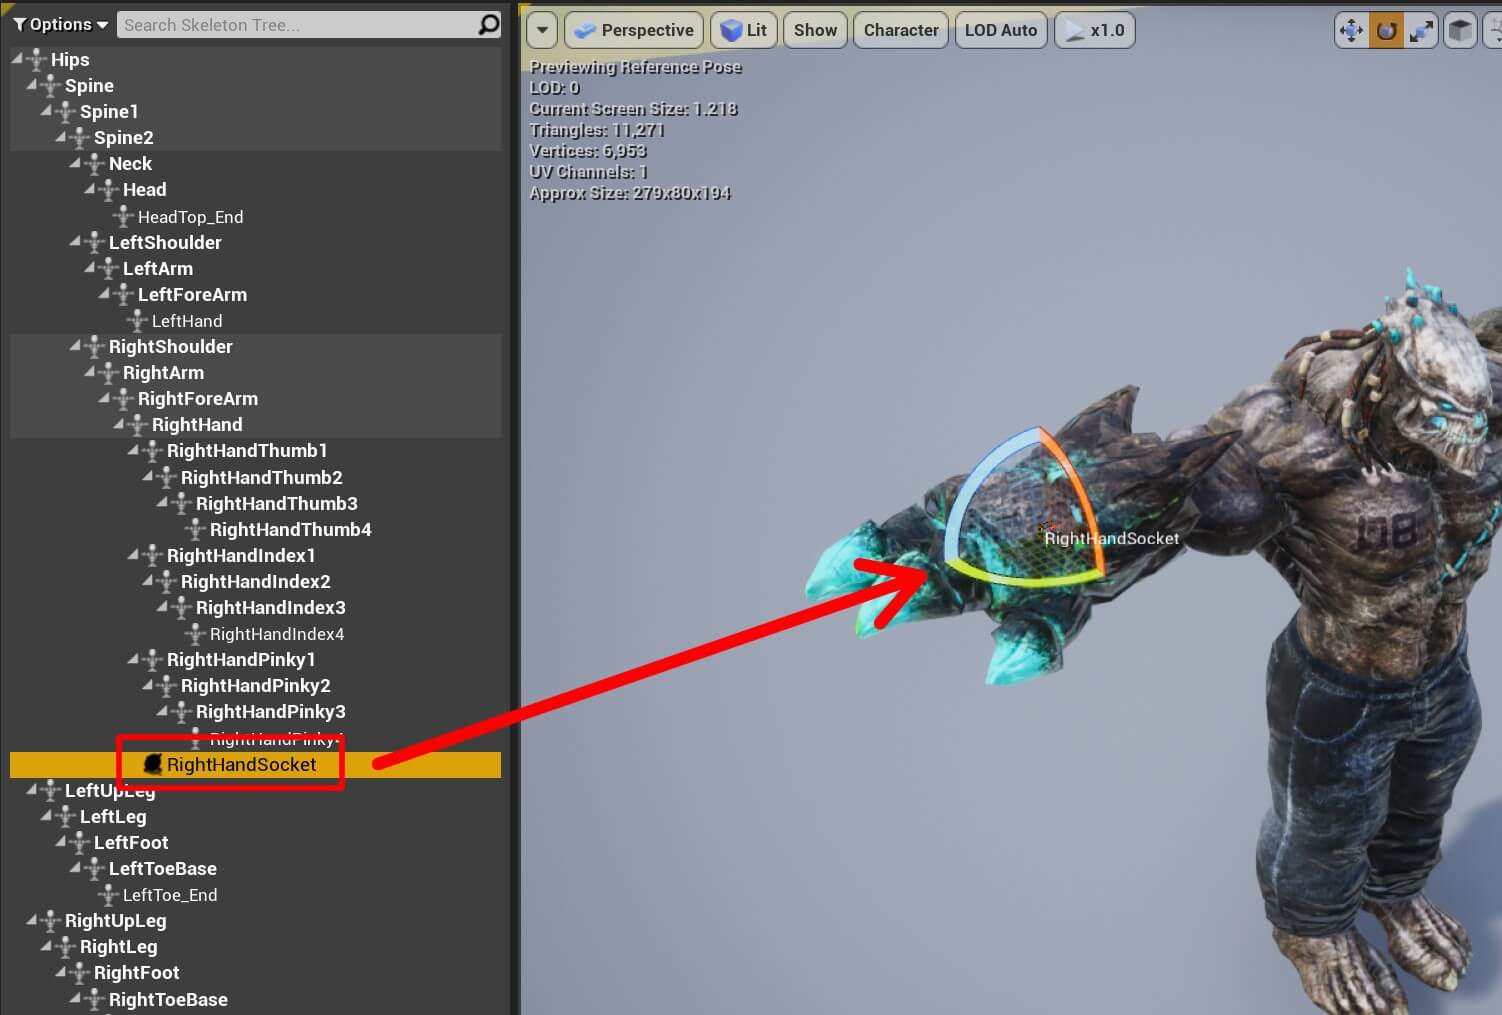
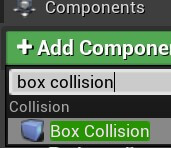
Rename the Box to Damage Collision, and in the Details tab under the Sockets settings for the Parent Socket field click on the little loop icon and search for the RightHandSocket which is the name of the socket we created in the Mutant_Skeleton a few moments ago:
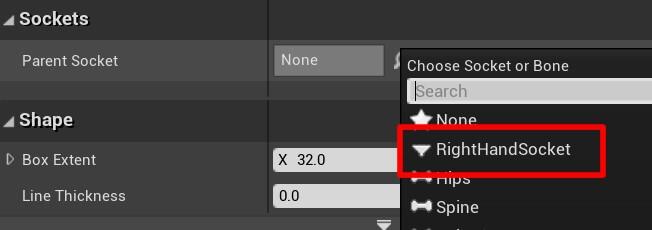
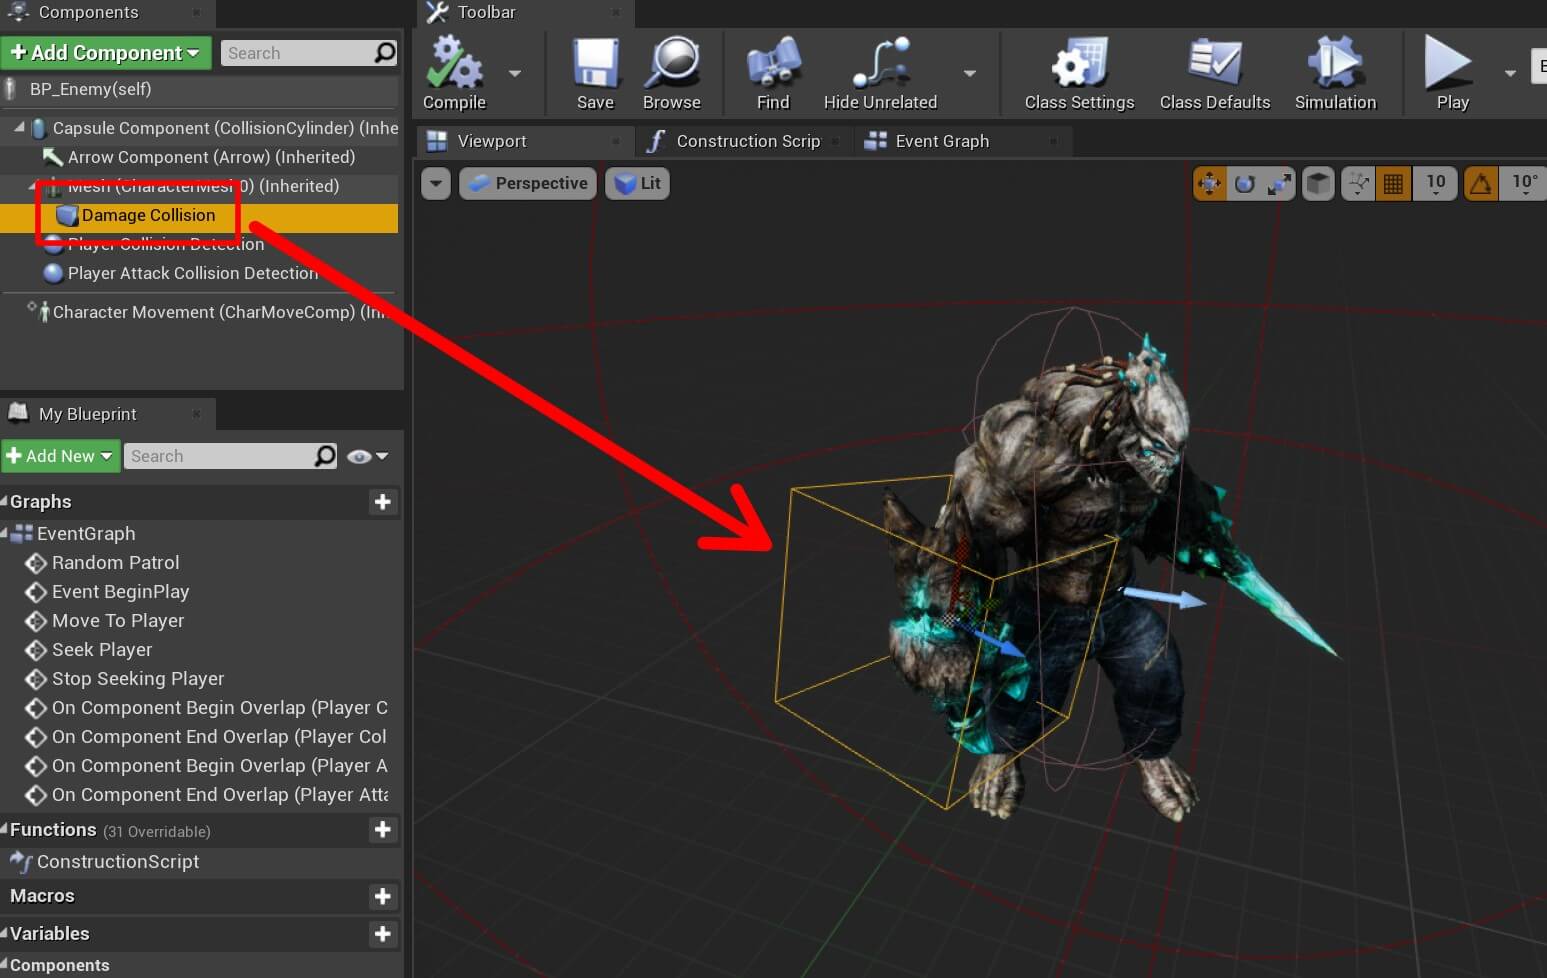
This means that the Damage Collision will move along with the right hand of the mutant model. We do need to reposition and resize the Damage Collision component, so set the following values for the location:

And the following values for the Box Extent axis under the Shape settings:

Now the Damage Collision component looks like this:
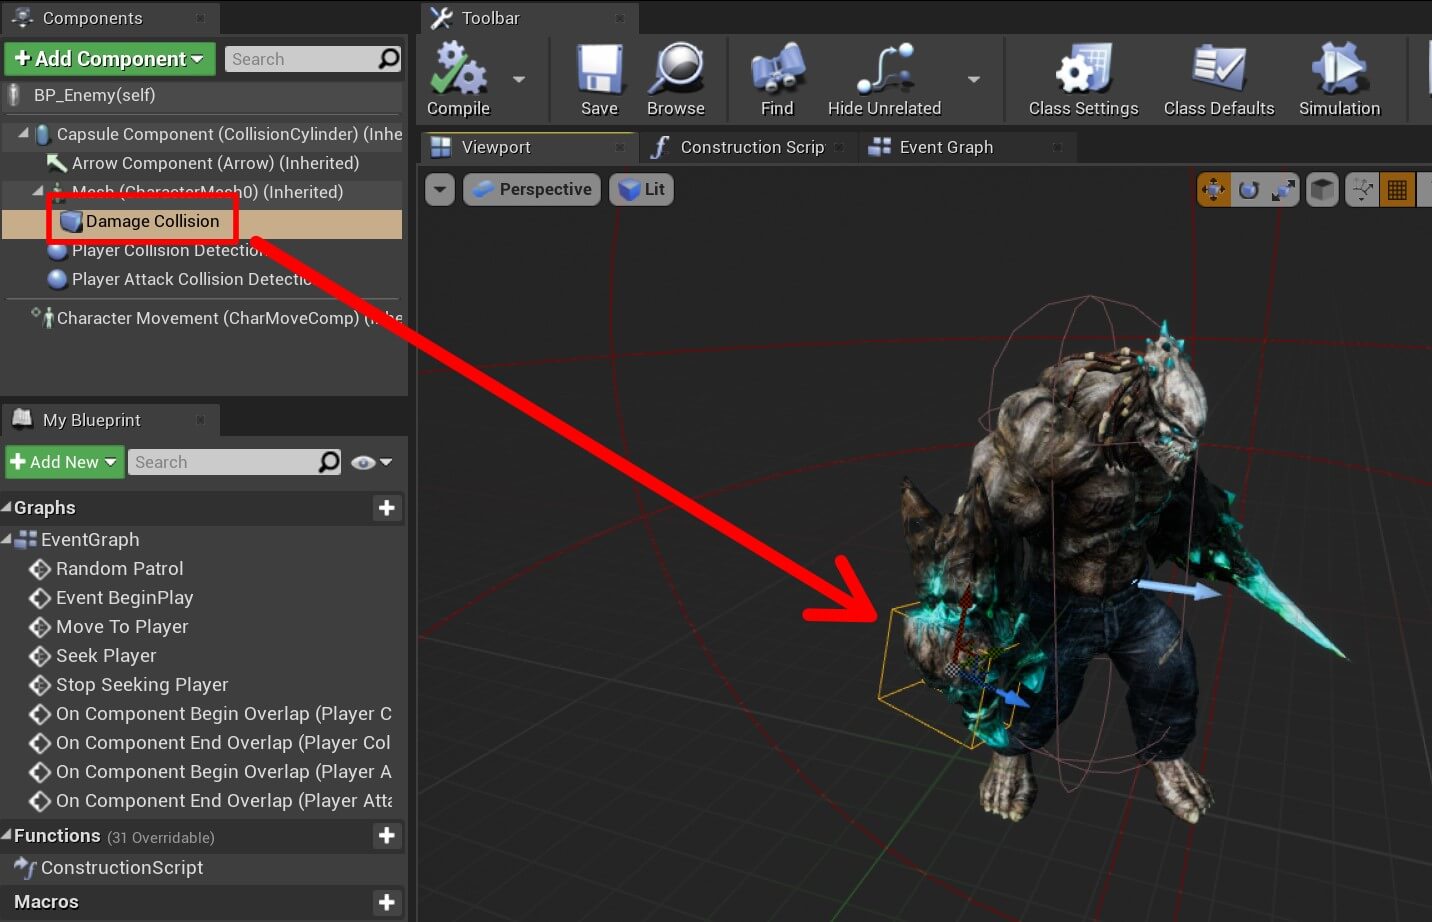
Animation Notification Events
The reason why we went through all of this Box collision and socket set up is because we are going to use the attack montage animation to trigger the damage functionality.
If we open the Mutant_Attack_Montage which is located in Content ->Enemy Model folder, and preview the animation we will see that the mutant is attacking with its right hand:
Since we attached the Damage Collision component to the right hand socket, when the attack animation is played and the mutant moves his right hand, the Damage Collision component will move along with it and we can use that to detect the collision with the player actor and deal damage.
To do that we need to add animation notifiers that will notify us when the animation is at a certain frame.
We can do that by dragging the animation preview slider at the desired frame in the animation timeline:
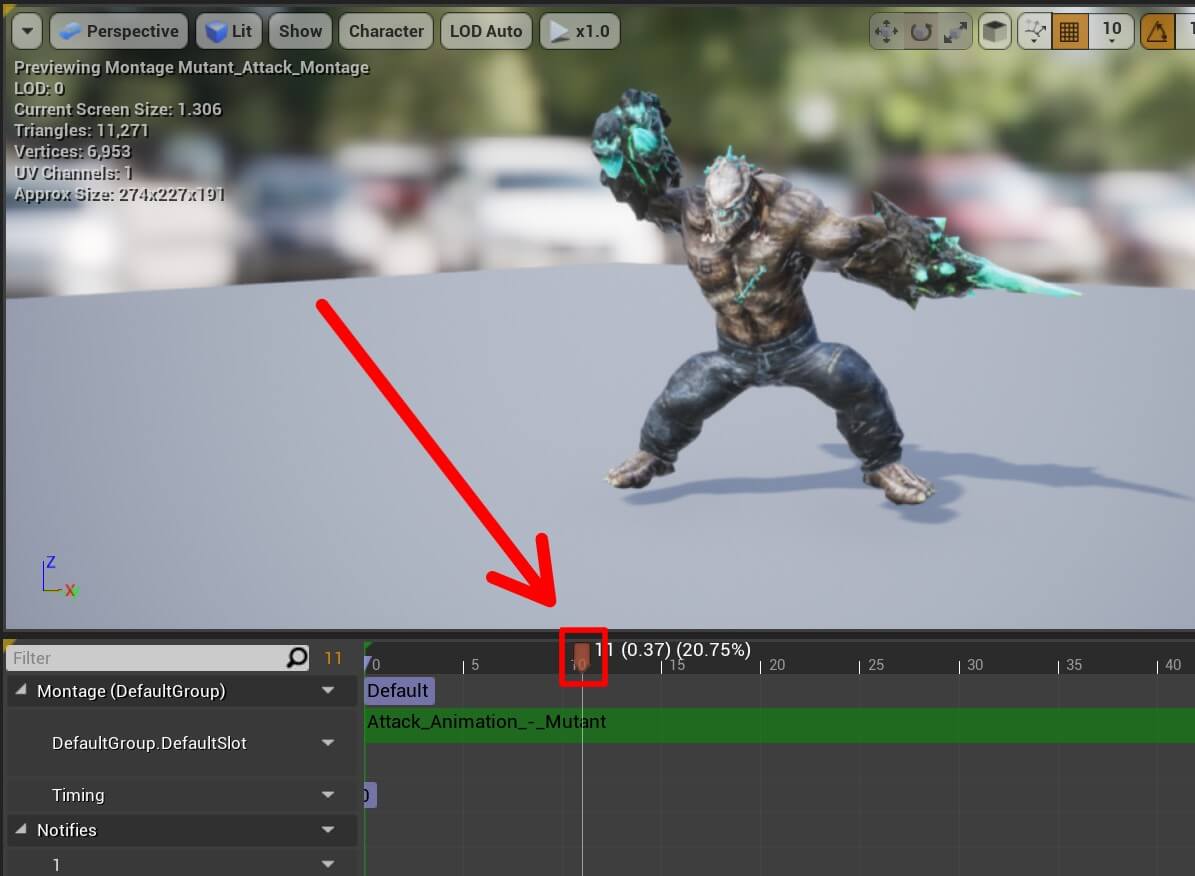
Or we can set the exact frame we want on the right side of the Filter search bar in the animation timeline:
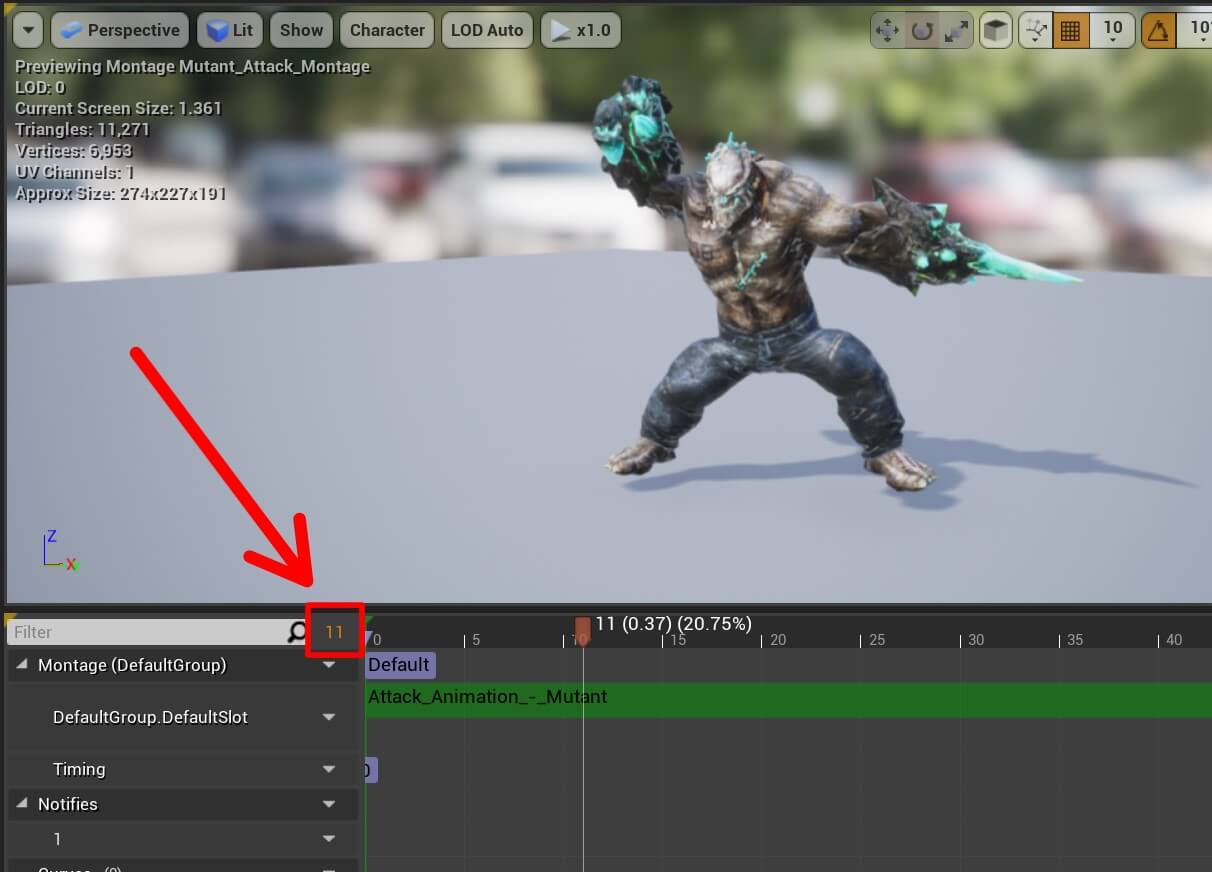
When we are done with that, on the Notifies timeline, Right Click -> Add Notify -> New Notify and name the new notify Attack Started:
We created a new animation notify, or notification, on frame 11, which means when we play the attack animation and when the animation reaches frame 11, the Attack Started notify will be called, and we will be notified in the code when that happens.
We also need to create another notification that will inform us that the animation has ended. Go on frame 30, and create a new notify and name it Attack Ended.
After you finish, you will see two animation notifications in the attack animation timeline:

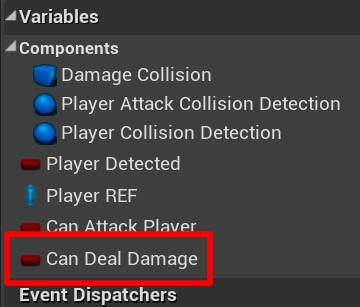
Before we access the notification events in the blueprint editor, we need to go inside the BP_Enemy editor, and under variables create a new boolean variable and name it Can Deal Damage:
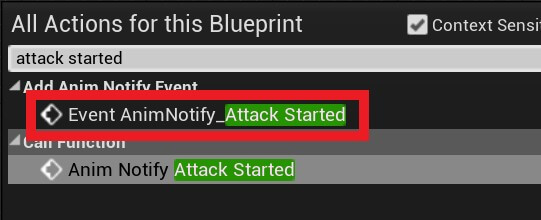
Now open the BP_Enemy_Animation blueprint located in Content -> Enemy_Model folder. In the Event Graph tab, Right Click and search for attack started:
In the same way search for the attack ended anim notify node. We already have a reference to the BP_Enemy in the BP_Enemy_Animation blueprint, so we can use that variable to access the Can Deal Damage bool to change its value when the attack has started and when the attack ends:
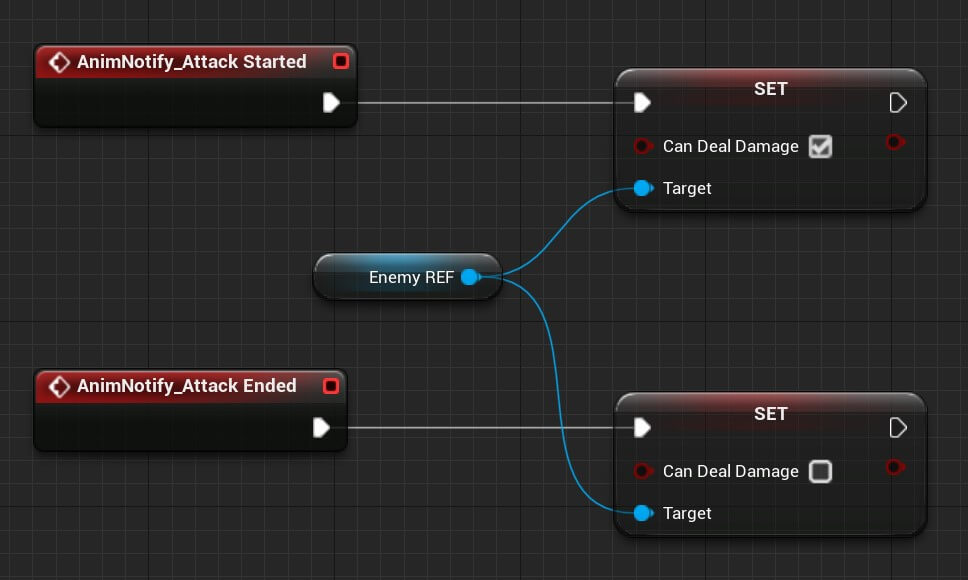
You can copy the nodes from here:
Going back to BP_Enemy blueprint, select the Damage Collision component and in the Details tab under Events, click on the green + button for the On Component Begin Overlap:
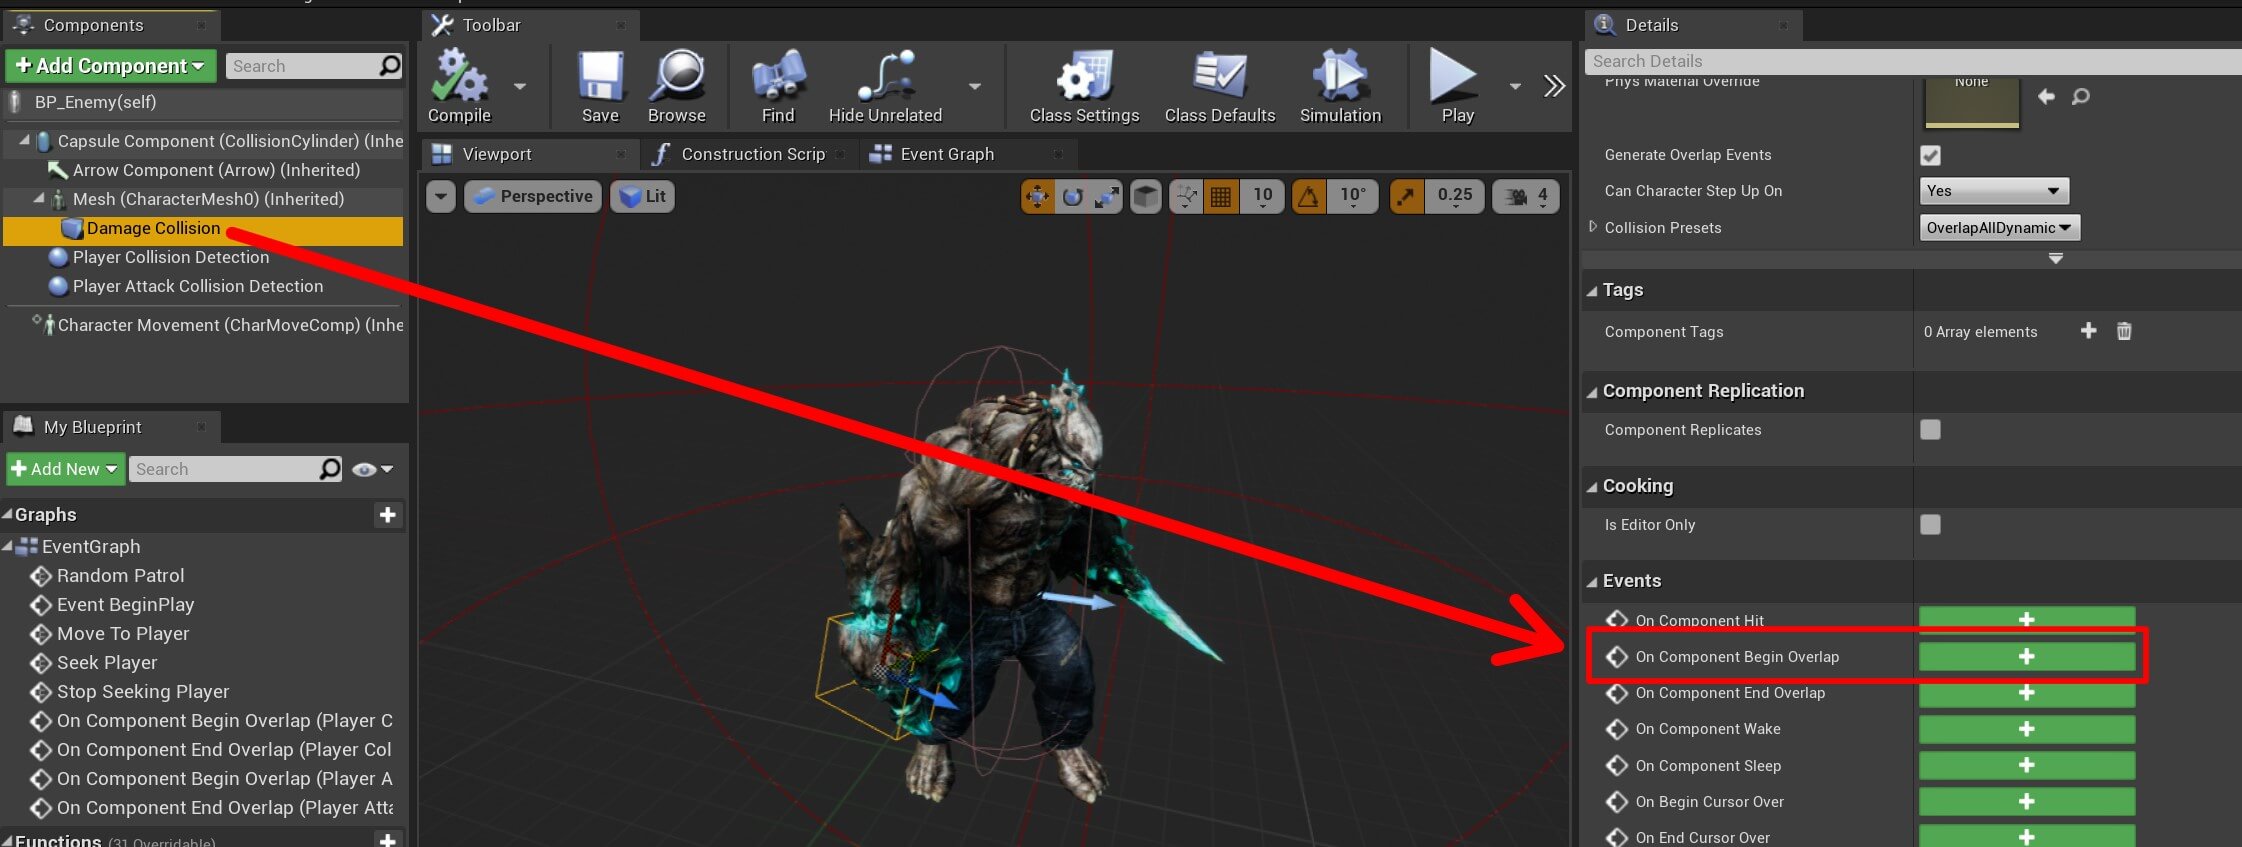
In the Event Graph tab, for the On Component Begin Overlap of the Damage Collision component, add the following nodes:

You can copy the nodes from here:
When the Damage Collision component detects the collision with the player actor, we are going to check if we can deal damage to the player, if that is true, we will deal damage, or in our case print something to the console hehehe 🙂
Compile and save the changes we made and let’s run the game to test it out:
Every time the enemy attacked the player and the collision was detected, we saw Player Damaged printed in the top left corner of the game window.
Of course, in your game, you would add logic where the player will have a health value and that health value will be decreased when the enemy attacks him, but this is the basic logic that goes behind that.
Enemy AI C++ Version
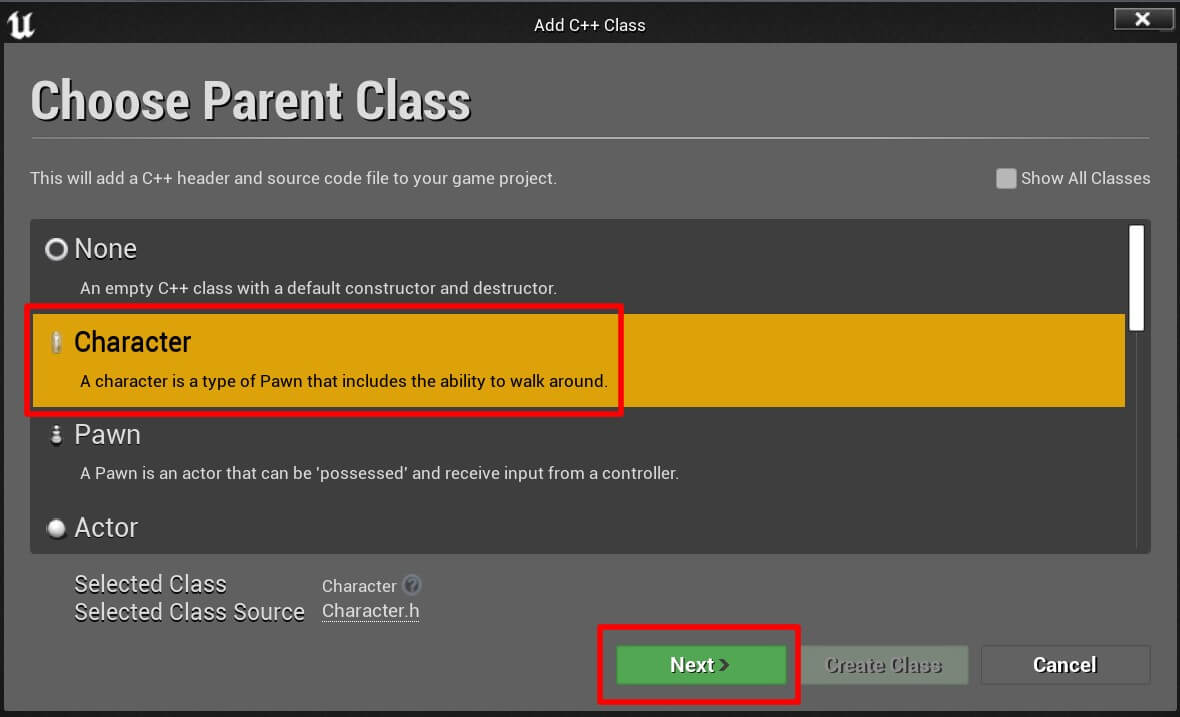
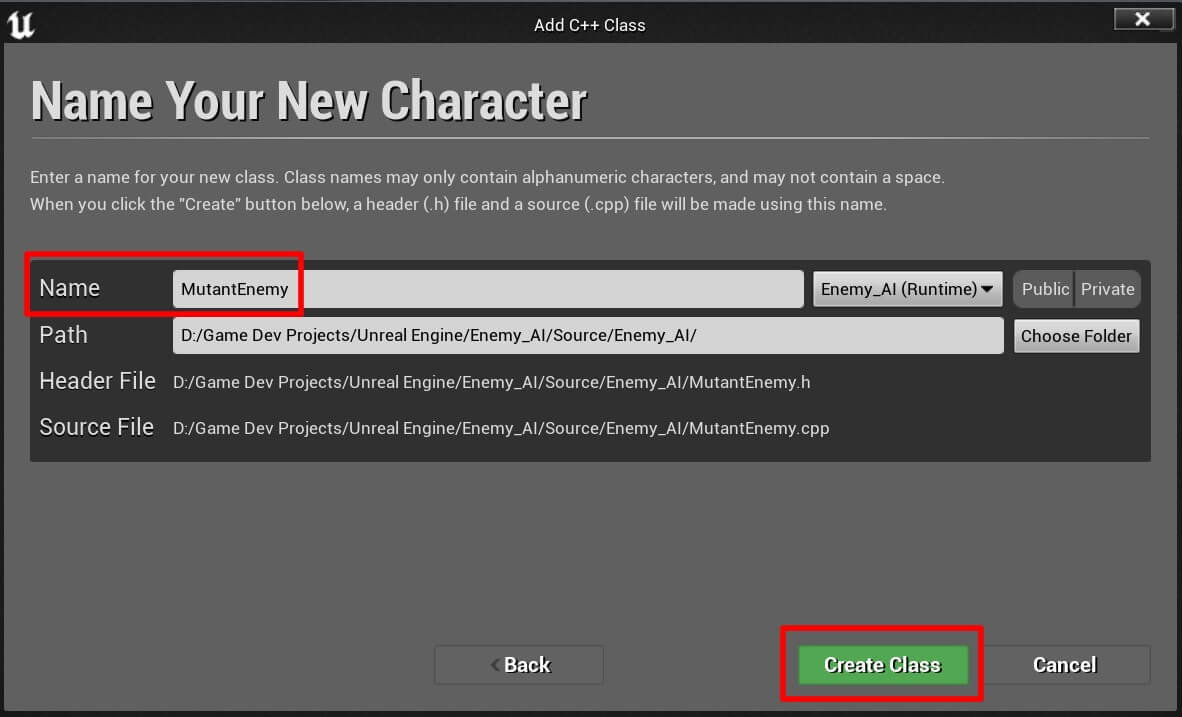
Now we are going to take a look at the C++ version of the enemy AI that we created. First, in Content -> C++ Classes -> Enemy_AI folder, Right Click -> New C++ Class. Make sure that the class inherits from the Character then click Next:
					public:

	bool PlayerDetected;
	bool CanAttackPlayer;

	UPROPERTY(BlueprintReadWrite)
		bool CanDealDamage;

	class AEnemy_AICharacter* PlayerREF;

	UPROPERTY(EditAnywhere)
		class USphereComponent* PlayerCollisionDetection;

	UPROPERTY(EditAnywhere)
		class USphereComponent* PlayerAttackCollisionDetection;

	UPROPERTY(EditAnywhere)
		class UBoxComponent* DamageCollision;
These are all the variables that we will need to create the enemy AI logic. And if you take a look at the variable names you will notice that these are the same variables as the ones we used in the BP_Enemy blueprint.
For the CanDealDamage bool variable we added BlueprintReadWrite as the parameter in the UPROPERTY because we need to access that variable in the BP_Enemy_Animation and with the help of animation notifiers set it to true or false depending on the state of the attack animation.
The AEnemy_AICharacter declared on line 9 is actually the class used to create the ThirdPersonCharacter blueprint that you can find in Content -> ThirdPersonCPP -> Blueprints, which is the player actor we use in the game.
I am addressing this just to avoid confusion, if there is any, because the class name has enemy AI in it, and I didn’t want to create a new class just to give it another name and still use it for the same purpose with the same code.
One thing that you will notice on lines 9, 12, 15, and 18, is that we are using forward declaration to declare the variables that we need. If you are not familiar with the concept of forward declaration, you can read about it by clicking here.
Now open the MutantEnemy.cpp file, and first at the top, above the class declaration add the imports we need to use the variables we declared in the .h file:
					#include "Enemy_AICharacter.h"
#include "Components/SphereComponent.h"
#include "Components/BoxComponent.h"
If you don’t know which includes to use for specific variables, you can take a look at my guide on that topic by clicking here.
In the constructor of the mutant class we are going to create these components and attach them to the root component:
					AMutantEnemy::AMutantEnemy()
{
 	// Set this character to call Tick() every frame.  You can turn this off to improve performance if you don't need it.
	PrimaryActorTick.bCanEverTick = true;

	PlayerCollisionDetection =
		CreateDefaultSubobject<USphereComponent>(TEXT("Player Collision Detection"));

	PlayerCollisionDetection->SetupAttachment(RootComponent);

	PlayerAttackCollisionDetection =
		CreateDefaultSubobject<USphereComponent>(TEXT("Player Attack Collision Detection"));

	PlayerAttackCollisionDetection->SetupAttachment(RootComponent);

	DamageCollision = CreateDefaultSubobject<UBoxComponent>(TEXT("Damage Collision"));
	DamageCollision->SetupAttachment(GetMesh(), TEXT("RightHandSocket"));
}
The code above is straight forward as we are just creating the components from code, but one specific thing that I will mention is on line 17 where we are attaching the DamageCollision variable to the mesh, we also need to specify the socket name where we want to attach the DamageCollision, same as what we did inside the BP_Enemy blueprint.
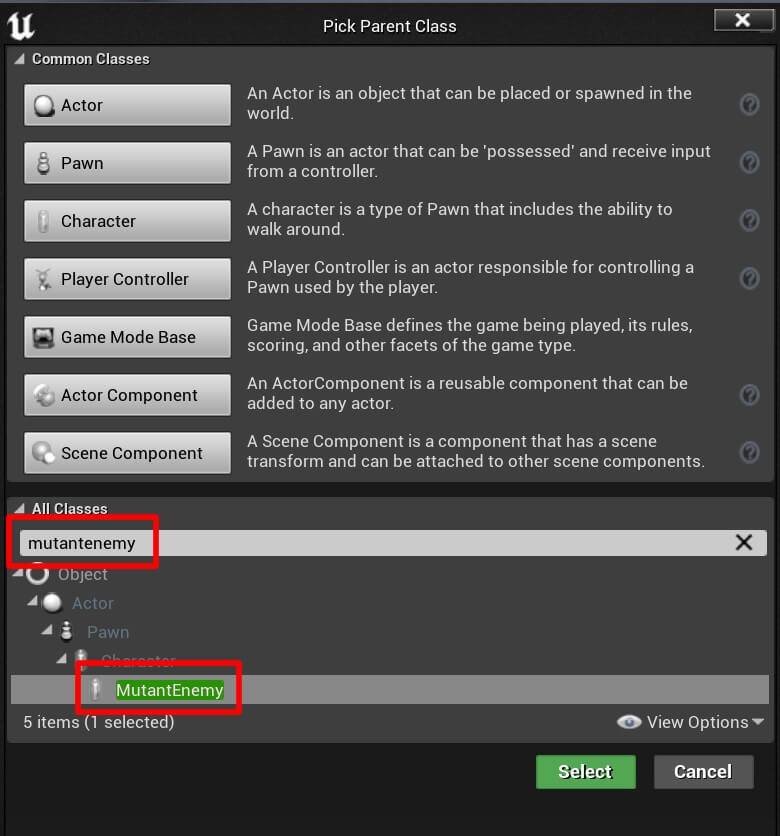
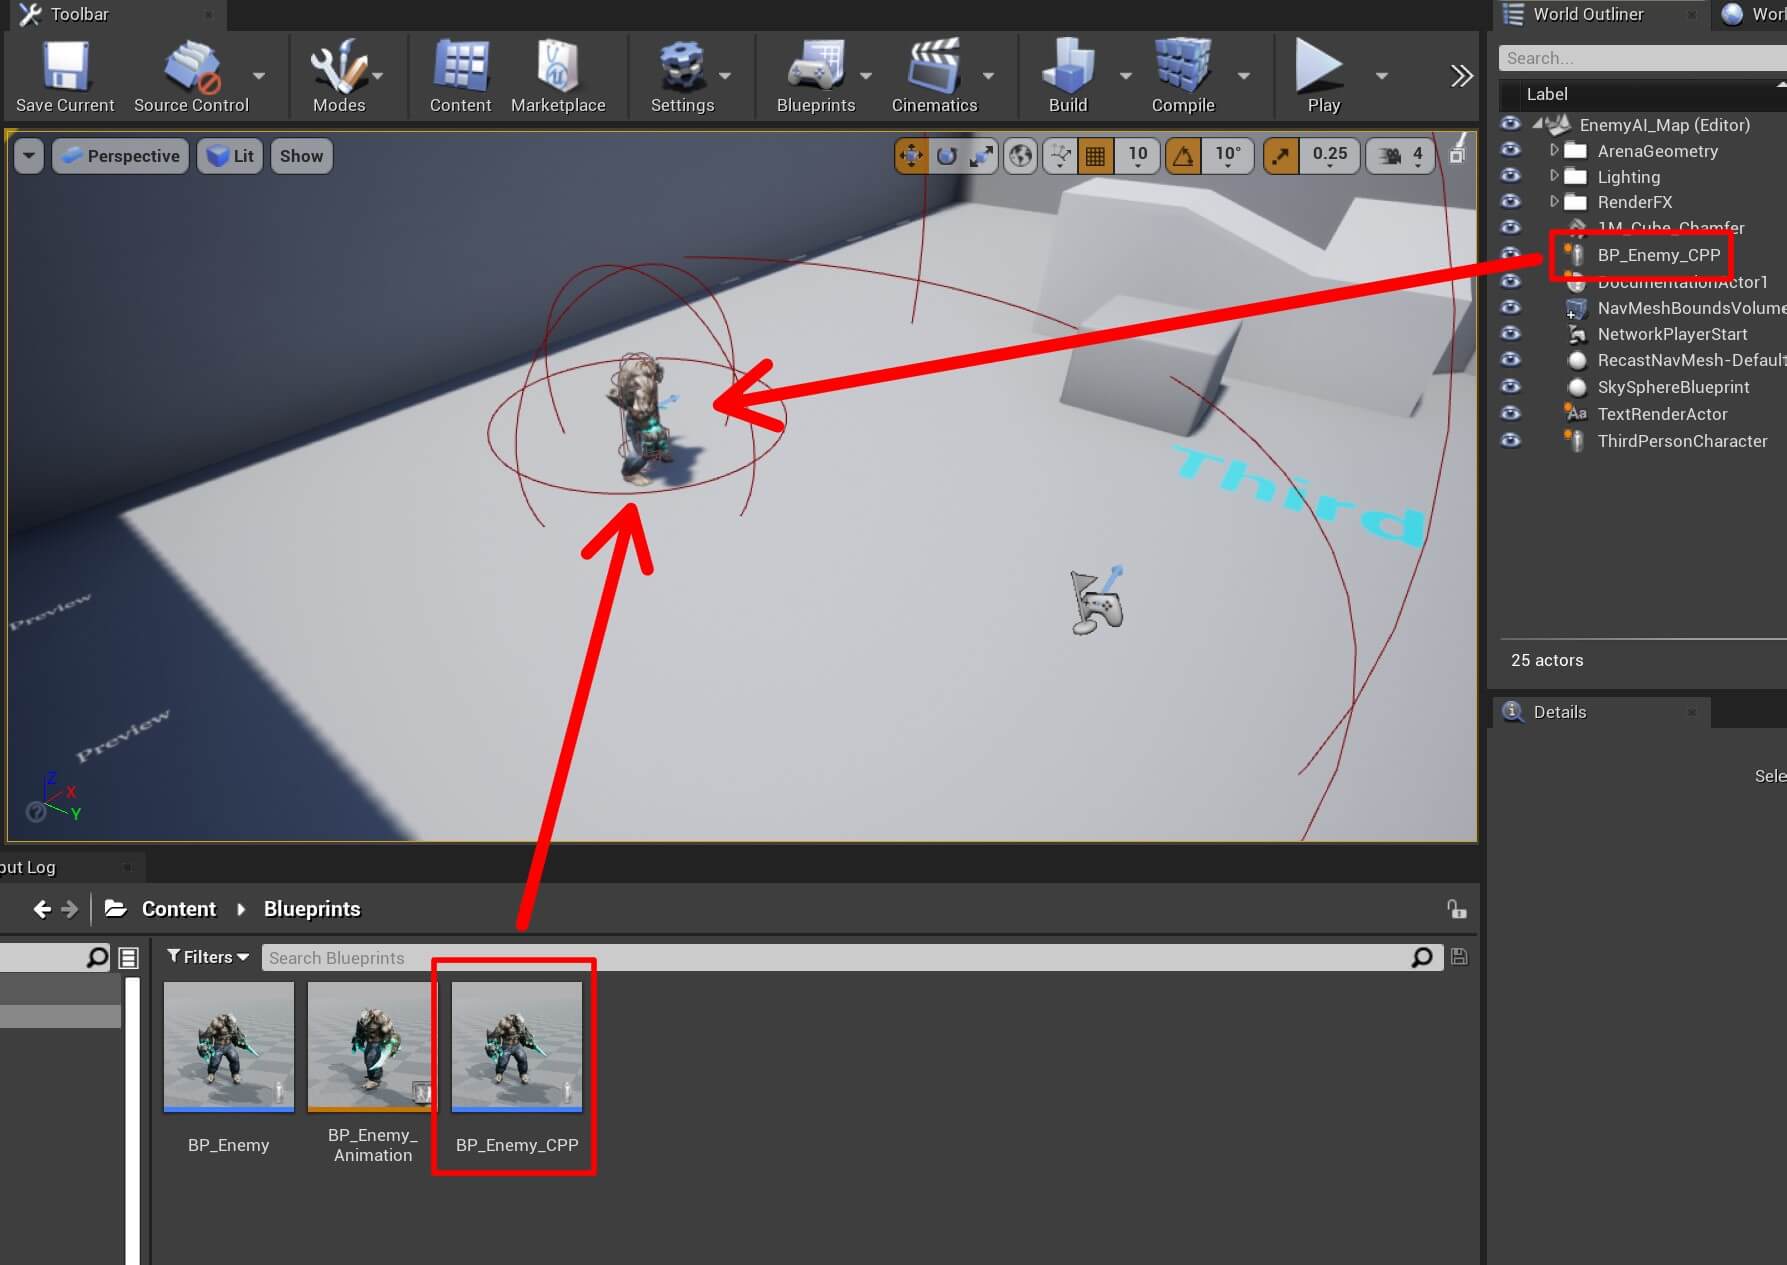
Now we can create a blueprint out of the mutant enemy class, so go inside the Content -> Blueprints, Right Click -> Blueprint Class and for the All Classes, click on the drop down list and filter for mutantenemy:
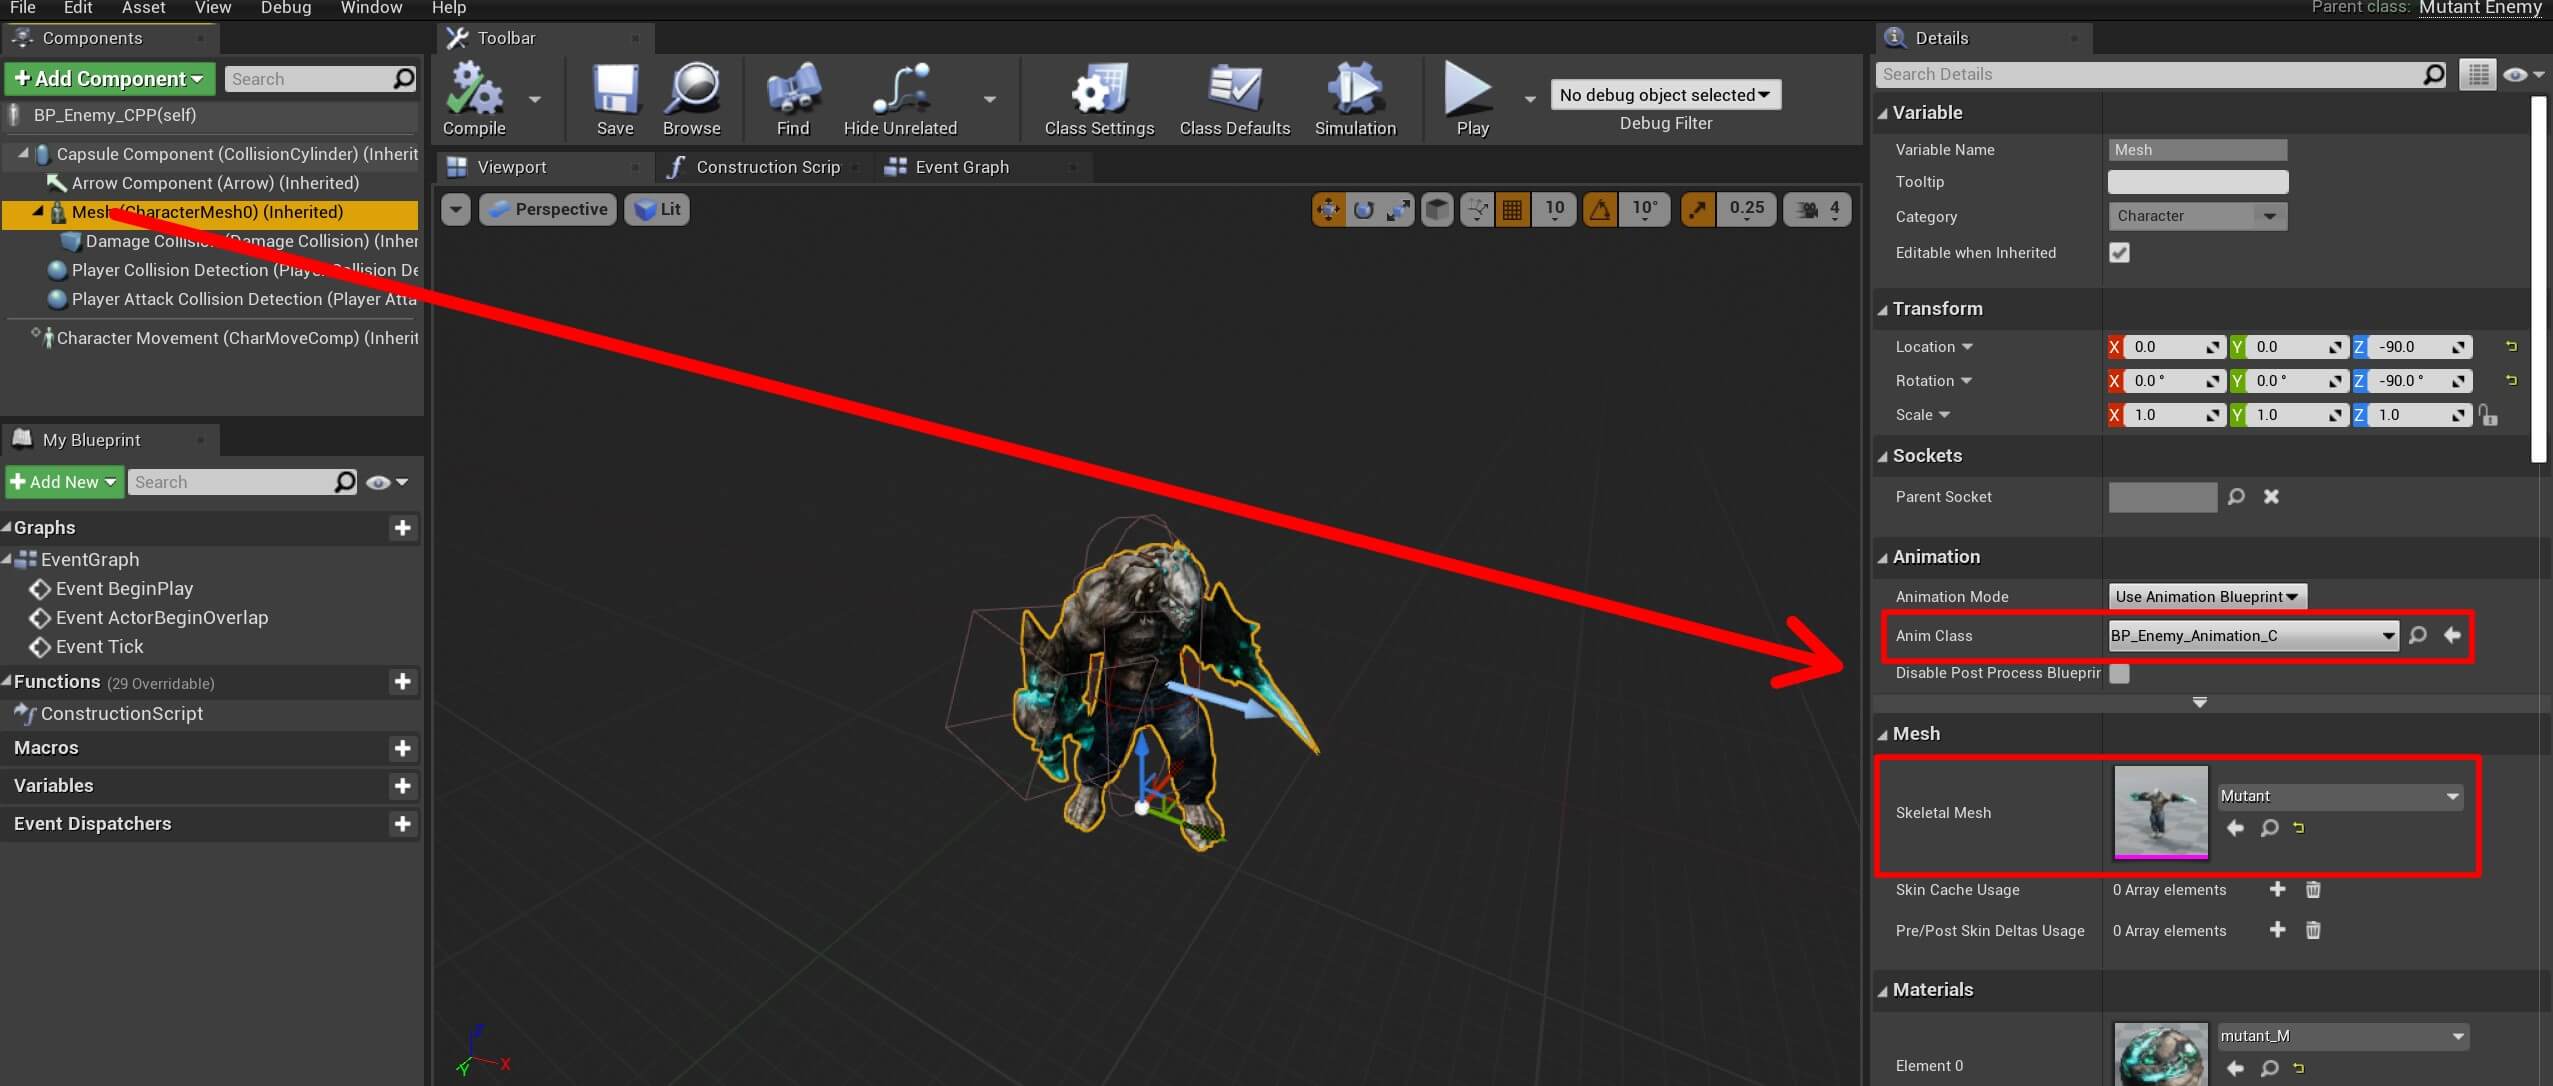
Name the new blueprint BP_Enemy_CPP and open it in the editor. First, select the Mesh component in the Components tab and in the Details tab for the Mesh settings select the Mutant model, and for the Animation settings select the BP_Enemy_Animation_C blueprint:
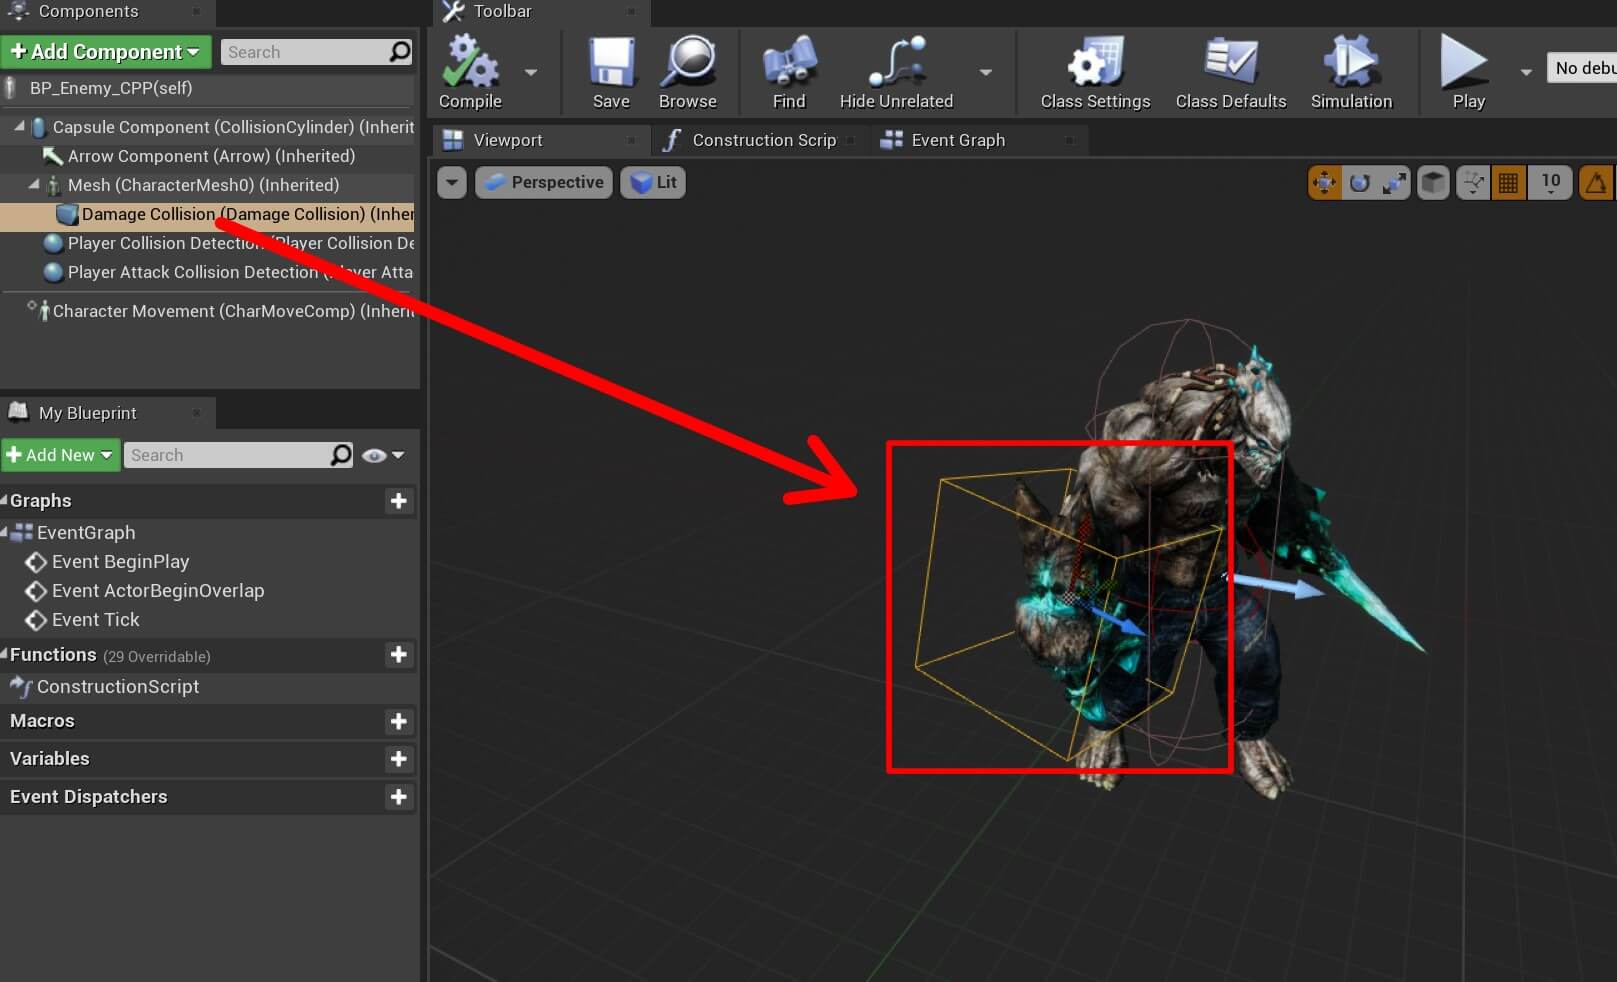
As soon as you select the Mutant model for the Mesh component, you will notice how the Damage Collision component is attached to the right hand of the Mutant enemy:
We also need to resize the Damage Collision same way we did in the BP_Enemy blueprint:

And we need to change the Location X value as well:

The last step is to resize the Radius for the Player Collision Detection to 800:
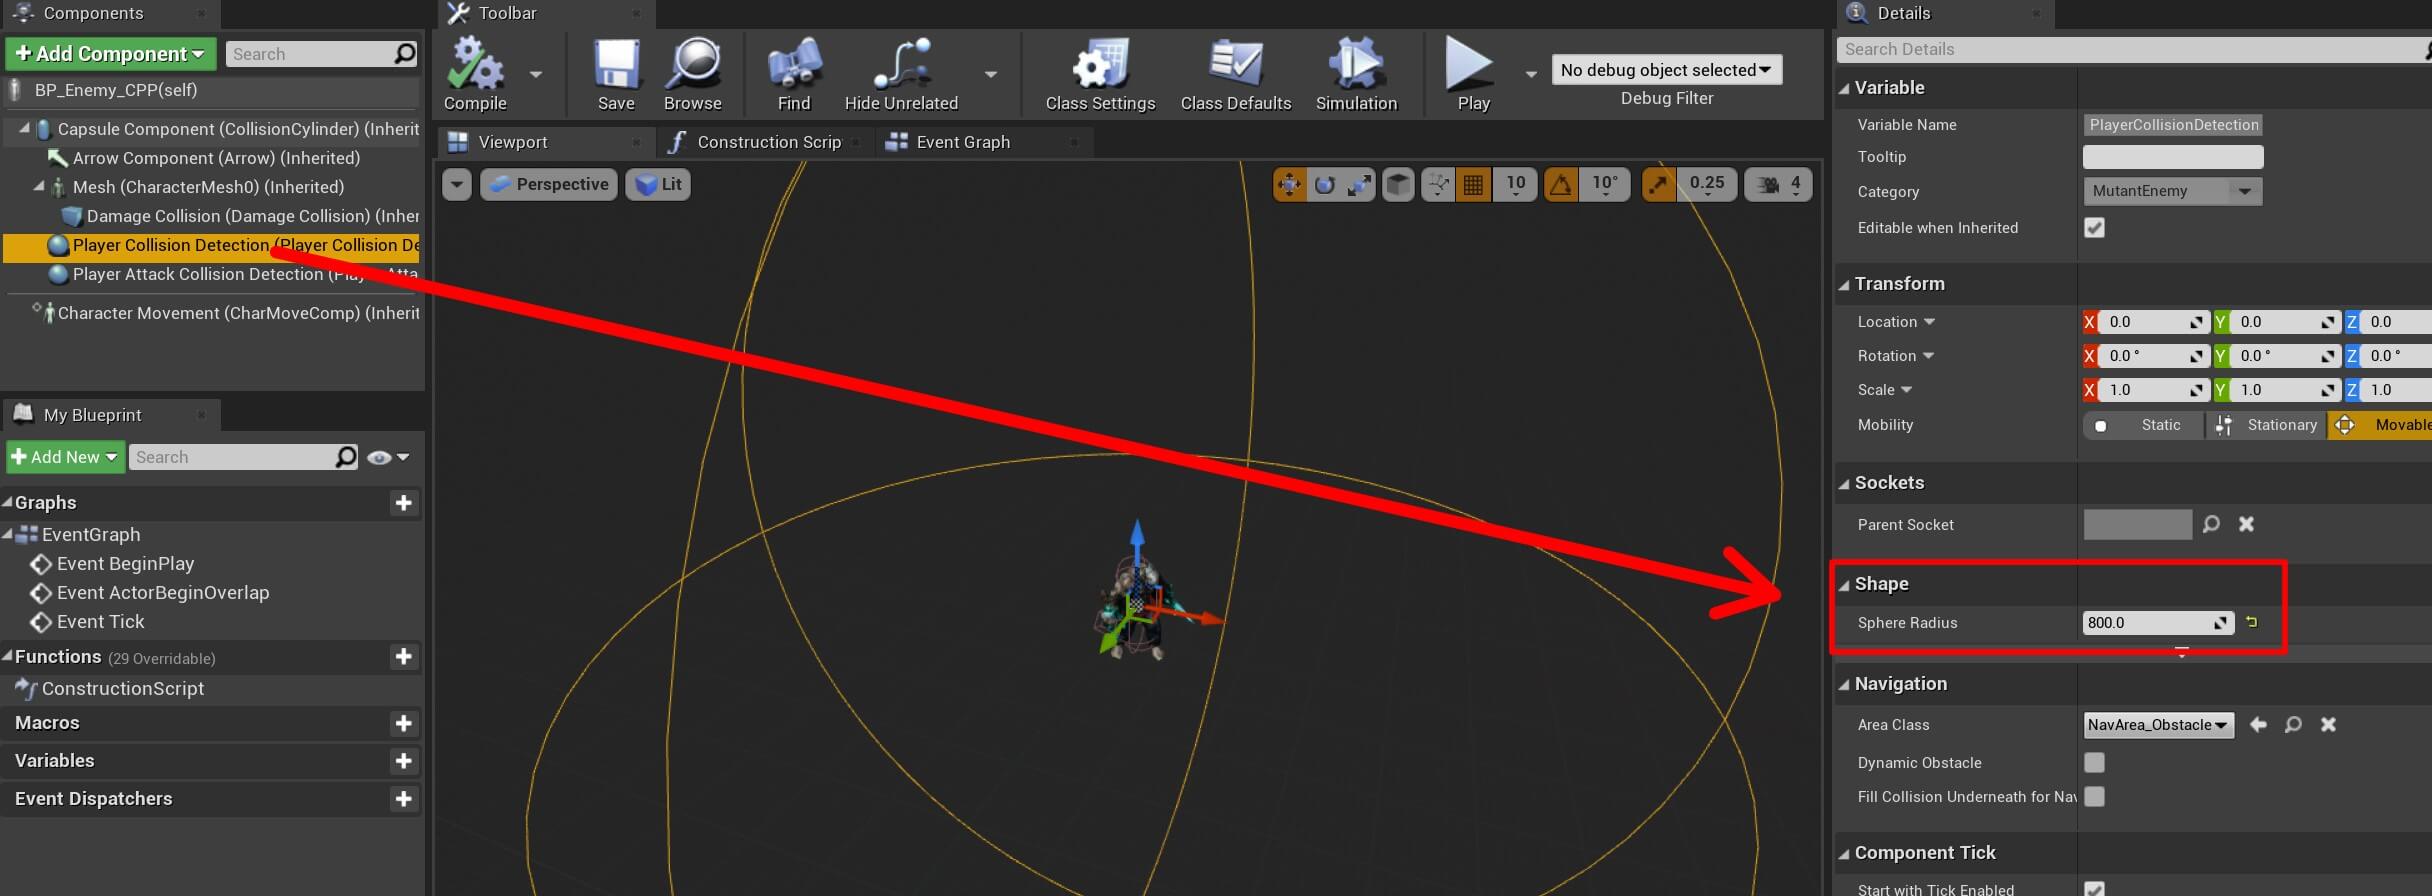
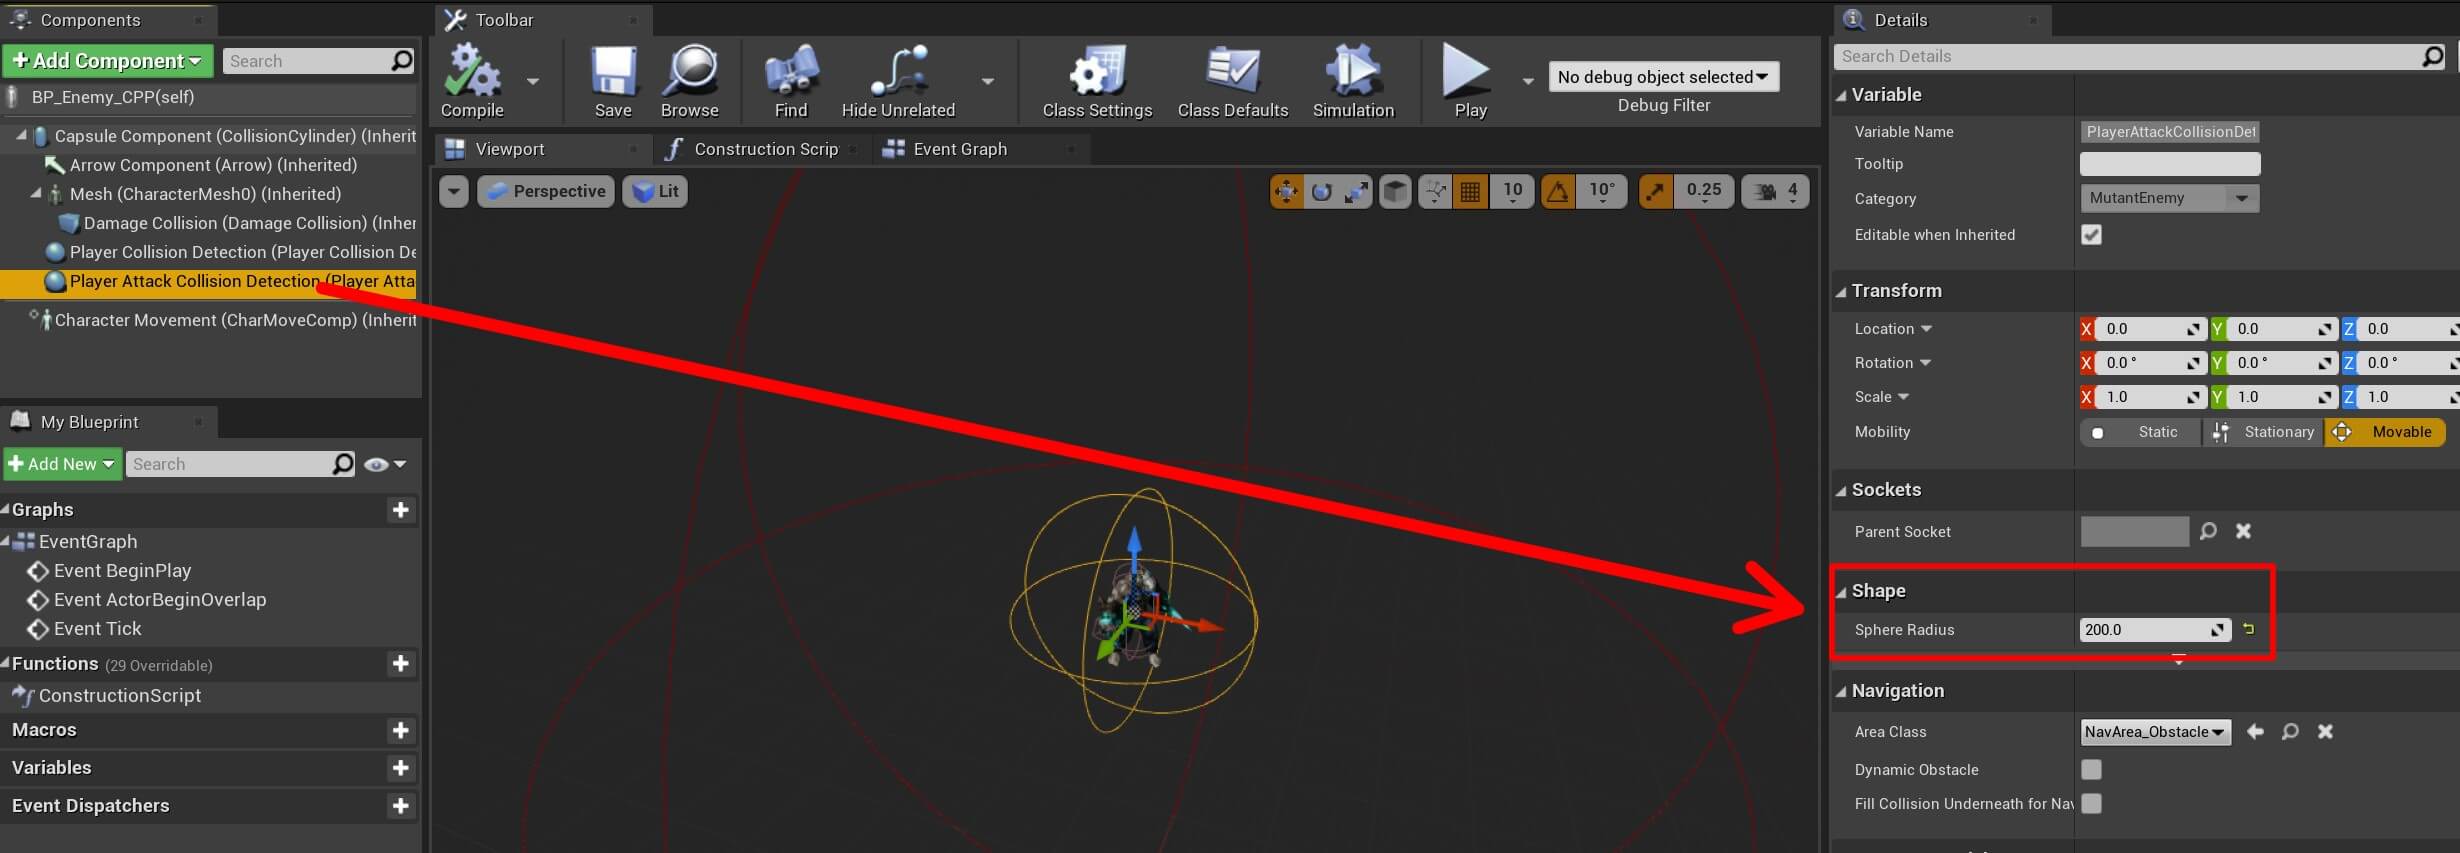
And set the Radius for the Player Attack Collision Detection to 200:
Small Fixes Before We Code C++ AI Logic
Before we proceed to code the AI behavior with C++, we need to make some small changes to the BP_Enemy_Animation blueprint.
Because now we are using BP_Enemy_CPP blueprint, we need to change the enemy reference variable to the type of the blueprint we are using.
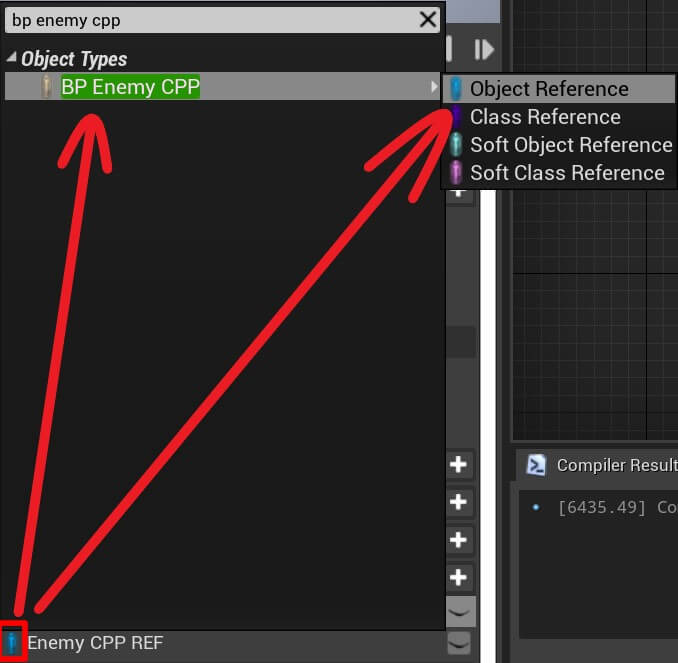
Open the BP_Enemy_Animation blueprint and in the My Blueprint tab create a new variable, name it Enemy CPP REF and set the type to BP_Enemy_CPP and chose Object Reference from the list:
From the Blueprint Initialize Animation event, instead of getting the reference to the Enemy REF variable, we are going to get a reference to Enemy CPP REF variable:

You can copy the nodes from here:
Now from the AnimGraph tab, open the Idle – Run State Machine and then open Idle – Run animation, and instead of using the Enemy REF variable, we are going to use Enemy CPP REF variable to get the velocity of the enemy actor for the purpose of the idle / run animation:
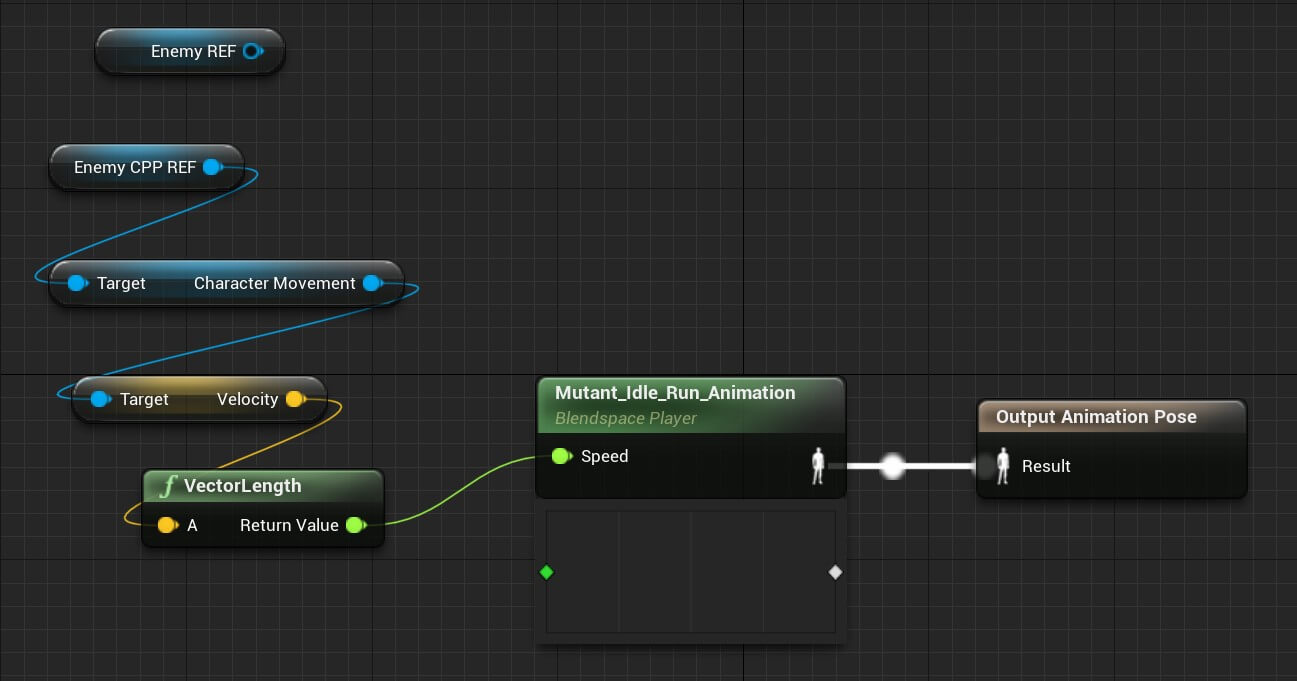
You can copy the nodes from here:
We had to make these changes otherwise when we start using BP_Enemy_CPP we would see all kind of errors because we are trying to get the reference to the BP_Enemy inside the BP_Enemy_Animation blueprint.
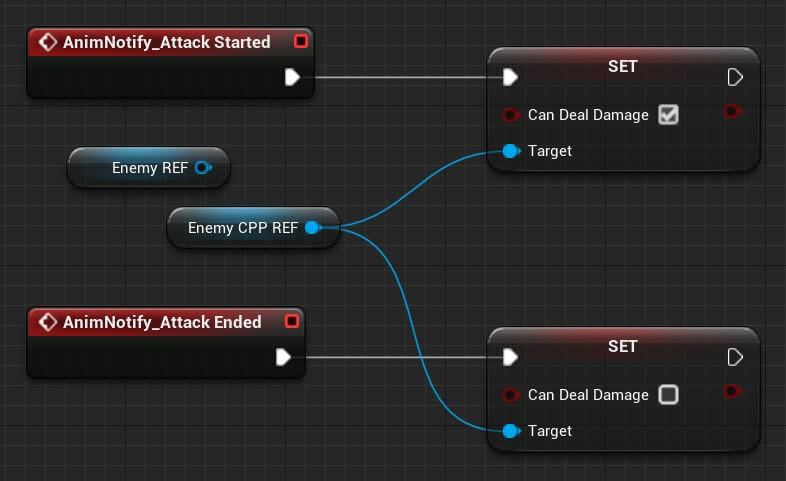
We also need to change the code in the animation notifiers to use the Enemy CPP REF instead of Enemy REF:
Creating And Setting Up The AI Controller Class
To create the AI logic we are going to use the AIController class. Inside the Content -> C++ Classes -> Enemy_AI folder, Right Click -> New C++ Class. Click on the Show All Classes checkbox and filter for ai controller, select it and press Next:
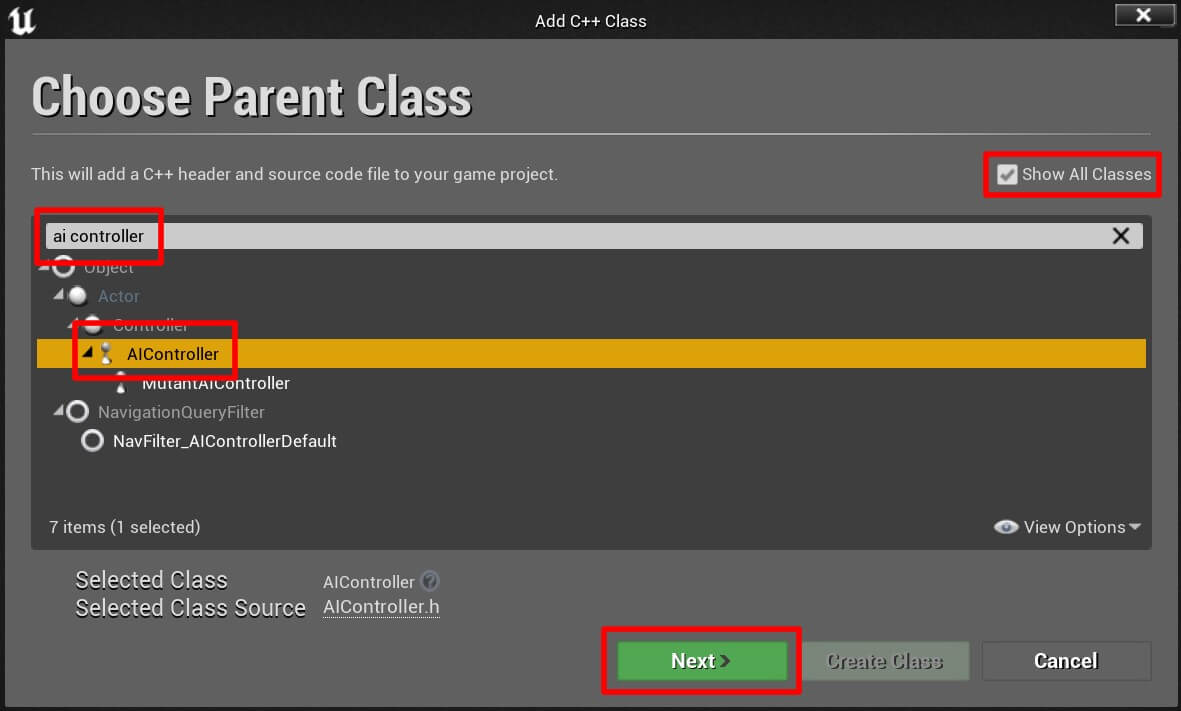
In the next window give the class a name MutantAIController and create the class. Before write code in the new class we created, we need to specify that the BP_Enemy_CPP blueprint will use MutantAIController class.
Open BP_Enemy_CPP blueprint, select the BP_Enemy_CPP(self) top parent, and in the details tab under Pawn settings, for the AI Controller Class click on the drop down list and select the MutantAIController class:
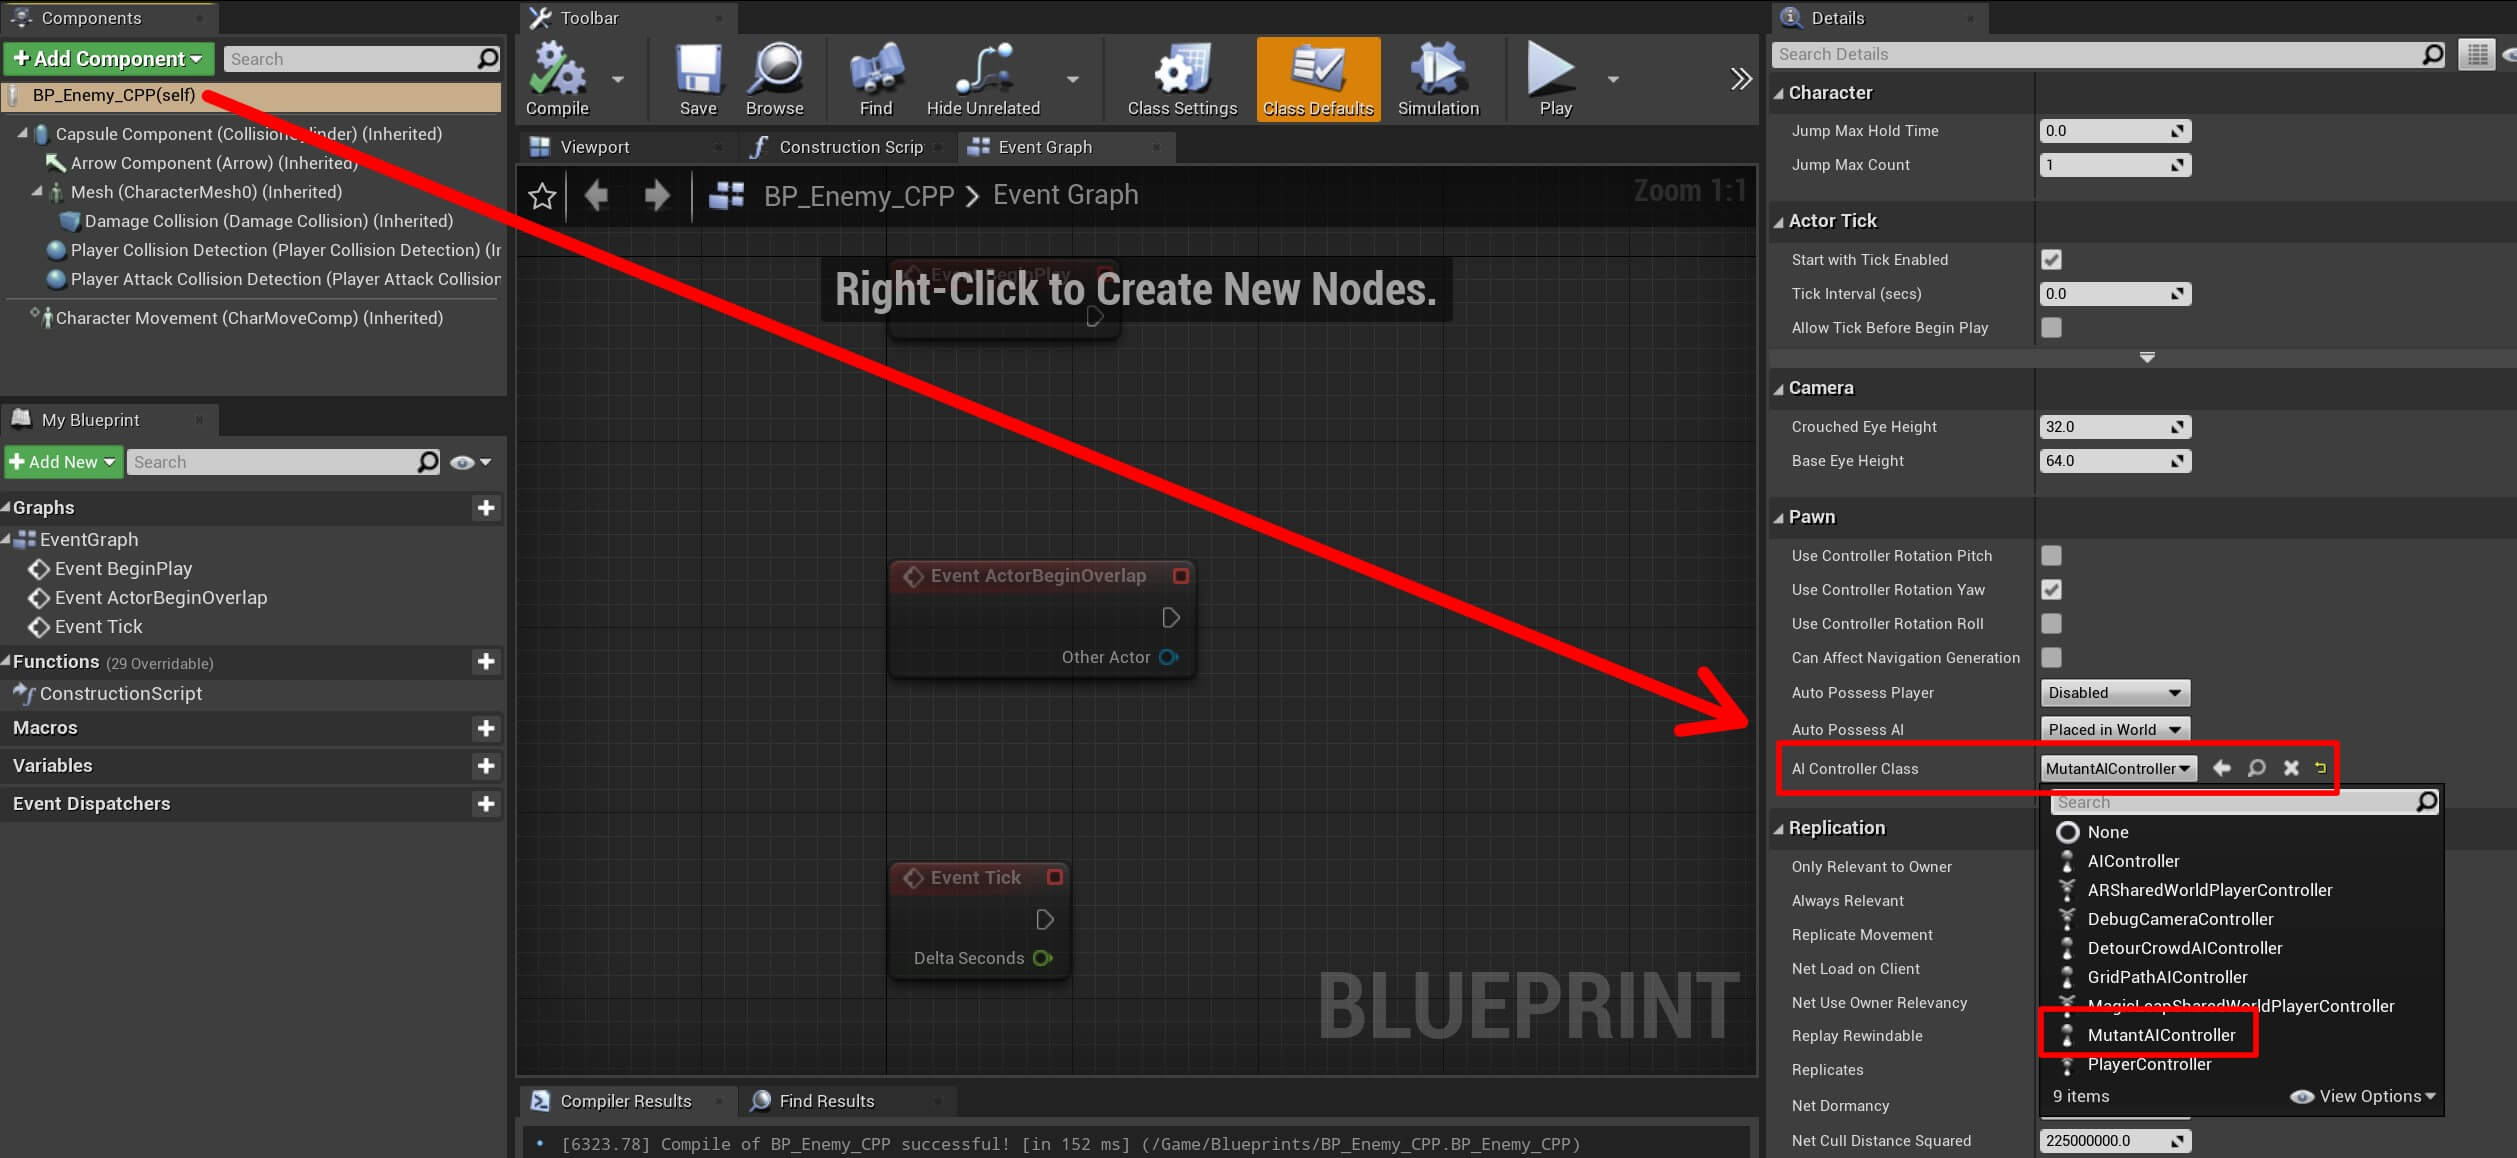
Since we are going to use the AI Controller class to control the AI actor, we also need to specify in the blueprint of the AI actor which AI Controller class is going to control him.
AI Patrol Logic With C++
Now open Visual Studio and first we need to specify in the Build.cs file that we want to use the navigation system. In the Solution Explorer locate the Enemy_AI.Build.cs file and open it:
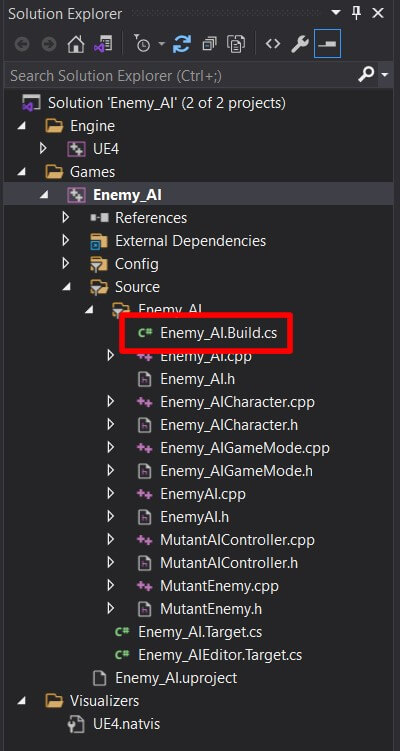
In the PublicDependencyModuleNames add NavigationSystem at the end:
					PublicDependencyModuleNames.AddRange(new string[] { "Core", "CoreUObject", "Engine",
			"InputCore", "HeadMountedDisplay", "NavigationSystem" });
This is mandatory if you want to use the navigation system classes, if we don’t add this line and try to use the navigation system, the code will not compile and we will see errors in the Output tab.
Now open the MutantAIController.h file, and add the following lines of code:
					public:
    void BeginPlay() override;

private:

    class UNavigationSystemV1* NavArea;

    FVector RandomLocation;

public:

    UFUNCTION()
        void RandomPatrol();
On line 6 we declared UNavigationSystemV1 which is a variable that we will use to get random navigationable points in the level.
And the RandomPatrol function is going to make the enemy actor randomly patrol the level.
Now open the MutantAIController.cpp file, and at the top, below the first #include line, add the following line of code:
#include "NavigationSystem.h"
We need to include the navigation system in order to use its functionality. Inside BeginPlay we are going to get a reference to the navigation system:
					void AMutantAIController::BeginPlay()
{
    Super::BeginPlay();

    NavArea = FNavigationSystem::GetCurrent<UNavigationSystemV1>(this);

    RandomPatrol();
}
Super::BeginPlay();
					void AMutantAIController::RandomPatrol()
{
    if (NavArea)
    {
        NavArea->K2_GetRandomReachablePointInRadius(GetWorld(), GetPawn()->GetActorLocation(),
            RandomLocation, 15000.0f);

        MoveToLocation(RandomLocation);
    }
}
The second parameter is the origin location from which we are going to search for the reachable point, for that parameter we passed the location of the actor that is controller by the AI Controller which is our BP_Mutant_CPP.
					#pragma once

#include "CoreMinimal.h"
#include "AIController.h"
#include "MutantAIController.generated.h"

/**
 *
 */
UCLASS()
class ENEMY_AI_API AMutantAIController : public AAIController
{
	GENERATED_BODY()

public:
    void BeginPlay() override;

private:

    class UNavigationSystemV1* NavArea;

    FVector RandomLocation;

public:

    UFUNCTION()
        void RandomPatrol();

};
					#include "MutantAIController.h"

#include "NavigationSystem.h"


void AMutantAIController::BeginPlay()
{
    Super::BeginPlay();

    NavArea = FNavigationSystem::GetCurrent<UNavigationSystemV1>(this);

    RandomPatrol();
}

void AMutantAIController::RandomPatrol()
{
    if (NavArea)
    {
        NavArea->K2_GetRandomReachablePointInRadius(GetWorld(), GetPawn()->GetActorLocation(),
            RandomLocation, 15000.0f);

        MoveToLocation(RandomLocation);
    }
}
Now open the MutantEnemy.h file and right below where we declared the DamageCollision variable, add the following lines of code:
					class AMutantAIController* MutantAIController;

	void OnAIMoveCompleted(struct FAIRequestID RequestID, const struct FPathFollowingResult& Result);
Since we specified that the MutantAIController is the controller of the MutantEnemy, we need to get a reference to it in order to perform AI actions, hence the MutantAIController variable declaration.
The OnAIMoveCompleted function will subscribe to the OnRequestFinished event to inform us when the AI movement has finished.
Now open the MutantEnemy.cpp file and below the last #include, add the following lines:
					#include "MutantAIController.h"
#include "Navigation/PathFollowingComponent.h"
#include "AITypes.h"
We need the includes in order to use functions from the AIController and to be able to use FAIRequestID and FPathFollowingResult as parameters in the OnAIMoveCompleted function.
In BeingPlay, we are going to get a reference to the AIController and subscribe to the OnRequestFinished event:
					void AMutantEnemy::BeginPlay()
{
	Super::BeginPlay();

	MutantAIController = Cast<AMutantAIController>(GetController());
	MutantAIController->GetPathFollowingComponent()->OnRequestFinished.AddUObject
	(this, &AMutantEnemy::OnAIMoveCompleted);
}
And inside the OnAIMoveCompleted function, we are going to call the MutantAIController to make the AI patrol again:
					void AMutantEnemy::OnAIMoveCompleted(FAIRequestID RequestID, const FPathFollowingResult& Result)
{
	MutantAIController->RandomPatrol();
}
As you can see, the enemy is patrolling the level cleverly avoiding all obstacles in its way. You can change the radius parameter value in the K2_GetRandomReachablePointInRadius function to make the AI patrol further from its location.
Detecting And Chasing The Player
To make the AI chase the player we need to detect the player’s presence near the enemy. For that we need to create functions that we will bind to on component being and end overlap of the collision components.
In the MutantEnemy.h file below the line where we declared the OnAIMoveCompleted function, add the following lines of code:
					UPROPERTY(EditAnywhere)
		float StoppingDistance = 100.0f;

	FTimerHandle SeekPlayerTimerHandle;

	UFUNCTION()
		void MoveToPlayer();

	UFUNCTION()
		void SeekPlayer();

	UFUNCTION()
		void StopSeekingPlayer();

	UFUNCTION()
		void OnPlayerDetectedOverlapBegin(class UPrimitiveComponent* OverlappedComp,
			class AActor* OtherActor, class UPrimitiveComponent* OtherComp,
			int32 OtherBodyIndex, bool bFromSweep, const FHitResult& SweepResult);

	UFUNCTION()
		void OnPlayerDetectedOverlapEnd(class UPrimitiveComponent* OverlappedComp,
			class AActor* OtherActor, class UPrimitiveComponent* OtherComp,
			int32 OtherBodyIndex);

	UFUNCTION()
		void OnPlayerAttackOverlapBegin(class UPrimitiveComponent* OverlappedComp,
			class AActor* OtherActor, class UPrimitiveComponent* OtherComp,
			int32 OtherBodyIndex, bool bFromSweep, const FHitResult& SweepResult);

	UFUNCTION()
		void OnPlayerAttackOverlapEnd(class UPrimitiveComponent* OverlappedComp,
			class AActor* OtherActor, class UPrimitiveComponent* OtherComp,
			int32 OtherBodyIndex);

	UFUNCTION()
		void OnDealDamageOverlapBegin(class UPrimitiveComponent* OverlappedComp,
			class AActor* OtherActor, class UPrimitiveComponent* OtherComp,
			int32 OtherBodyIndex, bool bFromSweep, const FHitResult& SweepResult);
The StoppingDistance variable is going to determine the stopping distance between the enemy and the player.
I’ve added the EditAnywhere parameter in the UPROPERTY which means that we will be able to edit this variable on the blueprint instance, so you can chose to make the enemy stop at a higher or lower distance from the player actor.
As for the SeekPlayerTimerHandler variable, we are going to use it to create a timer that will call the SeekPlayer function in a loop, the same way we did in the BP_Enemy blueprint, and we are also going to use that variable to stop the timer.
As for the functions that I’ve declared I gave them the same names as the ones we created in BP_Enemy blueprint, and you can already assume that these functions will perform the same actions as the ones in BP_Enemy.
First we are going to bind the functions to on component begin and overlap events of our collision components. Open MutantEnemy.cpp file and in BeginPlay below the line where we bind the OnAIMoveCompleted add the following lines of code:
					PlayerCollisionDetection->OnComponentBeginOverlap.AddDynamic(this,
		&AMutantEnemy::OnPlayerDetectedOverlapBegin);

	PlayerCollisionDetection->OnComponentEndOverlap.AddDynamic(this,
		&AMutantEnemy::OnPlayerDetectedOverlapEnd);

	PlayerAttackCollisionDetection->OnComponentBeginOverlap.AddDynamic(this,
		&AMutantEnemy::OnPlayerAttackOverlapBegin);

	PlayerAttackCollisionDetection->OnComponentEndOverlap.AddDynamic(this,
		&AMutantEnemy::OnPlayerAttackOverlapEnd);

	DamageCollision->OnComponentBeginOverlap.AddDynamic(this,
		&AMutantEnemy::OnDealDamageOverlapBegin);
Now we are going to create and code the functions one by one starting with MoveToPlayer function. Below the OnAIMoveCompleted function, add the following lines of code:
					void AMutantEnemy::MoveToPlayer()
{
	MutantAIController->MoveToLocation(PlayerREF->GetActorLocation(), StoppingDistance, true);
}
					void AMutantEnemy::SeekPlayer()
{
	MoveToPlayer();
	GetWorld()->GetTimerManager().SetTimer(SeekPlayerTimerHandle, this,
		&AMutantEnemy::SeekPlayer, 0.25f, true);
}
					void AMutantEnemy::StopSeekingPlayer()
{
	GetWorld()->GetTimerManager().ClearTimer(SeekPlayerTimerHandle);
}
					void AMutantEnemy::OnPlayerDetectedOverlapBegin(UPrimitiveComponent* OverlappedComp,
	AActor* OtherActor, UPrimitiveComponent* OtherComp, int32 OtherBodyIndex,
	bool bFromSweep, const FHitResult& SweepResult)
{
	PlayerREF = Cast<AEnemy_AICharacter>(OtherActor);
	if (PlayerREF)
	{
		PlayerDetected = true;
		SeekPlayer();
	}
}
					void AMutantEnemy::OnPlayerDetectedOverlapEnd(UPrimitiveComponent* OverlappedComp,
	AActor* OtherActor, UPrimitiveComponent* OtherComp, int32 OtherBodyIndex)
{
	PlayerREF = Cast<AEnemy_AICharacter>(OtherActor);
	if (PlayerREF)
	{
		PlayerDetected = false;
		StopSeekingPlayer();
		MutantAIController->RandomPatrol();
	}
}
					void AMutantEnemy::OnPlayerAttackOverlapBegin(UPrimitiveComponent* OverlappedComp,
	AActor* OtherActor, UPrimitiveComponent* OtherComp, int32 OtherBodyIndex,
	bool bFromSweep, const FHitResult& SweepResult)
{
	PlayerREF = Cast<AEnemy_AICharacter>(OtherActor);
	if (PlayerREF)
	{
		CanAttackPlayer = true;
	}
}
					void AMutantEnemy::OnPlayerAttackOverlapEnd(UPrimitiveComponent* OverlappedComp,
	AActor* OtherActor, UPrimitiveComponent* OtherComp, int32 OtherBodyIndex)
{
	PlayerREF = Cast<AEnemy_AICharacter>(OtherActor);
	if (PlayerREF)
	{
		CanAttackPlayer = false;

		SeekPlayer();
	}
}
					void AMutantEnemy::OnDealDamageOverlapBegin(UPrimitiveComponent* OverlappedComp,
	AActor* OtherActor, UPrimitiveComponent* OtherComp, int32 OtherBodyIndex,
	bool bFromSweep, const FHitResult& SweepResult)
{
	PlayerREF = Cast<AEnemy_AICharacter>(OtherActor);
	if (PlayerREF && CanDealDamage)
	{
		// deal damage to player
		UE_LOG(LogTemp, Warning, TEXT("Player Damaged"));
	}
}
					void AMutantEnemy::OnAIMoveCompleted(FAIRequestID RequestID, const FPathFollowingResult& Result)
{
	if (!PlayerDetected)
	{
		MutantAIController->RandomPatrol();
	}
	else if (PlayerDetected && CanAttackPlayer)
	{
		StopSeekingPlayer();

		// attack player
		UE_LOG(LogTemp, Warning, TEXT("Player ATTACKED"));
	}
}
As soon as the enemy detects the player it starts moving towards him, and when it reaches the player, of CanAttackPlayer is true, we saw that Player ATTACKED was printed in the console.
Attacking The Player And Dealing Damage
To make the enemy attack the player we need to play the enemy attack montage animation. To do this, we need a few variables.
In the MutantEnemy.h file, at the bottom of the class add the following lines of code:
					UPROPERTY(EditAnywhere)
		class UAnimMontage* EnemyAttackAnimation;

	class UAnimInstance* AnimInstance;

	UFUNCTION(BlueprintCallable)
		void AttackAnimationEnded();
EnemyAttackAnimation is a reference to the enemy attack montage. AnimInstance is a reference to the anim instance that will play the attack animation.
And the AttackAnimationEnded function is going to act like a delegate that will inform us when the animation has ended. Notice how I added BlueprintCallable in the UFUNCTION parameter, this is because we are going to create another notify event in the enemy attack montage, and we are going to call AttackAnimationEnded from that event.
Before we proceed make sure that you declare the AttackAnimationEnded function in the MutantEnemy.cpp file, you can click here to see a shortcut how to declare function.
Now save and compile the class and open BP_Enemy_CPP blueprint in the editor.
In the Components tab, select the BP_Enemy_CPP(self) top parent, and in the Details tab for the Enemy Attack Animation, click on the drop down list and select Mutant_Attack_Montage:

Compile and save the changes made to the blueprint and then open the Mutant_Attack_Montage animation in the editor.
Near the end of the attack animation under the Notifies timeline, Right Click -> Add Notify -> New Notify and give the new notify name Attack Animation Ended:

Save the new change and open the BP_Enemy_Animation blueprint in the editor. In the Event Graph Right Click and in the search bar filter for attack animation ended notify:
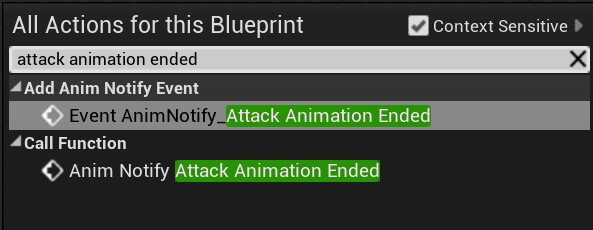
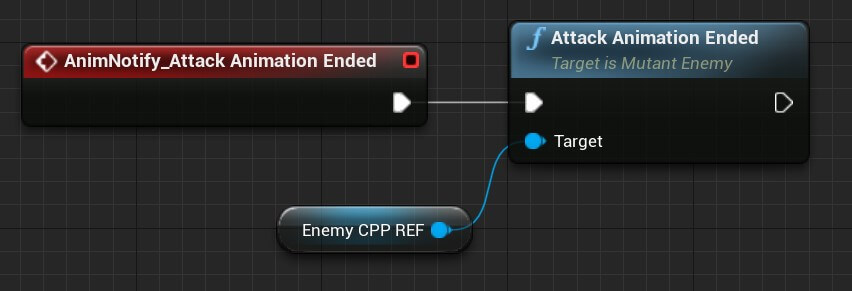
Compile and save the new changes and open MutantEnemy.cpp file. First we are going to add the additional includes that we need to play the attack animation. So below the last include add the following lines:
					#include "Animation/AnimInstance.h"
#include "Animation/AnimMontage.h"
At the bottom of BeginPlay function get a reference to the anim instance:
AnimInstance = GetMesh()->GetAnimInstance();
In OnAIMoveCompleted, make changes so that the enemy attacks the player when it reaches his position and the CanAttackPlayer value is set to true:
					void AMutantEnemy::OnAIMoveCompleted(FAIRequestID RequestID, const FPathFollowingResult& Result)
{
	if (!PlayerDetected)
	{
		MutantAIController->RandomPatrol();
	}
	else if (PlayerDetected && CanAttackPlayer)
	{
		StopSeekingPlayer();

		// attack player
		AnimInstance->Montage_Play(EnemyAttackAnimation);
	}
}
If the enemy tries to attack the player e.g. the attack animation starts playing, and the player runs away from the enemy at that moment, we are going to stop the attack animation and start chasing the player again.
For that, we need to make some changes in the OnPlayerAttackOverlapEnd function:
					void AMutantEnemy::OnPlayerAttackOverlapEnd(UPrimitiveComponent* OverlappedComp,
	AActor* OtherActor, UPrimitiveComponent* OtherComp, int32 OtherBodyIndex)
{
	PlayerREF = Cast<AEnemy_AICharacter>(OtherActor);
	if (PlayerREF)
	{
		CanAttackPlayer = false;

		// stop the attack animation and chase the player
		AnimInstance->Montage_Stop(0.0f, EnemyAttackAnimation);

		SeekPlayer();
	}
}
Calling Montage_Stop function from AnimInstance and passing 0.0f as the first parameter will immediately stop playing the provided animation which is the second parameter for that function and in our case the EnemyAttackAnimation.
And the last step is to attack the player again when the animation ends, which we will do in the AttackAnimationEnded function:
					void AMutantEnemy::AttackAnimationEnded()
{
	if (CanAttackPlayer)
	{
		AnimInstance->Montage_Play(EnemyAttackAnimation);
	}
}
					#include "CoreMinimal.h"
#include "GameFramework/Character.h"
#include "MutantEnemy.generated.h"

UCLASS()
class ENEMY_AI_API AMutantEnemy : public ACharacter
{
	GENERATED_BODY()

public:
	// Sets default values for this character's properties
	AMutantEnemy();

protected:
	// Called when the game starts or when spawned
	virtual void BeginPlay() override;

public:
	// Called every frame
	virtual void Tick(float DeltaTime) override;

	// Called to bind functionality to input
	virtual void SetupPlayerInputComponent(class UInputComponent* PlayerInputComponent) override;

public:

	bool PlayerDetected;
	bool CanAttackPlayer;

	UPROPERTY(BlueprintReadWrite)
		bool CanDealDamage;

	class AEnemy_AICharacter* PlayerREF;

	UPROPERTY(EditAnywhere)
		class USphereComponent* PlayerCollisionDetection;

	UPROPERTY(EditAnywhere)
		class USphereComponent* PlayerAttackCollisionDetection;

	UPROPERTY(EditAnywhere)
		class UBoxComponent* DamageCollision;

	class AMutantAIController* MutantAIController;

	void OnAIMoveCompleted(struct FAIRequestID RequestID, const struct FPathFollowingResult& Result);

	UPROPERTY(EditAnywhere)
		float StoppingDistance = 100.0f;

	FTimerHandle SeekPlayerTimerHandle;

	UFUNCTION()
		void MoveToPlayer();

	UFUNCTION()
		void SeekPlayer();

	UFUNCTION()
		void StopSeekingPlayer();

	UFUNCTION()
		void OnPlayerDetectedOverlapBegin(class UPrimitiveComponent* OverlappedComp,
			class AActor* OtherActor, class UPrimitiveComponent* OtherComp,
			int32 OtherBodyIndex, bool bFromSweep, const FHitResult& SweepResult);

	UFUNCTION()
		void OnPlayerDetectedOverlapEnd(class UPrimitiveComponent* OverlappedComp,
			class AActor* OtherActor, class UPrimitiveComponent* OtherComp,
			int32 OtherBodyIndex);

	UFUNCTION()
		void OnPlayerAttackOverlapBegin(class UPrimitiveComponent* OverlappedComp,
			class AActor* OtherActor, class UPrimitiveComponent* OtherComp,
			int32 OtherBodyIndex, bool bFromSweep, const FHitResult& SweepResult);

	UFUNCTION()
		void OnPlayerAttackOverlapEnd(class UPrimitiveComponent* OverlappedComp,
			class AActor* OtherActor, class UPrimitiveComponent* OtherComp,
			int32 OtherBodyIndex);

	UFUNCTION()
		void OnDealDamageOverlapBegin(class UPrimitiveComponent* OverlappedComp,
			class AActor* OtherActor, class UPrimitiveComponent* OtherComp,
			int32 OtherBodyIndex, bool bFromSweep, const FHitResult& SweepResult);

	UPROPERTY(EditAnywhere)
		class UAnimMontage* EnemyAttackAnimation;

	class UAnimInstance* AnimInstance;

	UFUNCTION(BlueprintCallable)
		void AttackAnimationEnded();

};
					#include "MutantEnemy.h"
#include "Enemy_AICharacter.h"
#include "Components/SphereComponent.h"
#include "Components/BoxComponent.h"
#include "MutantAIController.h"
#include "Navigation/PathFollowingComponent.h"
#include "AITypes.h"
#include "Animation/AnimInstance.h"
#include "Animation/AnimMontage.h"


// Sets default values
AMutantEnemy::AMutantEnemy()
{
 	// Set this character to call Tick() every frame.  You can turn this off to improve performance if you don't need it.
	PrimaryActorTick.bCanEverTick = true;

	PlayerCollisionDetection =
		CreateDefaultSubobject<USphereComponent>(TEXT("Player Collision Detection"));

	PlayerCollisionDetection->SetupAttachment(RootComponent);

	PlayerAttackCollisionDetection =
		CreateDefaultSubobject<USphereComponent>(TEXT("Player Attack Collision Detection"));

	PlayerAttackCollisionDetection->SetupAttachment(RootComponent);

	DamageCollision = CreateDefaultSubobject<UBoxComponent>(TEXT("Damage Collision"));
	DamageCollision->SetupAttachment(GetMesh(), TEXT("RightHandSocket"));

}

// Called when the game starts or when spawned
void AMutantEnemy::BeginPlay()
{
	Super::BeginPlay();

	MutantAIController = Cast<AMutantAIController>(GetController());
	MutantAIController->GetPathFollowingComponent()->OnRequestFinished.AddUObject
	(this, &AMutantEnemy::OnAIMoveCompleted);

	PlayerCollisionDetection->OnComponentBeginOverlap.AddDynamic(this,
		&AMutantEnemy::OnPlayerDetectedOverlapBegin);

	PlayerCollisionDetection->OnComponentEndOverlap.AddDynamic(this,
		&AMutantEnemy::OnPlayerDetectedOverlapEnd);

	PlayerAttackCollisionDetection->OnComponentBeginOverlap.AddDynamic(this,
		&AMutantEnemy::OnPlayerAttackOverlapBegin);

	PlayerAttackCollisionDetection->OnComponentEndOverlap.AddDynamic(this,
		&AMutantEnemy::OnPlayerAttackOverlapEnd);

	DamageCollision->OnComponentBeginOverlap.AddDynamic(this,
		&AMutantEnemy::OnDealDamageOverlapBegin);

	AnimInstance = GetMesh()->GetAnimInstance();
}

// Called every frame
void AMutantEnemy::Tick(float DeltaTime)
{
	Super::Tick(DeltaTime);

}

// Called to bind functionality to input
void AMutantEnemy::SetupPlayerInputComponent(UInputComponent* PlayerInputComponent)
{
	Super::SetupPlayerInputComponent(PlayerInputComponent);

}

void AMutantEnemy::OnAIMoveCompleted(FAIRequestID RequestID, const FPathFollowingResult& Result)
{
	if (!PlayerDetected)
	{
		MutantAIController->RandomPatrol();
	}
	else if (PlayerDetected && CanAttackPlayer)
	{
		StopSeekingPlayer();

		// attack player
		AnimInstance->Montage_Play(EnemyAttackAnimation);
	}
}

void AMutantEnemy::MoveToPlayer()
{
	MutantAIController->MoveToLocation(PlayerREF->GetActorLocation(), StoppingDistance, true);
}

void AMutantEnemy::SeekPlayer()
{
	MoveToPlayer();
	GetWorld()->GetTimerManager().SetTimer(SeekPlayerTimerHandle, this,
		&AMutantEnemy::SeekPlayer, 0.25f, true);
}

void AMutantEnemy::StopSeekingPlayer()
{
	GetWorld()->GetTimerManager().ClearTimer(SeekPlayerTimerHandle);
}

void AMutantEnemy::OnPlayerDetectedOverlapBegin(UPrimitiveComponent* OverlappedComp,
	AActor* OtherActor, UPrimitiveComponent* OtherComp, int32 OtherBodyIndex,
	bool bFromSweep, const FHitResult& SweepResult)
{
	PlayerREF = Cast<AEnemy_AICharacter>(OtherActor);
	if (PlayerREF)
	{
		PlayerDetected = true;
		SeekPlayer();
	}
}

void AMutantEnemy::OnPlayerDetectedOverlapEnd(UPrimitiveComponent* OverlappedComp,
	AActor* OtherActor, UPrimitiveComponent* OtherComp, int32 OtherBodyIndex)
{
	PlayerREF = Cast<AEnemy_AICharacter>(OtherActor);
	if (PlayerREF)
	{
		PlayerDetected = false;
		StopSeekingPlayer();
		MutantAIController->RandomPatrol();
	}
}

void AMutantEnemy::OnPlayerAttackOverlapBegin(UPrimitiveComponent* OverlappedComp,
	AActor* OtherActor, UPrimitiveComponent* OtherComp, int32 OtherBodyIndex,
	bool bFromSweep, const FHitResult& SweepResult)
{
	PlayerREF = Cast<AEnemy_AICharacter>(OtherActor);
	if (PlayerREF)
	{
		CanAttackPlayer = true;
	}
}

void AMutantEnemy::OnPlayerAttackOverlapEnd(UPrimitiveComponent* OverlappedComp,
	AActor* OtherActor, UPrimitiveComponent* OtherComp, int32 OtherBodyIndex)
{
	PlayerREF = Cast<AEnemy_AICharacter>(OtherActor);
	if (PlayerREF)
	{
		CanAttackPlayer = false;

		// stop the attack animation and chase the player
		AnimInstance->Montage_Stop(0.0f, EnemyAttackAnimation);

		SeekPlayer();
	}
}

void AMutantEnemy::OnDealDamageOverlapBegin(UPrimitiveComponent* OverlappedComp,
	AActor* OtherActor, UPrimitiveComponent* OtherComp, int32 OtherBodyIndex,
	bool bFromSweep, const FHitResult& SweepResult)
{
	PlayerREF = Cast<AEnemy_AICharacter>(OtherActor);
	if (PlayerREF && CanDealDamage)
	{
		// deal damage to player
		UE_LOG(LogTemp, Warning, TEXT("Player Damaged"));
	}
}

void AMutantEnemy::AttackAnimationEnded()
{
	if (CanAttackPlayer)
	{
		AnimInstance->Montage_Play(EnemyAttackAnimation);
	}
}
If by any chance you see Player Damage printed multiple times in the Output Log when you attack, you can move the Attack Ended notify a little closer to the Attack Started notify in the Mutant_Attack_Montage animation:

Where To Go From Here
In this tutorial we saw simple and intermediate ways how we can set up enemy AI in Unreal Engine using Blueprints and C++.
If you want to learn a more advanced way how to set up enemy AI using Behavior Trees which gives you more control and helps you create realistic enemies, you can do that in my Enemy AI With Behavior Trees In Unreal Engine tutorial.

