As the title of the post suggests we are going to create a character movement system in Unreal Engine.
I am going to show you how to create the movement system using blueprints as well as C++, so depending on your project if you are using only blueprints or only C++ or even a mix between the two, you will have everything you need to create the movement of your game character.
Download The Complete Project For This Tutorial
Important Note Before We Start
One of the labels of this tutorial is beginner, but this tutorial is not for complete beginners who are working with Unreal Engine for the first time.
I expect you to know your way around Unreal Engine editor and that you know how to use blueprints and write basic C++ code and that you created at least one basic game in Unreal Engine.
Creating The Project
I am not going to use anything fancy when it comes to 3D models because everything that I will cover in this post you can use on any 3D model that you want to use for your game.
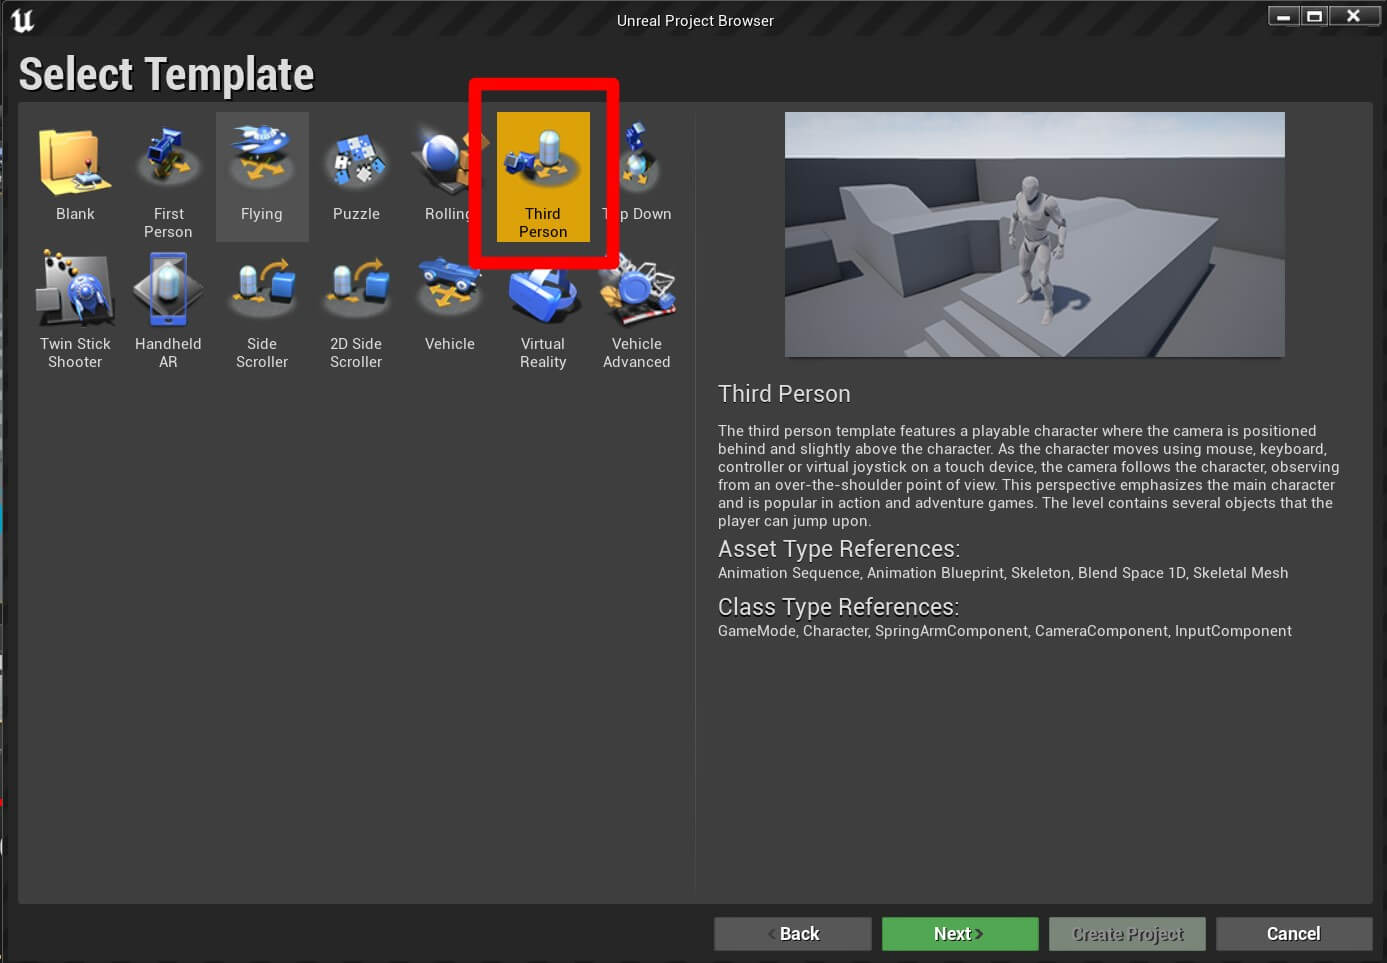
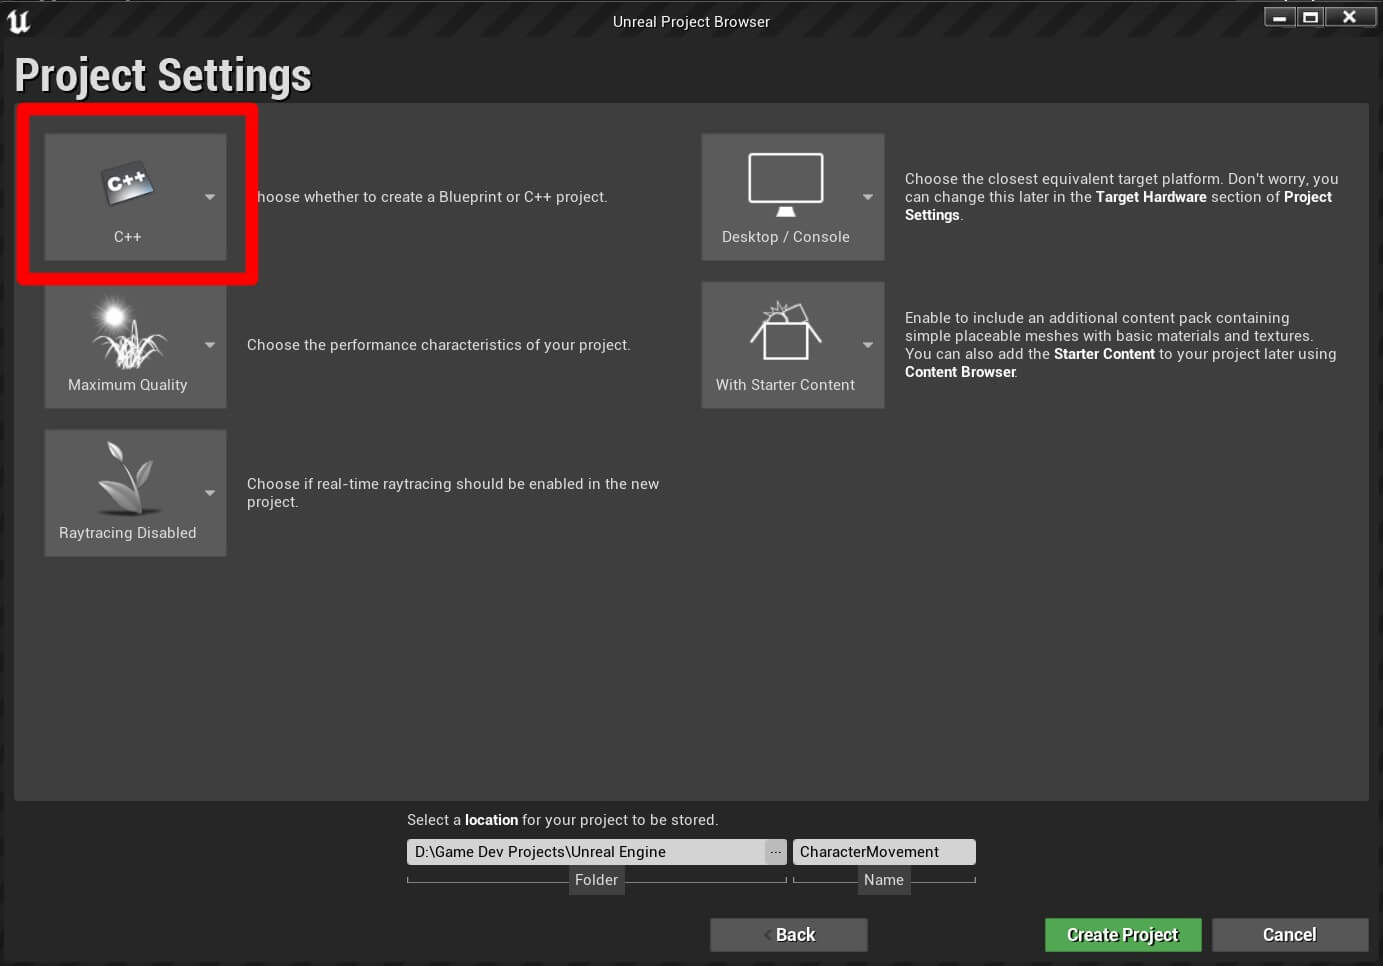
For the sake of simplicity I am going to use the third person project template, so make sure that you select it when you create your project:
Setting Up The Project
I am going to use the default level that comes with the project template, and because of that I am going to make some preparations before we start creating our custom character.
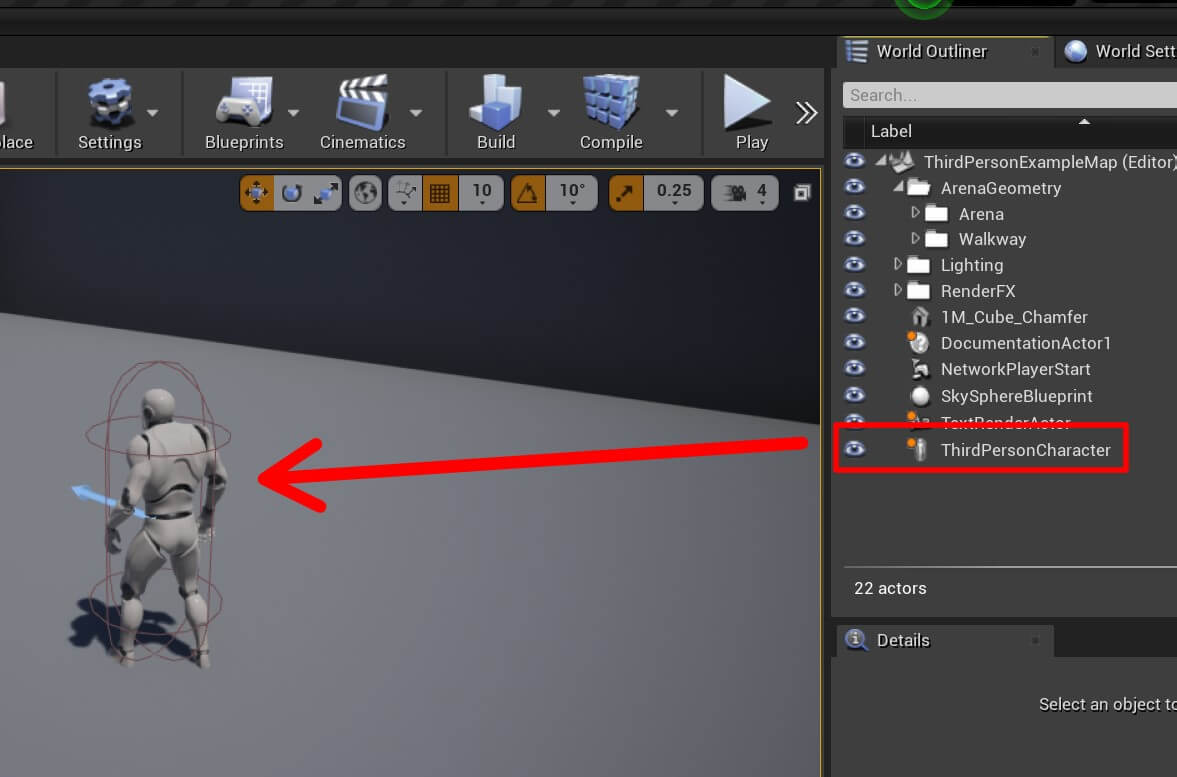
First I am going to remove the default ThirdPersonCharacter blueprint from the level, just locate it in the World Outliner tab and press the Delete key on your keyboard:
Inside the Content top folder, Right Click -> New Folder and name it Blueprints. Inside the Blueprints folder, Right Click -> Blueprint Class and in the Pick Parent Class window, expand the All Classes drop down list, filter for game mode and select GameMode as the parent class:
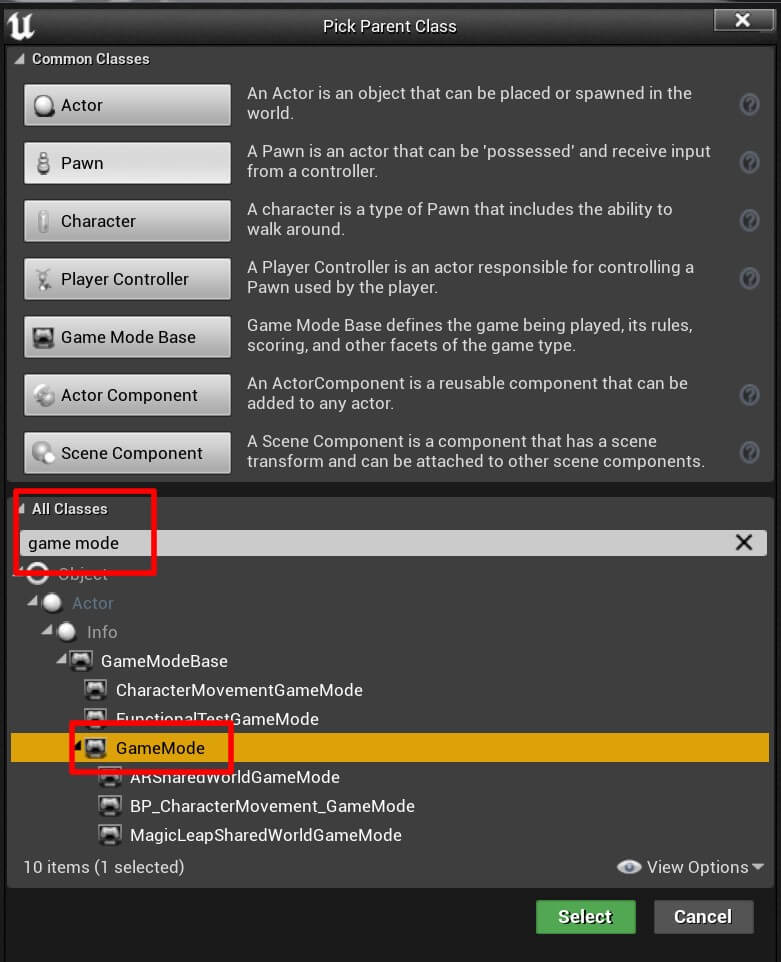
Give the new blueprint name BP_CharacterMovement_GameMode. Next, go under Edit -> Project Settings.
In the Project Settings locate Maps & Modes and under Default Modes click on the Default GameMode drop down list and select BP_CharacterMovement_GameMode as the default game mode:
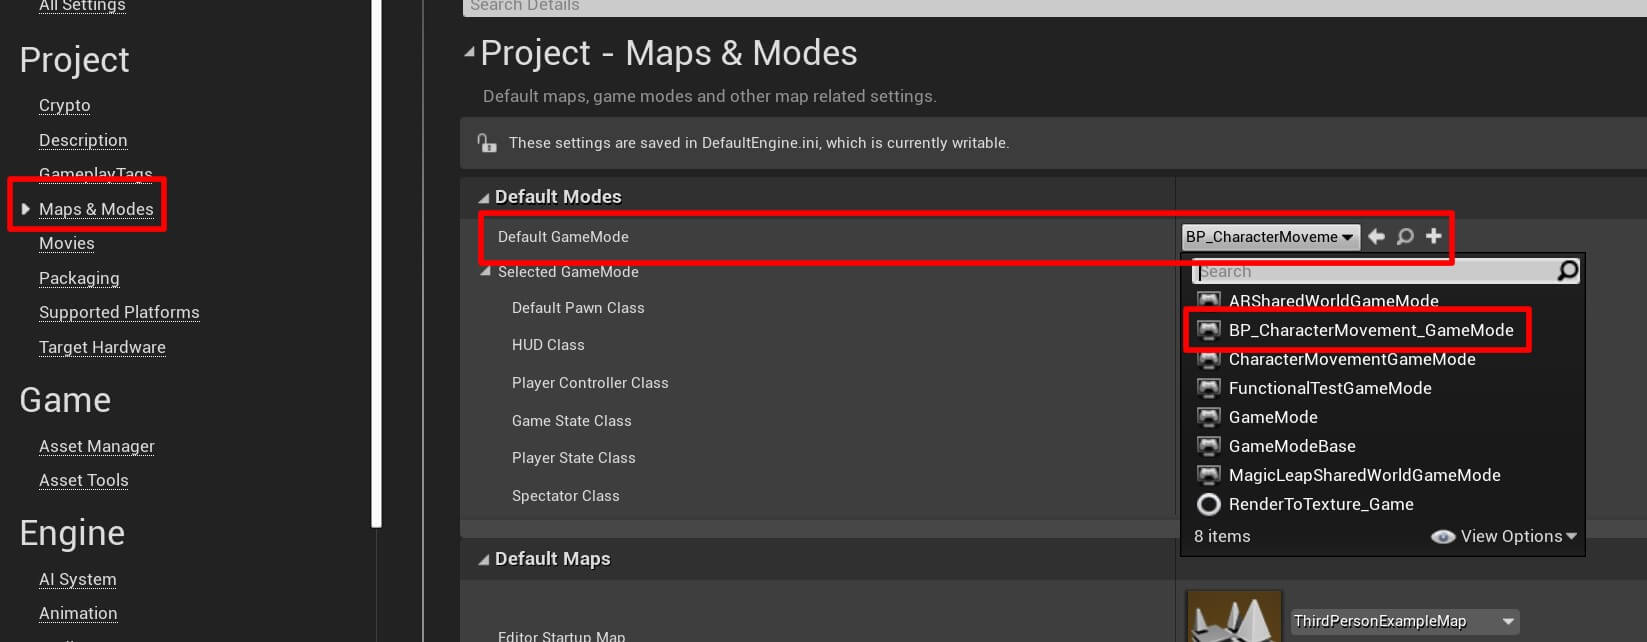
Setting Up The Input
Since we selected the Third Person template the input is set by default. If you go to Edit -> Project Settings -> Input you will see all the Action and Axis Mappings:
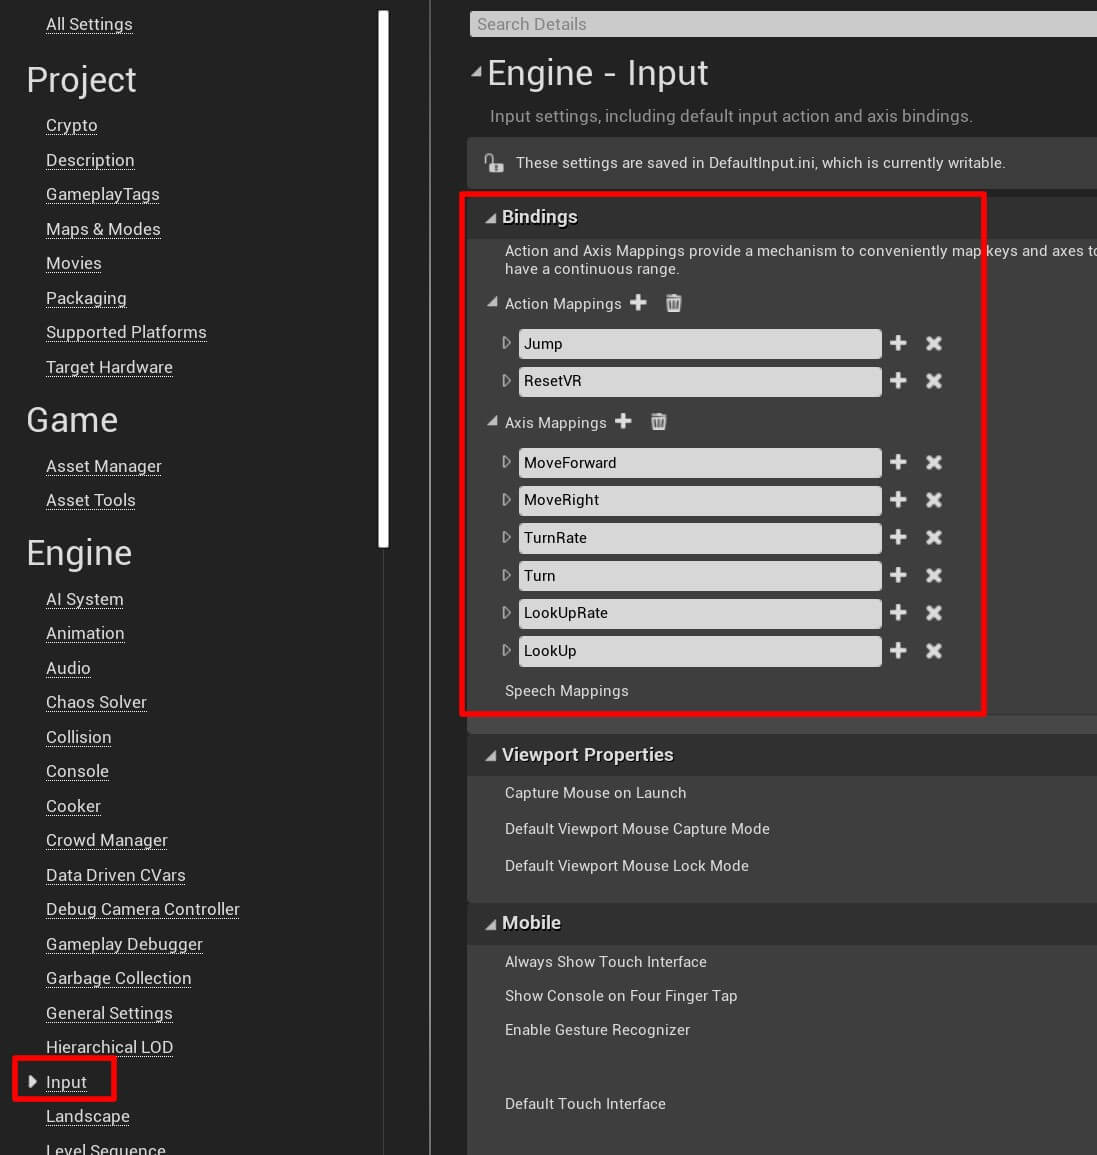
We don’t need all these defined inputs, so I am going to delete the ones we don’t need and leave the ones that we will use:
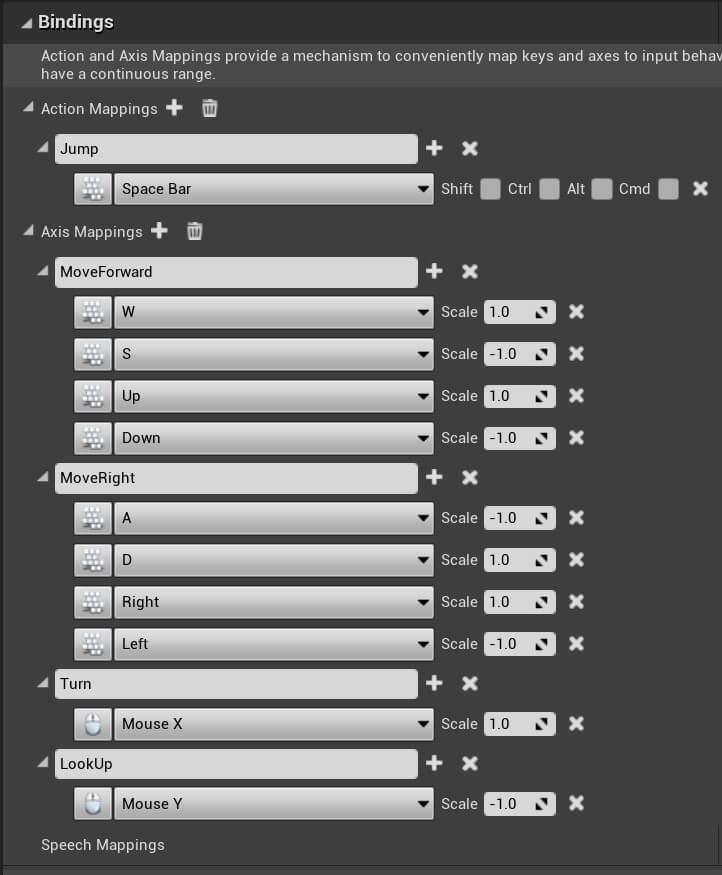
Preparing The Character Blueprint
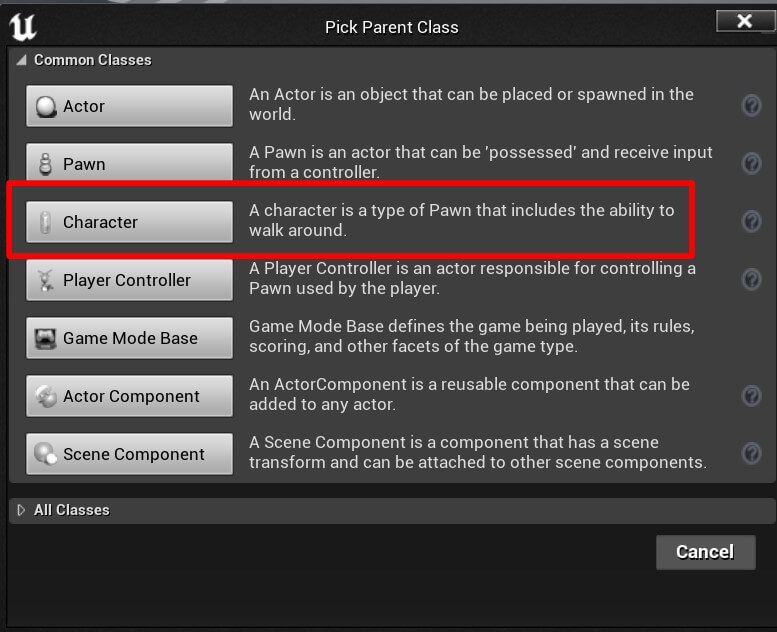
First we are going to create the character movement system using a blueprint. So inside the Blueprints folder, Right Click -> Blueprint Class. Select the Character as the parent class:
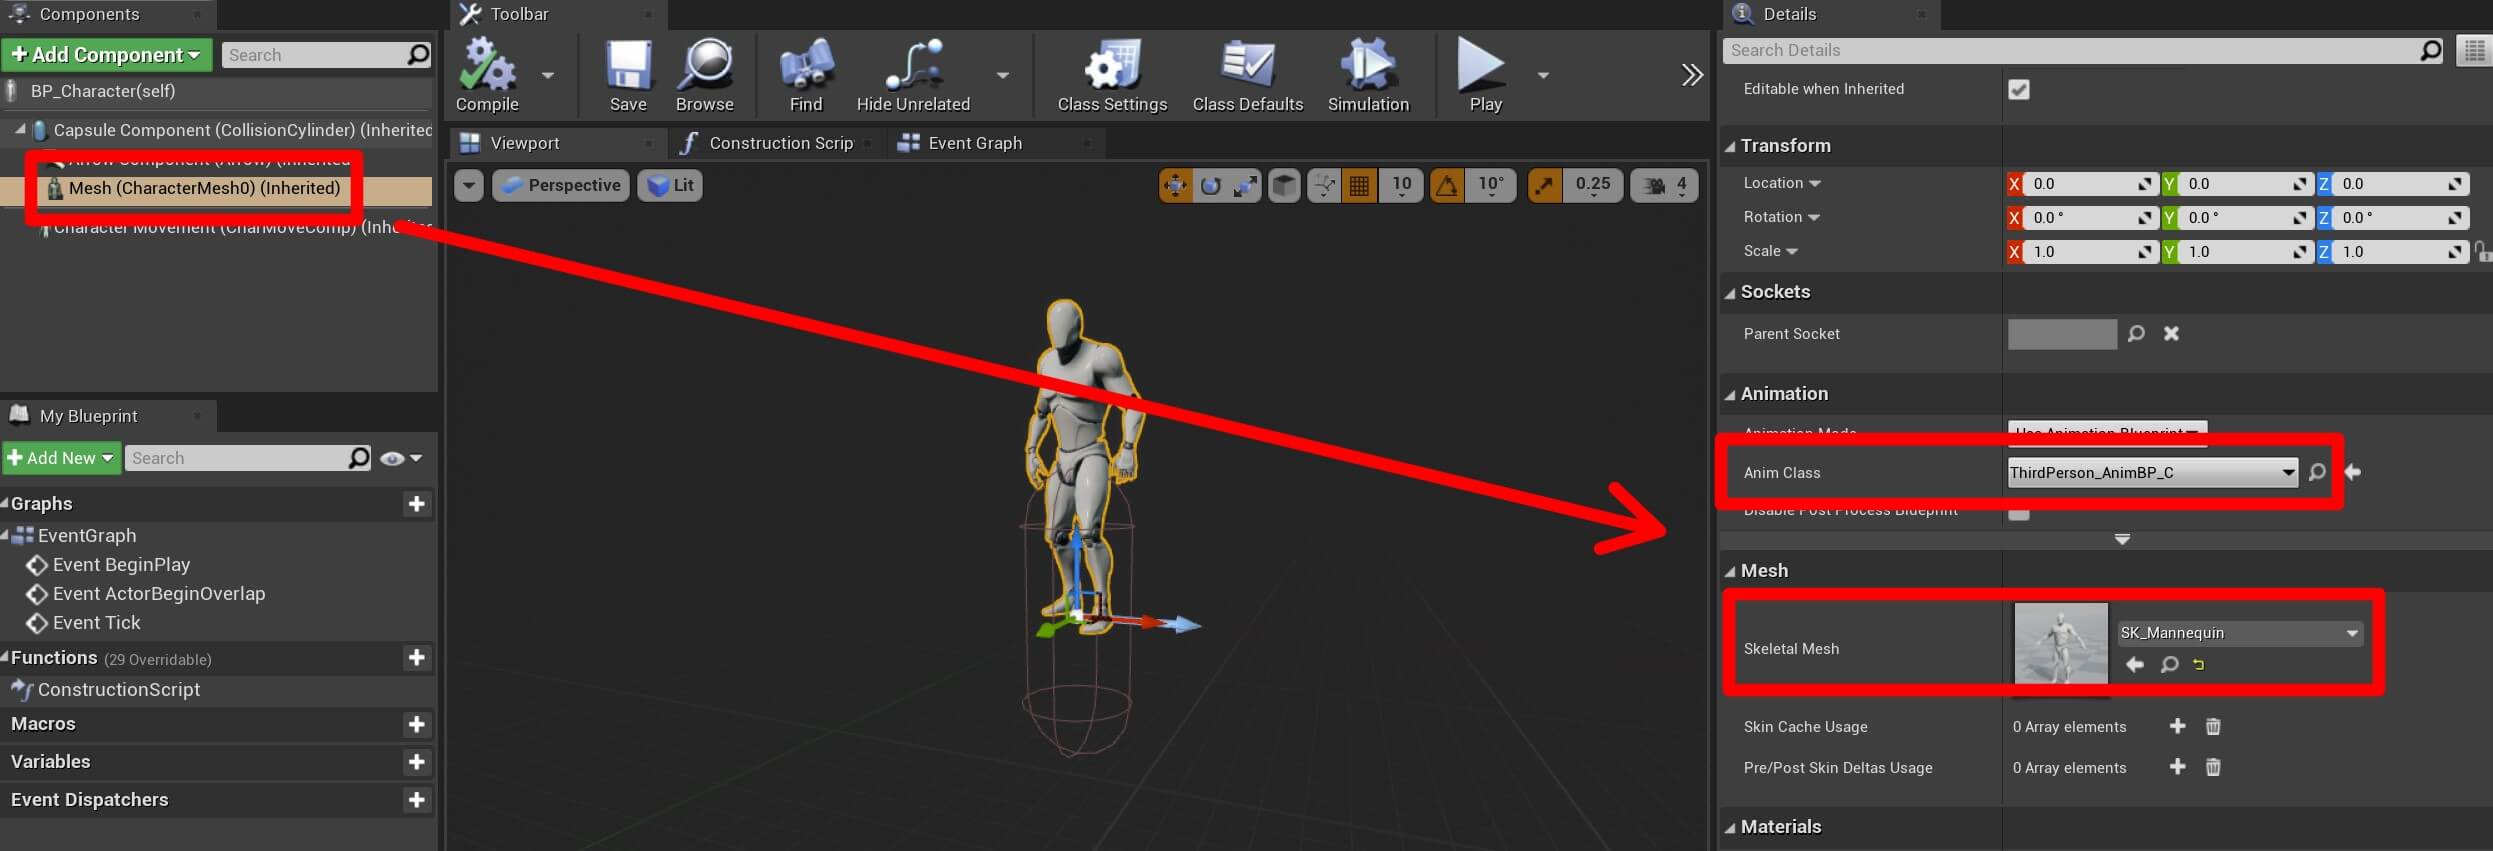
Name the new blueprint BP_Character and open it in the editor. In the Components tab select the Mesh component and in the Details tab under the Mesh settings for the Skeletal Mesh select the SK_Mannequin model that comes with the project, and under Animation settings for the Anim Class select ThirdPerson_AnimBP_C as the animation blueprint:

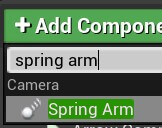
Now select the Spring Arm component and click on the Add Component button and filter for the camera:
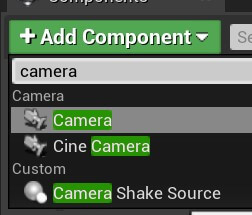
Make sure that the Camera component is a child of the Spring Arm component:
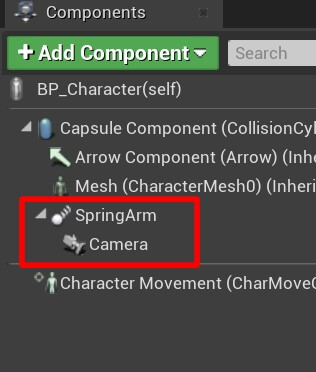

When are finished, this is how BP_Character blueprint looks like:
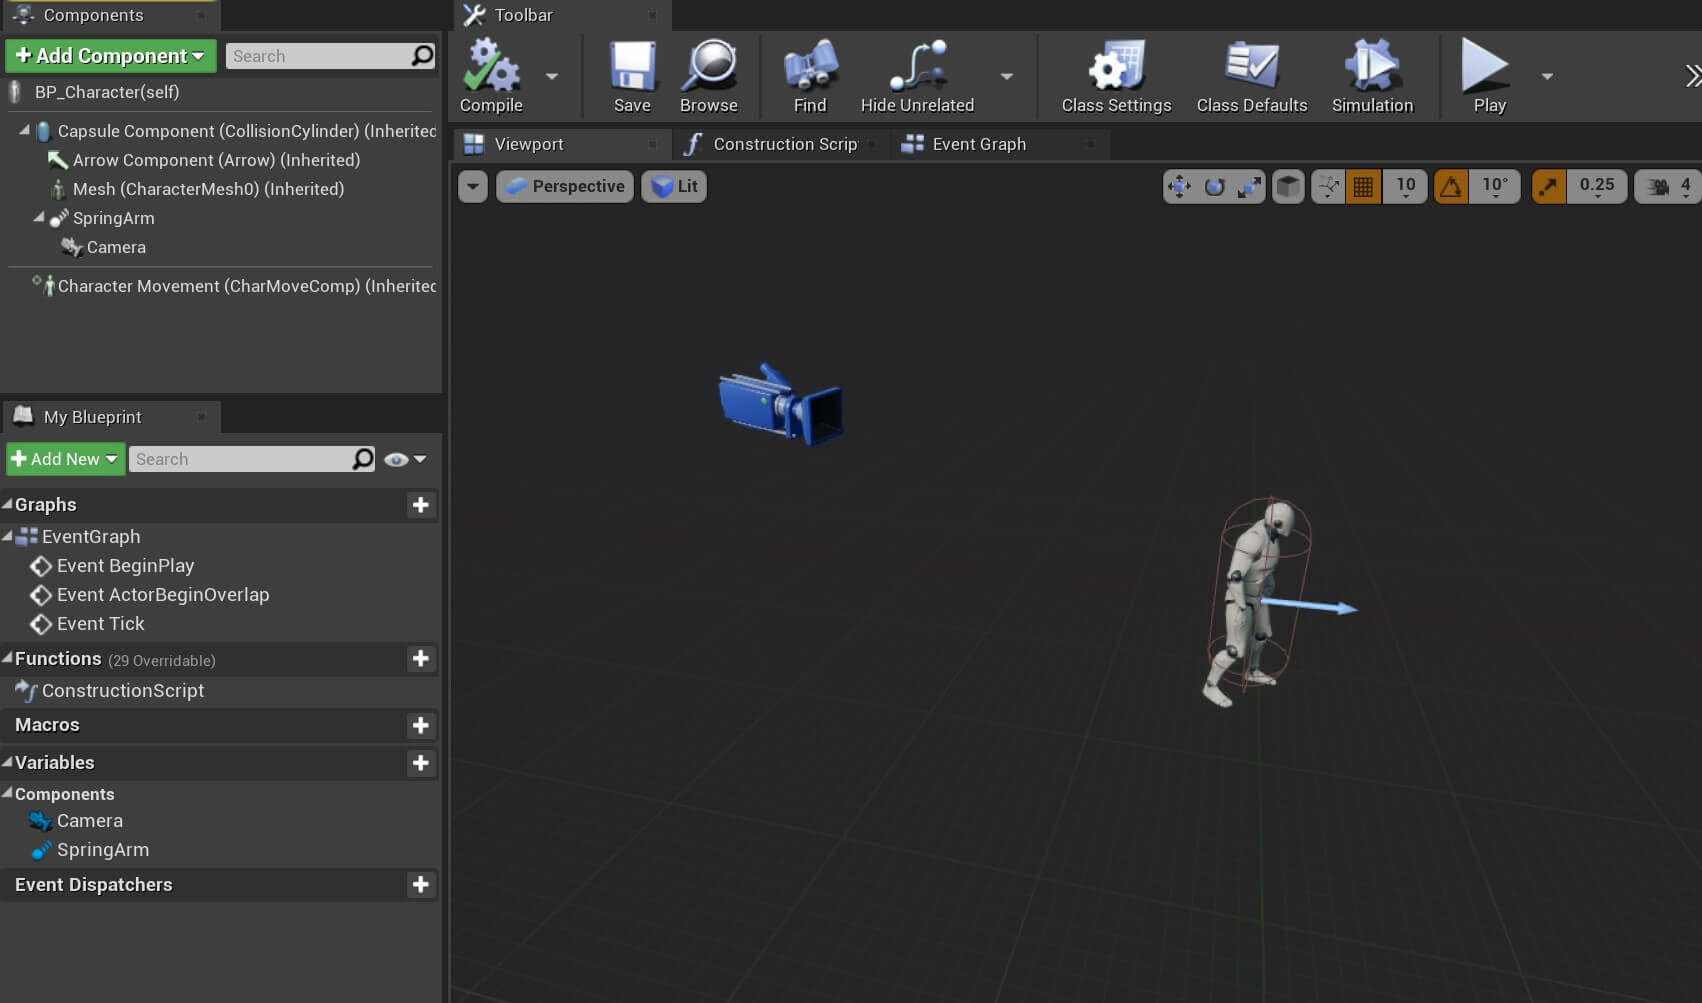
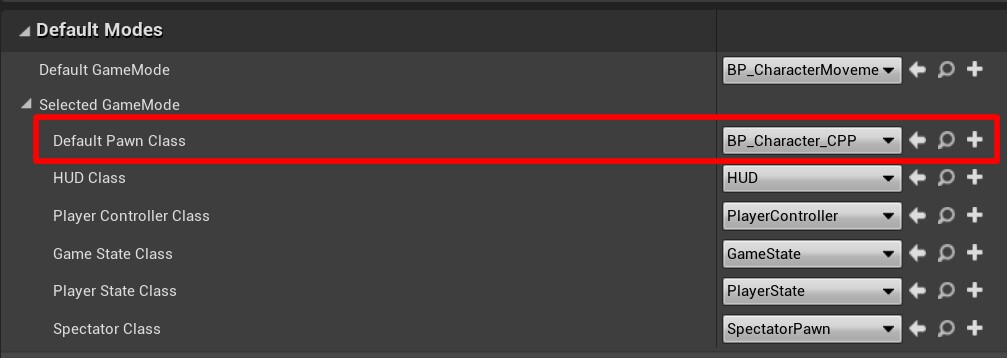
The last step before we proceed to code the movement in the blueprint is to set our BP_Character as the Default Pawn Class in Project Settings -> Maps & Modes:
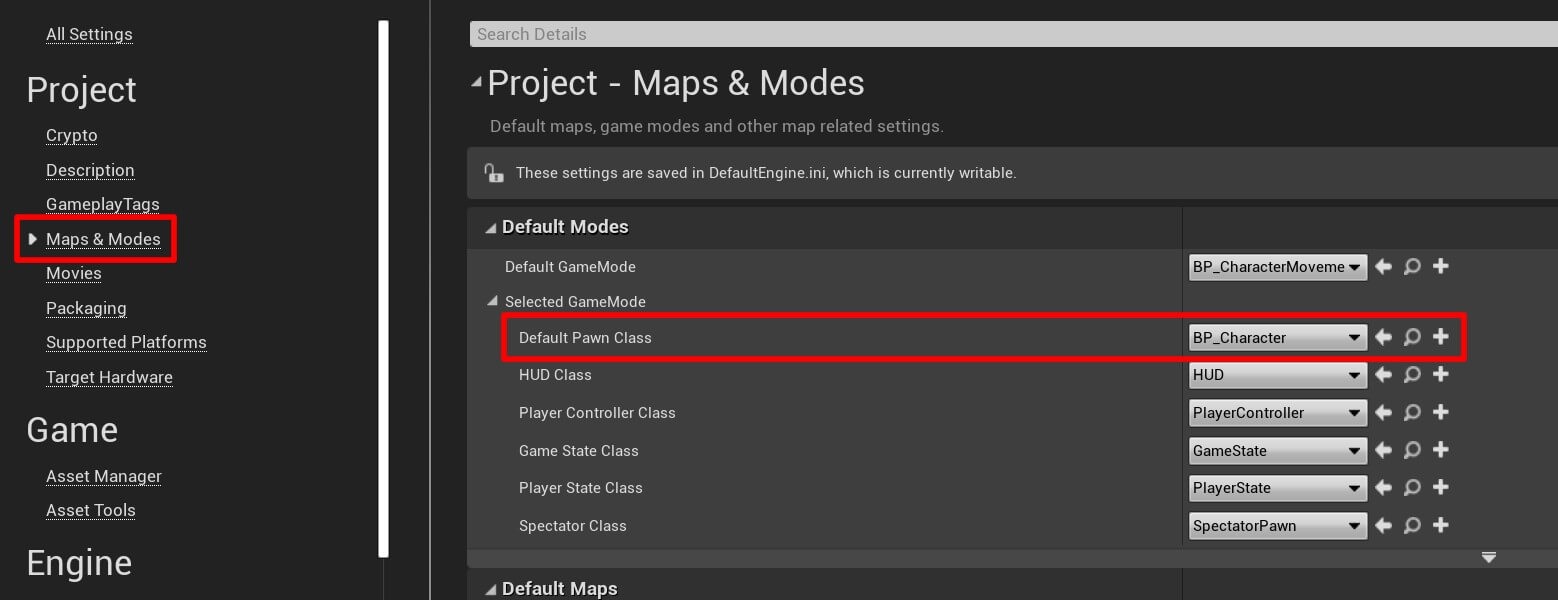
We already created our BP_CharacterMovement_GameMode and we set it as the Default GameMode, that means we can also change the Default Pawn Class and set it to our BP_Character.
When we start working with C++ and when we create a blueprint out of the C++ class we will change the Default Pawn Class to that blueprint.
Creating The Movement And Rotation Via Blueprints
Starting with the movement, inside the Event Graph of BP_Character, add the following nodes:
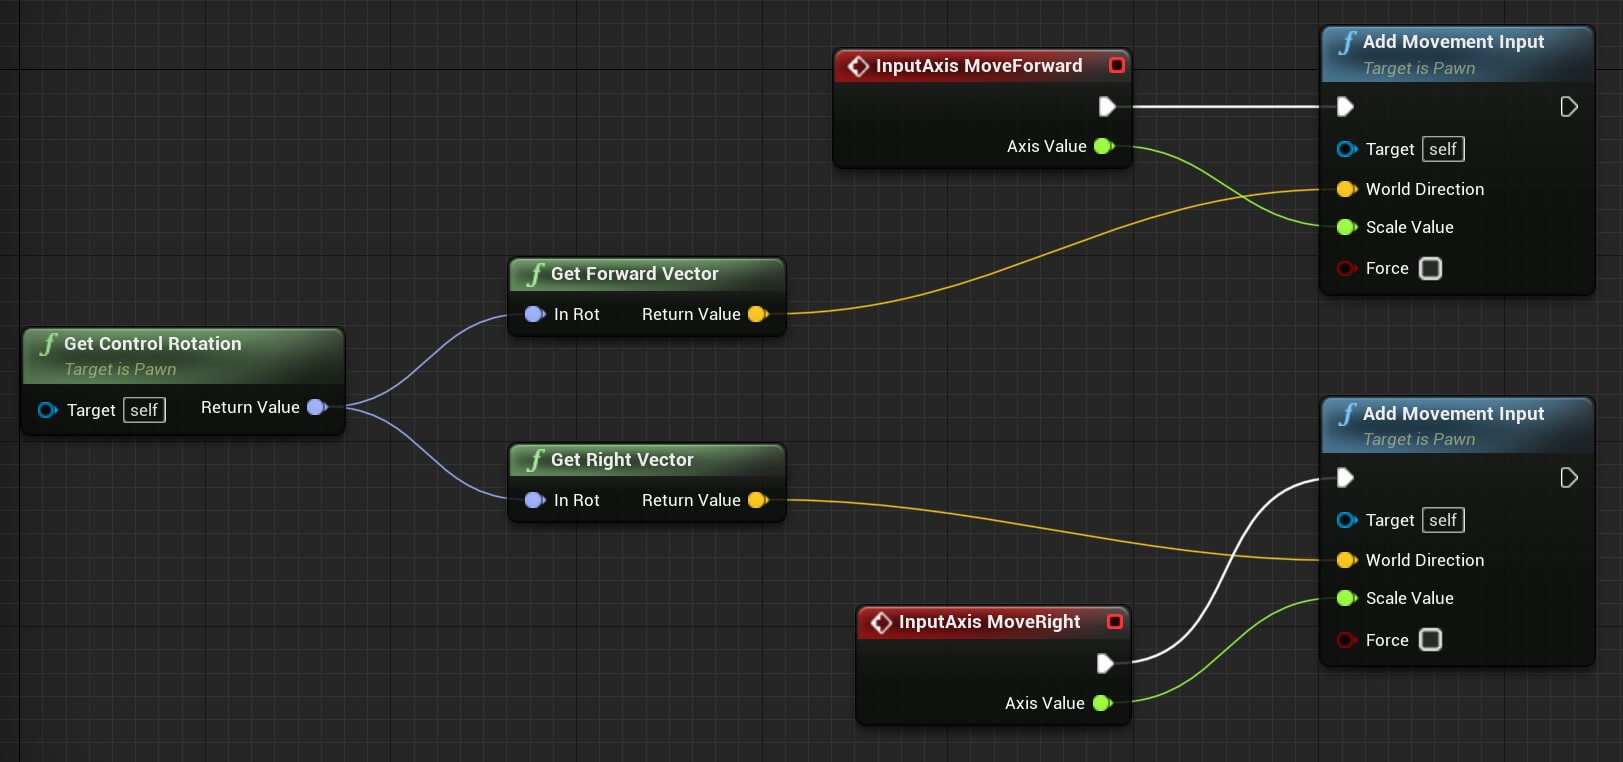
Yo can copy the nodes from here:
If you don’t know how to use blueprintUE tool to copy the nodes, you can learn that by clicking here.
First we get the rotation by calling Get Control Rotation function, because from the return value of that function we can get the forward and right vector rotation e.g. the rotation for the specified moving direction.
Next, we use the MoveForward and MoveRight input axis that are defined in Project Settings -> Input, and when they are triggered we are calling Add Movement Input function to make the actor move.
For that to happen, we need to provide the Scale Value which is either positive or negative and that will determine if the actor will move forward(positive), backward(negative), right(positive) or left(negative).
To determine the side where the actor will go, we need to pass the World Direction parameter which we can get from the Get Forward Vector and Get Right Vector, and the names of those vectors specify in which direction the actor will move.
This is everything we need to make the player actor move. Compile and Save the current blueprint and run the game to test it:
So the movement works and we can move the player actor left, right, forward and backwards, but we can’t rotate him.
To fix the rotation problem, we need to add the following nodes:
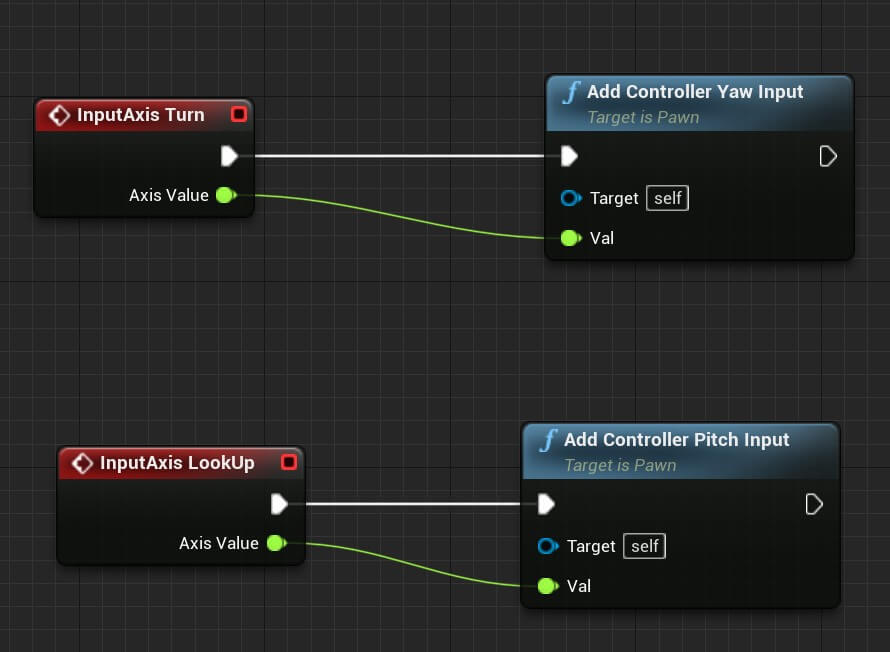
You can copy the nodes from here:
The InputAxis Turn is triggered when we move the mouse horizontally, and when that happens we are going to call Add Controller Yaw Input to change the rotation of the player actor left and right.
The same thing we are doing with InputAxis LookUp which is triggered when we move the mouse vertically, but for this case, we are calling Add Controller Pitch Input to change the rotation of the player actor up and down:
While we can rotate left and right, we are not able to rotate up or down and we also have movement issues where the player actor sort of glitches while moving when we try to rotate up or down.
The issue is with the Spring Arm component that is holding the Camera. We need to open BP_Character in the editor, click on the Spring Arm component and in the Details tab locate the Camera Settings and check the checkbox for Use Pawn Control Rotation:
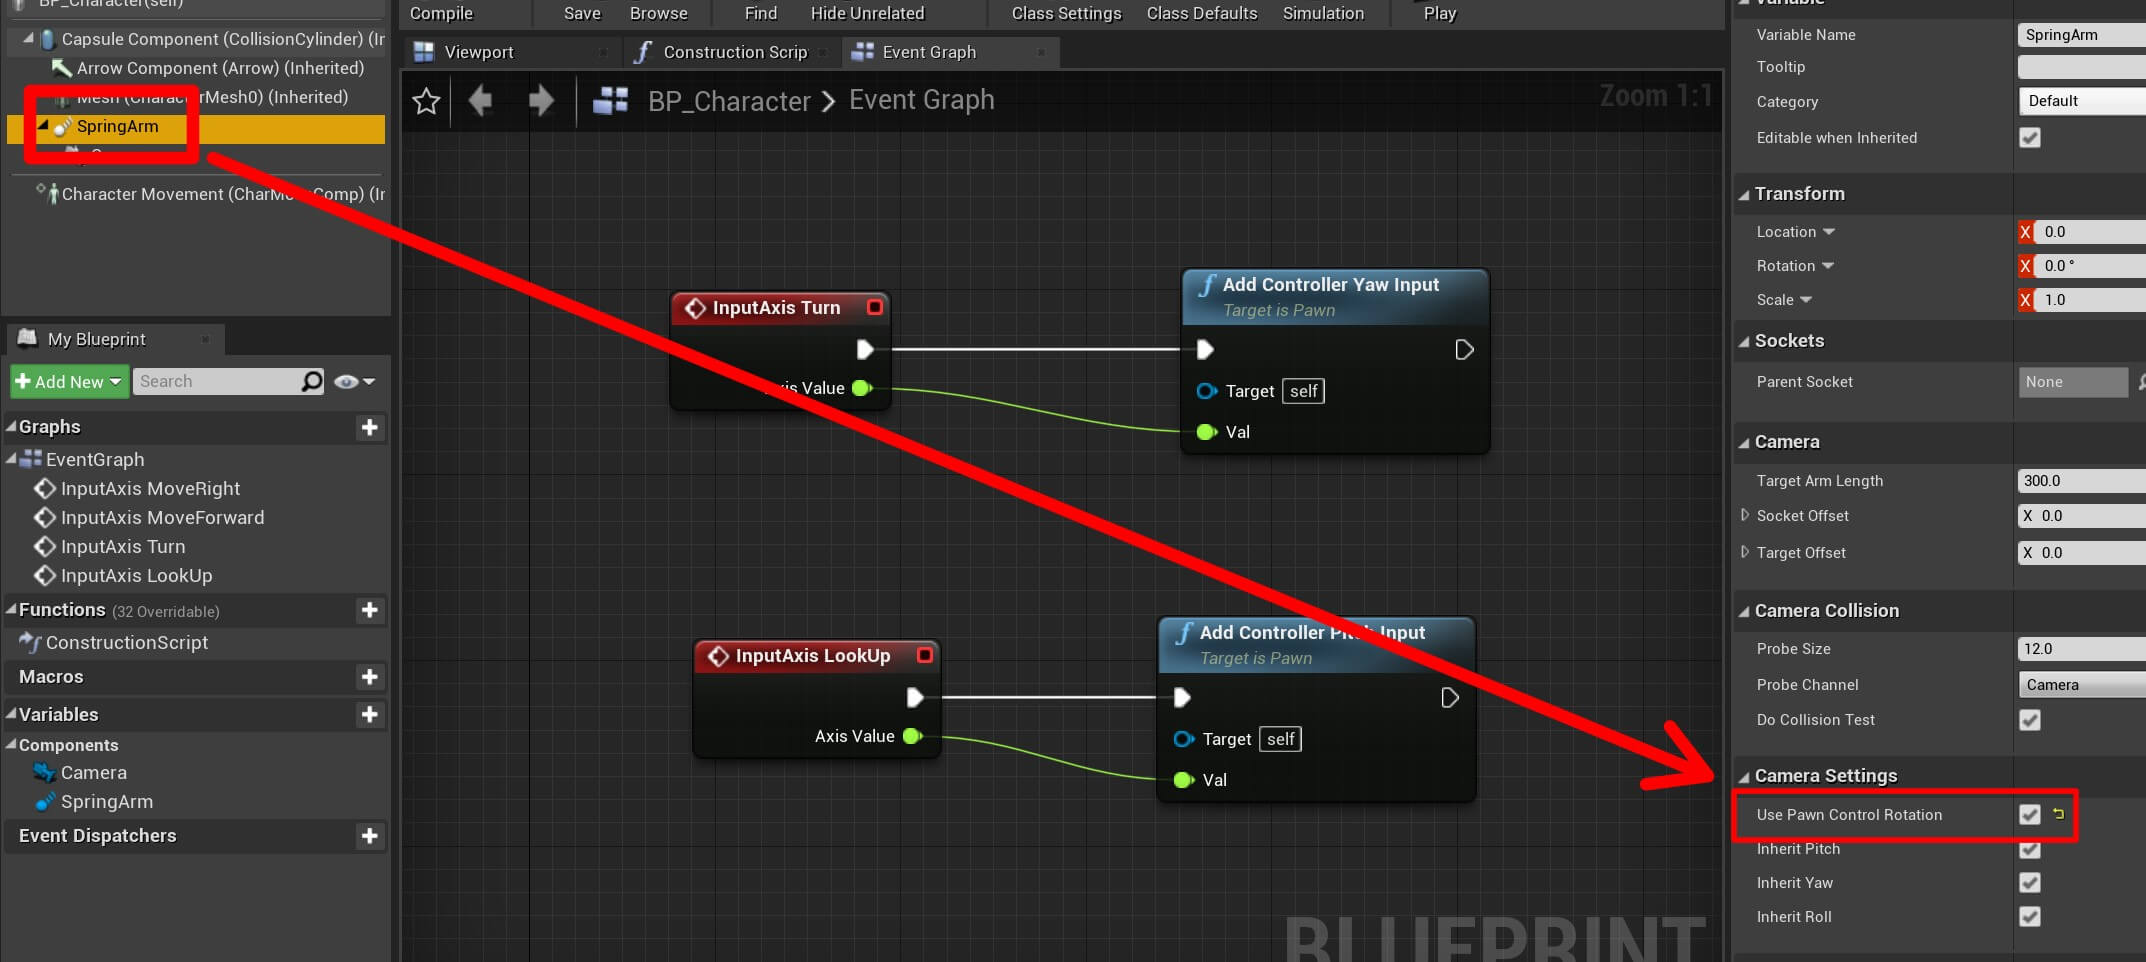
Compile and Save the new changes and let’s test the game now:
Additional Rotation Tips
While we can rotate in all directions, there are still some things that can be corrected. For example, if we are not moving the mouse and the rotation is standing still, if the player actor moves to the side it looks like a robot that it running that doesn’t know how to turn around.
To fix this, we need to go inside the BP_Character blueprint, select the BP_Character(self) top parent component in the Components tab, then in the Details tab locate the Pawn settings and uncheck the Use Controller Rotation Yaw checkbox:
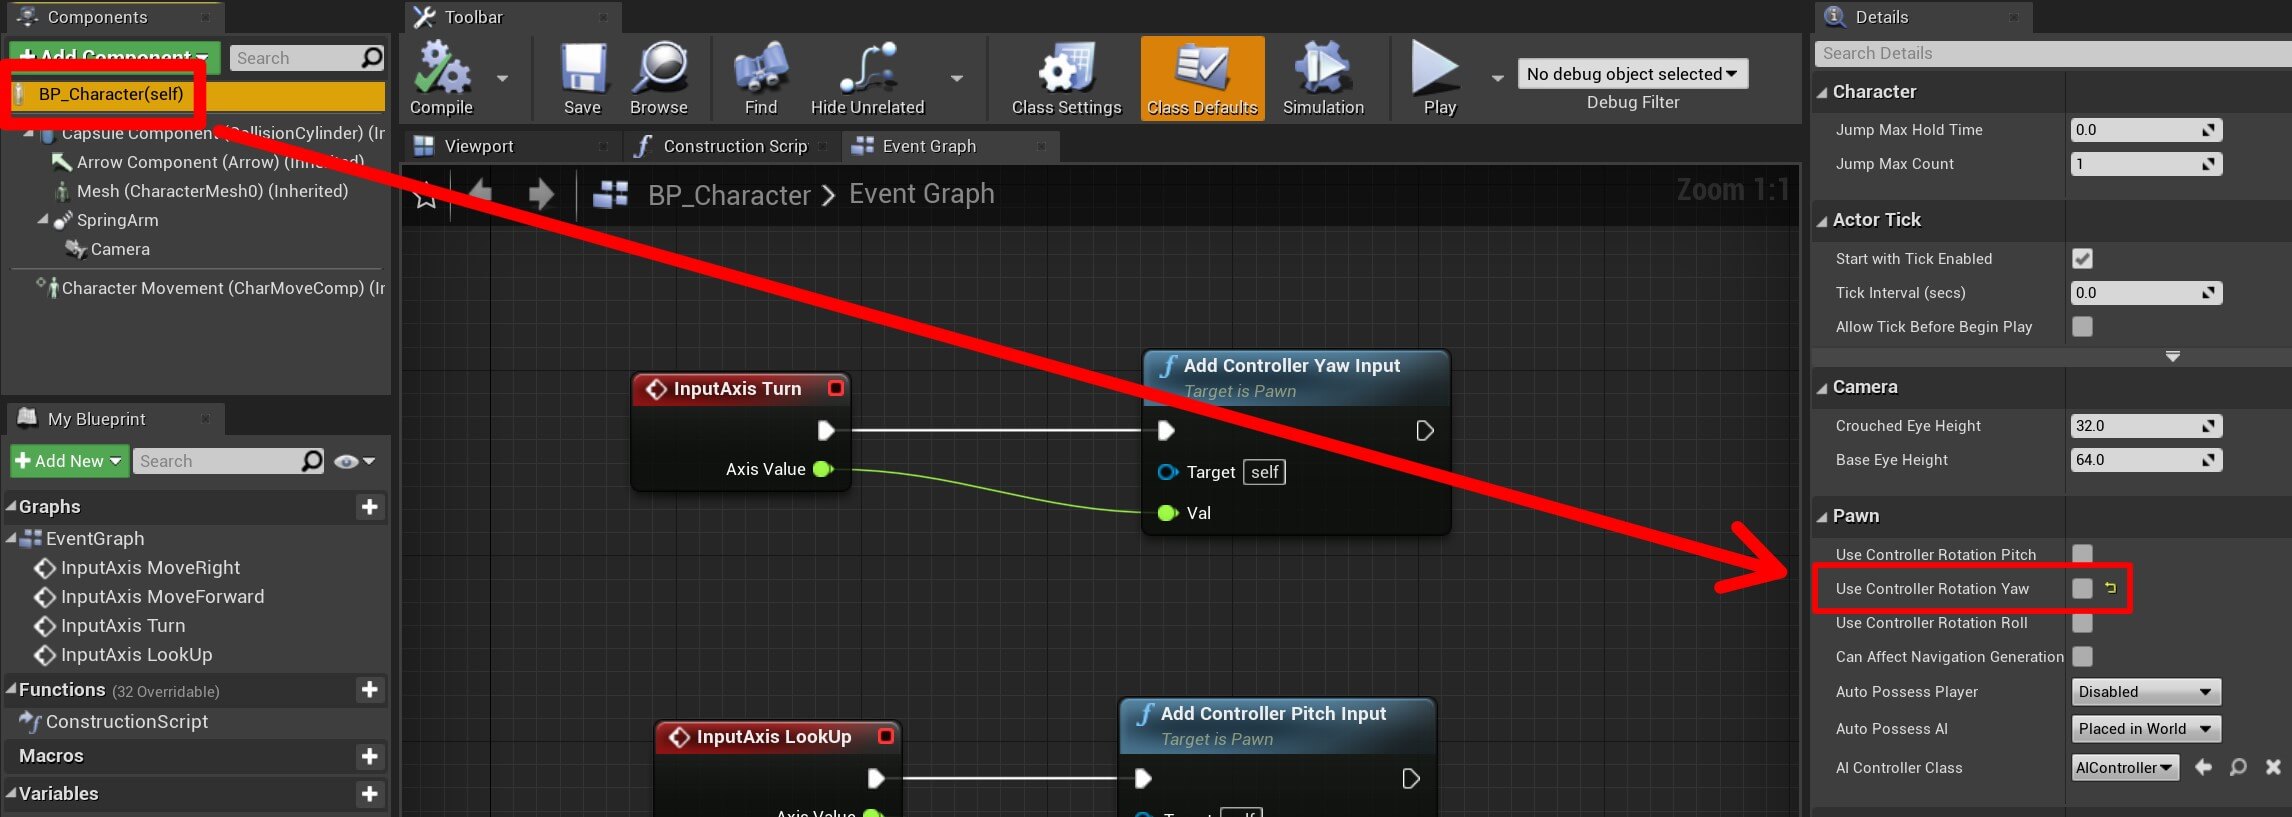
Unchecking the User Controller Rotation Yaw checkbox will give the control over that rotation back to the blueprint itself and it will not be controller by the controller of the blueprint.
Next, we need to select the Character Movement component in the Components tab, and in the Details tab locate the Character Movement (Rotation Settings) and check the Orient Rotation to Movement checkbox:
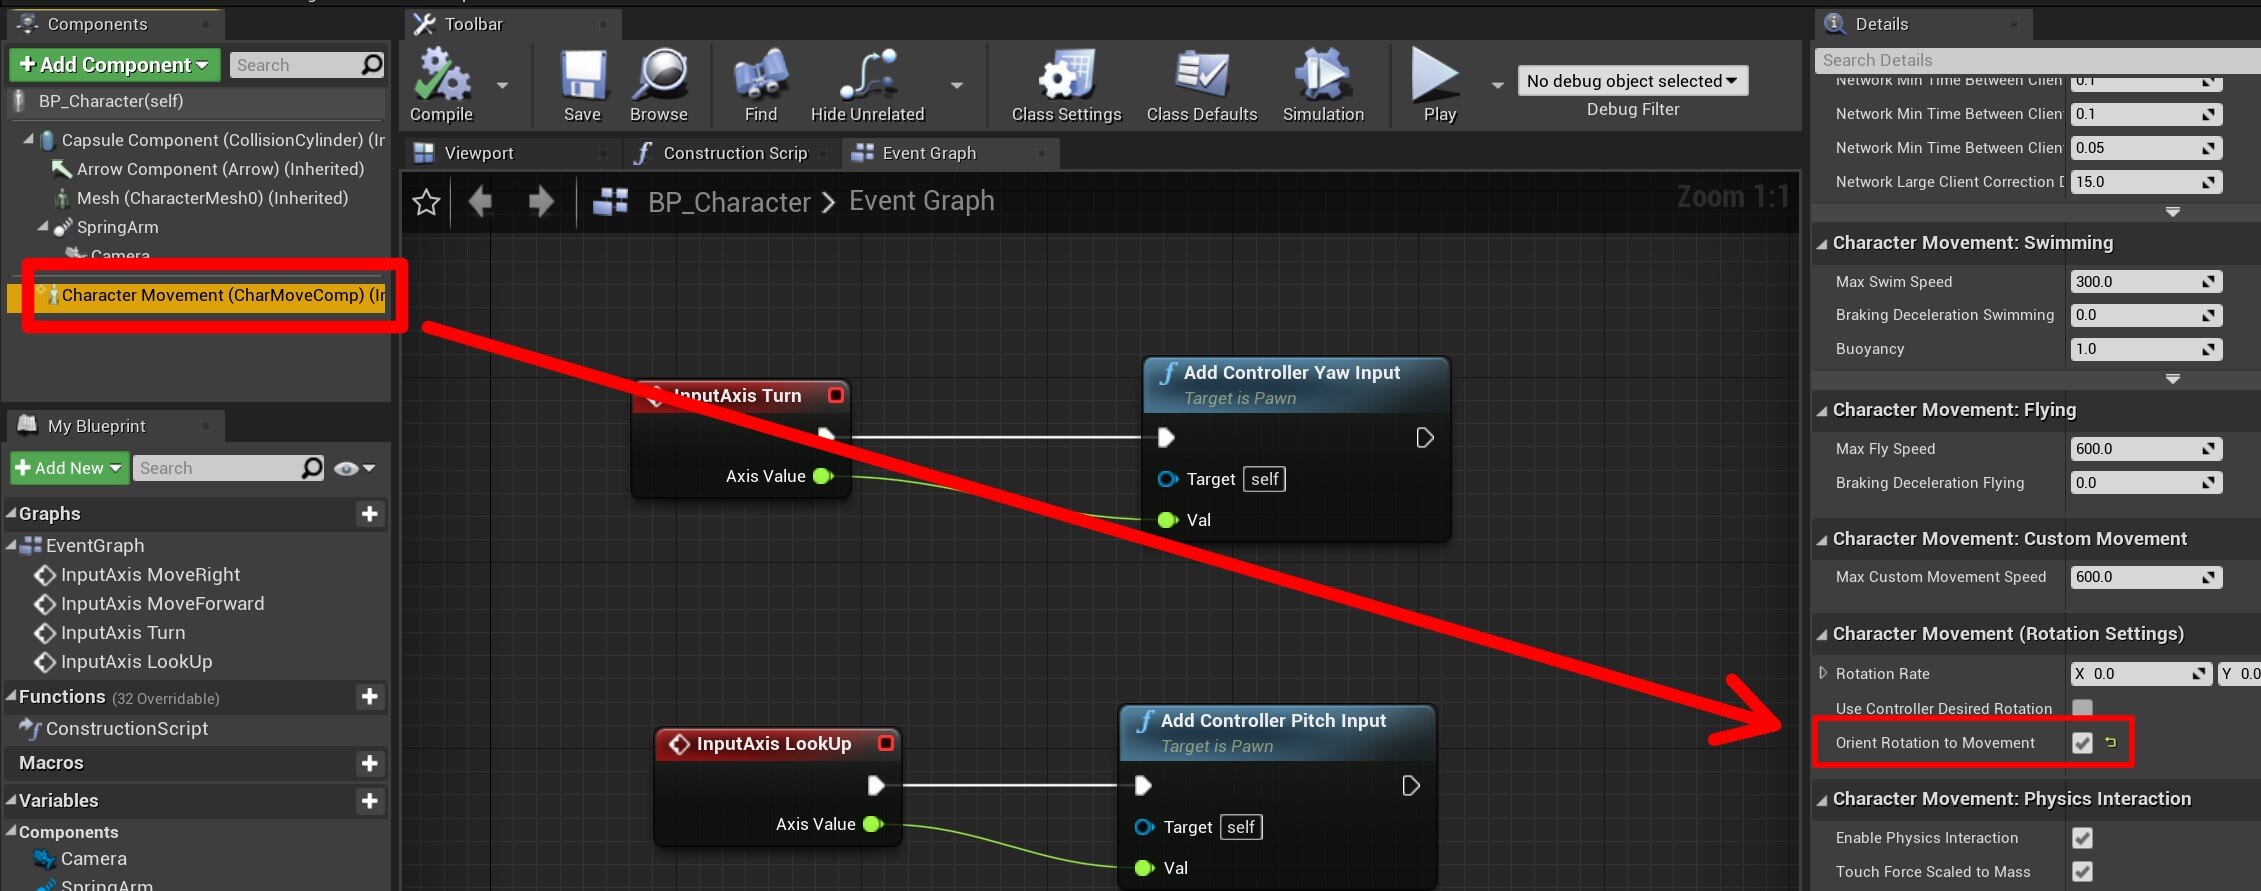
Orient Rotation To Movement will make sure that the actor is rotating towards the movement direction and it will fix the problem that we had. So let’s test the game now:
Now the player actor is rotating towards the direction where we are moving.
Another thing that we can do with the rotation is inverse it. If you run the game now and move the mouse up, the rotation will go up, if you move it down it will go down, which is what is suppose to happen.
But often in games, especially FPS games, you have an option in the settings to inverse the mouse which will make the rotation go in the opposite way e.g. when you move the mouse up the rotation goes down, and vice-versa.
To achieve this effect, all we have to do is go in the Project Settings -> Input, locate the Axis Mapping responsible for the rotation, and change the value of the Scale:
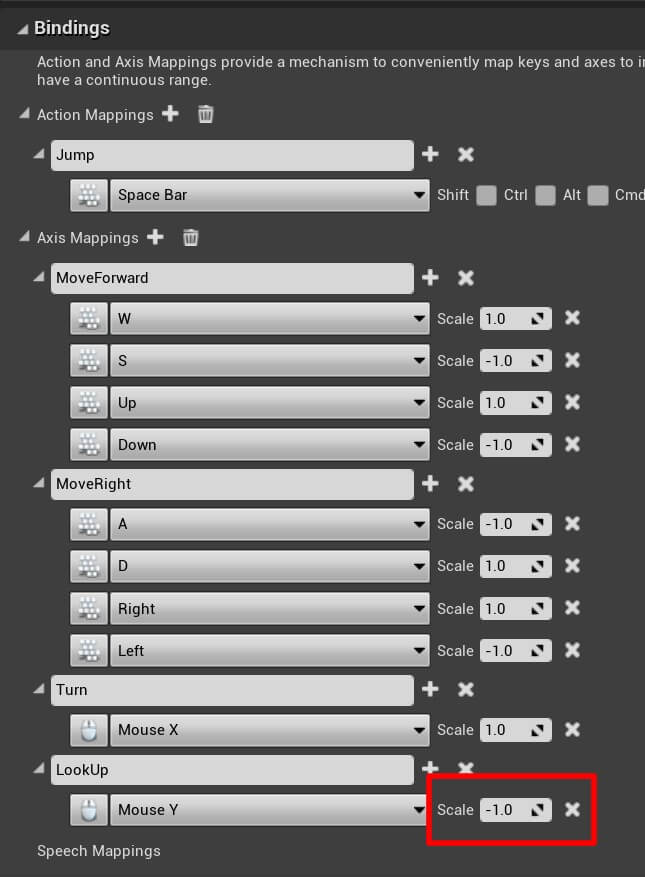
Currently, the value is set to -1, you can change it to 1 and test the game. You will see that the rotation now is inverse. You can do the same thing for the horizontal rotation and for the movement as well, so that is something that you can experiment with.
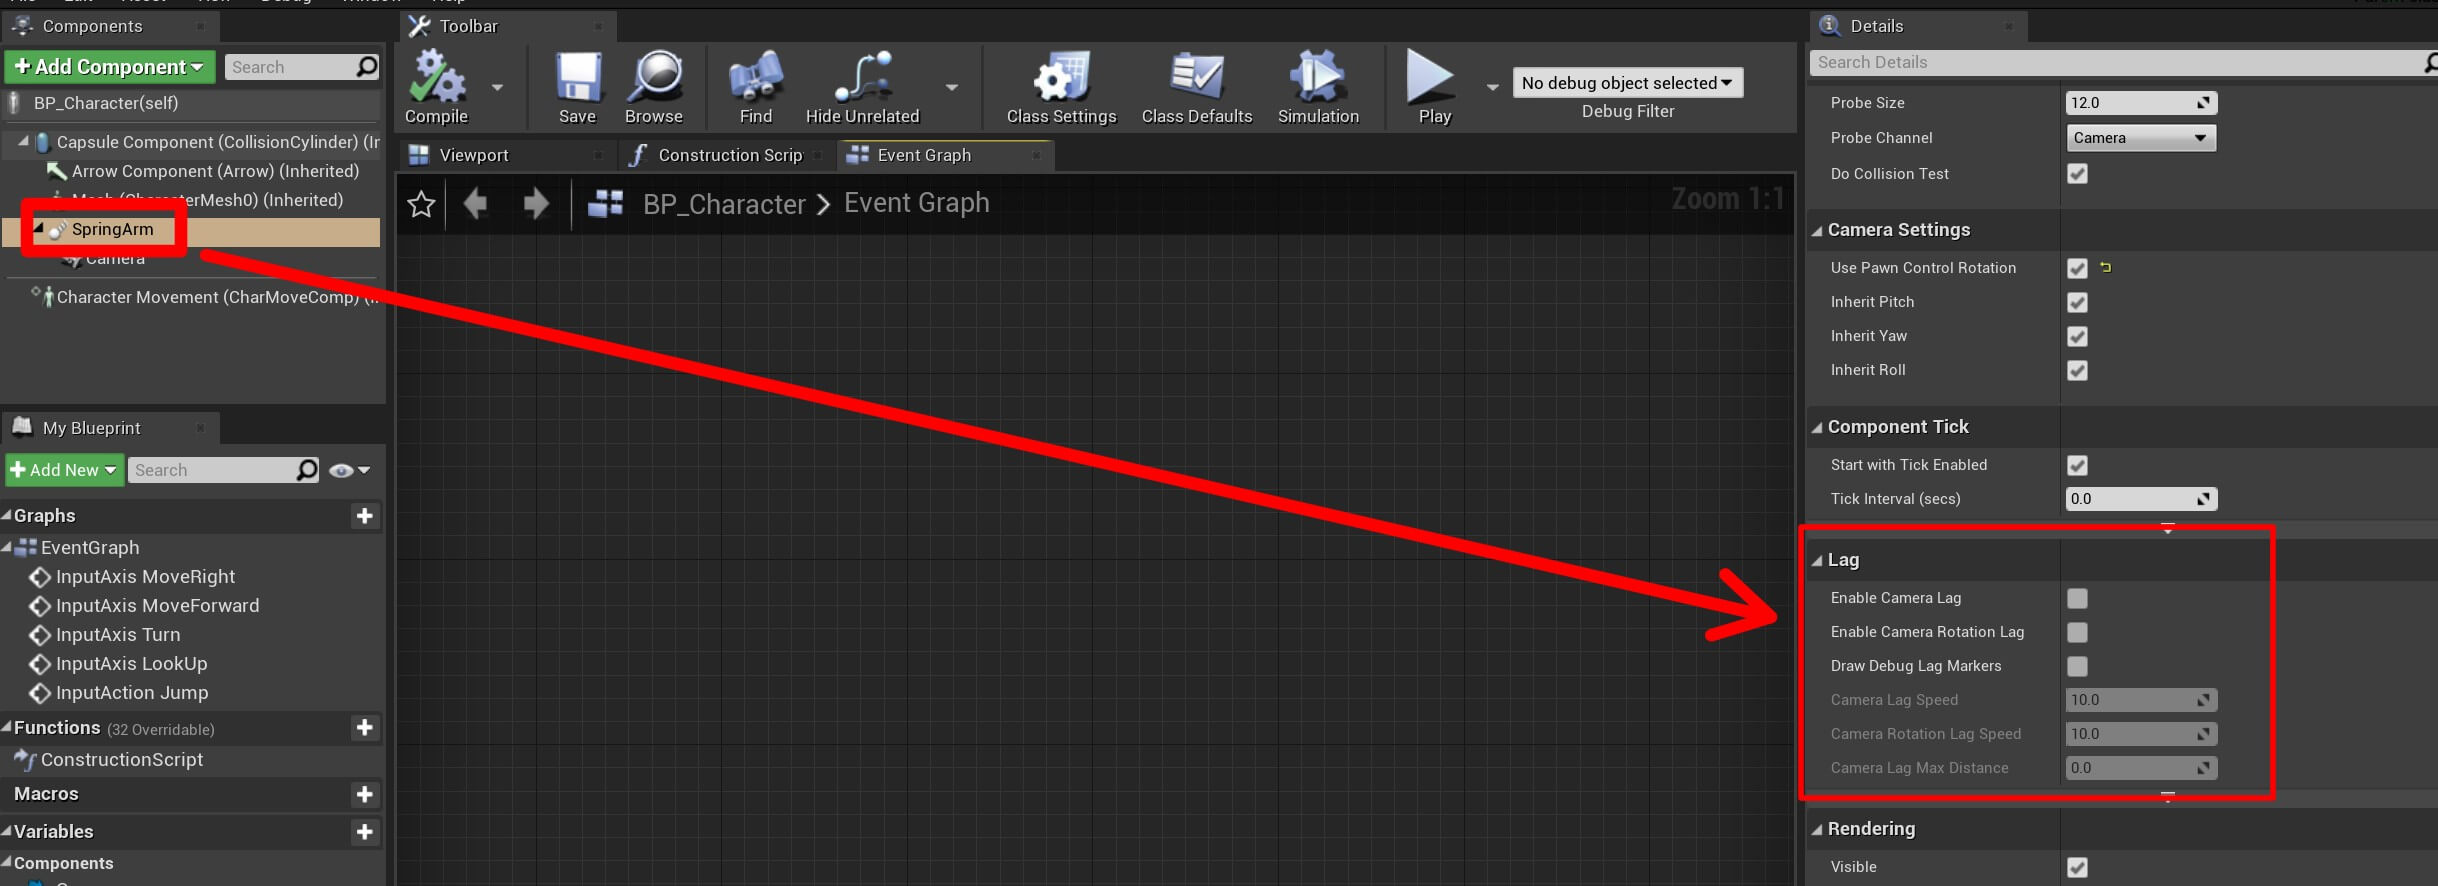
Spring Arm Lag Settings
Jumping Feature
The last step is to make the player actor jump, which is very simple to do because we already have a built in jump functionality in the Character class that we inherited from.
Open BP_Character in the blueprint editor and add the following nodes:
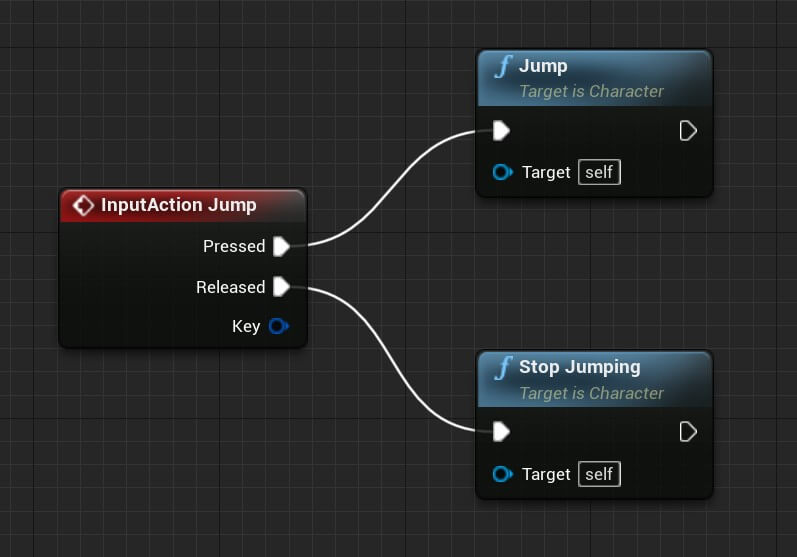
You can copy the nodes from here:
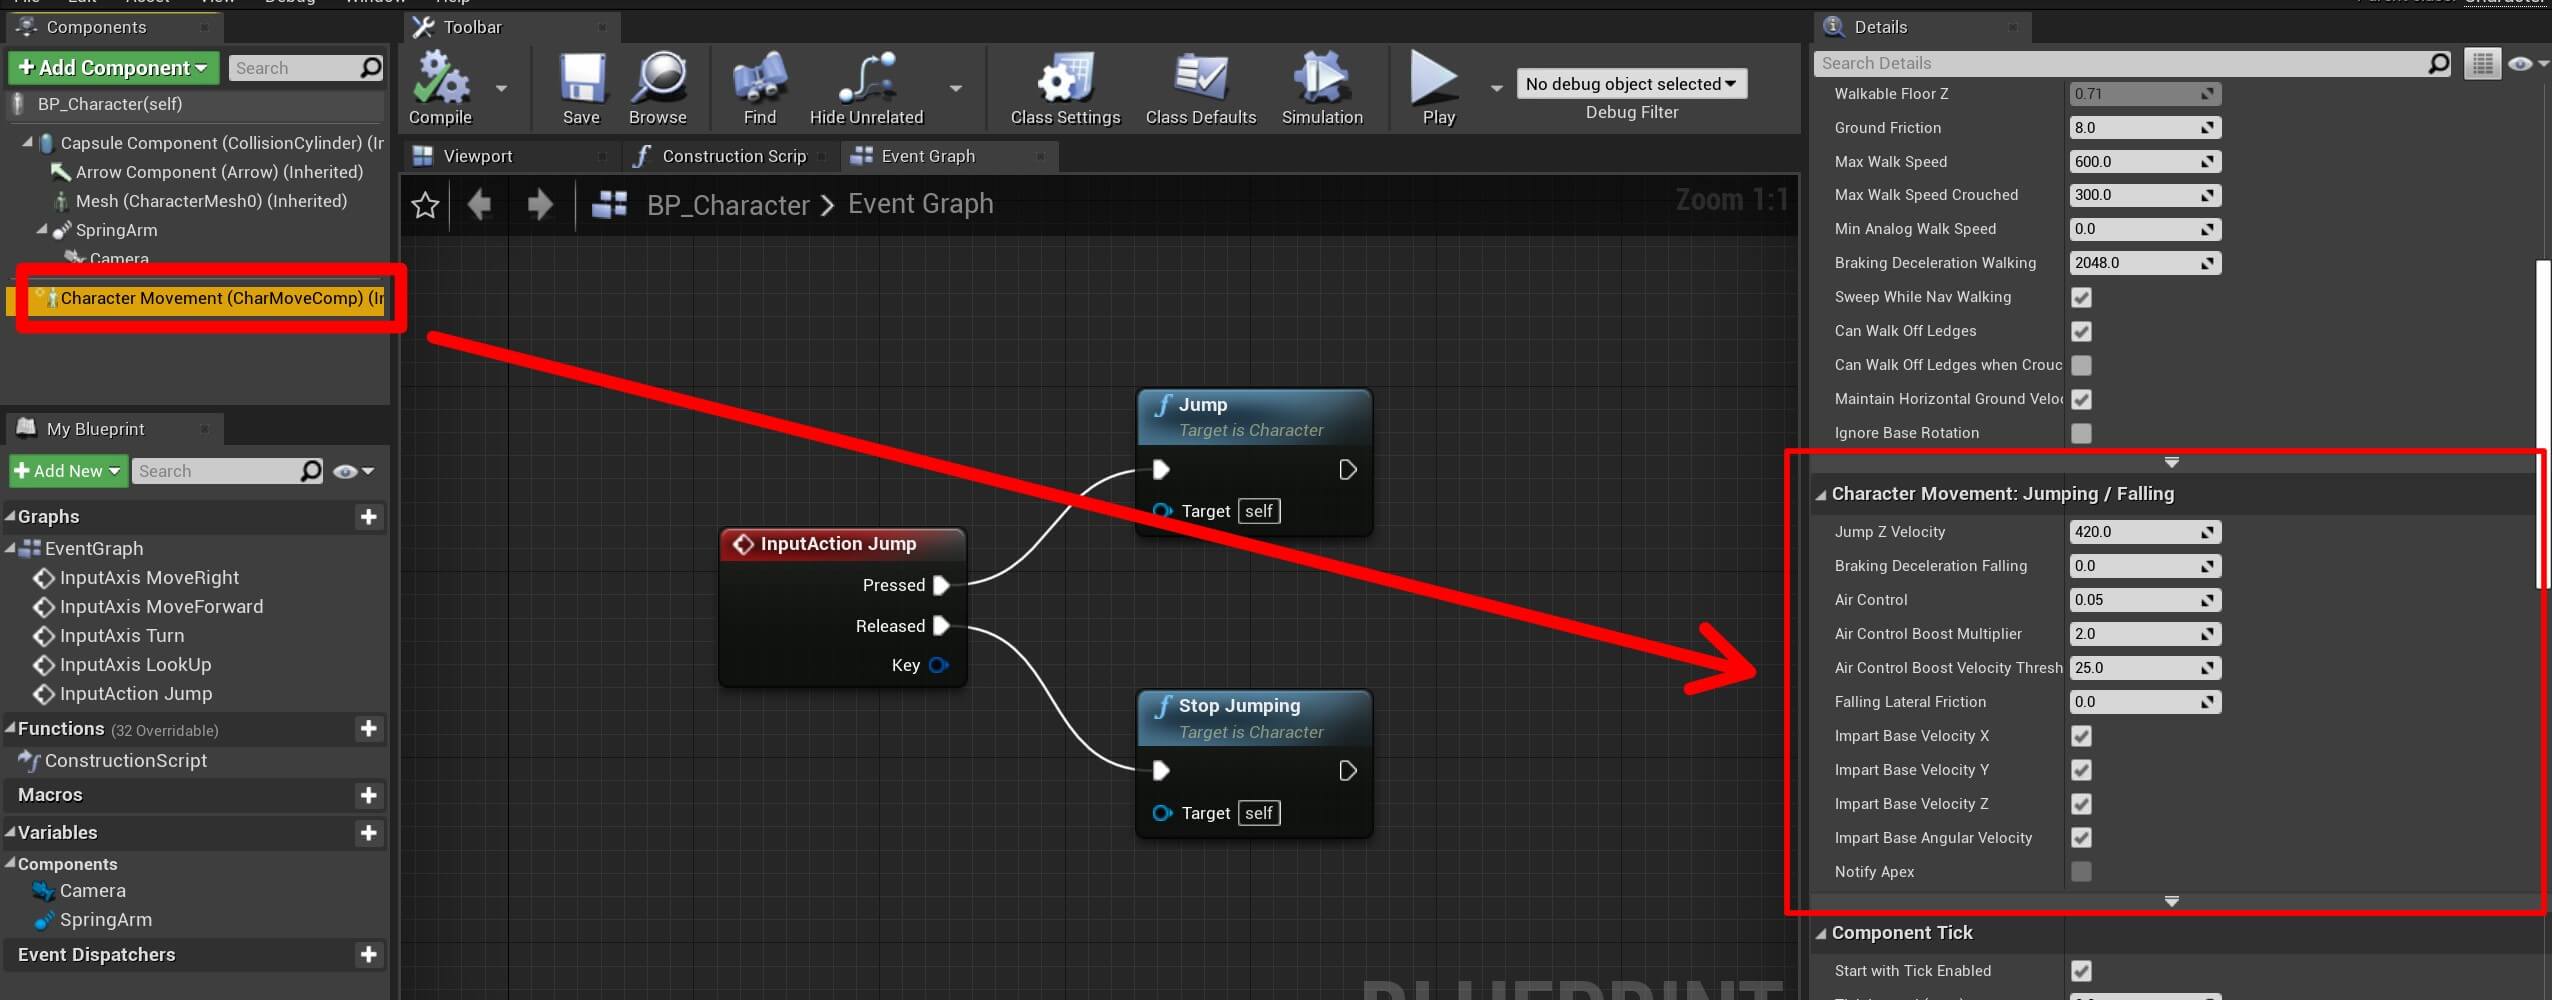
You can play with different settings like Jump Z Velocity which will affect how far the actor can jump, air control will determine the amount of control you have over the actor while he is in the air and so on.
Just experiment with the numbers for different settings and then run the game to see the effect of the change that you made.
Player Character C++ Class
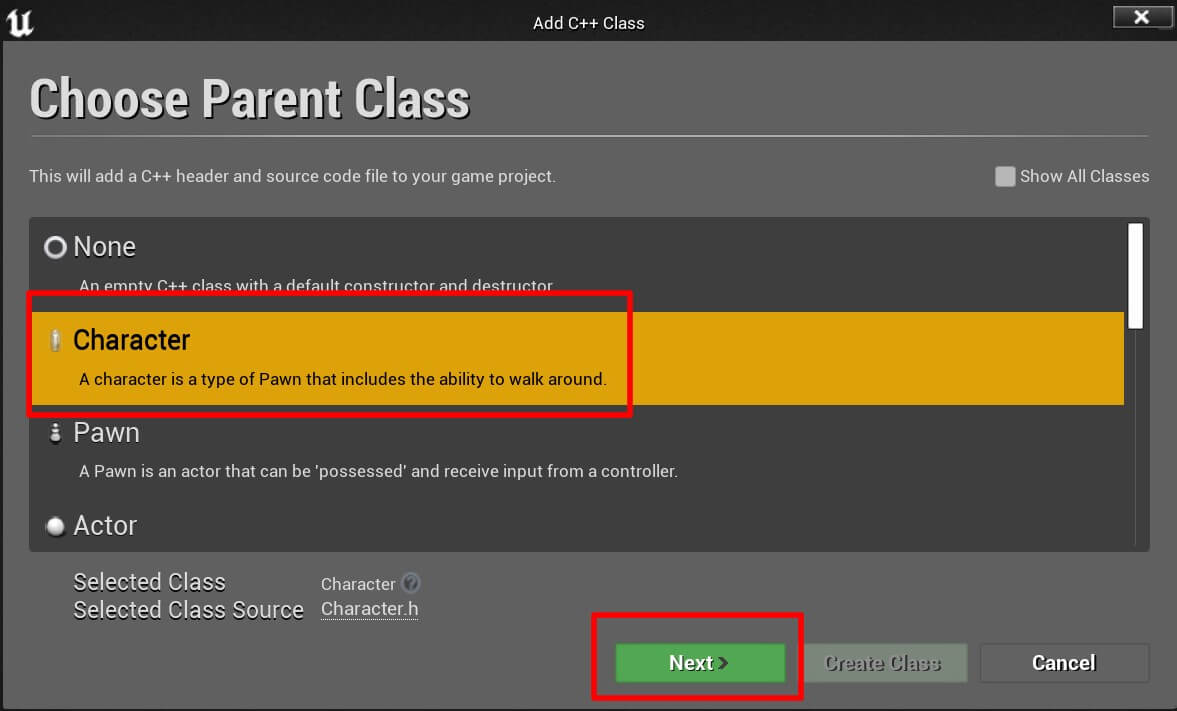
Moving on the C++ version of the movement, the first thing we will do is create the class. Inside the C++ Classes -> CharacterMovement folder Right Click -> New C++ Class.
Make sure that you inherit the Character class, then click the Next button:
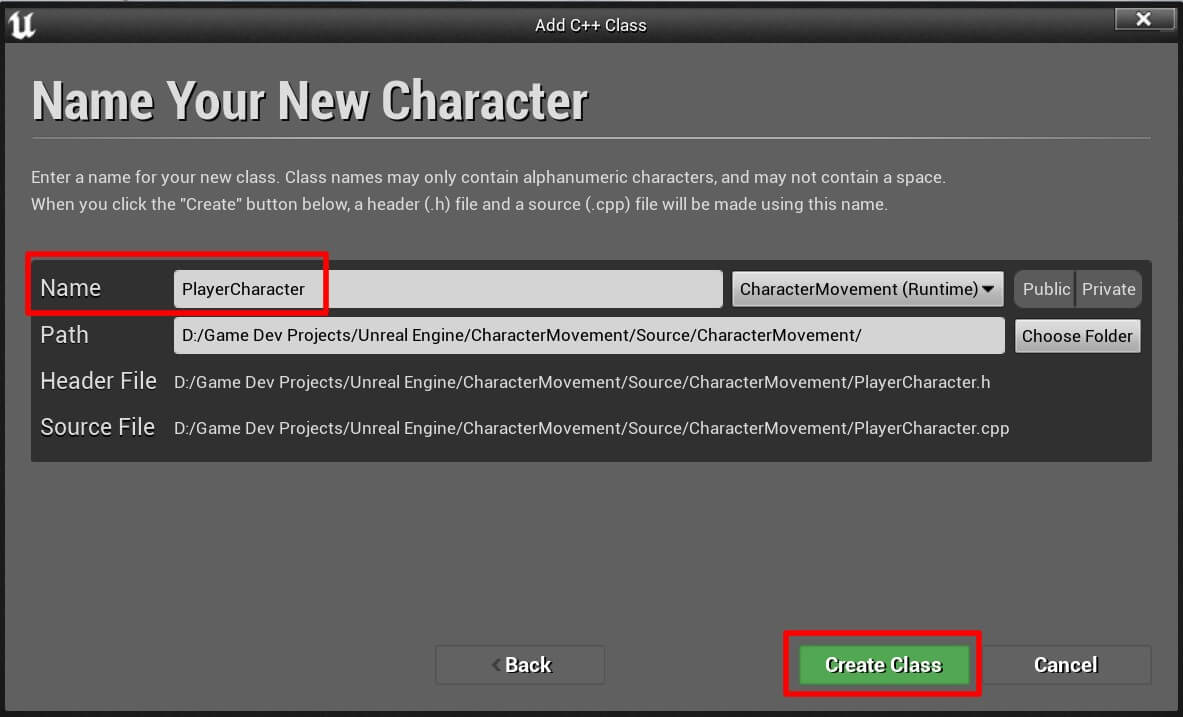
In the next window give the class a name PlayerCharacter and click the Create Class button:
Open the PlayerCharacter.h file and at the bottom of the class add the following lines:
					public:

	UPROPERTY(VisibleAnywhere, BlueprintReadOnly, Category = Camera)
		class USpringArmComponent* CameraBoom;

	UPROPERTY(VisibleAnywhere, BlueprintReadOnly, Category = Camera)
		class UCameraComponent* FollowCamera;

	void MoveForward(float Axis);
	void MoveRight(float Axis);
The Spring Arm and Camera components are the same ones we used in the blueprint in the first example of this tutorial.
The class keyword in front of them is called forward declaration and this is a really important concept to understand. If you don’t know what it is and why we use it, then make sure that you learn about that by clicking here.
The two functions MoveForward and MoveRight are going to be used to move the player actor in the game. Before we proceed to implement the code from PlayerCharacter.h file, make sure that you declare the two functions inside the PlayerCharacter.cpp file:
					void APlayerCharacter::MoveForward(float Axis)
{

}

void APlayerCharacter::MoveRight(float Axis)
{

}
You can either copy the functions above and paste them in the .cpp file, or you can follow this guide here that will show you a shortcut how to create definitions of functions inside the .cpp file.
Creating Components With C++ Code
With the declarations above, we have everything we need to start implementing the player’s movement.
Open the PlayerCharacter.cpp file, and at the top of the class, right below the last #include statement, add the following lines:
					#include "Components/InputComponent.h"
#include "GameFramework/Controller.h"
#include "GameFramework/CharacterMovementComponent.h"
#include "Camera/CameraComponent.h"
#include "GameFramework/SpringArmComponent.h"
					APlayerCharacter::APlayerCharacter()
{
 	// Set this character to call Tick() every frame.  You can turn this off to improve performance if you don't need it.
	PrimaryActorTick.bCanEverTick = true;

	CameraBoom = CreateDefaultSubobject<USpringArmComponent>(TEXT("Camera Boom"));
	CameraBoom->SetupAttachment(RootComponent);

	CameraBoom->TargetArmLength = 300.0f;

	FollowCamera = CreateDefaultSubobject<UCameraComponent>(TEXT("Follow Camera"));
	FollowCamera->SetupAttachment(CameraBoom);
}
Creating A Blueprint From The C++ Class
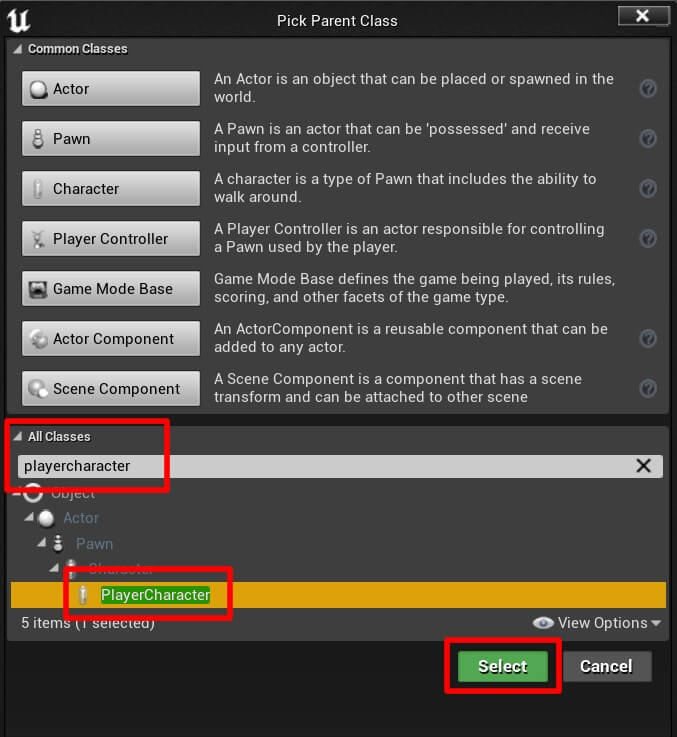
Name the new blueprint BP_Character_CPP so that we can differentiate it from the blueprint only one we created in the first example.
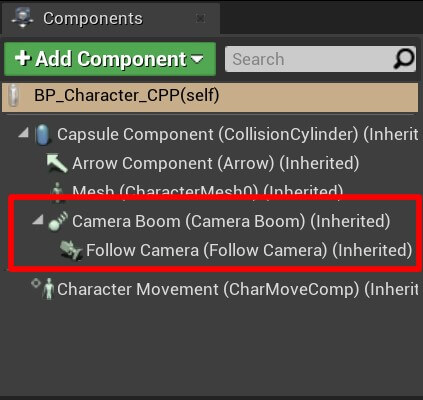
When you open the BP_Character_CPP in the blueprint editor you will notice that we already have the Spring Arm component named Camera Boom and the Camera component named Follow Camera in the Components tab:
Coding The Movement And Rotation Of The Player Actor
First, inside the SetupPlayerInputComponent function we are going to bind the functionality of the declared Axis Mappings to our functions:
					void APlayerCharacter::SetupPlayerInputComponent(UInputComponent* PlayerInputComponent)
{
	Super::SetupPlayerInputComponent(PlayerInputComponent);

	PlayerInputComponent->BindAxis("MoveForward", this, &APlayerCharacter::MoveForward);
	PlayerInputComponent->BindAxis("MoveRight", this, &APlayerCharacter::MoveRight);
}
In blueprints, we used the following nodes to bind the functionality of the MoveForward and MoveRight Axis Mappings:
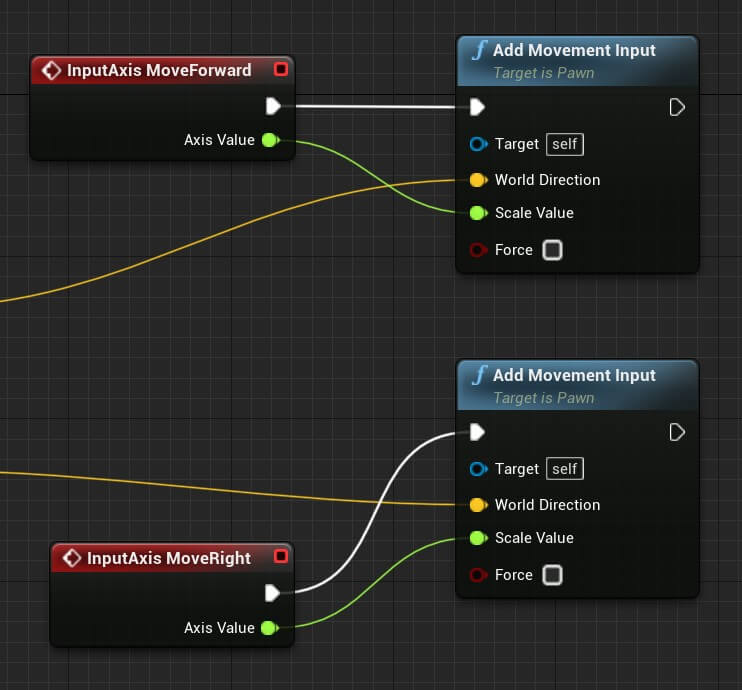
In code, we use the lines above. The first parameter in the BindAxis function is the name of the Axis Mappings we declared in Project Settings -> Input:
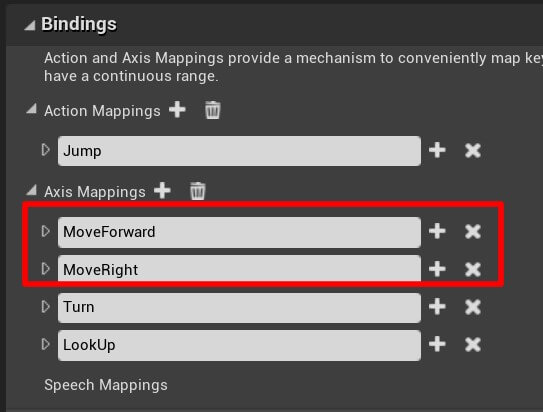
Keep in mind that the names you type for the Axis Mappings need to match with the same names you type in code, if you misspell the names then the binding will not work.
The second parameter, the keyword this, is referring to the class where the BindAxis function is called.
And the last parameter is the function in our class to which we are binding the Axis Mapping e.g. when we press the keys defined for the specific Axis Mapping the function we provide as the parameter will be executed.
In the two movement functions add the following lines:
					void APlayerCharacter::MoveForward(float Axis)
{
	FRotator Rotation = Controller->GetControlRotation();
	FRotator YawRotation(0.0f, Rotation.Yaw, 0.0f);

	FVector ForwardDirection = FRotationMatrix(YawRotation).GetUnitAxis(EAxis::X);
	AddMovementInput(ForwardDirection, Axis);
}

void APlayerCharacter::MoveRight(float Axis)
{
	FRotator Rotation = Controller->GetControlRotation();
	FRotator YawRotation(0.0f, Rotation.Yaw, 0.0f);

	FVector RightDirection = FRotationMatrix(YawRotation).GetUnitAxis(EAxis::Y);
	AddMovementInput(RightDirection, Axis);
}
					void APlayerCharacter::SetupPlayerInputComponent(UInputComponent* PlayerInputComponent)
{
	Super::SetupPlayerInputComponent(PlayerInputComponent);

	PlayerInputComponent->BindAxis("MoveForward", this, &APlayerCharacter::MoveForward);
	PlayerInputComponent->BindAxis("MoveRight", this, &APlayerCharacter::MoveRight);

	PlayerInputComponent->BindAxis("Turn", this, &APawn::AddControllerYawInput);
	PlayerInputComponent->BindAxis("LookUp", this, &APawn::AddControllerPitchInput);
}
The rotation now works and we can rotate with the mouse in all directions but the movement needs fixing because the player actor is not rotating towards the direction where he is going.
Fixing Rotation Issues And Additional Tips
To fix the rotation issue, we only need to set the orient rotation to movement to true in the Character Movement component which will make the player actor face the direction he is moving to. In the constructor add the following line of code:
					APlayerCharacter::APlayerCharacter()
{
 	// Set this character to call Tick() every frame.  You can turn this off to improve performance if you don't need it.
	PrimaryActorTick.bCanEverTick = true;

	CameraBoom = CreateDefaultSubobject<USpringArmComponent>(TEXT("Camera Boom"));
	CameraBoom->SetupAttachment(RootComponent);

	CameraBoom->TargetArmLength = 300.0f;

	FollowCamera = CreateDefaultSubobject<UCameraComponent>(TEXT("Follow Camera"));
	FollowCamera->SetupAttachment(CameraBoom);

	GetCharacterMovement()->bOrientRotationToMovement = true;
}
Compile the code and run the game to test it:
We can also do this inside the blueprint editor, just select the Character Movement component in the Components tab and in the Details tab locate the Orient Rotation To Movement checkbox and check it.
Keep in mind for this rotation to work, we need to make sure that we turn off use control rotation for Pitch, Yaw, and Roll for the player actor. This can be done in the blueprint by selecting the BP_PlayerCharacter_CPP top parent, and in the Details tab locate the Pawn settings:
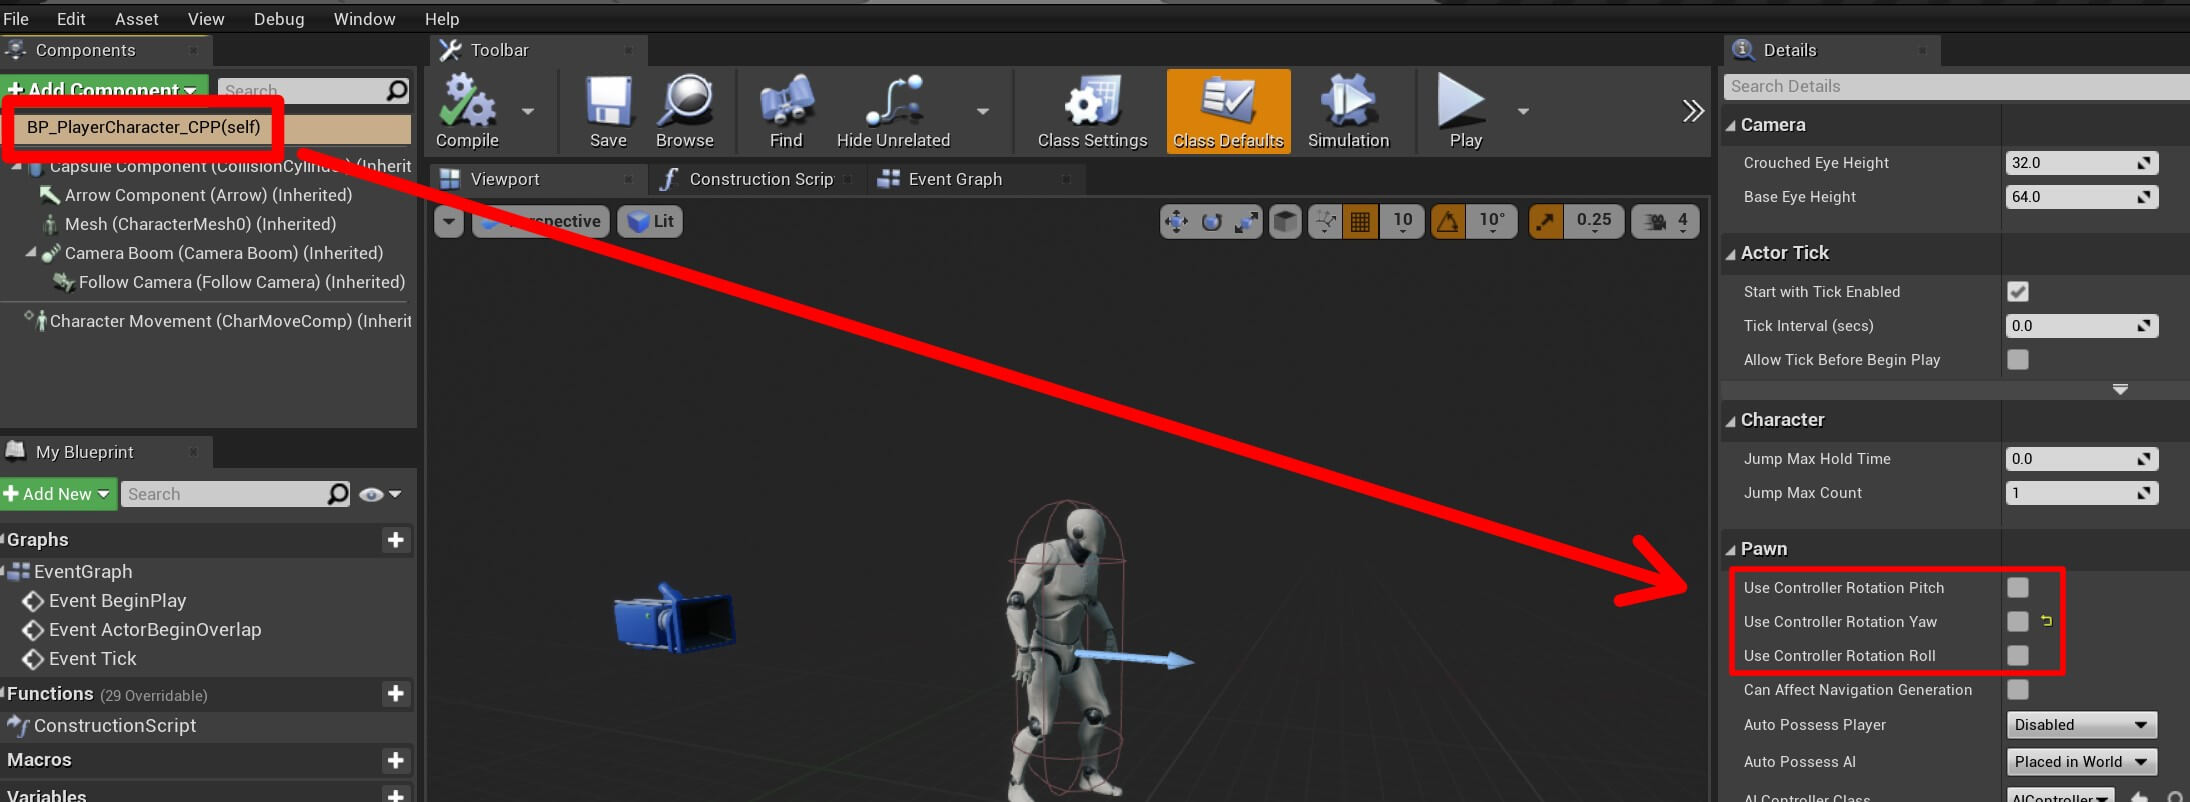
The code equivalent for this are the following lines of code:
					bUseControllerRotationPitch = false;
	bUseControllerRotationYaw = false;
	bUseControllerRotationRoll = false;
					CameraBoom->bUsePawnControlRotation = true;
	FollowCamera->bUsePawnControlRotation = false;
Additional Movement Tips
					GetCharacterMovement()->RotationRate = FRotator(0.0f, 360.0f, 0.0f);
	GetCharacterMovement()->JumpZVelocity = 600.0f;
	GetCharacterMovement()->AirControl = 0.2f;
Jumping Functionality With C++
					PlayerInputComponent->BindAction("Jump", IE_Pressed, this, &ACharacter::Jump);
	PlayerInputComponent->BindAction("Jump", IE_Released, this, &ACharacter::StopJumping);
					#include "PlayerCharacter.h"

#include "Components/InputComponent.h"
#include "GameFramework/Controller.h"
#include "GameFramework/CharacterMovementComponent.h"
#include "Camera/CameraComponent.h"
#include "GameFramework/SpringArmComponent.h"

// Sets default values
APlayerCharacter::APlayerCharacter()
{
 	// Set this character to call Tick() every frame.  You can turn this off to improve performance if you don't need it.
	PrimaryActorTick.bCanEverTick = true;

	CameraBoom = CreateDefaultSubobject<USpringArmComponent>(TEXT("Camera Boom"));
	CameraBoom->SetupAttachment(RootComponent);

	CameraBoom->TargetArmLength = 300.0f;

	FollowCamera = CreateDefaultSubobject<UCameraComponent>(TEXT("Follow Camera"));
	FollowCamera->SetupAttachment(CameraBoom);

	CameraBoom->bUsePawnControlRotation = true;
	FollowCamera->bUsePawnControlRotation = false;

	bUseControllerRotationPitch = false;
	bUseControllerRotationYaw = false;
	bUseControllerRotationRoll = false;

	GetCharacterMovement()->bOrientRotationToMovement = true;
	GetCharacterMovement()->RotationRate = FRotator(0.0f, 360.0f, 0.0f);
	GetCharacterMovement()->JumpZVelocity = 600.0f;
	GetCharacterMovement()->AirControl = 0.2f;

}

// Called when the game starts or when spawned
void APlayerCharacter::BeginPlay()
{
	Super::BeginPlay();

}

// Called every frame
void APlayerCharacter::Tick(float DeltaTime)
{
	Super::Tick(DeltaTime);

}

// Called to bind functionality to input
void APlayerCharacter::SetupPlayerInputComponent(UInputComponent* PlayerInputComponent)
{
	Super::SetupPlayerInputComponent(PlayerInputComponent);

	PlayerInputComponent->BindAxis("MoveForward", this, &APlayerCharacter::MoveForward);
	PlayerInputComponent->BindAxis("MoveRight", this, &APlayerCharacter::MoveRight);

	PlayerInputComponent->BindAxis("Turn", this, &APawn::AddControllerYawInput);
	PlayerInputComponent->BindAxis("LookUp", this, &APawn::AddControllerPitchInput);

	PlayerInputComponent->BindAction("Jump", IE_Pressed, this, &ACharacter::Jump);
	PlayerInputComponent->BindAction("Jump", IE_Released, this, &ACharacter::StopJumping);

}

void APlayerCharacter::MoveForward(float Axis)
{
	FRotator Rotation = Controller->GetControlRotation();
	FRotator YawRotation(0.0f, Rotation.Yaw, 0.0f);

	FVector ForwardDirection = FRotationMatrix(YawRotation).GetUnitAxis(EAxis::X);
	AddMovementInput(ForwardDirection, Axis);
}

void APlayerCharacter::MoveRight(float Axis)
{
	FRotator Rotation = Controller->GetControlRotation();
	FRotator YawRotation(0.0f, Rotation.Yaw, 0.0f);

	FVector RightDirection = FRotationMatrix(YawRotation).GetUnitAxis(EAxis::Y);
	AddMovementInput(RightDirection, Axis);
}
Make sure that you compile the code before you run the game to test it. And there you have it, a complete basic and intermediate movement system for your game characters in Unreal Engine.

